HarmonyOS技术精讲-Image Kit:图片编辑基础 - 裁剪、缩放、旋转
HarmonyOS 技术精讲 - Image Kit:图片编辑基础 - 裁剪、缩放、旋转
关于 Image Kit 图片编辑,你必须先知道的
HarmonyOS NEXT 开发里,Image Kit 提供了一整套图片处理能力。很多人第一次接触时,会优先想到用 Image 组件配合各种属性来实现图片变换。但实际项目里会遇到一个非常现实的问题:Image 组件的变换只是 UI 层级的渲染效果,并不会真正改变 PixelMap 的数据。当你需要把处理后的图片保存到本地、上传到服务器、或者传给下一个页面时,UI 变换是无效的。
这就是 PixelMap 编辑 API 真正的应用场景——直接操作像素数据。裁剪、缩放、旋转这三个操作,在 Image Kit 里分别对应 PixelMap 对象的 crop()、scale()、rotate() 方法。功能本身不复杂,但参数边界条件和生命周期影响才是实际开发里的关键点。
推荐使用场景:
- 图片上传前压缩到固定尺寸
- 用户头像裁剪
- 图片批量处理
- 需要保存处理结果的场景
不适合的场景:
- 仅用于展示(用 Image 组件属性即可)
- 需要实时滤镜效果(建议使用 Image Kit 的其他能力)
环境说明
DevEco Studio 版本:DevEco Studio 6.1.0 及以上
HarmonyOS SDK 版本:HarmonyOS 6.1.0(23) 及以上
目标设备:手机
核心实现:裁剪、缩放、旋转
文章将围绕三个独立示例展开。在开始之前,先确定一个通用思路:从资源文件加载一张图片生成 PixelMap,然后分别进行三种操作,并输出结果到 Image 组件展示。
通用准备:加载图片生成 PixelMap
所有操作都基于 PixelMap,所以先写一个工具方法从资源加载图片。
// utils/ImageHelper.ets
import { image } from '@kit.ImageKit';
import { common } from '@kit.AbilityKit';

export async function loadPixelMapFromResource(context: common.Context, resourceId: number): Promise<image.PixelMap | undefined> {
  try {
    // 获取资源管理器
    let resourceMgr = context.resourceManager;
    // 读取图片资源为 ArrayBuffer
    let arrayBuffer = await resourceMgr.getMediaContent(resourceId);
    // 创建图片源
    let imageSource = image.createImageSource(arrayBuffer.buffer as ArrayBuffer);
    // 解码生成 PixelMap
    let pixelMap = await imageSource.createPixelMap({
      desiredPixelFormat: image.PixelMapFormat.RGBA_8888
    });
    // 释放图片源
    imageSource.release();
    return pixelMap;
  } catch (error) {
    console.error(`loadPixelMap failed, error: ${JSON.stringify(error)}`);
    return undefined;
  }
}
这段代码用于从 resources 目录加载图片。image.createImageSource 支持 ArrayBuffer,也可以传入文件路径。实际项目里建议统一用这个方式加载资源,避免重复写解码逻辑。
注意点:
desiredPixelFormat建议用 RGBA_8888,兼容性最好imageSource.release()一定要调用,否则会出现资源泄漏- 返回的 PixelMap 是只读的,后续编辑时需要通过
createPixelMap创建新的可变 PixelMap
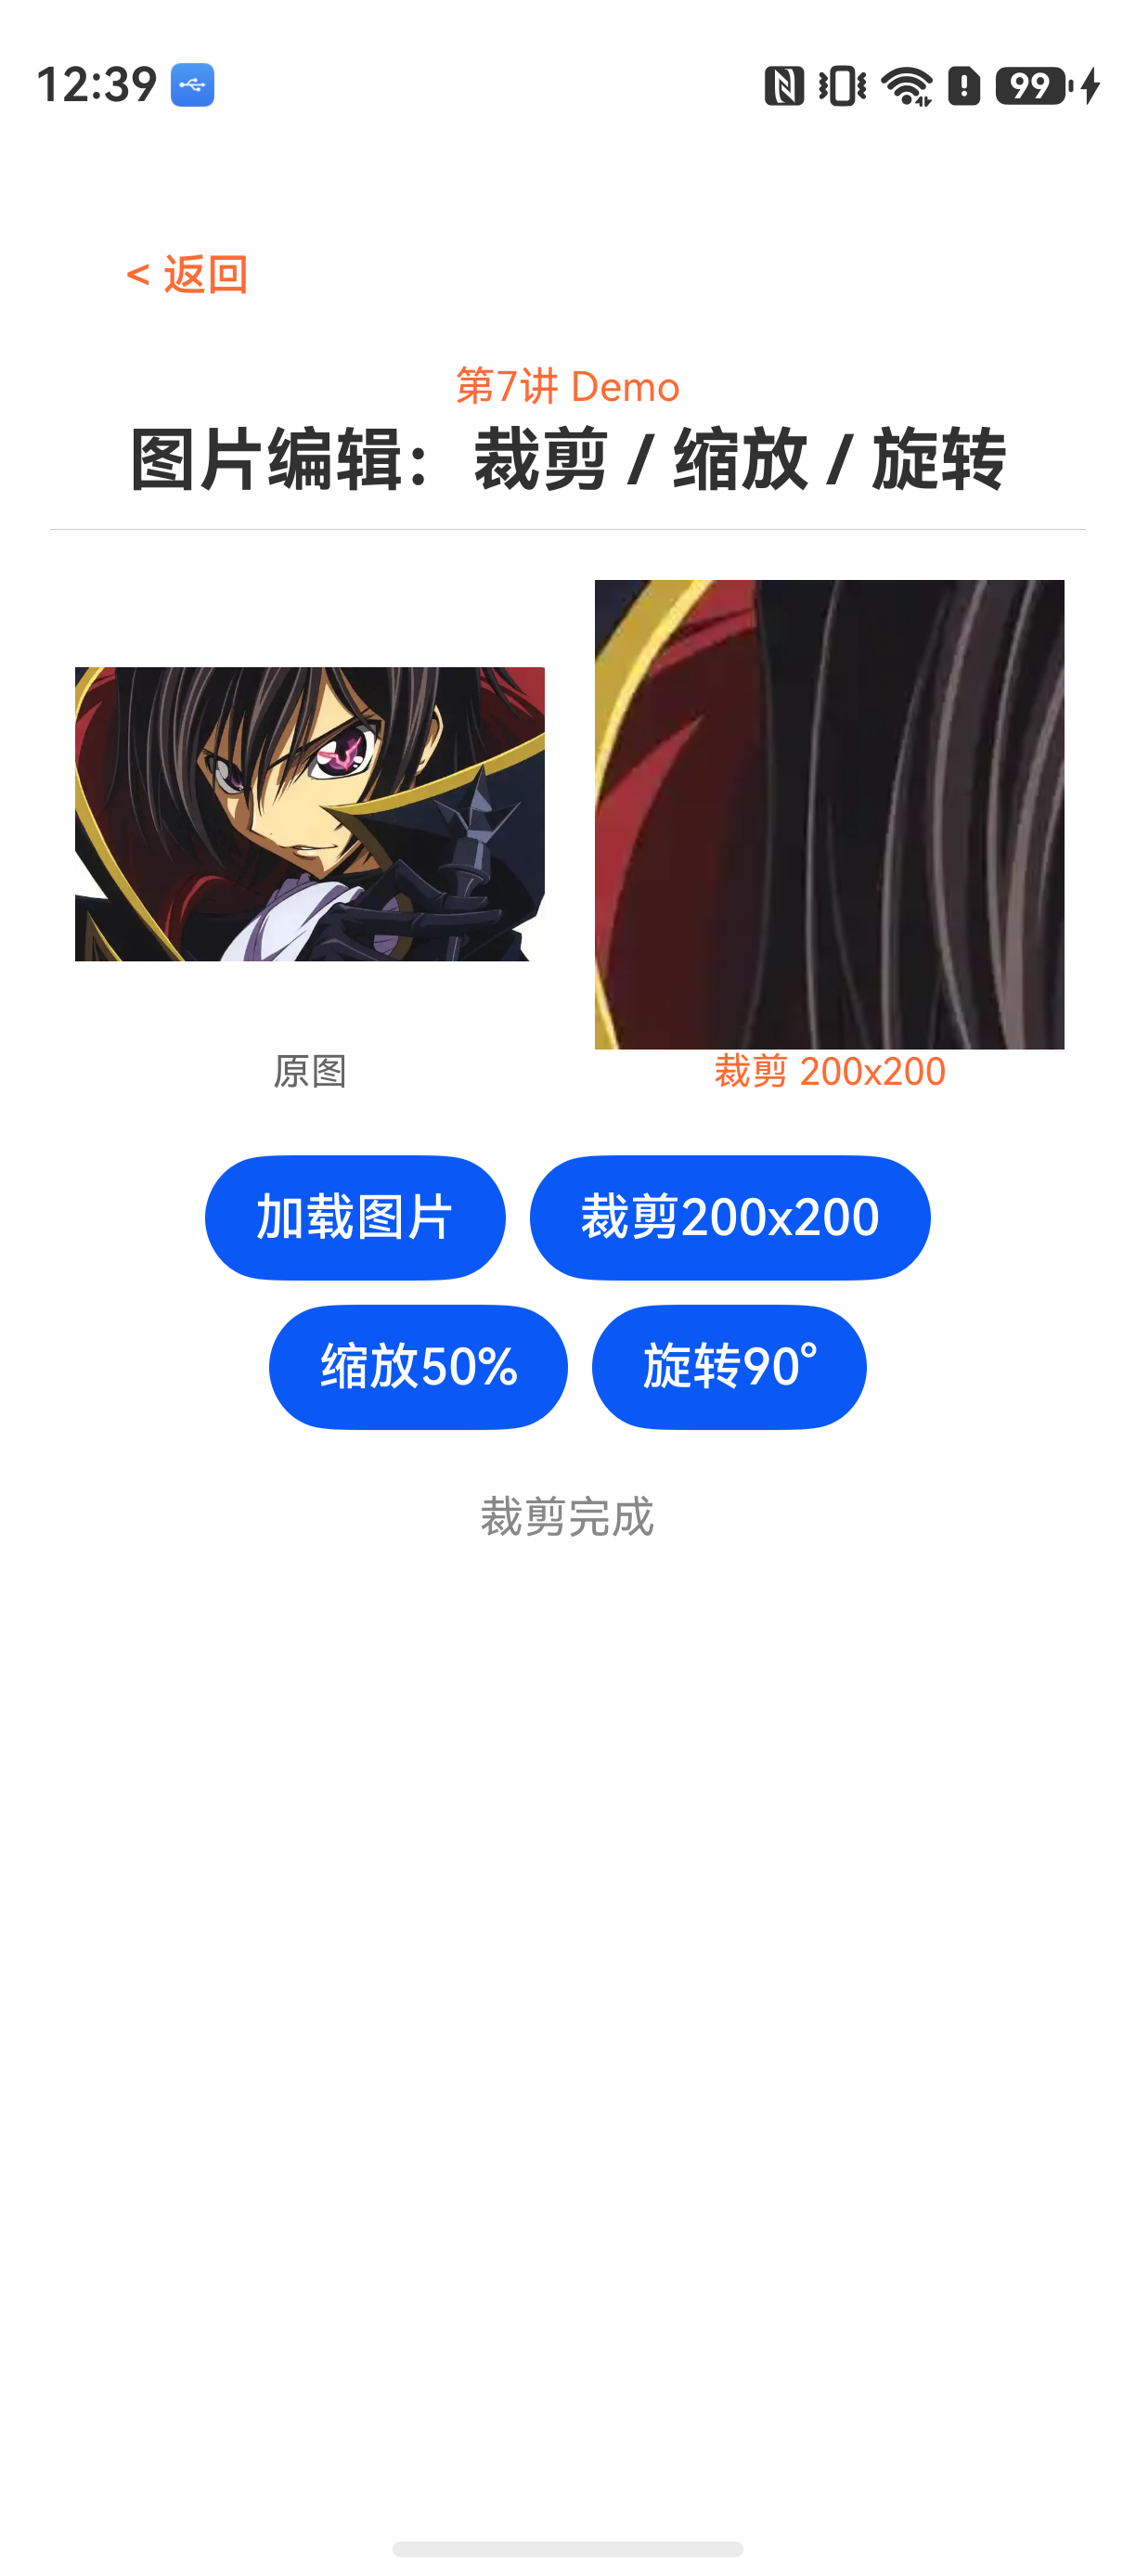
示例一:裁剪 200x200 区域
裁剪的核心是从原图中截取一个矩形区域。crop() 方法接收一个 Region 对象,指定裁剪区域。
// pages/CropExample.ets
import { image } from '@kit.ImageKit';
import { common } from '@kit.AbilityKit';
import { loadPixelMapFromResource } from '../utils/ImageHelper';

@Entry
@Component
struct CropExample {
  @State srcPixelMap: image.PixelMap | undefined = undefined;
  @State cropPixelMap: image.PixelMap | undefined = undefined;
  private context = getContext(this);

  aboutToAppear() {
    this.loadAndCrop();
  }

  async loadAndCrop() {
    // 1. 加载原图
    let src = await loadPixelMapFromResource(this.context, $r('app.media.testImage').id);
    if (!src) {
      return;
    }
    this.srcPixelMap = src;

    // 2. 创建可变 PixelMap(crop 要求目标 PixelMap 可变)
    let cropRegion: image.Region = {
      x: 50,       // 裁剪区域左上角 x
      y: 50,       // 裁剪区域左上角 y
      width: 200,  // 裁剪区域宽度
      height: 200  // 裁剪区域高度
    };

    // 3. 执行裁剪
    try {
      // 注意:crop 会直接修改调用者本身,因此需要先创建副本
      let editablePixelMap = await src.copyPixelMap();
      await editablePixelMap.crop(cropRegion);
      this.cropPixelMap = editablePixelMap;
      console.info(`crop success, result size: ${editablePixelMap.getImageInfoSync().size}`);
    } catch (error) {
      console.error(`crop failed, error: ${JSON.stringify(error)}`);
    }
  }

  build() {
    Column() {
      Text('原图').fontSize(16).margin(10)
      if (this.srcPixelMap) {
        Image(this.srcPixelMap).width(300).height(300).objectFit(ImageFit.Contain)
      }
      Text('裁剪 200x200(从 (50,50) 开始)').fontSize(16).margin(10)
      if (this.cropPixelMap) {
        Image(this.cropPixelMap).width(200).height(200).objectFit(ImageFit.Contain)
      }
    }.width('100%').padding(20)
  }
}
这个示例从原图 (50,50) 位置开始,裁剪 200x200 像素的区域。实际开发里最常见的坑是 crop 直接修改了原 PixelMap 的数据。如果后续还需要使用原图,一定要先调用 copyPixelMap() 创建一个副本。
关键参数说明:
Region的x、y不能为负数width、height不能超过原图边界,否则会抛出异常- 裁剪后的 PixelMap 分辨率就是
widthxheight
示例二:缩放到 50% 宽高
缩放操作通过 scale() 方法实现。这里演示将图片宽高各缩小到原来的 50%。
// pages/ScaleExample.ets
import { image } from '@kit.ImageKit';
import { common } from '@kit.AbilityKit';
import { loadPixelMapFromResource } from '../utils/ImageHelper';

@Entry
@Component
struct ScaleExample {
  @State srcPixelMap: image.PixelMap | undefined = undefined;
  @State scalePixelMap: image.PixelMap | undefined = undefined;
  private context = getContext(this);

  aboutToAppear() {
    this.loadAndScale();
  }

  async loadAndScale() {
    let src = await loadPixelMapFromResource(this.context, $r('app.media.testImage').id);
    if (!src) return;
    this.srcPixelMap = src;

    // 原图尺寸
    let srcInfo = src.getImageInfoSync();
    console.info(`original size: ${srcInfo.size.width}x${srcInfo.size.height}`);

    // 计算目标尺寸:宽高各缩放到 50%
    let targetWidth = Math.floor(srcInfo.size.width * 0.5);
    let targetHeight = Math.floor(srcInfo.size.height * 0.5);

    try {
      // scale 同样会修改调用者,先创建副本
      let editablePixelMap = await src.copyPixelMap();
      await editablePixelMap.scale(targetWidth, targetHeight);
      this.scalePixelMap = editablePixelMap;
      console.info(`scale success, result size: ${editablePixelMap.getImageInfoSync().size}`);
    } catch (error) {
      console.error(`scale failed, error: ${JSON.stringify(error)}`);
    }
  }

  build() {
    Column() {
      Text('原图').fontSize(16).margin(10)
      if (this.srcPixelMap) {
        Image(this.srcPixelMap).width(300).height(300).objectFit(ImageFit.Contain)
      }
      Text('缩放到 50% 宽高').fontSize(16).margin(10)
      if (this.scalePixelMap) {
        Image(this.scalePixelMap).width(150).height(150).objectFit(ImageFit.Contain)
      }
    }.width('100%').padding(20)
  }
}
scale() 直接传入目标宽度和高度(像素单位),是绝对尺寸而非倍数。很多人会误以为 scale(0.5, 0.5) 表示缩放到 50%,实际上是缩放到 0.5 像素——这显然不对。参数单位是像素,不是比例。
示例三:旋转 90 度
旋转使用 rotate() 方法,传入顺时针旋转角度。
// pages/RotateExample.ets
import { image } from '@kit.ImageKit';
import { common } from '@kit.AbilityKit';
import { loadPixelMapFromResource } from '../utils/ImageHelper';

@Entry
@Component
struct RotateExample {
  @State srcPixelMap: image.PixelMap | undefined = undefined;
  @State rotate90PixelMap: image.PixelMap | undefined = undefined;
  private context = getContext(this);

  aboutToAppear() {
    this.loadAndRotate();
  }

  async loadAndRotate() {
    let src = await loadPixelMapFromResource(this.context, $r('app.media.testImage').id);
    if (!src) return;
    this.srcPixelMap = src;

    try {
      // rotate 会修改调用者,先创建副本
      let editablePixelMap = await src.copyPixelMap();
      // 顺时针旋转90度
      await editablePixelMap.rotate(90);
      this.rotate90PixelMap = editablePixelMap;
      console.info(`rotate success`);
      // 旋转后宽高会互换
      let info = editablePixelMap.getImageInfoSync();
      console.info(`after rotate: ${info.size.width}x${info.size.height}`);
    } catch (error) {
      console.error(`rotate failed, error: ${JSON.stringify(error)}`);
    }
  }

  build() {
    Column() {
      Text('原图').fontSize(16).margin(10)
      if (this.srcPixelMap) {
        Image(this.srcPixelMap).width(300).height(300).objectFit(ImageFit.Contain)
      }
      Text('顺时针旋转 90 度').fontSize(16).margin(10)
      if (this.rotate90PixelMap) {
        Image(this.rotate90PixelMap).width(300).height(300).objectFit(ImageFit.Contain)
      }
    }.width('100%').padding(20)
  }
}
rotate() 的角度必须是 90 的整数倍(0, 90, 180, 270, 360)。传入 45 度会直接抛异常。旋转后图片的宽高会互换,布局时需要注意。
常见问题
问题 1:为什么 crop/scale/rotate 后 Image 组件不显示?
现象:操作完成后,把 PixelMap 赋值给 @State 变量,Image 组件不刷新或显示空白。
原因:这三个方法都是异步的,但在回调里直接修改 UI 状态时,如果 PixelMap 对象本身没有变化(内存地址相同),ArkUI 的响应式系统可能不会触发渲染。
解决方案:确保每次操作后都创建一个新的 PixelMap 引用。使用 copyPixelMap() 创建副本,或者在操作完成后重新赋值一个不同的变量引用。上述示例中通过 this.cropPixelMap = editablePixelMap 的方式,每次都是新对象,可以正常触发刷新。
问题 2:crop 时 Region 参数超出原图边界会怎样?
现象:程序直接崩溃或抛出异常。
原因:crop() 内部会检查 Region 是否完全位于原图范围内。x + width 超过原图宽度,或者 y + height 超过原图高度,都会导致校验失败。
解决方案:调用 crop 前先通过 getImageInfoSync() 获取原图尺寸,做边界校验。
let srcInfo = src.getImageInfoSync();
let region: image.Region = {
  x: 50,
  y: 50,
  width: 200,
  height: 200
};
// 边界校验
if (region.x + region.width > srcInfo.size.width ||
    region.y + region.height > srcInfo.size.height) {
  console.error('crop region out of bounds');
  return;
}
问题 3:为什么 scale 后图片模糊?
现象:缩放到更小尺寸后,再用 Image 组件放大展示,图片很模糊。
原因:scale() 默认使用最近邻插值算法,速度快但质量一般。Image Kit 目前没有提供插值算法选择参数,如果需要高质量缩放,建议分两步:先缩小到目标尺寸,再用 Image 组件的 interpolation 属性做显示优化。
实际建议:如果只是缩略图展示,直接用 Image 组件设置宽高比,不修改 PixelMap。只有在需要保存文件时,才使用 PixelMap 的 scale 方法。
最佳实践
1. 操作前先创建副本
crop()、scale()、rotate() 都会直接修改 PixelMap 本身。如果原图后续还要使用,务必在操作前调用 copyPixelMap() 创建副本。这个操作有一定性能开销,但比重新加载资源要快得多。
2. 不要连续多次调用 scale
如果需要将图片从 1000px 缩放到 100px,不要分多次调用 scale。每次缩放都会产生像素损失,多次累计会明显降低图片质量。一步到位是最佳选择。
3. 操作完成后立即释放中间 PixelMap
Image Kit 的 PixelMap 对象会占用大量内存。如果进行多个操作,及时释放不再使用的 PixelMap 对象,避免内存峰值过高。可以用 pixelMap.release() 手动释放。
完整入口文件
// pages/Index.ets
import { Router } from '@kit.ArkUI';

@Entry
@Component
struct Index {
  build() {
    Column({ space: 20 }) {
      Text('Image Kit 图片编辑示例').fontSize(24).fontWeight(FontWeight.Bold)

      Button('裁剪 200x200 区域')
        .onClick(() => Router.pushUrl({ url: 'pages/CropExample' }))
        .width('80%').height(50)

      Button('缩放到 50% 宽高')
        .onClick(() => Router.pushUrl({ url: 'pages/ScaleExample' }))
        .width('80%').height(50)

      Button('旋转 90 度')
        .onClick(() => Router.pushUrl({ url: 'pages/RotateExample' }))
        .width('80%').height(50)
    }.width('100%').padding(20).alignItems(HorizontalAlign.Center)
  }
}
FAQ
Q:crop 后的 PixelMap 可以继续旋转吗?
A:可以。crop 返回的是新的 PixelMap,可以继续调用 rotate、scale 等方法。但需要注意每次操作后图片尺寸会变化,后续操作需要重新计算参数。
Q:为什么真机上加载 4000x3000 的图片 crop 会闪退?
A:大图直接加载到 PixelMap 会占用大量内存。建议先通过 createPixelMap 的 options 参数设置 desiredSize 进行下采样,把加载尺寸控制在 2048px 以内。ArkUI 对大图的支持有限,超过 4096px 容易出现 OOM。
Q:rotate 后图片尺寸发生变化,如何保持预览区域固定?
A:Image 组件的 objectFit 属性可以控制图片在容器内的适配方式。旋转后宽高互换,使用 ImageFit.Contain 或 ImageFit.Cover 可以自动适配容器,不需要手动计算布局。
Q:多个操作可以合并执行吗?
A:目前 Image Kit 不支持链式调用。每个操作都是独立的异步方法,需要分步执行。建议先 scale 缩小图片,再 crop 裁剪,最后 rotate。先缩小可以减少后续操作的数据量,提升性能。
示例代码地址:项目地址
如果你在实际开发中遇到了 PixelMap 编辑相关的其他问题,可以重点检查参数边界条件和 PixelMap 的可变性这两个方向,大部分问题出在这里。

讨论HarmonyOS开发技术,专注于API与组件、DevEco Studio、测试、元服务和应用上架分发等。
更多推荐

 0
0 0
0- 0


 已为社区贡献5条内容

所有评论(0)