【私房菜集 HarmonyOS ArkTS 实战系列 06】菜谱详情页:大图、用料、步骤与忌口提醒的页面组织
【私房菜集 HarmonyOS ArkTS 实战系列 06】菜谱详情页:大图、用料、步骤与忌口提醒的页面组织
第 05 篇完成了探索与搜索链路:用户可以通过关键词、分类和列表找到目标菜谱。本篇继续进入菜谱详情页,拆解RecipeDetailPage如何承接recipeId路由参数,加载完整菜谱、记录浏览行为、展示大图、用料和步骤,并把收藏、想做、计时器、分享和忌口提醒放回同一个使用场景。
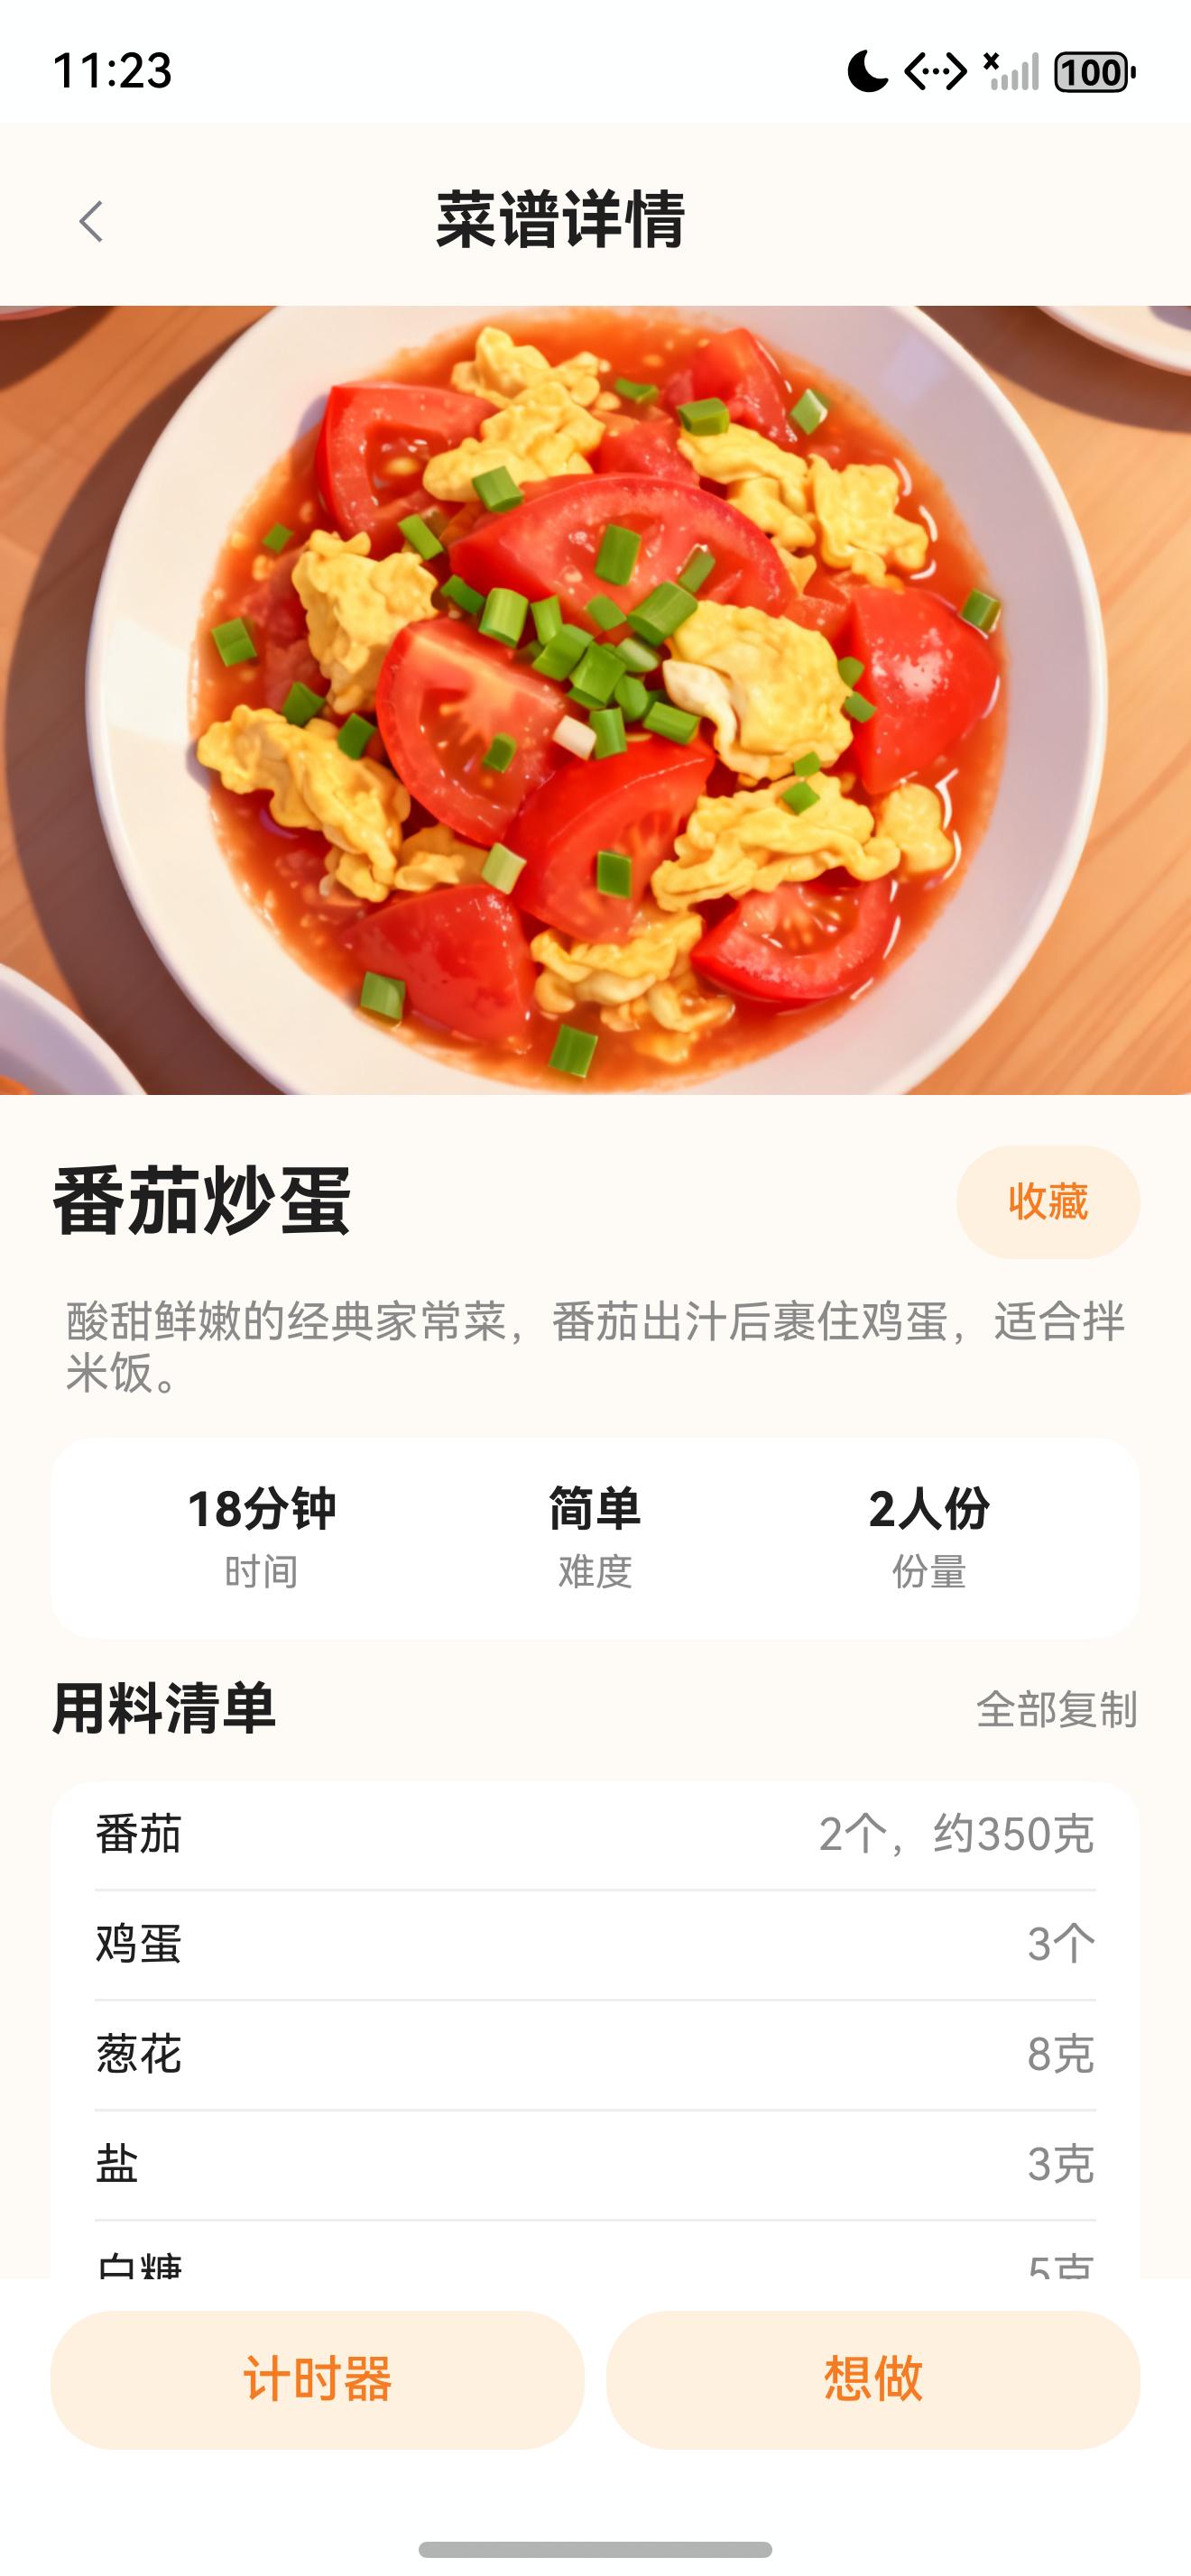
一、详情页不能只是长列表
菜谱详情页看起来只是“把一道菜的信息展示完整”,但真实工程里它承担的职责更多:
- 内容展示:大图、标题、描述、时长、难度、份量、用料和步骤。
- 状态刷新:进入详情时记录最近浏览,返回首页后能出现在最近浏览区。
- 用户行为:收藏、想做清单、计时器、分享都从详情页触发。
- 个性化提醒:如果命中忌口食材,需要在详情中提示。
- 路由边界:普通页面进入和桌面卡片进入,返回方式不同。
因此,详情页不能写成一个只有 Scroll + Text 的长列表。它需要把内容、状态和操作入口分层组织,既保证阅读顺序自然,也保证用户动作可以回写本地状态。
二、源码对象总览
| 源码对象 | 作用 |
|---|---|
entry/src/main/ets/pages/RecipeDetailPage.ets |
菜谱详情页主体,负责加载详情、记录浏览、渲染内容和处理操作。 |
entry/src/main/ets/models/RecipeModels.ets |
定义 Recipe、RecipeDetailData、Ingredient、RecipeStep。 |
entry/src/main/ets/services/RecipeService.ets |
提供 getRecipeDetail()、recordView()、getRecipeById() 等详情数据能力。 |
entry/src/main/ets/components/recipe/RecipeImage.ets |
统一封面图、步骤图和无图兜底渲染。 |
entry/src/main/ets/services/FavoriteService.ets、TodoService.ets |
详情页收藏和想做清单操作入口。 |
详情页的关键边界是:RecipeService 负责拼出完整详情数据,RecipeDetailPage 负责页面状态与交互,RecipeImage 负责图片显示。
三、详情数据模型:Recipe 加上用户状态
详情页消费的不是单纯 Recipe,而是 RecipeDetailData:
export interface RecipeDetailData {
  recipe: Recipe;
  isFavorite: boolean;
  isInTodoList: boolean;
  note: string;
  avoidedIngredients: string[];
}
这个模型说明详情页同时需要两类数据。
第一类是菜谱内容:标题、描述、封面、用料、步骤、技巧、时长、难度、份量。
第二类是用户状态:是否收藏、是否在想做清单、是否有笔记、是否命中忌口食材。
如果详情页只拿 Recipe,页面里就要额外调用收藏服务、想做服务、笔记服务和忌口偏好服务,状态很快会分散。当前实现把这些组合放到 RecipeService.getRecipeDetail(),让页面一次拿到完整可渲染数据。
Recipe 本身包含完整菜谱结构:
export interface Recipe {
  id: string;
  title: string;
  description: string;
  categoryId: string;
  categoryName: string;
  coverImages: string[];
  durationMinutes: number;
  difficulty: RecipeDifficulty;
  difficultyText: string;
  serving: string;
  ingredients: Ingredient[];
  steps: RecipeStep[];
  tips: string[];
  viewCount: number;
  source: RecipeSource;
  tags: string[];
  createdAt: number;
  updatedAt: number;
}
用料和步骤也有明确模型:
export interface Ingredient {
  id: string;
  name: string;
  amount: string;
  treatment?: string;
}

export interface RecipeStep {
  id: string;
  order: number;
  content: string;
  image?: string;
}
这让详情页可以自然分成“用料清单”和“步骤做法”两块,而不是在页面里解析原始 JSON。
四、进入详情:路由参数和浏览记录
详情页接收两个路由参数:
interface DetailParams {
  recipeId?: string;
  source?: string;
}
recipeId 决定加载哪一道菜,source 用来识别是否从桌面卡片进入。
页面启动逻辑如下:
async aboutToAppear() {
  recipeService.init(getContext(this) as common.UIAbilityContext);
  const params = router.getParams() as DetailParams;
  this.recipeId = params.recipeId ?? '';
  this.fromWidget = params.source === 'widget';
  if (this.recipeId.length > 0) {
    await recipeService.recordView(this.recipeId);
    const detail = await recipeService.getRecipeDetail(this.recipeId);
    if (detail === null) {
      promptAction.showToast({ message: '菜谱不存在' });
      router.back();
      return;
    }
    this.data = detail;
  }
}
这里有两个关键点。
第一,先调用 recordView(),再读取详情数据。这样从详情页返回首页时,首页最近浏览区能读取到最新 lastViewedAt。
第二,找不到菜谱时不渲染空页面,而是提示“菜谱不存在”并返回。详情页是强依赖 recipeId 的页面,不能在缺数据时继续展示空壳。
浏览记录写入逻辑在 RecipeService:
async recordView(recipeId: string): Promise<void> {
  const state = userStateRepository.getState(recipeId);
  userStateRepository.saveState({
    recipeId: state.recipeId,
    isFavorite: state.isFavorite,
    isInTodoList: state.isInTodoList,
    todoOrder: state.todoOrder,
    lastViewedAt: Date.now(),
    note: state.note,
    updatedAt: state.updatedAt
  });
}
它没有覆盖收藏、想做和笔记,只更新 lastViewedAt。这是本地状态设计里很重要的边界:一个操作只改自己负责的字段。
五、getRecipeDetail:把内容和状态组装好
详情数据由 RecipeService.getRecipeDetail() 提供:
async getRecipeDetail(recipeId: string): Promise<RecipeDetailData | null> {
  const recipe = this.getRecipeById(recipeId);
  if (!recipe) {
    return null;
  }
  const state = userStateRepository.getState(recipe.id);
  return {
    recipe,
    isFavorite: state.isFavorite,
    isInTodoList: state.isInTodoList,
    note: state.note,
    avoidedIngredients: preferenceService.detectAvoidedIngredients(recipe.id)
  };
}
这段逻辑做了四件事:
- 通过
recipeId找到菜谱内容。 - 从用户状态仓读取收藏、想做和笔记。
- 从偏好服务读取忌口命中结果。
- 返回页面可以直接渲染的
RecipeDetailData。
菜谱来源也不是单一内置数据:
getRecipeById(recipeId: string): Recipe | null {
  return this.getUserRecipes().concat(recipeDataSource.loadRecipes()).find(item => item.id === recipeId) ?? null;
}
这里先拼接用户自建菜谱,再拼接内置菜谱。后续第 09 篇讲添加菜谱时,这个入口会继续发挥作用:详情页不需要关心菜谱来自 rawfile 还是用户自建,只认 Recipe。
六、大图区域:单图和多图共用一个入口
详情页顶部先渲染图片区:
@Builder
private RecipeImageCarousel() {
  if (this.data.recipe.coverImages.length > 1) {
    Swiper() {
      ForEach(this.data.recipe.coverImages, (src: string) => {
        RecipeImage({
          src: src,
          title: this.data.recipe.title,
          heightValue: 250,
          radius: 0
        })
      }, (src: string) => src)
    }
    .width('100%')
    .height(250)
    .loop(true)
    .autoPlay(false)
    .indicator(true)
  } else {
    RecipeImage({
      src: this.data.recipe.coverImages[0] ?? '',
      title: this.data.recipe.title,
      heightValue: 250,
      radius: 0
    })
  }
}
当前截图中的番茄炒蛋是单图展示。如果某道菜有多张图,则自动切换到 Swiper,可以展示轮播图。页面不需要拆成两个详情页,也不需要让上层服务关心图片数量,展示层自己根据 coverImages.length 决定渲染形态。
图片组件统一使用 RecipeImage:
@Component
export struct RecipeImage {
  @Prop src: string = '';
  @Prop title: string = '';
  @Prop heightValue: number = 96;
  @Prop radius: number = 12;

  build() {
    Stack() {
      if (this.src.length > 0) {
        Image(this.src)
          .width('100%')
          .height(this.heightValue)
          .objectFit(ImageFit.Cover)
          .alt($r('app.media.background'))
      } else {
        Column() {
          Text('无图')
            .fontSize(14)
            .fontWeight(FontWeight.Medium)
            .fontColor($r('app.color.text_secondary'))
        }
        .width('100%')
        .height(this.heightValue)
        .justifyContent(FlexAlign.Center)
        .backgroundColor($r('app.color.divider'))
      }
    }
    .width('100%')
    .height(this.heightValue)
    .borderRadius(this.radius)
    .clip(true)
  }
}
这个组件被首页卡片、搜索列表、详情大图和步骤图共同复用。它的价值不是样式复杂,而是把“有图显示图片、无图显示兜底”的规则统一起来。
七、标题区:内容和收藏操作放在同一视线内
详情页标题区的关键结构如下:
Row() {
  Text(this.data.recipe.title)
    .fontSize(24)
    .fontWeight(FontWeight.Bold)
    .fontColor($r('app.color.text_primary'))
    .layoutWeight(1)
    .maxLines(2)
    .textOverflow({ overflow: TextOverflow.Ellipsis })
  Button(this.data.isFavorite ? '取消收藏' : '收藏')
    .height(36)
    .fontSize(13)
    .fontColor(this.data.isFavorite ? Color.White : $r('app.color.primary_orange'))
    .backgroundColor(this.data.isFavorite ? $r('app.color.primary_orange') : $r('app.color.primary_orange_light'))
    .onClick(() => this.toggleFavorite())
}
这里把收藏按钮放在标题右侧,而不是放到底部操作栏。原因很直接:收藏是对整道菜的行为,和标题处于同一语义区域,用户看完标题就能决定是否收藏。
标题设置了 maxLines(2) 和 TextOverflow.Ellipsis。菜名可能很长,例如“蒜香鸡腿肉番茄小炒”,如果不限制行数,会挤压收藏按钮和描述区域。
收藏切换后会重新读取详情:
private async toggleFavorite() {
  if (this.data.recipe.id.length === 0) {
    return;
  }
  await favoriteService.toggleFavorite(this.data.recipe.id);
  const detail = await recipeService.getRecipeDetail(this.data.recipe.id);
  if (detail !== null) {
    this.data = detail;
  }
}
切换后不只是手动反转 isFavorite,而是重新调用 getRecipeDetail()。这样收藏、想做、笔记和忌口提醒仍然由同一数据入口保证一致。
八、元信息区:时间、难度、份量固定三列
标题和描述之后是元信息区:
Row() {
  this.MetaItem(`${this.data.recipe.durationMinutes}分钟`, '时间')
  this.MetaItem(this.data.recipe.difficultyText, '难度')
  this.MetaItem(this.data.recipe.serving, '份量')
}
.width('100%')
.padding(14)
.backgroundColor($r('app.color.card_bg'))
.borderRadius(14)
每一项由 MetaItem 渲染:
@Builder
private MetaItem(value: string, label: string) {
  Column({ space: 4 }) {
    Text(value)
      .fontSize(15)
      .fontWeight(FontWeight.Bold)
      .fontColor($r('app.color.text_primary'))
      .maxLines(1)
      .textOverflow({ overflow: TextOverflow.Ellipsis })
    Text(label)
      .fontSize(12)
      .fontColor($r('app.color.text_secondary'))
  }
  .layoutWeight(1)
}
截图中可以看到“18分钟 / 简单 / 2人份”。这些信息放在用料之前,可以帮助用户快速判断这道菜是否适合当前场景。
九、忌口提醒:不打断阅读,但要足够醒目
详情页在描述之后渲染忌口提醒:
if (this.data.avoidedIngredients.length > 0) {
  Text(`忌口食材:${this.data.avoidedIngredients.join(' / ')}`)
    .fontSize(13)
    .fontColor($r('app.color.danger_red'))
    .padding(10)
    .backgroundColor('#FFFFEFED')
    .borderRadius(10)
}
这类提醒不适合弹窗。弹窗会打断查看菜谱的连续性,而且用户可能只是想先浏览,不一定马上做菜。当前设计把提醒放在描述和元信息之间,位置足够靠前,颜色也足够醒目,但不会阻断阅读。
忌口数据来自:
avoidedIngredients: preferenceService.detectAvoidedIngredients(recipe.id)
第 11 篇会继续拆偏好服务和笔记服务。本篇只需要明确一点:详情页已经预留了个人偏好回流的位置。
十、用料清单:列表可读性优先
用料区使用统一标题 Builder:
this.SectionTitle('用料清单', '全部复制')
Column() {
  ForEach(this.data.recipe.ingredients, (item: Ingredient) => {
    Row() {
      Text(item.name)
        .fontSize(14)
        .fontColor($r('app.color.text_primary'))
        .layoutWeight(1)
      Text(item.amount)
        .fontSize(14)
        .fontColor($r('app.color.text_secondary'))
    }
    .width('100%')
    .padding({ top: 9, bottom: 9 })
    .border({ width: { bottom: 1 }, color: $r('app.color.divider') })
  }, (item: Ingredient) => item.id)
}
.padding({ left: 14, right: 14 })
.backgroundColor($r('app.color.card_bg'))
.borderRadius(14)
用料清单强调左右对齐:左侧是食材名,右侧是用量。截图中能看到番茄、鸡蛋、葱花、盐、白糖等字段。这样的结构比一段连续文本更适合烹饪前检查。
标题区的“全部复制”当前使用提示反馈:
@Builder
private SectionTitle(title: string, action: string) {
  Row() {
    Text(title)
      .fontSize(18)
      .fontWeight(FontWeight.Bold)
      .fontColor($r('app.color.text_primary'))
    Blank()
    Text(action)
      .fontSize(13)
      .fontColor($r('app.color.text_secondary'))
      .onClick(() => {
        if (action === '全部复制') {
          promptAction.showToast({ message: '用料已复制' });
        }
      })
  }
  .width('100%')
}
后续可以把这个提示扩展成真实剪贴板写入,但当前页面结构已经给操作入口留出了位置。
十一、步骤做法:编号、文字和步骤图分开
步骤区域截图如下:
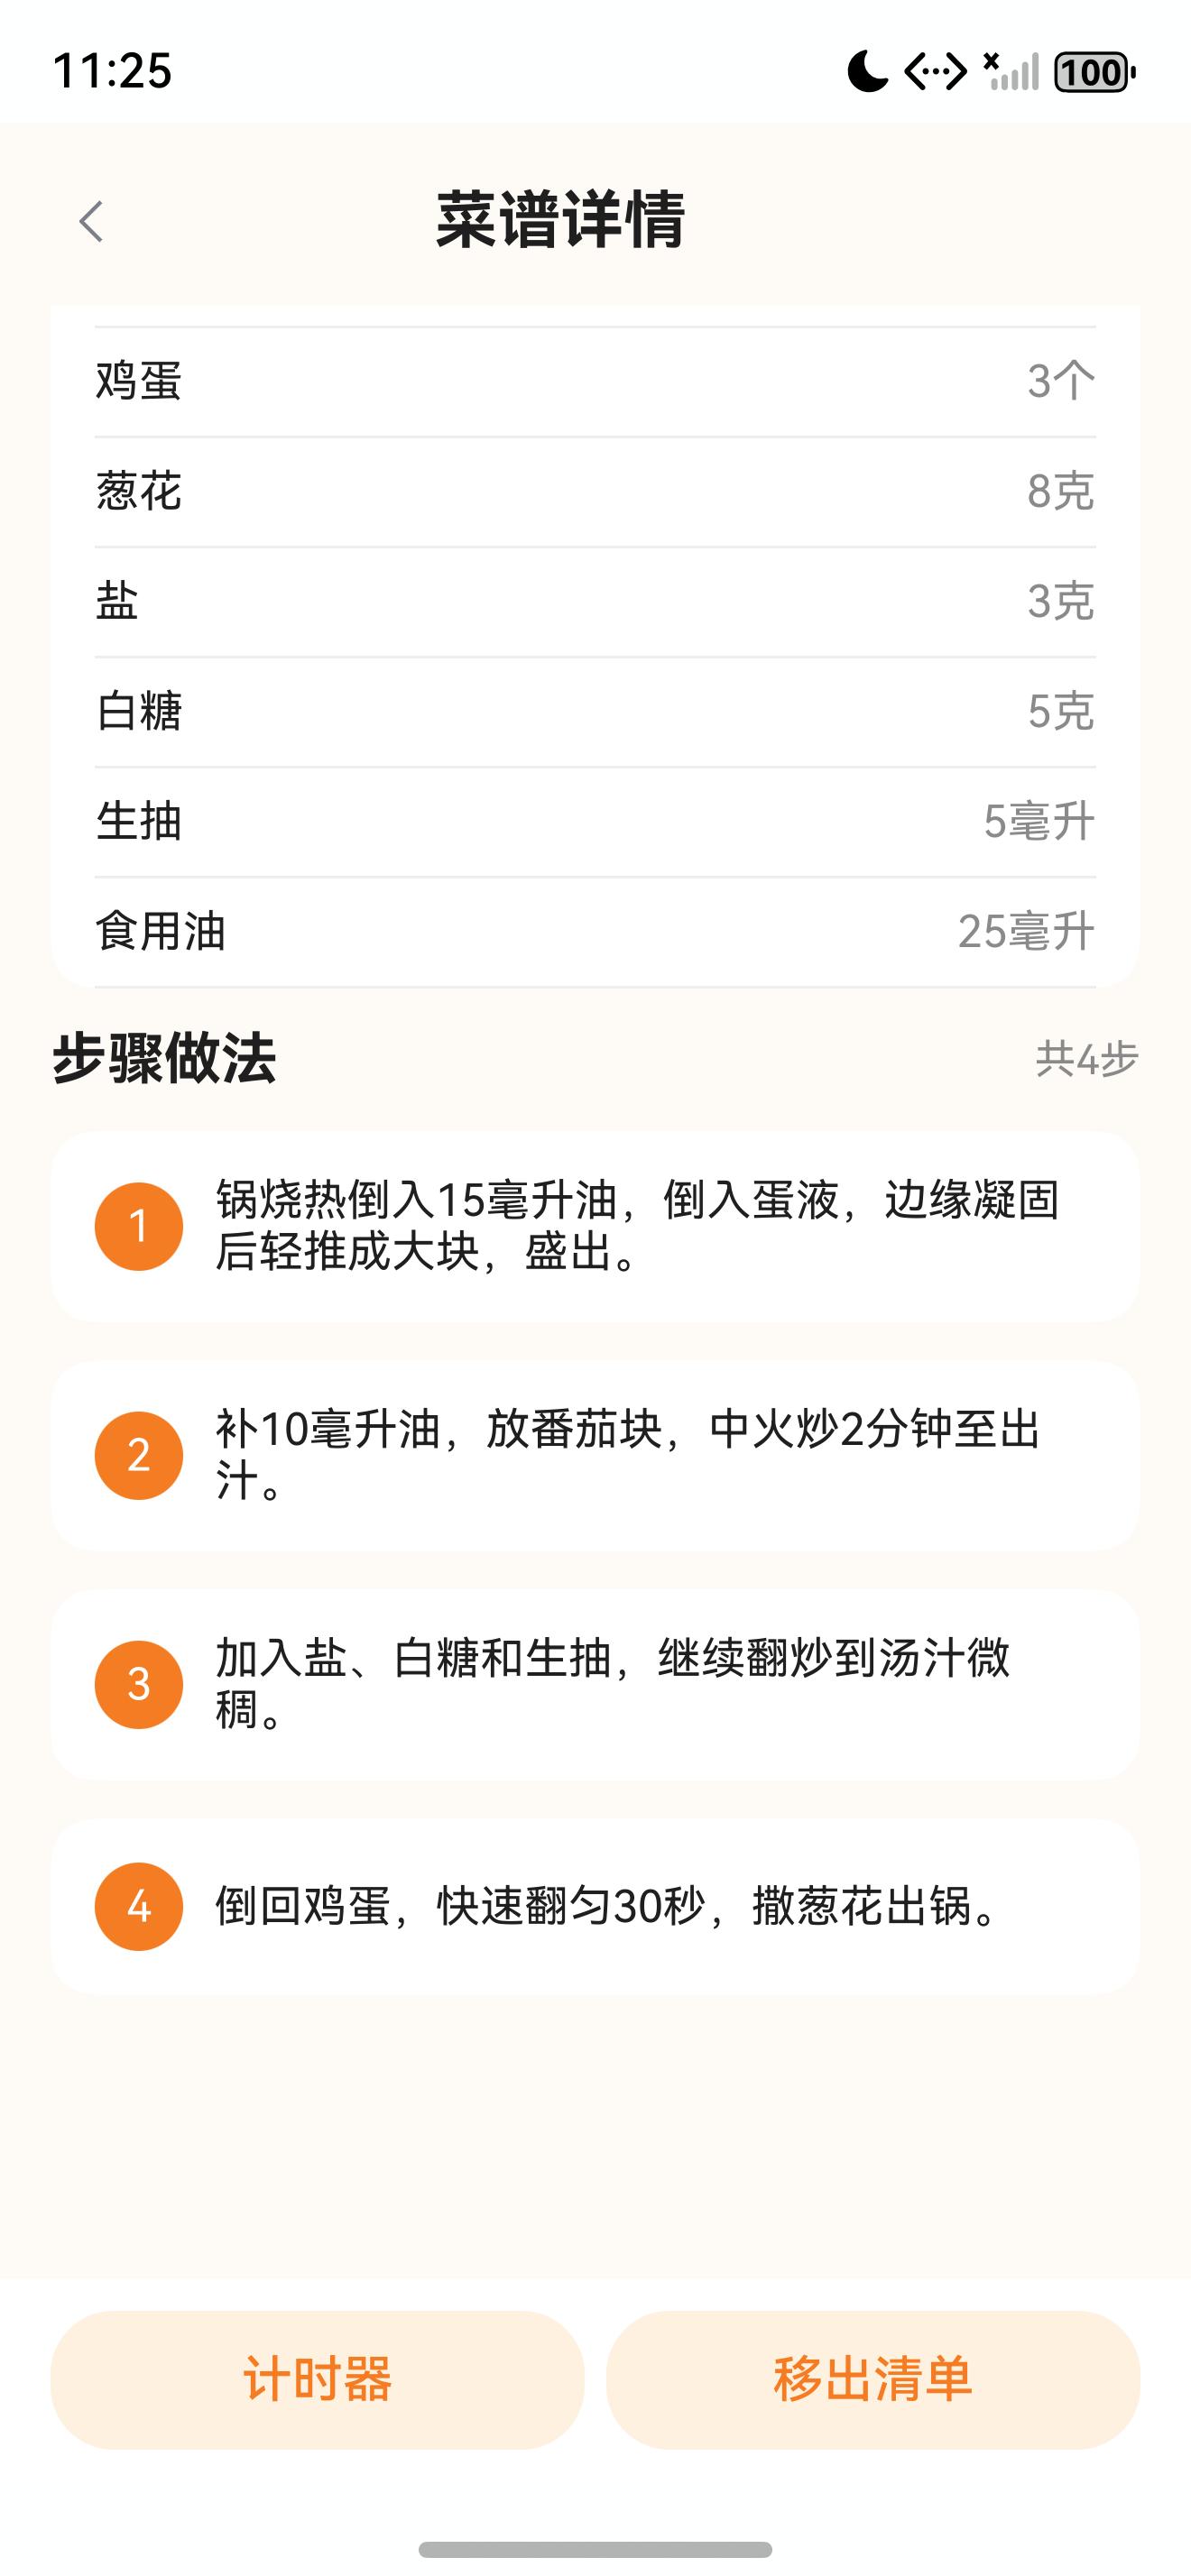
步骤标题和数量来自:
this.SectionTitle('步骤做法', `共${this.data.recipe.steps.length}步`)
每一步使用编号和文字:
ForEach(this.data.recipe.steps, (step: RecipeStep) => {
  Column({ space: 8 }) {
    Row({ space: 10 }) {
      Text(`${step.order}`)
        .fontSize(14)
        .fontColor(Color.White)
        .width(28)
        .height(28)
        .textAlign(TextAlign.Center)
        .backgroundColor($r('app.color.primary_orange'))
        .borderRadius(14)
      Text(step.content)
        .fontSize(14)
        .fontColor($r('app.color.text_primary'))
        .layoutWeight(1)
    }
    if (step.image !== undefined) {
      RecipeImage({ src: step.image, title: this.data.recipe.title, heightValue: 150, radius: 12 })
    }
  }
  .width('100%')
  .padding(14)
  .backgroundColor($r('app.color.card_bg'))
  .borderRadius(14)
}, (step: RecipeStep) => step.id)
步骤图不是强制字段。RecipeStep.image 是可选的,只有存在时才渲染 RecipeImage。这样同一套详情页既能展示图文步骤,也能展示纯文字步骤。
截图中的番茄炒蛋共有 4 步:
- 炒蛋盛出。
- 炒番茄出汁。
- 加调味料收汁。
- 倒回鸡蛋翻匀出锅。
这些步骤来自内容资产映射后的 RecipeStep[],页面不需要关心原始 rawfile 里图片和步骤如何对应。
十二、底部操作栏:计时器和想做清单
详情页底部固定两个操作:
Row({ space: 7 }) {
  Button('计时器')
    .layoutWeight(1)
    .height(44)
    .fontColor($r('app.color.primary_orange'))
    .backgroundColor($r('app.color.primary_orange_light'))
    .onClick(() => router.pushUrl({ url: AppRoutes.TIMER, params: { recipeId: this.data.recipe.id, durationMinutes: this.data.recipe.durationMinutes } }))
  Button(this.data.isInTodoList ? '移出清单' : '想做')
    .layoutWeight(1)
    .height(44)
    .fontColor($r('app.color.primary_orange'))
    .backgroundColor($r('app.color.primary_orange_light'))
    .onClick(() => this.toggleTodo())
}
.padding({ left: 16, right: 16, top: 10, bottom: 12 })
.backgroundColor($r('app.color.card_bg'))
这两个操作都和“马上做这道菜”相关,因此放在底部固定栏比放在页面中段更合适。
计时器跳转会携带 recipeId 和 durationMinutes,第 10 篇会继续拆计时器会话设计。
想做清单切换逻辑和收藏类似:
private async toggleTodo() {
  if (this.data.recipe.id.length === 0) {
    return;
  }
  await todoService.toggleTodo(this.data.recipe.id);
  const detail = await recipeService.getRecipeDetail(this.data.recipe.id);
  if (detail !== null) {
    this.data = detail;
  }
}
切换后重新读取详情,可以保证按钮文案从“想做”变成“移出清单”,并且收藏 Tab 里的想做清单能读到同一份状态。
十三、返回与分享:普通进入和卡片进入不同
详情页顶部使用 AppPageHeader:
AppPageHeader({
  title: '菜谱详情',
  onBack: () => this.handleBack(),
  onRight: () => {
    if (this.data.recipe.id.length > 0) {
      router.pushUrl({ url: AppRoutes.SHARE, params: { recipeId: this.data.recipe.id } });
    }
  }
})
返回逻辑单独封装:
onBackPress(): boolean {
  this.handleBack();
  return true;
}

private handleBack(): void {
  if (this.fromWidget) {
    router.back({ url: AppRoutes.INDEX });
    return;
  }
  router.back();
}
如果从桌面卡片进入详情,返回时需要回到主页面;如果从应用内部进入详情,则正常返回上一页。这个差异不适合散落在按钮和系统返回里,因此统一放进 handleBack()。
分享入口暂时只负责路由跳转:
router.pushUrl({ url: AppRoutes.SHARE, params: { recipeId: this.data.recipe.id } });
第 13 篇会继续拆分享页和桌面卡片。本篇只需要看到详情页已经是这些能力的中心入口。
十四、运行与验收
本篇截图来自本机 HarmonyOS 模拟器真实运行页面,操作路径如下:
hdc shell aa start -a EntryAbility -b com.lesson.myapplicationsfcj
hdc shell uitest uiInput click 502 2635
hdc shell uitest uiInput click 200 280
hdc shell uitest uiInput text 鸡
hdc shell uitest uiInput click 930 280
hdc shell uitest uiInput keyEvent Back
hdc shell uitest uiInput click 800 580
hdc shell snapshot_display -f /data/local/tmp/sfcj_06_detail_top.jpeg
hdc shell uitest uiInput swipe 650 2450 650 700 900
hdc shell snapshot_display -f /data/local/tmp/sfcj_06_detail_steps.jpeg
验收重点可以按下面清单检查:
- 从搜索结果、首页卡片或分类列表进入详情页时,能根据
recipeId加载正确菜谱。 - 顶部大图真实显示菜谱图片,无图时显示兜底。
- 标题长时不挤压收藏按钮。
- 描述、时长、难度、份量显示正确。
- 用料清单左右对齐,食材名和用量可读。
- 步骤区显示步骤数量、编号和步骤内容。
- 有步骤图时渲染图片,没有步骤图时不留空白占位。
- 收藏按钮点击后文案和状态即时变化。
- “想做”按钮点击后能切换到“移出清单”。
- 点击计时器能带着当前菜谱时长进入计时器页。
- 从详情页返回首页后,最近浏览区能出现刚看过的菜。
十五、问题复盘:详情页是内容页,也是状态入口
详情页最容易被写成“展示完整菜谱”的长页面,但在当前项目里,它已经是多个状态的入口:
recordView()让首页最近浏览能更新。toggleFavorite()写入收藏状态。toggleTodo()写入想做清单。detectAvoidedIngredients()把饮食偏好接回详情页。- 计时器和分享通过路由继续扩展使用场景。
当前实现的取舍是:详情页不直接操作仓储层,不直接解析 rawfile,也不直接维护多个状态源;它只调用服务层能力,然后重新读取 RecipeDetailData。这样页面代码虽然承载了较多 UI,但数据入口仍然清晰。
后续可以继续优化的点也很明确:用料复制可以接入系统剪贴板,步骤区可以增加当前步骤高亮,顶部图片可以支持预览大图,底部操作栏可以根据滚动状态做收起或吸附,但这些都不影响当前的详情数据边界。
十六、下一篇衔接
详情页里的收藏、想做、最近浏览和笔记并不是临时变量,它们都依赖本地状态仓。下一篇进入 Preferences 本地状态:LocalStoreAdapter 和 UserStateRepository 如何把收藏、清单、最近浏览和笔记统一到同一份用户状态结构里。

讨论HarmonyOS开发技术,专注于API与组件、DevEco Studio、测试、元服务和应用上架分发等。
更多推荐
 10
10 0
0- 0


 已为社区贡献26条内容

所有评论(0)