【私房菜集 HarmonyOS ArkTS 实战系列 09】添加菜谱:相册选择、动态表单与保存入库
【私房菜集 HarmonyOS ArkTS 实战系列 09】添加菜谱:相册选择、动态表单与保存入库
第 08 篇拆完了收藏中心和想做清单,用户已经可以围绕内置菜谱做个人化管理。菜谱应用继续往前走,就不能只看系统内置内容,还要允许用户把自己的私房菜写进应用。本篇进入添加菜谱链路,重点看AddRecipePage如何组织图片选择、基础信息、分类难度、动态用料、动态步骤和保存校验,再由RecipeService.saveRecipe()写入本地自建菜谱库。
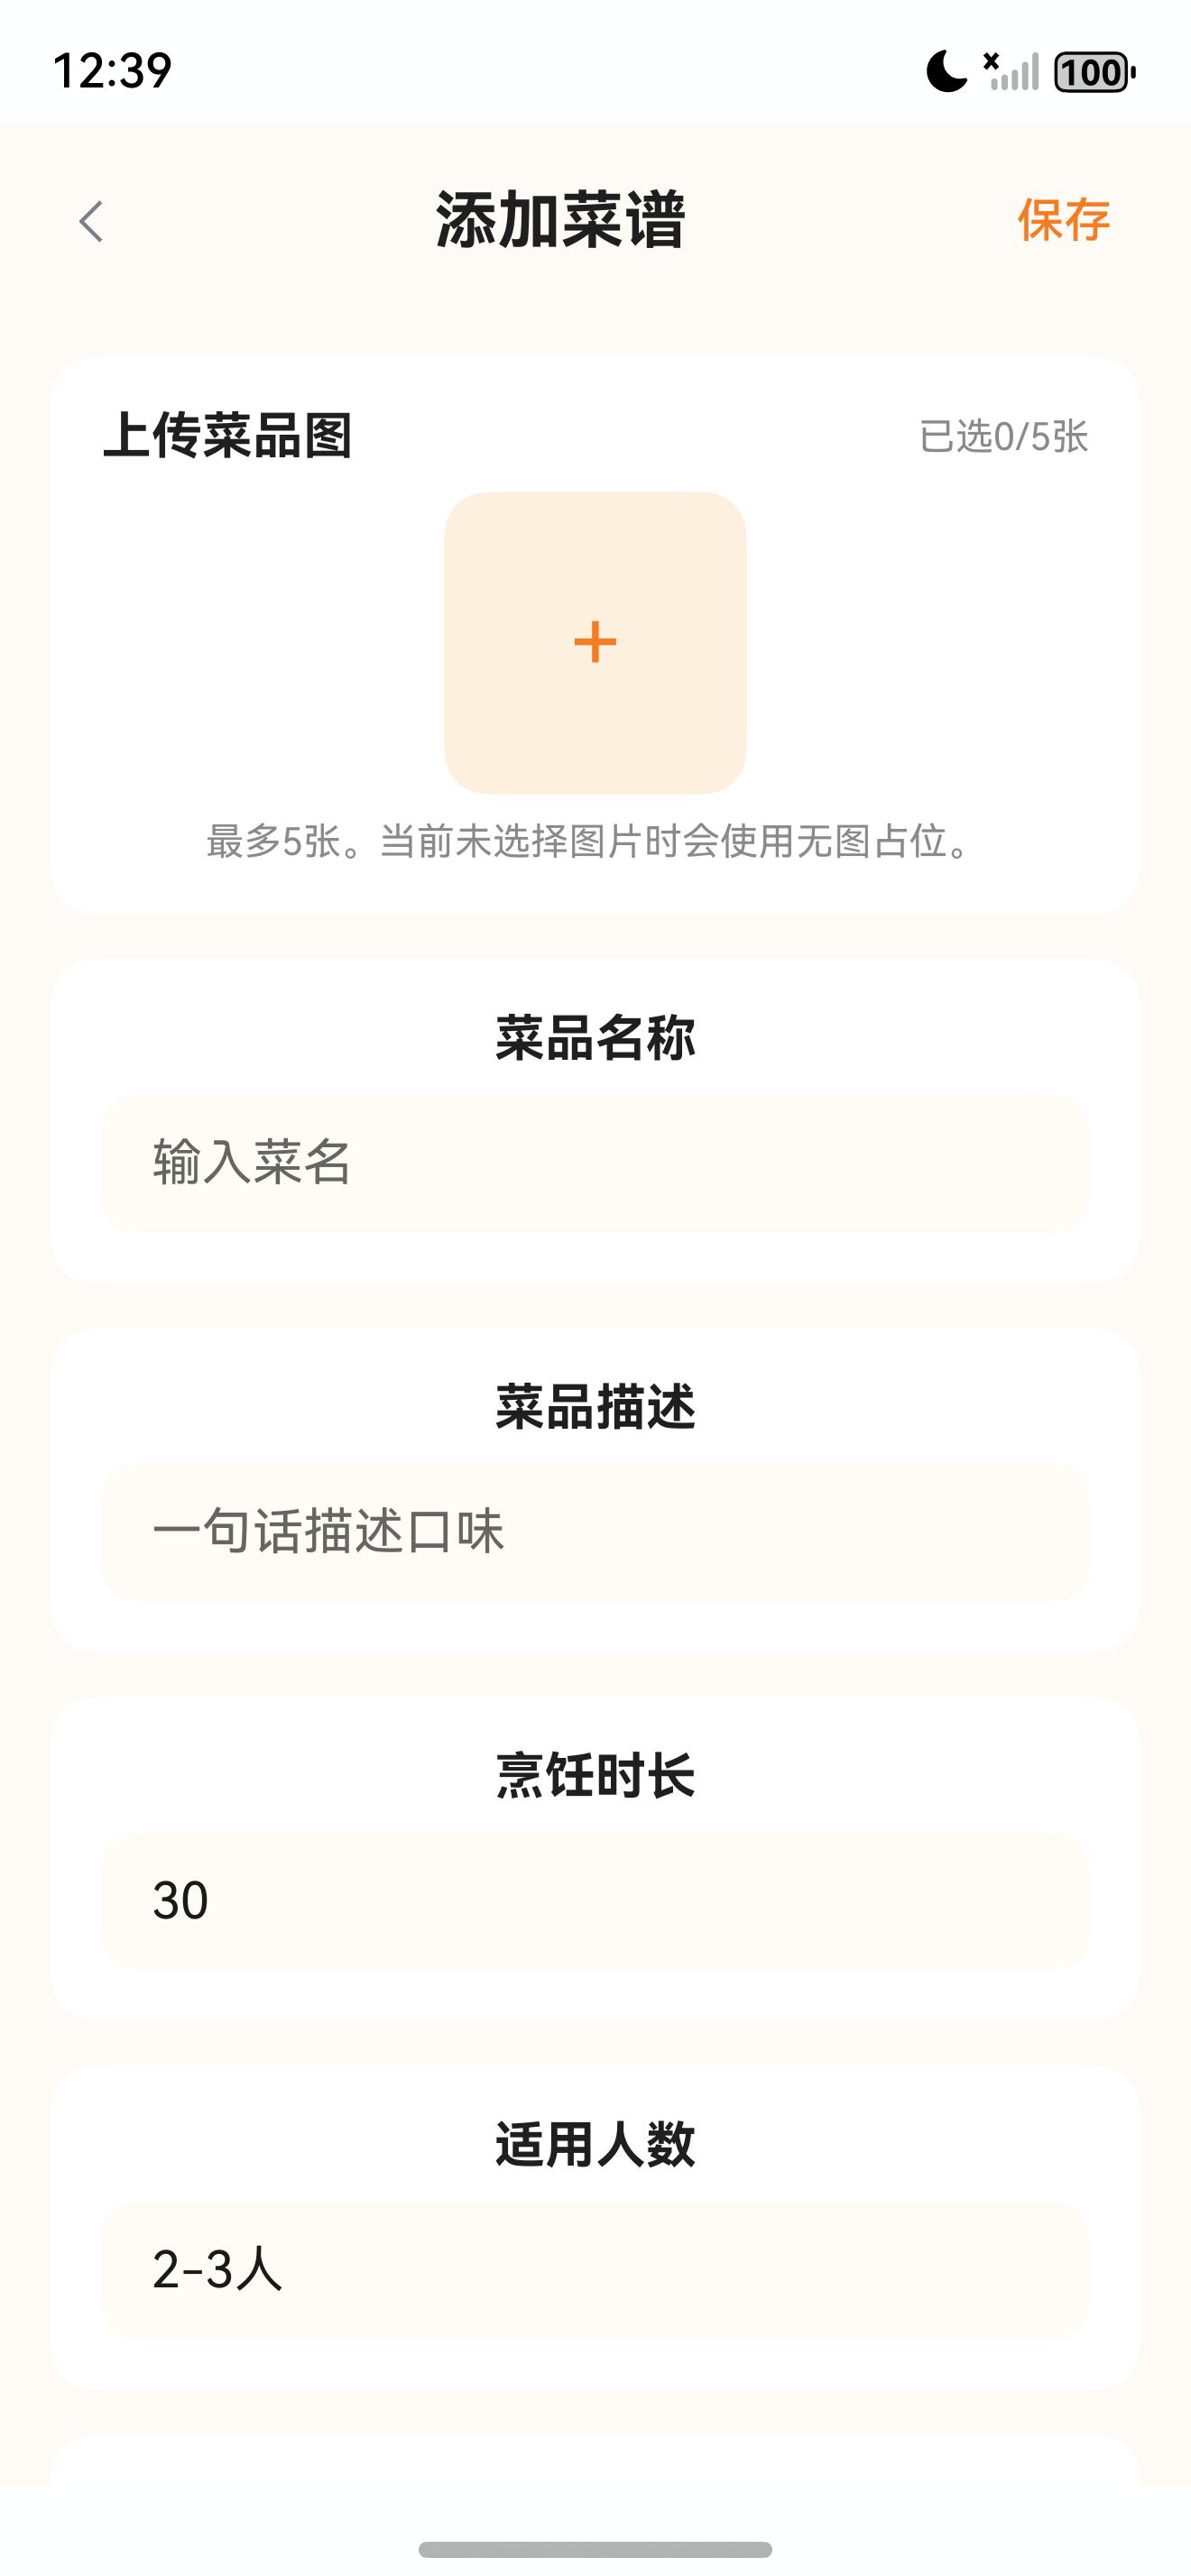
一、添加菜谱不是一个普通输入框
“添加菜谱”表面上是一个表单,但它承载的不是几行文本,而是一道完整菜谱的最小可用结构。至少要解决几类问题:
- 图片可以没有,但选择图片时要限制数量。
- 菜名、用料、步骤必须有基础校验。
- 用料和步骤不是固定条数,需要动态增删。
- 分类、难度、时长和份量要落到结构化字段。
- 保存后不能只停留在表单页,而要进入新菜谱详情页验证结果。
因此,添加页不能只做一组 TextInput。它要把 UI 输入转换成 SaveRecipePayload,再交给服务层生成 Recipe,最终和内置菜谱一起被详情页、收藏页、我的菜谱页消费。
二、源码对象总览
| 源码对象 | 作用 |
|---|---|
entry/src/main/ets/pages/AddRecipePage.ets | 添加菜谱页面主体,负责表单状态、图片选择、动态用料/步骤和保存动作。 |
entry/src/main/ets/models/RecipeModels.ets | 定义 SaveRecipePayload、Recipe、Ingredient、RecipeStep 等模型。 |
entry/src/main/ets/services/RecipeService.ets | 在 saveRecipe() 中把表单载荷转换成自建菜谱并写入本地存储。 |
entry/src/main/ets/components/recipe/RecipeImage.ets | 自建菜谱图片预览和详情图展示复用的图片组件。 |
entry/src/main/ets/common/constants/AppRoutes.ets | 提供保存后跳转详情页所需的路由常量。 |
这条链路的边界是:页面负责收集输入和校验,模型负责描述保存结构,服务层负责生成领域对象和落盘,路由负责把保存结果带到详情页。
三、页面状态:表单先用 @State 组织
添加页的状态集中在组件顶部:
@State title: string = '';
@State description: string = '';
@State categoryId: string = '';
@State durationText: string = '30';
@State difficulty: RecipeDifficulty = 'simple';
@State serving: string = '2-3人';
@State categories: Category[] = [];
@State coverImages: string[] = [];
@State ingredients: Ingredient[] = [{ id: 'ingredient_1', name: '', amount: '' }];
@State steps: RecipeStep[] = [{ id: 'step_1', order: 1, content: '' }];
private readonly maxCoverImageCount: number = 5;
这里没有一上来就创建 Recipe。表单阶段的数据还不完整,标题可能为空,用料可能只有占位行,步骤也可能没有内容。页面先用独立状态承载输入,保存时再过滤和组装。
ingredients 和 steps 默认各有一条空记录,是为了让用户进入页面后能直接看到输入位置,而不是先点“添加用料”或“添加步骤”。
四、初始化:分类来自 RecipeService
页面出现时会初始化服务并读取分类:
aboutToAppear() {
  recipeService.init(getContext(this) as common.UIAbilityContext);
  recipeService.getCategories().then(data => {
    this.categories = data;
    this.categoryId = this.categoryId || (data[0]?.id ?? '');
  });
}
这个初始化做了两件事。
第一,recipeService.init() 会继续初始化本地存储和内置数据源。添加菜谱最终要写入本地 recipes_user_created,所以本地存储上下文必须准备好。
第二,分类不是写死在添加页里,而是来自菜谱数据源。这样自建菜谱和内置菜谱使用同一套分类体系,后续在“我的菜谱”或详情页显示时不会出现分类口径不一致。
五、图片选择:PhotoViewPicker 加数量上限
添加页允许用户选择菜品图,但限制最多 5 张:
private async pickCoverImages(): Promise<void> {
  if (this.coverImages.length >= this.maxCoverImageCount) {
    promptAction.showToast({ message: '最多选择5张图片' });
    return;
  }
  try {
    const options = new photoAccessHelper.PhotoSelectOptions();
    options.MIMEType = photoAccessHelper.PhotoViewMIMETypes.IMAGE_TYPE;
    options.maxSelectNumber = this.maxCoverImageCount - this.coverImages.length;
    const picker = new photoAccessHelper.PhotoViewPicker();
    const result = await picker.select(options);
    if (result.photoUris.length > 0) {
      const merged = this.coverImages.slice();
      result.photoUris.forEach((uri: string) => {
        if (merged.length < this.maxCoverImageCount && merged.indexOf(uri) < 0) {
          merged.push(uri);
        }
      });
      this.coverImages = merged;
      promptAction.showToast({ message: `已选择${this.coverImages.length}/${this.maxCoverImageCount}张` });
    }
  } catch (_) {
    promptAction.showToast({ message: '未能打开相册' });
  }
}
这段代码没有把相册选择和保存逻辑混在一起。图片阶段只维护 coverImages: string[],保存时原样进入 SaveRecipePayload.coverImages。
页面上也给出明确提示:未选择图片时使用无图占位。这样添加菜谱不强制用户必须先挑图,降低了记录一条菜谱的成本。
六、基础输入:TextInput 复用 InputBlock
菜品名称、描述、时长、适用人数使用同一个 Builder:
@Builder
private InputBlock(label: string, value: string, placeholder: string, onChange: (value: string) => void) {
  Column({ space: 8 }) {
    Text(label)
      .fontSize(16)
      .fontWeight(FontWeight.Bold)
      .fontColor($r('app.color.text_primary'))
    TextInput({ text: value, placeholder })
      .height(44)
      .backgroundColor($r('app.color.app_bg'))
      .borderRadius(12)
      .onChange((text: string) => onChange(text))
  }
  .width('100%')
  .padding(16)
  .backgroundColor($r('app.color.card_bg'))
  .borderRadius(14)
}
复用这个 Builder 的好处是表单卡片样式一致,输入事件也统一落到外部传入的 onChange。页面调用时只需要关注字段本身:
this.InputBlock('菜品名称', this.title, '输入菜名', (value: string) => this.title = value)
this.InputBlock('菜品描述', this.description, '一句话描述口味', (value: string) => this.description = value)
this.InputBlock('烹饪时长', this.durationText, '分钟', (value: string) => this.durationText = value)
this.InputBlock('适用人数', this.serving, '如 2-3人', (value: string) => this.serving = value)
七、分类和难度:结构化选择比自由文本更稳
分类使用 Flex 渲染标签:
Flex({ wrap: FlexWrap.Wrap }) {
  ForEach(this.categories, (category: Category) => {
    Text(category.name)
      .fontSize(13)
      .fontColor(this.categoryId === category.id ? Color.White : $r('app.color.primary_orange'))
      .padding({ left: 10, right: 10, top: 7, bottom: 7 })
      .margin({ right: 8, bottom: 8 })
      .backgroundColor(this.categoryId === category.id ? $r('app.color.primary_orange') : $r('app.color.primary_orange_light'))
      .borderRadius(16)
      .onClick(() => this.categoryId = category.id)
  }, (category: Category) => category.id)
}
难度使用固定三段:
@Builder
private DifficultyButton(key: RecipeDifficulty, label: string) {
  Button(label)
    .layoutWeight(1)
    .height(40)
    .fontColor(this.difficulty === key ? Color.White : $r('app.color.primary_orange'))
    .backgroundColor(this.difficulty === key ? $r('app.color.primary_orange') : $r('app.color.primary_orange_light'))
    .onClick(() => this.difficulty = key)
}
分类和难度都不让用户随便输入字符串。分类保存 categoryId,难度保存 simple | medium | hard,这能让详情页、筛选页和列表展示持续使用可控字段。
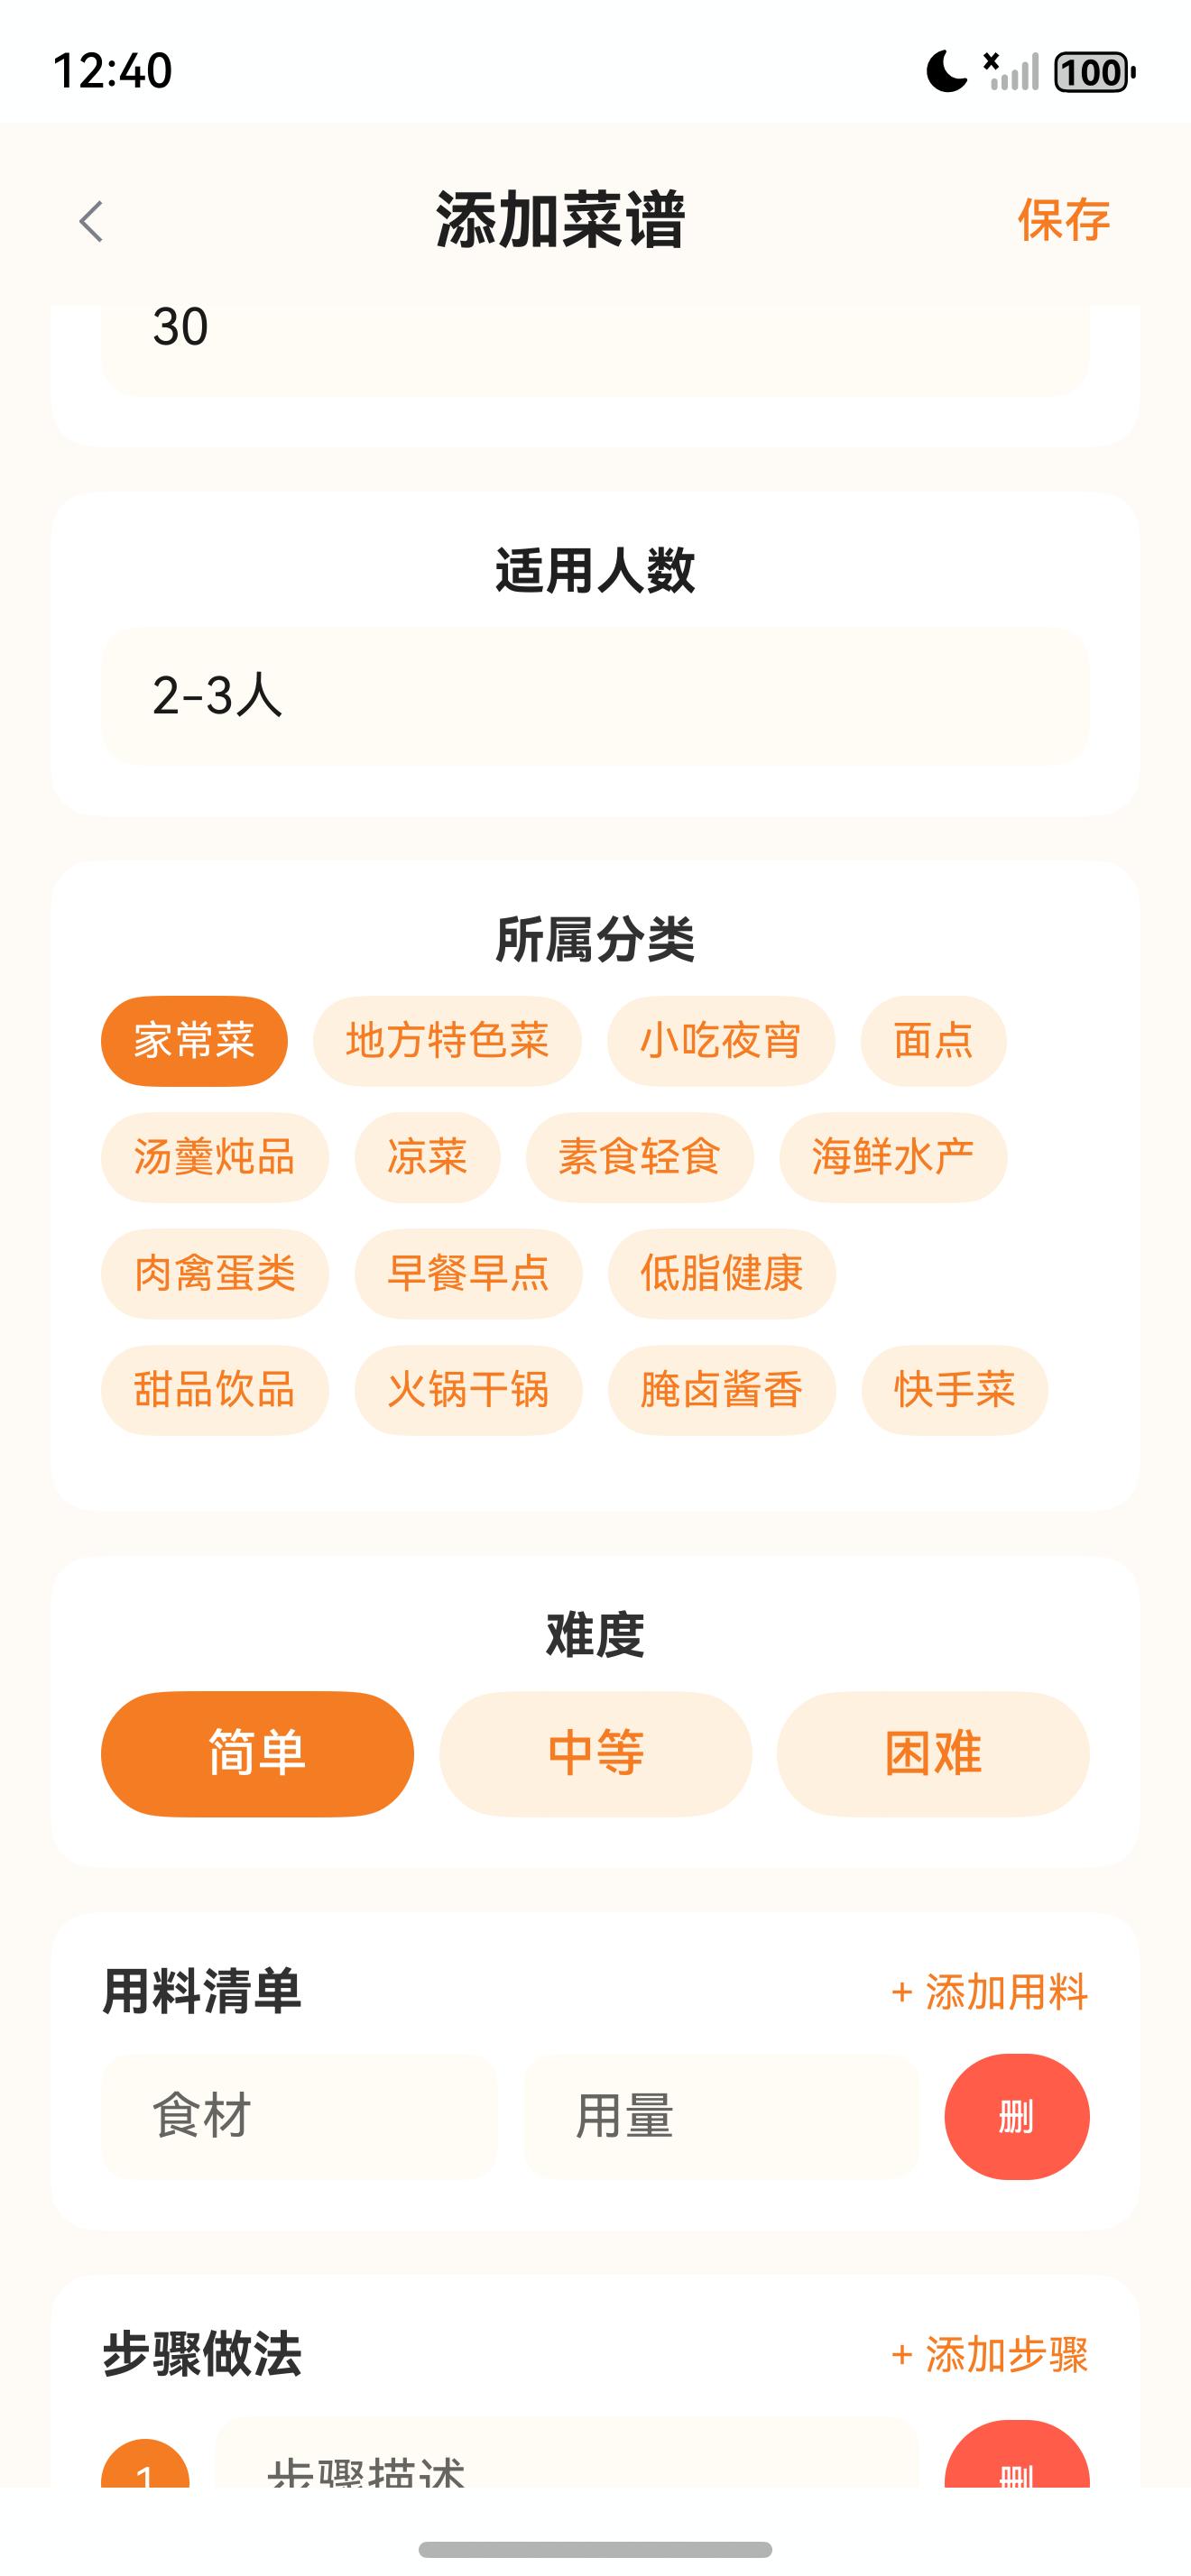
八、动态用料:数组更新不要直接改原对象
添加用料:
private addIngredient(): void {
  const item: Ingredient = { id: `ingredient_${Date.now()}`, name: '', amount: '' };
  this.ingredients = this.ingredients.concat([item]);
}
删除用料:
private removeIngredient(id: string): void {
  this.ingredients = this.ingredients.filter(item => item.id !== id);
}
更新用料名称:
private updateIngredientName(id: string, value: string): void {
  this.ingredients = this.ingredients.map((item: Ingredient): Ingredient => {
    if (item.id !== id) {
      return item;
    }
    return {
      id: item.id,
      name: value,
      amount: item.amount,
      treatment: item.treatment
    };
  });
}
这些方法都返回新数组,而不是直接修改原数组里的对象。ArkUI 状态更新更容易被感知,表单渲染也更稳定。
九、动态步骤:删除后重新整理 order
步骤和用料不同,步骤有顺序。添加步骤时使用当前长度生成 order:
private addStep(): void {
  const order = this.steps.length + 1;
  const step: RecipeStep = { id: `step_${Date.now()}`, order, content: '' };
  this.steps = this.steps.concat([step]);
}
删除步骤后会重排顺序:
private removeStep(id: string): void {
  this.steps = this.steps.filter(item => item.id !== id).map((item: RecipeStep, index: number): RecipeStep => {
    return {
      id: item.id,
      order: index + 1,
      content: item.content,
      image: item.image
    };
  });
}
这一步很重要。如果删除第 2 步后不重排,页面可能出现 1、3、4 这样的跳号,详情页渲染时也会显得不完整。当前实现把顺序修正放在删除动作里,让保存后的 RecipeStep[] 始终是连续步骤。
十、保存校验:先过滤有效用料和步骤
保存前会先过滤有效输入:
const validIngredients = this.ingredients.filter(item => item.name.trim().length > 0 && item.amount.trim().length > 0);
const validSteps = this.steps.filter(item => item.content.trim().length > 0);
const duration = Number(this.durationText);
随后依次校验:
if (this.title.trim().length === 0) {
  promptAction.showToast({ message: '菜品名称必填' });
  return;
}
if (!duration || duration <= 0) {
  promptAction.showToast({ message: '烹饪时长需为正整数' });
  return;
}
if (validIngredients.length === 0) {
  promptAction.showToast({ message: '至少添加1条用料' });
  return;
}
if (validSteps.length === 0) {
  promptAction.showToast({ message: '至少添加1条步骤' });
  return;
}
这里的校验顺序贴近用户修正路径:先确认菜名,再确认时长,再确认用料和步骤。每个失败点都有 toast 提示,不会静默失败。
十一、SaveRecipePayload:页面和服务层的交接对象
保存时页面传给服务层的是 SaveRecipePayload:
export interface SaveRecipePayload {
  title: string;
  description: string;
  categoryId: string;
  coverImages: string[];
  durationMinutes: number;
  difficulty: RecipeDifficulty;
  serving: string;
  ingredients: Ingredient[];
  steps: RecipeStep[];
}
页面只传“用户输入后的业务字段”,不传 id、createdAt、updatedAt、source、difficultyText 这类派生字段。派生字段应该由服务层统一生成,避免页面和服务层各自拼一套规则。
十二、saveRecipe:写入 userCreated 菜谱库
服务层生成 Recipe:
async saveRecipe(payload: SaveRecipePayload): Promise<RecipeDetailData> {
  const now = Date.now();
  const recipe: Recipe = {
    id: `user_${now}`,
    title: payload.title.trim(),
    description: payload.description.trim(),
    categoryId: payload.categoryId,
    categoryName: recipeDataSource.loadCategories().find(item => item.id === payload.categoryId)?.name ?? '自建菜谱',
    coverImages: payload.coverImages,
    durationMinutes: payload.durationMinutes,
    difficulty: payload.difficulty,
    difficultyText: payload.difficulty === 'hard' ? '困难' : payload.difficulty === 'medium' ? '中等' : '简单',
    serving: payload.serving,
    ingredients: payload.ingredients,
    steps: payload.steps,
    tips: [],
    viewCount: 0,
    source: 'userCreated',
    tags: ['自建菜谱'],
    createdAt: now,
    updatedAt: now
  };
然后写入本地:
const raw = localStoreAdapter.loadString('recipes_user_created');
const current: Recipe[] = raw ? JSON.parse(raw) as Recipe[] : [];
current.push(recipe);
localStoreAdapter.saveString('recipes_user_created', JSON.stringify(current));
return (await this.getRecipeDetail(recipe.id)) as RecipeDetailData;
自建菜谱没有进入 rawfile,而是写到 recipes_user_created。这符合单机应用的边界:内置数据稳定保留,用户数据通过 Preferences 单独保存。
十三、保存后跳转:直接进入详情页验收
页面保存成功后不会停在添加页:
const detail = await recipeService.saveRecipe({
  title: this.title,
  description: this.description || '这是一道记录在本地的私房菜。',
  categoryId: this.categoryId,
  coverImages: this.coverImages,
  durationMinutes: duration,
  difficulty: this.difficulty,
  serving: this.serving,
  ingredients: validIngredients,
  steps: validSteps
});
promptAction.showToast({ message: '菜谱已保存' });
router.replaceUrl({ url: AppRoutes.DETAIL, params: { recipeId: detail.recipe.id } });
这里使用 replaceUrl,而不是 pushUrl。保存完成后,当前表单页已经完成使命,直接替换成详情页更符合用户预期。用户看到详情页,也能立即验证标题、用料、步骤、时长和图片是否保存成功。
十四、运行与验收
本篇截图来自本机 HarmonyOS 模拟器真实运行页面,操作路径如下:
hdc shell aa start -a EntryAbility -b com.lesson.myapplicationsfcj
hdc shell uitest uiInput click 1135 2665
hdc shell uitest uiInput click 660 1360
hdc shell snapshot_display -f /data/local/tmp/sfcj_09_add_top.jpeg
hdc file recv /data/local/tmp/sfcj_09_add_top.jpeg .\SFCJ\screenshots\09_add_top_raw.jpeg
hdc shell uitest uiInput swipe 650 2350 650 650 800
hdc shell snapshot_display -f /data/local/tmp/sfcj_09_add_form.jpeg
hdc file recv /data/local/tmp/sfcj_09_add_form.jpeg .\SFCJ\screenshots\09_add_form_raw.jpeg
验收重点可以按下面清单检查:
- 点击“添加菜谱”能进入添加页。
- 未选择图片时页面展示无图占位提示。
- 图片最多选择 5 张,超过时提示“最多选择5张图片”。
- 菜名为空时不能保存。
- 烹饪时长必须是正整数。
- 至少保留 1 条有效用料和 1 条有效步骤。
- 删除步骤后
order连续递增。 - 保存成功后跳转详情页,菜谱来源为
userCreated。 - “我的菜谱”能看到新保存的自建菜谱。
十五、问题复盘:表单页要控制边界,不要生成半成品 Recipe
添加菜谱的关键取舍是:表单阶段不直接生成 Recipe,而是先维护页面输入状态,保存时统一过滤、校验和组装。这样页面可以允许用户短暂输入半成品内容,但服务层只接收通过校验的 SaveRecipePayload。
当前实现也有可继续增强的空间。例如图片只保存相册 URI,没有做图片压缩和复制;动态步骤暂时只有文本,没有给每一步单独选择图片;保存 JSON 时也没有做异常兜底。对于当前单机菜谱应用,这个实现已经覆盖“记录一条私房菜”的主链路,后续可以在不改变 SaveRecipePayload 主体结构的基础上继续扩展。
十六、下一篇衔接
添加菜谱解决的是“把自己的菜记录下来”。进入真正烹饪阶段后,用户还需要过程辅助。下一篇进入烹饪计时器:TimerSession 状态机如何支持开始、暂停、继续、取消,以及离开页面后如何恢复计时会话。

讨论HarmonyOS开发技术,专注于API与组件、DevEco Studio、测试、元服务和应用上架分发等。
更多推荐

 12
12 0
0- 0


 已为社区贡献28条内容

所有评论(0)