【私房菜集 HarmonyOS ArkTS 实战系列 12】设置与主题:跟随系统、浅色、深色模式如何落到应用
【私房菜集 HarmonyOS ArkTS 实战系列 12】设置与主题:跟随系统、浅色、深色模式如何落到应用
第 11 篇讲了笔记和饮食偏好,它们让应用开始保存用户个人数据。本篇继续看应用级偏好:设置页里的主题模式不是一个按钮状态,而要真正落到 HarmonyOS 应用窗口、资源颜色和下一次启动。本篇重点拆SettingsPage、SettingsService、EntryAbility和明暗资源文件之间的协作。
一、主题设置不能只改按钮颜色
设置页里有三个按钮:跟随系统、浅色、深色。表面上它只是一个分段选择器,但背后至少要解决四个问题:
- 用户选择后要立即切换当前应用色彩模式。
- 选择结果要持久化,应用重启后仍然生效。
- 页面组件要通过资源颜色响应主题,而不是写死颜色。
- 启动窗口背景也要跟主题匹配,避免启动瞬间闪白或闪黑。
如果只在 SettingsPage 里改一个 @State themeMode,页面返回后状态就丢了;如果只保存 Preferences,不调用系统色彩模式,用户也看不到即时变化。因此这一篇的主线是“设置页写入偏好,服务层应用主题,Ability 启动时恢复主题”。
二、源码对象总览
| 源码对象 | 作用 |
|---|---|
pages/SettingsPage.ets |
设置页面,展示三种主题模式、单位换算入口和关于入口。 |
services/SettingsService.ets |
读取设置、保存主题、调用 setColorMode()。 |
entryability/EntryAbility.ets |
Ability 创建时初始化本地存储并恢复已保存主题。 |
resources/base/element/color.json |
浅色资源颜色。 |
resources/dark/element/color.json |
深色资源颜色。 |
pages/UnitConverterPage.ets |
设置页中的单位换算工具入口。 |
pages/AboutPage.ets |
设置页中的版本和应用说明入口。 |
设置页不是孤立页面,它同时连接了本地偏好、系统窗口、资源体系和工具入口。
三、设置页状态:从 SettingsService 读取
SettingsPage 中的状态定义如下:
@State settings: AppSettings = {
  themeMode: 'system',
  cacheSizeText: '0MB',
  versionName: '1.0.0'
};
页面出现时读取设置,并立即应用主题:
aboutToAppear() {
  recipeService.init(getContext(this) as common.UIAbilityContext);
  this.settings = settingsService.getSettings();
  settingsService.applyThemeMode(
    getContext(this) as common.UIAbilityContext,
    this.settings.themeMode
  );
}
这里有两个细节。
第一,设置页依然调用了 recipeService.init()。虽然设置页本身不直接读取菜谱列表,但项目里多个服务共享本地存储初始化上下文,页面进入时保证上下文可用。
第二,进入设置页时再次执行 applyThemeMode()。这让设置页面本身也能基于当前保存的主题重新校准显示状态。
四、三段按钮:状态和视觉绑定
主题按钮写在一个 Row 中:
Row({ space: 8 }) {
  Button('跟随系统')
    .layoutWeight(1)
    .height(40)
    .backgroundColor(this.settings.themeMode === 'system'
      ? $r('app.color.primary_orange')
      : $r('app.color.primary_orange_light'))
    .fontColor(this.settings.themeMode === 'system'
      ? Color.White
      : $r('app.color.primary_orange'))
    .onClick(() => this.setTheme('system'))

  Button('浅色')
    .layoutWeight(1)
    .height(40)
    .backgroundColor(this.settings.themeMode === 'light'
      ? $r('app.color.primary_orange')
      : $r('app.color.primary_orange_light'))
    .fontColor(this.settings.themeMode === 'light'
      ? Color.White
      : $r('app.color.primary_orange'))
    .onClick(() => this.setTheme('light'))

  Button('深色')
    .layoutWeight(1)
    .height(40)
    .backgroundColor(this.settings.themeMode === 'dark'
      ? $r('app.color.primary_orange')
      : $r('app.color.primary_orange_light'))
    .fontColor(this.settings.themeMode === 'dark'
      ? Color.White
      : $r('app.color.primary_orange'))
    .onClick(() => this.setTheme('dark'))
}
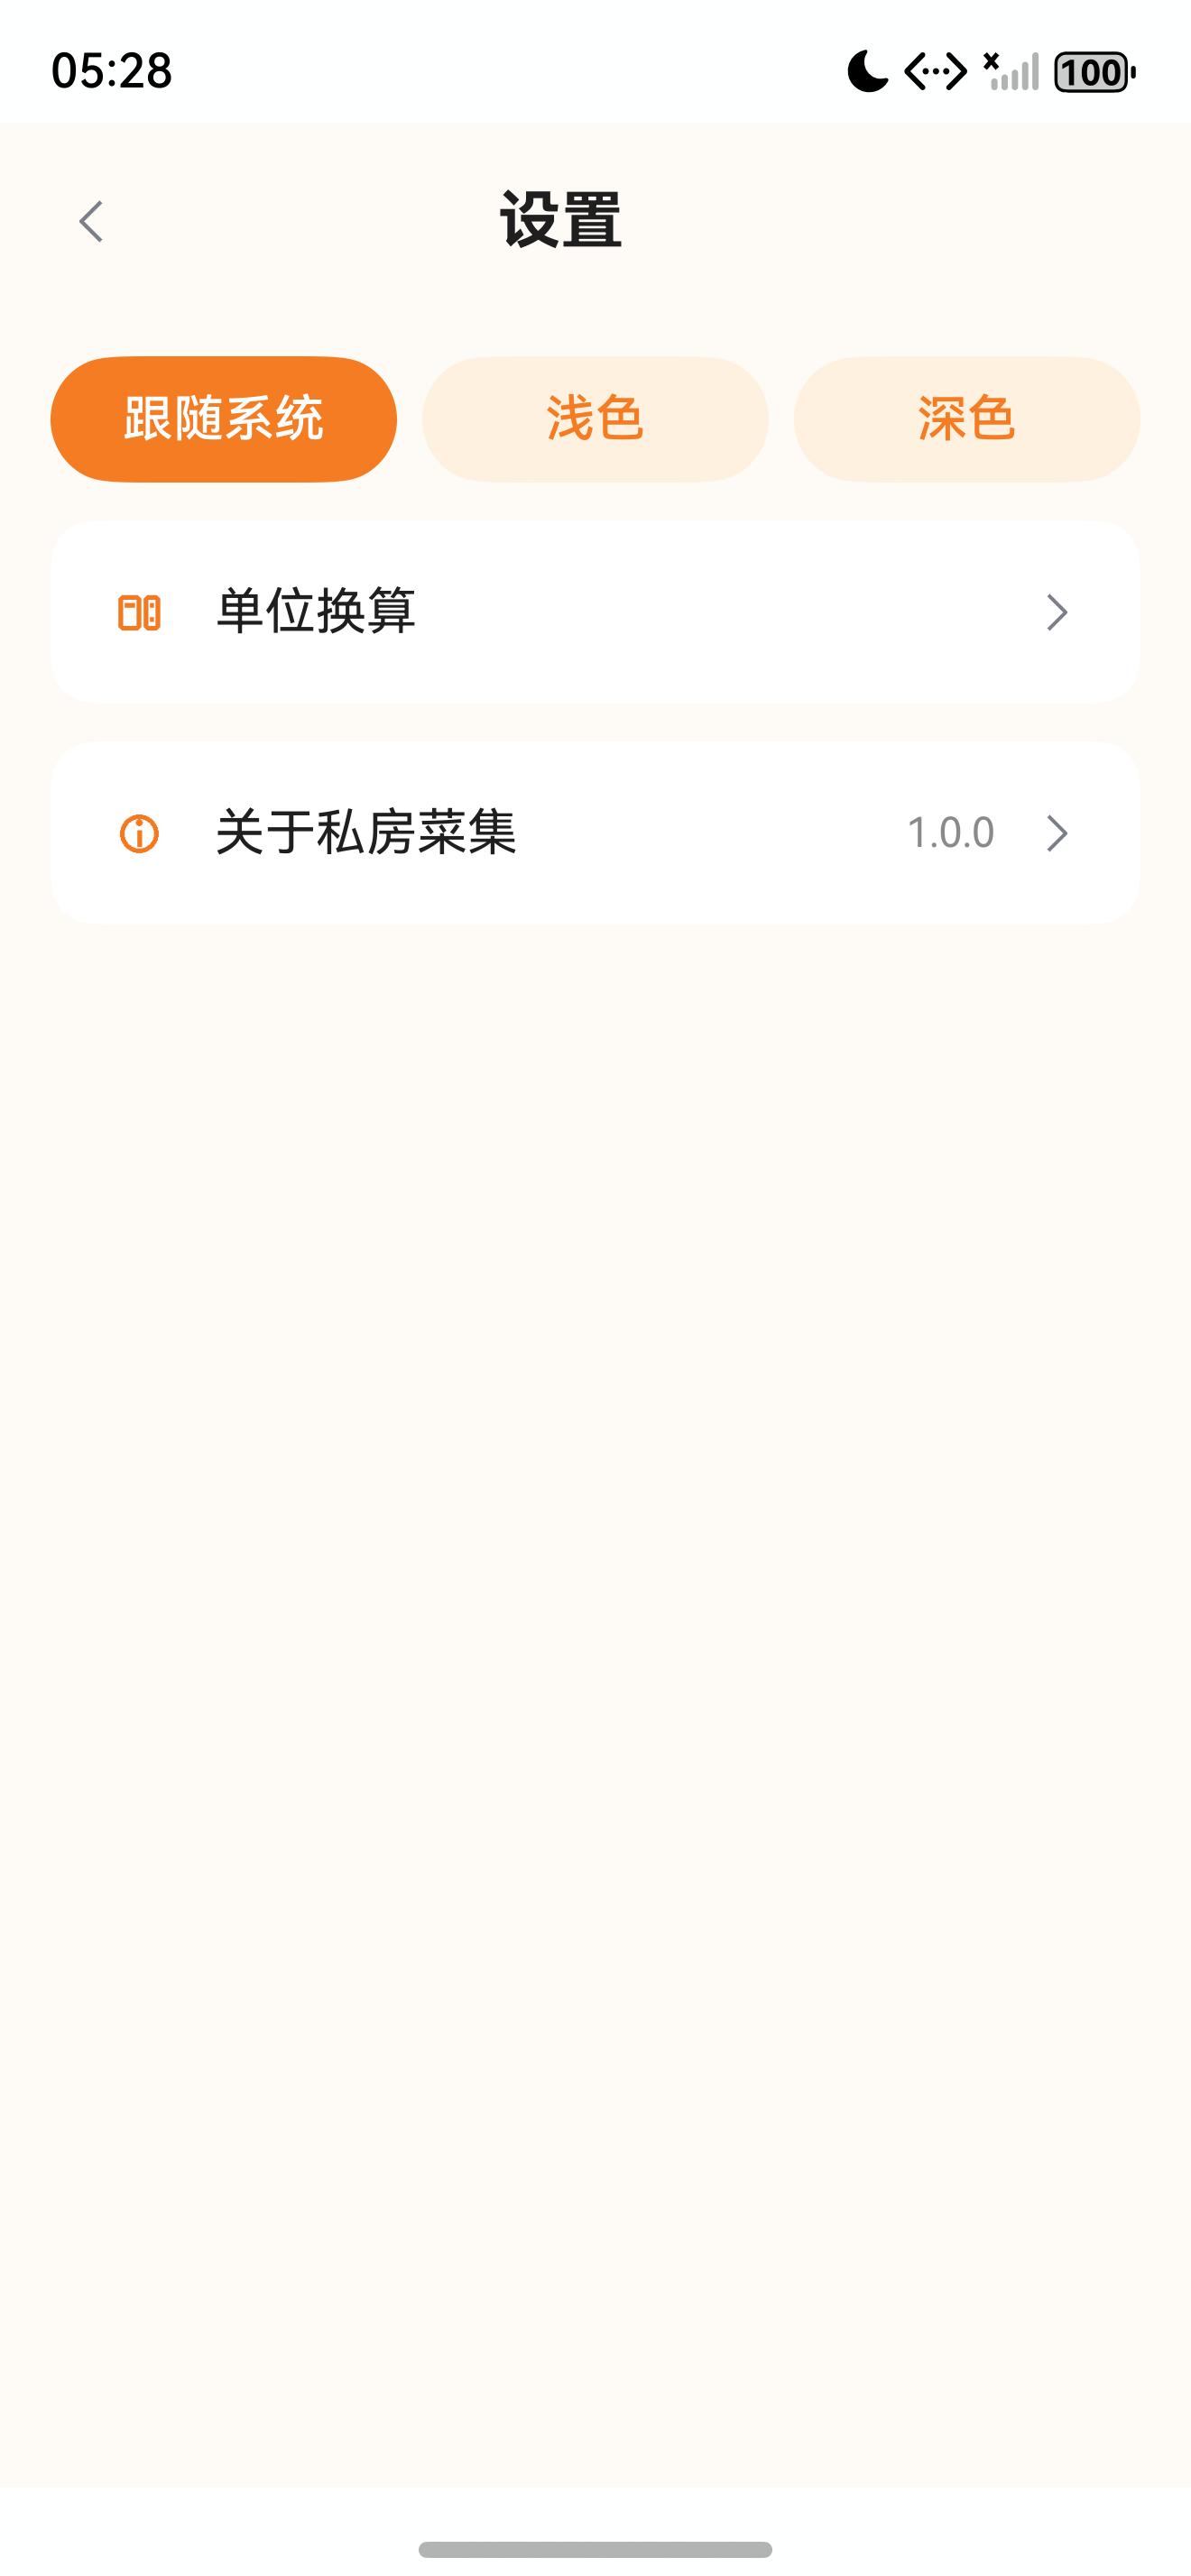
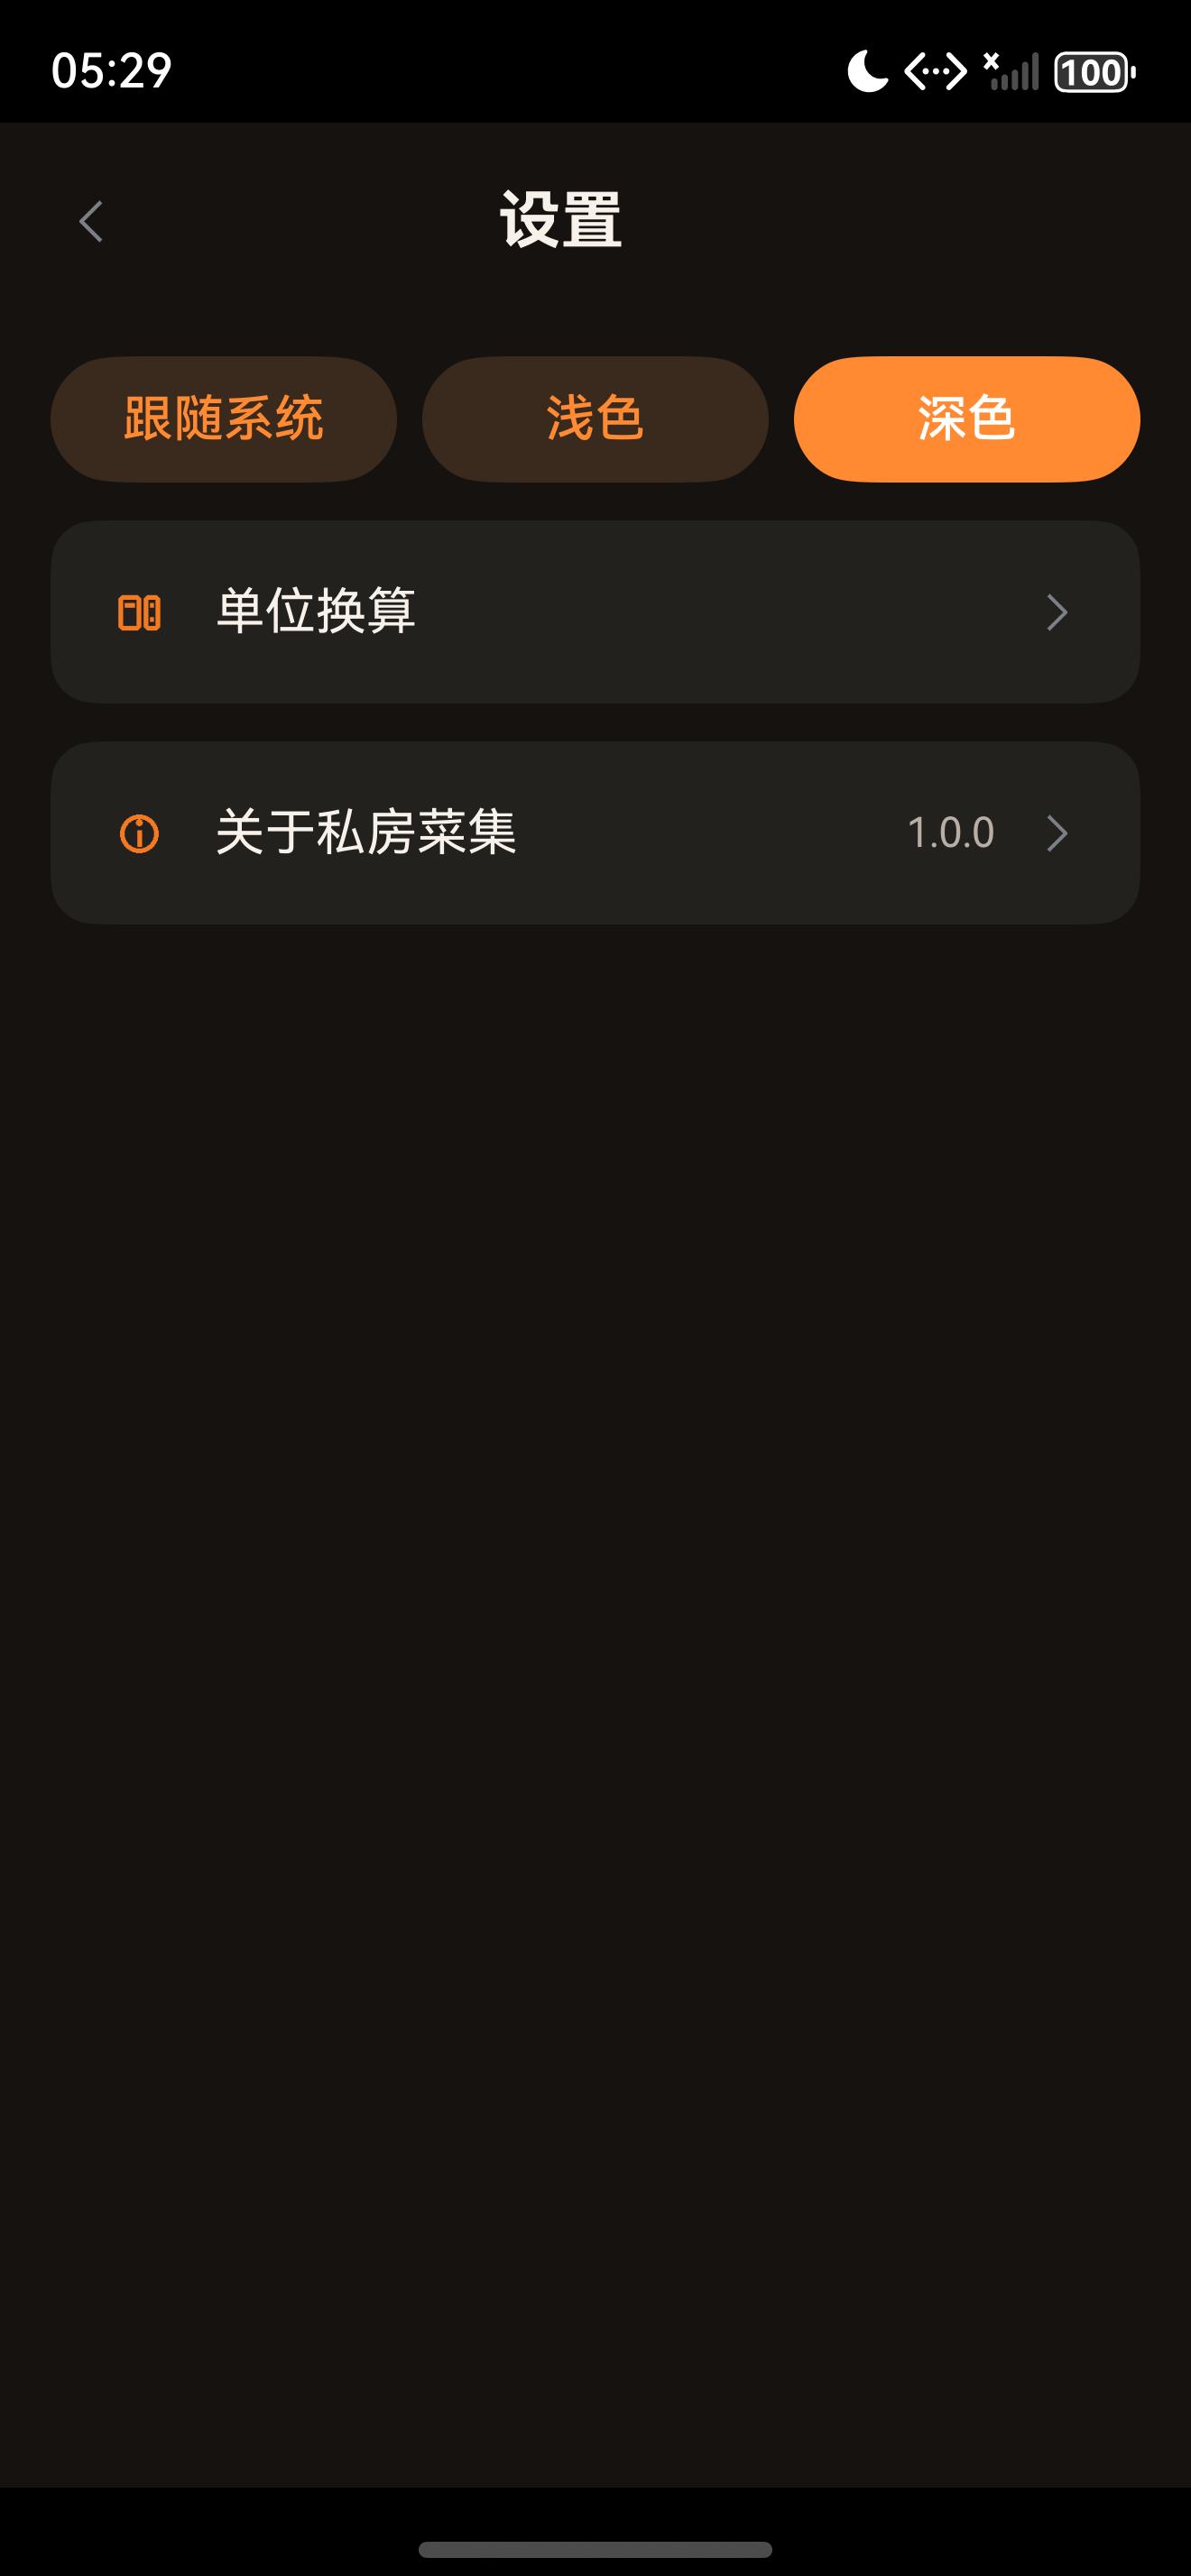
三个按钮不是普通列表项,而是互斥选择。当前选中的模式使用主橙色,未选中的模式使用浅橙背景。截图中“跟随系统”为选中态,切换到深色后“深色”按钮变成选中态。
五、点击后:先保存,再应用
点击按钮调用 setTheme():
private setTheme(mode: ThemeMode): void {
  settingsService.setThemeMode(mode, getContext(this) as common.UIAbilityContext);
  this.settings = settingsService.getSettings();
  promptAction.showToast({ message: '夜间模式已更新' });
}
这段代码完成三件事:
- 调用服务层保存主题模式。
- 传入当前
UIAbilityContext,让服务层立即应用色彩模式。 - 重新读取设置刷新按钮选中态。
页面没有直接调用系统 API,这是比较好的边界。页面只表达“用户选择了某个模式”,真正的持久化和系统调用放在 SettingsService。
六、SettingsService:把 themeMode 转成系统 ColorMode
服务层保存主题时复用第 11 篇讲过的 UserPreference:
setThemeMode(mode: ThemeMode, context?: common.UIAbilityContext): void {
  const preference = userStateRepository.getPreference();
  userStateRepository.savePreference({
    avoidedIngredients: preference.avoidedIngredients,
    avoidReminderEnabled: preference.avoidReminderEnabled,
    themeMode: mode,
    unitPreference: preference.unitPreference,
    updatedAt: preference.updatedAt
  });
  if (context) {
    this.applyThemeMode(context, mode);
  }
}
依然是局部更新、整体保存。修改 themeMode 时保留忌口和单位偏好,避免设置主题把饮食偏好覆盖掉。
真正和系统对接的是 applyThemeMode():
applyThemeMode(context: common.UIAbilityContext, mode: ThemeMode): void {
  try {
    context.getApplicationContext().setColorMode(this.toColorMode(mode));
  } catch (_) {
  }
}
转换函数如下:
private toColorMode(mode: ThemeMode): ConfigurationConstant.ColorMode {
  if (mode === 'dark') {
    return ConfigurationConstant.ColorMode.COLOR_MODE_DARK;
  }
  if (mode === 'light') {
    return ConfigurationConstant.ColorMode.COLOR_MODE_LIGHT;
  }
  return ConfigurationConstant.ColorMode.COLOR_MODE_NOT_SET;
}
system 并不是一种固定颜色,而是 COLOR_MODE_NOT_SET,交给系统当前外观决定。
七、Ability 启动时恢复主题
设置页能即时切换还不够。应用下一次启动时,需要读取已保存的模式。
EntryAbility.onCreate() 中做了这件事:
onCreate(want: Want, launchParam: AbilityConstant.LaunchParam): void {
  try {
    localStoreAdapter.init(this.context);
    settingsService.applySavedTheme(this.context);
    this.handleCardRouterWant(want);
  } catch (err) {
    hilog.error(DOMAIN, 'testTag',
      'Failed to set colorMode. Cause: %{public}s',
      JSON.stringify(err));
  }
  hilog.info(DOMAIN, 'testTag', '%{public}s', 'Ability onCreate');
}
顺序很重要:先初始化 localStoreAdapter,再读取保存的偏好并应用主题。如果本地存储上下文没有准备好,applySavedTheme() 读不到用户偏好,只能回到默认值。
SettingsService.applySavedTheme() 只是做了一层转发:
applySavedTheme(context: common.UIAbilityContext): void {
  this.applyThemeMode(context, userStateRepository.getPreference().themeMode);
}
这让启动恢复和设置页点击复用同一条转换逻辑。
八、启动窗口背景也要跟着变
主题切换时,页面内容会用资源颜色响应;但应用启动时先显示的是启动窗口。EntryAbility.onWindowStageCreate() 对这个细节做了处理:
const LIGHT_START_WINDOW_BG = '#FFF0DF';
const DARK_START_WINDOW_BG = '#151311';

onWindowStageCreate(windowStage: window.WindowStage): void {
  try {
    const themeMode = settingsService.getSettings().themeMode;
    const backgroundColor = themeMode === 'dark'
      ? DARK_START_WINDOW_BG
      : LIGHT_START_WINDOW_BG;
    windowStage.getMainWindowSync().setWindowBackgroundColor(backgroundColor);
  } catch (err) {
    hilog.error(DOMAIN, 'testTag',
      'Failed to set start window background. Cause: %{public}s',
      JSON.stringify(err));
  }

  windowStage.loadContent('pages/Index', (err) => {
    ...
  });
}
这一步解决的是启动瞬间体验。深色模式下如果启动窗口仍然是浅色,会在进入首页前闪一下亮色背景。当前代码根据保存的 themeMode 设置启动窗口背景,让启动过程也和用户偏好保持一致。
九、资源颜色:浅色和深色分目录维护
浅色资源在 resources/base/element/color.json 中,例如:
{
  "name": "app_bg",
  "value": "#FFFBF5"
},
{
  "name": "card_bg",
  "value": "#FFFFFF"
},
{
  "name": "text_primary",
  "value": "#1F1F1F"
}
深色资源在 resources/dark/element/color.json 中:
{
  "name": "app_bg",
  "value": "#151311"
},
{
  "name": "card_bg",
  "value": "#24211E"
},
{
  "name": "text_primary",
  "value": "#F7F1EA"
}
页面里大量使用 $r('app.color.xxx'):
.backgroundColor($r('app.color.app_bg'))
.fontColor($r('app.color.text_primary'))
.backgroundColor($r('app.color.card_bg'))
这正是主题能落地的原因。页面不关心当前是浅色还是深色,只声明使用语义颜色;系统切换模式后,资源解析到不同目录下的颜色值。
十、设置页中的工具入口
除了主题模式,设置页还保留了两个有效入口:
this.SettingRow(
  '单位换算',
  '',
  () => router.pushUrl({ url: AppRoutes.UNIT_CONVERTER }),
  $r('app.media.ic_unit_active')
)

this.SettingRow(
  '关于私房菜集',
  this.settings.versionName,
  () => router.pushUrl({ url: AppRoutes.ABOUT }),
  $r('app.media.ic_about_active')
)
UnitConverterPage 做了一个轻量换算:
Text(`${Number(this.gram || '0')} 克 ≈ ${(Number(this.gram || '0') / 15).toFixed(1)} 汤勺`)
Text('常用估算:1汤勺约15g,1茶勺约5g,1杯约240ml。')
这类工具页适合放在设置或“我的”里,因为它不属于某一道菜的详情,但属于烹饪过程中的辅助能力。
十一、为什么部分设置入口被注释
SettingsPage 中还能看到一些被注释的入口:
// this.SettingRow('数据备份与恢复', '', () => router.pushUrl({ url: AppRoutes.BACKUP_RESTORE }), ...)
// this.SettingRow('导出所有菜谱数据', '', () => promptAction.showToast({ message: '导出入口已准备,本版使用本地 JSON 数据' }), ...)
// this.SettingRow('清空缓存', this.settings.cacheSizeText, () => { ... })
// this.SettingRow('隐私与数据', '', () => router.pushUrl({ url: AppRoutes.PRIVACY_DATA }), ...)
这说明工程里已经预留了更完整的设置项,但当前可交付版本只打开了单位换算和关于页。对系列文章来说,这是一个适合复盘的点:规划中的能力可以先完成底层结构,再根据完成度决定是否开放入口。
十二、运行验证
本次运行截图来自本地 HarmonyOS 模拟器,验证路径为“我的 -> 设置 -> 深色”。
验证结果如下:
- 设置页默认读取
themeMode并高亮当前模式。 - 点击“深色”后页面背景、卡片、文字和按钮立即切换。
- 主题模式保存到
UserPreference.themeMode。 EntryAbility.onCreate()启动时会调用applySavedTheme()。- 启动窗口背景根据深色/浅色模式设置。
- 页面使用资源颜色,能响应
resources/base和resources/dark两套颜色。
十三、问题复盘
设置与主题链路已经跑通,但还有几个可以继续改进的点。
第一,设置页里的三个主题按钮可以抽成一个小组件,减少重复的背景色和字体色判断。
第二,applyThemeMode() 的 catch 当前为空。发布版本可以保留静默失败,但开发阶段建议至少记录日志,便于定位模拟器或系统 API 兼容问题。
第三,缓存、隐私、备份等入口已经有注释代码和部分页面,后续如果开放,需要补齐真实数据读写和验收逻辑,避免只展示空页面。
十四、小结
这一篇的关键不是设置页长什么样,而是主题模式如何完整流转:
SettingsPage 点击
  -> SettingsService.setThemeMode()
  -> UserStateRepository.savePreference()
  -> ApplicationContext.setColorMode()
  -> 资源颜色自动切换
  -> EntryAbility 下次启动恢复
下一篇进入分享与桌面卡片,看看菜谱内容如何从 App 内页面扩展到相册和桌面入口。

讨论HarmonyOS开发技术,专注于API与组件、DevEco Studio、测试、元服务和应用上架分发等。
更多推荐


 9
9 0
0- 0


 已为社区贡献28条内容

所有评论(0)