# 随机数生成器深度解析:表单校验、输入验证与历史记录管理
·
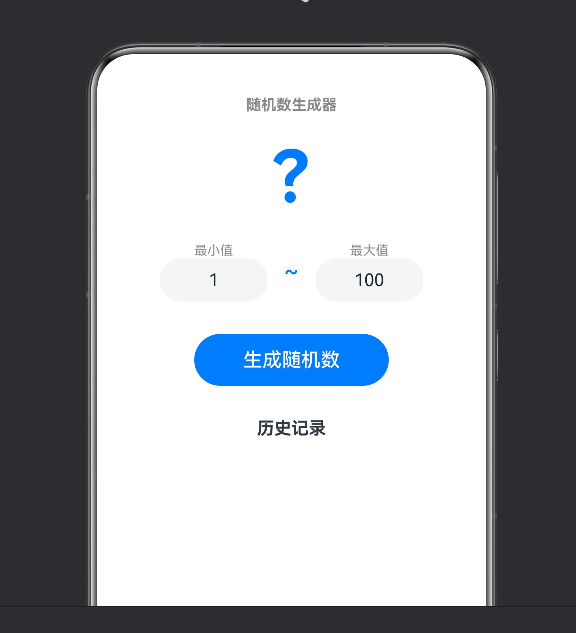
一、引言
随机数生成器是一个看似简单但内涵丰富的应用。它在用户交互层面需要解决三个核心问题:
- 输入验证:用户输入的"最小值"和"最大值"必须是有效数字,且最小值必须小于最大值
- 随机数生成:基于
Math.random()生成指定范围内的随机整数 - 历史记录管理:保留最近生成的随机数,使用 FIFO(先进先出)队列
本文将深入 ArkTS 中的输入验证模式、Random API 的使用细节,以及列表历史记录的状态管理策略。
二、完整源码
// index5.ets
@Entry
@Component
struct Index5 {
  @State minValue: string = '1';
  @State maxValue: string = '100';
  @State result: string = '?';
  @State history: number[] = [];

  generateRandom(): void {
    const min = parseInt(this.minValue);
    const max = parseInt(this.maxValue);
    if (isNaN(min) || isNaN(max) || min >= max) {
      this.result = '无效范围';
      return;
    }
    const rand = Math.floor(Math.random() * (max - min + 1)) + min;
    this.result = rand.toString();
    this.history.push(rand);
    if (this.history.length > 20) {
      this.history.shift();
    }
  }

  build() {
    Column() {
      Text('随机数生成器')
        .fontSize(28).fontWeight(FontWeight.Bold)
        .margin({ top: 40, bottom: 10 })

      Text(this.result)
        .fontSize(64).fontWeight(FontWeight.Bold)
        .fontColor('#007AFF').height(80).margin({ bottom: 20 })

      Row() {
        Column() {
          Text('最小值').fontSize(12).fontColor('#8E8E93')
          TextInput({ placeholder: '1', text: this.minValue })
            .width(100).height(40).fontSize(16)
            .textAlign(TextAlign.Center)
            .onChange((v: string) => { this.minValue = v; })
        }
        Text('~').fontSize(24).fontColor('#007AFF')
          .margin({ left: 15, right: 15 })
        Column() {
          Text('最大值').fontSize(12).fontColor('#8E8E93')
          TextInput({ placeholder: '100', text: this.maxValue })
            .width(100).height(40).fontSize(16)
            .textAlign(TextAlign.Center)
            .onChange((v: string) => { this.maxValue = v; })
        }
      }
      .margin({ bottom: 30 })

      Button('生成随机数')
        .width(180).height(48).fontSize(18)
        .backgroundColor('#007AFF').borderRadius(24)
        .onClick(() => { this.generateRandom(); })

      Text('历史记录').fontSize(16).fontWeight(FontWeight.Bold)
        .margin({ top: 30, bottom: 10 })

      List({ space: 6 }) {
        ForEach(this.history, (item: number, index: number) => {
          ListItem() {
            Row() {
              Text('#' + (index + 1))
                .fontSize(14).fontColor('#8E8E93')
                .margin({ right: 10 })
              Text(item.toString())
                .fontSize(18).fontWeight(FontWeight.Bold)
                .fontColor('#007AFF')
            }
            .width('80%').padding({ top: 6, bottom: 6 })
            .justifyContent(FlexAlign.Center)
          }
        }, (item: number) => item.toString())
      }
      .width('100%').layoutWeight(1)
    }
    .width('100%').height('100%')
    .justifyContent(FlexAlign.Start)
    .alignItems(HorizontalAlign.Center)
  }
}
三、表单输入与验证
3.1 TextInput 的三种输入模式
// ① 无绑定 — 只读占位
TextInput({ placeholder: '请输??...' })

// ② 单向绑定 — 初始值
TextInput({ placeholder: '1', text: '1' })

// ③ 双向绑定(当前使用)— 初始值 + 数据反馈
TextInput({ placeholder: '1', text: this.minValue })
  .onChange((v: string) => { this.minValue = v; })
3.2 TextInput 的类型限制
TextInput({ text: this.minValue })
  .type(InputType.Number)        // 限制为数字键盘
  .maxLength(6)                  // 限制最大 6 位数字
InputType.Number 在移动端弹出数字键盘,限制用户只能输入数字和负号/小数点。
3.3 textAlign(TextAlign.Center) 居中
TextInput({ text: this.minValue })
  .textAlign(TextAlign.Center)
输入框文本水平居中。在区间输入场景中,居中对齐让值与标签对应更直观。
四、parseInt 与输入验证
4.1 parseInt 用法
const min = parseInt(this.minValue);
const max = parseInt(this.maxValue);
parseInt(string) 将字符串解析为整数:
parseInt('42')        → 42
parseInt('42.5')      → 42      // 丢弃小数部分
parseInt('  42  ')    → 42      // 自动 trim 空格
parseInt('')          → NaN     // 空字符串
parseInt('abc')       → NaN     // 非数字开头
parseInt('12abc')     → 12      // 解析到第一个非数字字符为止
4.2 isNaN 检查
if (isNaN(min) || isNaN(max) || min >= max) {
  this.result = '无效范围';
  return;
}
isNaN(value) 判断传入值是否为 NaN(Not a Number):
isNaN(42)        → false   // ✅ 是有效数字
isNaN(NaN)       → true    // ❌ 不是数字
isNaN('abc')     → true    // ❌ 'abc' 转数字为 NaN
isNaN('')        → false   // ⚠️ 特殊:'' 转数字为 0
isNaN(undefined) → true    // ❌
isNaN(null)      → false   // ⚠️ null 转数字为 0
完整验证链:
| 输入场景 | parseInt 结果 |
isNaN |
min >= max |
最终结果 |
|---|---|---|---|---|
| 1 ~ 100 | 1, 100 | false, false | false | ✅ 正常生成 |
| 空 ~ 100 | NaN, 100 | true | - | ❌ “无效范围” |
| 1 ~ 空 | 1, NaN | true | - | ❌ “无效范围” |
| abc ~ 100 | NaN, 100 | true | - | ❌ “无效范围” |
| 100 ~ 1 | 100, 1 | false, false | true | ❌ “无效范围” |
| 50 ~ 50 | 50, 50 | false, false | true | ❌ “无效范围”(≥ 而非 >) |
4.3 为什么用 >= 而非 >?
min >= max // 最小值等于最大值时同样报错
当 min === max 时,区间只有一个值,每次都生成同一个数字,失去随机意义。用 >= 同时覆盖了"相等"和"倒挂"两种不合理输入。
五、Math.random 生成随机数
5.1 公式推导
const rand = Math.floor(Math.random() * (max - min + 1)) + min;
逐层拆解:
| 表达式 | 值(min=1, max=100) | 含义 |
|---|---|---|
Math.random() |
0.0 ~ 0.999... |
生成 [0, 1) 浮点数 |
× (max - min + 1) |
× 100 |
映射到 [0, 100) |
Math.floor(...) |
0 ~ 99 |
向下取整为整数 |
+ min |
+ 1 |
偏移到 [1, 100] |
测试验证:
| Math.random() | 计算过程 | 结果 |
|---|---|---|
| 0.0 | floor(0 × 100) + 1 = 1 |
1 ✅ |
| 0.5 | floor(0.5 × 100) + 1 = 51 |
51 ✅ |
| 0.999… | floor(0.999 × 100) + 1 = 100 |
100 ✅ |
5.2 Math 对象常用方法
Math.random()        // [0, 1) 随机浮点数
Math.floor(n)       // 向下取整:3.9 → 3, -3.1 → -4
Math.ceil(n)        // 向上取整:3.1 → 4, -3.9 → -3
Math.round(n)       // 四舍五入:3.5 → 4, 3.4 → 3
Math.max(a, b)      // 最大值
Math.min(a, b)      // 最小值
Math.abs(n)         // 绝对值
Math.pow(a, b)      // a 的 b 次幂
Math.sqrt(n)        // 平方根
5.3 随机数的均匀性
Math.random() 使用伪随机数生成器(PRNG),对于大多数应用(游戏、抽奖、模拟)足够均匀。
// 测试 100000 次生成的分布
function testDistribution(): void {
  const counts: number[] = new Array(10).fill(0);
  for (let i = 0; i < 100000; i++) {
    const rand = Math.floor(Math.random() * 10);  // 0-9
    counts[rand]++;
  }
  console.info(JSON.stringify(counts));
  // 理论上每个约 10000,实际 9900~10100 之间
}
六、历史记录 FIFO 管理
6.1 push + shift 队列
this.history.push(rand);              // 追加到末尾
if (this.history.length > 20) {
  this.history.shift();               // 移除最旧的(开头)
}
FIFO 队列行为:
初始: []
push(42) → [42]
push(17) → [42, 17]
push(99) → [42, 17, 99]
... 到 21 个元素时:
push(3)  → [42, 17, 99, ..., 3]  (21 个元素)
shift()  → [17, 99, ..., 3]      (移除 42)
数组作为队列的性能:
| 操作 | 时间复杂度 | 说明 |
|---|---|---|
push |
O(1) | 末尾追加,高效 |
shift |
O(n) | 开头移除,需要重新索引所有元素 |
pop |
O(1) | 末尾移除,高效 |
对于最多 20 条记录,O(n) 的 shift 性能无感知。但对于百万级数据,应该使用环形缓冲区替代。
6.2 环形缓冲区实现(高性能方案)
class CircularBuffer {
  private buffer: number[] = new Array(20);
  private head: number = 0;
  private count: number = 0;

  push(value: number): void {
    this.buffer[(this.head + this.count) % 20] = value;
    if (this.count < 20) this.count++;
    else this.head = (this.head + 1) % 20;
  }

  toArray(): number[] {
    const result: number[] = [];
    for (let i = 0; i < this.count; i++) {
      result.push(this.buffer[(this.head + i) % 20]);
    }
    return result;
  }
}
七、TextInput 作为数字输入的最佳实践
7.1 数字输入框配置
TextInput({ placeholder: '100', text: this.maxValue })
  .width(100).height(40).fontSize(16)
  .textAlign(TextAlign.Center)
  .type(InputType.Number)         // 数字键盘
  .maxLength(6)                   // 最多 6 位(999999)
  .placeholderFont({ size: 16, color: '#C7C7CC' })
  .onChange((v: string) => { this.maxValue = v; })
7.2 实时校验
当前代码只有在点击"生成随机数"时才校验。可以改进为实时校验:
@State minError: string = '';
@State maxError: string = '';

validateInput(): void {
  const min = parseInt(this.minValue);
  const max = parseInt(this.maxValue);

  if (isNaN(min)) this.minError = '请输入有效数字';
  else this.minError = '';

  if (isNaN(max)) this.maxError = '请输入有效数字';
  else this.maxError = '';

  if (!isNaN(min) && !isNaN(max) && min >= max) {
    this.minError = '最小值须小于最大值';
    this.maxError = '最大值须大于最小值';
  }
}

// 在 onChange 中调用
TextInput({ text: this.minValue })
  .onChange((v: string) => {
    this.minValue = v;
    this.validateInput();  // 每输入一个字符都校验
  })
八、UI 视觉分析
8.1 结果显示区域
Text(this.result)
  .fontSize(64).fontWeight(FontWeight.Bold)
  .fontColor('#007AFF').height(80).margin({ bottom: 20 })
设计意图:超大字号(64fp)展示生成的随机数,蓝色加粗,让用户一眼看到结果。
8.2 输入区间布局
Row() {
  Column() {
    Text('最小值').fontSize(12).fontColor('#8E8E93')
    TextInput({ text: this.minValue })
  }
  Text('~').fontSize(24).fontColor('#007AFF')
    .margin({ left: 15, right: 15 })
  Column() {
    Text('最大值').fontSize(12).fontColor('#8E8E93')
    TextInput({ text: this.maxValue })
  }
}
标签在上、输入在下的布局(两个 Column 包裹),分隔符 ~ 居中,配色与主题呼应。
8.3 按钮设计
Button('生成随机数')
  .width(180).height(48).fontSize(18)
  .backgroundColor('#007AFF').borderRadius(24)
- 宽度 180vp(足够容纳 5 个中文)
- 圆角 24(高度 48 的一半,两头半圆)
- 蓝色主色调,与"生成"操作的正向语义匹配
九、错误状态的视觉反馈
9.1 当前实现
if (isNaN(min) || isNaN(max) || min >= max) {
  this.result = '无效范围';
  return;
}
错误时结果区文字变为红色提示。但更好的做法是用颜色区分:
Text(this.result)
  .fontSize(64)
  .fontColor(this.result === '无效范围' ? '#FF3B30' : '#007AFF')
  // 错误时为红色,正常为蓝色
9.2 完整的错误视觉方案
// 使用对象映射错误状态
private isError(): boolean {
  return this.result === '无效范围';
}

build() {
  // ...
  Text(this.result)
    .fontSize(this.isError() ? 36 : 64)    // 错误时字小一些
    .fontColor(this.isError() ? '#FF3B30' : '#007AFF')
  // ...
  Button('生成随机数')
    .backgroundColor(this.isError() ? '#FF9500' : '#007AFF')
    // 错误时按钮变橙色,提示用户修正
}
十、扩展功能
10.1 随机小数
// 生成 [min, max) 的随机浮点数
generateRandomFloat(): void {
  const min = parseFloat(this.minValue);
  const max = parseFloat(this.maxValue);
  if (isNaN(min) || isNaN(max) || min >= max) {
    this.result = '无效范围';
    return;
  }
  const rand = Math.random() * (max - min) + min;
  this.result = rand.toFixed(2);  // 保留两位小数
}
10.2 不重复随机数
generateUniqueRandom(): void {
  const min = parseInt(this.minValue);
  const max = parseInt(this.maxValue);
  const range = max - min + 1;

  // 如果历史已包含所有可能值,清空
  if (this.history.length >= range) {
    this.history = [];
  }

  let rand: number;
  do {
    rand = Math.floor(Math.random() * range) + min;
  } while (this.history.includes(rand));

  this.result = rand.toString();
  this.history.push(rand);
}
10.3 清空历史
Button('清空历史')
  .width(120).height(36).fontSize(14)
  .backgroundColor('#8E8E93').borderRadius(18)
  .onClick(() => { this.history = []; })
十一、总结
通过随机数生成器应用,我们深入掌握了:
| 知识点 | 重要程度 | 关键代码 |
|---|---|---|
parseInt 字符串转整数 |
必须掌握 | parseInt(this.minValue) |
isNaN 数字有效性检查 |
必须掌握 | isNaN(min) |
Math.random() 随机数 |
基础 API | Math.floor(Math.random() * n) |
| 随机整数公式 | 核心技能 | floor(random * (max-min+1)) + min |
| 输入验证链式检查 | 防御编程 | `isNaN |
FIFO 队列 push + shift |
常用模式 | push(rand) + 超限 shift() |
TextInput 数字配置 |
常用技能 | .type(InputType.Number).maxLength(6) |
| 占位文本与默认值 | 用户体验 | placeholder: '100' |
随机数生成器展示了一个很重要的设计模式:先验证,再操作。这在所有涉及用户输入的应用中都是必须遵循的原则。

讨论HarmonyOS开发技术,专注于API与组件、DevEco Studio、测试、元服务和应用上架分发等。
更多推荐

 3
3 0
0- 0


 已为社区贡献11条内容

所有评论(0)