35 拍照流程实现:CaptureSession 管理与照片保存
35 拍照流程实现:CaptureSession 管理与照片保存
前言
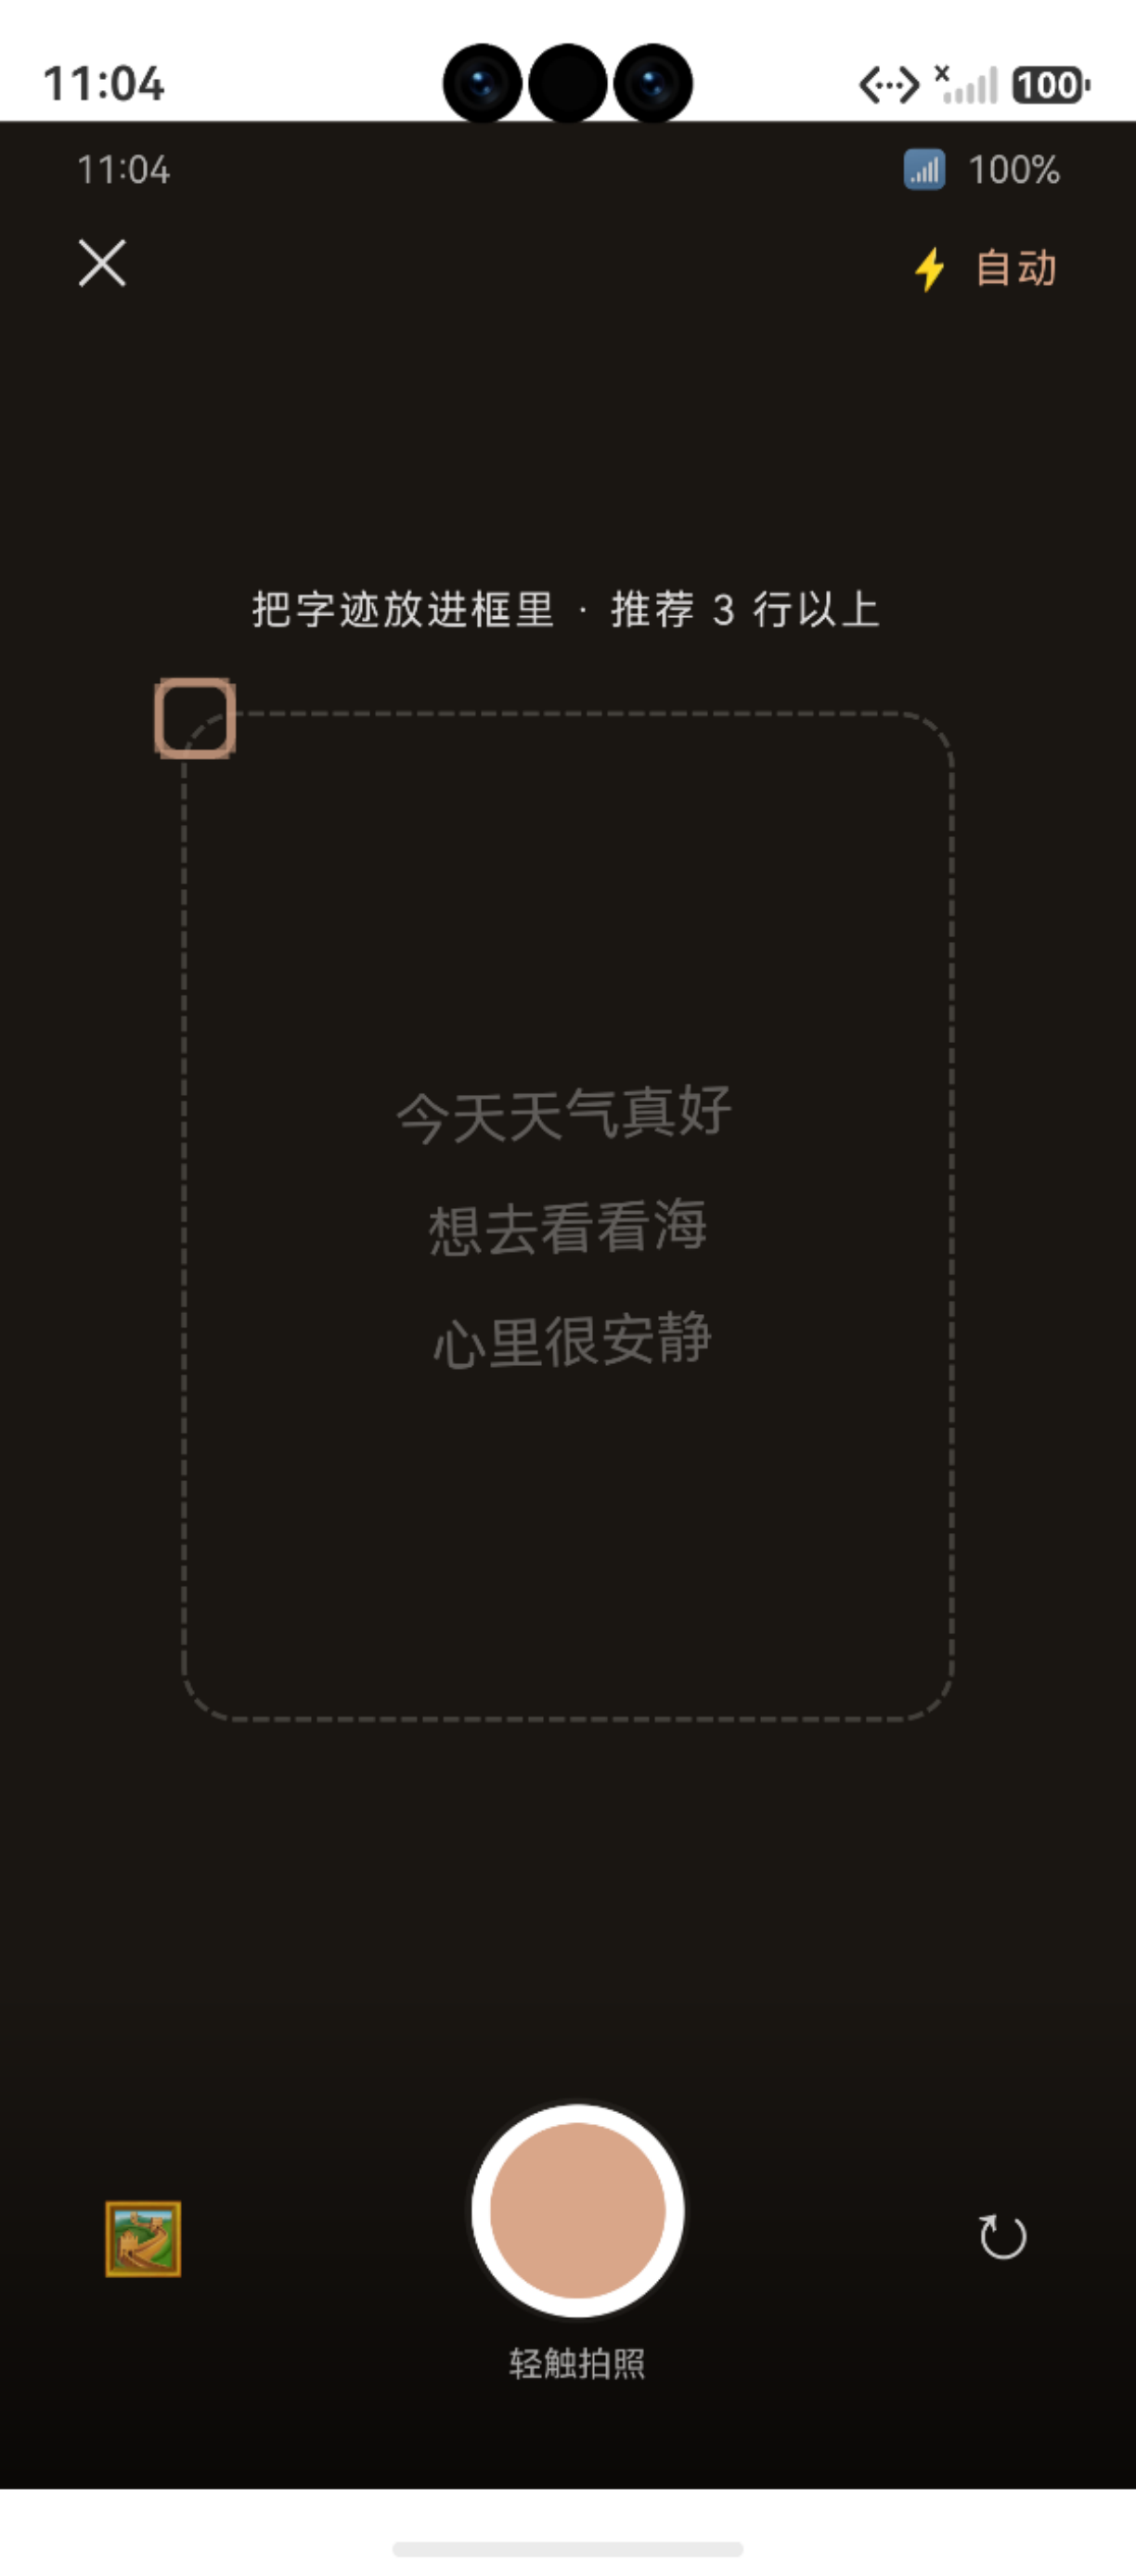
图:35 拍照流程实现:CaptureSession 管理与照片保存 运行效果截图(HarmonyOS NEXT)
在 Camera Kit 中,拍照流程的核心是 CaptureSession——它负责管理相机输入、预览输出和拍照输出之间的数据流转。一个完整的拍照流程包括:创建会话、配置输入输出、触发拍照和保存照片文件。
本文以 “鹿鹿·笔迹心理分析” [CapturePage.ets](file:///Users/fiona/Downloads/bijixinli/harmony-app/entry/src/main/ets/pages/CapturePage.ets) 中的拍照方法 takePhoto() 为主线,深入解析 CaptureSession 的配置和照片文件的保存流程。
鸿蒙官方·拍照开发指南:developer.huawei.com
项目源码仓库:harmony-app GitHub
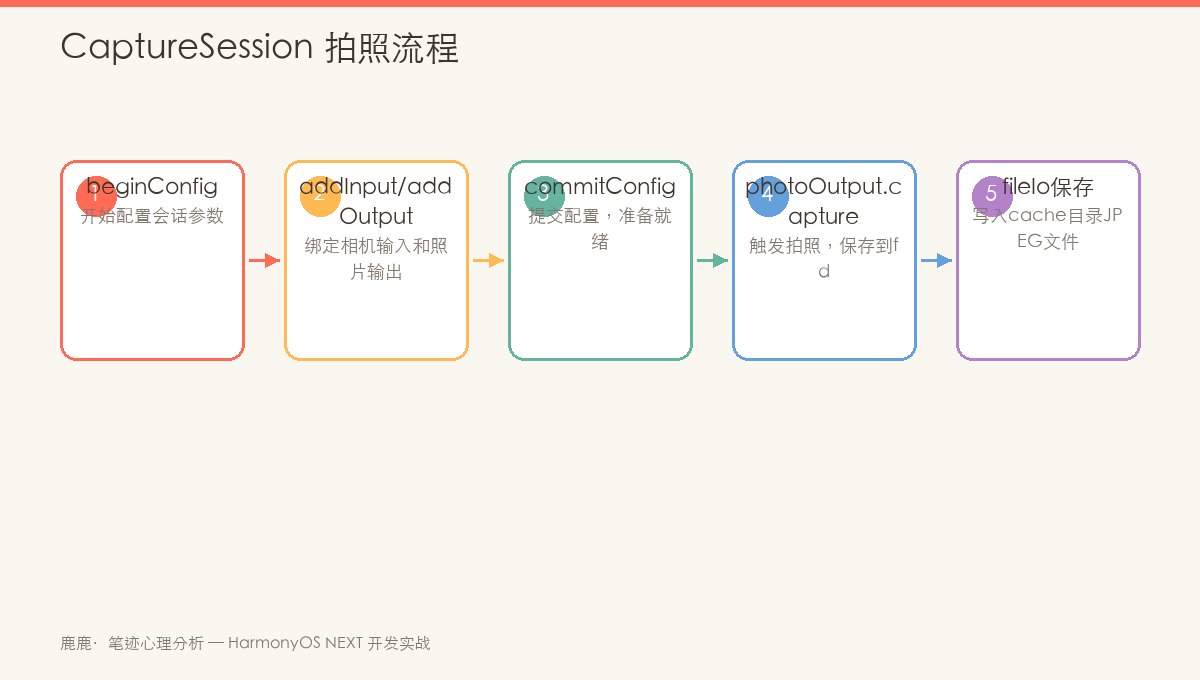
图:CaptureSession 管理——从创建会话到照片保存的完整数据流
一、拍照的完整流程
1.1 七大步骤
private async takePhoto() {
  this.isCapturing = true

  try {
    // Step 1: 获取相机管理器
    const cameraManager = camera.getCameraManager(getContext(this) as common.Context)

    // Step 2: 获取相机设备
    const cameras = cameraManager.getSupportedCameras()
    const cameraDevice = cameras[0]  // 使用第一个可用相机(通常为后置)

    // Step 3: 创建 CaptureSession
    const session = cameraManager.createCaptureSession(cameraDevice)
    await session.beginConfig()

    // Step 4: 添加相机输入
    const cameraInput = cameraManager.createCameraInput(cameraDevice)
    await cameraInput.open()
    session.addInput(cameraInput)

    // Step 5: 添加预览输出(surface)
    const previewSurface = this.surfaceId
    const previewOutput = cameraManager.createPreviewOutput(previewSurface)
    session.addOutput(previewOutput)

    // Step 6: 添加拍照输出
    const photoOutput = cameraManager.createPhotoOutput()
    session.addOutput(photoOutput)

    // 提交配置
    await session.commitConfig()
    await session.start()

    // Step 7: 拍照 + 保存文件
    const photoFile = fs.openSync(
      `/data/storage/el2/base/cache/capture_${Date.now()}.jpg`,
      fs.OpenMode.READ_WRITE | fs.OpenMode.CREATE
    )
    await photoOutput.capture(photoFile.fd)
    this.previewPath = photoFile.path
    this.hasPreview = true
    fs.closeSync(photoFile)

  } catch (error) {
    hilog.error(0x0000, TAG, '拍照失败: %s', JSON.stringify(error))
  } finally {
    this.isCapturing = false
  }
}
1.2 项目中的调试简化
// 项目当前使用调试模式(模拟拍照)
private async takePhoto() {
  this.isCapturing = true
  try {
    await new Promise<void>(resolve => setTimeout(resolve, 500))
    this.previewPath = `/data/storage/el2/base/cache/capture_${Date.now()}.jpg`
    this.hasPreview = true
  } finally {
    this.isCapturing = false
  }
}
提示:完整拍照流程依赖真机的相机硬件支持。在开发调试阶段,使用 setTimeout 模拟延时是一个常见的降级策略。
二、CaptureSession 的关键概念
2.1 beginConfig / commitConfig
CaptureSession 采用配置-提交模式:
| 方法 | 说明 | 调用时机 |
|---|---|---|
beginConfig() |
开始配置会话 | 添加/移除输出之前 |
addInput(input) |
添加相机输入源 | beginConfig 之后 |
addOutput(output) |
添加输出目标 | beginConfig 之后 |
removeOutput(output) |
移除输出 | beginConfig 之后 |
commitConfig() |
提交配置 | 所有配置完成后 |
start() |
启动会话 | commitConfig 之后 |
stop() |
停止会话 | 暂停预览时 |
release() |
释放会话 | 页面销毁时 |
2.2 配置的生命周期
beginConfig()
  ↓ 会话进入"可配置"状态
addInput() / addOutput()
  ↓ 可以多次添加
commitConfig()
  ↓ 配置锁定
start()
  ↓ 会话开始运行,拍照/预览
stop()
  ↓ 会话暂停
beginConfig() (再次)
  ↓ 切换摄像头等需要重新配置
commitConfig()
  ↓
start()
  ↓
release()
  ↓ 会话销毁
三、输入与输出
3.1 CameraInput(相机输入)
// 创建相机输入
const cameraInput = cameraManager.createCameraInput(cameraDevice)
await cameraInput.open()

// 添加到会话
session.addInput(cameraInput)

// 关闭
cameraInput.close()
3.2 PreviewOutput(预览输出)
// 预览需要 XComponent 提供的 surfaceId
// 在 UI 中定义取景 Surface
// XComponent({ id: 'cameraXComponent', type: 'surface', ... })

// 创建预览输出
const previewOutput = cameraManager.createPreviewOutput(previewSurface)
session.addOutput(previewOutput)
3.3 PhotoOutput(拍照输出)
// 创建拍照输出
const photoOutput = cameraManager.createPhotoOutput()
session.addOutput(photoOutput)

// 捕获照片 → 保存到文件
await photoOutput.capture(fileDescriptor)
四、照片文件保存
4.1 使用 fileIo 保存
import { fileIo as fs } from '@kit.CoreFileKit'

// 打开/创建文件
const photoFile = fs.openSync(
  `/data/storage/el2/base/cache/capture_${Date.now()}.jpg`,
  fs.OpenMode.READ_WRITE | fs.OpenMode.CREATE
)

// 拍照(写入文件)
await photoOutput.capture(photoFile.fd)

// 关闭文件
fs.closeSync(photoFile)
4.2 文件名策略
// 生成唯一文件名
const timestamp = Date.now()
const fileName = `capture_${timestamp}.jpg`
// 示例:capture_1712345678900.jpg

const filePath = `/data/storage/el2/base/cache/${fileName}`
4.3 文件保存位置
| 路径 | 说明 | 用途 |
|---|---|---|
/data/storage/el2/base/cache/ |
应用缓存目录 | 临时文件 |
/data/storage/el2/base/files/ |
应用文件目录 | 持久文件 |
| 相册 | photoAccessHelper | 持久+用户可见 |
五、拍照后处理
5.1 确认使用
// 确认使用照片
private confirmPhoto() {
  // 保存照片路径到全局状态
  AppStorage.setOrCreate<string>('capture_image_path', this.previewPath)

  // 跳转分析页面
  this.getUIContext().getRouter().pushUrl({
    url: 'pages/AnalyzingPage',
    params: { imagePath: this.previewPath }
  })
}
5.2 重拍
private retake() {
  this.hasPreview = false
  this.previewPath = ''
  // 相机重新进入取景模式
}
5.3 完整交互流程
用户进入 CapturePage
  ↓
取景模式(实时预览)
  ↓
用户点击拍照按钮
  ↓
isCapturing = true(拍照中...)
  ↓
photoOutput.capture(fd) → 文件保存
  ↓
hasPreview = true(进入预览模式)
  ↓
┌── 用户选择"确认使用" → 跳转 AnalyzingPage
└── 用户选择"重拍" → hasPreview = false,回到取景
六、拍照页面的 UI 结构
6.1 分屏状态
CapturePage 的 UI 分为两种状态:
build() {
  Column() {
    // 状态栏
    // 顶部栏(关闭 + 自动模式)

    if (!this.hasPreview) {
      // 取景模式:提示文字 + 取景框 + 四角引导 + 示例文字
    } else {
      // 预览模式:显示拍摄预览
    }

    if (!this.hasPreview) {
      // 底部操作区:相册按钮 + 拍照按钮 + 翻转按钮
    } else {
      // 底部操作区:重拍按钮 + 确认使用按钮
    }
  }
}
6.2 取景框设计
取景框使用 Stack + 虚线框 + 四角引导 + 示例文字的组合:
Stack() {
  Column()
    .width(260).height(340)
    .border({
      width: 2, color: 'rgba(247,243,236,0.7)',
      style: BorderStyle.Dashed
    })
    .borderRadius(18)
    .scale({ x: this.pulseScale, y: this.pulseScale })
    .opacity(this.pulseOpacity)

  // 四角引导框
  // 左上角 border: { left: 3, top: 3 }, radius: { topLeft: 8 }
  // 右上角 border: { right: 3, top: 3 }, radius: { topRight: 8 }
  // ...

  Text('今天天气真好\n想去看看海\n心里很安静')
    .fontSize(18).fontFamily(AppFonts.SERIF)
    .fontColor('rgba(255,255,255,0.55)')
    .rotate({ angle: -2 })
}
七、拍照流程调试
7.1 日志追踪
hilog.info(0x0000, TAG, '拍照成功: %{public}s', this.previewPath)
hilog.error(0x0000, TAG, '拍照失败: %{public}s', JSON.stringify(error))
7.2 常见错误
| 错误信息 | 原因 | 解决 |
|---|---|---|
session.beginConfig() 失败 |
Session 已被 release | 检查资源释放时序 |
cameraInput.open() 超时 |
相机设备被占用 | 确保之前会话已 release |
photoOutput.capture() 失败 |
fd 无效 | 检查文件路径和权限 |
| surfaceId 无效 | XComponent 未就绪 | 使用 onReady 回调后再获取 |
八、拍照性能优化
8.1 拍照按钮防重复
@State isCapturing: boolean = false

// 拍照时禁用按钮
Circle()
  .fill(AppColors.WARM)
  .opacity(this.isCapturing ? 0.5 : 1.0)
  .enabled(!this.isCapturing)
  .onClick(() => this.takePhoto())
8.2 异步处理
所有相机操作都是异步的,使用 async/await 管理流程:
private async takePhoto() {
  this.isCapturing = true
  try {
    // await 每一步操作
    await this.initCamera()
    await session.beginConfig()
    // ...
  } finally {
    this.isCapturing = false
  }
}
总结
本文深入解析了鸿蒙 Camera Kit 的拍照流程实现:
- CaptureSession 配置:
beginConfig → addInput/addOutput → commitConfig → start - 输入输出管理:CameraInput(输入) + PreviewOutput(预览) + PhotoOutput(拍照)
- 照片保存:
photoOutput.capture(fd)+ fileIo 文件操作 - 流程控制:取景模式 ↔ 预览模式,拍照状态
isCapturing防重复 - UI 交互:两段式底部栏(拍照态 vs 预览态)+ 确认/重拍
下一篇文章将介绍 图像预处理与裁剪——拍照后的图片处理流程。
如果这篇文章对你有帮助,欢迎点赞👍、收藏⭐、关注🔔,你的支持是我持续创作的动力!
参考资源:
- Camera Kit 拍照开发指南
- CaptureSession 管理
- [CapturePage 项目源码](file:///Users/fiona/Downloads/bijixinli/harmony-app/entry/src/main/ets/pages/CapturePage.ets)
- fileIo 文件读写
- @kit.CoreFileKit 模块
- PhotoOutput.capture API
- HarmonyOS 开发文档

讨论HarmonyOS开发技术,专注于API与组件、DevEco Studio、测试、元服务和应用上架分发等。
更多推荐

 2
2 0
0- 0


 已为社区贡献5条内容

所有评论(0)