HarmonyOS APP实战-基于Image Kit的图像处理APP - 第3篇:图片解码与元数据获取
HarmonyOS APP实战-基于Image Kit的图像处理APP - 第3篇:图片解码与信息提取
1. 开篇
在第2篇中,我们完成了图片选择与预览功能,使用PhotoViewPicker让用户能够从相册中选择图片,并通过Image组件在页面上展示缩略图。依赖注入的图片文件URI存储在全局状态中,供后续功能调用。
现在,我们要让APP真正理解“这是一张什么样的图片”。用户选中图片后,APP应当能够解析出图片的宽高、文件大小、格式等基本信息,并在详情界面清晰展示。这些元数据是后续实现缩放、裁剪、滤镜等所有编辑操作的基础——比如裁剪前要知道图片有多宽多高,缩放时要按比例计算。
本篇的核心任务:通过image.createImageSource解码图片,使用ImageSource.createFromFile获取文件句柄,提取ImageInfo中的宽高和格式信息。我们将创建ImageInfoModel数据模型统一管理这些信息,设计ImageSourceUtils工具类封装解码逻辑,最后在DecodeDemoPage页面中展示解码结果。
2. 核心实现
2.1 基础配置:导入模块与权限声明
在entry/src/main/ets/下创建model和utils目录。首先在model目录中定义ImageInfoModel类,用于结构化存储图片解码后获取的信息。
// entry/src/main/ets/model/ImageInfoModel.ets

/**
 * 图片信息数据模型
 * 封装从ImageInfo、文件大小等来源获取的图片元数据
 */
export class ImageInfoModel {
  /** 图片宽度,单位为像素 */
  width: number = 0;
  /** 图片高度,单位为像素 */
  height: number = 0;
  /** 图片文件大小,单位为字节 */
  size: number = 0;
  /** 图片格式,如 'image/jpeg'、'image/png' */
  format: string = '';
  /** 图片文件路径,用于标识来源 */
  uri: string = '';

  /**
   * 将ImageInfo对象的属性映射到模型
   * @param imageInfo 从ImageKit获取的ImageInfo对象
   * @param fileSize 文件字节大小
   * @param fileUri 文件路径
   */
  public fromImageInfo(imageInfo: image.ImageInfo, fileSize: number, fileUri: string): void {
    this.width = imageInfo.size.width;
    this.height = imageInfo.size.height;
    this.size = fileSize;
    this.format = imageInfo.mimeType || '';
    this.uri = fileUri;
  }

  /**
   * 格式化文件大小显示,保留一位小数
   * @returns 带单位的字符串,如 1.5 MB / 800 KB
   */
  public getFormattedSize(): string {
    if (this.size < 1024) {
      return this.size + ' B';
    } else if (this.size < 1024 * 1024) {
      return (this.size / 1024).toFixed(1) + ' KB';
    } else {
      return (this.size / (1024 * 1024)).toFixed(1) + ' MB';
    }
  }

  /**
   * 获取格式显示名称
   * @returns 如 'JPEG'、'PNG'
   */
  public getFormatName(): string {
    const mime = this.format;
    if (mime.includes('jpeg') || mime.includes('jpg')) {
      return 'JPEG';
    } else if (mime.includes('png')) {
      return 'PNG';
    } else if (mime.includes('bmp')) {
      return 'BMP';
    } else if (mime.includes('webp')) {
      return 'WebP';
    }
    return '未知格式';
  }
}
关键点说明:
ImageInfo对象包含size(PixelMapSize类型,有width和height)和mimeType(MIME类型字符串)。直接从文档API可知,image.ImageInfo的定义中包含这两个字段。- 我们额外将文件大小和URI也纳入模型,方便UI一次性展示。
- 格式化大小和格式名称的方法便于前端直接绑定,避免业务逻辑分散在页面中。
2.2 核心逻辑:ImageSourceUtils工具类
ImageSourceUtils负责调用原始API解码图片。这里使用fs模块获取文件大小,用image.createImageSource创建解码源。
// entry/src/main/ets/utils/ImageSourceUtils.ets

import image from '@ohos.multimedia.image';
import fs from '@ohos.file.fs';
import { ImageInfoModel } from '../model/ImageInfoModel';

/**
 * 图片源工具类
 * 封装图片解码和元数据提取的通用方法
 */
export class ImageSourceUtils {
  private imageSource: image.ImageSource | null = null;

  /**
   * 根据文件路径创建ImageSource并获取图片信息
   * @param fileUri 文件的URI,格式为 file://xxx 或 /xxx
   * @returns 包含宽高、格式、大小的ImageInfoModel
   */
  public async getImageInfo(fileUri: string): Promise<ImageInfoModel> {
    try {
      // 1. 通过文件路径创建ImageSource
      //    使用ImageSource.createFromFile直接传入文件路径
      this.imageSource = image.ImageSource.createFromFile(fileUri);

      // 2. 获取ImageInfo对象
      //    getImageInfo()返回Promise<ImageInfo>
      const imageInfo: image.ImageInfo = await this.imageSource.getImageInfo();

      // 3. 获取文件大小
      //    使用fs.statSync获取文件属性
      const stat = fs.statSync(fileUri);
      const fileSize = stat.size;

      // 4. 填充模型
      const model = new ImageInfoModel();
      model.fromImageInfo(imageInfo, fileSize, fileUri);

      return model;
    } catch (error) {
      console.error(`[ImageSourceUtils] 获取图片信息失败: ${error.message}`);
      throw error;
    } finally {
      // 5. 及时释放ImageSource占用的资源
      this.release();
    }
  }

  /**
   * 释放ImageSource资源
   * 解引用对象让垃圾回收机制回收
   */
  public release(): void {
    if (this.imageSource) {
      this.imageSource = null;
    }
  }
}
关键点说明:
ImageSource.createFromFile(fileUri)是官方文档中明确提供的静态工厂方法,返回ImageSource实例。传参为字符串形式文件路径。getImageInfo()异步返回ImageInfo,内部封装了图片解码的第一步(读取文件头获取元数据)。注意此方法不会解码完整像素数据,性能开销较小。- 使用
fs.statSync获取文件大小,注意该方法同步执行,不用担心阻塞UI线程。 finally块中释放资源,避免后续处理时持有无用的ImageSource实例导致内存泄漏。
2.3 完整页面:DecodeDemoPage
将所有代码整合到DecodeDemoPage页面中。该页面展示用户选中的图片,并显示解码后的完整信息。
// entry/src/main/ets/pages/DecodeDemoPage.ets

import image from '@ohos.multimedia.image';
import { ImageInfoModel } from '../model/ImageInfoModel';
import { ImageSourceUtils } from '../utils/ImageSourceUtils';
import router from '@ohos.router';

@Entry
@Component
struct DecodeDemoPage {
  // 接收跳转前页面的图片URI
  @State imageUri: string = '';
  @State imageInfo: ImageInfoModel = new ImageInfoModel();
  @State isLoading: boolean = false;
  @State errorMsg: string = '';

  /**
   * 页面加载时获取传入的uri参数
   */
  aboutToAppear(): void {
    const params = router.getParams() as Record<string, Object>;
    if (params && params['uri']) {
      this.imageUri = params['uri'] as string;
      this.decodeImage();
    }
  }

  /**
   * 调用ImageSourceUtils执行解码和获取信息
   */
  private async decodeImage(): Promise<void> {
    if (!this.imageUri) {
      this.errorMsg = '未指定图片文件';
      return;
    }

    this.isLoading = true;
    this.errorMsg = '';

    try {
      const utils = new ImageSourceUtils();
      const info = await utils.getImageInfo(this.imageUri);
      this.imageInfo = info;
    } catch (error) {
      this.errorMsg = `解码失败: ${error.message}`;
      console.error(`[DecodeDemoPage] decodeImage error: ${error}`);
    } finally {
      this.isLoading = false;
    }
  }

  build() {
    Column() {
      // 标题栏
      Text('图片信息详情')
        .fontSize(20)
        .fontWeight(FontWeight.Bold)
        .width('100%')
        .textAlign(TextAlign.Center)
        .margin({ top: 16, bottom: 8 })

      // 图片预览区域
      if (this.imageUri) {
        Image(this.imageUri)
          .width('100%')
          .height(200)
          .objectFit(ImageFit.Contain)
          .margin({ bottom: 12 })
      }

      // 加载状态
      if (this.isLoading) {
        LoadingProgress()
          .width(32)
          .height(32)
          .margin(24)
      }

      // 错误提示
      if (this.errorMsg) {
        Text(this.errorMsg)
          .fontColor(Color.Red)
          .fontSize(14)
          .margin(12)
      }

      // 信息展示卡片
      if (!this.isLoading && !this.errorMsg && this.imageInfo.width > 0) {
        Column() {
          this.buildInfoRow('图片宽度', `${this.imageInfo.width} px`)
          this.buildInfoRow('图片高度', `${this.imageInfo.height} px`)
          this.buildInfoRow('文件大小', this.imageInfo.getFormattedSize())
          this.buildInfoRow('MIME类型', this.imageInfo.format)
          this.buildInfoRow('格式名称', this.imageInfo.getFormatName())
        }
        .width('90%')
        .padding(16)
        .backgroundColor(Color.White)
        .borderRadius(12)
        .shadow({ radius: 6, color: '#33000000', offsetY: 2 })
      }

      // 空状态提示
      if (!this.imageUri) {
        Text('请通过前一页选择图片')
          .fontColor('#888')
          .margin(24)
      }
    }
    .width('100%')
    .height('100%')
    .backgroundColor('#F5F5F5')
    .padding(16)
  }

  /**
   * 构建信息条目
   * @param label 标签名
   * @param value 数值
   */
  @Builder
  private buildInfoRow(label: string, value: string) {
    Row() {
      Text(label)
        .fontSize(16)
        .fontColor('#333')
        .fontWeight(FontWeight.Medium)
        .width(120)

      Text(value)
        .fontSize(16)
        .fontColor('#666')
        .width('100%')
    }
    .width('100%')
    .height(40)
    .border({ width: { bottom: 1 }, color: '#E0E0E0' })
  }
}
关键点说明:
- 页面通过
router.getParams()接收上一页传递的uri参数,确保选图功能和解码功能串联。 decodeImage方法中用异步方式调用工具类,防止阻塞UI线程,显示LoadingProgress加载动画。- 使用
buildInfoRow构建器批量生成信息行,保持代码简洁。 - 页面中对
imageInfo.width > 0的判读确保解码成功后才渲染卡片,否则只显示错误或空状态。
3. 运行验证
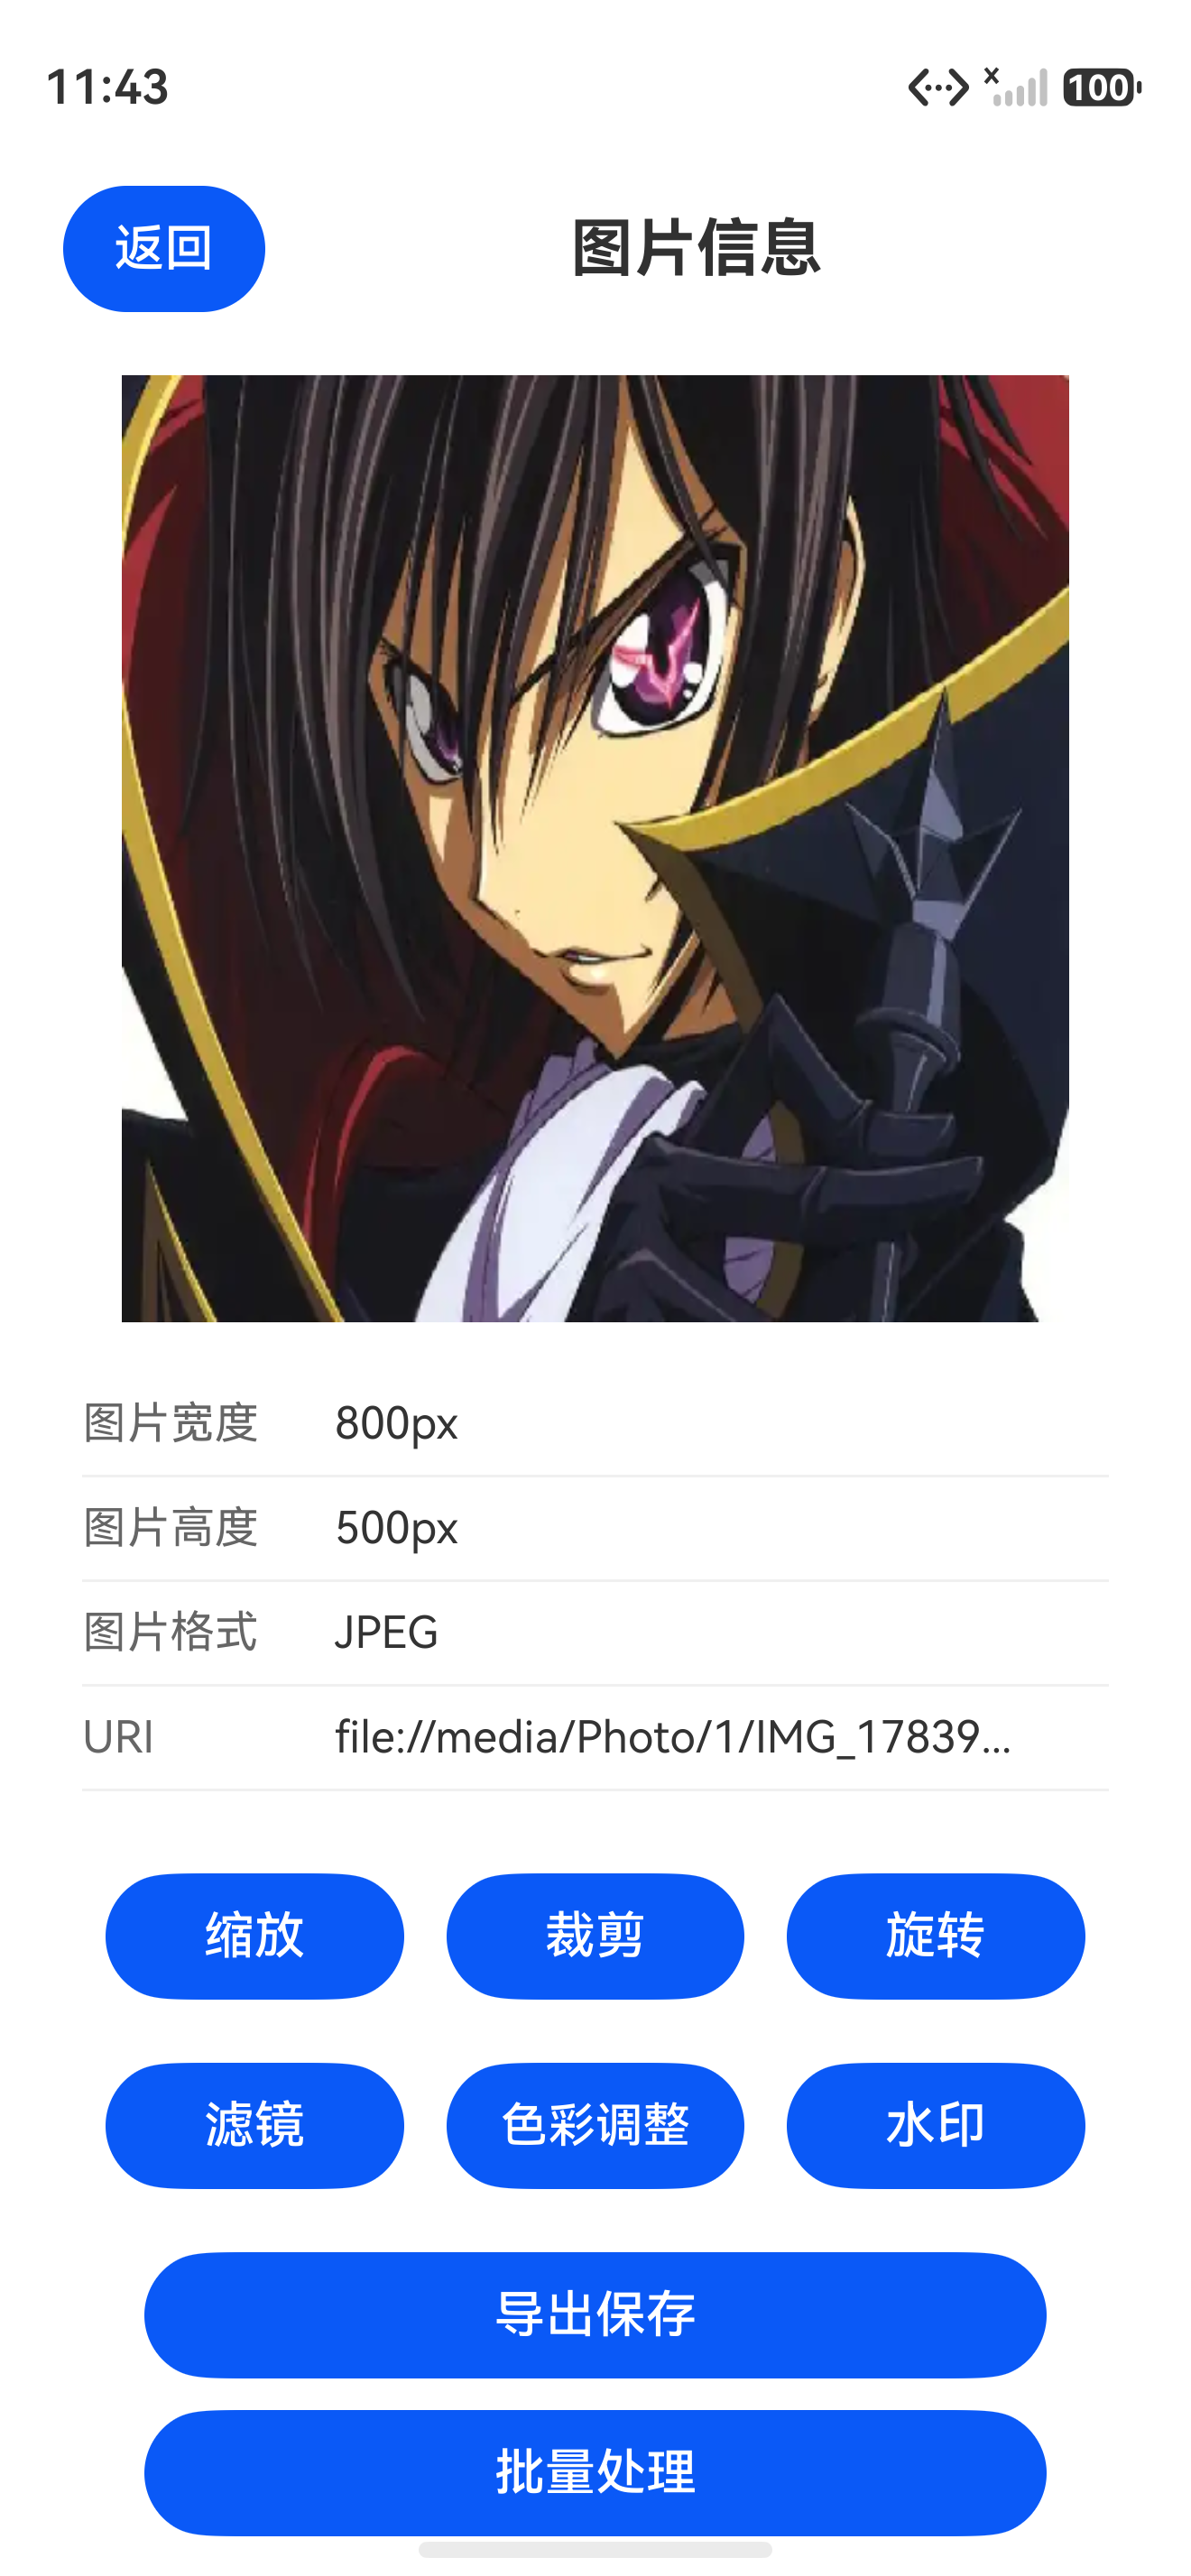
运行APP,从上一页通过PhotoViewPicker选择一张图片(例如截取一张分辨率为1920×1080的JPEG照片),点击确认后自动跳转到DecodeDemoPage。
预期效果:
- 页面顶部显示图片预览缩略图(通过
Image组件加载原始URI)。 - 加载中会出现圆形进度条。
- 解码完成后,信息卡片清晰展示:
- 图片宽度:1920 px
- 图片高度:1080 px
- 文件大小:例如 1.2 MB(根据实际图片)
- MIME类型:image/jpeg
- 格式名称:JPEG
若选择无效文件或路径,则页面显示红色错误提示。
4. 小结与预告
本篇我们实现了图片解码与信息提取模块,创建了ImageInfoModel数据模型、ImageSourceUtils工具类,并设计了DecodeDemoPage页面。现在APP已经能从原始文件路径解码出图片的宽高、格式、大小等元数据,这些信息将作为后续所有编辑功能的输入参数。
下一篇我们将基于当前的图片解码能力,实现缩放裁剪功能。具体来说,我们将使用PixelMap的scale和crop方法,配合滑块让用户调整缩放比例和裁剪区域,最终生成新的PixelMap并在界面上实时预览效果。这将是APP第一个真正的图片编辑功能,敬请期待。

讨论HarmonyOS开发技术,专注于API与组件、DevEco Studio、测试、元服务和应用上架分发等。
更多推荐



 0
0 0
0- 0


 已为社区贡献194条内容

所有评论(0)