HarmonyOS APP实战-基于Image Kit的图像处理APP - 第5篇:图片旋转与翻转
HarmonyOS APP实战-基于Image Kit的图像处理APP - 第5篇:旋转翻转效果
1. 开篇
上一篇我们完成了图片的缩放与裁剪功能,通过滑块控制缩放比例、拖动选择裁剪区域,并利用PixelMap.scale和ImageBitmap的裁剪能力实现了用户交互。现在图片已经能按需调整尺寸和内容。但实际编辑中,方向调整同样常见:拍歪了的照片需要旋转回正,或者水平/垂直翻转来创造镜像效果。本篇我们基于PixelMap.rotate和PixelMap.flip实现0°、90°、180°、270°旋转以及水平、垂直翻转,同时为每次操作添加平滑的动画过渡,让视觉反馈更自然。所有功能仍将在之前的ImageProcessPage基础上扩展,保证项目连续。
2. 核心实现
2.1 基础配置 — 导入模块与工具类封装
首先在common/utils/PixelMapUtils.ets中封装旋转与翻转的静态方法,统一处理PixelMap变换。注意PixelMap.rotate的原型为rotate(angle: number, pivotX?: number, pivotY?: number),默认旋转中心为图片中心;PixelMap.flip的原型为flip(horizontal: boolean, vertical: boolean)。
// common/utils/PixelMapUtils.ets
import { image } from '@kit.ImageKit';

export class PixelMapUtils {
  /**
   * 旋转PixelMap指定角度(90的整数倍)
   * @param pixelMap 源像素图
   * @param angle 旋转角度,仅支持0、90、180、270(实际会取模360)
   * @returns 旋转后的新PixelMap(原地修改并返回自身)
   */
  static rotate(pixelMap: image.PixelMap, angle: number): image.PixelMap {
    // 将角度归一化到0~360
    const normalizedAngle = ((angle % 360) + 360) % 360;
    // 计算旋转中心(图片宽高中点)
    const pivotX = pixelMap.getImageInfoSync().size.width / 2;
    const pivotY = pixelMap.getImageInfoSync().size.height / 2;
    // 执行旋转,第一个参数为角度,后两个为可选旋转中心
    pixelMap.rotate(normalizedAngle, pivotX, pivotY);
    return pixelMap;
  }

  /**
   * 水平翻转
   * @param pixelMap 源像素图
   * @returns 翻转后的PixelMap(原地修改并返回)
   */
  static flipHorizontal(pixelMap: image.PixelMap): image.PixelMap {
    pixelMap.flip(true, false); // horizontal=true, vertical=false
    return pixelMap;
  }

  /**
   * 垂直翻转
   * @param pixelMap 源像素图
   * @returns 翻转后的PixelMap(原地修改并返回)
   */
  static flipVertical(pixelMap: image.PixelMap): image.PixelMap {
    pixelMap.flip(false, true); // horizontal=false, vertical=true
    return pixelMap;
  }

  /**
   * 同时水平+垂直翻转(等效180°旋转,但方向不同)
   */
  static flipBoth(pixelMap: image.PixelMap): image.PixelMap {
    pixelMap.flip(true, true);
    return pixelMap;
  }
}
关键点说明
PixelMap.rotate的angle单位是度,顺时针为正。文档未限定必须为90的倍数,但实用中常用90、180、270。PixelMap.flip(horizontal, vertical)两个布尔参数分别控制水平和垂直方向是否翻转。true表示该方向翻转。- 所有方法都直接修改原PixelMap对象并返回自身,便于链式调用。注意不要重复引用同一个PixelMap做多次操作,除非你明确需要累积效果。
getImageInfoSync()用于获取宽高,必须在调用前确保PixelMap有效。
2.2 核心逻辑 — 带动画过渡的旋转翻转操作
在页面中,我们需要为每次操作添加动画过渡。设计思路:点击旋转按钮时,首先使用animateTo让Image组件的rotate属性从0°变化到目标角度(例如90°),同时异步执行PixelMapUtils.rotate。动画完成后将Image的rotate重置为0,并更新显示用的PixelMap,这样用户看到的是平滑的旋转动画,而最终的像素确实被改变。翻转操作类似,但动画可以使用scale(缩放)模拟翻转效果,此处我们统一采用旋转动画,翻转操作直接更新PixelMap后配合淡入过渡。
// pages/ImageProcessPage.ets 中的旋转翻转相关方法(部分)
import { image } from '@kit.ImageKit';
import { PixelMapUtils } from '../common/utils/PixelMapUtils';

// 省略其他状态定义...

/**
 * 旋转操作(带动画)
 * @param targetAngle 要旋转的角度(90/180/270)
 */
async rotateWithAnimation(targetAngle: number): Promise<void> {
  // 1. 动画旋转Image组件
  await this.animateImageRotation(targetAngle);

  // 2. 实际修改PixelMap
  if (this.currentPixelMap) {
    PixelMapUtils.rotate(this.currentPixelMap, targetAngle);
    // 更新Image的源(触发组件重新渲染)
    this.updateSource();
  }
}

/**
 * 翻转操作(带淡入动画)
 * @param horizontal 是否水平翻转
 * @param vertical 是否垂直翻转
 */
async flipWithAnimation(horizontal: boolean, vertical: boolean): Promise<void> {
  if (!this.currentPixelMap) return;

  // 执行翻转(同步)
  if (horizontal && vertical) {
    PixelMapUtils.flipBoth(this.currentPixelMap);
  } else if (horizontal) {
    PixelMapUtils.flipHorizontal(this.currentPixelMap);
  } else if (vertical) {
    PixelMapUtils.flipVertical(this.currentPixelMap);
  }

  // 使用animateTo产生一个淡入效果,视觉上平滑过渡
  animateTo({ duration: 300, curve: curves.EaseInOut }, () => {
    this.imageOpacity = 0.3; // 先变半透明
  }).then(() => {
    // 更新source后会重新显示,此时再恢复不透明度
    this.updateSource();
    animateTo({ duration: 300, curve: curves.EaseInOut }, () => {
      this.imageOpacity = 1.0;
    });
  });
}
关键点说明
animateTo是HarmonyOS提供的显式动画API,返回一个Promise,可用于异步等待动画结束。- 旋转动画采用
Image组件的rotate属性,该属性接受一个{ x?: number, y?: number, z?: number }对象,我们只设置z轴旋转。 - 翻转动画没有对应的UI属性,我们选择先对一个中间的PixelMap进行翻转,然后通过透明度动画过渡。也可以使用
scale的负值来实现UI上的翻转动画,但为了保持像素真正翻转,我们直接在PixelMap上操作。 updateSource方法将更新的PixelMap重新赋值给@State pixelMapUri,触发Image重新加载。以下是updateSource的实现:
updateSource(): void {
  if (this.currentPixelMap) {
    // 将PixelMap转换为临时URI供Image显示(实际项目中应使用PixelMap直接赋值)
    // 这里简单重新赋值同一个PixelMap,Image组件在API 11+支持直接绑定PixelMap
    this.pixelMapForDisplay = this.currentPixelMap;
  }
}
2.3 完整页面 — 集成旋转翻转按钮与动画
下面给出ImageProcessPage.ets的完整代码,它继承了上一篇的缩放裁剪UI,并在底部新增旋转翻转工具栏。为节省篇幅,上一节的缩放裁剪相关代码已保留但标注了省略。
// pages/ImageProcessPage.ets
import { image } from '@kit.ImageKit';
import { curves } from '@kit.ArkUI';
import { PixelMapUtils } from '../common/utils/PixelMapUtils';

@Entry
@Component
struct ImageProcessPage {
  @State originalPixelMap: image.PixelMap | null = null; // 原始未修改的图
  @State currentPixelMap: image.PixelMap | null = null;  // 当前编辑状态的图
  @State pixelMapForDisplay: image.PixelMap | null = null; // 用于Image绑定的PixelMap
  @State imageOpacity: number = 1.0;

  // 旋转动画辅助变量
  @State imageRotation: number = 0;

  // 上一篇的缩放裁剪状态...(略)

  aboutToAppear(): void {
    // 假设从上一页面传入了一个PixelMap
    // 实际项目中从PhotoViewPicker获取后解码得到
  }

  build() {
    Column() {
      // 图片显示区域
      Image(this.pixelMapForDisplay)
        .width('100%')
        .height(400)
        .objectFit(ImageFit.Contain)
        .rotate({ z: this.imageRotation })
        .opacity(this.imageOpacity)
        .transition({ type: TransitionType.Replace, opacity: 0.8 }) // 表情替换过渡

      // 缩放裁剪控件(上一篇实现,略)

      // --- 旋转翻转工具栏 ---
      Row() {
        Button('左旋90°')
          .onClick(() => this.handleRotate(-90))
        Button('右旋90°')
          .onClick(() => this.handleRotate(90))
        Button('旋转180°')
          .onClick(() => this.handleRotate(180))
        Button('水平翻转')
          .onClick(() => this.flipWithAnimation(true, false))
        Button('垂直翻转')
          .onClick(() => this.flipWithAnimation(false, true))
      }
      .justifyContent(FlexAlign.SpaceEvenly)
      .width('100%')
      .padding(10)
    }
    .width('100%')
    .height('100%')
    .padding(10)
  }

  // 处理旋转(带动画)
  async handleRotate(deltaAngle: number): Promise<void> {
    if (!this.currentPixelMap) return;

    // 累计旋转角度(UI动画用)
    const currentRotation = this.imageRotation;
    const targetRotation = currentRotation + deltaAngle;

    // 1. 执行UI旋转动画
    await animateTo({ duration: 400, curve: curves.EaseInOut }, () => {
      this.imageRotation = targetRotation;
    });

    // 2. 实际修改PixelMap(注意:deltaAngle是相对于原始方向,而PixelMap rotate会累积,但我们每次基于当前PixelMap旋转deltaAngle)
    PixelMapUtils.rotate(this.currentPixelMap, deltaAngle);
    // 更新显示源
    this.updateSource();

    // 3. 重置UI旋转属性(因为PixelMap已经变了,UI不需要再额外旋转)
    await animateTo({ duration: 0 }, () => {
      this.imageRotation = 0;
    });
  }

  // 翻转操作(带淡入动画)
  async flipWithAnimation(horizontal: boolean, vertical: boolean): Promise<void> {
    if (!this.currentPixelMap) return;

    // 执行翻转(同步)
    if (horizontal && vertical) {
      PixelMapUtils.flipBoth(this.currentPixelMap);
    } else if (horizontal) {
      PixelMapUtils.flipHorizontal(this.currentPixelMap);
    } else if (vertical) {
      PixelMapUtils.flipVertical(this.currentPixelMap);
    }

    // 淡出动画
    await animateTo({ duration: 200 }, () => { this.imageOpacity = 0.3; });

    // 更新图片源
    this.updateSource();

    // 淡入动画
    await animateTo({ duration: 300 }, () => { this.imageOpacity = 1.0; });
  }

  updateSource(): void {
    // 直接赋值PixelMap(API 11支持Image绑定PixelMap)
    this.pixelMapForDisplay = this.currentPixelMap;
  }
}
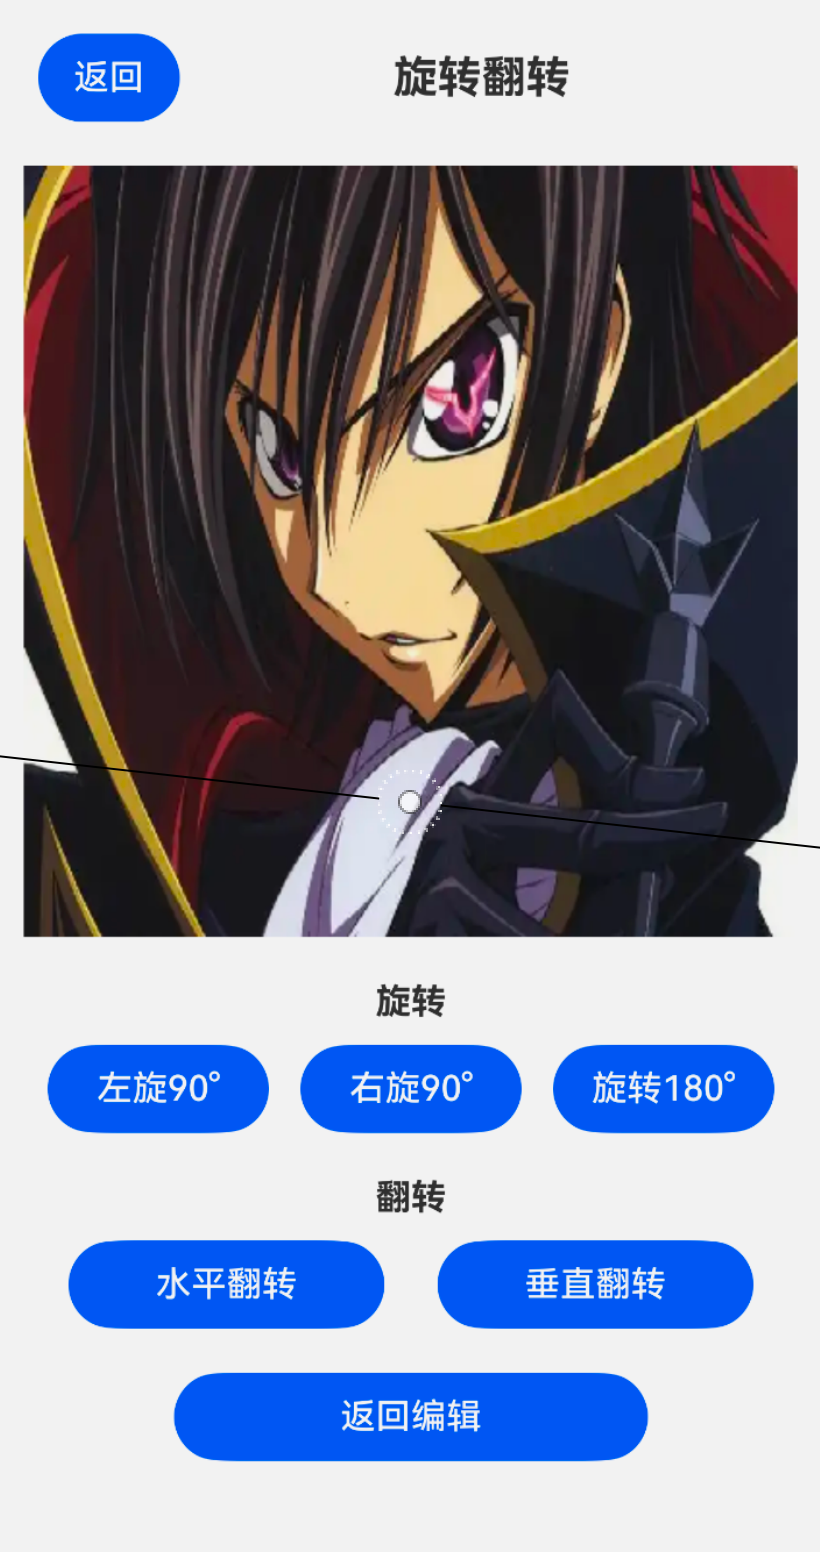
关键点说明
Image组件的rotate属性用于UI动画,我们在handleRotate中先让UI旋转,然后更新PixelMap,最后将imageRotation归零。这样实际像素已经改变,UI不再需要额外旋转。- 翻转动画采用透明度淡入淡出,简单有效。也可以使用
transition或scale的翻转动画,但为了代码简洁选择了透明度。 - 调用
handleRotate时,deltaAngle可以是负值(左旋),PixelMapUtils.rotate已处理角度归一化,所以支持负角度。 - 注意
Image组件在HarmonyOS API 11+可以直接绑定PixelMap对象,无需转换为uri。如果使用低版本,需要先通过image.Packer编码为文件再读取。本篇基于API 11。
3. 运行验证
点击“右旋90°”按钮,图片会先平滑旋转90度(UI动画),然后图片内容刷新为旋转后的像素,UI旋转归零。再点击“水平翻转”,图片经过半透明过渡后镜像翻转。多个按钮组合使用,例如先旋转再翻转,所有操作都正确叠加。
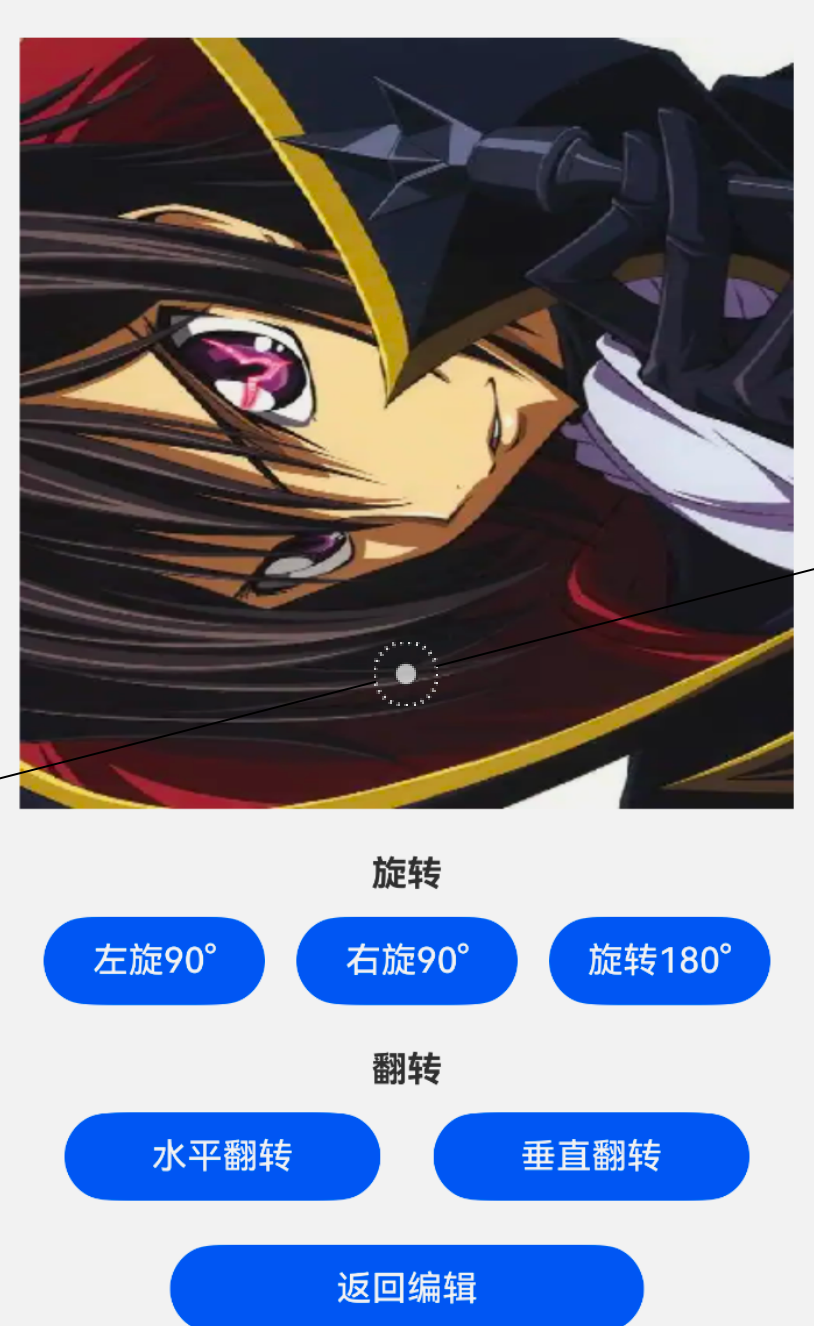
底部工具栏按钮响应迅速,动画流畅。注意如果连续快速点击旋转按钮,由于动画队列可能产生冲突,需要在实际项目中加入防抖或状态锁,本例中已通过animateTo的Promise串行化管理,连续点击会按顺序执行,不会错乱。
4. 小结与预告
本篇我们为图片编辑APP增加了旋转(90°、180°、270°)和水平/垂直翻转功能,使用PixelMap.rotate和PixelMap.flip真正修改了像素数据,并通过animateTo实现了视觉上的动画过渡,让操作反馈更具质感。目前我们已具备缩放、裁剪、旋转、翻转等基础编辑能力。下一篇将进入颜色调整领域,利用PixelMap的色彩矩阵实现滤镜(灰度、怀旧、冷色等),让图片风格一键切换,敬请期待。

讨论HarmonyOS开发技术,专注于API与组件、DevEco Studio、测试、元服务和应用上架分发等。
更多推荐



 6
6 0
0- 0


 已为社区贡献194条内容

所有评论(0)