【共创季稿事节】HarmonyOS 6.1 实况窗(Live View)开发实战:从接入到上线
文章目录

每日一句正能量
一个认为只有自己正确的人,永远不会快乐。
绝对正确意味着拒绝成长、关闭倾听、无法共情。这种人常陷入人际冲突与认知僵局。快乐往往诞生于开放、谦逊与自我修正的能力之中。
摘要
摘要: HarmonyOS 6.1 推出的实况窗(Live View)特性,为开发者提供了一套系统级的实时信息展示框架。本文从架构原理出发,完整演示实况窗的创建、数据更新、交互响应流程,并详细讲解其在锁屏、通知中心、状态栏等多入口的呈现机制。通过外卖配送场景的完整代码示例,帮助开发者快速掌握 Live View 的接入与上线全链路。
一、实况窗特性概述
1.1 什么是实况窗(Live View)?
实况窗是 HarmonyOS 6.1 在系统通知体系之上构建的实时信息展示能力。与传统通知(Notification)的一次性推送不同,实况窗具有以下核心特征:
- 持续更新:同一实况窗可在生命周期内被多次更新,用户无需打开应用即可看到最新进度;
- 多入口呈现:同时展示在锁屏界面、通知中心、状态栏胶囊等多个系统级入口;
- 低打扰:以静默方式更新,不触发声音或震动,避免对用户造成干扰;
- 可交互:支持按钮点击、进度查看、快捷操作等轻量级交互。
1.2 典型应用场景
| 场景 | 展示内容 | 更新频率 |
|---|---|---|
| 外卖配送 | 商家备餐 → 骑手取餐 → 配送中 → 已送达 | 每 30 秒或状态变更 |
| 网约车出行 | 司机接单 → 距离 2km → 距离 500m → 已到达 | 每 5 秒或位置变更 |
| 运动健身 | 跑步时长、配速、消耗卡路里、心率区间 | 每 1-3 秒 |
| 航班出行 | 计划起飞 → 开始登机 → 登机结束 → 起飞 | 状态变更时 |
| 文件下载 | 下载进度、剩余时间、当前速度 | 每 500ms |
1.3 实况窗 vs 传统通知
| 维度 | 传统通知(Notification) | 实况窗(Live View) |
|---|---|---|
| 生命周期 | 一次性展示,用户清除即消失 | 持续存在,主动更新或到期消失 |
| 更新能力 | 无法更新已发送内容 | 支持多次更新同一实例 |
| 展示位置 | 通知中心 + 横幅 | 锁屏 + 通知中心 + 状态栏胶囊 |
| 用户打扰 | 响铃/震动/亮屏 | 静默更新,无打扰 |
| 交互深度 | 点击打开应用 | 支持按钮、进度条等内联交互 |
二、核心架构与 API 详解
2.1 架构分层
HarmonyOS 6.1 的实况窗框架分为三层:
- 应用层:业务应用通过 LiveViewKit 创建/更新/销毁实况窗实例;
- 服务层:LiveViewService 负责数据校验、冲突管理、生命周期调度;
- 系统层:SystemUI 负责将实况窗渲染到锁屏、通知中心、状态栏等位置。
2.2 核心 API 一览
实况窗能力封装在 @kit.LiveViewKit 中,核心接口如下:
import { liveView } from '@kit.LiveViewKit';
| 接口 | 作用 |
|---|---|
liveView.create(config: LiveViewConfig) | 创建实况窗实例 |
liveView.update(id: string, content: LiveViewContent) | 更新指定实况窗的内容 |
liveView.dismiss(id: string) | 主动结束实况窗 |
liveView.on('click', callback) | 监听实况窗点击事件 |
liveView.getAllLiveViews() | 获取当前应用的所有实况窗 |
2.3 关键数据模型
// 实况窗创建配置
interface LiveViewConfig {
  id: string;                    // 唯一标识,建议格式:业务前缀 + 订单号
  type: LiveViewType;            // 类型:PROGRESS / TIMER / NAVIGATION / SCORE
  priority: LiveViewPriority;    // 优先级:LOW / DEFAULT / HIGH / CRITICAL
  expiration: number;            // 过期时间(ms),超时自动销毁
  initialContent: LiveViewContent;
}

// 实况窗内容结构
interface LiveViewContent {
  title: string;                 // 主标题
  subtitle?: string;             // 副标题
  progress?: LiveViewProgress;   // 进度信息
  buttons?: LiveViewButton[];    // 操作按钮
  icons?: LiveViewIcon[];        // 图标数组
  customData?: Record<string, string>; // 透传业务数据
}

// 进度信息
interface LiveViewProgress {
  current: number;               // 当前值
  total: number;                 // 总量
  label: string;                 // 进度描述,如"配送中"
}

// 操作按钮
interface LiveViewButton {
  id: string;                    // 按钮标识
  text: string;                  // 按钮文案
  action: string;                // 触发动作名
  style: ButtonStyle;            // 样式:DEFAULT / PRIMARY / DANGER
}
三、创建实况窗:外卖配送场景实战
3.1 场景设计
以"外卖配送"为例,实况窗需要展示以下信息:
- 订单状态:商家备餐 → 骑手取餐 → 配送中 → 已送达
- 配送进度:百分比进度条 + 预计送达时间
- 快捷操作:联系骑手、查看地图、确认收货
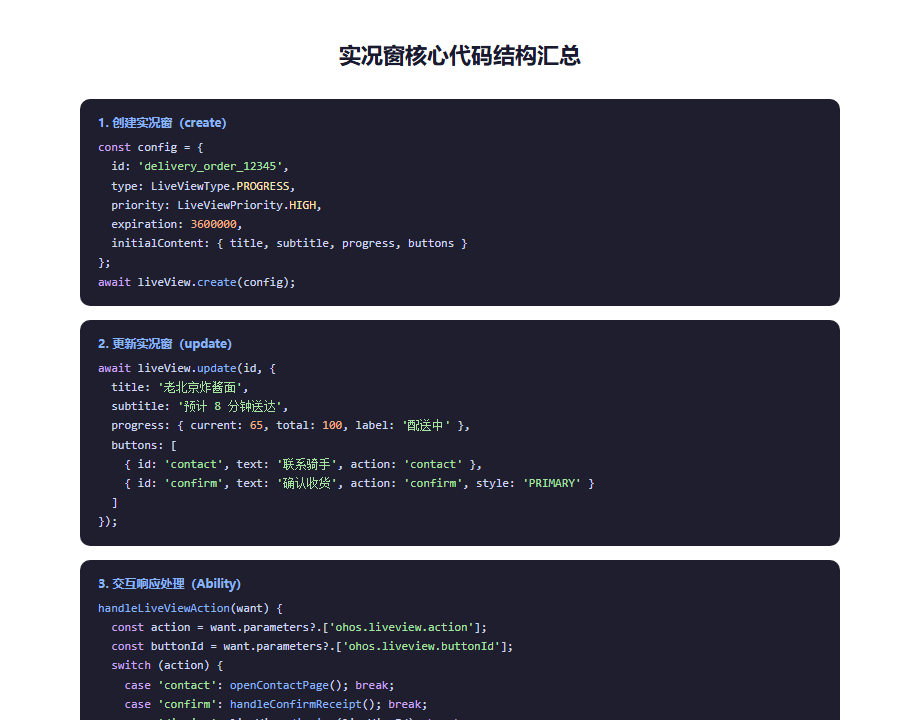
3.2 创建实况窗代码
// services/DeliveryLiveView.ets
import { liveView, LiveViewType, LiveViewPriority } from '@kit.LiveViewKit';

export class DeliveryLiveView {
  private static readonly LIVE_VIEW_ID = 'delivery_order_';

  // 创建配送实况窗
  static async create(orderId: string, shopName: string): Promise<void> {
    const config = {
      id: this.LIVE_VIEW_ID + orderId,
      type: LiveViewType.PROGRESS,
      priority: LiveViewPriority.HIGH,
      expiration: 60 * 60 * 1000,  // 1 小时后自动过期
      initialContent: {
        title: shopName,
        subtitle: '商家正在备餐',
        progress: {
          current: 0,
          total: 100,
          label: '备餐中'
        },
        icons: [
          { src: $r('app.media.ic_shop'), position: 'leading' },
          { src: $r('app.media.ic_clock'), position: 'trailing' }
        ],
        buttons: [
          { id: 'contact_rider', text: '联系骑手', action: 'contact', style: 'DEFAULT' },
          { id: 'view_map', text: '查看地图', action: 'map', style: 'PRIMARY' }
        ],
        customData: {
          orderId: orderId,
          shopName: shopName,
          createTime: Date.now().toString()
        }
      }
    };

    try {
      await liveView.create(config);
      console.info(`[LiveView] 配送实况窗已创建: ${orderId}`);
    } catch (err) {
      console.error(`[LiveView] 创建失败: ${err.message}`);
    }
  }
}
3.3 更新实况窗内容
随着配送状态变化,应用需要持续更新实况窗:
// services/DeliveryLiveView.ets(续)

export enum DeliveryStatus {
  PREPARING = 'preparing',       // 商家备餐
  RIDER_PICKED = 'rider_picked', // 骑手已取餐
  DELIVERING = 'delivering',     // 配送中
  ARRIVED = 'arrived',           // 已送达
  COMPLETED = 'completed'        // 已完成
}

export class DeliveryLiveView {
  // ... create 方法 ...

  // 更新配送状态
  static async updateStatus(
    orderId: string,
    status: DeliveryStatus,
    progressPercent: number,
    etaMinutes?: number
  ): Promise<void> {
    const statusMap: Record<DeliveryStatus, { subtitle: string; label: string }> = {
      [DeliveryStatus.PREPARING]: { subtitle: '商家正在备餐', label: '备餐中' },
      [DeliveryStatus.RIDER_PICKED]: { subtitle: '骑手已取餐,准备配送', label: '已取餐' },
      [DeliveryStatus.DELIVERING]: { subtitle: `预计 ${etaMinutes} 分钟送达`, label: '配送中' },
      [DeliveryStatus.ARRIVED]: { subtitle: '骑手已到达,请取餐', label: '已到达' },
      [DeliveryStatus.COMPLETED]: { subtitle: '订单已完成,期待再次光临', label: '已完成' }
    };

    const info = statusMap[status];
    const content = {
      title: this.getLastShopName(orderId),
      subtitle: info.subtitle,
      progress: {
        current: progressPercent,
        total: 100,
        label: info.label
      },
      buttons: status === DeliveryStatus.DELIVERING
        ? [
            { id: 'contact_rider', text: '联系骑手', action: 'contact', style: 'DEFAULT' },
            { id: 'confirm_receipt', text: '确认收货', action: 'confirm', style: 'PRIMARY' }
          ]
        : status === DeliveryStatus.ARRIVED
          ? [
              { id: 'confirm_receipt', text: '确认收货', action: 'confirm', style: 'PRIMARY' },
              { id: 'dismiss', text: '关闭', action: 'dismiss', style: 'DEFAULT' }
            ]
          : [
              { id: 'contact_rider', text: '联系骑手', action: 'contact', style: 'DEFAULT' },
              { id: 'view_map', text: '查看地图', action: 'map', style: 'PRIMARY' }
            ]
    };

    try {
      await liveView.update(this.LIVE_VIEW_ID + orderId, content);
      console.info(`[LiveView] 状态已更新: ${status}, 进度: ${progressPercent}%`);
    } catch (err) {
      console.error(`[LiveView] 更新失败: ${err.message}`);
    }
  }

  // 结束实况窗
  static async complete(orderId: string): Promise<void> {
    try {
      await liveView.dismiss(this.LIVE_VIEW_ID + orderId);
      console.info(`[LiveView] 实况窗已结束: ${orderId}`);
    } catch (err) {
      console.error(`[LiveView] 结束失败: ${err.message}`);
    }
  }

  private static getLastShopName(orderId: string): string {
    // 实际项目中从缓存或数据库读取
    return AppStorage.get<string>('lastShopName_' + orderId) ?? '商家';
  }
}
四、数据更新时序与交互响应
4.1 数据更新时序图
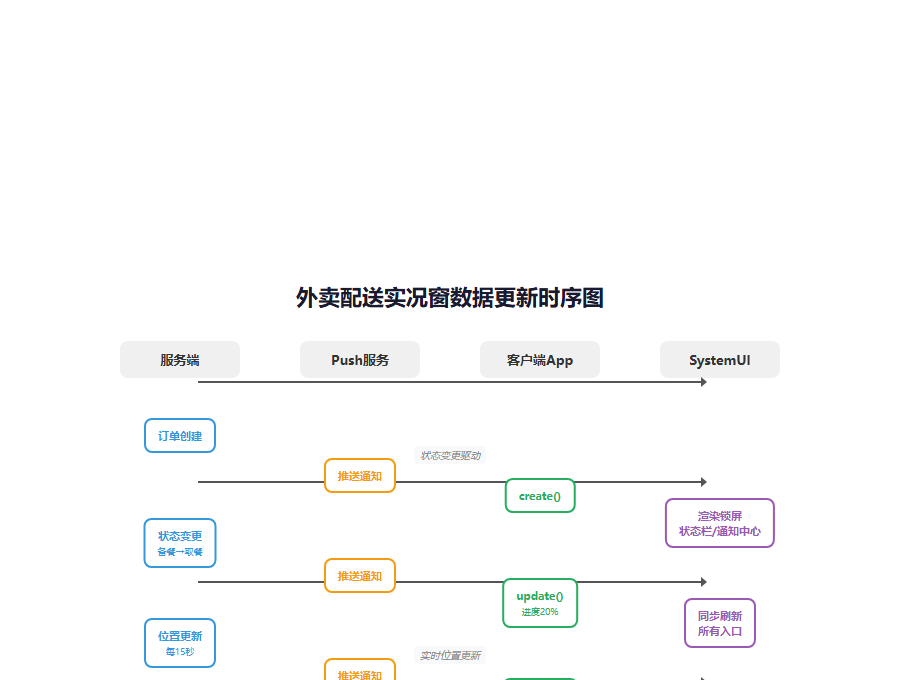
上图展示了外卖配送场景下,从订单创建到完成的完整数据更新时序。服务端状态变更通过 Push 或轮询到达应用,应用调用 LiveViewKit 更新实况窗,SystemUI 在收到更新后刷新所有展示入口。
4.2 交互响应处理
用户在实况窗上点击按钮后,系统通过 Ability 的 onCreate 或 onNewWant 将事件回传给应用:
// entry/src/main/ets/entryability/EntryAbility.ets
import { UIAbility, Want } from '@kit.AbilityKit';
import { liveView } from '@kit.LiveViewKit';
import { router } from '@kit.ArkUI';

export default class EntryAbility extends UIAbility {
  onCreate(want: Want): void {
    this.handleLiveViewAction(want);
  }

  onNewWant(want: Want): void {
    this.handleLiveViewAction(want);
  }

  private handleLiveViewAction(want: Want): void {
    const action = want.parameters?.['ohos.liveview.action'] as string;
    const liveViewId = want.parameters?.['ohos.liveview.id'] as string;
    const buttonId = want.parameters?.['ohos.liveview.buttonId'] as string;
    const customData = want.parameters?.['ohos.liveview.customData'] as Record<string, string>;

    if (!action || !liveViewId) return;

    console.info(`[LiveView] 交互事件: action=${action}, button=${buttonId}`);

    switch (action) {
      case 'contact':
        this.openContactPage(customData?.orderId);
        break;
      case 'map':
        this.openMapPage(customData?.orderId);
        break;
      case 'confirm':
        this.handleConfirmReceipt(customData?.orderId, liveViewId);
        break;
      case 'dismiss':
        liveView.dismiss(liveViewId);
        break;
      default:
        // 默认打开订单详情
        this.openOrderDetail(customData?.orderId);
    }
  }

  private openContactPage(orderId?: string): void {
    router.pushUrl({ url: 'pages/ContactRider', params: { orderId } });
  }

  private openMapPage(orderId?: string): void {
    router.pushUrl({ url: 'pages/DeliveryMap', params: { orderId } });
  }

  private async handleConfirmReceipt(orderId?: string, liveViewId?: string): Promise<void> {
    // 1. 调用服务端确认收货接口
    await this.callConfirmApi(orderId);

    // 2. 更新实况窗为完成状态
    if (liveViewId) {
      await liveView.update(liveViewId, {
        title: '订单已完成',
        subtitle: '感谢您的使用,期待再次光临',
        progress: { current: 100, total: 100, label: '已完成' },
        buttons: [
          { id: 'rate_order', text: '评价订单', action: 'rate', style: 'PRIMARY' }
        ]
      });

      // 3. 5 秒后自动销毁实况窗
      setTimeout(() => {
        liveView.dismiss(liveViewId);
      }, 5000);
    }
  }

  private openOrderDetail(orderId?: string): void {
    router.pushUrl({ url: 'pages/OrderDetail', params: { orderId } });
  }

  private async callConfirmApi(orderId?: string): Promise<void> {
    // 实际项目中调用 HTTP 接口
    console.info(`[LiveView] 确认收货: ${orderId}`);
  }
}
五、多位置呈现机制
5.1 实况窗展示入口
HarmonyOS 6.1 的实况窗支持在以下四个系统入口同时呈现:
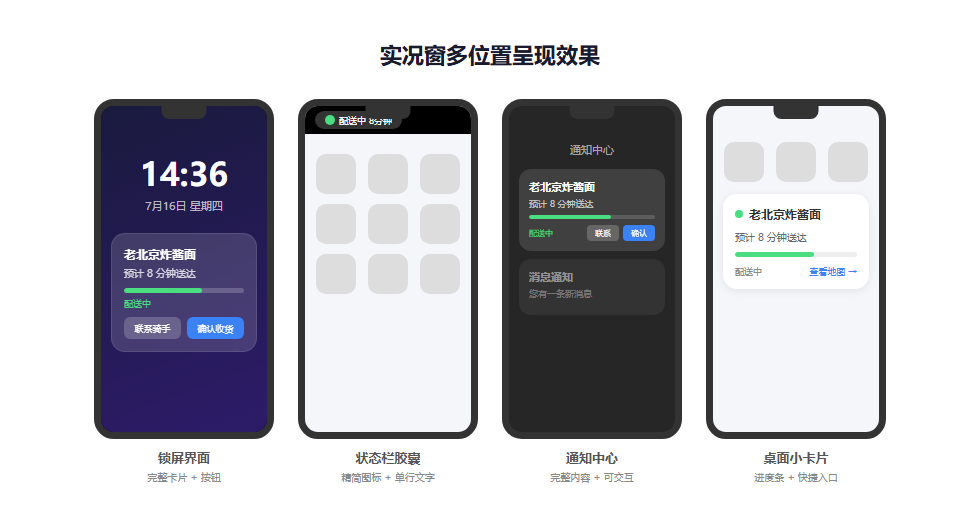
上图展示了同一实况窗在锁屏界面、状态栏胶囊、通知中心展开态和桌面小卡片四个位置的呈现效果。各位置会自动根据可用空间对内容进行裁剪与重排。
5.2 各位置渲染规则
| 展示位置 | 最大信息容量 | 交互能力 | 更新策略 |
|---|---|---|---|
| 锁屏界面 | 标题 + 副标题 + 进度条 + 2 个按钮 | 点击按钮触发 Action | 实时同步 |
| 状态栏胶囊 | 图标 + 单行标题(最多 8 字) | 点击展开通知中心 | 实时同步 |
| 通知中心 | 完整内容:标题 + 副标题 + 进度 + 按钮 | 全部交互可用 | 实时同步 |
| 桌面小卡片 | 标题 + 进度条 + 1 个按钮(可选) | 点击打开应用 | 受卡片刷新频率限制 |
5.3 不同位置的适配建议
开发者无需为每个位置单独编写代码,SystemUI 会自动裁剪。但以下建议可提升展示效果:
- 标题控制在 8 个汉字以内,确保状态栏胶囊能完整显示;
- 按钮文案控制在 4 个汉字以内,避免锁屏界面按钮换行;
- 副标题使用动态数据,如"预计 12 分钟送达"比"配送中"信息密度更高;
- 进度条标签(label)使用状态枚举,如"备餐中 / 已取餐 / 配送中 / 已到达"。
六、完整实战:外卖配送全流程接入
6.1 订单创建时初始化实况窗
// pages/OrderConfirm.ets
import { DeliveryLiveView, DeliveryStatus } from '../services/DeliveryLiveView';

@Entry
@Component
struct OrderConfirm {
  private orderId: string = 'ORD' + Date.now();
  private shopName: string = '老北京炸酱面';

  async onOrderCreated(): Promise<void> {
    // 1. 创建实况窗
    await DeliveryLiveView.create(this.orderId, this.shopName);

    // 2. 保存商家名称到缓存
    AppStorage.setOrCreate('lastShopName_' + this.orderId, this.shopName);

    // 3. 启动配送状态轮询(实际项目中可用 Push 替代)
    this.startStatusPolling();
  }

  private startStatusPolling(): void {
    const pollInterval = setInterval(async () => {
      const status = await this.fetchDeliveryStatus(this.orderId);

      if (status.isCompleted) {
        clearInterval(pollInterval);
        await DeliveryLiveView.complete(this.orderId);
        return;
      }

      await DeliveryLiveView.updateStatus(
        this.orderId,
        status.phase as DeliveryStatus,
        status.progress,
        status.etaMinutes
      );
    }, 15000);  // 每 15 秒轮询一次
  }

  private async fetchDeliveryStatus(orderId: string): Promise<DeliveryStatusResponse> {
    // 实际项目中调用服务端接口
    return { isCompleted: false, phase: 'delivering', progress: 65, etaMinutes: 8 };
  }
}

interface DeliveryStatusResponse {
  isCompleted: boolean;
  phase: string;
  progress: number;
  etaMinutes: number;
}
6.2 服务端 Push 驱动更新(推荐方案)
相比客户端轮询,更优的方案是通过服务端 Push 触发更新:
// services/PushHandler.ets
import { push } from '@kit.PushKit';
import { DeliveryLiveView, DeliveryStatus } from './DeliveryLiveView';

export class PushHandler {
  static init(): void {
    push.on('receiveMessage', (message) => {
      const payload = JSON.parse(message.data);

      if (payload.type === 'delivery_status_update') {
        const { orderId, status, progress, etaMinutes } = payload;

        DeliveryLiveView.updateStatus(
          orderId,
          status as DeliveryStatus,
          progress,
          etaMinutes
        );
      }
    });
  }
}
七、常见问题与排障指南
7.1 实况窗不显示
| 可能原因 | 排查方法 |
|---|---|
| 权限未声明 | 检查 module.json5 是否申请 ohos.permission.LIVE_VIEW |
| 优先级过低被挤掉 | 系统最多同时展示 3 个实况窗,提高 priority 至 HIGH |
| ID 重复导致创建失败 | 确保每个实况窗 ID 全局唯一 |
| 已过期自动销毁 | 检查 expiration 设置是否合理 |
7.2 更新内容不生效
- 确认
liveView.update()的 ID 与创建时一致; - 检查更新内容是否超出字段长度限制(标题 ≤ 50 字符,副标题 ≤ 100 字符);
- 观察系统日志
hilog | grep LiveView,查看是否有渲染异常。
7.3 交互按钮无响应
- 确认 EntryAbility 的
onCreate/onNewWant中正确处理了ohos.liveview.action; - 检查
want.parameters中是否包含预期的buttonId和customData; - 验证按钮的
action字段与 Ability 中的 switch case 匹配。
八、性能与体验优化
8.1 更新频率控制
| 场景 | 建议更新频率 | 说明 |
|---|---|---|
| 外卖配送 | 状态变更时 + 每 30 秒 | 用户关注预计到达时间 |
| 网约车 | 每 5 秒 | 位置变化快,用户实时关注 |
| 运动跑步 | 每 1-3 秒 | 实时配速/心率需高频刷新 |
| 文件下载 | 每 500ms | 进度条需流畅动画 |
| 航班动态 | 状态变更时 | 更新频率低,但准确性要求高 |
8.2 电量与性能优化
- 避免后台常驻:实况窗本身不消耗电量,但驱动它更新的后台轮询会。优先使用 Push 而非轮询;
- 批量更新:若多个字段同时变化,合并为一次
update()调用; - 及时销毁:订单完成后立即调用
dismiss(),释放系统资源; - 过期设置合理:根据业务场景设置 expiration,避免僵尸实况窗长期占用展示位。
九、总结
本文从架构到代码,完整演示了 HarmonyOS 6.1 实况窗的接入与上线全链路:
- 创建阶段:使用
LiveViewConfig定义实况窗类型、优先级、初始内容和过期时间; - 更新阶段:通过
liveView.update()在业务状态变化时同步刷新展示内容; - 交互阶段:在 EntryAbility 中处理
ohos.liveview.action和buttonId,实现按钮响应; - 呈现阶段:实况窗自动在锁屏、状态栏胶囊、通知中心、桌面卡片多入口同步展示;
- 收尾阶段:业务完成后及时
dismiss(),避免资源浪费。
开发者行动清单:
- 在
module.json5中申请ohos.permission.LIVE_VIEW权限; - 封装
LiveViewService统一封装创建/更新/销毁逻辑; - 优先使用服务端 Push 驱动更新,减少客户端轮询;
- 标题和按钮文案控制长度,适配状态栏胶囊的窄空间;
- 在 EntryAbility 中完整处理实况窗的交互事件;
- 为实况窗设置合理的 expiration,防止长期残留;
- 业务完成后 3-5 秒内自动销毁实况窗,或引导用户手动关闭。
实况窗是 HarmonyOS 6.1 连接用户与应用的重要桥梁。用好这一特性,既能提升用户的任务效率,也能增强应用的品牌感知——让关键信息始终"在场"。
转载自:https://blog.csdn.net/u014727709/article/details/162937332
欢迎 👍点赞✍评论⭐收藏,欢迎指正

讨论HarmonyOS开发技术,专注于API与组件、DevEco Studio、测试、元服务和应用上架分发等。
更多推荐


 1
1 0
0- 0


 已为社区贡献794条内容

所有评论(0)