HarmonyOs应用《重要日》开发第28篇 - 通知 ID 哈希算法与通知管理策略
·
本文深入解析 ImportantDays 项目中通知 ID 的生成算法、哈希冲突分析、通知的生命周期管理(创建/覆盖/取消),以及如何通过稳定的 ID 实现可靠的通知管理。
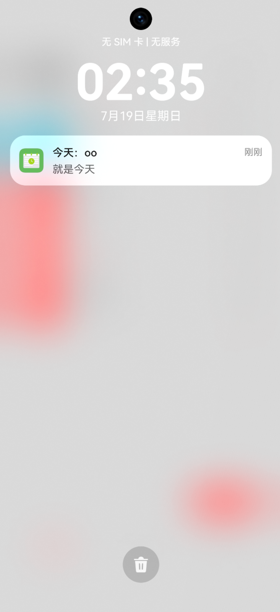
一、通知 ID 的重要性
在鸿蒙通知系统中,每个通知需要一个唯一的数字 ID。通知 ID 用于:
- 标识通知:系统通过 ID 区分不同通知
- 覆盖更新:相同 ID 的通知会覆盖旧通知
- 精确取消:通过 ID 取消特定通知
如果 ID 管理不当,可能导致:
- 通知重复(不同通知用了相同 ID)
- 无法取消(找不到通知 ID)
- 覆盖错误(新通知覆盖了不该覆盖的)
二、ID 生成算法
private static notificationIdBase = 10000;

private getNotificationId(dayID: string): number {
  let hash = 0;
  for (let i = 0; i < dayID.length; i++) {
    hash = ((hash << 5) - hash) + dayID.charCodeAt(i);
    hash |= 0;
  }
  return Math.abs(hash) % 100000 + ImportantDayManager.notificationIdBase;
}
算法解析
这是经典的 djb2 哈希算法 变体:
hash = hash * 31 + charCode
等价于 (hash << 5) - hash:
hash << 5=hash * 32(hash << 5) - hash=hash * 31
逐步执行示例
以 dayID = "1721234567890_5678" 为例:
初始: hash = 0

字符 '1' (charCode=49):
  hash = (0 << 5) - 0 + 49 = 49

字符 '7' (charCode=55):
  hash = (49 << 5) - 49 + 55 = 1568 - 49 + 55 = 1574

字符 '2' (charCode=50):
  hash = (1574 << 5) - 1574 + 50 = 50368 - 1574 + 50 = 48844

...(继续处理每个字符)

最终 hash = 某个大整数(可能溢出为负数)

hash |= 0  →  转为 32 位有符号整数

Math.abs(hash) % 100000  →  取 0-99999 范围
+ 10000  →  最终范围 10000-109999
关键操作说明
| 操作 | 作用 |
|---|---|
hash << 5 | 左移5位 = 乘以32 |
- hash | 减去自身 = 乘以31 |
+ charCode | 加上字符编码 |
| `hash | = 0` |
Math.abs(hash) | 取绝对值(处理负数) |
% 100000 | 限制范围到 0-99999 |
+ 10000 | 偏移到 10000-109999 |
为什么用 hash |= 0?
JavaScript/ArkTS 的数字是 64 位浮点数,位运算会转为 32 位整数。hash |= 0 确保:
hash始终是 32 位有符号整数- 溢出时自动回绕(不会变成浮点数)
- 负数被正确处理(
| 0保留符号位)
为什么加基数 10000?
return Math.abs(hash) % 100000 + 10000;
加基数 10000 确保:
- 通知 ID 不会是 0(某些系统可能特殊处理 ID 0)
- 通知 ID 在一个明确的范围内(10000-109999)
- 与其他可能的通知 ID 不冲突
三、ID 稳定性分析
同一 dayID → 相同 ID
getNotificationId("1721234567890_5678")
// 总是返回相同的数字,如 45678
哈希函数是确定性的——相同输入总是产生相同输出。
不同 dayID → 大概率不同 ID
getNotificationId("1721234567890_5678")  // → 45678
getNotificationId("1721234567890_5679")  // → 23456(不同)
getNotificationId("1721234567890_6789")  // → 78901(不同)
由于哈希函数的雪崩效应,输入的微小变化会导致输出的巨大变化。
四、哈希冲突分析
冲突概率
ID 范围:10000-109999,共 100000 个槽位。
| 重要日数量 | 冲突概率(近似) |
|---|---|
| 10 | ~0.0045% |
| 50 | ~1.2% |
| 100 | ~4.7% |
| 500 | ~71.8% |
对于个人使用场景(通常几十条),冲突概率极低。
冲突的影响
如果两个重要日的 dayID 哈希到同一个通知 ID:
重要日 A → notificationId = 45678
重要日 B → notificationId = 45678(冲突!)

发送 A 的通知 → 通知栏显示 A
发送 B 的通知 → 通知栏显示 B(覆盖了 A)
A 的通知被 B 覆盖,用户只看到 B 的通知。
冲突解决方向
- 增大取模范围:
% 1000000而非% 100000 - 使用计数器:维护一个递增的 ID 分配器
- 使用 dayID 的数字部分:如果 dayID 包含时间戳,可直接使用
五、通知生命周期管理
创建通知
// 添加重要日时
async addDay(day: ImportantDay): Promise<void> {
  this.allDays.push(day);
  // ...
  if (day.reminderEnabled) {
    this.scheduleReminder(day);  // ← 创建通知
  }
}

private async scheduleReminder(day: ImportantDay): Promise<void> {
  const diff = day.getDaysDiff();
  if (diff < 0) return;
  if (diff <= day.reminderDaysBefore) {
    await NotificationUtil.publishBasic(
      `即将到来:${day.title}`,
      day.getDisplayText(),
      this.getNotificationId(day.dayID)  // ← 使用稳定 ID
    );
  }
}
覆盖通知
// 批量检查时(checkAndSendReminders)
for (const day of needReminder) {
  await NotificationUtil.publishBasic(
    title, content,
    this.getNotificationId(day.dayID)  // ← 相同 ID 覆盖旧通知
  );
}
每次回前台时重新发送通知,相同 ID 自动覆盖旧通知,确保内容是最新的。
取消通知
// 删除重要日时
async deleteDay(dayID: string): Promise<void> {
  const day = this.allDays[index];
  if (day.reminderEnabled) {
    await NotificationUtil.cancel(this.getNotificationId(dayID));  // ← 取消通知
  }
  this.allDays.splice(index, 1);
  // ...
}

// 更新重要日时
async updateDay(day: ImportantDay): Promise<void> {
  await NotificationUtil.cancel(this.getNotificationId(day.dayID));  // ← 先取消旧通知
  this.allDays[index] = day;
  // ...
  if (day.reminderEnabled) {
    this.scheduleReminder(day);  // ← 再发新通知
  }
}
取消所有通知
// 用户在"我的"页面操作
NotificationUtil.cancelAll();
生命周期图
添加重要日(启用提醒)
    ↓
scheduleReminder → publishBasic(id=哈希值)
    ↓
通知显示在通知栏
    ↓
    ├── 用户更新重要日 → cancel(id) → publishBasic(id) [新内容]
    ├── 用户删除重要日 → cancel(id) [通知消失]
    ├── 应用回前台 → publishBasic(id) [覆盖更新]
    └── 用户清除通知 → cancelAll() [全部消失]
六、ID 与 dayID 的关系
dayID 的生成
static generateId(): string {
  return `${Date.now()}_${Math.floor(Math.random() * 10000)}`;
}
格式:"1721234567890_5678"
dayID → notificationId 的映射
dayID (字符串)                    notificationId (数字)
"1721234567890_5678"     →        45678
"1721234567890_1234"     →        23456
"1721234567891_8765"     →        78901
为什么不直接用 dayID 作为通知 ID?
- 通知 ID 必须是数字:鸿蒙通知系统只接受
number类型 - dayID 是字符串:格式为
"时间戳_随机数" - 需要确定性映射:同一 dayID 每次都要得到相同的数字
为什么不用时间戳部分?
// 不采用的方式
const notificationId = parseInt(dayID.split('_')[0]);
时间戳值太大(如 1721234567890),可能超出通知 ID 的有效范围。哈希取模确保 ID 在合理范围内。
七、通知管理的完整代码流
EntryAbility.onCreate()
    ↓
Manager.init()
    ↓ loadImportantDays() → 加载数据
    ↓ rebuildDayMap() → 构建索引
    ↓ checkAndSendReminders()
        ↓ getDaysNeedReminder() → 筛选需要提醒的
        ↓ checkPermission() → 检查权限
        ↓ for each day:
            ↓ getNotificationId(dayID) → 哈希生成 ID
            ↓ publishBasic(title, content, id) → 发布通知

用户添加重要日(启用提醒)
    ↓
Manager.addDay(day)
    ↓ allDays.push(day)
    ↓ rebuildDayMap()
    ↓ persist() → 持久化
    ↓ scheduleReminder(day)
        ↓ getNotificationId(dayID) → 哈希生成 ID
        ↓ publishBasic(title, content, id) → 发布通知

用户更新重要日
    ↓
Manager.updateDay(day)
    ↓ cancel(getNotificationId(dayID)) → 取消旧通知
    ↓ allDays[index] = day
    ↓ scheduleReminder(day) → 发布新通知

用户删除重要日
    ↓
Manager.deleteDay(dayID)
    ↓ cancel(getNotificationId(dayID)) → 取消通知
    ↓ allDays.splice(index, 1)
    ↓ rebuildDayMap()
    ↓ persist()

EntryAbility.onForeground()
    ↓
Manager.checkAndSendReminders() → 重新检查并覆盖通知
八、总结
通知 ID 哈希算法和管理策略体现了以下设计:
- 确定性映射:dayID → notificationId 的稳定哈希
- djb2 算法:经典的字符串哈希,分布均匀
- 范围控制:10000-109999,避免 ID 过大或为 0
- 覆盖策略:相同 ID 自动覆盖,避免重复通知
- 完整生命周期:创建 → 覆盖 → 取消,每个阶段都有对应操作
- 冲突可接受:对于个人使用场景,冲突概率极低
通知 ID 虽然只是一个数字,但它的生成和管理策略直接影响通知系统的可靠性。

讨论HarmonyOS开发技术,专注于API与组件、DevEco Studio、测试、元服务和应用上架分发等。
更多推荐
 6
6 0
0- 0


 已为社区贡献104条内容

所有评论(0)