鸿蒙【harmonyOS】项目实战 登录and注册页面加网络请求
·
页面布局图
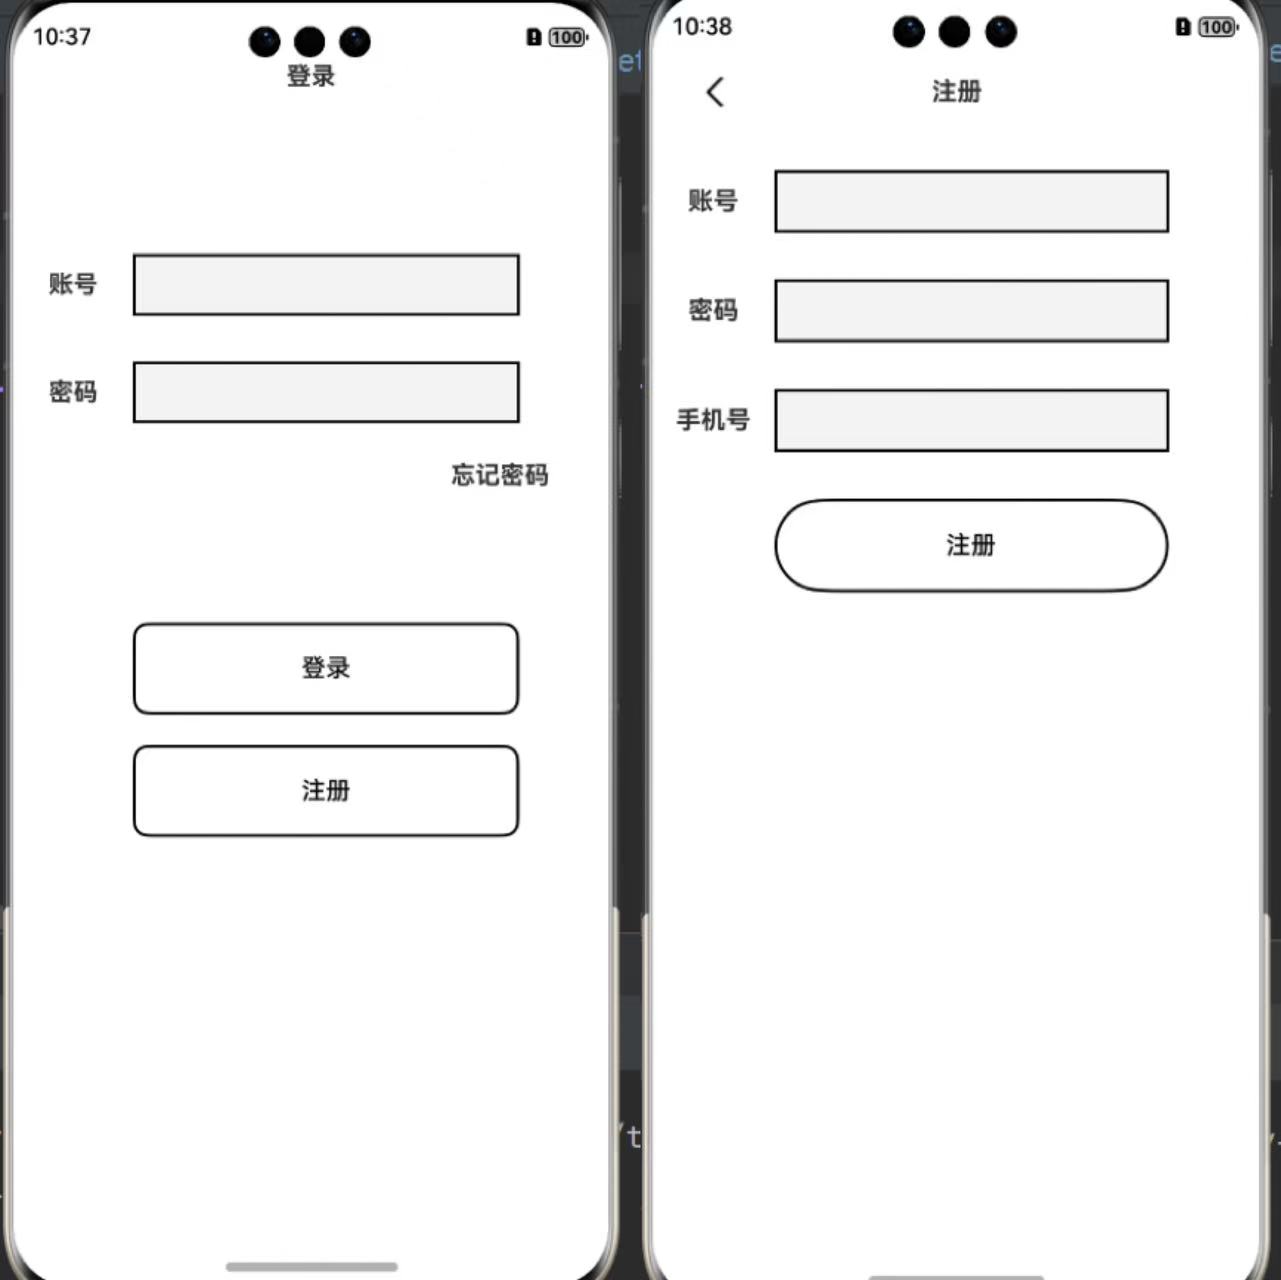
介绍:模拟APP登录注册功能
1)先找好项目对应的后端服务器创建一个新项目
2)封装好网络请求
3)构建好UI界面
4)写功能代码
4.1)点击注册按钮时,先发送请求给后端注册一个账号。
4.2)点击登录按钮时,登录到主页,并把后端返回的数据json数据解析,把项目要求需要的信息,例如后端一般会返回的Token(唯一登录凭证),保存到用户首选项(perferences)中。
4.3)什么是用户首选项?用户对应用、系统等设置的个性化选择,简单来说就是让应用 “记住”用户习惯,以键值对方式记录用户习惯。下次使用时直接加载,不用重复设置。。
4.4)为什么要记住Token?登录凭证,当你退出后台或者清空后台再进入应用时,需要根据查找本地储存(例如你保存在用户首选项的数据),判断有无token(也就是你有没有登录过)而判断是否需要跳转到登录页面或者直接跳转到主页面。当你在应用操作退出登录时,同时需要清除储存的Token。
4.5)提示,做这上面的步骤需要先封装网络请求和用户首选项
登录页面布局:
  // 网络请求实例(我这里已经提前封装好)
  private httpRequest = new myHttp("你的baseURL")
  //输入的信息
  @State username:string=""
  @State password:string=""

build() {
    Column() {
      Text("登录")
        .fontWeight(700)
        .textAlign(TextAlign.Center)
        .align(Alignment.TopStart)
        .width("100%")
        .height(100)
      //这里用了组件复用,后面有代码
      this.textInput("账号",true)
      this.textInput("密码",false)
      Blank().height(20)
      Text("忘记密码")
        .fontWeight(700)
        .width("80%")
        .height(50)
        .textAlign(TextAlign.End)
        .align(Alignment.TopStart)
        .onClick(()=>{
          router.pushUrl({url:"pages/Demo02_Main/Demo07_ChangePasswd"})
        })
      Blank().height(30)
      //这里用了组件复用,后面有代码
      this.Button("登录",()=>{
        this.login()
      })
      this.Button("注册",()=>{
          router.pushUrl({
            url:"pages/Demo02_Main/Demo02_Register"}) //跳转到注册页面
      })
    }.width("100%").height("100%")
  }
登录界面的组件复用代码
  //登录/注册按钮复用组件
  @Builder Button(text:string,cb:()=>void){
    Blank().height(30)
    Row() {
      Blank().width("20%")
      Button(text, { type: ButtonType.Normal })
        .fontColor(Color.Black)
        .width("65%")
        .height(60)
        .border({ color: Color.Black, width: 2 })
        .borderRadius(10)
        .backgroundColor(Color.White)
        .onClick(cb)
    }.width("100%").height(50)
  }

  //账号密码输入复用组件
  @Builder textInput(text:string,type:Boolean){
    Blank().height(20)
    Row() {
      Text(text).width("20%").textAlign(TextAlign.Center).fontWeight(700)
      TextInput({ text: type?this.username:this.password})
        .width("65%")
        .height(40)
        .borderRadius(0)
        .border({ color: Color.Black, width: 2 })
        .showPasswordIcon(false)
        .onChange((value) => {if(type){this.username=value}else {this.password=value}})
        .type(type?InputType.Normal:InputType.Password)//传入true为文本,否则是密码
    }.width("100%").height(50)
  }
点击登录按钮时,向后端发送http请求: baseURL 拼上 url:"/1.1/login"
 // 登录请求功能代码
  async login() {
    //向后端传的参数
    const params =JSON.stringify( {
      username: this.username,
      password: this.password,
    })
    await this.httpRequest.post("/1.1/login",params)
      .then((data: http.HttpResponse) => {
        if (data.responseCode === 200) {
          //处理数据
          let LoginBackData = JSON.parse(data.result as string) as loginBackData
          //把信息保存到用户首选项,根据实际开发APP需要的东西保存
          preferenceUtil.putPreferenceValue("sessionToken",LoginBackData.sessionToken)
          preferenceUtil.putPreferenceValue("objectId",LoginBackData.objectId)
          preferenceUtil.putPreferenceValue("username",LoginBackData.username)
          //登录成功后,跳转到主页面
            prompt.showToast({   //轻量级显示弹窗
              message: "登录成功!",
              duration: 1000
            })
            router.pushUrl({ url: "pages/Demo02_Main/Demo04_MainPage", })
        }else {promptAction.showToast({message:"登录失败!账号或密码输入错误",duration:1500,backgroundColor:Color.Red,backgroundBlurStyle:BlurStyle.NONE,textColor:Color.White})}
      })
      .catch((err: Error) => {console.log("登录请求失败")})
  }
到这里一个登录页面和请求操作就做好了。接下来做注册页面
页面布局:
  private httpRequest = new myHttp("你的baseURL")
  @State username: string = ""
  @State password: string = ""
  @State phone: string = ""

  build() {
    Column() {
      Row() {
        Image($r("app.media.back")).width("10%").height(30).margin({ left: 20 }).onClick(() => {
          router.back() //返回登录页面
        })
        Text("注册")
          .fontWeight(700)
          .textAlign(TextAlign.Center)
          .margin({ right: 20 })
          .width("70%")
          .height(30)
      }.width("100%").height(50)

      this.inputs("账号", true)
      this.inputs("密码", false)

      Blank().height(20)
      Row() {
        Text("手机号").width("20%").textAlign(TextAlign.Center).fontWeight(700)
        TextInput({ text: this.phone })
          .width("65%")
          .height(40)
          .borderRadius(0)
          .border({ color: Color.Black, width: 2 })
          .onChange((value) => {this.phone=value})
      }.width("100%").height(50)

      Blank().height(30)
      Row() {
        Blank().width("20%")
        Button("注册")
          .fontColor(Color.Black)
          .width("65%")
          .height(60)
          .border({ color: Color.Black, width: 2 })
          .backgroundColor(Color.White)
          .onClick(() => {
            this.register()
          })
      }.width("100%").height(50)
    }.width("100%").height("100%")
  }
组件复用代码:
  @Builder
  inputs(text: string, type: boolean) {
    Blank().height(20)
    Row() {
      Text(text).width("20%").textAlign(TextAlign.Center).fontWeight(700)
        TextInput({ text: type ? this.username : this.password })
          .width("65%")
          .height(40)
          .borderRadius(0)
          .border({ color: Color.Black, width: 2 })
          .showPasswordIcon(false)//去小眼睛
          .type(type ? InputType.Normal : InputType.Password)
          .onChange((value) => {
            if (type) {
              this.username = value
            } else {
              this.password = value
            }
          })
    }.width("100%").height(50)
  }
点击注册按钮时,向后端发送请求
  // 注册
  register() {
    //参数
    const params = JSON.stringify({
      username: this.username,
      password: this.password,
      phone: this.phone
    })
    this.httpRequest.post("/1.1/users", params)
      .then((data: http.HttpResponse) => {
        if(data.responseCode===201){
          prompt.showToast({   //轻量级显示弹窗
            message: "注册成功!",
            duration: 1000
          })
          //如果注册成功,跳转到登录页面
          router.pushUrl({ url: "pages/Demo02_Main/Demo01_login", })
        }else {
          promptAction.showToast({message:"注册失败!请重试",duration:1500,backgroundColor:Color.Red,backgroundBlurStyle:BlurStyle.NONE,textColor:Color.White})
        }
        console.log(JSON.stringify(data.result))
      }).catch((err: Error) => {
      console.log("请求失败")
    })
  }
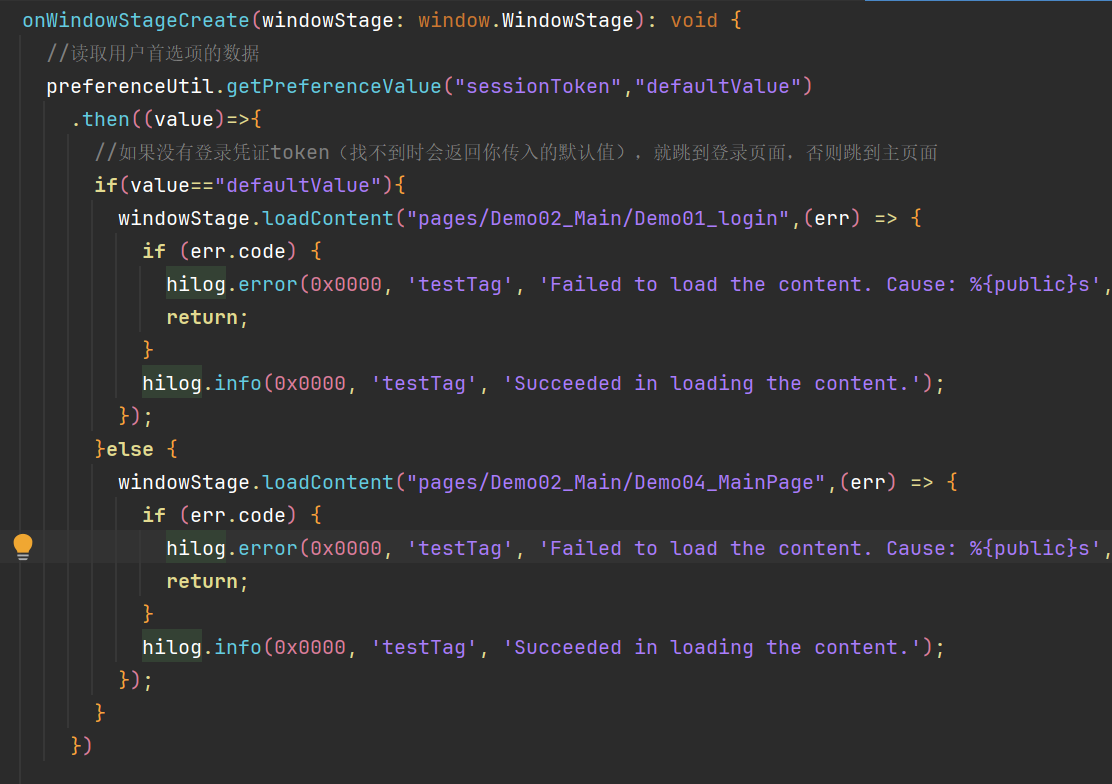
到这里两个页面布局和功能就做好了,你还可以在EntryAbility中设置,登录过后打开应用都是跳过登录页面跳转到主页面。
有纰漏的地方欢迎大家提醒

讨论HarmonyOS开发技术,专注于API与组件、DevEco Studio、测试、元服务和应用上架分发等。
更多推荐



 11
11 0
0- 0


 已为社区贡献7条内容

所有评论(0)