Flutter框架跨平台鸿蒙开发——Hero自定义Tween详解
Hero自定义Tween详解
一、知识点概述
Tween(补间动画)是Flutter动画系统的核心组件,它定义了动画从起始值到结束值的变化规律。Hero动画虽然默认会自动计算位置和尺寸的插值,但在某些复杂场景下,开发者可能需要自定义插值逻辑,以实现更加精确和灵活的动画效果。Hero自定义Tween通过继承Tween类并重写lerp方法,可以完全控制Hero飞行过程中属性的变化方式,包括非线性插值、特殊曲线、自定义算法等。
在实际应用中,自定义Tween的应用场景包括:非线性尺寸变化、特殊曲线运动、基于物理规律的动画、根据时间或其他因素动态调整动画曲线等。这些场景下,标准的线性插值无法满足需求,需要通过自定义Tween来实现更加精确的控制。
Hero自定义Tween的关键在于理解Tween的工作原理和lerp方法的数学含义。Tween的lerp方法接收一个0.0到1.0之间的值t,返回该时刻的插值结果。通过重写lerp方法,开发者可以实现任意的插值算法,从简单的二次函数到复杂的物理模拟,从线性插值到贝塞尔曲线,无所不能。
二、核心知识点
1. Tween类的工作原理
Tween类是Flutter动画系统的基础,它定义了动画从起始值到结束值的变化规律。理解Tween的工作原理是实现自定义Tween的第一步。Tween是一个泛型类,其类型参数T表示要插值的类型,如double、Offset、Size、Color等。
Tween类的核心是lerp方法(线性插值,Linear Interpolation),该方法接收一个0.0到1.0之间的值t,返回该时刻的插值结果。标准Tween的lerp方法实现如下:
[ \text{lerp}(t) = \text{begin} + (\text{end} - \text{begin}) \times t ]
其中,begin是起始值,end是结束值,t是进度值(0.0到1.0)。当t=0时,lerp返回begin;当t=1时,lerp返回end;当t在0和1之间时,lerp返回begin和end之间的线性插值。
class SizeTween extends Tween<Size> {
SizeTween({Size? begin, Size? end}) : super(begin: begin, end: end);
Size lerp(double t) {
final begin = this.begin ?? Size.zero;
final end = this.end ?? Size.zero;
return Size(
begin.width + (end.width - begin.width) * t,
begin.height + (end.height - begin.height) * t,
);
}
}
在上述代码中,我们自定义了一个SizeTween类,继承自Tween。重写的lerp方法分别对Size的width和height进行线性插值,返回一个新的Size对象。
Tween类的重要属性和方法:
| 属性/方法 | 类型 | 说明 | 默认值 |
|---|---|---|---|
| begin | T | 动画的起始值 | null |
| end | T | 动画的结束值 | null |
| lerp(double t) | T | 计算t时刻的插值 | 需要重写 |
| animate(Animation parent) | Animatable | 将Tween绑定到Animation | - |
| evaluate(Animation animation) | T | 计算当前动画值 | - |
| chain(Animatable parent) | Animatable | 将Tween链接到另一个Animatable | - |
2. 自定义SizeTween的实现
SizeTween是示例代码中自定义的一个Tween类,用于对Size类型进行插值。虽然Flutter已经提供了内置的SizeTween,但通过自己实现SizeTween,可以深入理解Tween的工作原理,并可以根据需要进行自定义。
SizeTween的lerp方法实现分别对Size的width和height进行线性插值:
Size lerp(double t) {
final begin = this.begin ?? Size.zero;
final end = this.end ?? Size.zero;
return Size(
begin.width + (end.width - begin.width) * t,
begin.height + (end.height - begin.height) * t,
);
}
代码解析:
- null处理: 使用
??运算符,如果begin或end为null,则使用Size.zero作为默认值 - width插值:
begin.width + (end.width - begin.width) * t计算width的线性插值 - height插值:
begin.height + (end.height - begin.height) * t计算height的线性插值 - 返回新对象: 创建并返回一个新的Size对象,包含插值后的width和height
Size插值的数学表示:
[ \text{width}(t) = \text{begin.width} + (\text{end.width} - \text{begin.width}) \times t ]
[ \text{height}(t) = \text{begin.height} + (\text{end.height} - \text{begin.height}) \times t ]
其中t是进度值,范围从0.0到1.0。
SizeTween的插值过程可以通过下面的示意图来表示:
从示意图可以看出,当t从0.0逐渐增加到1.0时,Size的width和height分别从begin值线性变化到end值,中间时刻(t=0.5)的值是begin和end的平均值。
3. 在Hero动画中使用自定义Tween
自定义Tween的一个主要应用场景是在Hero动画的flightShuttleBuilder中,通过AnimatedBuilder监听动画进度,并使用自定义Tween计算中间值。这样可以实现比默认Hero更加精确和灵活的动画效果。
在示例代码中,我们使用自定义的SizeTween在Hero飞行过程中计算Container的尺寸:
flightShuttleBuilder: (flightContext, animation, direction,
    fromContext, toContext) {
  return AnimatedBuilder(
    animation: animation,
    builder: (context, child) {
      final size = SizeTween(
        begin: beginSize,
        end: endSize,
      ).animate(animation).value;
      return Container(
        width: size.width,
        height: size.height,
        decoration: BoxDecoration(
          gradient: LinearGradient(
            colors: [
              Colors.primaries[index % Colors.primaries.length],
              Colors.primaries[(index + 1) % Colors.primaries.length],
            ],
          ),
          borderRadius: BorderRadius.circular(30),
        ),
        child: Center(
          child: Column(
            mainAxisAlignment: MainAxisAlignment.center,
            children: [
              const Icon(Icons.tune, color: Colors.white, size: 64),
              const SizedBox(height: 16),
              Text(
                '${size.width.toInt()}x${size.height.toInt()}',
                style: const TextStyle(
                  color: Colors.white,
                  fontSize: 18,
                  fontWeight: FontWeight.bold,
                ),
              ),
            ],
          ),
        ),
      );
    },
  );
}
代码分析:
- AnimatedBuilder: 监听animation的变化,在每一帧重新构建widget
- SizeTween: 创建自定义的SizeTween,设置beginSize和endSize
- animate(animation): 将SizeTween绑定到animation,返回一个Animatable
- .value: 获取当前时刻的插值Size值
- 动态Container: 使用插值后的size动态设置Container的width和height
Hero飞行过程中的尺寸变化:
| 进度t | 列表页尺寸 | 目标尺寸 | 当前尺寸 | 显示文字 |
|---|---|---|---|---|
| 0.0 | 100x100 | 200x200 | 100x100 | 100x100 |
| 0.25 | 100x100 | 200x200 | 125x125 | 125x125 |
| 0.5 | 100x100 | 200x200 | 150x150 | 150x150 |
| 0.75 | 100x100 | 200x200 | 175x175 | 175x175 |
| 1.0 | 100x100 | 200x200 | 200x200 | 200x200 |
从表格可以看出,Hero飞行过程中,Container的尺寸从100x100平滑过渡到200x200,Flutter会自动计算每一帧的尺寸,并在Text中显示当前的尺寸值。
4. 非线性插值的实现
线性插值虽然简单直接,但在某些场景下可能无法满足需求。非线性插值可以实现更加自然和生动的动画效果,如指数增长、平方、立方、贝塞尔曲线等。
实现非线性插值的方法是修改lerp方法中的插值算法,使用非线性函数替代线性函数:
class NonlinearSizeTween extends Tween<Size> {
NonlinearSizeTween({Size? begin, Size? end}) : super(begin: begin, end: end);
Size lerp(double t) {
final begin = this.begin ?? Size.zero;
final end = this.end ?? Size.zero;
// 使用平方函数实现加速效果
final tSquared = t * t;
return Size(
begin.width + (end.width - begin.width) * tSquared,
begin.height + (end.height - begin.height) * tSquared,
);
}
}
常见的非线性插值函数:
| 函数类型 | 数学表达式 | 效果描述 | 适用场景 |
|---|---|---|---|
| 平方 | ( t^2 ) | 开始慢,逐渐加速 | 需要加速启动 |
| 立方 | ( t^3 ) | 明显的加速效果 | 强调加速 |
| 平方根 | ( \sqrt{t} ) | 开始快,逐渐减速 | 需要快速启动 |
| 指数 | ( e^{t-1} ) | 快速加速 | 强烈加速效果 |
| 反向平方 | ( 1-(1-t)^2 ) | 快速启动,缓慢结束 | 常用的缓入缓出 |
// 反向平方插值(缓入缓出)
final tCurve = t * t * (3 - 2 * t);
return Size(
  begin.width + (end.width - begin.width) * tCurve,
  begin.height + (end.height - begin.height) * tCurve,
);
反向平方插值是缓入缓出动画的经典算法,它在开始时缓慢加速,中间快速,结束时缓慢减速,非常符合物理运动的规律。
非线性插值的视觉效果对比:
从对比可以看出,不同的插值算法会产生不同的视觉效果,开发者应该根据具体需求选择合适的插值函数。
5. 贝塞尔曲线插值
贝塞尔曲线是一种广泛应用于计算机图形学的曲线,它可以生成平滑、自然的曲线形状。在动画中,贝塞尔曲线可以用于实现复杂的非线性插值,如弹性效果、S形曲线等。
二次贝塞尔曲线的数学表达式:
[ B(t) = (1-t)^2 P_0 + 2t(1-t) P_1 + t^2 P_2 ]
其中,P0是起点,P1是控制点,P2是终点,t是进度值(0.0到1.0)。
class BezierSizeTween extends Tween<Size> {
final Size controlPoint;
BezierSizeTween({Size? begin, Size? end, required this.controlPoint})
: super(begin: begin, end: end);
Size lerp(double t) {
final begin = this.begin ?? Size.zero;
final end = this.end ?? Size.zero;
// 二次贝塞尔曲线插值
final mt = 1 - t;
final width = mt * mt * begin.width +
2 * t * mt * controlPoint.width +
t * t * end.width;
final height = mt * mt * begin.height +
2 * t * mt * controlPoint.height +
t * t * end.height;
return Size(width, height);
}
}
控制点的选择对贝塞尔曲线的形状有重要影响:
| 控制点位置 | 曲线形状 | 效果描述 |
|---|---|---|
| 在起点和终点中间 | S形曲线 | 标准的缓入缓出 |
| 靠近起点 | 快速启动 | 开始阶段快速 |
| 靠近终点 | 快速结束 | 结束阶段快速 |
| 超出起点和终点 | 弹性效果 | 带有回弹 |
// 创建弹性贝塞尔曲线
final bezierTween = BezierSizeTween(
  begin: Size(100, 100),
  end: Size(200, 200),
  controlPoint: Size(250, 250), // 超出终点,产生弹性效果
);
6. 自定义Tween的实际应用场景
自定义Tween在实际应用中有许多场景,以下是一些常见的应用案例:
场景1: 非线性尺寸变化
当Hero从列表页飞向详情页时,可能需要非线性地调整尺寸,如先快速放大后缓慢放大,这样可以创造出更自然的视觉效果。
class NonlinearSizeTween extends Tween<Size> {
Size lerp(double t) {
// 使用缓入缓出曲线
final curve = t * t * (3 - 2 * t);
return Size(
begin.width + (end.width - begin.width) * curve,
begin.height + (end.height - begin.height) * curve,
);
}
}
场景2: 特殊的运动轨迹
Hero不仅需要改变尺寸,还需要沿着特殊的轨迹移动,如弧线、螺旋线等。这需要同时自定义位置和尺寸的插值。
class SpiralTween extends Tween<Offset> {
final double radius;
final double rotations;
SpiralTween({
Offset? begin,
Offset? end,
required this.radius,
this.rotations = 1,
}) : super(begin: begin, end: end);
Offset lerp(double t) {
final begin = this.begin ?? Offset.zero;
final end = this.end ?? Offset.zero;
// 线性插值基础位置
final baseX = begin.dx + (end.dx - begin.dx) * t;
final baseY = begin.dy + (end.dy - begin.dy) * t;
// 添加螺旋偏移
final angle = t * rotations * 2 * math.pi;
final offsetX = math.cos(angle) * radius * math.sin(t * math.pi);
final offsetY = math.sin(angle) * radius * math.sin(t * math.pi);
return Offset(baseX + offsetX, baseY + offsetY);
}
}
场景3: 基于物理规律的动画
某些动画需要模拟真实的物理现象,如阻尼振荡、弹性碰撞等。这需要使用物理公式来实现插值。
class DampedOscillationTween extends Tween<double> {
final double frequency;
final double damping;
DampedOscillationTween({
double? begin,
double? end,
this.frequency = 2.0,
this.damping = 0.5,
}) : super(begin: begin, end: end);
double lerp(double t) {
final begin = this.begin ?? 0;
final end = this.end ?? 0;
// 阻尼振荡公式
final oscillation = math.exp(-damping * t) *
math.cos(frequency * 2 * math.pi * t);
return begin + (end - begin) * t * (1 + oscillation * 0.1);
}
}
下表总结了自定义Tween的常见应用场景:
| 应用场景 | 插值类型 | 实现难度 | 效果描述 |
|---|---|---|---|
| 非线性尺寸变化 | 非线性函数 | 低 | 尺寸按曲线变化 |
| 特殊运动轨迹 | 贝塞尔曲线 | 中 | 沿弧线或螺旋移动 |
| 物理模拟 | 物理公式 | 高 | 模拟真实物理现象 |
| 弹性效果 | 超出范围的插值 | 中 | 产生回弹效果 |
| 节奏控制 | 分段函数 | 中 | 不同阶段不同速度 |
7. 示例代码展示
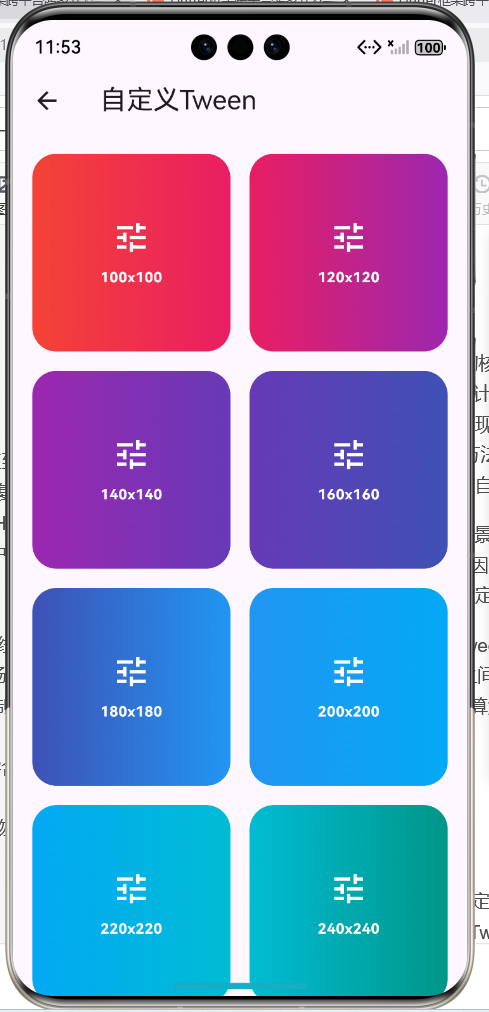
下面是一个展示Hero自定义Tween的完整示例代码,该代码来自example06_hero_custom_tween.dart文件。这个示例展示了如何自定义SizeTween并在Hero动画中使用,实现精确控制Container尺寸变化的动画效果。
import 'package:flutter/material.dart';
class SizeTween extends Tween<Size> {
SizeTween({Size? begin, Size? end}) : super(begin: begin, end: end);
Size lerp(double t) {
final begin = this.begin ?? Size.zero;
final end = this.end ?? Size.zero;
return Size(
begin.width + (end.width - begin.width) * t,
begin.height + (end.height - begin.height) * t,
);
}
}
class HeroCustomTweenDemo extends StatelessWidget {
const HeroCustomTweenDemo({super.key});
Widget build(BuildContext context) {
return Scaffold(
appBar: AppBar(title: const Text('自定义Tween')),
body: GridView.builder(
padding: const EdgeInsets.all(16),
gridDelegate: const SliverGridDelegateWithFixedCrossAxisCount(
crossAxisCount: 2,
mainAxisSpacing: 16,
crossAxisSpacing: 16,
),
itemCount: 8,
itemBuilder: (context, index) {
final size = Size(100.0 + index * 20, 100.0 + index * 20);
final targetSize = Size(200.0 + index * 30, 200.0 + index * 30);
return GestureDetector(
onTap: () {
Navigator.push(
context,
MaterialPageRoute(
builder: (context) => CustomTweenDetailPage(
index: index,
beginSize: size,
endSize: targetSize,
),
),
);
},
child: Hero(
tag: 'custom_tween_$index',
child: Container(
width: size.width,
height: size.height,
decoration: BoxDecoration(
gradient: LinearGradient(
colors: [
Colors.primaries[index % Colors.primaries.length],
Colors.primaries[(index + 1) % Colors.primaries.length],
],
),
borderRadius: BorderRadius.circular(20),
),
child: Center(
child: Column(
mainAxisAlignment: MainAxisAlignment.center,
children: [
const Icon(Icons.tune, color: Colors.white, size: 32),
const SizedBox(height: 8),
Text(
'${size.width.toInt()}x${size.height.toInt()}',
style: const TextStyle(
color: Colors.white,
fontSize: 12,
fontWeight: FontWeight.bold,
),
),
],
),
),
),
),
);
},
),
);
}
}
class CustomTweenDetailPage extends StatelessWidget {
final int index;
final Size beginSize;
final Size endSize;
const CustomTweenDetailPage({
required this.index,
required this.beginSize,
required this.endSize,
});
Widget build(BuildContext context) {
return Scaffold(
appBar: AppBar(title: const Text('自定义Tween详情')),
body: Center(
child: Hero(
tag: 'custom_tween_$index',
flightShuttleBuilder: (flightContext, animation, direction,
fromContext, toContext) {
return AnimatedBuilder(
animation: animation,
builder: (context, child) {
final size = SizeTween(
begin: beginSize,
end: endSize,
).animate(animation).value;
return Container(
width: size.width,
height: size.height,
decoration: BoxDecoration(
gradient: LinearGradient(
colors: [
Colors.primaries[index % Colors.primaries.length],
Colors.primaries[(index + 1) % Colors.primaries.length],
],
),
borderRadius: BorderRadius.circular(30),
),
child: Center(
child: Column(
mainAxisAlignment: MainAxisAlignment.center,
children: [
const Icon(Icons.tune, color: Colors.white, size: 64),
const SizedBox(height: 16),
Text(
'${size.width.toInt()}x${size.height.toInt()}',
style: const TextStyle(
color: Colors.white,
fontSize: 18,
fontWeight: FontWeight.bold,
),
),
],
),
),
);
},
);
},
child: Container(
width: beginSize.width,
height: beginSize.height,
decoration: BoxDecoration(
gradient: LinearGradient(
colors: [
Colors.primaries[index % Colors.primaries.length],
Colors.primaries[(index + 1) % Colors.primaries.length],
],
),
borderRadius: BorderRadius.circular(20),
),
child: Center(
child: Column(
mainAxisAlignment: MainAxisAlignment.center,
children: [
const Icon(Icons.tune, color: Colors.white, size: 32),
const SizedBox(height: 8),
Text(
'${beginSize.width.toInt()}x${beginSize.height.toInt()}',
style: const TextStyle(
color: Colors.white,
fontSize: 12,
fontWeight: FontWeight.bold,
),
),
],
),
),
),
),
),
);
}
}
代码分析:
- SizeTween类: 自定义的SizeTween类,继承自Tween,重写lerp方法实现Size的线性插值。
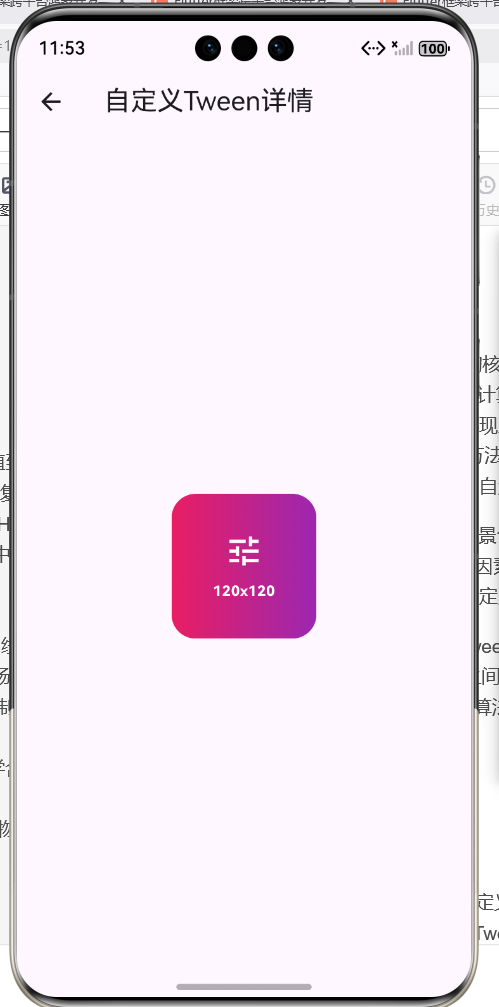
- 动态尺寸: 列表页的Container尺寸根据index动态计算,从100x100逐渐增加到240x240;详情页的尺寸从200x200逐渐增加到410x410。
- flightShuttleBuilder: 在Hero飞行过程中使用自定义SizeTween计算Container的尺寸,实时更新到widget上。
- AnimatedBuilder: 监听animation的变化,在每一帧重新构建Container,应用插值后的尺寸。
- 尺寸显示: 在Container的中心显示当前的尺寸值,用户可以清楚地看到尺寸在动画过程中的变化。
8. 自定义Tween的性能考虑
自定义Tween虽然功能强大,但如果使用不当可能会影响性能。以下是一些性能优化的建议:
建议1: 避免复杂的计算
lerp方法会在动画的每一帧被调用,因此应该避免在lerp方法中进行复杂的计算。尽量使用简单的数学运算,避免循环、递归等操作。
// 不推荐: 复杂的计算
Size lerp(double t) {
// 复杂的循环计算
var result = 0.0;
for (var i = 0; i < 100; i++) {
result += math.sin(i * t);
}
return Size(result, result);
}
// 推荐: 简单的计算
Size lerp(double t) {
// 简单的数学运算
final curve = t * t * (3 - 2 * t);
return Size(
begin.width + (end.width - begin.width) * curve,
begin.height + (end.height - begin.height) * curve,
);
}
建议2: 使用缓存和预计算
如果插值算法中包含固定的参数或常量,可以在类初始化时预计算这些值,避免在lerp方法中重复计算。
class OptimizedBezierTween extends Tween<Size> {
final Offset _controlPoint;
final double _cp2x;
final double _cp2y;
OptimizedBezierTween({
Size? begin,
Size? end,
required Offset controlPoint,
}) : _controlPoint = controlPoint,
_cp2x = 2 * controlPoint.dx,
_cp2y = 2 * controlPoint.dy,
super(begin: begin, end: end);
Size lerp(double t) {
final mt = 1 - t;
final width = mt * mt * begin.width +
mt * t * _cp2x +
t * t * end.width;
final height = mt * mt * begin.height +
mt * t * _cp2y +
t * t * end.height;
return Size(width, height);
}
}
建议3: 限制动画时长和帧率
自定义Tween的复杂计算会增加每帧的负担,因此应该限制动画的时长,避免长时间执行复杂的插值算法。同时,可以使用profile模式测试性能,必要时降低动画的帧率。
Navigator.push(
  context,
  PageRouteBuilder(
    transitionDuration: const Duration(milliseconds: 400),
    pageBuilder: (context, animation, secondaryAnimation) =>
        CustomTweenDetailPage(...),
  ),
);
建议4: 使用GPU加速
如果自定义Tween涉及大量的矩阵变换或图形计算,可以考虑使用Transform widget或其他GPU加速的widget,将计算卸载到GPU上。
下表总结了自定义Tween性能优化的主要策略:
| 优化策略 | 具体方法 | 性能提升 | 实现难度 | 推荐度 |
|---|---|---|---|---|
| 避免复杂计算 | 简化lerp方法 | 高 | 低 | ⭐⭐⭐⭐⭐ |
| 使用预计算 | 初始化时计算常量 | 中 | 低 | ⭐⭐⭐⭐ |
| 限制时长 | 缩短动画时长 | 中 | 低 | ⭐⭐⭐⭐ |
| GPU加速 | 使用Transform widget | 高 | 中 | ⭐⭐⭐ |
| 降低帧率 | 使用TickerMode | 中 | 中 | ⭐⭐ |
9. 调试自定义Tween
自定义Tween的调试是一个重要的环节,因为插值算法的正确性直接影响动画效果。以下是一些调试技巧:
技巧1: 使用print输出插值值
在lerp方法中添加print语句,输出不同t值下的插值结果,帮助理解插值算法的行为。
Size lerp(double t) {
final size = Size(
begin.width + (end.width - begin.width) * t,
begin.height + (end.height - begin.height) * t,
);
// 输出调试信息
if (t == 0.0 || t == 0.5 || t == 1.0) {
print('t=$t, size=$size');
}
return size;
}
技巧2: 使用可视化工具
使用Flutter DevTools的Performance工具,查看动画的帧率和绘制性能,分析是否存在性能瓶颈。
技巧3: 对比标准Tween
将自定义Tween的行为与标准Tween进行对比,确保插值结果的正确性。
// 标准SizeTween
final standardTween = SizeTween(begin: begin, end: end);

// 自定义SizeTween
final customTween = MyCustomSizeTween(begin: begin, end: end);

// 对比插值结果
for (var t = 0.0; t <= 1.0; t += 0.1) {
  final standardValue = standardTween.lerp(t);
  final customValue = customTween.lerp(t);
  print('t=$t: standard=$standardValue, custom=$customValue');
}
技巧4: 单元测试
为自定义Tween编写单元测试,验证插值算法的正确性。
test('SizeTween should interpolate correctly', () {
  final tween = SizeTween(begin: Size(100, 100), end: Size(200, 200));

  expect(tween.lerp(0.0), Size(100, 100));
  expect(tween.lerp(0.5), Size(150, 150));
  expect(tween.lerp(1.0), Size(200, 200));
});
10. 自定义Tween的最佳实践
总结实现Hero自定义Tween的最佳实践,帮助开发者构建高质量的自定义动画效果。
实践1: 保持lerp方法的简洁性
lerp方法应该尽可能简洁,避免复杂的逻辑和计算。如果需要复杂的算法,考虑将其拆分为多个辅助方法或类。
class ComplexSizeTween extends Tween<Size> {
final Curve _curve;
ComplexSizeTween({
Size? begin,
Size? end,
Curve curve = Curves.easeInOut,
}) : _curve = curve,
super(begin: begin, end: end);
Size lerp(double t) {
final curvedT = _curve.transform(t);
return _lerpSize(curvedT);
}
Size _lerpSize(double t) {
return Size(
begin.width + (end.width - begin.width) * t,
begin.height + (end.height - begin.height) * t,
);
}
}
实践2: 提供灵活的配置选项
自定义Tween应该提供足够的配置选项,让用户可以根据需求调整动画效果。
class ConfigurableSizeTween extends Tween<Size> {
final double _widthRatio;
final double _heightRatio;
final Curve _widthCurve;
final Curve _heightCurve;
ConfigurableSizeTween({
Size? begin,
Size? end,
double widthRatio = 1.0,
double heightRatio = 1.0,
Curve widthCurve = Curves.linear,
Curve heightCurve = Curves.linear,
}) : _widthRatio = widthRatio,
_heightRatio = heightRatio,
_widthCurve = widthCurve,
_heightCurve = heightCurve,
super(begin: begin, end: end);
Size lerp(double t) {
return Size(
begin.width + (end.width - begin.width) * _widthRatio * _widthCurve.transform(t),
begin.height + (end.height - begin.height) * _heightRatio * _heightCurve.transform(t),
);
}
}
实践3: 文档化和注释
为自定义Tween添加详细的文档和注释,说明其用途、使用方法和注意事项。
/// 自定义的Size Tween,支持不同的插值曲线
///
/// 使用示例:
/// ```dart
/// final tween = CustomSizeTween(
/// begin: Size(100, 100),
/// end: Size(200, 200),
/// curve: Curves.easeInOut,
/// );
/// final size = tween.lerp(0.5);
/// ```
class CustomSizeTween extends Tween<Size> {
/// 插值曲线,默认为线性插值
final Curve curve;
CustomSizeTween({
Size? begin,
Size? end,
this.curve = Curves.linear,
}) : super(begin: begin, end: end);
Size lerp(double t) {
// 应用曲线变换
final curvedT = curve.transform(t);
// 线性插值
return Size(
begin.width + (end.width - begin.width) * curvedT,
begin.height + (end.height - begin.height) * curvedT,
);
}
}
实践4: 测试和验证
为自定义Tween编写完整的测试用例,确保在各种边界条件下都能正确工作。
group('CustomSizeTween', () {
  test('should interpolate from begin to end', () {
    final tween = CustomSizeTween(
      begin: Size(100, 100),
      end: Size(200, 200),
    );

    expect(tween.lerp(0.0), Size(100, 100));
    expect(tween.lerp(1.0), Size(200, 200));
  });

  test('should handle null values', () {
    final tween = CustomSizeTween(
      begin: null,
      end: Size(200, 200),
    );

    expect(tween.lerp(0.5), Size(100, 100));
  });

  test('should apply curve correctly', () {
    final tween = CustomSizeTween(
      begin: Size(100, 100),
      end: Size(200, 200),
      curve: Curves.easeInOut,
    );

    final result = tween.lerp(0.5);
    expect(result.width > 100 && result.width < 200, true);
  });
});
三、总结
Hero自定义Tween通过继承Tween类并重写lerp方法,可以完全控制Hero飞行过程中属性的变化方式,实现比默认Hero更加精确和灵活的动画效果。本文深入讲解了10个核心知识点,包括Tween类的工作原理、自定义SizeTween的实现、在Hero动画中使用自定义Tween、非线性插值的实现、贝塞尔曲线插值、自定义Tween的实际应用场景、示例代码展示、自定义Tween的性能考虑、调试自定义Tween以及最佳实践。
通过example06_hero_custom_tween.dart的实际代码,详细分析了如何自定义SizeTween并在Hero动画中使用,包括线性插值、非线性插值、贝塞尔曲线等多种插值算法。掌握了这些知识点和技巧,开发者可以构建出精确控制、富有创意的Hero动画效果。
自定义Tween不仅是技术实现的挑战,更是数学思维和艺术创造的结合。需要从动画的需求出发,选择合适的插值算法,优化性能表现,确保动画的流畅性和准确性。通过不断的学习和实践,掌握这些技巧和最佳实践,能够帮助开发者构建出更加出色的Hero动画。
欢迎加入开源鸿蒙跨平台社区:https://openharmonycrossplatform.csdn.net

讨论HarmonyOS开发技术,专注于API与组件、DevEco Studio、测试、元服务和应用上架分发等。
更多推荐

 15
15 0
0- 0


 已为社区贡献30条内容

所有评论(0)