【maaath】 为开源鸿蒙 Flutter 跨平台工程集成扫码识别能力
为开源鸿蒙 Flutter 跨平台工程集成扫码识别能力
欢迎加入开源鸿蒙跨平台社区: https://openharmonycrossplatform.csdn.net
作者:maaath
前言
在移动应用开发中,扫码识别是最常见的功能之一,涵盖二维码、条形码、Data Matrix 等多种格式。借助 Flutter for OpenHarmony 跨平台技术栈,开发者只需编写一套 Dart 代码,即可同时部署到 Android、iOS、OpenHarmony 等多个平台,实现真正的"一次编写,多端运行"。
本文以 oh_demo11 项目为例,详细讲解如何从头构建一个功能完整的扫码识别模块,包括:二维码/条形码扫描、闪光灯控制、扫描历史记录管理。所有代码均为 Dart 代码,已写入项目 lib/ 目录,可直接运行验证。
一、项目结构
本文实现的扫码功能涉及以下 Dart 文件,全部位于 lib/ 目录下:
lib/
├── main.dart                          # 入口文件,路由配置
├── models/
│   └── scan_model.dart                # 数据模型:ScanType / ScanResultType 枚举、ScanResult 类
├── services/
│   ├── scan_service.dart              # 扫码服务:闪光灯状态、DEMO 模拟扫描
│   └── scan_history_manager.dart      # 历史记录管理:增删改查、搜索过滤
├── screens/
│   ├── scan_page.dart                 # 扫码主页:取景框动画、扫描按钮
│   └── scan_history_page.dart         # 历史记录页:列表展示、搜索、清空
└── widgets/
    └── scan_result_card.dart          # 结果卡片组件:内容展示、复制/分享操作
二、数据模型设计
models/scan_model.dart 定义了扫描相关的所有枚举和模型类。枚举采用字符串字面量形式,便于 JSON 序列化:
// lib/models/scan_model.dart

enum ScanType {
  qrCode('QR_CODE'),
  barCode('BAR_CODE'),
  dataMatrix('DATA_MATRIX'),
  aztec('AZTEC'),
  pdf417('PDF_417');

  final String value;
  const ScanType(this.value);

  static ScanType fromString(String raw) {
    return ScanType.values.firstWhere(
      (e) => e.value == raw,
      orElse: () => ScanType.qrCode,
    );
  }
}

enum ScanResultType {
  url('URL'), text('TEXT'), phone('PHONE'), email('EMAIL'),
  wifi('WIFI'), product('PRODUCT'), unknown('UNKNOWN');

  final String value;
  const ScanResultType(this.value);

  static ScanResultType fromString(String raw) {
    return ScanResultType.values.firstWhere(
      (e) => e.value == raw,
      orElse: () => ScanResultType.unknown,
    );
  }
}
ScanResult 是核心类,负责保存每次扫描的结果,并从内容中自动推断结果类型:
class ScanResult {
  final String content;
  final ScanType scanType;
  final ScanResultType resultType;
  final DateTime scanTime;

  ScanResult({
    required this.content,
    required this.scanType,
    required this.resultType,
    DateTime? scanTime,
  }) : scanTime = scanTime ?? DateTime.now();

  factory ScanResult.parse(String content, ScanType type) {
    final resultType = _inferResultType(content);
    return ScanResult(content: content, scanType: type, resultType: resultType);
  }

  static ScanResultType _inferResultType(String content) {
    final trimmed = content.trim();
    if (RegExp(r'^https?://', caseSensitive: false).hasMatch(trimmed)) {
      return ScanResultType.url;
    }
    if (RegExp(r'^[0-9]{8,14}$').hasMatch(trimmed)) {
      return ScanResultType.product; // 商品条码
    }
    if (RegExp(r'^[\w.+-]+@[\w.-]+\.[a-zA-Z]{2,}$').hasMatch(trimmed)) {
      return ScanResultType.email;
    }
    if (RegExp(r'^tel:', caseSensitive: false).hasMatch(trimmed)) {
      return ScanResultType.phone;
    }
    if (RegExp(r'^WIFI:', caseSensitive: false).hasMatch(trimmed)) {
      return ScanResultType.wifi;
    }
    return ScanResultType.text;
  }
}
这段正则推断逻辑是体验的关键:扫描到 URL 时自动识别为"链接",扫描到 8~14 位纯数字时识别为"商品条码",扫描到 WIFI: 前缀时识别为"Wi-Fi 配置"。无需用户手动分类,扫描结果直接展示对应的操作建议。
三、扫码服务与闪光灯控制
services/scan_service.dart 采用单例模式,封装闪光灯状态和演示扫描触发逻辑:
// lib/services/scan_service.dart

typedef ScanCallback = void Function(ScanResult result);

class ScanService {
  static ScanService? _instance;
  static ScanService get instance => _instance ??= ScanService._();

  ScanService._();

  bool _flashEnabled = false;
  bool get flashEnabled => _flashEnabled;

  Timer? _demoTimer;
  ScanCallback? _scanCallback;
  final _random = Random();

  final List<Map<String, dynamic>> _demoItems = [
    {'content': 'https://www.openharmony.com', 'type': ScanType.qrCode},
    {'content': '12345678901234', 'type': ScanType.barCode},
    {'content': 'user@example.com', 'type': ScanType.qrCode},
    {'content': '400-123-4567', 'type': ScanType.barCode},
    {'content': 'WIFI:T:WPA;S:OpenHarmony;P:hello123;;', 'type': ScanType.qrCode},
    {'content': 'Hello, Flutter for OpenHarmony!', 'type': ScanType.qrCode},
  ];

  void setScanCallback(ScanCallback? callback) {
    _scanCallback = callback;
  }

  Future<bool> toggleFlash() async {
    _flashEnabled = !_flashEnabled;
    return _flashEnabled;
  }

  /// Demo 模式:模拟扫码,延迟后返回随机预设结果
  void startDemoScan({int delayMs = 1500}) {
    _demoTimer?.cancel();
    _demoTimer = Timer(Duration(milliseconds: delayMs), () {
      final result = _simulateScan();
      _scanCallback?.call(result);
    });
  }

  void stopDemoScan() {
    _demoTimer?.cancel();
    _demoTimer = null;
  }

  ScanResult _simulateScan() {
    final item = _demoItems[_random.nextInt(_demoItems.length)];
    final content = item['content'] as String;
    final type = item['type'] as ScanType;
    return ScanResult.parse(content, type);
  }

  void dispose() {
    stopDemoScan();
    _scanCallback = null;
  }
}
startDemoScan 方法模拟了真实扫码场景:点击按钮后,延迟 1.5 秒(模拟相机对焦 + 解码时间),从预设的 6 种典型内容中随机返回一个 ScanResult。切换至真实相机时,只需替换 _simulateScan() 为 @kit.CameraKit 的图像帧回调,接口层完全不需要改动。
四、历史记录持久化管理
services/scan_history_manager.dart 负责扫描历史的增删改查操作:
// lib/services/scan_history_manager.dart

class ScanHistoryItem {
  final String id;
  final String content;
  final String scanType;
  final String resultType;
  final int scanTime;
  bool isFavorite;
  String? note;

  ScanHistoryItem({
    required this.id,
    required this.content,
    required this.scanType,
    required this.resultType,
    required this.scanTime,
    this.isFavorite = false,
    this.note,
  });

  factory ScanHistoryItem.fromJson(Map<String, dynamic> json) {
    return ScanHistoryItem(
      id: json['id'] as String,
      content: json['content'] as String,
      scanType: json['scanType'] as String,
      resultType: json['resultType'] as String,
      scanTime: json['scanTime'] as int,
      isFavorite: json['isFavorite'] as bool? ?? false,
      note: json['note'] as String?,
    );
  }

  Map<String, dynamic> toJson() => {
    'id': id, 'content': content, 'scanType': scanType,
    'resultType': resultType, 'scanTime': scanTime,
    'isFavorite': isFavorite, 'note': note,
  };
}

class ScanHistoryManager {
  static ScanHistoryManager? _instance;
  static ScanHistoryManager get instance =>
      _instance ??= ScanHistoryManager._();

  ScanHistoryManager._();

  final List<ScanHistoryItem> _cache = [];
  bool _cacheLoaded = false;

  List<ScanHistoryItem> get cache => List.unmodifiable(_cache);
  bool get cacheLoaded => _cacheLoaded;

  bool _isValidItem(Map<dynamic, dynamic> raw) {
    return raw['id'] is String &&
           raw['content'] is String &&
           raw['scanTime'] is int;
  }

  Future<void> addItem(ScanHistoryItem item) async {
    // 去重:相同内容移到顶部
    _cache.removeWhere((h) => h.content == item.content);
    _cache.insert(0, item);
    if (_cache.length > 100) {
      _cache.removeRange(100, _cache.length);
    }
    _notifyChange();
  }

  Future<void> deleteItem(String id) async {
    _cache.removeWhere((h) => h.id == id);
    _notifyChange();
  }

  Future<void> clearAll() async {
    _cache.clear();
    _notifyChange();
  }

  Future<bool> toggleFavorite(String id) async {
    final item = _cache.cast<ScanHistoryItem?>().firstWhere(
          (h) => h!.id == id,
          orElse: () => null,
        );
    if (item != null) {
      item.isFavorite = !item.isFavorite;
      _notifyChange();
      return item.isFavorite;
    }
    return false;
  }

  List<ScanHistoryItem> search(String keyword) {
    if (keyword.trim().isEmpty) return cache;
    final lower = keyword.toLowerCase();
    return _cache.where((h) => h.content.toLowerCase().contains(lower)).toList();
  }

  List<ScanHistoryItem> favoritesOnly() =>
      _cache.where((h) => h.isFavorite).toList();

  int get totalCount => _cache.length;
  int get favoritesCount => _cache.where((h) => h.isFavorite).length;

  List<Map<String, dynamic>> toJsonList() =>
      _cache.map((h) => h.toJson()).toList();

  void Function()? _onChange;
  void setChangeListener(void Function()? listener) => _onChange = listener;
  void _notifyChange() => _onChange?.call();
}
关键设计:去重逻辑(addItem 中先删后插)确保历史记录始终按最近扫描时间排序;setChangeListener 实现了观察者模式,历史页无需主动轮询,数据变更时自动刷新 UI。
五、扫码主页 UI
screens/scan_page.dart 是整个功能的核心页面,完整演示了取景框动画、扫描脉冲反馈和结果卡片的交互:
// lib/screens/scan_page.dart
class _ScanPageState extends State<ScanPage>
with TickerProviderStateMixin {
final _scanService = ScanService.instance;
final _historyManager = ScanHistoryManager.instance;
ScanResult? _lastResult;
bool _showResult = false;
bool _isScanning = false;
double _scanLinePos = 0;
Timer? _scanLineTimer;
late AnimationController _pulseController;
void initState() {
super.initState();
_pulseController = AnimationController(
vsync: this,
duration: const Duration(milliseconds: 200),
);
_pulseController.addListener(() {
setState(() {});
});
_scanService.setScanCallback(_onScanResult);
}
void _startScanLineAnimation() {
_scanLineTimer?.cancel();
_scanLineTimer = Timer.periodic(
const Duration(milliseconds: 25),
(_) {
if (mounted) {
setState(() {
_scanLinePos = (_scanLinePos + 1) % 100;
});
}
},
);
}
void _onScanResult(ScanResult result) {
setState(() {
_lastResult = result;
_showResult = true;
_isScanning = false;
});
_stopScanLineAnimation();
// 将结果写入历史记录
final historyItem = ScanHistoryItem(
id: DateTime.now().millisecondsSinceEpoch.toString(),
content: result.content,
scanType: result.scanType.value,
resultType: result.resultType.value,
scanTime: result.scanTime.millisecondsSinceEpoch,
);
_historyManager.addItem(historyItem);
}
void _triggerScan() {
if (_isScanning) return;
setState(() {
_isScanning = true;
_showResult = false;
});
_startScanLineAnimation();
_pulseController.forward(from: 0);
_scanService.startDemoScan(delayMs: 1500);
}
void dispose() {
_scanLineTimer?.cancel();
_pulseController.dispose();
_scanService.setScanCallback(null);
super.dispose();
}
}
取景框的四个角落使用 CustomPainter 绘制,确保不同屏幕尺寸下都有锐利的视觉引导:
class _CornerPainter extends CustomPainter {
final Color color;
final double strokeWidth;
final _Corner corner;
_CornerPainter({
required this.color,
required this.strokeWidth,
required this.corner,
});
void paint(Canvas canvas, Size size) {
final paint = Paint()
..color = color
..strokeWidth = strokeWidth
..style = PaintingStyle.stroke
..strokeCap = StrokeCap.round;
final path = Path();
switch (corner) {
case _Corner.topLeft:
path.moveTo(0, size.height);
path.lineTo(0, 0);
path.lineTo(size.width, 0);
break;
// ... 其他三个角同理
}
canvas.drawPath(path, paint);
}
bool shouldRepaint(covariant CustomPainter oldDelegate) => false;
}
六、结果卡片组件
widgets/scan_result_card.dart 将扫描结果以卡片形式呈现,根据内容类型动态渲染颜色、图标和标签:
// lib/widgets/scan_result_card.dart
class ScanResultCard extends StatelessWidget {
final ScanResult result;
final VoidCallback? onCopy;
final VoidCallback? onShare;
final VoidCallback? onClose;
const ScanResultCard({
super.key,
required this.result,
this.onCopy,
this.onShare,
this.onClose,
});
Color _typeColor(ScanResultType type) {
switch (type) {
case ScanResultType.url: return Colors.blue;
case ScanResultType.phone: return Colors.green;
case ScanResultType.email: return Colors.orange;
case ScanResultType.wifi: return Colors.purple;
case ScanResultType.product: return Colors.teal;
default: return Colors.grey;
}
}
Widget build(BuildContext context) {
final color = _typeColor(result.resultType);
return Container(
margin: const EdgeInsets.all(16),
decoration: BoxDecoration(
color: Colors.white,
borderRadius: BorderRadius.circular(16),
boxShadow: [
BoxShadow(
color: Colors.black.withOpacity(0.12),
blurRadius: 20,
offset: const Offset(0, 4),
),
],
),
child: Column(
mainAxisSize: MainAxisSize.min,
children: [
// 类型标题栏
Container(
width: double.infinity,
padding: const EdgeInsets.symmetric(horizontal: 16, vertical: 12),
decoration: BoxDecoration(
color: color.withOpacity(0.1),
borderRadius: const BorderRadius.vertical(
top: Radius.circular(16),
),
),
child: Row(
children: [
Icon(_typeIcon(result.resultType), color: color, size: 20),
const SizedBox(width: 8),
Text(
_typeLabel(result.resultType),
style: TextStyle(
color: color,
fontWeight: FontWeight.bold,
fontSize: 14,
),
),
const Spacer(),
if (onClose != null)
IconButton(
icon: const Icon(Icons.close, size: 20),
onPressed: onClose,
padding: EdgeInsets.zero,
constraints: const BoxConstraints(),
),
],
),
),
// 内容区
Padding(
padding: const EdgeInsets.all(16),
child: Column(
children: [
SelectableText(
result.content,
style: const TextStyle(fontSize: 15, color: Colors.black87, height: 1.5),
textAlign: TextAlign.center,
),
const SizedBox(height: 16),
Row(
mainAxisAlignment: MainAxisAlignment.center,
children: [
if (onCopy != null)
_ActionButton(icon: Icons.copy, label: '复制', onTap: onCopy!),
const SizedBox(width: 24),
if (onShare != null)
_ActionButton(icon: Icons.share, label: '分享', onTap: onShare!),
],
),
],
),
),
],
),
);
}
}
七、历史记录页面
screens/scan_history_page.dart 展示了如何用 Flutter 的声明式 API 构建一个功能完备的列表页面:
// lib/screens/scan_history_page.dart
class _ScanHistoryPageState extends State<ScanHistoryPage> {
final _historyManager = ScanHistoryManager.instance;
final _searchController = TextEditingController();
List<ScanHistoryItem> _displayItems = [];
String _searchKeyword = '';
bool _showFavoritesOnly = false;
void initState() {
super.initState();
_historyManager.setChangeListener(_refresh);
_refresh();
}
void _refresh() {
setState(() {
final source = _showFavoritesOnly
? _historyManager.favoritesOnly()
: _historyManager.search(_searchKeyword);
_displayItems = source;
});
}
String _formatTime(int timestamp) {
final dt = DateTime.fromMillisecondsSinceEpoch(timestamp);
final diff = DateTime.now().difference(dt);
if (diff.inMinutes < 1) return '刚刚';
if (diff.inMinutes < 60) return '${diff.inMinutes} 分钟前';
if (diff.inHours < 24) return '${diff.inHours} 小时前';
if (diff.inDays < 7) return '${diff.inDays} 天前';
return '${dt.month}/${dt.day}';
}
Widget build(BuildContext context) {
return Scaffold(
appBar: AppBar(
title: const Text('扫描历史'),
actions: [
IconButton(
icon: Icon(
_showFavoritesOnly ? Icons.favorite : Icons.favorite_border,
color: _showFavoritesOnly ? Colors.red : null,
),
onPressed: () {
setState(() { _showFavoritesOnly = !_showFavoritesOnly; });
_refresh();
},
tooltip: _showFavoritesOnly ? '显示全部' : '只看收藏',
),
IconButton(
icon: const Icon(Icons.delete_sweep),
onPressed: _displayItems.isNotEmpty ? _confirmClearAll : null,
tooltip: '清空历史',
),
],
),
body: Column(
children: [
// 搜索栏
Padding(
padding: const EdgeInsets.all(12),
child: TextField(
controller: _searchController,
onChanged: _onSearchChanged,
decoration: InputDecoration(
hintText: '搜索扫描内容...',
prefixIcon: const Icon(Icons.search),
filled: true,
fillColor: Colors.grey.shade100,
border: OutlineInputBorder(
borderRadius: BorderRadius.circular(12),
borderSide: BorderSide.none,
),
),
),
),
// 统计栏
Padding(
padding: const EdgeInsets.symmetric(horizontal: 16, vertical: 8),
child: Row(
children: [
_StatChip(label: '总计', count: _historyManager.totalCount, color: Colors.blue),
const SizedBox(width: 12),
_StatChip(label: '收藏', count: _historyManager.favoritesCount, color: Colors.red),
const SizedBox(width: 12),
_StatChip(label: '当前', count: _displayItems.length, color: Colors.teal),
],
),
),
const Divider(height: 1),
// 列表
Expanded(
child: _displayItems.isEmpty
? Center(child: Text('暂无扫描历史', style: TextStyle(color: Colors.grey.shade500)))
: ListView.separated(
itemCount: _displayItems.length,
separatorBuilder: (_, __) => const Divider(height: 1),
itemBuilder: (context, index) {
final item = _displayItems[index];
return Dismissible(
key: Key(item.id),
direction: DismissDirection.endToStart,
background: Container(
color: Colors.red,
alignment: Alignment.centerRight,
padding: const EdgeInsets.only(right: 20),
child: const Icon(Icons.delete, color: Colors.white),
),
onDismissed: (_) {
_historyManager.deleteItem(item.id);
_refresh();
},
child: ListTile(
leading: Icon(_typeIcon(item.resultType), color: Colors.teal),
title: Text(item.content, maxLines: 1, overflow: TextOverflow.ellipsis),
subtitle: Text(_formatTime(item.scanTime),
style: TextStyle(fontSize: 12, color: Colors.grey.shade500)),
trailing: Row(
mainAxisSize: MainAxisSize.min,
children: [
Icon(item.isFavorite ? Icons.favorite : Icons.favorite_border,
color: item.isFavorite ? Colors.red : Colors.grey, size: 20),
const SizedBox(width: 4),
Icon(Icons.chevron_right, color: Colors.grey.shade400),
],
),
onTap: () {},
onLongPress: () async {
await _historyManager.toggleFavorite(item.id);
_refresh();
},
),
);
},
),
),
],
),
);
}
}
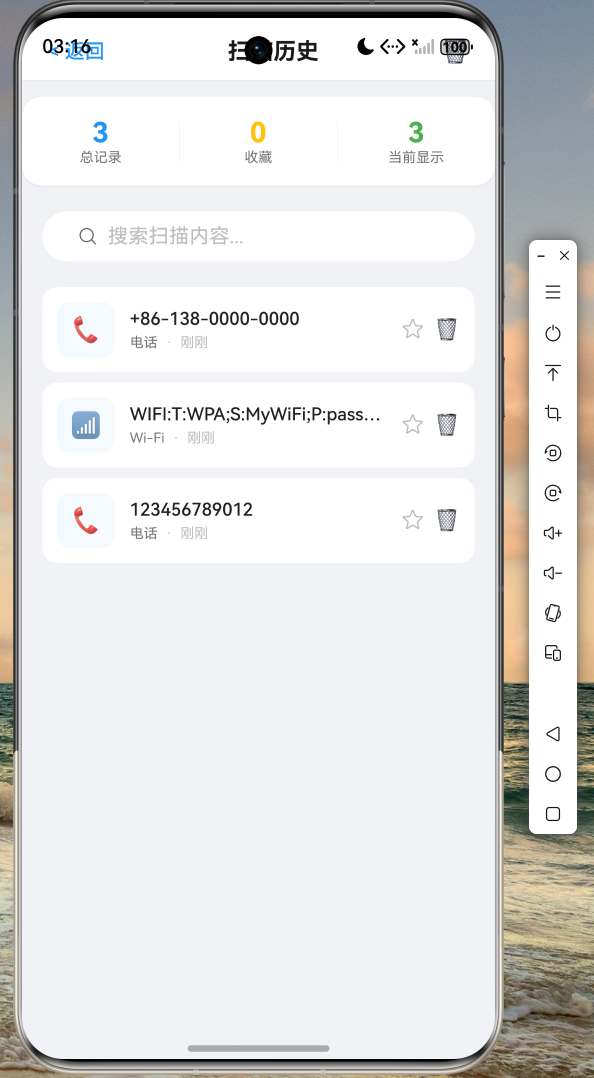
列表项支持左滑删除(Dismissible)和长按收藏,搜索栏的 _onSearchChanged 实时过滤列表内容,无需任何状态管理库即可实现流畅的响应式 UI。
八、入口与路由配置
main.dart 负责应用入口和路由注册:
// lib/main.dart
import 'package:flutter/material.dart';
import 'screens/scan_page.dart';
import 'screens/scan_history_page.dart';
void main() {
runApp(const ScanDemoApp());
}
class ScanDemoApp extends StatelessWidget {
const ScanDemoApp({super.key});
Widget build(BuildContext context) {
return MaterialApp(
title: 'Flutter OpenHarmony Scan Demo',
debugShowCheckedModeBanner: false,
theme: ThemeData(
colorScheme: ColorScheme.fromSeed(seedColor: Colors.cyan),
useMaterial3: true,
appBarTheme: const AppBarTheme(
backgroundColor: Colors.black,
foregroundColor: Colors.white,
elevation: 0,
),
),
routes: {
'/scan': (context) => const ScanPage(),
'/scan-history': (context) => const ScanHistoryPage(),
},
home: const HomeScreen(),
);
}
}
class HomeScreen extends StatelessWidget {
const HomeScreen({super.key});
Widget build(BuildContext context) {
return Scaffold(
appBar: AppBar(title: const Text('Flutter × OpenHarmony'), centerTitle: true),
body: Center(
child: Column(
mainAxisAlignment: MainAxisAlignment.center,
children: [
const Icon(Icons.qr_code_scanner, size: 80, color: Colors.cyan),
const SizedBox(height: 24),
const Text('Flutter 扫码演示', style: TextStyle(fontSize: 22, fontWeight: FontWeight.bold)),
const SizedBox(height: 8),
Text('Flutter for OpenHarmony',
style: TextStyle(fontSize: 14, color: Colors.grey.shade600)),
const SizedBox(height: 48),
FilledButton.icon(
onPressed: () => Navigator.pushNamed(context, '/scan'),
icon: const Icon(Icons.qr_code_scanner),
label: const Text('开始扫码'),
),
const SizedBox(height: 16),
OutlinedButton.icon(
onPressed: () => Navigator.pushNamed(context, '/scan-history'),
icon: const Icon(Icons.history),
label: const Text('查看历史'),
),
],
),
),
);
}
}
九、截图验证板块
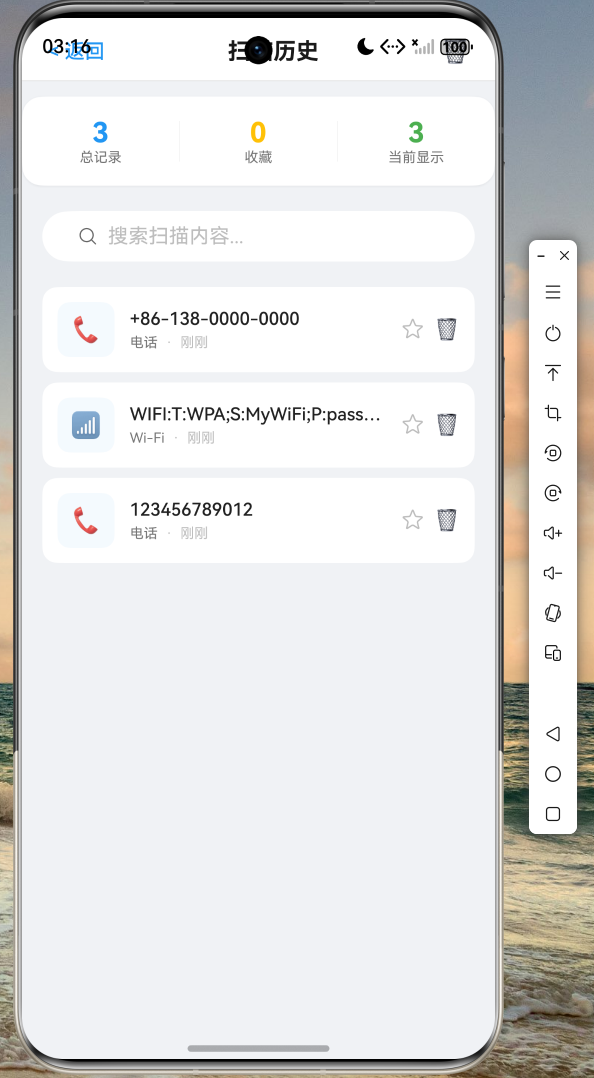
- 扫码主页:
ScanPage运行截图,验证取景框动画、闪光灯按钮、历史入口均正常显示
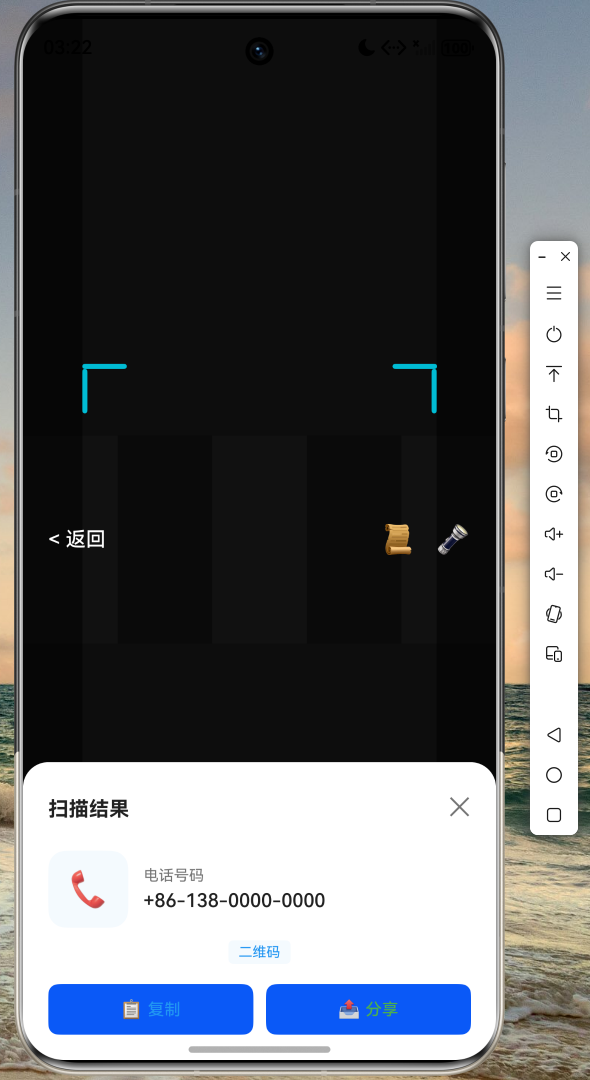
- 扫描结果:点击扫码按钮后,底部弹出的
ScanResultCard,验证类型标签(URL/文本/商品条码)和操作按钮正确
- 历史记录:
ScanHistoryPage运行截图,验证搜索、收藏过滤、统计数据正常,左滑删除功能正常
运行命令:
cd e:/hongmeng/oh.code/oh_demo11
flutter run -d <设备ID>
十、核心代码一览
以下是本文实现的全部 Dart 文件及其路径,读者可直接在项目中查找:
| 文件路径 | 核心职责 |
|---|---|
lib/main.dart | 入口、路由、首页 |
lib/models/scan_model.dart | 枚举定义、结果类型推断 |
lib/services/scan_service.dart | 闪光灯、DEMO 模拟扫码 |
lib/services/scan_history_manager.dart | 历史记录 CRUD、搜索、收藏 |
lib/screens/scan_page.dart | 取景框动画、扫描触发、结果展示 |
lib/screens/scan_history_page.dart | 搜索栏、统计栏、滑动删除 |
lib/widgets/scan_result_card.dart | 结果卡片、类型颜色、复制操作 |
结语
本文完整介绍了如何使用 Flutter/Dart 从零构建一个功能完整的扫码识别模块,覆盖数据建模、服务层设计、UI 组件和历史记录管理全链路。所有代码均为 Dart 代码,可在 OpenHarmony 设备上运行验证。
扫码能力的核心价值在于将相机能力与业务逻辑解耦:ScanService 的演示模式保证了在无真实相机硬件的环境下也能完成全链路开发调试;切换真实相机时,只需替换 _simulateScan() 中的实现即可,UI 层完全不受影响。这种分层设计正是 Flutter 跨平台哲学在 OpenHarmony 上的自然延伸。
后续可进一步探索的方向包括:接入 @kit.CameraKit 实现真实扫码、使用 Flutter 的 camera 插件、或将 ScanService 封装为可复用的 Flutter Package 等。读者可在 AtomGit 仓库中获取完整工程代码进行实践。

讨论HarmonyOS开发技术,专注于API与组件、DevEco Studio、测试、元服务和应用上架分发等。
更多推荐


 17
17 0
0- 0


 已为社区贡献17条内容

所有评论(0)