ArkTS列表布局List与Grid:数据驱动的高性能列表方案
文章目录

每日一句正能量
处境不同,角度不一,一味地奢求别人理解,只会让自己感到疲惫。
真正的理解需要对方拥有相似的经历、认知框架和共情意愿,三者缺一不可。当你把理解当作应得之物,就容易陷入委屈;当你视之为稀有礼物,得到时感恩,得不到也释然。
摘要
摘要:List(列表布局)是HarmonyOS ArkTS开发中处理大量数据展示的核心组件。本文从List与ListItem的基础结构出发,深入讲解List容器的滚动控制、分割线、边缘效果等属性,ListItem的滑动操作、粘性定位等交互能力,以及ForEach与LazyForEach两种数据驱动模式的差异与选型策略,并通过聊天消息列表、联系人分组、设置页面等实战案例,帮助开发者构建高性能、高体验的列表界面。
一、引言:列表布局的重要性
在移动应用开发中,列表是最常见的界面形式之一。从微信的聊天列表到淘宝的商品列表,从系统设置到新闻资讯,列表无处不在。然而,当数据量达到成百上千条时,如何确保列表的渲染性能和滚动流畅度,成为开发者面临的核心挑战。
ArkTS提供了List组件作为列表布局的解决方案。与简单的Column嵌套不同,List内置了虚拟滚动、懒加载、滑动操作、粘性头部等高级能力,能够高效处理大规模数据展示场景。同时,List与Grid(网格布局)可以配合使用,构建更丰富的数据展示形式。
本文将从核心概念、容器属性、子元素属性、数据驱动模式、实战案例和性能优化六个维度,全面解析ArkTS列表布局的技术细节。
二、List布局核心概念
2.1 组件结构
List布局由两个核心组件构成:
- List:列表容器,负责提供滚动视口、控制整体滚动行为、管理列表项的渲染策略。
- ListItem:列表项组件,作为List的直接子元素,负责单条数据的展示与交互。
List() {
  ListItem() { Text('消息1') }
  ListItem() { Text('消息2') }
  ListItem() { Text('消息3') }
}
2.2 与Column的区别
很多初学者会困惑:List和Column有什么区别?核心差异在于:
| 特性 | Column | List |
|---|---|---|
| 滚动能力 | 需嵌套Scroll | 内置滚动 |
| 大数据量 | 全部渲染,性能差 | 懒加载,性能优 |
| 滑动操作 | 需自行实现 | 内置swipeAction |
| 粘性头部 | 需自行实现 | 内置sticky |
| 分割线 | 需自行绘制 | 内置divider |
结论:当数据量超过一屏或需要滚动时,优先使用List;仅展示少量静态内容时,可使用Column。
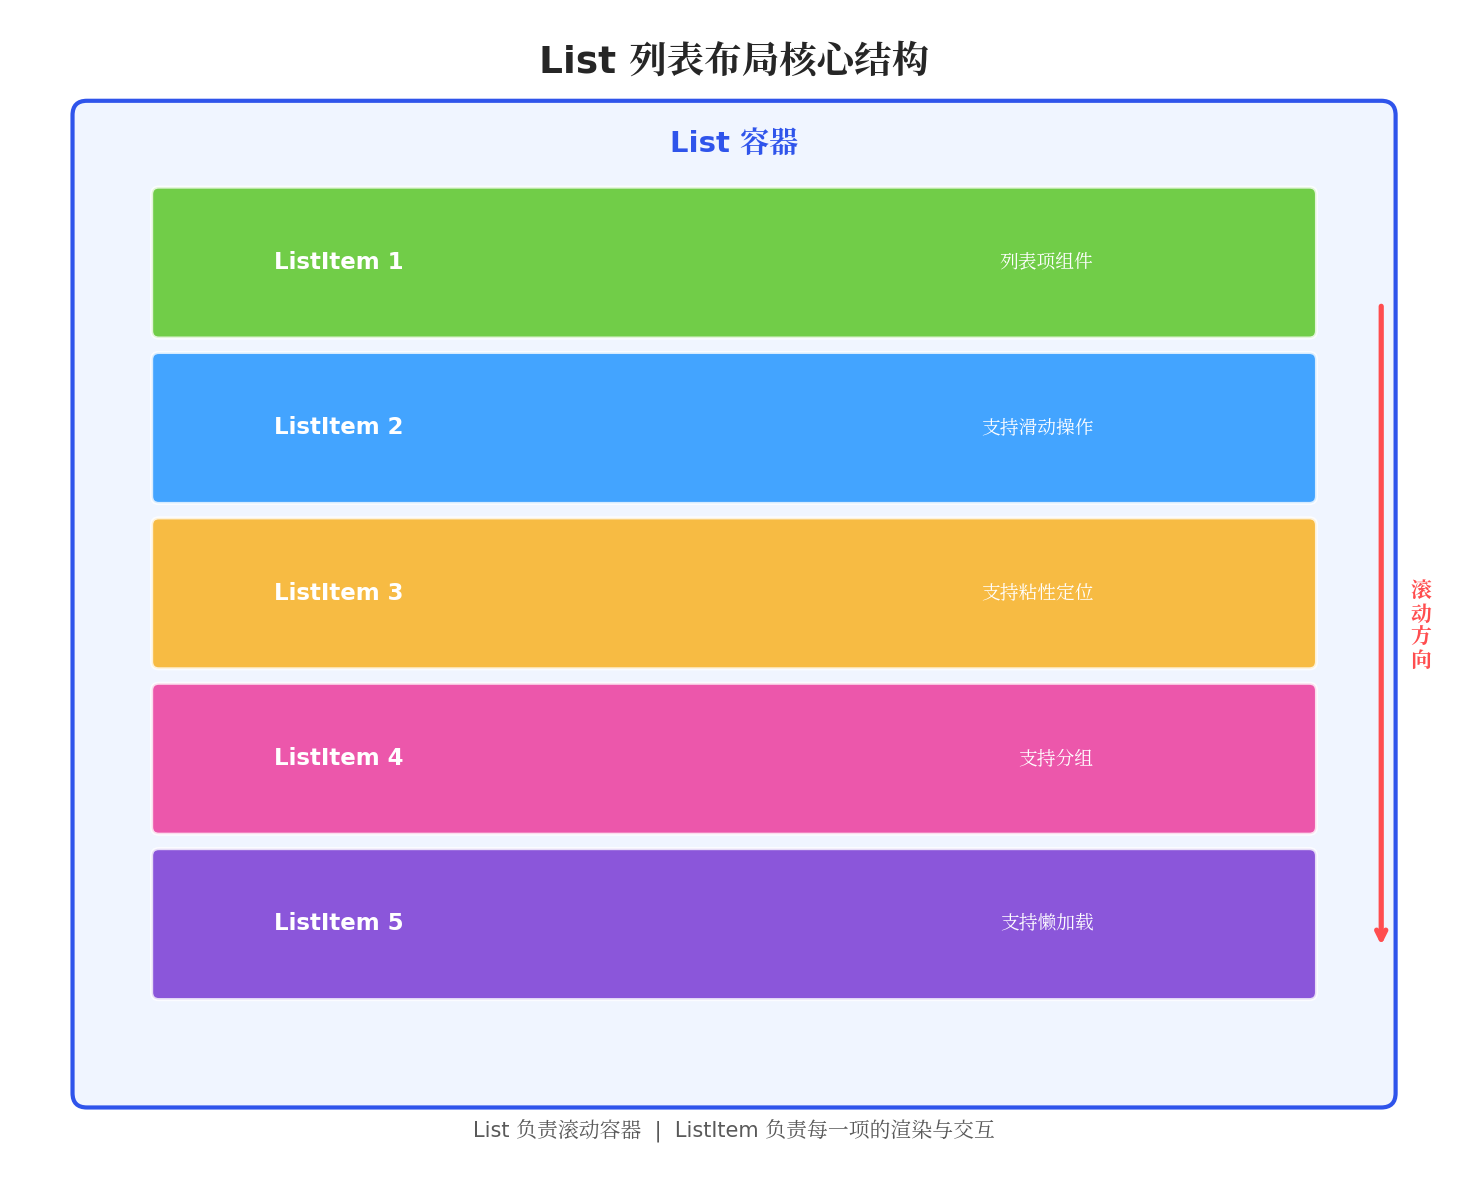
图1:List列表布局核心结构示意图。List作为滚动容器,内部包含多个ListItem子元素,支持垂直方向滚动浏览。
三、List容器属性详解
3.1 space:列表项间距
space属性控制相邻ListItem之间的间距,单位为vp。
List({ space: 12 }) {
  ForEach(this.messages, (msg: Message) => {
    ListItem() {
      this.MessageItemBuilder(msg)
    }
  })
}
开发建议:
- 聊天消息列表 →
space: 0(消息之间无间距,靠气泡内边距区分) - 联系人列表 →
space: 0(配合divider使用) - 卡片列表 →
space: 12(卡片之间有明确间隔)
3.2 divider:分割线
divider属性为列表项之间添加分割线,支持自定义样式。
List() {
  ForEach(this.settings, (item: SettingItem) => {
    ListItem() {
      this.SettingItemBuilder(item)
    }
  })
}
.divider({
  strokeWidth: 1,              // 分割线宽度
  color: '#E8E8E8',           // 分割线颜色
  startMargin: 16,             // 左侧留白
  endMargin: 16                // 右侧留白
})
3.3 scrollBar:滚动条控制
scrollBar属性控制滚动条的显示策略。
List() {
  // ...
}
.scrollBar(BarState.Auto)   // 滚动时显示,停止后隐藏

// 其他选项:
// BarState.On    - 始终显示
// BarState.Off   - 始终隐藏
3.4 edgeEffect:边缘效果
edgeEffect属性控制列表滚动到边缘时的视觉效果。
List() {
  // ...
}
.edgeEffect(EdgeEffect.Spring)  // 弹性回弹效果

// 其他选项:
// EdgeEffect.Fade   - 渐隐效果
// EdgeEffect.None   - 无效果
3.5 chainAnimation:链式动画
chainAnimation属性开启列表项的链式滚动动画,使滚动更加流畅自然。
List() {
  // ...
}
.chainAnimation(true)  // 开启链式动画
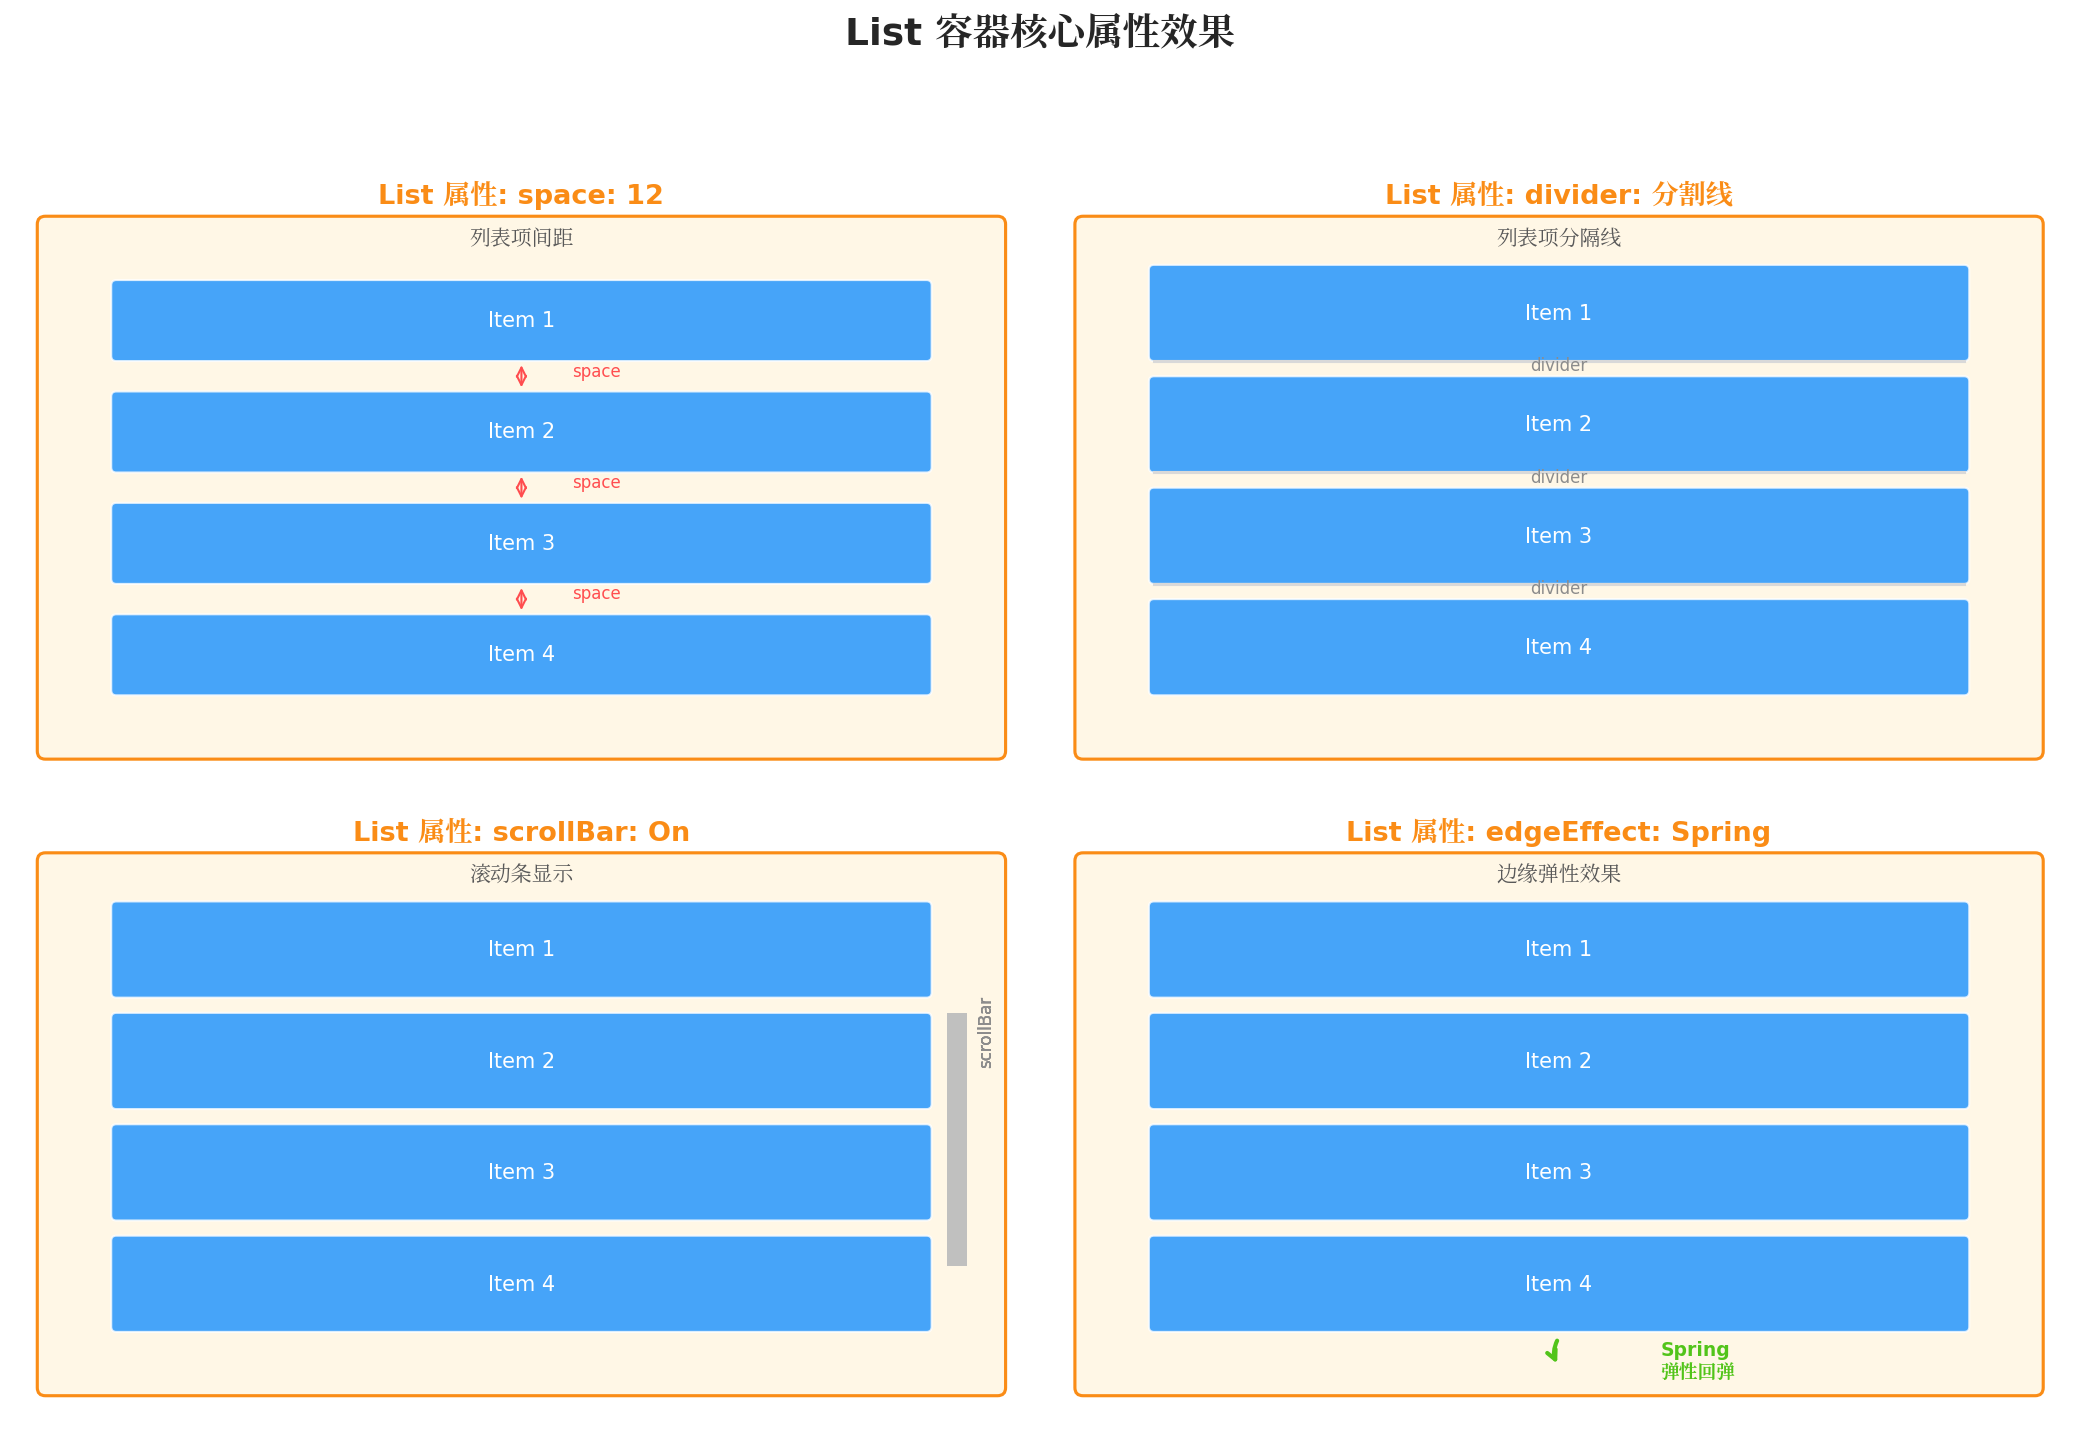
图2:List容器四种核心属性的效果对比。左上角为space间距控制,右上角为divider分割线,左下角为scrollBar滚动条,右下角为edgeEffect弹性回弹效果。
3.6 listDirection:滚动方向
listDirection属性控制列表的滚动方向,默认为垂直方向。
List() {
  // ...
}
.listDirection(Axis.Horizontal)  // 水平滚动列表

// 其他选项:
// Axis.Vertical   - 垂直滚动(默认)
开发建议:横向图片浏览、标签页切换等场景使用Axis.Horizontal。
3.7 完整属性配置示例
List({ space: 0 }) {
  ForEach(this.dataList, (item: DataItem, index: number) => {
    ListItem() {
      this.ItemBuilder(item, index)
    }
  })
}
.width('100%')
.layoutWeight(1)
.divider({
  strokeWidth: 0.5,
  color: '#E8E8E8',
  startMargin: 72,
  endMargin: 16
})
.scrollBar(BarState.Auto)
.edgeEffect(EdgeEffect.Spring)
.chainAnimation(true)
四、ListItem子元素属性详解
4.1 sticky:粘性定位
sticky属性使ListItem在滚动时"吸顶"或"吸底",常用于分组列表的头部。
List() {
  // A组头部
  ListItem() {
    Text('A组联系人')
      .width('100%')
      .height(40)
      .padding({ left: 16 })
      .backgroundColor('#F0F5FF')
      .fontColor('#1890FF')
      .fontWeight(FontWeight.Bold)
  }
  .sticky(StickyStyle.Header)  // 头部吸顶

  // A组联系人
  ForEach(this.groupA, (contact: Contact) => {
    ListItem() {
      this.ContactItemBuilder(contact)
    }
  })

  // B组头部
  ListItem() {
    Text('B组联系人')
      .width('100%')
      .height(40)
      .padding({ left: 16 })
      .backgroundColor('#F0F5FF')
      .fontColor('#1890FF')
      .fontWeight(FontWeight.Bold)
  }
  .sticky(StickyStyle.Header)

  // B组联系人
  ForEach(this.groupB, (contact: Contact) => {
    ListItem() {
      this.ContactItemBuilder(contact)
    }
  })
}
| 枚举值 | 说明 |
|---|---|
StickyStyle.None |
不粘性(默认) |
StickyStyle.Header |
滚动到顶部时吸顶 |
StickyStyle.Footer |
滚动到底部时吸底 |
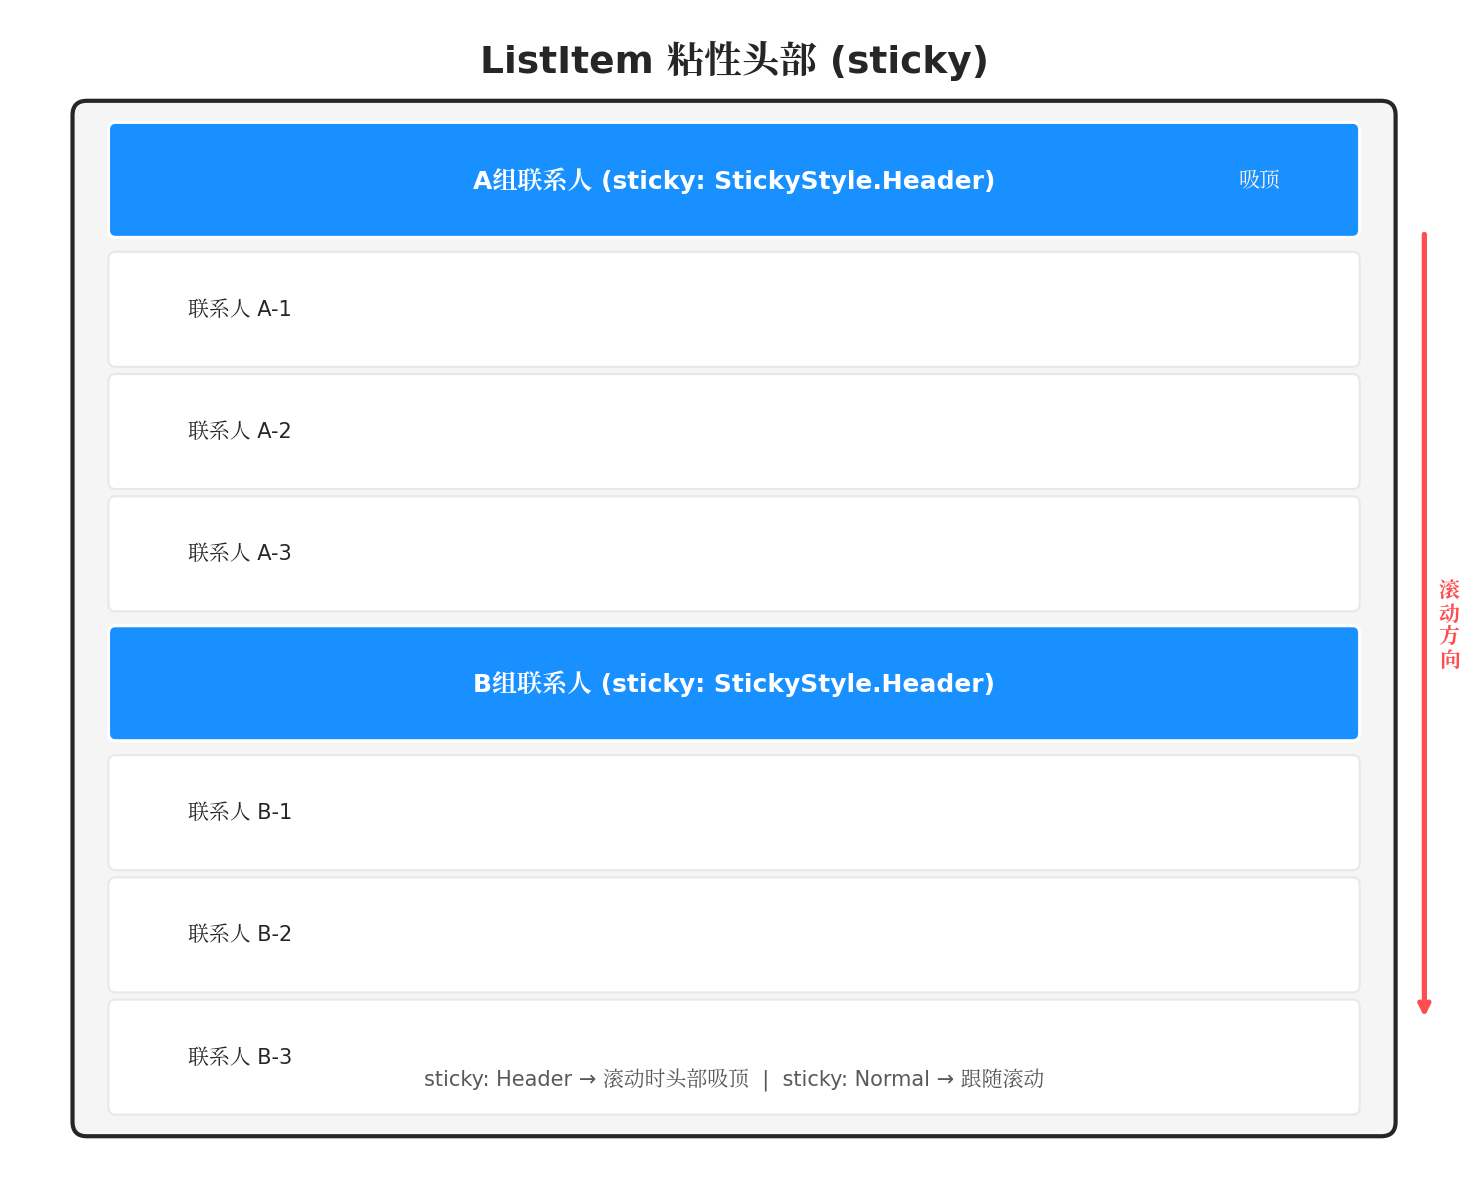
图4:ListItem粘性头部效果示意图。A组联系人和B组联系人的头部在滚动时会吸顶,帮助用户识别当前所在分组。
4.2 swipeAction:滑动操作
swipeAction属性为ListItem添加滑动操作按钮,支持左滑和右滑两种方向。
List() {
  ForEach(this.messages, (msg: Message, index: number) => {
    ListItem() {
      this.MessageItemBuilder(msg)
    }
    .swipeAction({
      start: {  // 右滑显示的操作(从右向左滑)
        builder: () => {
          this.StartSwipeBuilder(msg, index)
        }
      },
      end: {    // 左滑显示的操作(从左向右滑)
        builder: () => {
          this.EndSwipeBuilder(msg, index)
        }
      }
    })
  })
}

@Builder
StartSwipeBuilder(msg: Message, index: number) {
  Row() {
    Button('置顶')
      .width(70)
      .height('100%')
      .backgroundColor('#FAAD14')
      .fontColor('#FFFFFF')
      .onClick(() => {
        this.pinMessage(index)
      })
  }
}

@Builder
EndSwipeBuilder(msg: Message, index: number) {
  Row() {
    Button('删除')
      .width(70)
      .height('100%')
      .backgroundColor('#FF4D4F')
      .fontColor('#FFFFFF')
      .onClick(() => {
        this.deleteMessage(index)
      })
  }
}
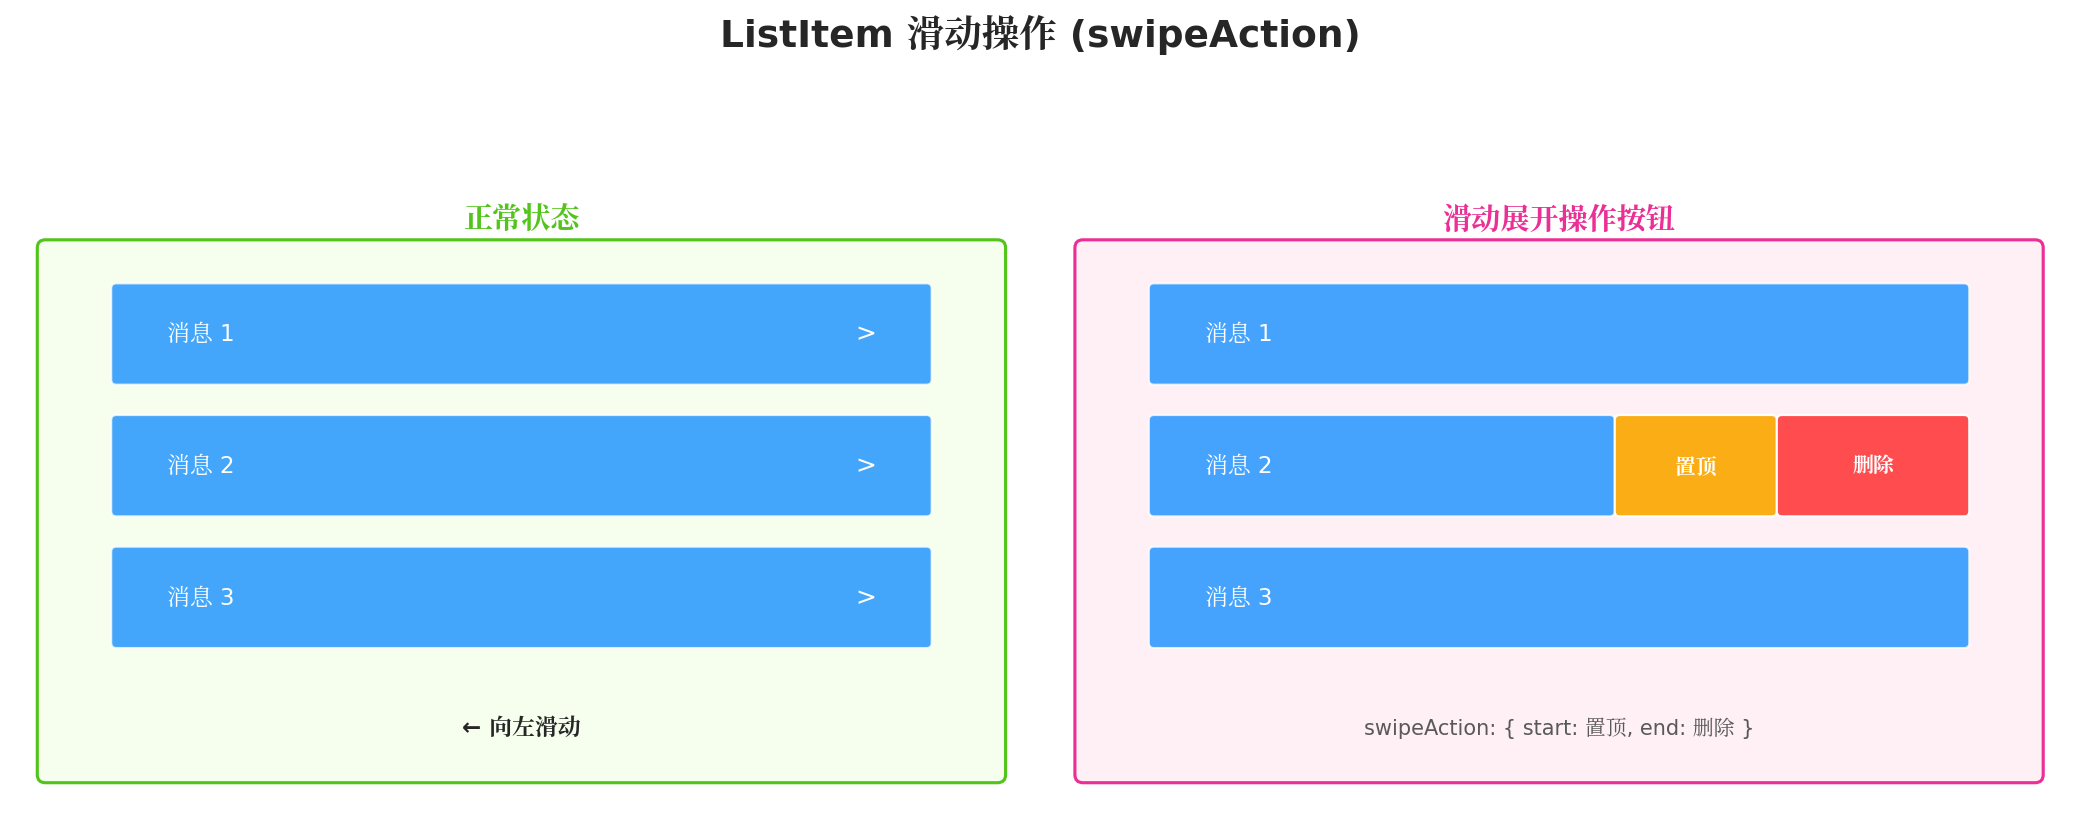
图3:ListItem滑动操作效果对比。左侧为正常状态,右侧为向左滑动后展开"置顶"和"删除"操作按钮。
开发建议:
- 聊天列表 → 左滑删除,右滑置顶
- 邮件列表 → 左滑删除/归档,右滑标记已读
- 购物车 → 左滑删除,右滑移入收藏
4.3 selectable:可选中
selectable属性控制ListItem是否支持选中状态。
ListItem() {
  this.ItemBuilder(item)
}
.selectable(true)           // 支持选中
.selected(this.isSelected) // 绑定选中状态
.onSelect((isSelected: boolean) => {
  this.isSelected = isSelected
})
五、数据驱动模式:ForEach vs LazyForEach
List组件本身不直接管理数据,需要通过数据驱动模式将数据与视图绑定。ArkTS提供了两种数据驱动方式:
5.1 ForEach:全量渲染
ForEach会一次性创建所有列表项,适用于数据量较小的场景。
List() {
  ForEach(this.items, (item: Item, index: number) => {
    ListItem() {
      this.ItemBuilder(item)
    }
  }, (item: Item, index: number) => JSON.stringify(item))
}
特点:
- 一次性渲染所有数据
- 数据变化时全量更新
- 实现简单,无需额外数据源类
- 数据量>50时不推荐使用
5.2 LazyForEach:懒加载渲染
LazyForEach采用虚拟滚动策略,仅渲染可视区域及缓冲区的列表项,是大数据量场景的最佳选择。
// 1. 定义数据源类
class MessageDataSource implements IDataSource {
  private messages: Message[] = []
  private listeners: DataChangeListener[] = []

  constructor(messages: Message[]) {
    this.messages = messages
  }

  totalCount(): number {
    return this.messages.length
  }

  getData(index: number): Message {
    return this.messages[index]
  }

  registerDataChangeListener(listener: DataChangeListener): void {
    this.listeners.push(listener)
  }

  unregisterDataChangeListener(listener: DataChangeListener): void {
    const pos = this.listeners.indexOf(listener)
    if (pos > -1) {
      this.listeners.splice(pos, 1)
    }
  }

  // 数据操作方法
  addMessage(msg: Message): void {
    this.messages.push(msg)
    this.notifyDataAdd(this.messages.length - 1)
  }

  deleteMessage(index: number): void {
    this.messages.splice(index, 1)
    this.notifyDataDelete(index)
  }

  private notifyDataAdd(index: number): void {
    this.listeners.forEach(listener => listener.onDataAdd(index))
  }

  private notifyDataDelete(index: number): void {
    this.listeners.forEach(listener => listener.onDataDelete(index))
  }
}

// 2. 使用LazyForEach
@Entry
@Component
struct MessageList {
  private dataSource: MessageDataSource = new MessageDataSource([
    { id: 1, content: '你好!', isSelf: false, time: '10:00' },
    { id: 2, content: '你好,有什么可以帮你的?', isSelf: true, time: '10:01' },
    // ... 更多数据
  ])

  build() {
    List({ space: 8 }) {
      LazyForEach(this.dataSource, (msg: Message, index: number) => {
        ListItem() {
          this.MessageBubbleBuilder(msg)
        }
        .swipeAction({
          end: {
            builder: () => {
              this.DeleteButtonBuilder(index)
            }
          }
        })
      }, (msg: Message) => msg.id.toString())
    }
    .width('100%')
    .layoutWeight(1)
    .edgeEffect(EdgeEffect.Spring)
  }

  @Builder
  MessageBubbleBuilder(msg: Message) {
    Row() {
      if (!msg.isSelf) {
        Image($r('app.media.avatar_other'))
          .width(40)
          .height(40)
          .borderRadius(20)
          .margin({ right: 8 })
      } else {
        Blank()
      }

      Column() {
        Text(msg.content)
          .fontSize(14)
          .fontColor(msg.isSelf ? '#FFFFFF' : '#262626')
          .padding(12)
          .backgroundColor(msg.isSelf ? '#1890FF' : '#F0F0F0')
          .borderRadius(12)
          .constraintSize({ maxWidth: '70%' })

        Text(msg.time)
          .fontSize(10)
          .fontColor('#BFBFBF')
          .margin({ top: 4 })
      }
      .alignItems(msg.isSelf ? HorizontalAlign.End : HorizontalAlign.Start)
      .layoutWeight(1)

      if (msg.isSelf) {
        Image($r('app.media.avatar_self'))
          .width(40)
          .height(40)
          .borderRadius(20)
          .margin({ left: 8 })
      } else {
        Blank()
      }
    }
    .width('100%')
    .justifyContent(msg.isSelf ? FlexAlign.End : FlexAlign.Start)
    .padding({ left: 12, right: 12 })
  }

  @Builder
  DeleteButtonBuilder(index: number) {
    Button('删除')
      .width(70)
      .height('100%')
      .backgroundColor('#FF4D4F')
      .fontColor('#FFFFFF')
      .onClick(() => {
        this.dataSource.deleteMessage(index)
      })
  }
}

interface Message {
  id: number
  content: string
  isSelf: boolean
  time: string
}
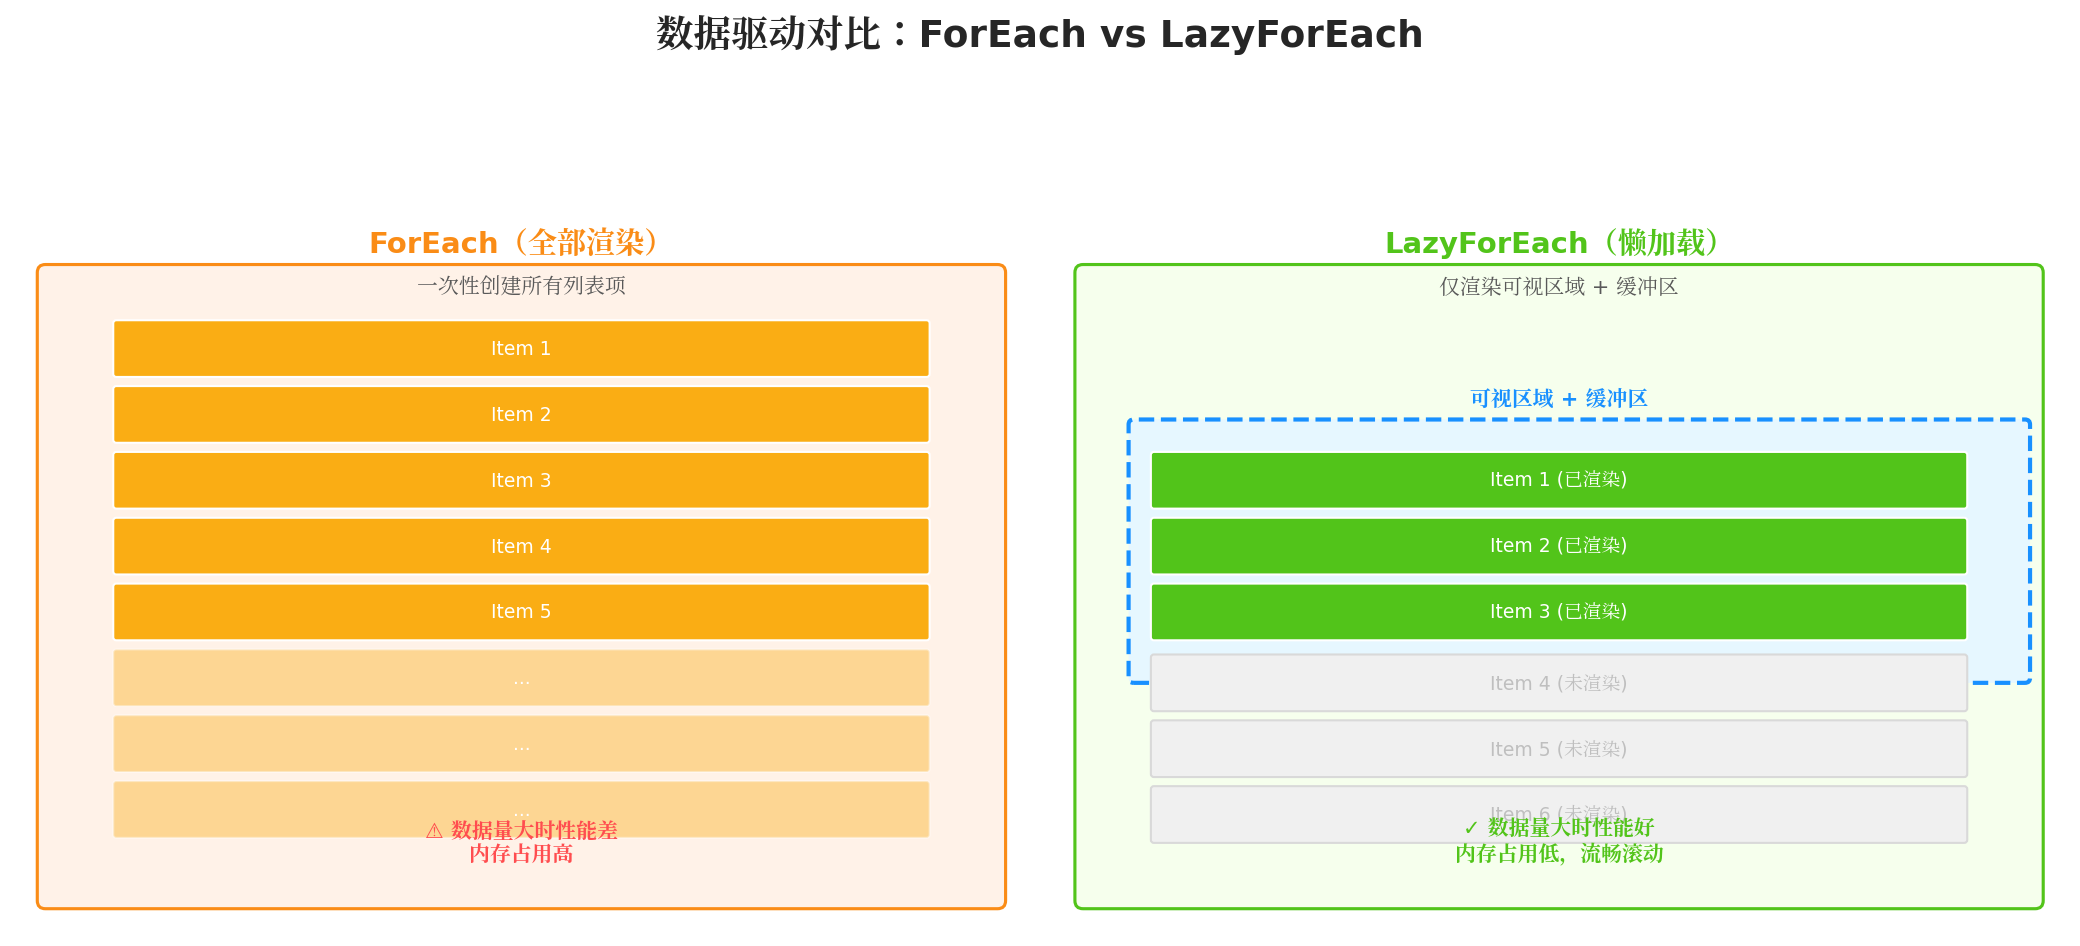
图5:ForEach与LazyForEach的数据驱动模式对比。ForEach一次性渲染所有项,内存占用高;LazyForEach仅渲染可视区域,支持大数据量流畅滚动。
5.3 选型策略
| 数据量 | 推荐方案 | 理由 |
|---|---|---|
| < 20条 | ForEach | 实现简单,无需数据源类 |
| 20-50条 | ForEach/LazyForEach | 根据是否需要动态增删选择 |
| > 50条 | LazyForEach | 必须,确保滚动性能 |
| 无限滚动 | LazyForEach + 分页加载 | 配合网络请求分页加载数据 |
六、实战案例
6.1 案例一:聊天消息列表
实现一个完整的聊天界面,支持消息气泡、头像、时间戳、滑动删除等功能。
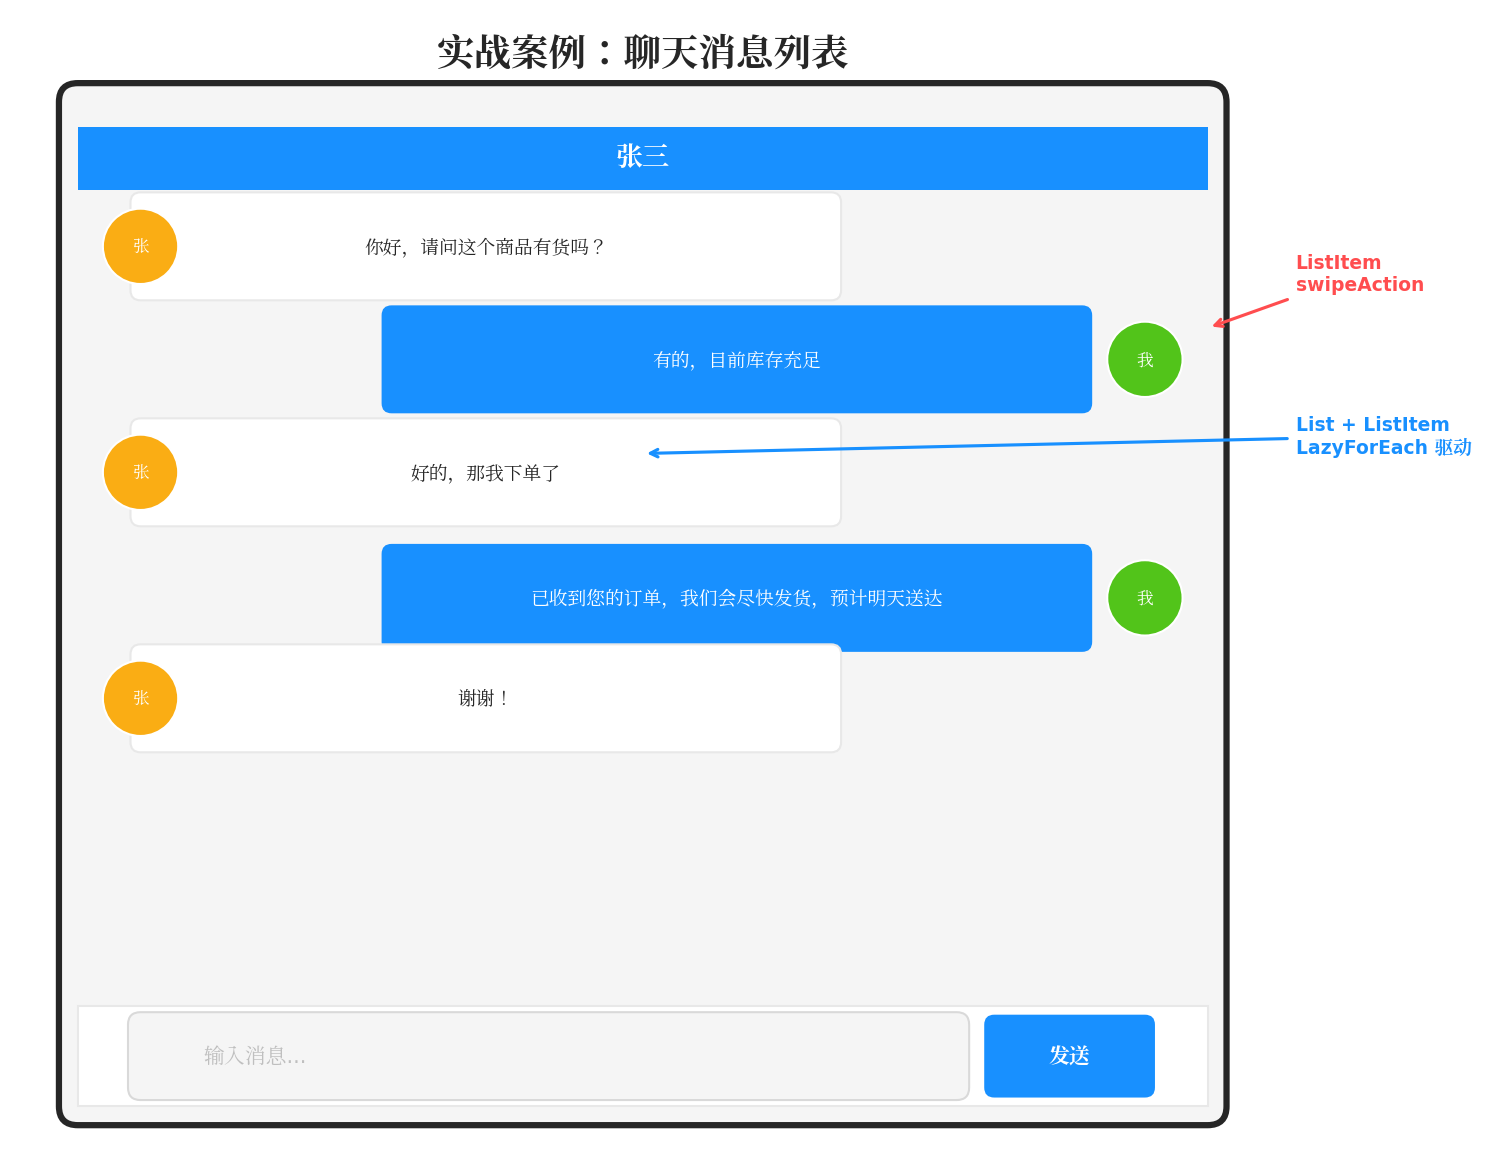
图6:聊天消息列表实战案例。左侧为对方消息(白色气泡+左侧头像),右侧为发送消息(蓝色气泡+右侧头像),底部为输入框区域。
@Entry
@Component
struct ChatPage {
  @State messageText: string = ''
  private dataSource: MessageDataSource = new MessageDataSource([
    { id: 1, content: '你好,请问这个商品有货吗?', isSelf: false, time: '10:30', avatar: 'app.media.avatar_other' },
    { id: 2, content: '有的,目前库存充足', isSelf: true, time: '10:31', avatar: 'app.media.avatar_self' },
    { id: 3, content: '好的,那我下单了', isSelf: false, time: '10:32', avatar: 'app.media.avatar_other' },
    { id: 4, content: '已收到您的订单,我们会尽快发货', isSelf: true, time: '10:33', avatar: 'app.media.avatar_self' },
  ])

  build() {
    Column() {
      // 顶部导航栏
      Row() {
        Image($r('app.media.back'))
          .width(24)
          .height(24)
          .fillColor('#262626')

        Text('张三')
          .fontSize(18)
          .fontWeight(FontWeight.Bold)
          .layoutWeight(1)
          .textAlign(TextAlign.Center)

        Image($r('app.media.more'))
          .width(24)
          .height(24)
          .fillColor('#262626')
      }
      .width('100%')
      .height(56)
      .padding({ left: 16, right: 16 })
      .backgroundColor('#FFFFFF')
      .border({ width: { bottom: 1 }, color: '#E8E8E8' })

      // 消息列表 - 核心List布局
      List({ space: 12 }) {
        LazyForEach(this.dataSource, (msg: Message, index: number) => {
          ListItem() {
            this.MessageBubbleBuilder(msg)
          }
          .swipeAction({
            end: {
              builder: () => {
                this.MessageActionBuilder(index)
              }
            }
          })
        }, (msg: Message) => msg.id.toString())
      }
      .width('100%')
      .layoutWeight(1)
      .padding({ top: 12, bottom: 12 })
      .edgeEffect(EdgeEffect.Spring)
      .scrollBar(BarState.Auto)
      .backgroundColor('#F5F5F5')

      // 输入框区域
      Flex({ direction: FlexDirection.Row, alignItems: ItemAlign.Center }) {
        Image($r('app.media.voice'))
          .width(28)
          .height(28)
          .fillColor('#8C8C8C')
          .margin({ right: 8 })

        TextInput({ placeholder: '输入消息...', text: $$this.messageText })
          .layoutWeight(1)
          .height(44)
          .backgroundColor('#F5F5F5')
          .borderRadius(22)
          .padding({ left: 16, right: 16 })

        Image($r('app.media.emoji'))
          .width(28)
          .height(28)
          .fillColor('#8C8C8C')
          .margin({ left: 8, right: 8 })

        Button('发送')
          .width(60)
          .height(36)
          .backgroundColor(this.messageText.length > 0 ? '#1890FF' : '#BFBFBF')
          .fontColor('#FFFFFF')
          .fontSize(14)
          .borderRadius(18)
          .enabled(this.messageText.length > 0)
          .onClick(() => {
            this.sendMessage()
          })
      }
      .width('100%')
      .height(60)
      .padding({ left: 12, right: 12 })
      .backgroundColor('#FFFFFF')
      .border({ width: { top: 1 }, color: '#E8E8E8' })
    }
    .width('100%')
    .height('100%')
    .backgroundColor('#FFFFFF')
  }

  @Builder
  MessageBubbleBuilder(msg: Message) {
    Row() {
      if (!msg.isSelf) {
        // 对方头像
        Image($r(msg.avatar))
          .width(40)
          .height(40)
          .borderRadius(20)
          .margin({ right: 8 })
      } else {
        Blank()
      }

      Column() {
        // 消息气泡
        Text(msg.content)
          .fontSize(15)
          .fontColor(msg.isSelf ? '#FFFFFF' : '#262626')
          .padding(12)
          .backgroundColor(msg.isSelf ? '#1890FF' : '#FFFFFF')
          .borderRadius(12)
          .constraintSize({ maxWidth: '70%' })

        // 时间戳
        Text(msg.time)
          .fontSize(10)
          .fontColor('#BFBFBF')
          .margin({ top: 4 })
      }
      .alignItems(msg.isSelf ? HorizontalAlign.End : HorizontalAlign.Start)
      .layoutWeight(1)

      if (msg.isSelf) {
        // 自己头像
        Image($r(msg.avatar))
          .width(40)
          .height(40)
          .borderRadius(20)
          .margin({ left: 8 })
      } else {
        Blank()
      }
    }
    .width('100%')
    .justifyContent(msg.isSelf ? FlexAlign.End : FlexAlign.Start)
    .padding({ left: 12, right: 12 })
  }

  @Builder
  MessageActionBuilder(index: number) {
    Row() {
      Button('删除')
        .width(70)
        .height('100%')
        .backgroundColor('#FF4D4F')
        .fontColor('#FFFFFF')
        .onClick(() => {
          this.dataSource.deleteMessage(index)
        })
    }
  }

  private sendMessage() {
    if (this.messageText.trim().length === 0) return

    const newMsg: Message = {
      id: Date.now(),
      content: this.messageText,
      isSelf: true,
      time: this.getCurrentTime(),
      avatar: 'app.media.avatar_self'
    }
    this.dataSource.addMessage(newMsg)
    this.messageText = ''
  }

  private getCurrentTime(): string {
    const now = new Date()
    return `${now.getHours()}:${now.getMinutes().toString().padStart(2, '0')}`
  }
}
6.2 案例二:联系人分组列表
@Entry
@Component
struct ContactList {
  private contacts: ContactGroup[] = [
    {
      letter: 'A',
      items: [
        { name: '阿强', phone: '13800138001' },
        { name: '爱丽丝', phone: '13800138002' },
      ]
    },
    {
      letter: 'B',
      items: [
        { name: '包拯', phone: '13800138003' },
        { name: '白居易', phone: '13800138004' },
        { name: '扁鹊', phone: '13800138005' },
      ]
    },
    {
      letter: 'C',
      items: [
        { name: '曹操', phone: '13800138006' },
        { name: '曹雪芹', phone: '13800138007' },
      ]
    },
  ]

  build() {
    Column() {
      // 搜索栏
      Search({ placeholder: '搜索联系人' })
        .width('100%')
        .height(44)
        .margin(16)
        .backgroundColor('#F5F5F5')
        .borderRadius(22)

      // 联系人列表
      List() {
        ForEach(this.contacts, (group: ContactGroup) => {
          // 分组头部 - 粘性吸顶
          ListItem() {
            Text(group.letter)
              .width('100%')
              .height(36)
              .padding({ left: 16 })
              .backgroundColor('#F0F5FF')
              .fontColor('#1890FF')
              .fontSize(16)
              .fontWeight(FontWeight.Bold)
          }
          .sticky(StickyStyle.Header)

          // 分组联系人
          ForEach(group.items, (contact: Contact) => {
            ListItem() {
              this.ContactItemBuilder(contact)
            }
          })
        })
      }
      .width('100%')
      .layoutWeight(1)
      .divider({
        strokeWidth: 0.5,
        color: '#E8E8E8',
        startMargin: 72,
        endMargin: 16
      })
      .scrollBar(BarState.Auto)
    }
    .width('100%')
    .height('100%')
    .backgroundColor('#FFFFFF')
  }

  @Builder
  ContactItemBuilder(contact: Contact) {
    Row() {
      // 头像
      Stack({ alignContent: Alignment.Center }) {
        Circle()
          .width(48)
          .height(48)
          .fill('#1890FF')
        Text(contact.name.substring(0, 1))
          .fontSize(20)
          .fontColor('#FFFFFF')
          .fontWeight(FontWeight.Bold)
      }
      .margin({ right: 12 })

      // 信息
      Column() {
        Text(contact.name)
          .fontSize(16)
          .fontColor('#262626')
        Text(contact.phone)
          .fontSize(13)
          .fontColor('#8C8C8C')
          .margin({ top: 4 })
      }
      .alignItems(HorizontalAlign.Start)
      .layoutWeight(1)

      // 拨号按钮
      Image($r('app.media.call'))
        .width(24)
        .height(24)
        .fillColor('#1890FF')
    }
    .width('100%')
    .height(64)
    .padding({ left: 16, right: 16 })
  }
}

interface Contact {
  name: string
  phone: string
}

interface ContactGroup {
  letter: string
  items: Contact[]
}
6.3 案例三:系统设置页面
@Entry
@Component
struct SettingsPage {
  private settings: SettingGroup[] = [
    {
      title: '网络',
      items: [
        { icon: 'app.media.wifi', title: 'WLAN', subtitle: '已连接', type: 'arrow' },
        { icon: 'app.media.bluetooth', title: '蓝牙', subtitle: '开启', type: 'arrow' },
        { icon: 'app.mobile.data', title: '移动网络', subtitle: '', type: 'arrow' },
      ]
    },
    {
      title: '声音与振动',
      items: [
        { icon: 'app.media.volume', title: '音量', subtitle: '', type: 'arrow' },
        { icon: 'app.media.ringtone', title: '铃声', subtitle: '默认', type: 'arrow' },
        { icon: 'app.media.vibrate', title: '振动', subtitle: '', type: 'switch' },
      ]
    },
    {
      title: '显示',
      items: [
        { icon: 'app.media.brightness', title: '亮度', subtitle: '自动', type: 'arrow' },
        { icon: 'app.media.font', title: '字体大小', subtitle: '标准', type: 'arrow' },
        { icon: 'app.media.dark', title: '深色模式', subtitle: '', type: 'switch' },
      ]
    },
  ]

  build() {
    Column() {
      // 标题
      Text('设置')
        .fontSize(22)
        .fontWeight(FontWeight.Bold)
        .margin({ left: 16, top: 16, bottom: 16 })
        .alignSelf(ItemAlign.Start)

      // 设置列表
      List({ space: 12 }) {
        ForEach(this.settings, (group: SettingGroup) => {
          // 分组
          ListItemGroup({ header: this.GroupHeaderBuilder(group.title) }) {
            ForEach(group.items, (item: SettingItem) => {
              ListItem() {
                this.SettingItemBuilder(item)
              }
            })
          }
          .divider({
            strokeWidth: 0.5,
            color: '#E8E8E8',
            startMargin: 60,
            endMargin: 16
          })
        })
      }
      .width('100%')
      .layoutWeight(1)
      .backgroundColor('#F5F5F5')
    }
    .width('100%')
    .height('100%')
    .backgroundColor('#F5F5F5')
  }

  @Builder
  GroupHeaderBuilder(title: string) {
    Text(title)
      .fontSize(13)
      .fontColor('#8C8C8C')
      .margin({ left: 16, top: 16, bottom: 8 })
  }

  @Builder
  SettingItemBuilder(item: SettingItem) {
    Row() {
      Image($r(item.icon))
        .width(24)
        .height(24)
        .fillColor('#1890FF')
        .margin({ right: 12 })

      Text(item.title)
        .fontSize(16)
        .fontColor('#262626')
        .layoutWeight(1)

      if (item.type === 'arrow') {
        Text(item.subtitle)
          .fontSize(14)
          .fontColor('#8C8C8C')
          .margin({ right: 8 })
        Image($r('app.media.arrow_right'))
          .width(16)
          .height(16)
          .fillColor('#BFBFBF')
      } else if (item.type === 'switch') {
        Toggle({ type: ToggleType.Switch })
          .selectedColor('#1890FF')
      }
    }
    .width('100%')
    .height(56)
    .padding({ left: 16, right: 16 })
    .backgroundColor('#FFFFFF')
  }
}

interface SettingItem {
  icon: string
  title: string
  subtitle: string
  type: string
}

interface SettingGroup {
  title: string
  items: SettingItem[]
}
七、List与Grid的配合使用
在实际项目中,List和Grid经常配合使用,构建复杂的混合布局。
7.1 List内嵌套Grid
List() {
  // 顶部Banner(非列表项)
  ListItem() {
    Image($r('app.media.banner'))
      .width('100%')
      .height(180)
      .objectFit(ImageFit.Cover)
  }

  // 分类网格
  ListItem() {
    GridRow({ columnsTemplate: '1fr 1fr 1fr 1fr', columnGap: 8 }) {
      ForEach(this.categories, (cat: Category) => {
        GridCol() {
          this.CategoryItemBuilder(cat)
        }
      })
    }
    .padding(16)
  }

  // 商品列表
  LazyForEach(this.productSource, (product: Product) => {
    ListItem() {
      this.ProductItemBuilder(product)
    }
  })
}
7.2 选择策略
| 场景 | 推荐方案 |
|---|---|
| 纯纵向列表 | List + ListItem |
| 纯网格展示 | GridRow + GridCol |
| 列表+网格混合 | List内嵌套GridRow |
| 横向滚动+纵向列表 | List(Horizontal) + List(Vertical) |
八、性能优化建议
8.1 使用LazyForEach处理大数据
// ✅ 推荐:大数据量使用LazyForEach
List() {
  LazyForEach(this.dataSource, (item: Item, index: number) => {
    ListItem() { ... }
  })
}

// ❌ 不推荐:大数据量使用ForEach
List() {
  ForEach(this.largeDataList, (item: Item) => {  // 数据量>50时性能差
    ListItem() { ... }
  })
}
8.2 避免复杂布局嵌套
ListItem内部应保持布局简洁:
// ✅ 推荐:扁平化布局
ListItem() {
  Row() {
    Image().width(40).height(40)
    Column() {
      Text().fontSize(16)
      Text().fontSize(13)
    }
  }
}

// ❌ 不推荐:深层嵌套
ListItem() {
  Column() {
    Row() {
      Column() {
        Row() {  // 嵌套过深
          // ...
        }
      }
    }
  }
}
8.3 图片资源优化
ListItem() {
  Image($r('app.media.avatar'))
    .width(40)
    .height(40)
    .borderRadius(20)
    .objectFit(ImageFit.Cover)
    // .interpolation(ImageInterpolation.High)  // 高质量插值(按需开启)
}
8.4 合理使用key
ForEach和LazyForEach都需要提供key函数,确保数据更新时正确识别项:
LazyForEach(this.dataSource, (item: Item) => {
  ListItem() { ... }
}, (item: Item) => item.id.toString())  // 使用唯一ID作为key
九、常见问题与解决方案
9.1 List不滚动
问题:List内数据超出屏幕,但无法滚动。
原因:List没有设置明确的高度或layoutWeight。
解决:
List() {
  // ...
}
.height(400)        // 方式1:固定高度
// 或
.layoutWeight(1)    // 方式2:自适应剩余空间
9.2 LazyForEach数据不更新
问题:调用数据操作方法后,界面没有刷新。
原因:未正确实现IDataSource接口的数据变更通知。
解决:确保在增删数据后调用onDataAdd/onDataDelete/onDataChange通知监听器。
9.3 swipeAction手势冲突
问题:ListItem内包含可点击组件时,swipeAction与点击事件冲突。
解决:调整swipeAction的触发阈值,或在点击事件中判断当前是否处于滑动状态。
十、总结
List列表布局是ArkTS开发中处理数据展示的核心组件。本文系统讲解了:
- 核心概念:List与ListItem的结构关系,与Column的差异
- 容器属性:space、divider、scrollBar、edgeEffect、chainAnimation、listDirection
- 子元素属性:sticky粘性定位、swipeAction滑动操作、selectable选中状态
- 数据驱动:ForEach全量渲染与LazyForEach懒加载的选型策略
- 实战案例:聊天消息列表、联系人分组、系统设置页面的完整实现
- 混合布局:List与Grid的配合使用策略
- 性能优化:LazyForEach、扁平化布局、图片优化、key函数
掌握List布局后,开发者可以高效构建从简单列表到复杂数据展示的各种界面,为用户提供流畅、优雅的滚动体验。
转载自:https://blog.csdn.net/u014727709/article/details/163196387
欢迎 👍点赞✍评论⭐收藏,欢迎指正

讨论HarmonyOS开发技术,专注于API与组件、DevEco Studio、测试、元服务和应用上架分发等。
更多推荐
 1
1 0
0- 0


 已为社区贡献286条内容

所有评论(0)