HarmonyOS应用开发实战:猫猫大作战-@Local/@Param 基础迁移、@Event 跨组件触发、@ObservedV2+@Trace 字段级
前言
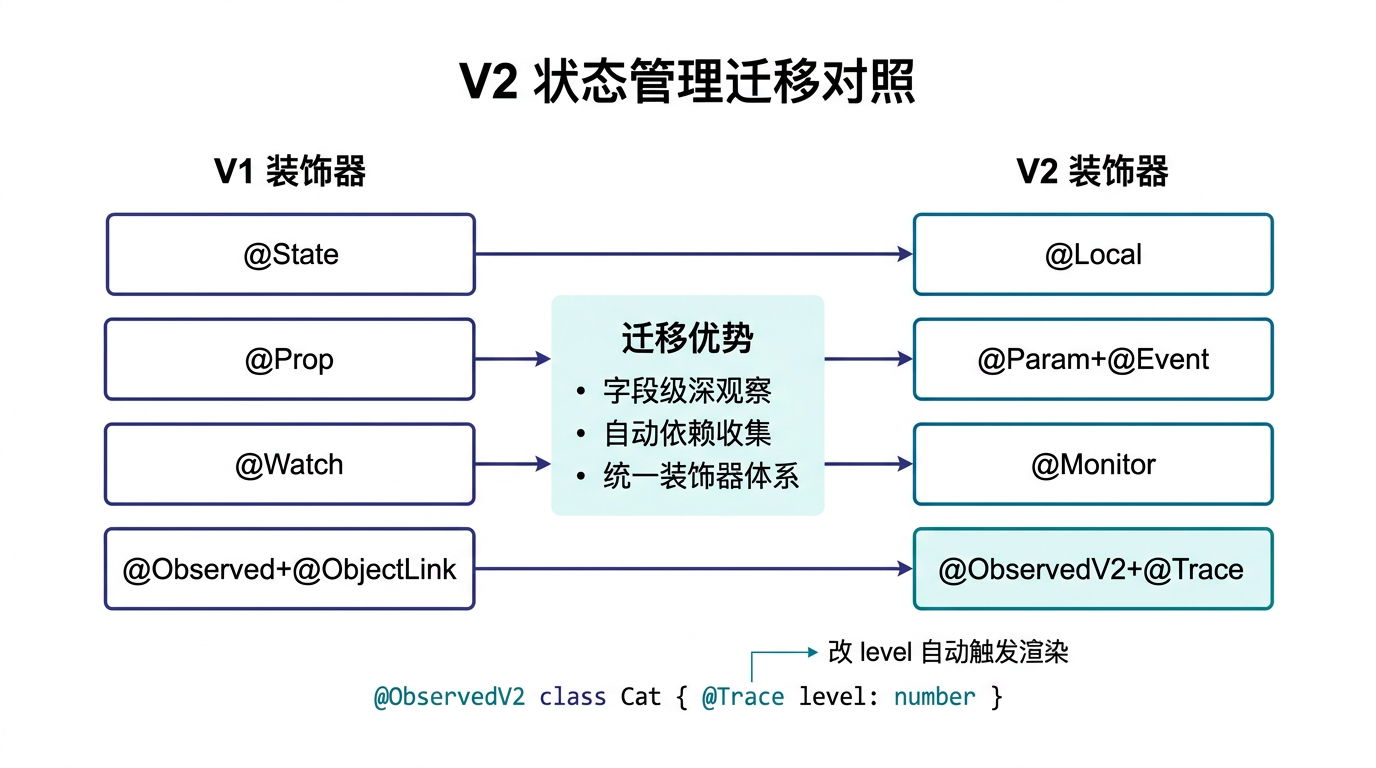
上一篇我们总结了 V1 的三大局限——浅观察要整体赋值、@Observed 必须 new、装饰器多易混。本篇动手把「猫猫大作战」迁到 V2 状态管理——用 @Local 替 @State、@Param 替 @Prop(自深观察)、@Event 替手写函数 prop、@ObservedV2+@Trace 替 @Observed+@ObjectLink、@Monitor 替 @Watch。
本篇是阶段二「状态管理」的收尾篇,把**@Local/@Param 基础迁移**、@Event 跨组件触发、@ObservedV2+@Trace 字段级深观察、@Monitor 多字段监听四大要点讲透。
提示:本系列不讲 ArkTS 基础语法与环境搭建,假设你已跟完第 1–49 篇。本篇是阶段二第 20 篇,V2 迁移实战。
一、场景拆解:迁 V2 的改造点
回顾「猫猫大作战」当前 V1 状态(第 49 篇总结):
// V1 版
@Entry
@Component
struct Index {
  @State @Watch('onGameStateChange') gameState: GameState = GameState.IDLE;
  @State score: number = 0;
  @State combo: ComboInfo = { count: 0, multiplier: 1, lastMergeTime: 0 };
  @State cats: Cat[] = [];
  /* ... */
}

@Observed
export class Cat { /* 整类深观察 */ }

@Component
export struct CatItem {
  @ObjectLink cat: Cat;       // 必须用 @ObjectLink
  build() { /* ... */ }
}

@Component
export struct PauseOverlay {
  @Link gameState: GameState;     // 双向,$val 传
  @Prop score: number;
  build() { /* ... */ }
}
V2 迁移后:
// V2 版
@Entry
@ComponentV2
struct Index {
  @Local gameState: GameState = GameState.IDLE;
  @Local score: number = 0;
  @Local combo: ComboInfo = { count: 0, multiplier: 1, lastMergeTime: 0 };
  @Local cats: Cat[] = [];
  /* ... */

  @Monitor('gameState')
  onGameStateChange(monitor: Monitor): void { /* ... */ }
}

@ObservedV2
export class Cat {
  @Trace id: string = '';
  @Trace level: CatLevel = 0;
  @Trace x: number = 0;
  @Trace y: number = 0;          // 字段级深观察
  @Trace falling: boolean = false;
}

@ComponentV2
export struct CatItem {
  @Param cat: Cat;               // @Param 自深观察,不用 @ObjectLink
  build() { /* ... */ }
}

@ComponentV2
export struct PauseOverlay {
  @Param gameState: GameState;   // V2 @Param 改了也同步(但要 @Event 回传改)
  @Param score: number;
  @Event onResume: () => void;    // 子触发父方法
  build() { /* ... */ }
}
关键经验:V2 用 @ComponentV2 替代 @Component——整个组件 V2 化,装饰器全换 V2 版。
二、@Local 替 @State
2.1 基本迁移
// V1
@State score: number = 0;

// V2
@Local score: number = 0;
``

**拆解**:

| 片段 | 含义 |
|------|------|
| `@Local` | 装饰器,标记「本地响应式状态」 |
| `score` | 变量名 |
| `number` | 类型 |
| `= 0` | 初始值 |

**语义差异**:@State 是「状态」,@Local 强调「本地」(组件私有),更清晰。

### 2.2 改属性直接触发(深观察)

```ts
// V2 @Local 对象改属性直接触发
@Local combo: ComboInfo = { count: 0, multiplier: 1, lastMergeTime: 0 };

this.combo.count = 5;       // ✅ V2 直接触发!
// V1 要 this.combo = { ...this.combo, count: 5 };
关键经验:V2 @Local 自深观察——改对象/数组内部属性直接触发,省整体赋值。这是 V2 最大收益。
2.3 完整迁移 Index 的 @State
// 来源:entry/src/main/ets/pages/Index.ets(V2 改造后)
@Entry
@ComponentV2                    // ← V2 组件装饰器
struct Index {
  // V2:@Local 替 @State
  @Local gameState: GameState = GameState.IDLE;
  @Local score: number = 0;
  @Local cats: Cat[] = [];
  @Local combo: ComboInfo = { count: 0, multiplier: 1, lastMergeTime: 0 };
  @Local nextCatLevel: CatLevel = CatLevel.SMALL;
  @Local highScore: number = 0;
  @Local gameTime: number = 0;
  @Local maxCombo: number = 0;
  @Local mergeCount: number = 0;
  @Local highestLevel: CatLevel = CatLevel.SMALL;

  // V2:@Provide 保留(V1 V2 都支持)
  @Provide('gameState') providedGameState: GameState = this.gameState;
  @Provide('score') providedScore: number = this.score;

  private gameEngine: GameEngine = new GameEngine();
  private gameLoopTimer: number = -1;
  private spawnTimer: number = -1;
  private timeTimer: number = -1;
  private readonly cols: number[] = [0, 1, 2, 3, 4];
  private readonly rows: number[] = [0, 1, 2, 3, 4, 5, 6, 7];

  startGame() {
    this.clearTimers();
    this.gameEngine.reset();
    this.gameState = GameState.PLAYING;
    this.score = 0;
    this.cats = [];
    this.gameTime = 0;
    // V2:combo 改属性也触发,但整体赋值更稳
    this.combo = { count: 0, multiplier: 1, lastMergeTime: 0 };
    this.nextCatLevel = this.gameEngine.getNextCatLevel();

    this.gameLoopTimer = setInterval(() => {
      if (this.gameState !== GameState.PLAYING) return;
      this.cats = this.gameEngine.updateCats();
      this.score = this.gameEngine.getScore();
      this.combo = this.gameEngine.getCombo();
      if (this.gameEngine.isGameOver()) { this.endGame(); }
    }, 100);

    /* spawnTimer、timeTimer 筑略 */
  }

  /* 其他方法不变 */
}
三、@Param 替 @Prop(自深观察)
3.1 基本迁移
// V1
@Prop score: number;

// V2
@Param score: number;
语义差异:@Param 强调「参数」(从父接收),且自深观察——接 @ObservedV2 实例时改属性直接触发。
3.2 @Param 深观察实例
// V2 Cat 是 @ObservedV2
@ObservedV2
export class Cat {
  @Trace x: number = 0;
  @Trace y: number = 0;
}

// V2 子组件用 @Param 接 Cat,自深观察
@ComponentV2
export struct CatItem {
  @Param cat: Cat;          // ← @Param 替 @ObjectLink
  build() {
    Column() { /* ... */ }
      .position({ x: this.cat.x * 60, y: this.cat.y * 60 })
  }
}

// 父改 cat.y,子 CatItem 重渲染
this.cats[0].y = 7;        // ✅ V2 直接触发,不用整体赋值数组
关键经验:V2 @Param 替代 @ObjectLink——@Param 接 @ObservedV2 实例时自深观察,不用单独装饰器。
3.3 改造 CatItem
// 来源:entry/src/main/ets/components/CatItem.ets(V2 改造后)
import { Cat, CatConfig } from './GameTypes';

@ComponentV2                    // ← V2
export struct CatItem {
  @Param cat: Cat;             // ← @Param 替 @ObjectLink

  build() {
    Column() {
      Text(CatConfig[this.cat.level].emoji)
        .fontSize(CatConfig[this.cat.level].size * 0.5)
    }
    .width(CatConfig[this.cat.level].size)
    .height(CatConfig[this.cat.level].size)
    .borderRadius(CatConfig[this.cat.level].size / 2)
    .backgroundColor(CatConfig[this.cat.level].color)
    .justifyContent(FlexAlign.Center)
    .shadow({ radius: 4, color: 'rgba(0,0,0,0.2)', offsetY: 2 })
    .position({
      x: this.cat.x * 60 + (60 - CatConfig[this.cat.level].size) / 2,
      y: this.cat.y * 60 + (60 - CatConfig[this.cat.level].size) / 2
    })
    .animation({ duration: 100, curve: Curve.Linear })
  }
}
四、@Event 跨组件触发
4.1 替手写函数 prop
V1 子组件触发父方法要手写函数 prop:
// V1
@Component
export struct PauseOverlay {
  onResume: () => void;        // 手写函数 prop
  build() {
    Button('继续').onClick(() => { this.onResume(); })
  }
}
// 父:PauseOverlay({ onResume: () => { this.gameState = GameState.PLAYING; } })
V2 用 @Event 装饰器:
// V2
@ComponentV2
export struct PauseOverlay {
  @Event onResume: () => void;   // ← @Event 装饰
  build() {
    Button('继续').onClick(() => { this.onResume(); })
  }
}
// 父:PauseOverlay({ onResume: () => { this.gameState = GameState.PLAYING; } })
``

**关键经验**:**@Event 明确标记「事件回调」**——比 V1 手写函数 prop 语义清晰,IDE 能识别。

### 4.2 @Param + @Event 替 @Link

V1 的 @Link 双向绑定,V2 拆成 @Param(只读显示)+ @Event(触发改):

```ts
// V1 @Link
@Component
export struct PauseOverlay {
  @Link gameState: GameState;
  build() {
    Button('继续').onClick(() => { this.gameState = GameState.PLAYING; })
  }
}
// 父:PauseOverlay({ gameState: this.$gameState })

// V2 @Param + @Event
@ComponentV2
export struct PauseOverlay {
  @Param gameState: GameState;        // 只读显示
  @Event onResume: () => void;        // 触发父改
  @Event onRestart: () => void;
  @Event onBackToMenu: () => void;
  build() {
    Button('继续').onClick(() => { this.onResume(); })
    Button('重新开始').onClick(() => { this.onRestart(); })
    Button('返回主菜单').onClick(() => { this.onBackToMenu(); })
  }
}
// 父:PauseOverlay({
//   gameState: this.gameState,
//   onResume: () => { this.gameState = GameState.PLAYING; },
//   onRestart: () => { this.clearTimers(); this.startGame(); },
//   onBackToMenu: () => { this.clearTimers(); this.gameState = GameState.IDLE; }
// })
关键经验:V2 拆 @Link 为 @Param(数据)+ @Event(触发)——数据流单向只读,事件流单向触发,更清晰。
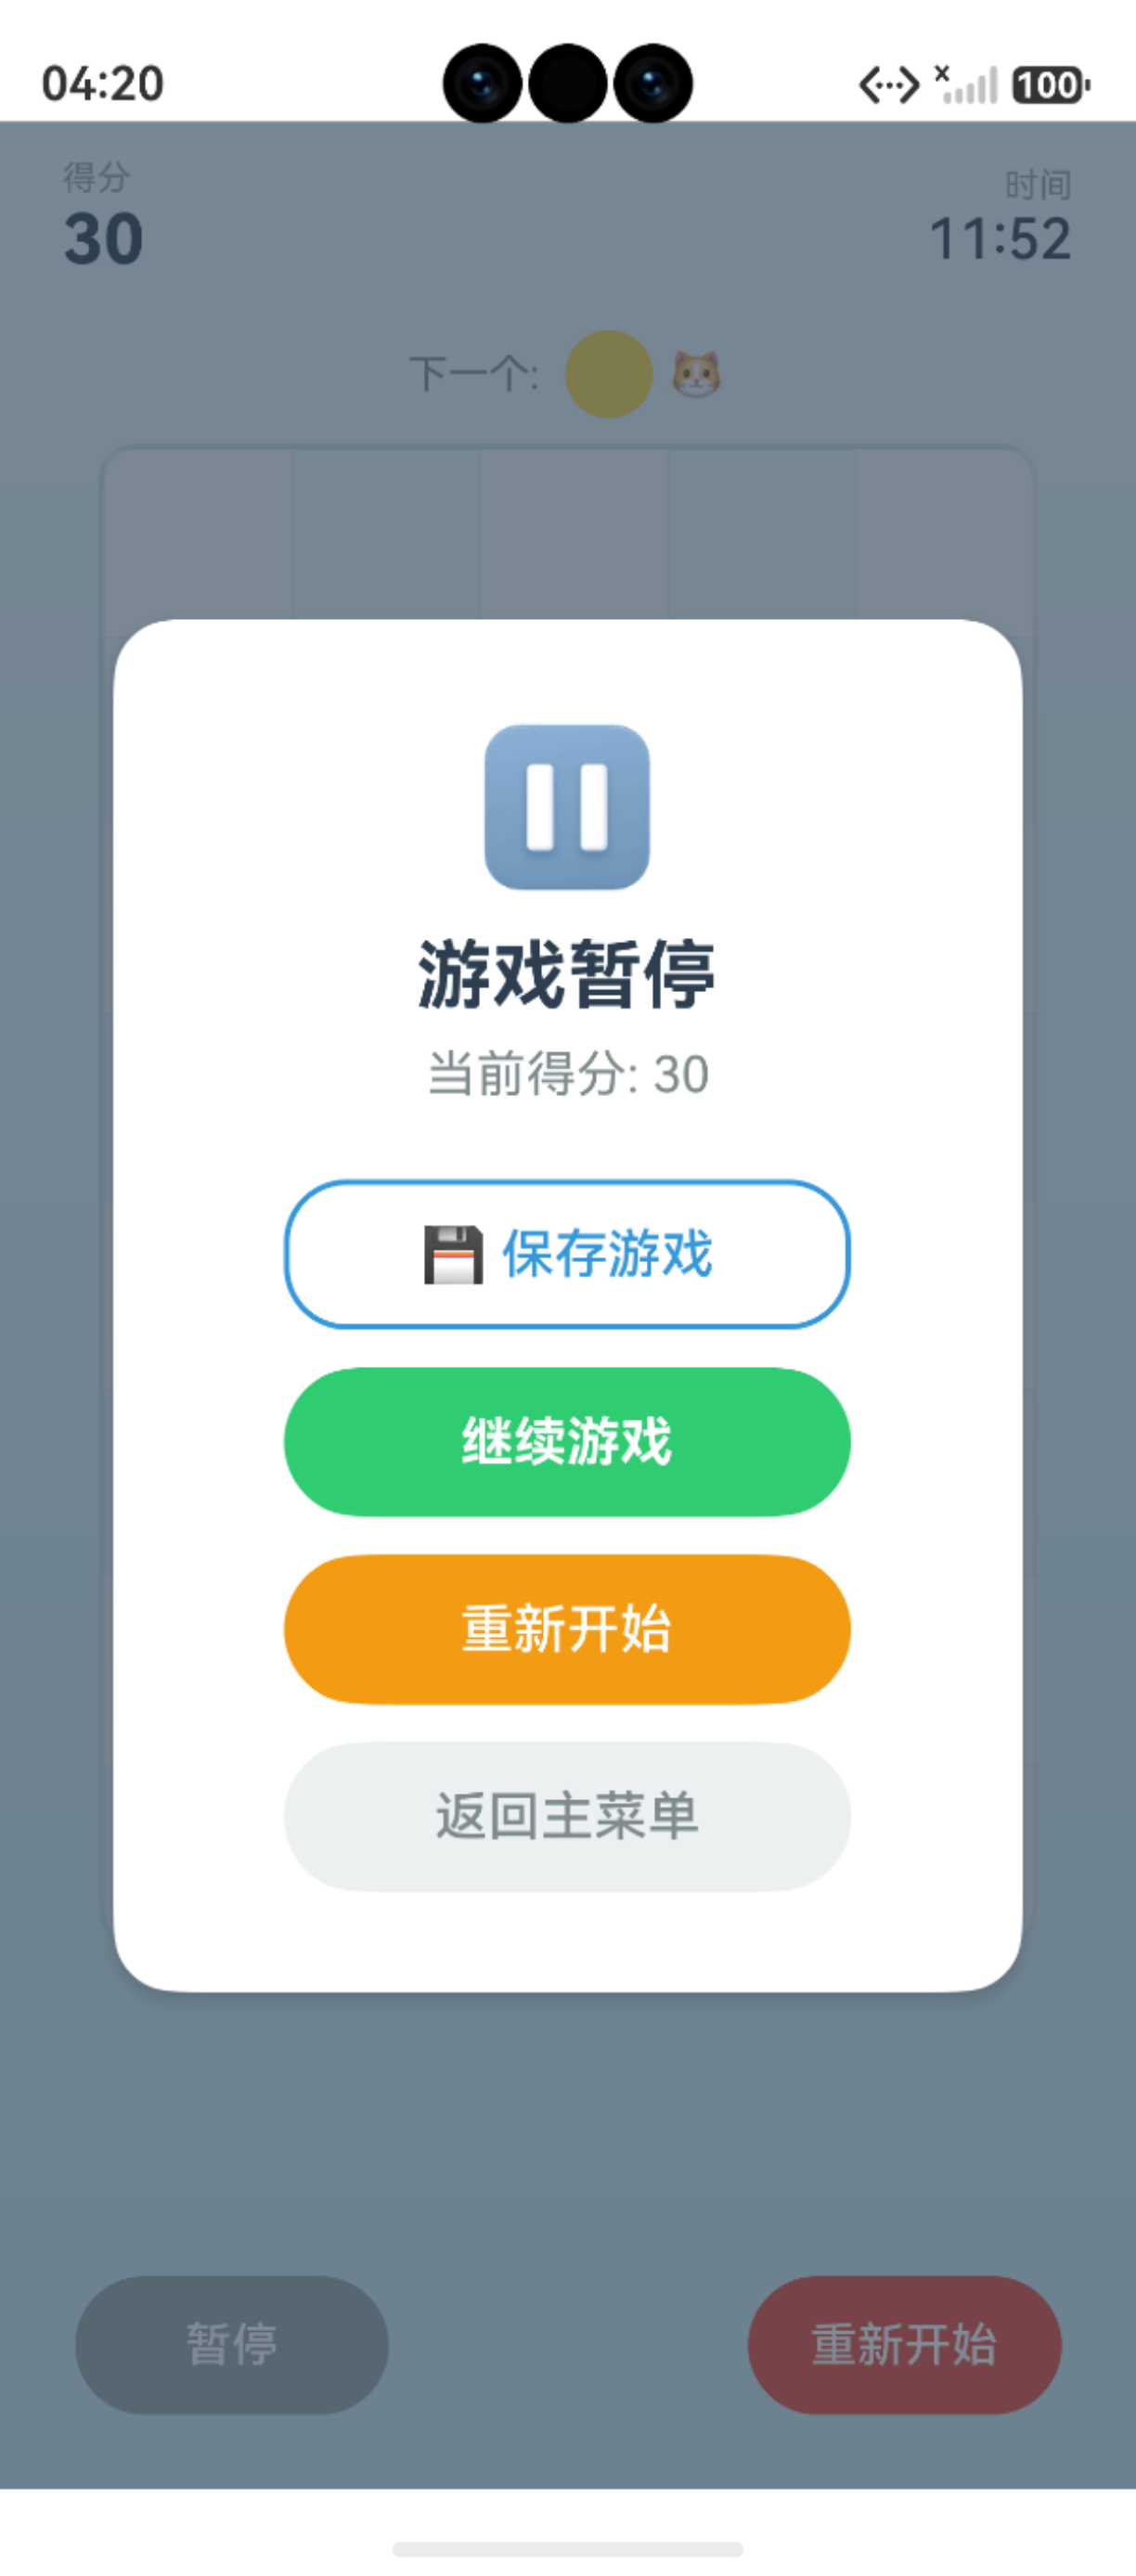
4.3 改造 PauseOverlay
// 来源:entry/src/main/ets/components/PauseOverlay.ets(V2 改造后)
import { GameState } from './GameTypes';

@ComponentV2
export struct PauseOverlay {
  @Param gameState: GameState;       // 只读显示当前状态
  @Param score: number;              // 只读显示得分
  @Event onResume: () => void;       // ← V2 @Event
  @Event onRestart: () => void;
  @Event onBackToMenu: () => void;

  build() {
    Column() {
      Column() {
        Text('⏸️').fontSize(48).margin({ bottom: 12 })
        Text('游戏暂停').fontSize(24).fontWeight(FontWeight.Bold).fontColor('#2C3E50').margin({ bottom: 8 })
        Text(`当前得分: ${this.score}`).fontSize(16).fontColor('#7F8C8D').margin({ bottom: 24 })

        Button('继续游戏')
          .width('80%').height(48)
          .fontSize(17).fontWeight(FontWeight.Bold)
          .fontColor('#FFFFFF').backgroundColor('#2ECC71')
          .borderRadius(24).margin({ bottom: 12 })
          .onClick(() => { this.onResume(); })      // ← 触发 @Event

        Button('重新开始')
          .width('80%').height(48)
          .fontSize(17)
          .fontColor('#FFFFFF').backgroundColor('#F39C12')
          .borderRadius(24).margin({ bottom: 12 })
          .onClick(() => { this.onRestart(); })

        Button('返回主菜单')
          .width('80%').height(48)
          .fontSize(17)
          .fontColor('#7F8C8D').backgroundColor('#ECF0F1')
          .borderRadius(24)
          .onClick(() => { this.onBackToMenu(); })
      }
      .width('80%').padding(32)
      .backgroundColor('#FFFFFF').borderRadius(20)
      .shadow({ radius: 20, color: 'rgba(0,0,0,0.15)', offsetY: 8 })
      .alignItems(HorizontalAlign.Center)
    }
    .width('100%').height('100%')
    .backgroundColor('rgba(44, 62, 80, 0.6)')
    .justifyContent(FlexAlign.Center)
    .alignItems(HorizontalAlign.Center)
  }
}
五、@ObservedV2+@Trace 字段级深观察
5.1 改造 Cat
// 来源:entry/src/main/ets/components/GameTypes.ets(V2 改造后)
@ObservedV2                    // ← V2 整类标记
export class Cat {
  @Trace id: string = '';      // ← 字段级深观察
  @Trace level: CatLevel = 0;
  @Trace x: number = 0;
  @Trace y: number = 0;
  @Trace falling: boolean = false;

  constructor(id: string, level: CatLevel, x: number, y: number, falling: boolean) {
    this.id = id;
    this.level = level;
    this.x = x;
    this.y = y;
    this.falling = falling;
  }
}
拆解:
| 片段 | 含义 |
|---|---|
@ObservedV2 |
装饰器,标记「V2 可深观察类」 |
@Trace |
装饰器,标记「本字段深观察,改值触发」 |
= '' / = 0 |
V2 要求 @Trace 字段有初始值 |
关键经验:V2 @Trace 字段级深观察——只标需要响应的字段,不标的字段改了不触发,省无谓追踪。
5.2 改属性直接触发
// V2 Cat 是 @ObservedV2 + @Trace y
const cat = new Cat('cat_0', CatLevel.SMALL, 0, 0, true);

cat.y = 7;        // ✅ 改 @Trace y,触发所有依赖 cat.y 的 CatItem 重渲染
cat.id = 'cat_1'; // ✅ 改 @Trace id,触发
// 不 @Trace 的字段改了不触发(如果有的话)
5.3 与 V1 @Observed 对比
| 维度 | V1 @Observed | V2 @ObservedV2+@Trace |
|---|---|---|
| 深观察粒度 | 整类所有字段 | 字段级(只 @Trace 的) |
| 子接收 | @ObjectLink | @Param(自深观察) |
| 必须初始值 | 否 | ✅ @Trace 字段要初始值 |
| 性能 | 中(全字段追踪) | 高(只追踪 @Trace) |
关键经验:V2 @Trace 字段级追踪性能更优——只监听需要响应的字段,不费的不管。
六、@Monitor 替 @Watch(多字段监听)
6.1 基本迁移
// V1
@State @Watch('onGameStateChange') gameState: GameState = GameState.IDLE;

onGameStateChange(newVal: GameState): void {
  switch (newVal) { /* ... */ }
}

// V2
@Local gameState: GameState = GameState.IDLE;

@Monitor('gameState')           // ← V2 @Monitor
onGameStateChange(monitor: Monitor): void {
  const newVal = monitor.value(GameState);
  switch (newVal) { /* ... */ }
}
``

**拆解**:

| 片段 | 含义 |
|------|------|
| `@Monitor('gameState')` | 装饰器,监听 gameState 变化 |
| `onGameStateChange` | 回调方法名 |
| `monitor: Monitor` | 监听器对象,能取变后的值 |

### 6.2 多字段监听(V2 新能力)

```ts
// V2:一次监多字段
@Local combo: ComboInfo = { count: 0, multiplier: 1, lastMergeTime: 0 };

@Monitor('combo.count', 'combo.multiplier')    // ← 监两个嵌套字段
onComboChange(monitor: Monitor): void {
  console.info('combo 变了', monitor.value(combo));
  if (monitor.value(combo).count >= 3) {
    this.vibrate();      // 3 连击以上震动
  }
}

// V1 要两个 @Watch 分别监,V2 一个 @Monitor 搞定
关键经验:V2 @Monitor 一次监多字段——比 V1 @Watch 一字段一回调更省,嵌套字段也直接监。
6.3 改造 onGameStateChange
// 来源:entry/src/main/ets/pages/Index.ets(V2 改造后)
@Entry
@ComponentV2
struct Index {
  @Local gameState: GameState = GameState.IDLE;
  /* ... 其他 @Local */

  // V2:@Monitor 替 @Watch(本篇重点)
  @Monitor('gameState')
  onGameStateChange(monitor: Monitor): void {
    const newVal = monitor.value(GameState);
    switch (newVal) {
      case GameState.PLAYING:
        this.playSfx('start');
        break;
      case GameState.PAUSED:
        this.playSfx('pause');
        break;
      case GameState.GAME_OVER:
        this.playSfx('over');
        this.vibrate();
        break;
      case GameState.IDLE:
        this.playSfx('menu');
        this.clearTimers();      // 切主菜单清定时器
        break;
    }
  }

  playSfx(name: string): void { console.info(`playSfx: ${name}`); }
  vibrate(): void { console.info('vibrate'); }

  /* ... 其他方法 */
}
七、完整 V2 迁移对比
7.1 装饰器迁移对照
| V1 | V2 | 改动量 |
|---|---|---|
@Component |
@ComponentV2 |
低(改名) |
@State |
@Local |
低(改名) |
@Prop |
@Param |
低(改名,自深观察) |
@Link |
@Param + @Event |
中(拆双向) |
@Observed + @ObjectLink |
@ObservedV2 + @Trace + @Param |
中(字段标 @Trace) |
@Watch |
@Monitor |
中(改签名) |
@Provide/@Consume |
@Provide/@Consume |
不变 |
@Reusable |
@Reusable |
不变 |
7.2 核心收益
| 痛点 | V1 解法 | V2 解法 |
|---|---|---|
| combo 嵌套对象改属性 | {...this.combo, count: 5} |
this.combo.count = 5 直接触发 |
| cats 数组项改属性 | 引擎返回新数组整体赋值 | this.cats[0].y = 7 直接触发 |
| Cat 深观察要 @ObjectLink | 子组件单独装饰 | @Param 自深观察 |
| gameState 监听单字段 | @Watch 一字段一回调 | @Monitor 多字段一次监 |
| PauseOverlay 改父 state | @Link 双向 | @Param + @Event 分离 |
关键经验:V2 迁移核心收益是「嵌套对象/数组改属性直接触发」——省整体赋值,代码量减半。
八、踩坑提示
8.1 V1 V2 同组件混用
// ❌ 错误:同组件混用,编译报错
@ComponentV2
struct Bad {
  @State score: number = 0;        // V1
  @Local combo: ComboInfo = { /* ... */ };   // V2
}

// ✅ 正确:整个组件统一 V2
@ComponentV2
struct Good {
  @Local score: number = 0;
  @Local combo: ComboInfo = { /* ... */ };
}
8.2 @Trace 字段忘初始值
// ❌ 错误:@Trace 字段没初始值,编译报错
@ObservedV2
export class Cat {
  @Trace y: number;       // 没初始值
}

// ✅ 正确:@Trace 字段要初始值
@ObservedV2
export class Cat {
  @Trace y: number = 0;   // 有初始值
}
8.3 忘 @ComponentV2
// ❌ 错误:用了 @Local 但还是 @Component,编译报错
@Component
struct Bad {
  @Local score: number = 0;       // V2 装饰器配 V1 组件
}

// ✅ 正确:@ComponentV2
@ComponentV2
struct Good {
  @Local score: number = 0;
}
8.4 @Monitor 忘取值
// ❌ 错误:@Monitor 回调没参数,取不到新值
@Monitor('gameState')
onGameStateChange(): void {
  console.info(this.gameState);      // 可能还是旧值(时机问题)
}

// ✅ 正确:用 monitor.value 取新值
@Monitor('gameState')
onGameStateChange(monitor: Monitor): void {
  const newVal = monitor.value(GameState);   // 取新值
  console.info(newVal);
}
8.5 @Event 忘在父传函数
// ❌ 错误:子声明了 @Event 但父没传函数,运行时报错
PauseOverlay({ gameState: this.gameState })   // 忘了 onResume 等

// ✅ 正确:所有 @Event 都要在父传
PauseOverlay({
  gameState: this.gameState,
  onResume: () => { this.gameState = GameState.PLAYING; },
  onRestart: () => { this.clearTimers(); this.startGame(); },
  onBackToMenu: () => { this.clearTimers(); this.gameState = GameState.IDLE; }
})
九、调试技巧
console.info在 @Monitor 回调:logmonitor.value(),追触发和取值。- 改属性不刷新排查:检查类是否 @ObservedV2;检查字段是否 @Trace;检查子是否 @Param。
- 编译报「V1 V2 混用」排查:检查组件装饰器是 @Component 还是 @ComponentV2;检查所有状态装饰器版本一致。
- @Event 触发无响应排查:检查父是否传了对应函数;检查函数内是否真的改了 @Local。
十、性能与最佳实践
- 整个组件统一 V1 或 V2——@ComponentV2 配 @Local/@Param/@Event/@Monitor,不能混。
- @Local 自深观察——嵌套对象/数组改属性直接触发,省整体赋值。
- @Param 替 @ObjectLink——接 @ObservedV2 实例自深观察,不用单独装饰器。
- @Trace 字段级深观察——只标需要响应的字段,省无谓追踪开销。
- @Event 明确事件回调——比 V1 手写函数 prop 语义清晰。
- @Monitor 多字段监听——一次监多字段,嵌套字段也直接监。
- @Trace 字段要初始值——V2 要求,不赋会编译报错。
- @Provide/@Consume/@Reusable 保留——V1 V2 都支持,迁移时这两个不动。
十一、阶段二收尾总结(31–50)
本篇是阶段二「状态管理 + 交互 + 动画」第 20 篇,阶段二收尾。回顾阶段二完整覆盖:
| 篇 | 主题 | 核心要点 |
|---|---|---|
| 31-36 | 定时器与主循环 | @State、setInterval、clearTimers |
| 37-38 | 事件与回调 | onClick、箭头函数 this |
| 39 | @Watch | 状态变化副作用 |
| 40-42 | 跨组件数据流 | @Prop、@Link、@Provide/@Consume |
| 43-44 | 深观察 | @Observed+@ObjectLink、数组项替换 |
| 45-46 | 批量与嵌套 | batchUpdate、嵌套陷阱 |
| 47-48 | 长列表 | @Reusable、LazyForEach |
| 49-50 | V1 V2 迁移 | V1 局限总结、V2 迁移实战 |
阶段二核心收获:
- V1 状态管理全套:@State/@Prop/@Link/@Provide/@Consume/@Observed+@ObjectLink/@Watch/@Reusable/LazyForEach。
- 定时器驱动游戏:setInterval 三个周期 + clearTimers 防泄漏。
- 浅观察的坑:嵌套对象/数组要整体赋值,V2 @Local/@Param 解决。
- V2 迁移:@Local/@Param/@Event/@ObservedV2+@Trace/@Monitor,深观察省整体赋值。
- 长列表优化:@Reusable 复用池 + LazyForEach 按需渲染。
接下来阶段三(51–70)将进入交互与动画:onClick/onTouch/onHover/onKeyEvent 事件四件套、animateTo 显式动画、属性动画、Hero 共享元素、transition 转场、bindSheet/app bindUI ContentType 路由、spring 物理、Hero Style Player 等。
总结
本篇我们做 V2 迁移实战,掌握了**@Local 替 @State(自深观察)、@Param 替 @Prop/@ObjectLink(接 @ObservedV2 自深观察)、@Event 替手写函数 prop(明确事件)、@ObservedV2+@Trace 字段级深观察**、@Monitor 替 @Watch(多字段监听)五大要点,并给出了猫猫大作战 V2 迁移完整代码。核心要点:@ComponentV2 统一 V2;@Local/@Param 自深观察省整体赋值;@Trace 字段级精细;@Event 明确事件;@Monitor 多字段监听。
下一篇我们将进入阶段三,拆解 onTouch——按下/移动/抬起全手势。
如果这篇文章对你有帮助,欢迎点赞👍、收藏⭐、关注🔔,你的支持是我持续创作的动力!
相关资源:
- 「猫猫大作战」项目源码:本仓库
entry/src/main/ets/pages/Index.ets、entry/src/main/ets/components/ - ArkUI V2 状态管理官方指南
- ArkUI @Local/@Param 官方文档
- ArkUI @ObservedV2+@Trace 深观察官方指南
- ArkUI @Monitor 监听官方文档
- 开源鸿蒙跨平台社区
- HarmonyOS 开发者官方文档首页
- 系列索引:本仓库
articles/INDEX.md

讨论HarmonyOS开发技术,专注于API与组件、DevEco Studio、测试、元服务和应用上架分发等。
更多推荐

 6
6 0
0- 0


 已为社区贡献74条内容

所有评论(0)