HarmonyOS 6.0 AppStorageV2跨页面全局状态——从“传参地狱“到全局共享的终极方案
多页面共享状态一直是HarmonyOS开发的痛点——登录状态要传、购物车数量要同步、主题偏好要一致,V1的AppStorage虽然能用但跟V2状态管理体系割裂。API 12推出的AppStorageV2完美融入了@ObservedV2+@Trace体系,connect一行代码就能实现跨页面、跨Ability的全局状态共享——这篇把AppStorageV2跨页面全局状态的完整方案讲清楚。
AppStorageV2与AppStorage的区别
V1的AppStorage用@StorageLink/@StorageProp连接,跟@State/@Observed体系割裂;AppStorageV2则原生融入V2状态管理,用connect()获取单例,配合@ObservedV2+@Trace实现响应式全局状态。
// V1 AppStorage方式——与@State体系割裂
AppStorage.setOrCreate('userName', '张三')
@Entry
@Component
struct V1Page {
  @StorageLink('userName') userName: string = ''
  build() {
    Text(this.userName)
  }
}

// V2 AppStorageV2方式——融入@ObservedV2+@Trace
import { AppStorageV2 } from '@kit.ArkUI'
@ObservedV2
class UserState {
  @Trace userName: string = '张三'
  @Trace isLogin: boolean = false
}
@Entry
@ComponentV2
struct V2Page {
  @Local user: UserState = AppStorageV2.connect(UserState, () => new UserState())!
  build() {
    Text(this.user.userName)
  }
}
关键区别:AppStorage存基本类型,AppStorageV2只存class类型;AppStorage用@StorageLink/@StorageProp,AppStorageV2用connect()获取单例后直接操作属性。两者数据互不共享,是两套独立的体系。
connect()的核心用法
connect是AppStorageV2唯一的获取数据方式——传入类型和默认构造器,返回全局单例。同一个key多次connect拿到的都是同一个对象。
import { AppStorageV2 } from '@kit.ArkUI'

@ObservedV2
class GlobalConfig {
  @Trace theme: string = 'dark'
  @Trace fontSize: number = 16
  @Trace lang: string = 'zh-CN'
}

@Entry
@ComponentV2
struct ConfigPage {
  // connect获取全局单例,不存在则用构造器创建
  @Local config: GlobalConfig = AppStorageV2.connect(
    GlobalConfig,
    () => new GlobalConfig()
  )!

  build() {
    Column({ space: 12 }) {
      Text(`主题: ${this.config.theme}`)
      Text(`字号: ${this.config.fontSize}`)
      Text(`语言: ${this.config.lang}`)
      Button('切换主题').onClick(() => {
        // 直接修改属性,全局同步
        this.config.theme = this.config.theme === 'dark' ? 'light' : 'dark'
      })
    }
  }
}
connect的第一个参数是类类型(同时作为key),第二个参数是默认构造器。如果AppStorageV2中已有该key的数据,直接返回已有对象;没有则用构造器创建后存入。
注意:connect返回值可能是undefined(理论上不会,但类型签名如此),所以一般用!断言。如果你不放心,可以?? new GlobalConfig()兜底,但那就不是同一个单例了。
跨页面状态同步实战
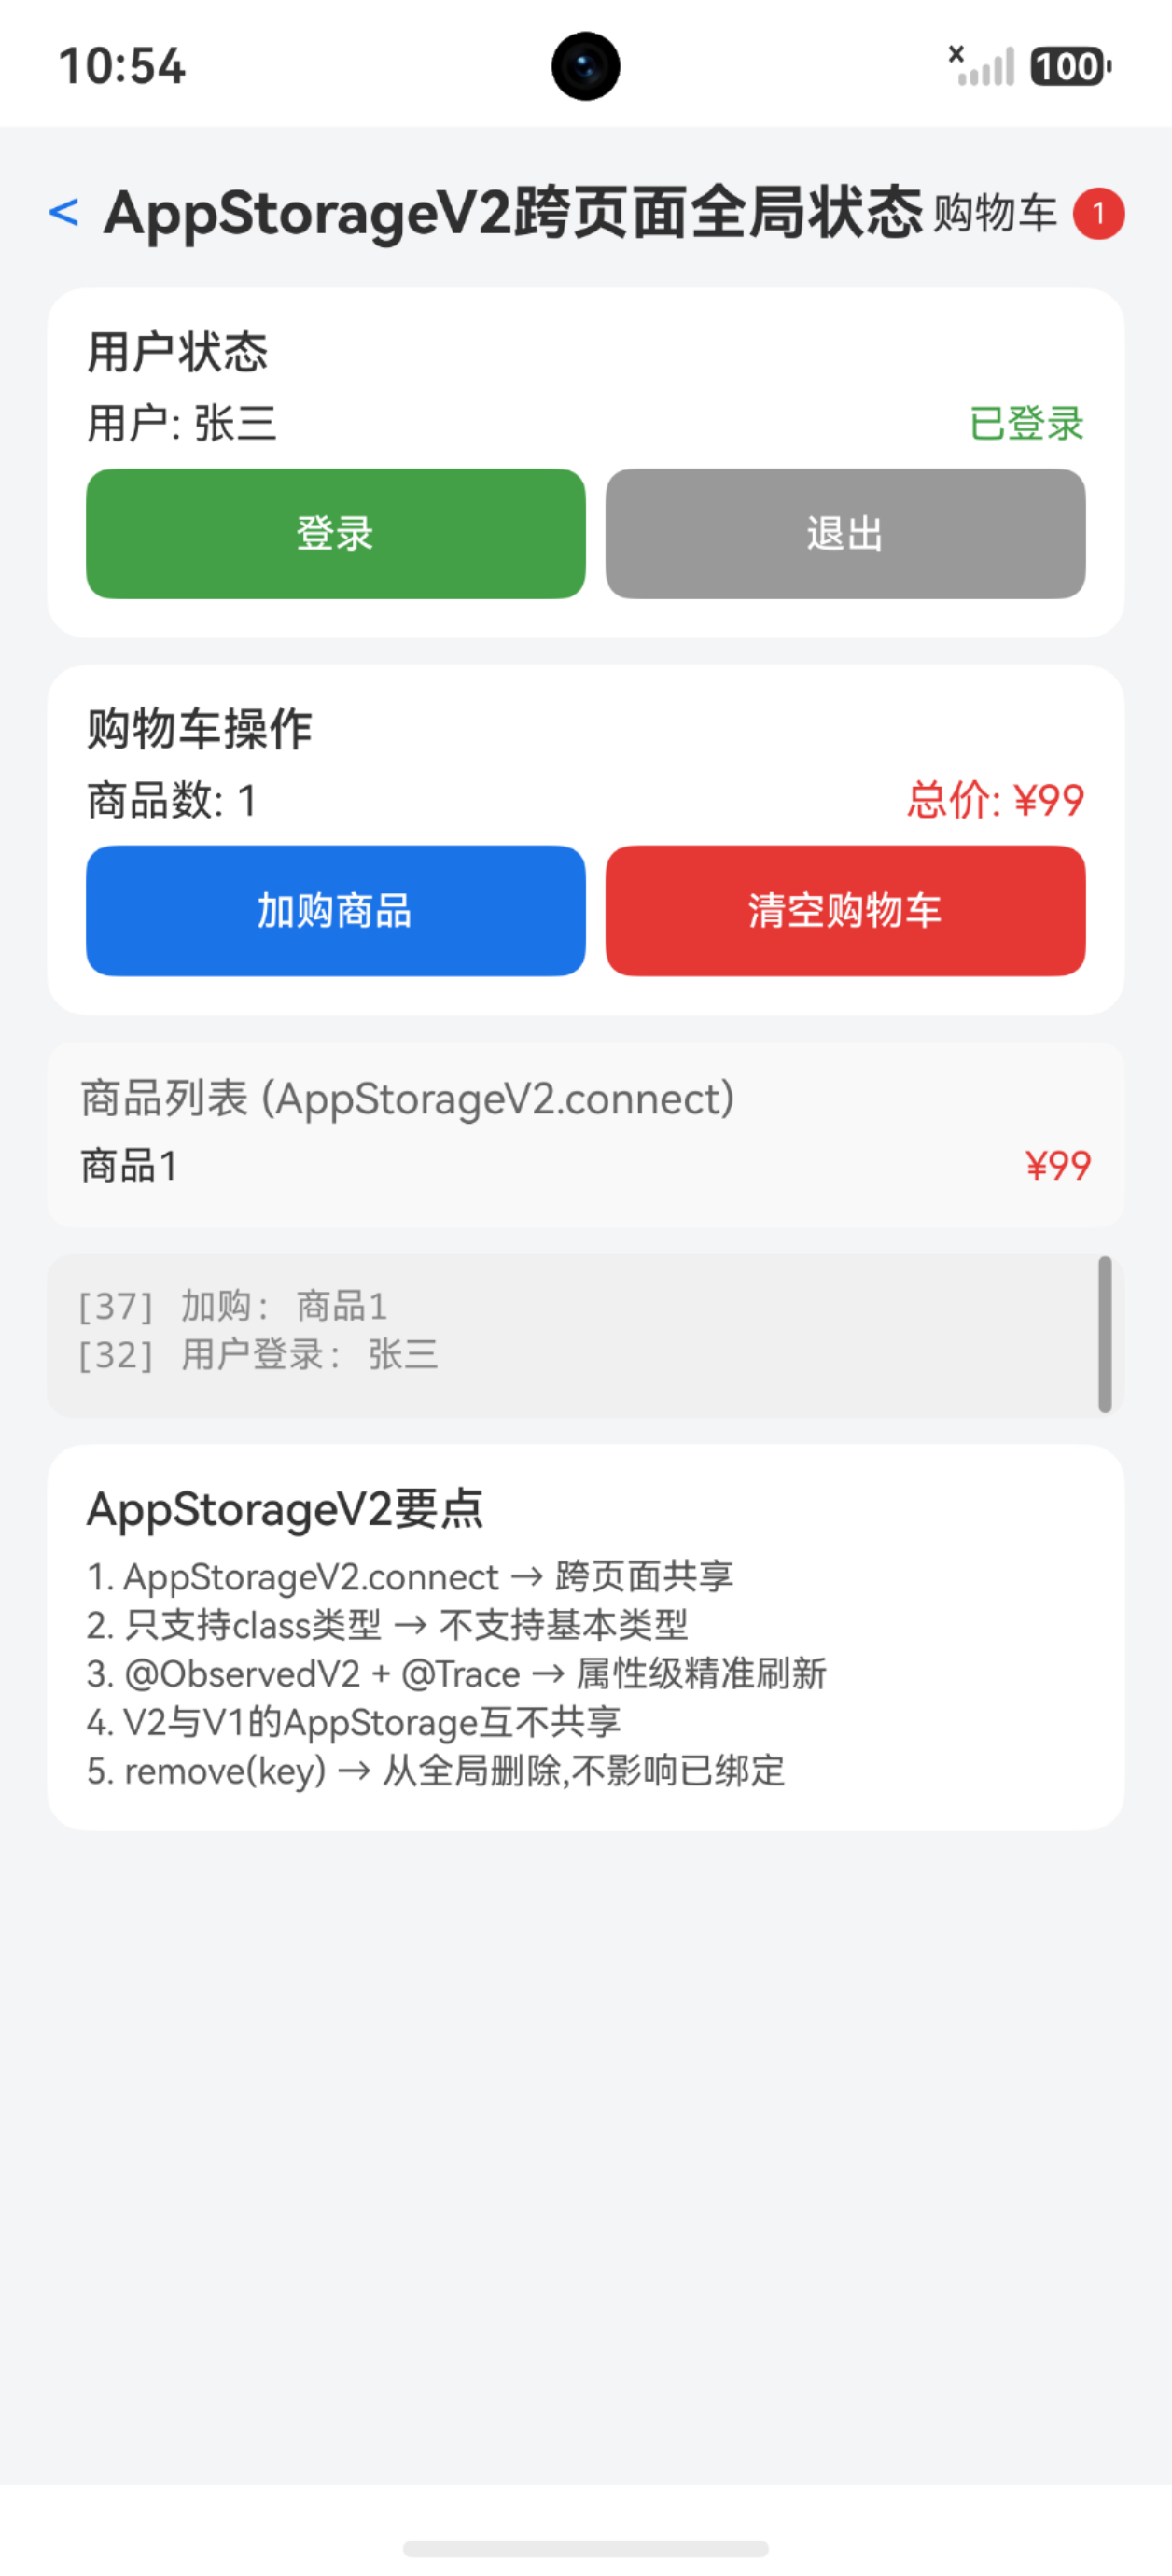
AppStorageV2最核心的价值:页面A修改了全局状态,页面B自动感知并刷新——不需要EventHub,不需要路由传参,零耦合。
import { AppStorageV2, router } from '@kit.ArkUI'

@ObservedV2
class LoginState {
  @Trace isLogin: boolean = false
  @Trace userName: string = ''
  @Trace avatar: string = ''
  login(name: string): void {
    this.isLogin = true
    this.userName = name
    this.avatar = `https://img.example.com/${name}.png`
  }
  logout(): void {
    this.isLogin = false
    this.userName = ''
    this.avatar = ''
  }
}

// 登录页
@Entry
@ComponentV2
struct LoginPage {
  @Local loginState: LoginState = AppStorageV2.connect(
    LoginState,
    () => new LoginState()
  )!
  @Local inputName: string = ''

  build() {
    Column({ space: 12 }) {
      TextInput({ placeholder: '请输入用户名', text: this.inputName })
        .onChange((value: string) => { this.inputName = value })
      Button('登录').onClick(() => {
        this.loginState.login(this.inputName)
        router.pushUrl({ url: 'pages/HomePage' })
      })
    }
  }
}

// 首页——自动感知登录状态变化
@Entry
@ComponentV2
struct HomePage {
  @Local loginState: LoginState = AppStorageV2.connect(
    LoginState,
    () => new LoginState()
  )!

  build() {
    Column({ space: 12 }) {
      if (this.loginState.isLogin) {
        Text(`欢迎, ${this.loginState.userName}`)
        Image(this.loginState.avatar).width(40).height(40)
        Button('退出').onClick(() => {
          this.loginState.logout()
        })
      } else {
        Text('未登录')
        Button('去登录').onClick(() => {
          router.pushUrl({ url: 'pages/LoginPage' })
        })
      }
    }
  }
}
登录页调login()后,首页的loginState自动同步——因为connect返回的是同一个单例对象,@Trace装饰的属性变化会触发所有绑定的组件刷新。
注意:两个页面connect的key必须一致才能拿到同一个单例。默认key是类名(如LoginState),也可以手动指定key字符串。
自定义key与remove/keys
connect默认用类名作为key,但有时需要同一类型存多个实例——这时可以指定自定义key。remove删除指定key的数据,keys查看所有key。
import { AppStorageV2 } from '@kit.ArkUI'

@ObservedV2
class PlayerState {
  @Trace songName: string = ''
  @Trace isPlaying: boolean = false
  @Trace progress: number = 0
}

@Entry
@ComponentV2
struct PlayerPage {
  // 指定自定义key 'mainPlayer'
  @Local player: PlayerState = AppStorageV2.connect(
    PlayerState,
    'mainPlayer',
    () => new PlayerState()
  )!
  // 查看所有key
  allKeys: string[] = AppStorageV2.keys()

  build() {
    Column({ space: 12 }) {
      Text(`当前播放: ${this.player.songName}`)
      Text(`进度: ${this.player.progress}%`)
      Text(`所有key: ${this.allKeys.length}`)
      Button('播放').onClick(() => {
        this.player.songName = '夜曲'
        this.player.isPlaying = true
      })
      Button('清除播放器状态').onClick(() => {
        // 删除指定key的数据,不影响组件中已有的引用
        AppStorageV2.remove('mainPlayer')
      })
    }
  }
}
指定key时connect的参数顺序是:类型、key字符串、默认构造器。remove只会把数据从AppStorageV2中删除,但组件中已经通过connect拿到的对象引用不受影响——这点需要特别注意。
关键区别:remove后,已connect的组件还能正常使用对象,只是该key不再被AppStorageV2管理。新的connect调用会重新创建实例。
购物车全局同步实战
购物车数量跨页面同步是最典型的全局状态场景——商品详情页加购、首页Badge更新、购物车页实时同步。
import { AppStorageV2, router } from '@kit.ArkUI'

@ObservedV2
class CartState {
  @Trace count: number = 0
  @Trace items: CartItem[] = []
  addItem(name: string, price: number): void {
    this.items.push(new CartItem(name, price))
    this.count = this.items.length
  }
  clearCart(): void {
    this.items = []
    this.count = 0
  }
}
@ObservedV2
class CartItem {
  @Trace name: string = ''
  @Trace price: number = 0
  constructor(name: string, price: number) {
    this.name = name
    this.price = price
  }
}

// 商品详情页——添加商品
@Entry
@ComponentV2
struct DetailPage {
  @Local cart: CartState = AppStorageV2.connect(
    CartState,
    () => new CartState()
  )!

  build() {
    Column({ space: 12 }) {
      Text('商品: 蓝牙耳机 ¥299')
      Button('加入购物车').onClick(() => {
        this.cart.addItem('蓝牙耳机', 299)
      })
      Button('查看购物车').onClick(() => {
        router.pushUrl({ url: 'pages/CartListPage' })
      })
    }
  }
}

// 首页Tab——购物车Badge
@ComponentV2
struct HomeTab {
  @Local cart: CartState = AppStorageV2.connect(
    CartState,
    () => new CartState()
  )!

  build() {
    Badge({ count: this.cart.count }) {
      Text('购物车').fontSize(16)
    }
  }
}
商品详情页addItem后,首页Tab的Badge.count自动更新——全程零耦合,不需要EventHub,不需要回调,@Trace+AppStorageV2自动搞定。
注意:AppStorageV2只支持class类型,不支持基本类型(string/number/boolean)。如果你只需要存一个数字,得包装成class:@ObservedV2 class Count { @Trace value: number = 0 }。
主题偏好全局切换
深色/浅色主题切换是另一个经典的全局状态场景——设置页切换后,所有页面立刻响应。
import { AppStorageV2 } from '@kit.ArkUI'

@ObservedV2
class ThemeState {
  @Trace isDark: boolean = false
  @Trace primaryColor: string = '#007DFF'
  getBackgroundColor(): string {
    return this.isDark ? '#1a1a1a' : '#ffffff'
  }
  getTextColor(): string {
    return this.isDark ? '#e5e5e5' : '#333333'
  }
  toggle(): void {
    this.isDark = !this.isDark
    this.primaryColor = this.isDark ? '#4DA3FF' : '#007DFF'
  }
}

@ComponentV2
struct ThemedPage {
  @Local theme: ThemeState = AppStorageV2.connect(
    ThemeState,
    () => new ThemeState()
  )!

  build() {
    Column({ space: 12 }) {
      Text('主题设置页')
        .fontColor(this.theme.getTextColor())
      Text(`当前: ${this.theme.isDark ? '深色' : '浅色'}`)
        .fontColor(this.theme.getTextColor())
      Toggle({ type: ToggleType.Switch, isOn: this.theme.isDark })
        .onChange((isOn: boolean) => {
          this.theme.toggle()
        })
    }
    .backgroundColor(this.theme.getBackgroundColor())
    .width('100%')
    .height('100%')
  }
}
toggle()修改了@Trace装饰的isDark和primaryColor,所有通过connect绑定的组件都会自动刷新——深色/浅色主题切换就是这么简单。
跨Ability状态共享
AppStorageV2支持同一个应用主线程内多个UIAbility实例间的状态共享——这在多窗口场景中非常实用。
import { AppStorageV2 } from '@kit.ArkUI'
import { UIAbility, AbilityConstant, Want } from '@kit.AbilityKit'

@ObservedV2
class ShareData {
  @Trace message: string = 'Hello'
  @Trace timestamp: number = Date.now()
  update(msg: string): void {
    this.message = msg
    this.timestamp = Date.now()
  }
}

// 在EntryAbility中初始化
class EntryAbility extends UIAbility {
  onCreate(want: Want, launchParam: AbilityConstant.LaunchParam): void {
    // 在Ability启动时预创建全局状态
    AppStorageV2.connect(ShareData, () => new ShareData())
  }
}

// 在任意页面的组件中都能拿到同一个单例
@Entry
@ComponentV2
struct SharePage {
  @Local shareData: ShareData = AppStorageV2.connect(
    ShareData,
    () => new ShareData()
  )!

  build() {
    Column({ space: 12 }) {
      Text(this.shareData.message)
      Text(`更新时间: ${this.shareData.timestamp}`)
      Button('更新消息').onClick(() => {
        this.shareData.update('新的消息')
      })
    }
  }
}
在EntryAbility.onCreate中预创建,后续所有UIAbility实例的页面通过connect都能拿到同一个单例——跨Ability共享就这么实现了。
注意:AppStorageV2只能在UI线程使用,不能在@Sendable标注的类或Worker线程中调用。跨线程共享需要用Emitter或TaskPool。
限制与注意事项
AppStorageV2虽然好用,但有明确的限制边界——了解这些才能避免踩坑。
import { AppStorageV2 } from '@kit.ArkUI'

// ❌ 错误:不支持基本类型
// AppStorageV2.connect(string, () => '')  // 运行时报错

// ✅ 正确:包装成class
@ObservedV2
class StringValue {
  @Trace value: string = ''
}

// ❌ 错误:不支持ArrayList、PixelMap等Native类型
// @ObservedV2 class BadModel { @Trace img: PixelMap } // 不支持

// ✅ 正确:存路径字符串,需要时再加载
@ObservedV2
class ImageState {
  @Trace imgPath: string = ''
}

// ❌ 错误:不支持collections.Map / collections.Set
// @ObservedV2 class BadMap { @Trace map: collections.Map<string, string> }

// ✅ 正确:用内置Map/Set
@ObservedV2
class GoodMapModel {
  @Trace data: Map<string, string> = new Map()
}
注意:AppStorageV2不支持基本类型、不支持collections.Map/Set、不支持PixelMap/ArrayList等Native类型、不能在非UI线程使用。connect传入的类必须是普通class,且key类型要一致——同一个key connect不同类型会导致应用异常。
踩坑清单
| 问题 | 原因 | 解决 |
|---|---|---|
| connect基本类型报错 | AppStorageV2只支持class | 包装成@ObservedV2 class |
| 跨页面状态不同步 | key不一致 | 确保connect用同一个key |
| remove后状态还在 | remove只删存储不影响已有引用 | re-connect获取新实例 |
| @Trace属性改了UI不刷新 | 类没加@ObservedV2 | 类加@ObservedV2装饰器 |
| connect返回undefined | 理论上不会但类型签名允许 | 用!断言或??兜底 |
| Worker中调用connect崩溃 | 只支持UI线程 | 用Emitter跨线程通信 |
| 同key不同类型导致异常 | key绑定了类型 | key+类型必须一致 |
| ArrayList/PixelMap存不进去 | 不支持Native类型 | 存路径或基本类型字段 |
| collections.Map无法观测 | 不支持collections类型 | 用内置Map/Set |
| AppStorage与AppStorageV2数据不通 | 两套独立体系 | 统一用一套,不要混用 |

讨论HarmonyOS开发技术,专注于API与组件、DevEco Studio、测试、元服务和应用上架分发等。
更多推荐



 9
9 0
0- 0


 已为社区贡献100条内容

所有评论(0)