HarmonyOS7 MediaComponentOverview 教程:Video、Audio、Image 这三类媒体组件该怎么分工
文章目录
前言
学媒体组件时,最容易出现一种错觉:每次只学一个案例,好像都懂了,但一放到真正页面里,还是不知道该选哪类组件、怎么组合它们。
比如你要做一个课程详情页,到底哪些部分该用 Video,哪些适合 Audio,哪些只是 Image 就够了?如果没有整体视角,代码很容易越写越散。
这份案例的价值就在这里。它不是在深挖某一个组件,而是在帮你把三大媒体组件的角色边界先搭清楚。
这份案例在做什么
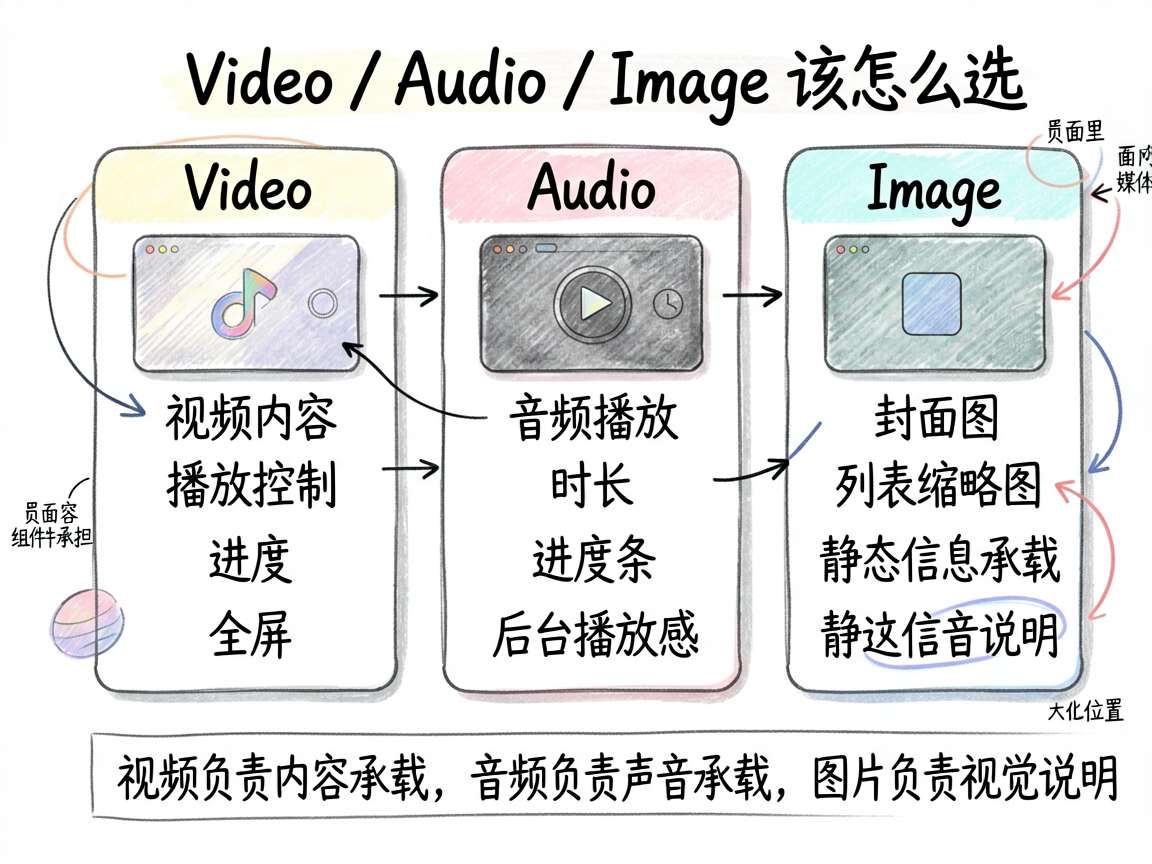
页面把三类媒体能力并排整理出来:
VideoAudioImage
然后再补一块对比说明,帮助你理解它们各自擅长什么。
这类案例特别适合拿来建立“媒体组件选型思维”。
完整代码
/**
 * MediaComponentOverview - 媒体综合
 * 演示 Video + Image + Audio 三大媒体组件总览
 */
import { PRESET_COLORS, generateListItems, PAGE_BG_COLOR, PANEL_BG_COLOR, ACCENT_COLOR, MUTED_TEXT_COLOR } from './types'

@Entry
@Component
struct MediaComponentOverview {
  @State isShow: boolean = true
  @State activeTab: number = 0

  build() {
    Column() {
      if (this.isShow) {
        Scroll() {
          Column({ space: 16 }) {
            Text('媒体组件综合').fontSize(16).fontColor(ACCENT_COLOR).fontWeight(FontWeight.Bold)

            Column() {
              Row() {
                Text('🎬 Video 组件').fontSize(14).fontColor('#4D96FF').fontWeight(FontWeight.Bold)
                Blank()
                Text('视频').fontSize(11).fontColor('#4D96FF')
              }.margin({ bottom: 8 })
              Column() {
                Text('Video Player').fontSize(14).fontColor('#FFFFFF')
              }
              .width('100%').height(120).backgroundColor('#4D96FF').borderRadius(8).justifyContent(FlexAlign.Center)
              Row({ space: 4 }) {
                ForEach(['播放', '暂停', '倍速', '全屏'], (label: string) => {
                  Text(label).fontSize(10).fontColor(ACCENT_COLOR)
                    .backgroundColor('#E8F4FD').borderRadius(3).padding({ left: 6, right: 6, top: 2, bottom: 2 })
                })
              }.width('100%').justifyContent(FlexAlign.SpaceEvenly).margin({ top: 8 })
            }
            .backgroundColor(PANEL_BG_COLOR).padding(12).borderRadius(12)

            Column() {
              Row() {
                Text('🎵 Audio 组件').fontSize(14).fontColor('#6BCB77').fontWeight(FontWeight.Bold)
                Blank()
                Text('音频').fontSize(11).fontColor('#6BCB77')
              }.margin({ bottom: 8 })
              Column({ space: 8 }) {
                Row() {
                  Text('▶').fontSize(14).fontColor('#FFFFFF')
                  Text('音乐播放器').fontSize(12).fontColor('#FFFFFFCC')
                  Blank()
                  Text('03:42').fontSize(10).fontColor('#FFFFFF80')
                }.width('100%').padding({ left: 12, right: 12 })
                Column() {
                  Row() {
                    Column() {}.layoutWeight(4).height(2).backgroundColor('#6BCB77').borderRadius(1)
                    Column() {}.layoutWeight(6).height(2).backgroundColor('#FFFFFF30').borderRadius(1)
                  }
                }.width('90%')
              }
              .width('100%').height(80).backgroundColor('#6BCB77').borderRadius(8).justifyContent(FlexAlign.Center)
              Row({ space: 4 }) {
                ForEach(['播放', '暂停', '静音', '音量'], (label: string) => {
                  Text(label).fontSize(10).fontColor('#6BCB77')
                    .backgroundColor('#F0FAF1').borderRadius(3).padding({ left: 6, right: 6, top: 2, bottom: 2 })
                })
              }.width('100%').justifyContent(FlexAlign.SpaceEvenly).margin({ top: 8 })
            }
            .backgroundColor(PANEL_BG_COLOR).padding(12).borderRadius(12)

            Column() {
              Row() {
                Text('🖼 Image 组件').fontSize(14).fontColor('#9B59B6').fontWeight(FontWeight.Bold)
                Blank()
                Text('图片').fontSize(11).fontColor('#9B59B6')
              }.margin({ bottom: 8 })
              Row({ space: 6 }) {
                Column() { Text('1').fontSize(10).fontColor('#FFF') }
                  .layoutWeight(1).height(60).backgroundColor('#9B59B6').borderRadius(6).justifyContent(FlexAlign.Center)
                Column() { Text('2').fontSize(10).fontColor('#FFF') }
                  .layoutWeight(1).height(60).backgroundColor('#FF6B9D').borderRadius(6).justifyContent(FlexAlign.Center)
                Column() { Text('3').fontSize(10).fontColor('#FFF') }
                  .layoutWeight(1).height(60).backgroundColor('#4ECDC4').borderRadius(6).justifyContent(FlexAlign.Center)
              }.width('100%')
              Row({ space: 4 }) {
                ForEach(['圆角', '裁剪', '边框', '滤镜'], (label: string) => {
                  Text(label).fontSize(10).fontColor('#9B59B6')
                    .backgroundColor('#F5EEF8').borderRadius(3).padding({ left: 6, right: 6, top: 2, bottom: 2 })
                })
              }.width('100%').justifyContent(FlexAlign.SpaceEvenly).margin({ top: 8 })
            }
            .backgroundColor(PANEL_BG_COLOR).padding(12).borderRadius(12)

            Column({ space: 6 }) {
              Text('媒体组件功能对比').fontSize(14).fontColor(ACCENT_COLOR).fontWeight(FontWeight.Bold)
              Text('Video: 视频播放/控制/倍速/全屏/PiP').fontSize(12).fontColor('#333333')
              Text('Audio: 音频播放/控制/循环/状态').fontSize(12).fontColor('#333333')
              Text('Image: 图片显示/填充/裁剪/滤镜').fontSize(12).fontColor('#333333')
              Text('共同: src/controller/onComplete/onError').fontSize(11).fontColor(MUTED_TEXT_COLOR).margin({ top: 2 })
            }
            .width('100%').backgroundColor('#E8F4FD').padding(14).borderRadius(12)
          }.width('100%')
        }
      }
      Text('媒体组件总览 - 给 Video、Audio、Image 建立清晰分工')
        .fontSize(12).fontColor(MUTED_TEXT_COLOR).margin({ top: 12 })
    }
    .width('100%').height('100%').backgroundColor(PAGE_BG_COLOR).padding(16)
  }
}
为什么这篇更像“选型地图”
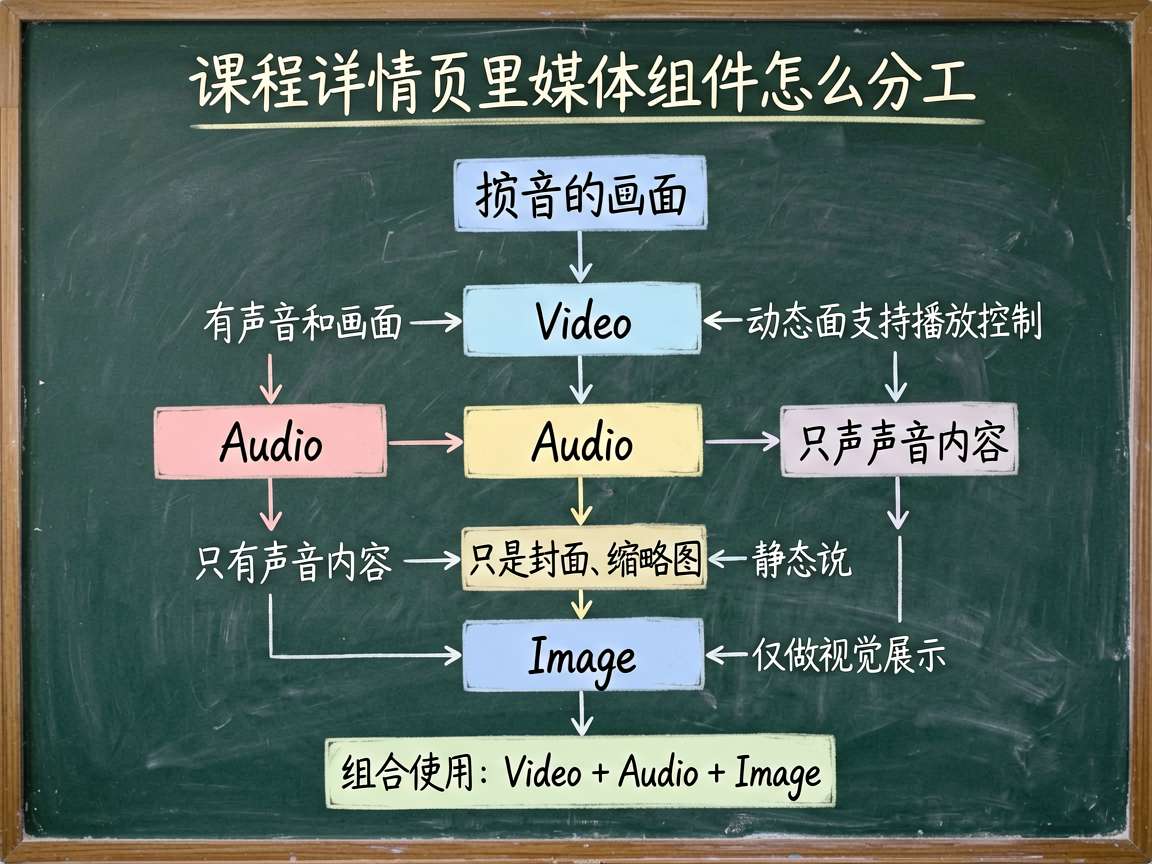
这份代码并没有深挖某一个组件的完整细节,而是先把三类媒体能力拆开看。
这很有意义,因为在真实项目里,你真正面对的问题往往不是“怎么用某个 API”,而是:
这个场景到底该由谁来负责。
比如:
- 有画面、有声音、可拖动进度,那就是
Video - 只有声音和播放控制,那更偏
Audio - 只是静态内容展示或做封面,那通常
Image就够了
Video 为什么是最重的一类媒体组件
案例里 Video 这部分列了:
- 播放
- 暂停
- 倍速
- 全屏
这些能力说明 Video 不只是显示媒体内容,而是承担完整的观看交互。
它通常适合:
- 课程视频
- 演示视频
- 短视频
- 影视播放页
也因为能力最重,所以它的控制逻辑通常也最复杂。
Audio 为什么更像“轻量播放能力”
音频部分虽然没有画面,但它仍然保留了重要的播放信息:
- 播放状态
- 当前时长
- 进度
- 音量相关控制
这说明 Audio 的重点不在视觉内容,而在持续播放和轻交互。
它适合:
- 背景音乐
- 课程音频
- 有声书
- 语音回放
Image 为什么既轻,又不能被低估
案例里 Image 主要强调的是:
- 圆角
- 裁剪
- 边框
- 滤镜
你会发现它不像 Video 和 Audio 那样突出播放控制,而更关注“显示效果”和“视觉承载方式”。
但它绝不只是最简单的组件。因为大量页面中的封面、预览图、缩略图、背景图,最后都靠它完成。
对比区为什么值得重点看
最后这几行非常像一张速查表:
Video: 视频播放/控制/倍速/全屏/PiP
Audio: 音频播放/控制/循环/状态
Image: 图片显示/填充/裁剪/滤镜
它直接告诉你,三者的区别不在于“谁更高级”,而在于处理的媒体类型和交互复杂度不同。
另外这行也很有意思:
共同: src/controller/onComplete/onError
这提醒你三者虽然分工不同,但在资源来源、控制思路和回调处理上,仍然有共同的编程模式可复用。
关键代码单独讲解
Blank()
在每个媒体块的标题行里都用了 Blank(),它让左侧标题和右侧标签自然拉开,形成更稳定的阅读秩序。
ForEach([...], (label) => ...)
用来渲染每类组件的能力标签,非常适合做知识概览型页面。
共同: src/controller/onComplete/onError
这行特别值得记住。它让你开始意识到,不同媒体组件背后其实共享一部分架构思路。
小白最容易踩的坑
1. 看到媒体内容就优先上 Video
其实很多静态展示或轻交互页面,Image 就够了。
2. 不区分“播放能力”和“展示能力”
结果组件选型偏重,页面复杂度也被带高。
3. 只学单个组件,不建立整体视角
后面做综合页面时很容易不知道怎么拆职责。
这份代码能怎么改成真实业务
| 场景 | 改法 |
|---|---|
| 课程详情页 | 顶部 Video,下方资料图片和音频讲解 |
| 内容平台首页 | Image 做封面,点击进入 Video 播放 |
| 冥想或音乐应用 | 以 Audio 为主,Image 做背景和封面 |
| 新人培训页 | 把这张媒体地图扩展成组件导航页 |
动手改一改
- 给每一类组件补一个“适用场景”按钮。
- 点击不同媒体卡片时跳转到对应专题案例。
- 把
Audio和Video的共同能力抽成一组对比项。 - 用你自己的项目场景重写这张组件分工图。
写在最后
会用单个媒体组件,只能说明你能写出某一块功能;真正会做页面,是你知道该让谁负责什么。Video、Audio、Image 的分工一旦清楚,很多页面结构问题会一下子简单很多。
如果你现在正处在“案例看了不少,但还不会自己选组件”的阶段,这篇很值得反复看。它帮你补的不是某个 API,而是媒体页面最基础的选型判断力。

讨论HarmonyOS开发技术,专注于API与组件、DevEco Studio、测试、元服务和应用上架分发等。
更多推荐

 8
8 0
0- 0


 已为社区贡献82条内容

所有评论(0)