HarmonyOS NEXT 设置中心开发:从数据模型到持久化的完整实现
HarmonyOS NEXT 设置中心开发:从数据模型到持久化的完整实现
前言
在企业级应用开发中,设置中心是用户个性化体验的核心入口。HarmonyExplorer 作为鸿蒙文件管理工具,需要提供主题切换、排序方式、默认视图、缓存清理等丰富的设置能力。本文将详细讲解如何基于 ArkTS 和 Preferences 轻量级存储,构建一个可扩展、可持久化的设置中心模块。参考 HarmonyOS 官方文档 了解更多持久化方案。
一、设置中心整体架构设计
1.1 架构分层
设置中心采用 UI -> ViewModel -> Repository -> PreferenceUtil 的分层架构,保证职责清晰、易于测试。Setting 页面负责展示与交互,ViewModel 管理状态流转,Repository 封装数据读写,PreferenceUtil 底层调用 Preferences API。各层职责单向依赖,数据自上而下流转,状态变化自下而上通知。
1.2 模块职责划分
设置中心涉及以下核心模块协同工作:
- Setting 页面:渲染所有设置项,响应用户操作
- SettingItem 组件:通用的设置行组件,支持图标、标题、副标题、箭头
- Setting 数据模型:定义设置项的数据结构
- PreferenceUtil:封装 Preferences 读写
- ThemeUtil:监听主题变化并应用全局样式
良好的分层设计能让设置中心后续扩展新功能时,只需新增数据项和 UI 行,无需修改底层逻辑。
二、Setting 数据模型定义
2.1 Setting 主模型
Setting 模型存储用户的全局配置,使用 PersistenceV2 或 Preferences 进行持久化。以下是核心数据结构定义:
export enum ThemeMode {
  LIGHT = 'light', DARK = 'dark', AUTO = 'auto'
}

export enum SortType {
  NAME_ASC = 'name_asc', NAME_DESC = 'name_desc',
  TIME_DESC = 'time_desc', TIME_ASC = 'time_asc',
  SIZE_DESC = 'size_desc', SIZE_ASC = 'size_asc'
}

export enum ViewMode {
  LIST = 'list', GRID = 'grid'
}

export interface SettingModel {
  theme: ThemeMode;
  sortType: SortType;
  defaultView: ViewMode;
  cacheSize: number;
  isLogEnabled: boolean;
  defaultOpenApp: string;
}
2.2 默认设置值
在 constants 目录中定义默认设置,确保首次启动时有合理的初始值:
import { SettingModel, ThemeMode, SortType, ViewMode } from '../model/SettingModel';
export const DEFAULT_SETTING: SettingModel = {
  theme: ThemeMode.AUTO,
  sortType: SortType.TIME_DESC,
  defaultView: ViewMode.LIST,
  cacheSize: 0,
  isLogEnabled: true,
  defaultOpenApp: 'system'
};
三、Preferences 持久化封装
3.1 PreferenceUtil 实现
PreferenceUtil 是设置中心的数据基石,封装了 Preferences 的增删改查操作。参考 Preferences API 文档 获取完整接口说明。PreferenceUtil 提供的核心方法如下:
| 方法名 | 参数 | 返回值 | 说明 |
|---|---|---|---|
| init | context: Context | Promise | 初始化 Preferences 实例 |
| getSetting | 无 | Promise | 读取全部设置项 |
| saveSetting | key, value | Promise | 保存单个设置项 |
| has | key: string | Promise | 检查 key 是否存在 |
| delete | key: string | Promise | 删除指定设置项 |
import dataPreferences from '@ohos.data.preferences';
import { SettingModel } from '../model/SettingModel';
import { DEFAULT_SETTING } from '../constants/DefaultConstants';

const PREFERENCE_NAME: string = 'harmony_explorer_setting';

export class PreferenceUtil {
  private static preference: dataPreferences.Preferences | null = null;

  static async init(context: Context): Promise<void> {
    this.preference = await dataPreferences.getPreferences(context, PREFERENCE_NAME);
  }

  static async getSetting(): Promise<SettingModel> {
    if (this.preference === null) {
      return DEFAULT_SETTING;
    }
    const theme: ThemeMode = await this.preference.get('theme', DEFAULT_SETTING.theme);
    const sortType: SortType = await this.preference.get('sortType', DEFAULT_SETTING.sortType);
    const defaultView: ViewMode = await this.preference.get('defaultView', DEFAULT_SETTING.defaultView);
    return {
      theme: theme,
      sortType: sortType,
      defaultView: defaultView,
      cacheSize: await this.preference.get('cacheSize', 0),
      isLogEnabled: await this.preference.get('isLogEnabled', true),
      defaultOpenApp: 'system'
    };
  }

  static async saveSetting(key: string, value: string | number | boolean): Promise<void> {
    if (this.preference === null) {
      return;
    }
    await this.preference.put(key, value);
    await this.preference.flush();
  }
}
3.2 初始化时机
PreferenceUtil 需要在 Ability 启动时完成初始化,保证后续读写操作可用。初始化流程包含以下步骤:
- 在 EntryAbility.onCreate 中调用 PreferenceUtil.init 传入 context
- 调用 getSetting 读取已保存的设置数据
- 将设置数据写入 AppStorage 供全局使用
// EntryAbility.ets
import { PreferenceUtil } from '../utils/PreferenceUtil';

export default class EntryAbility extends UIAbility {
  async onCreate(want: Want, launchParam: AbilityConstant.LaunchParam): Promise<void> {
    await PreferenceUtil.init(this.context);
    const setting: SettingModel = await PreferenceUtil.getSetting();
    AppStorage.setOrCreate<SettingModel>('setting', setting);
  }
}
四、SettingItem 公共组件封装
SettingItem 是设置页面的核心行组件,需要支持多种展示形态:纯文本行、带开关行、带选择行。通过统一接口降低重复代码。以下是 SettingItem 组件的实现:
@Component
export struct SettingItem {
  @Prop icon: Resource;
  @Prop title: string;
  @Prop subtitle: string = '';
  @Prop showArrow: boolean = true;
  @Prop showSwitch: boolean = false;
  @Link isSwitchOn: boolean;
  onItemClick: () => void = () => {};
  onSwitchChange: (value: boolean) => void = () => {};

  build(): void {
    Row() {
      Image(this.icon).width(24).height(24).margin({ right: 12 })
      Column() {
        Text(this.title).fontSize(16).fontColor($r('app.color.text_primary'))
        if (this.subtitle.length > 0) {
          Text(this.subtitle).fontSize(12)
            .fontColor($r('app.color.text_secondary')).margin({ top: 2 })
        }
      }
      .alignItems(HorizontalAlign.Start).layoutWeight(1)

      if (this.showSwitch) {
        Toggle({ type: ToggleType.Switch, isOn: this.isSwitchOn })
          .onChange((value: boolean) => { this.onSwitchChange(value); })
      }
      if (this.showArrow && !this.showSwitch) {
        Image($r('app.media.ic_arrow_right')).width(16).height(16)
      }
    }
    .width('100%').height(56).padding({ left: 16, right: 16 })
    .backgroundColor($r('app.color.bg_card'))
    .onClick(() => { this.onItemClick(); })
  }
}
SettingItem 组件通过 showArrow 和 showSwitch 两个属性实现了三种展示模式,大幅减少了设置页面的代码量。
五、主题设置功能实现
5.1 主题切换逻辑
主题设置支持浅色、深色、自动三种模式。当选择"自动"时,跟随系统主题变化。参考 颜色模式适配指南。
import { ThemeMode } from '../model/SettingModel';

@Component
export struct ThemeSettingSection {
  @StorageLink('setting') setting: SettingModel = DEFAULT_SETTING;

  private themeOptions: Array<string> = ['浅色模式', '深色模式', '跟随系统'];

  private async onThemeSelect(index: number): Promise<void> {
    const modes: Array<ThemeMode> = [ThemeMode.LIGHT, ThemeMode.DARK, ThemeMode.AUTO];
    const selectedMode: ThemeMode = modes[index];
    this.setting.theme = selectedMode;
    await PreferenceUtil.saveSetting('theme', selectedMode);
    ThemeUtil.applyTheme(selectedMode);
  }

  build(): void {
    Column() {
      Text('主题设置').fontSize(14)
        .fontColor($r('app.color.text_secondary')).margin({ bottom: 8 })
      ForEach(this.themeOptions, (option: string, index: number) => {
        SettingItem({
          icon: $r('app.media.ic_theme'), title: option,
          subtitle: index === 2 ? '根据系统设置自动切换' : '',
          onItemClick: () => { this.onThemeSelect(index); }
        })
      })
    }
  }
}
5.2 ThemeUtil 全局主题管理
ThemeUtil 负责将主题配置应用到全局,通过 AppStorage 驱动 ArkUI 刷新:
export class ThemeUtil {
  static applyTheme(mode: ThemeMode): void {
    const colorMode: string = mode === ThemeMode.LIGHT ? 'light' : mode === ThemeMode.DARK ? 'dark' : 'auto';
    AppStorage.setOrCreate<string>('colorMode', colorMode);
  }

  static getCurrentColorMode(): string {
    return AppStorage.get<string>('colorMode') ?? 'auto';
  }
}
六、排序方式与默认视图设置
6.1 排序方式选择器
文件列表支持按名称、时间、大小进行升降序排列。用户选择后立即生效并持久化。
| 排序选项 | 枚举值 | 说明 |
|---|---|---|
| 名称升序 | NAME_ASC | A-Z 字母顺序 |
| 名称降序 | NAME_DESC | Z-A 字母顺序 |
| 时间降序 | TIME_DESC | 最新修改在前 |
| 时间升序 | TIME_ASC | 最早修改在前 |
| 大小降序 | SIZE_DESC | 大文件在前 |
| 大小升序 | SIZE_ASC | 小文件在前 |
6.2 默认视图设置
默认视图决定用户首次进入文件浏览器时的展示方式:
@Component
export struct ViewModeSection {
  @StorageLink('setting') setting: SettingModel = DEFAULT_SETTING;

  private async onViewModeChange(mode: ViewMode): Promise<void> {
    this.setting.defaultView = mode;
    await PreferenceUtil.saveSetting('defaultView', mode);
    ToastUtil.show('默认视图已更新');
  }

  build(): void {
    Row() {
      Text('默认视图').fontSize(16).layoutWeight(1)
      Row() {
        Image($r('app.media.ic_list')).width(20).height(20)
          .fillColor(this.setting.defaultView === ViewMode.LIST ? $r('app.color.primary') : $r('app.color.text_secondary'))
          .margin({ right: 16 })
          .onClick(() => { this.onViewModeChange(ViewMode.LIST); })
        Image($r('app.media.ic_grid')).width(20).height(20)
          .fillColor(this.setting.defaultView === ViewMode.GRID ? $r('app.color.primary') : $r('app.color.text_secondary'))
          .onClick(() => { this.onViewModeChange(ViewMode.GRID); })
      }
    }
    .width('100%').height(56).padding({ left: 16, right: 16 })
  }
}
七、缓存清理功能
7.1 缓存大小计算
缓存清理是文件管理类应用的必备功能,核心流程如下:
- 遍历缓存目录计算所有文件总大小
- 用户确认后递归删除缓存文件并更新显示
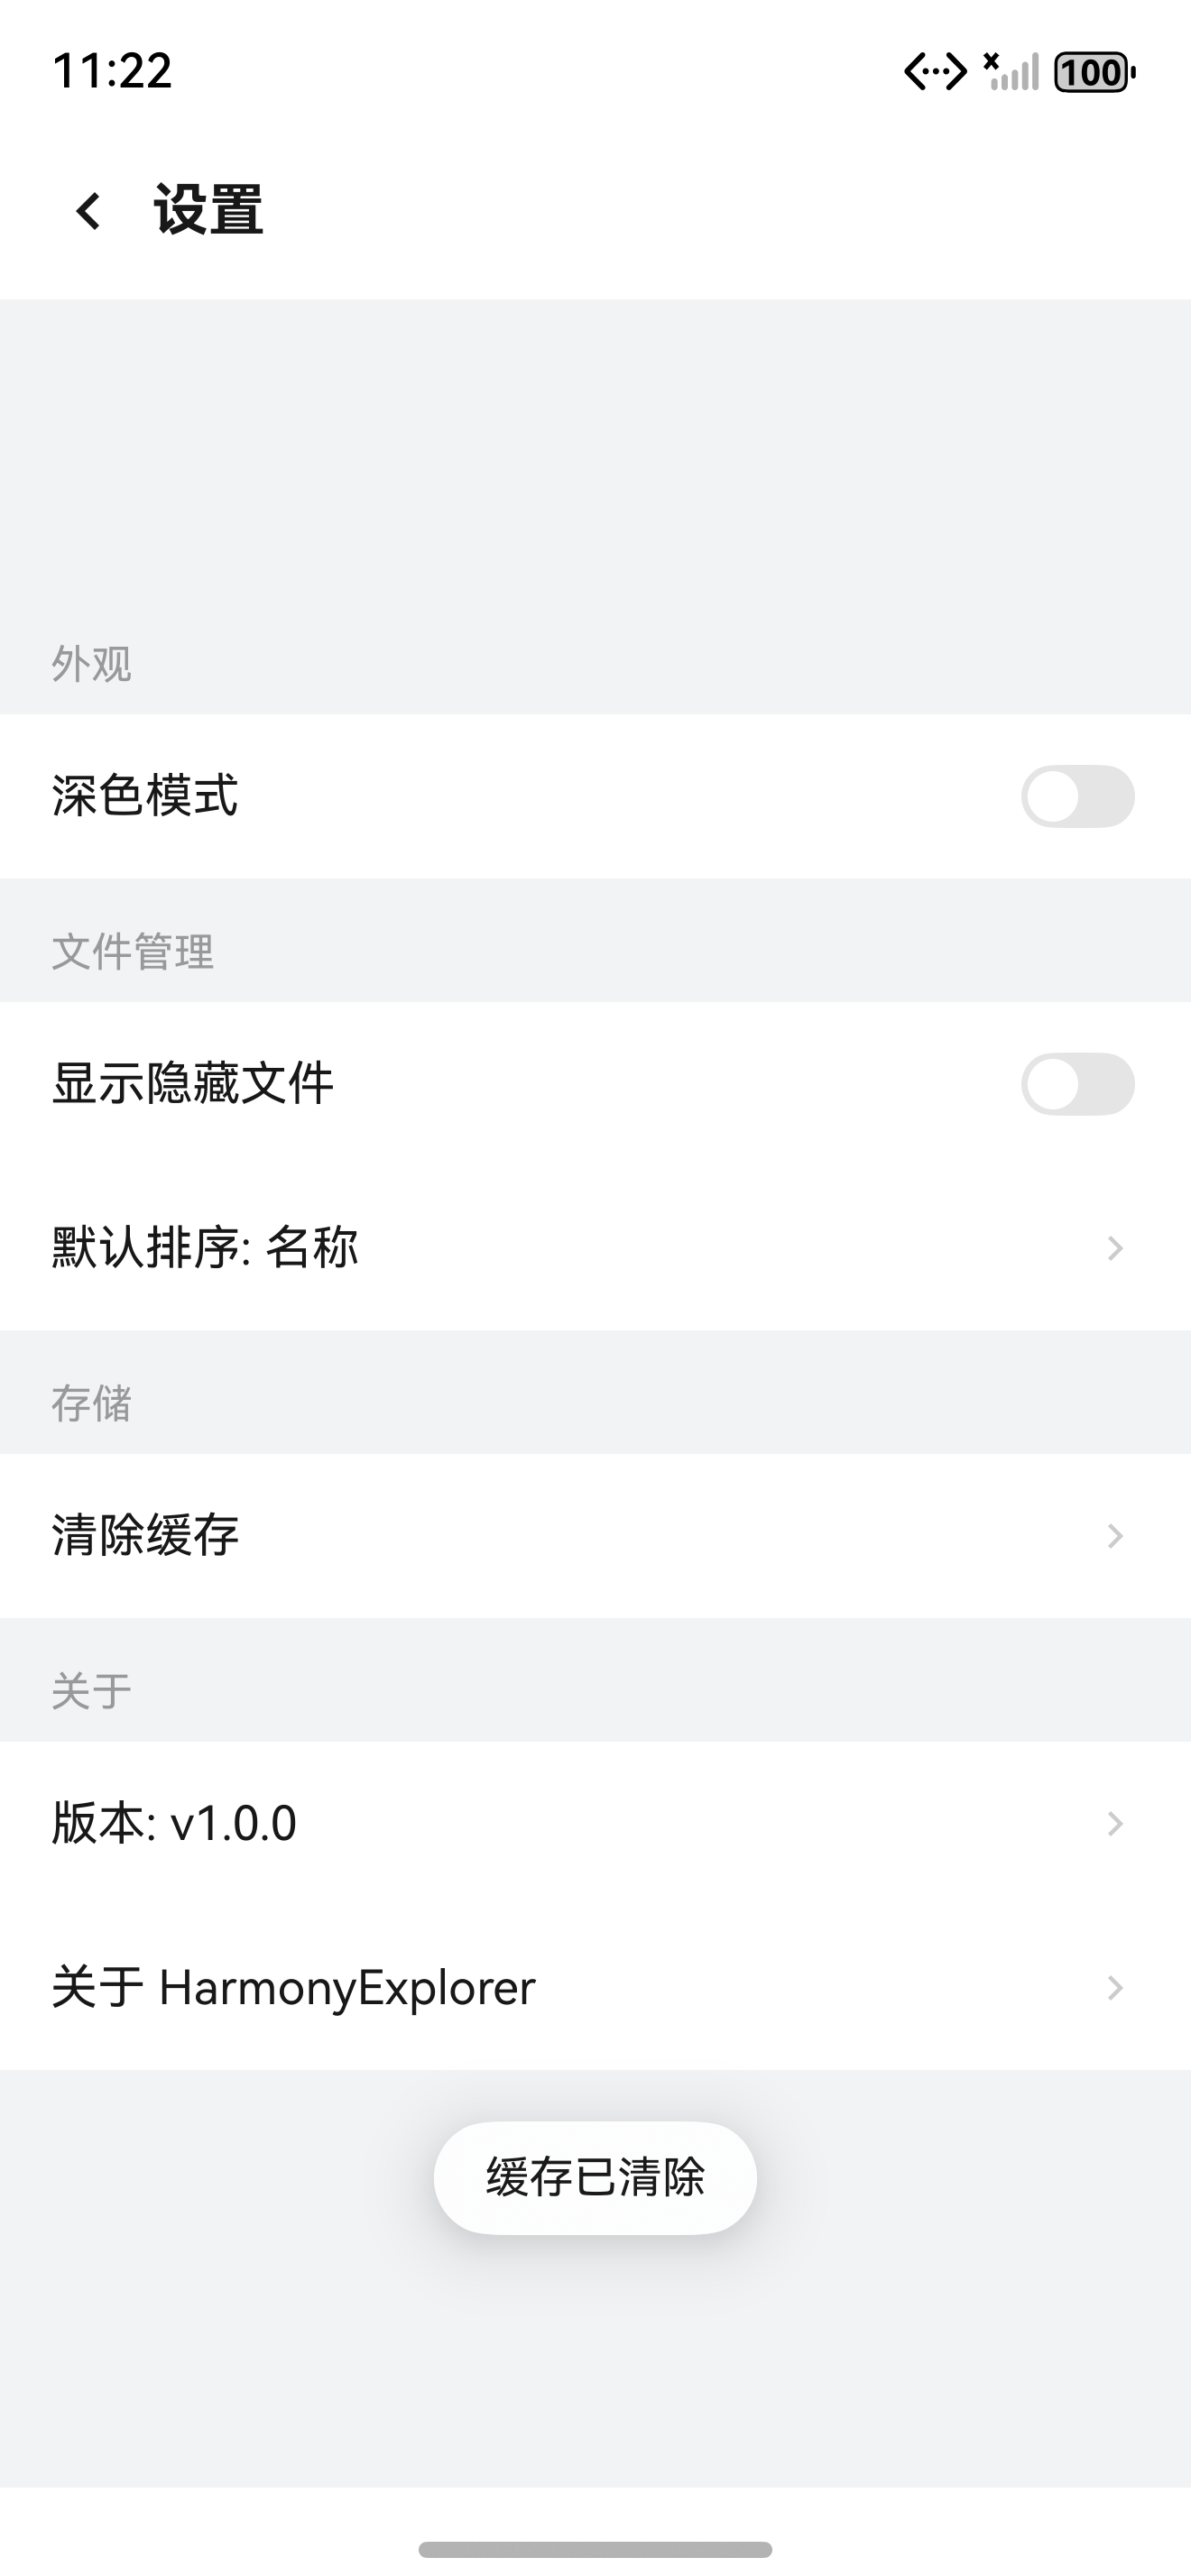
图1:设置中心缓存清理功能界面展示
7.2 缓存清理实现
import fs from '@ohos.file.fs';

export class CacheManager {
  static async calculateCacheSize(cacheDir: string): Promise<number> {
    let totalSize: number = 0;
    try {
      const entries: Array<fs.Dirent> = fs.listFileSync(cacheDir);
      for (const entry of entries) {
        const filePath: string = cacheDir + '/' + entry.name;
        if (entry.isDirectory()) {
          totalSize += await this.calculateCacheSize(filePath);
        } else {
          totalSize += fs.statSync(filePath).size;
        }
      }
    } catch (error) {
      LogUtil.error('计算缓存大小失败: ' + error.message);
    }
    return totalSize;
  }

  static async clearCache(cacheDir: string): Promise<number> {
    let clearedSize: number = 0;
    const entries: Array<fs.Dirent> = fs.listFileSync(cacheDir);
    for (const entry of entries) {
      const filePath: string = cacheDir + '/' + entry.name;
      if (entry.isDirectory()) {
        fs.rmdirSync(filePath);
      } else {
        clearedSize += fs.statSync(filePath).size;
        fs.unlinkSync(filePath);
      }
    }
    return clearedSize;
  }
}
八、日志管理功能
8.1 日志开关控制
日志管理允许用户开启或关闭应用日志记录。关闭后 LogUtil 不会写入文件,仅输出到控制台。以下是 LogUtil 适配实现:
import hilog from '@ohos.hilog';

const DOMAIN: number = 0x0001;
const TAG: string = 'HarmonyExplorer';

export class LogUtil {
  private static isLogEnabled: boolean = true;

  static setLogEnabled(enabled: boolean): void {
    this.isLogEnabled = enabled;
  }

  static info(message: string): void {
    hilog.info(DOMAIN, TAG, '%{public}s', message);
    if (this.isLogEnabled) { this.writeToFile('INFO', message); }
  }

  static error(message: string): void {
    hilog.error(DOMAIN, TAG, '%{public}s', message);
    if (this.isLogEnabled) { this.writeToFile('ERROR', message); }
  }
}
九、Setting 页面完整组装
Setting 页面将所有设置分区组合在一起,使用 SectionTitle 组件作为分组标题,从上到下依次包含外观、文件浏览、存储管理和关于入口等分区。
9.1 页面实现
@Entry
@Component
struct SettingPage {
  @StorageLink('setting') setting: SettingModel = DEFAULT_SETTING;
  @State cacheSizeText: string = '计算中...';

  async aboutToAppear(): Promise<void> {
    const size: number = await CacheManager.calculateCacheSize(this.getCacheDir());
    this.cacheSizeText = StorageUtil.formatFileSize(size);
  }

  private async onClearCache(): Promise<void> {
    const cleared: number = await CacheManager.clearCache(this.getCacheDir());
    this.cacheSizeText = '0 B';
    ToastUtil.show('已清理 ' + StorageUtil.formatFileSize(cleared));
  }

  build(): void {
    Column() {
      AppNavigationBar({ title: '设置', showBack: true })
      Scroll() {
        Column() {
          SectionTitle({ title: '外观' })
          ThemeSettingSection()

          SectionTitle({ title: '文件浏览' })
          ViewModeSection()
          SettingItem({
            icon: $r('app.media.ic_sort'), title: '排序方式',
            subtitle: this.getSortTypeName(),
            onItemClick: () => { this.showSortDialog(); }
          })

          SectionTitle({ title: '存储' })
          SettingItem({
            icon: $r('app.media.ic_cache'), title: '清理缓存',
            subtitle: this.cacheSizeText,
            onItemClick: () => { this.onClearCache(); }
          })

          SectionTitle({ title: '关于' })
          SettingItem({
            icon: $r('app.media.ic_about'), title: '关于 HarmonyExplorer',
            onItemClick: () => { RouterUtil.push('AboutPage'); }
          })
        }
        .width('100%').padding({ bottom: 20 })
      }
      .layoutWeight(1)
    }
    .width('100%').height('100%')
  }
}
十、关于页面入口
10.1 About 页面内容
关于页面展示应用版本、开源协议、联系方式等信息。点击设置页面的"关于"入口跳转至此。
| 信息项 | 内容 |
|---|---|
| 应用名称 | HarmonyExplorer |
| 版本号 | 1.0.0 |
| 构建版本 | 1 |
| 开源协议 | Apache 2.0 |
| 反馈邮箱 | support@example.com |
10.2 版本号读取
import bundleManager from '@ohos.bundle.bundleManager';

export class AboutUtil {
  static async getAppInfo(): Promise<AppInfo> {
    const info: bundleManager.BundleInfo = await bundleManager.getBundleInfoForSelf(
      bundleManager.BundleFlag.GET_BUNDLE_INFO_DEFAULT);
    return {
      appName: 'HarmonyExplorer', versionName: info.versionName,
      versionCode: info.versionCode, description: '鸿蒙文件管理与工具箱'
    };
  }
}
十一、设置项数据流总结
设置中心的完整数据流如下:
- 用户在 Setting 页面操作 SettingItem
- ViewModel 更新 @StorageLink 绑定的 setting 对象
- Repository 调用 PreferenceUtil.saveSetting 持久化
- AppStorage 变化驱动全局 UI 刷新
- 相关模块(ThemeUtil、LogUtil)监听变化并应用
这种单向数据流设计确保了设置变更的即时生效与可靠持久化,避免状态不一致问题。
总结
设置中心是 HarmonyExplorer 项目中用户个性化能力的集中体现。通过 SettingItem 组件封装、Preferences 持久化、ThemeUtil 全局主题管理等模块的协同,实现了一个结构清晰、扩展性强的设置系统。核心设计要点在于分层架构的严格遵循和数据流的单向流转,这使得新增设置项只需添加数据模型字段和 UI 行即可完成。更多 HarmonyOS 开发实践请参考 HarmonyOS 开发者社区 和 ArkUI 开发指南。
如果这篇文章对你有帮助,欢迎点赞👍、收藏⭐、关注🔔,你的支持是我持续创作的动力!
相关资源

讨论HarmonyOS开发技术,专注于API与组件、DevEco Studio、测试、元服务和应用上架分发等。
更多推荐


 7
7 0
0- 0


 已为社区贡献87条内容

所有评论(0)