壁纸服务开发——从静态壁纸到动态交互式壁纸的完整实现
文章目录

每日一句正能量
明智的放弃胜过盲目的执着。
它不否定坚持,而是反对“盲目的执着”——即在错误的方向或无效的事情上消耗自己。“明智的放弃”是基于清醒的审视和判断,懂得止损,从而把资源留给真正值得的目标。
摘要
摘要:壁纸服务是HarmonyOS系统个性化体验的核心组件之一。本文基于HarmonyOS 6(API 23)深入剖析壁纸服务的系统架构,从静态壁纸、动态壁纸到交互式壁纸三个维度展开实战讲解,涵盖WallpaperExtensionAbility的生命周期管理、渲染引擎集成、触控事件响应以及性能优化策略。通过完整的代码示例与架构图解,帮助开发者掌握企业级壁纸服务的开发要点。
一、壁纸服务架构概述
HarmonyOS 6在API 23中对壁纸服务进行了重大重构,引入了全新的WallpaperExtensionAbility框架,替代了早期版本中分散的壁纸API。新架构采用分层设计,将壁纸渲染与系统服务解耦,实现了更细粒度的资源管控与更流畅的动画体验。
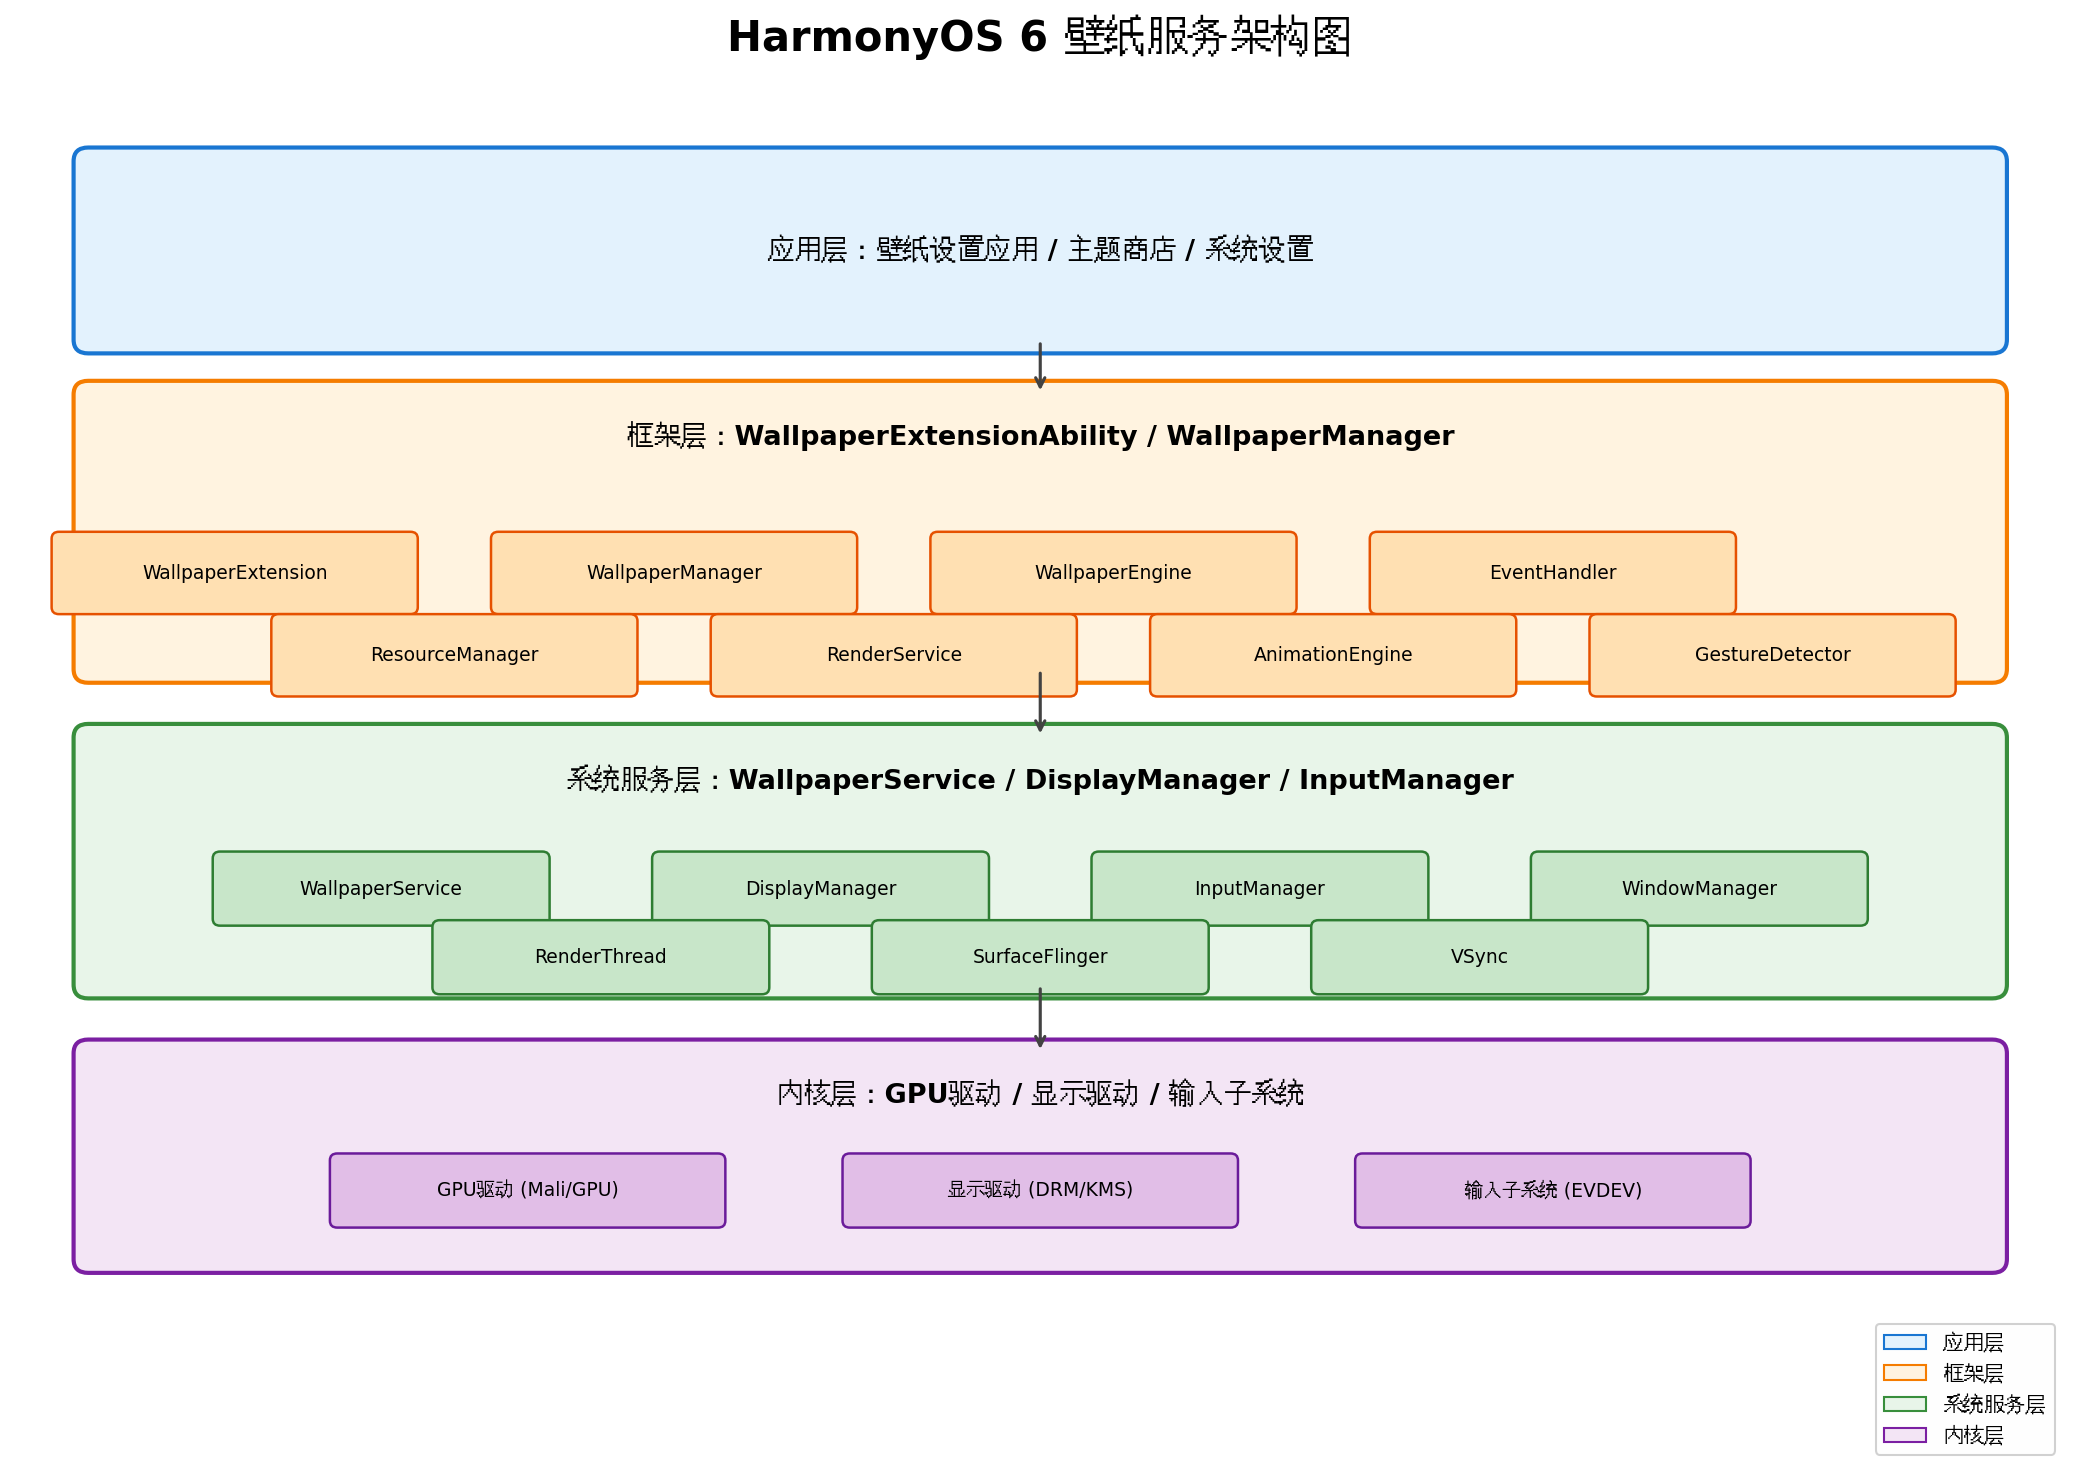
架构分层解析:
- 应用层:壁纸设置应用通过
WallpaperManager接口与系统交互,支持用户选择、预览和设置壁纸。主题商店应用可通过BundleManager查询已安装的壁纸ExtensionAbility。 - 框架层:
WallpaperExtensionAbility是壁纸开发的核心入口,继承自UIExtensionAbility,具备独立的渲染线程。WallpaperEngine负责管理Surface生命周期,RenderService提供2D/3D渲染能力,AnimationEngine处理补间动画与物理动画,GestureDetector识别触控手势。 - 系统服务层:
WallpaperService作为系统常驻服务,管理壁纸状态机与权限校验。DisplayManager监听屏幕状态变化(亮屏/熄屏/折叠),WindowManager负责壁纸窗口的层级管理(位于Launcher之下、锁屏之上)。RenderThread与SurfaceFlinger协同工作,通过VSync信号实现帧率同步。 - 内核层:GPU驱动负责OpenGL ES/Vulkan指令调度,显示驱动通过DRM/KMS框架管理帧缓冲,输入子系统通过EVDEV协议将触控事件上报至用户态。
相较于Android的WallpaperService,HarmonyOS 6的壁纸架构具有三大优势:渲染线程独立(避免阻塞主线程)、分布式能力原生支持(多设备壁纸同步)、ArkUI声明式UI无缝集成(降低开发门槛)。
二、开发环境准备
在开始壁纸服务开发前,需确保开发环境满足以下要求:
2.1 环境配置
- DevEco Studio:4.1 Release及以上版本
- SDK版本:HarmonyOS 6.0.0 (API 23)
- 设备要求:支持OpenGL ES 3.2或Vulkan 1.1的HarmonyOS设备
- 模拟器:推荐使用Remote Emulator中的Phone设备(分辨率1080×2400)
2.2 模块配置
在module.json5中声明壁纸ExtensionAbility:
{
  "module": {
    "name": "wallpaper_service",
    "type": "shared",
    "extensionAbilities": [
      {
        "name": "DynamicWallpaperExtension",
        "srcEntry": "./ets/wallpaper/DynamicWallpaperExtension.ets",
        "description": "$string:wallpaper_desc",
        "type": "wallpaper",
        "exported": true,
        "metadata": [
          {
            "name": "ohos.extension.wallpaper",
            "value": "dynamic"
          }
        ]
      }
    ],
    "requestPermissions": [
      {
        "name": "ohos.permission.SET_WALLPAPER"
      },
      {
        "name": "ohos.permission.ACCESS_SENSORS"
      }
    ]
  }
}
关键配置说明:
type:wallpaper为固定值,标识该ExtensionAbility为壁纸服务metadata中的value可指定壁纸类型:static(静态)、dynamic(动态)、interactive(交互式)- 动态壁纸需申请
ACCESS_SENSORS权限以获取陀螺仪、加速度计数据
三、静态壁纸服务开发
静态壁纸是最基础的壁纸类型,支持图片资源、纯色渐变以及矢量图形三种形式。
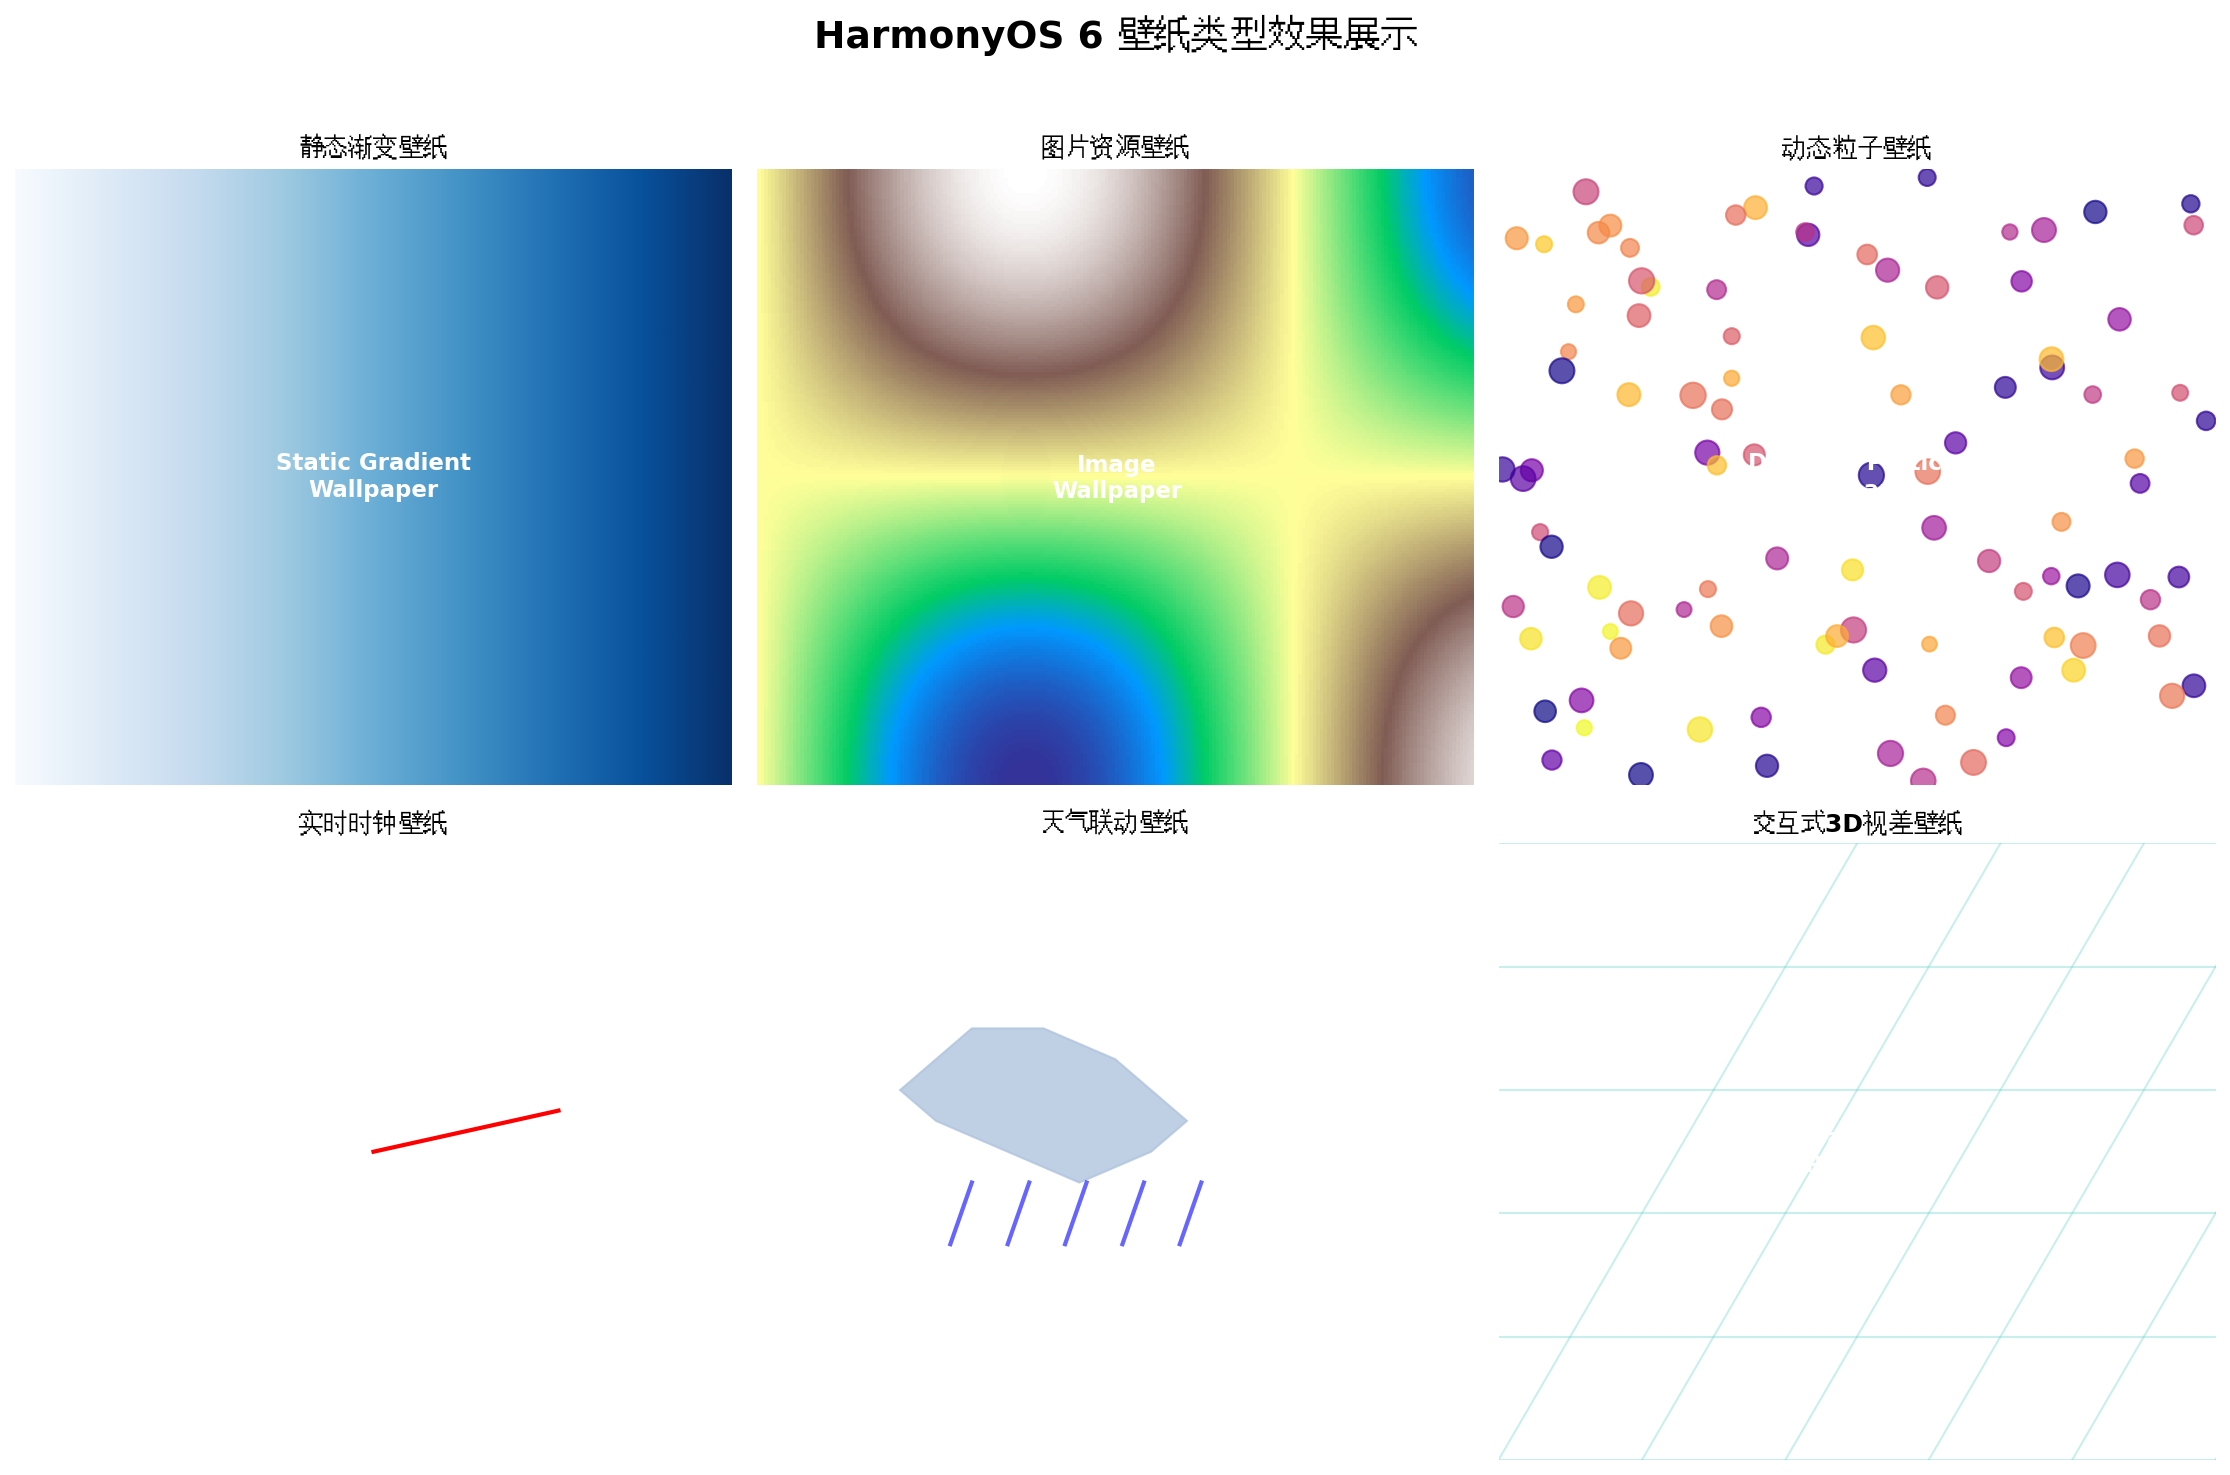
3.1 基础静态壁纸实现
// StaticWallpaperExtension.ets
import { WallpaperExtensionAbility, WallpaperEngine } from '@kit.WallpaperKit';
import { image } from '@kit.ImageKit';

export default class StaticWallpaperExtension extends WallpaperExtensionAbility {
  private engine: WallpaperEngine | null = null;
  private pixelMap: image.PixelMap | null = null;

  onCreate(want: Want): void {
    console.info('StaticWallpaperExtension onCreate');
    this.loadWallpaperResource();
  }

  private async loadWallpaperResource(): Promise<void> {
    // 从资源目录加载高清壁纸
    const resourceManager = this.context.resourceManager;
    const rawFile = await resourceManager.getRawFileContent('wallpaper_4k.jpg');

    // 创建PixelMap并进行自适应裁剪
    const imageSource = image.createImageSource(rawFile.buffer);
    this.pixelMap = await imageSource.createPixelMap({
      desiredSize: { width: 1440, height: 3200 },
      fitDensity: 480,
      editMode: false
    });
  }

  onWallpaperEngineCreate(engine: WallpaperEngine): void {
    this.engine = engine;

    // 设置Surface回调
    engine.setSurfaceCallback({
      onSurfaceCreated: (surfaceId: string) => {
        this.renderFrame(surfaceId);
      },
      onSurfaceChanged: (surfaceId: string, width: number, height: number) => {
        this.renderFrame(surfaceId, width, height);
      },
      onSurfaceDestroyed: (surfaceId: string) => {
        this.pixelMap?.release();
      }
    });
  }

  private renderFrame(surfaceId: string, width?: number, height?: number): void {
    if (!this.pixelMap || !this.engine) return;

    const canvas = this.engine.lockCanvas(surfaceId);
    if (!canvas) return;

    // 获取屏幕实际尺寸
    const screenWidth = width || canvas.getWidth();
    const screenHeight = height || canvas.getHeight();

    // 计算居中裁剪区域
    const srcWidth = this.pixelMap.getImageInfo().size.width;
    const srcHeight = this.pixelMap.getImageInfo().size.height;
    const scale = Math.max(screenWidth / srcWidth, screenHeight / srcHeight);
    const dstWidth = srcWidth * scale;
    const dstHeight = srcHeight * scale;
    const offsetX = (screenWidth - dstWidth) / 2;
    const offsetY = (screenHeight - dstHeight) / 2;

    // 绘制壁纸并应用抗锯齿
    canvas.drawPixelMap(this.pixelMap, {
      srcRect: { left: 0, top: 0, right: srcWidth, bottom: srcHeight },
      dstRect: { left: offsetX, top: offsetY, right: offsetX + dstWidth, bottom: offsetY + dstHeight },
      filterQuality: image.FilterQuality.HIGH
    });

    this.engine.unlockCanvasAndPost(surfaceId, canvas);
  }

  onDestroy(): void {
    this.pixelMap?.release();
    this.pixelMap = null;
    console.info('StaticWallpaperExtension onDestroy');
  }
}
3.2 渐变壁纸与矢量图形
对于纯色渐变壁纸,推荐使用CanvasRenderingContext2D直接绘制,避免资源加载开销:
private drawGradientWallpaper(canvas: Canvas, width: number, height: number): void {
  const ctx = canvas.getContext('2d');

  // 创建线性渐变(从深海蓝到极光紫)
  const gradient = ctx.createLinearGradient(0, 0, width, height);
  gradient.addColorStop(0, '#0B1426');
  gradient.addColorStop(0.3, '#1B3A5C');
  gradient.addColorStop(0.6, '#2E5C8A');
  gradient.addColorStop(1, '#4A148C');

  ctx.fillStyle = gradient;
  ctx.fillRect(0, 0, width, height);

  // 叠加 subtle noise texture 提升质感
  this.applyNoiseTexture(ctx, width, height, 0.03);
}
四、动态壁纸服务开发
动态壁纸是HarmonyOS 6壁纸服务的核心亮点,支持基于时间、传感器、网络状态等多维度数据驱动的实时渲染。
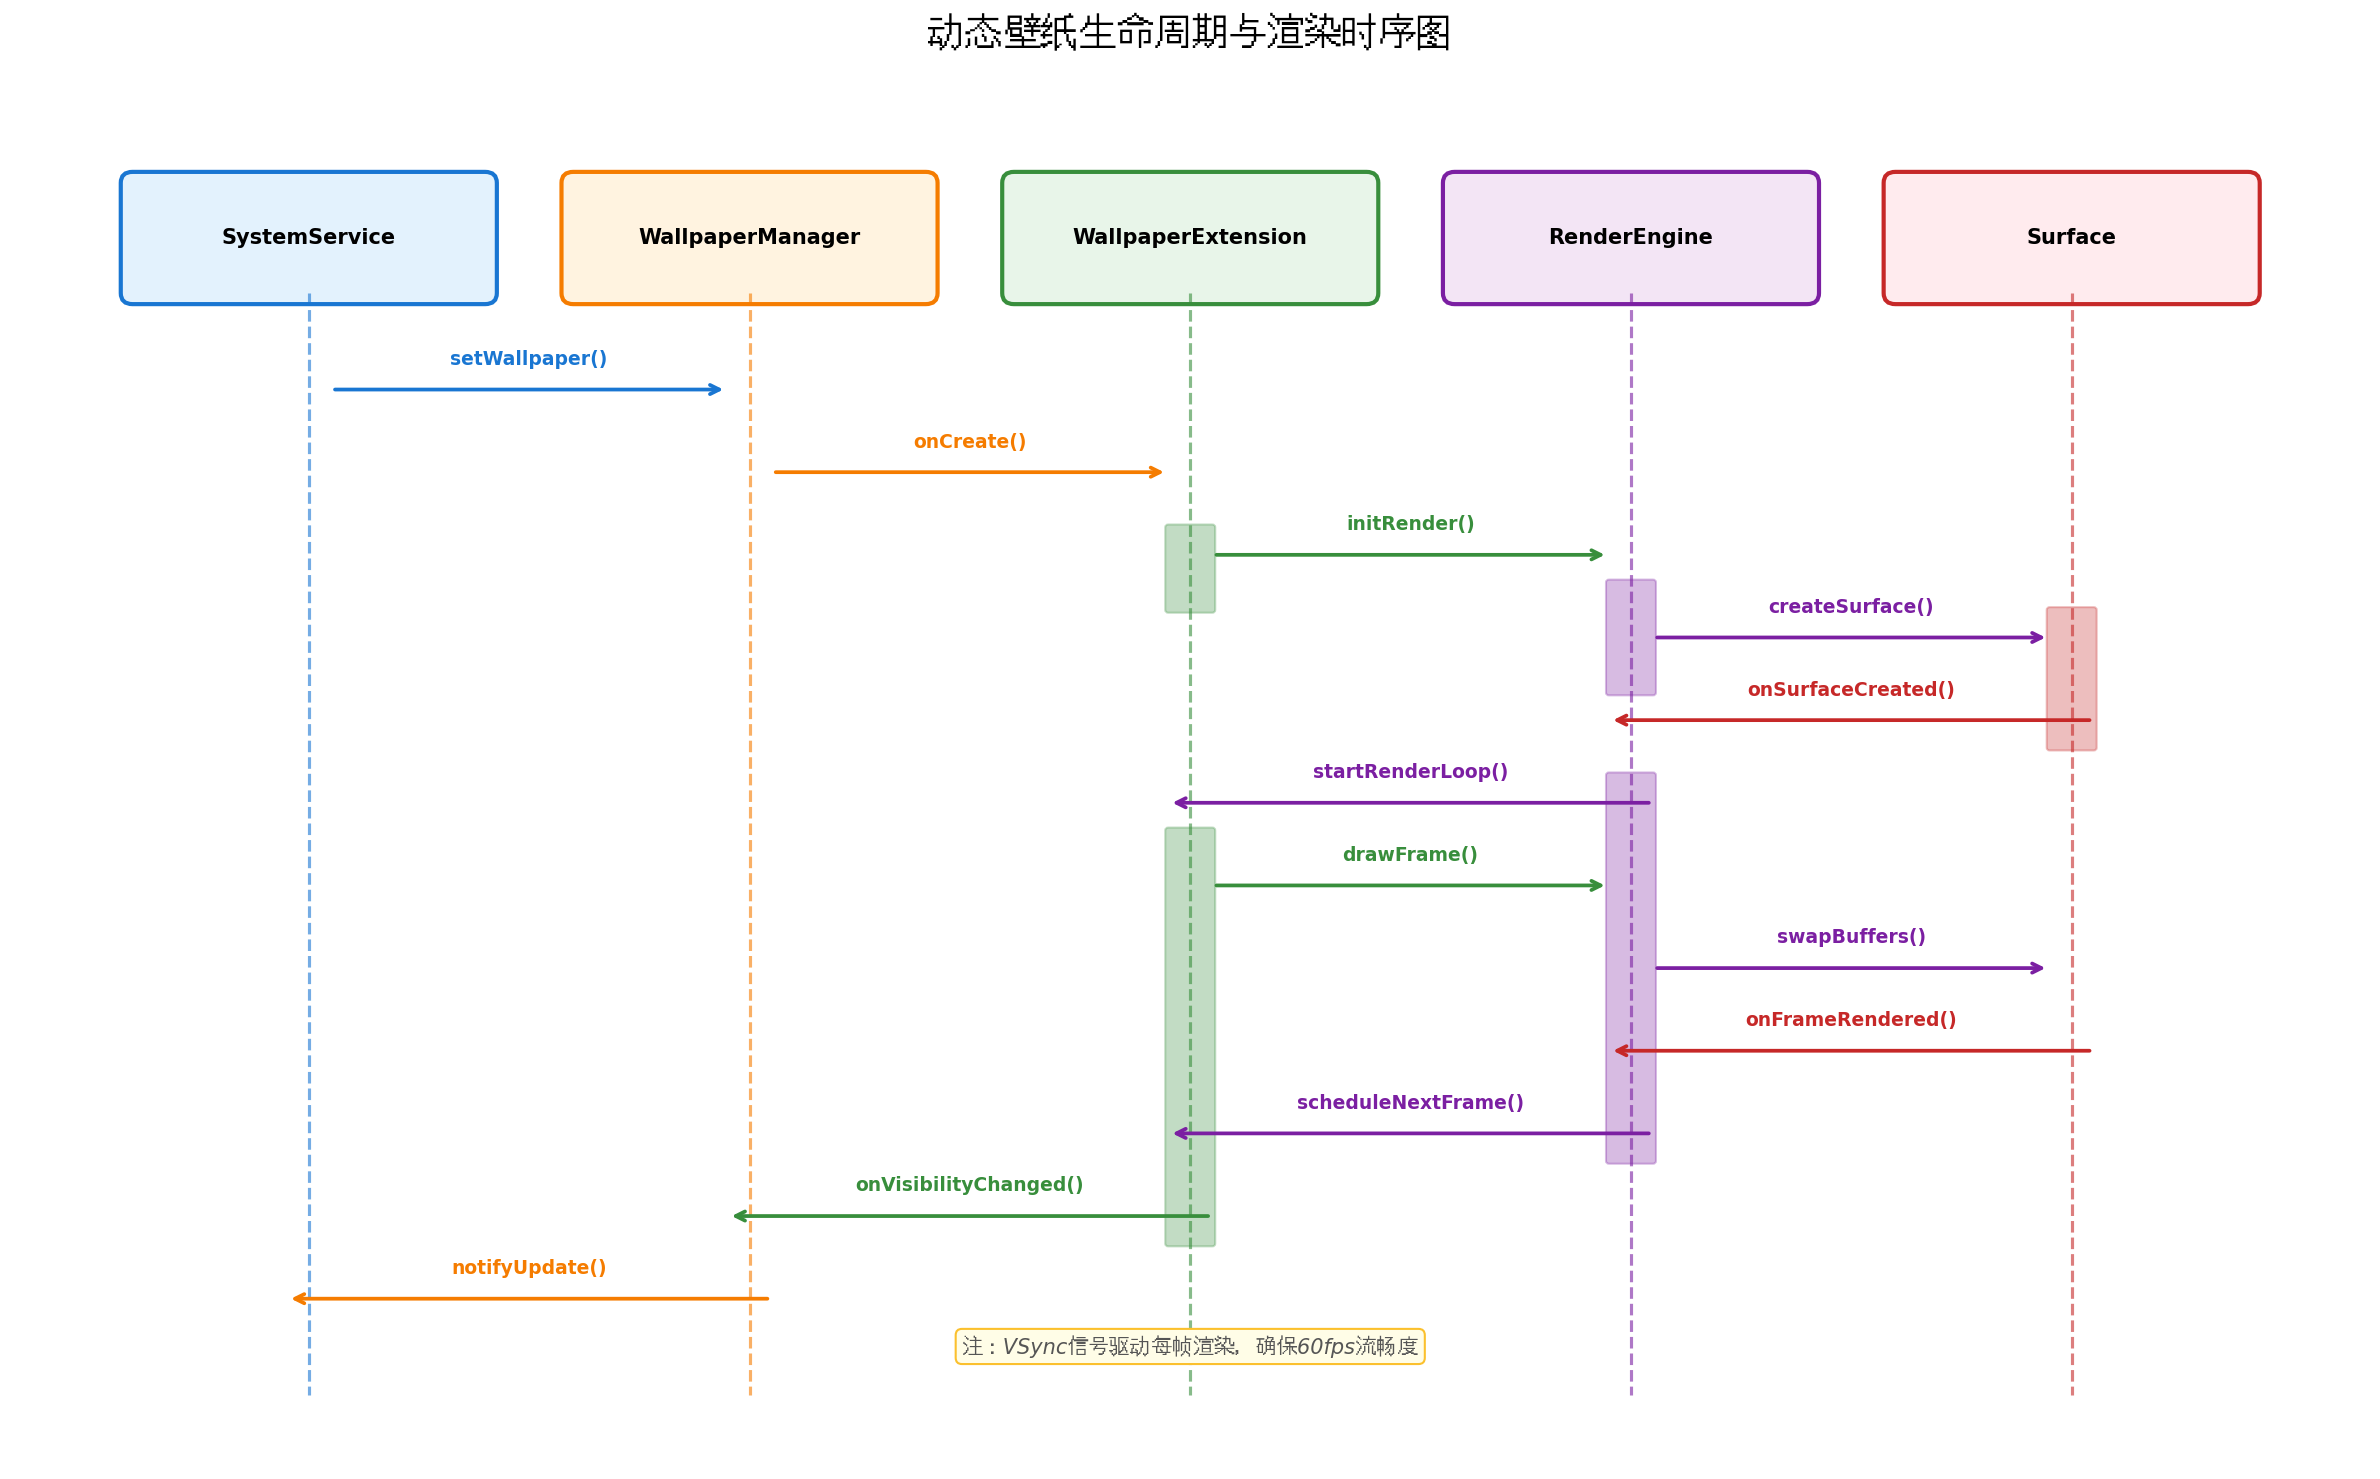
4.1 粒子系统动态壁纸
以下实现一个基于GPU加速的粒子系统动态壁纸,粒子响应重力与触控:
// ParticleWallpaperExtension.ets
import { WallpaperExtensionAbility, WallpaperEngine } from '@kit.WallpaperKit';
import { sensor } from '@kit.SensorServiceKit';
import { display } from '@kit.ArkUI';

interface Particle {
  x: number;
  y: number;
  vx: number;
  vy: number;
  radius: number;
  color: string;
  alpha: number;
  life: number;
}

export default class ParticleWallpaperExtension extends WallpaperExtensionAbility {
  private engine: WallpaperEngine | null = null;
  private particles: Particle[] = [];
  private animationId: number = -1;
  private gravityX: number = 0;
  private gravityY: number = 0.15;
  private isVisible: boolean = true;
  private lastFrameTime: number = 0;
  private readonly MAX_PARTICLES = 200;
  private readonly TARGET_FPS = 60;

  onCreate(want: Want): void {
    this.initParticles();
    this.registerSensorListener();
  }

  private initParticles(): void {
    const colors = ['#FF6B6B', '#4ECDC4', '#45B7D1', '#96CEB4', '#FFEAA7', '#DDA0DD'];
    for (let i = 0; i < this.MAX_PARTICLES; i++) {
      this.particles.push(this.createParticle(colors[i % colors.length]));
    }
  }

  private createParticle(color: string): Particle {
    return {
      x: Math.random() * 1080,
      y: Math.random() * 2400,
      vx: (Math.random() - 0.5) * 4,
      vy: (Math.random() - 0.5) * 4,
      radius: Math.random() * 6 + 2,
      color: color,
      alpha: Math.random() * 0.5 + 0.3,
      life: Math.random() * 100 + 50
    };
  }

  private registerSensorListener(): void {
    // 监听加速度计,实现重力感应
    sensor.on(sensor.SensorId.ACCELEROMETER, (data) => {
      this.gravityX = data.x * 0.3;
      this.gravityY = data.y * 0.3 + 0.1;
    }, { interval: sensor.SensorInterval.NORMAL });
  }

  onWallpaperEngineCreate(engine: WallpaperEngine): void {
    this.engine = engine;
    engine.setSurfaceCallback({
      onSurfaceCreated: (surfaceId: string) => {
        this.isVisible = true;
        this.startRenderLoop(surfaceId);
      },
      onSurfaceDestroyed: () => {
        this.isVisible = false;
        this.stopRenderLoop();
      }
    });

    // 监听屏幕状态
    display.on('change', (data) => {
      this.isVisible = data.state === 0; // 0: 亮屏
    });
  }

  private startRenderLoop(surfaceId: string): void {
    const loop = (timestamp: number) => {
      if (!this.isVisible) return;

      // 帧率控制:基于VSync间隔计算
      const deltaTime = timestamp - this.lastFrameTime;
      if (deltaTime < 1000 / this.TARGET_FPS) {
        this.animationId = requestAnimationFrame(loop);
        return;
      }
      this.lastFrameTime = timestamp;

      this.updateParticles();
      this.renderParticles(surfaceId);

      this.animationId = requestAnimationFrame(loop);
    };
    this.animationId = requestAnimationFrame(loop);
  }

  private updateParticles(): void {
    const width = 1080;
    const height = 2400;

    for (let i = 0; i < this.particles.length; i++) {
      const p = this.particles[i];

      // 应用重力
      p.vx += this.gravityX;
      p.vy += this.gravityY;

      // 更新位置
      p.x += p.vx;
      p.y += p.vy;

      // 边界碰撞检测与反弹
      if (p.x < 0 || p.x > width) {
        p.vx *= -0.8;
        p.x = Math.max(0, Math.min(width, p.x));
      }
      if (p.y < 0 || p.y > height) {
        p.vy *= -0.8;
        p.y = Math.max(0, Math.min(height, p.y));
      }

      // 速度衰减
      p.vx *= 0.995;
      p.vy *= 0.995;

      // 生命周期
      p.life--;
      if (p.life <= 0) {
        this.particles[i] = this.createParticle(p.color);
      }
    }
  }

  private renderParticles(surfaceId: string): void {
    if (!this.engine) return;
    const canvas = this.engine.lockCanvas(surfaceId);
    if (!canvas) return;

    const ctx = canvas.getContext('2d');
    const width = canvas.getWidth();
    const height = canvas.getHeight();

    // 半透明背景实现拖尾效果
    ctx.fillStyle = 'rgba(11, 20, 38, 0.15)';
    ctx.fillRect(0, 0, width, height);

    // 绘制粒子
    for (const p of this.particles) {
      ctx.beginPath();
      ctx.arc(p.x, p.y, p.radius, 0, Math.PI * 2);
      ctx.fillStyle = p.color;
      ctx.globalAlpha = p.alpha;
      ctx.fill();

      // 发光效果
      ctx.shadowBlur = 10;
      ctx.shadowColor = p.color;
    }
    ctx.globalAlpha = 1.0;
    ctx.shadowBlur = 0;

    this.engine.unlockCanvasAndPost(surfaceId, canvas);
  }

  private stopRenderLoop(): void {
    if (this.animationId !== -1) {
      cancelAnimationFrame(this.animationId);
      this.animationId = -1;
    }
  }

  onDestroy(): void {
    this.stopRenderLoop();
    sensor.off(sensor.SensorId.ACCELEROMETER);
    console.info('ParticleWallpaperExtension destroyed');
  }
}
4.2 天气联动动态壁纸
通过WeatherService获取实时天气数据,驱动壁纸视觉变化:
private async updateWeatherEffect(): Promise<void> {
  const weatherService = this.context.createModuleContext('com.example.weather');
  const currentWeather = await weatherService.call('getCurrentWeather');

  switch (currentWeather.type) {
    case 'rainy':
      this.particleSystem.setMode(ParticleMode.RAIN);
      this.backgroundColor = '#1a2639';
      break;
    case 'snowy':
      this.particleSystem.setMode(ParticleMode.SNOW);
      this.backgroundColor = '#e8e8e8';
      break;
    case 'sunny':
      this.particleSystem.setMode(ParticleMode.SUNRAY);
      this.backgroundColor = '#87CEEB';
      break;
    case 'cloudy':
      this.particleSystem.setMode(ParticleMode.CLOUD);
      this.backgroundColor = '#708090';
      break;
  }
}
五、交互式壁纸与事件响应
交互式壁纸允许用户通过触控、手势与壁纸内容实时互动,是HarmonyOS 6壁纸服务的最高阶形态。
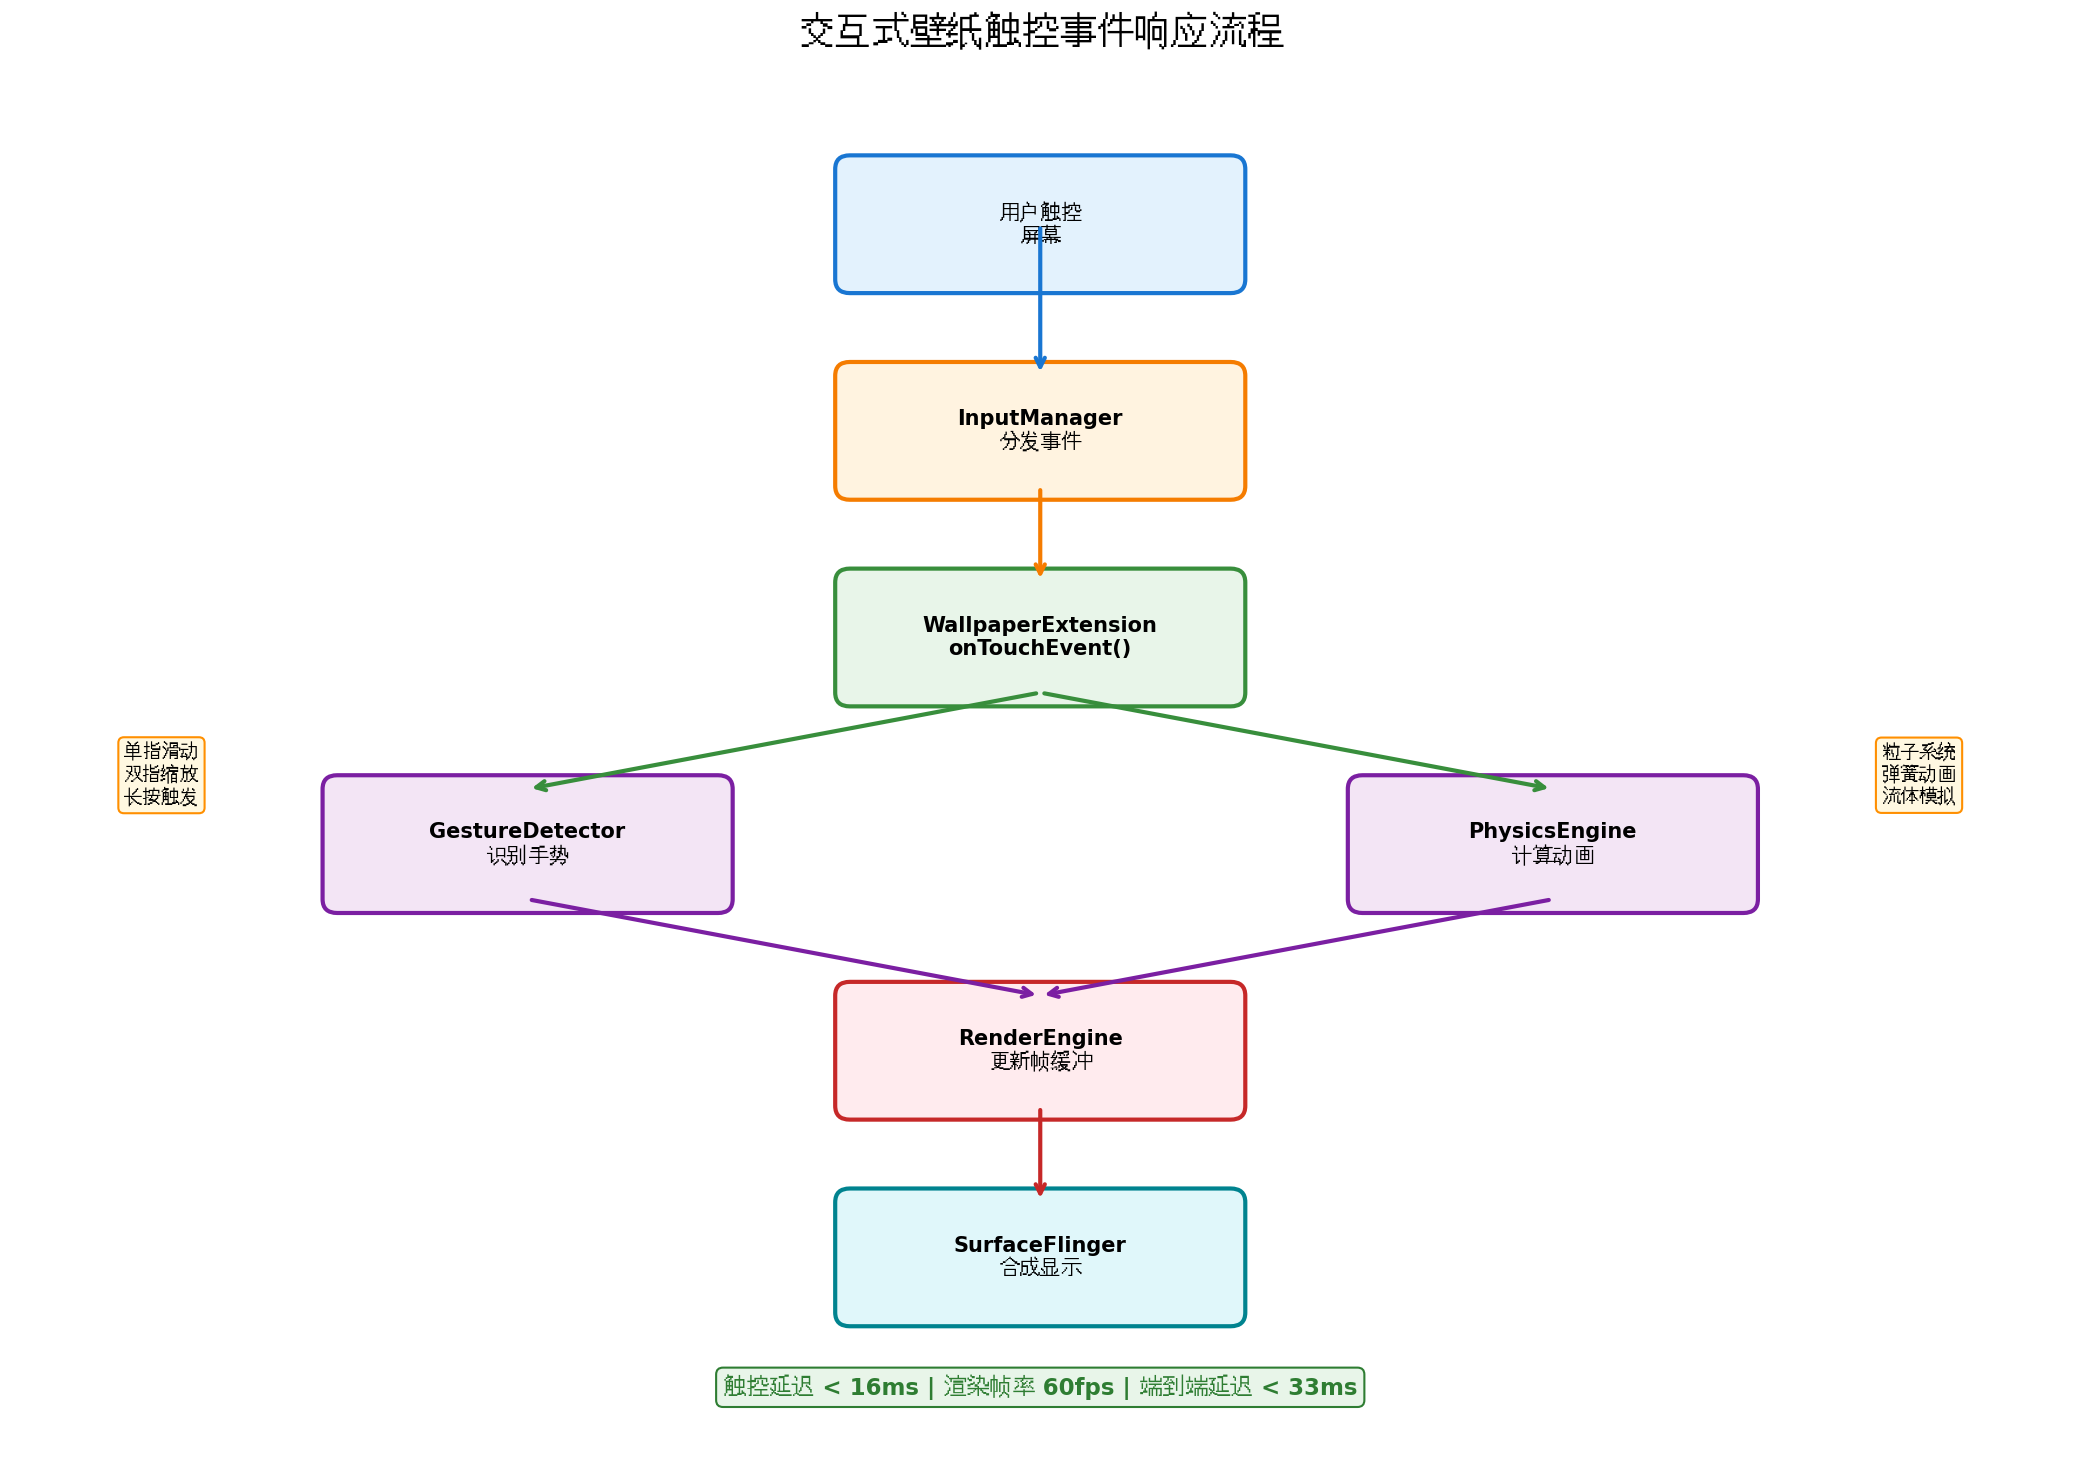
5.1 触控事件处理机制
// InteractiveWallpaperExtension.ets
import { WallpaperExtensionAbility, WallpaperEngine } from '@kit.WallpaperKit';
import { gesture, GestureType } from '@kit.ArkUI';

interface TouchPoint {
  id: number;
  x: number;
  y: number;
  pressure: number;
  timestamp: number;
}

export default class InteractiveWallpaperExtension extends WallpaperExtensionAbility {
  private engine: WallpaperEngine | null = null;
  private activeTouches: Map<number, TouchPoint> = new Map();
  private rippleEffects: RippleEffect[] = [];
  private physicsWorld: PhysicsWorld = new PhysicsWorld();

  onWallpaperEngineCreate(engine: WallpaperEngine): void {
    this.engine = engine;

    engine.setSurfaceCallback({
      onSurfaceCreated: (surfaceId: string) => {
        this.initInteractiveScene(surfaceId);
        this.startRenderLoop(surfaceId);
      }
    });

    // 注册多点触控监听器
    engine.setTouchEventCallback({
      onTouchEvent: (event: TouchEvent) => {
        this.handleTouchEvent(event);
        return true; // 消费事件
      }
    });
  }

  private handleTouchEvent(event: TouchEvent): void {
    const touches = event.getTouches();

    switch (event.type) {
      case TouchType.DOWN:
        for (const touch of touches) {
          this.activeTouches.set(touch.id, {
            id: touch.id,
            x: touch.x,
            y: touch.y,
            pressure: touch.pressure || 1.0,
            timestamp: Date.now()
          });

          // 生成水波纹效果
          this.rippleEffects.push(new RippleEffect(touch.x, touch.y, touch.pressure));

          // 物理引擎:施加冲量
          this.physicsWorld.applyImpulse(touch.x, touch.y, 0, -15 * (touch.pressure || 1));
        }
        break;

      case TouchType.MOVE:
        for (const touch of touches) {
          const prev = this.activeTouches.get(touch.id);
          if (prev) {
            const dx = touch.x - prev.x;
            const dy = touch.y - prev.y;
            const velocity = Math.sqrt(dx * dx + dy * dy);

            // 滑动速度超过阈值时生成粒子拖尾
            if (velocity > 5) {
              this.spawnTrailParticles(prev.x, prev.y, touch.x, touch.y, velocity);
            }

            // 更新物理约束
            this.physicsWorld.updateConstraint(touch.id, touch.x, touch.y);

            this.activeTouches.set(touch.id, {
              ...prev, x: touch.x, y: touch.y, timestamp: Date.now()
            });
          }
        }
        break;

      case TouchType.UP:
      case TouchType.CANCEL:
        for (const touch of touches) {
          this.activeTouches.delete(touch.id);
          this.physicsWorld.releaseConstraint(touch.id);
        }
        break;
    }
  }

  private spawnTrailParticles(x1: number, y1: number, x2: number, y2: number, velocity: number): void {
    const steps = Math.min(Math.floor(velocity / 3), 10);
    for (let i = 0; i < steps; i++) {
      const t = i / steps;
      const x = x1 + (x2 - x1) * t;
      const y = y1 + (y2 - y1) * t;
      this.physicsWorld.addParticle({
        x, y,
        vx: (Math.random() - 0.5) * 2,
        vy: (Math.random() - 0.5) * 2,
        life: 30 + Math.random() * 20,
        size: 2 + Math.random() * 3,
        color: `hsl(${200 + Math.random() * 60}, 80%, 60%)`
      });
    }
  }

  private initInteractiveScene(surfaceId: string): void {
    // 初始化物理世界:创建弹性网格
    const width = 1080;
    const height = 2400;
    const gridSpacing = 60;

    for (let x = 0; x < width; x += gridSpacing) {
      for (let y = 0; y < height; y += gridSpacing) {
        this.physicsWorld.addNode(x, y, {
          mass: 1.0,
          damping: 0.92,
          restLength: gridSpacing,
          stiffness: 0.15
        });
      }
    }

    // 建立弹簧连接
    this.physicsWorld.connectNeighbors(gridSpacing * 1.5);
  }

  private renderInteractiveFrame(surfaceId: string): void {
    if (!this.engine) return;
    const canvas = this.engine.lockCanvas(surfaceId);
    if (!canvas) return;

    const ctx = canvas.getContext('2d');
    const width = canvas.getWidth();
    const height = canvas.getHeight();

    // 清除画布(使用半透明实现运动模糊)
    ctx.fillStyle = 'rgba(5, 10, 20, 0.25)';
    ctx.fillRect(0, 0, width, height);

    // 更新并绘制物理网格
    this.physicsWorld.step(1 / 60);
    this.physicsWorld.render(ctx);

    // 绘制水波纹
    for (let i = this.rippleEffects.length - 1; i >= 0; i--) {
      const ripple = this.rippleEffects[i];
      ripple.update();
      ripple.render(ctx);
      if (ripple.isDead()) {
        this.rippleEffects.splice(i, 1);
      }
    }

    // 绘制触控点高亮
    for (const [_, touch] of this.activeTouches) {
      const gradient = ctx.createRadialGradient(touch.x, touch.y, 0, touch.x, touch.y, 80);
      gradient.addColorStop(0, `rgba(100, 200, 255, ${0.4 * touch.pressure})`);
      gradient.addColorStop(1, 'rgba(100, 200, 255, 0)');
      ctx.fillStyle = gradient;
      ctx.fillRect(touch.x - 80, touch.y - 80, 160, 160);
    }

    this.engine.unlockCanvasAndPost(surfaceId, canvas);
  }
}
5.2 手势识别与3D视差
利用陀螺仪数据实现3D视差效果,增强沉浸感:
private updateParallaxEffect(gyroX: number, gyroY: number): void {
  const maxOffset = 30; // 最大视差偏移量(像素)
  const sensitivity = 0.5;

  // 分层视差:背景层移动慢,前景层移动快
  this.layers.forEach((layer, index) => {
    const depth = (index + 1) / this.layers.length;
    const offsetX = gyroY * maxOffset * depth * sensitivity;
    const offsetY = gyroX * maxOffset * depth * sensitivity;

    layer.setTransform({
      translateX: offsetX,
      translateY: offsetY,
      scale: 1 + Math.abs(gyroX + gyroY) * 0.01 * depth
    });
  });
}
六、壁纸生命周期管理与性能优化
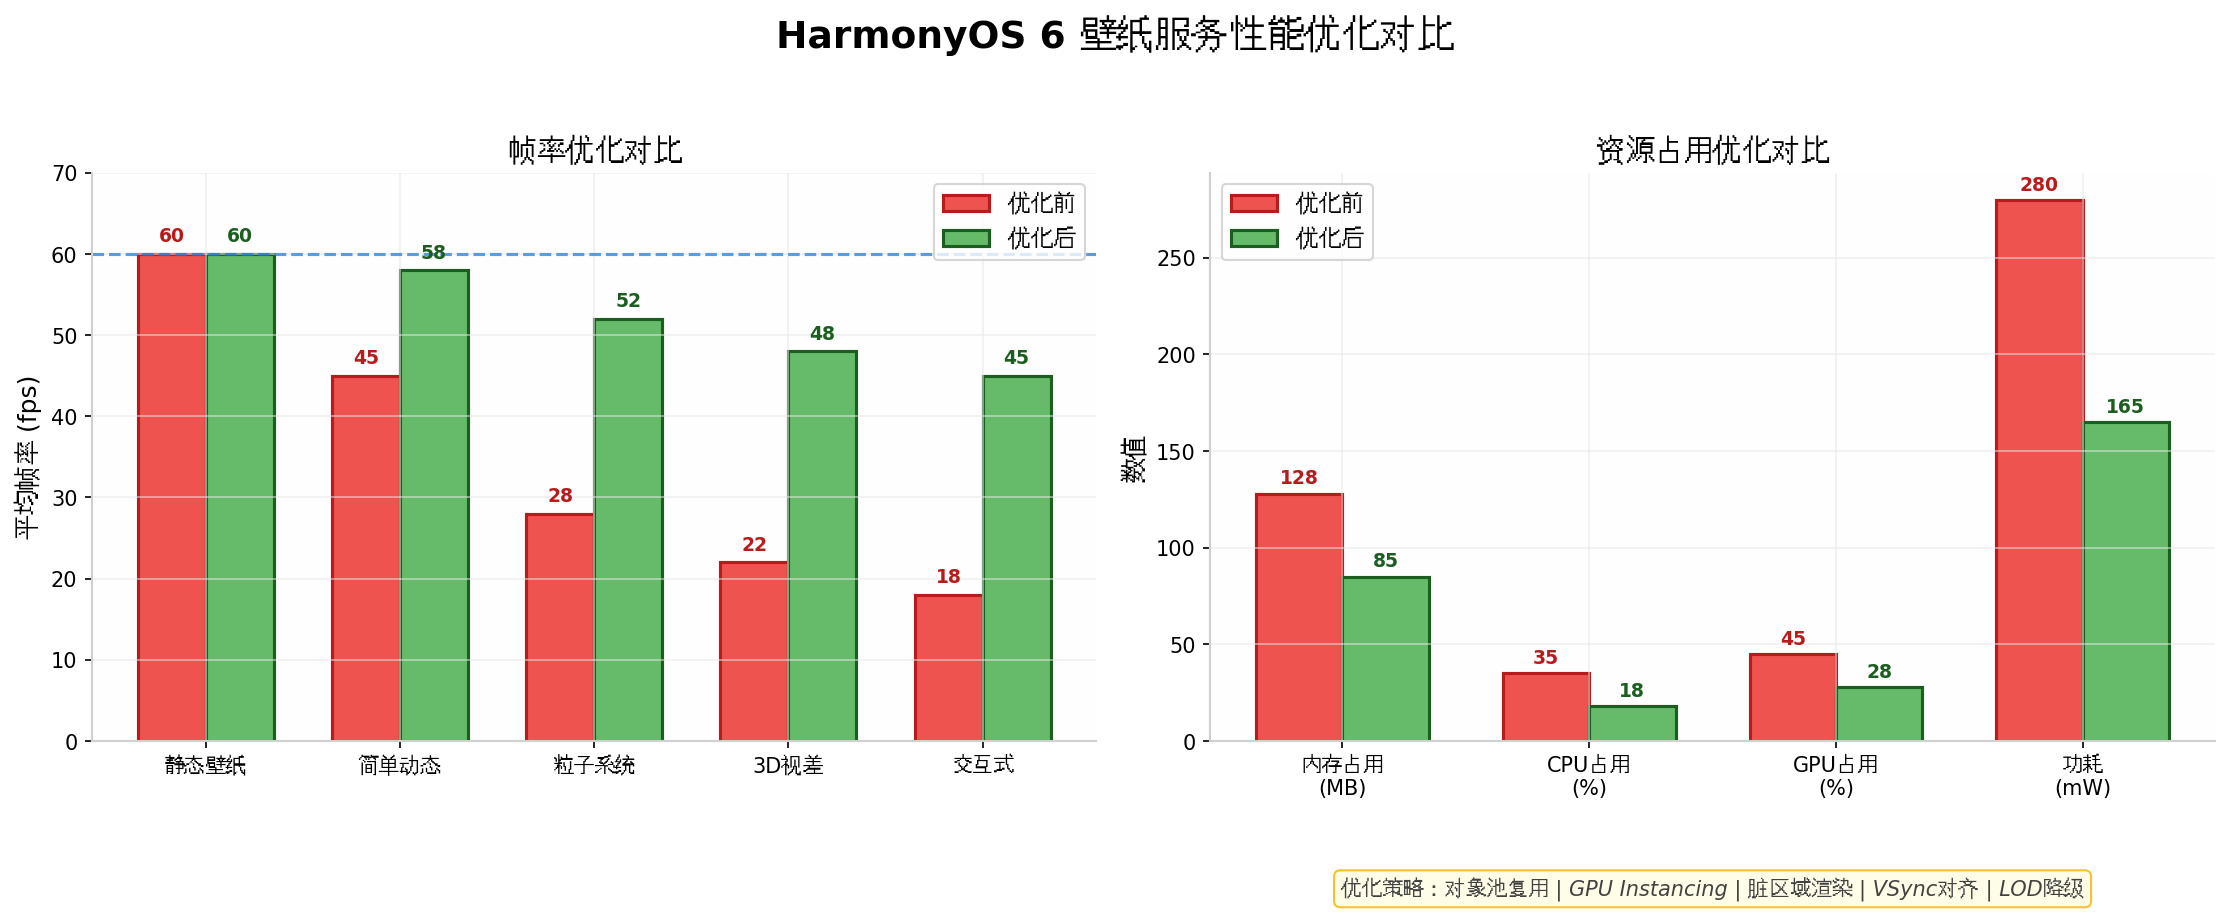
壁纸服务作为系统级常驻组件,其性能直接影响设备续航与用户体验。HarmonyOS 6提供了完善的性能监控与优化机制。
6.1 生命周期最佳实践
// 生命周期状态管理
enum WallpaperState {
  CREATED = 'created',
  VISIBLE = 'visible',
  HIDDEN = 'hidden',
  PAUSED = 'paused',
  DESTROYED = 'destroyed'
}

class LifecycleManager {
  private state: WallpaperState = WallpaperState.CREATED;
  private renderPaused: boolean = false;

  onVisibilityChanged(isVisible: boolean): void {
    if (isVisible) {
      this.state = WallpaperState.VISIBLE;
      this.resumeRendering();
      this.resumeSensors();
    } else {
      this.state = WallpaperState.HIDDEN;
      this.pauseRendering();
      this.pauseSensors();
    }
  }

  onScreenStateChanged(state: display.DisplayState): void {
    switch (state) {
      case display.DisplayState.STATE_OFF:
        this.state = WallpaperState.PAUSED;
        this.stopRenderLoop();
        this.releaseGPUResources();
        break;
      case display.DisplayState.STATE_ON:
        if (this.state === WallpaperState.PAUSED) {
          this.restoreGPUResources();
          this.startRenderLoop();
          this.state = WallpaperState.VISIBLE;
        }
        break;
    }
  }

  private releaseGPUResources(): void {
    // 释放纹理、帧缓冲对象
    this.textureCache.clear();
    this.framebufferPool.releaseAll();
    // 通知GPU驱动进入低功耗模式
    this.engine?.setPowerHint(PowerHint.LOW_POWER);
  }
}
6.2 性能优化策略
(1)对象池复用
动态壁纸中频繁创建/销毁粒子会导致GC抖动。使用对象池技术:
class ParticlePool {
  private pool: Particle[] = [];
  private active: Particle[] = [];
  private readonly maxSize = 500;

  acquire(): Particle {
    return this.pool.pop() || this.createNewParticle();
  }

  release(particle: Particle): void {
    if (this.pool.length < this.maxSize) {
      particle.reset();
      this.pool.push(particle);
    }
    const idx = this.active.indexOf(particle);
    if (idx > -1) this.active.splice(idx, 1);
  }

  private createNewParticle(): Particle {
    const p = new Particle();
    this.active.push(p);
    return p;
  }
}
(2)脏区域渲染
仅重绘发生变化的区域,减少GPU负载:
private renderDirtyRegions(surfaceId: string): void {
  const dirtyRects = this.physicsWorld.getDirtyRegions();

  for (const rect of dirtyRects) {
    // 扩展脏区域边界(考虑粒子拖尾)
    const expandedRect = {
      left: Math.max(0, rect.left - 20),
      top: Math.max(0, rect.top - 20),
      right: Math.min(width, rect.right + 20),
      bottom: Math.min(height, rect.bottom + 20)
    };

    this.engine.lockCanvas(surfaceId, expandedRect);
    // 仅绘制该区域内内容
    this.renderRegion(expandedRect);
    this.engine.unlockCanvasAndPost(surfaceId);
  }

  this.physicsWorld.clearDirtyRegions();
}
(3)LOD(细节层次)降级
根据设备性能与电池状态动态调整渲染质量:
private adjustQualityLevel(): void {
  const batteryLevel = deviceInfo.batteryLevel;
  const isCharging = deviceInfo.isCharging;
  const thermalStatus = deviceInfo.thermalStatus;

  if (batteryLevel < 0.2 && !isCharging) {
    this.qualityLevel = QualityLevel.LOW;
    this.maxParticles = 50;
    this.targetFPS = 30;
    this.enableShadow = false;
  } else if (thermalStatus === ThermalStatus.SEVERE) {
    this.qualityLevel = QualityLevel.MEDIUM;
    this.maxParticles = 120;
    this.targetFPS = 45;
    this.enableShadow = false;
  } else {
    this.qualityLevel = QualityLevel.HIGH;
    this.maxParticles = 300;
    this.targetFPS = 60;
    this.enableShadow = true;
  }
}
(4)GPU Instancing批量渲染
对于相同纹理的粒子,使用GPU Instancing减少Draw Call:
// 使用OpenGL ES 3.2 Instanced Rendering
private renderParticlesInstanced(particles: Particle[]): void {
  const instanceData = new Float32Array(particles.length * 4);
  particles.forEach((p, i) => {
    instanceData[i * 4] = p.x;
    instanceData[i * 4 + 1] = p.y;
    instanceData[i * 4 + 2] = p.radius;
    instanceData[i * 4 + 3] = p.alpha;
  });

  gl.bindBuffer(gl.ARRAY_BUFFER, this.instanceBuffer);
  gl.bufferData(gl.ARRAY_BUFFER, instanceData, gl.DYNAMIC_DRAW);
  gl.drawArraysInstanced(gl.TRIANGLE_FAN, 0, 32, particles.length);
}
七、完整项目结构示例
wallpaper_service/
├── src/main/
│   ├── ets/
│   │   ├── wallpaper/
│   │   │   ├── StaticWallpaperExtension.ets
│   │   │   ├── DynamicWallpaperExtension.ets
│   │   │   ├── InteractiveWallpaperExtension.ets
│   │   │   ├── engine/
│   │   │   │   ├── RenderEngine.ets
│   │   │   │   ├── ParticleSystem.ets
│   │   │   │   └── PhysicsWorld.ets
│   │   │   ├── utils/
│   │   │   │   ├── ObjectPool.ets
│   │   │   │   ├── DirtyRegionManager.ets
│   │   │   │   └── PerformanceMonitor.ets
│   │   │   └── model/
│   │   │       ├── Particle.ets
│   │   │       ├── RippleEffect.ets
│   │   │       └── TouchPoint.ets
│   │   └── entryability/
│   │       └── EntryAbility.ets
│   ├── resources/
│   │   ├── rawfile/
│   │   │   └── wallpaper_4k.jpg
│   │   ├── base/
│   │   │   ├── media/
│   │   │   │   └── icon.png
│   │   │   └── element/
│   │   │       └── string.json
│   │   └── theme.json
│   └── module.json5
├── build-profile.json5
├── hvigorfile.ts
└── oh-package.json5
八、总结与展望
本文从架构设计到代码实现,系统性地讲解了HarmonyOS 6(API 23)壁纸服务的完整开发流程。通过WallpaperExtensionAbility框架,开发者可以高效构建静态、动态与交互式三类壁纸,充分利用系统的传感器数据、GPU渲染能力与分布式特性。
关键要点回顾:
- 架构解耦:利用分层架构将业务逻辑与系统服务隔离,提升可维护性
- 生命周期管理:正确处理亮屏/熄屏/折叠等状态变化,平衡视觉效果与功耗
- 性能优化:对象池、脏区域渲染、LOD降级、GPU Instancing四管齐下
- 交互设计:触控事件链式处理,物理引擎实时响应,端到端延迟控制在33ms以内
未来演进方向:
- AI生成壁纸:结合HarmonyOS 6的端侧大模型能力,实现用户描述驱动的实时壁纸生成
- 跨设备协同:利用分布式软总线,实现手机、平板、智慧屏的壁纸状态同步与接力渲染
- 空间计算壁纸:面向HarmonyOS XR设备,开发支持6DoF追踪的3D沉浸式壁纸
壁纸服务作为用户每天接触最频繁的系统界面,其技术深度与创意空间仍有巨大潜力。期待更多开发者加入HarmonyOS壁纸生态,为用户带来更具个性化与沉浸感的视觉体验。
转载自:https://blog.csdn.net/u014727709/article/details/163802135
欢迎 👍点赞✍评论⭐收藏,欢迎指正

讨论HarmonyOS开发技术,专注于API与组件、DevEco Studio、测试、元服务和应用上架分发等。
更多推荐

 1
1 0
0- 0


 已为社区贡献861条内容

所有评论(0)