HarmonyOS Scan Kit 自定义界面扫码深度开发:从相机流控制到个性化 UI 渲染
HarmonyOS Scan Kit 自定义界面扫码深度开发:从相机流控制到个性化 UI 渲染
前言
当默认界面扫码无法满足你的产品设计需求时,Scan Kit 自定义界面扫码能力为你提供了完全的控制权。你可以自定义扫码界面的视觉风格、交互方式、动画效果,甚至实时控制相机参数(变焦、闪光灯、对焦等),打造独一无二的扫码体验。
本文将深入讲解自定义界面扫码的完整开发流程,从 XComponent 渲染、相机流初始化、扫码引擎配置到闪光灯/变焦控制,覆盖所有核心 API 的使用。
适用场景:需要个性化扫码 UI 的应用(如品牌定制扫码框、特殊动画效果、自定义交互逻辑),或需要与相机预览流深度结合的场景(如扫码 + 识物)。
一、自定义界面扫码概述
1.1 什么是自定义界面扫码
自定义界面扫码是 Scan Kit 提供的高级扫码能力,开放了相机流控制接口。开发者可以:
- 通过 XComponent 组件渲染相机预览流
- 自定义扫码界面的视觉风格(颜色、形状、动画)
- 控制相机参数(闪光灯、变焦、对焦)
- 获取每帧 YUV 数据(适合扫码 + 识物综合场景)
- 实现自定义的多码交互逻辑
1.2 自定义界面扫码 vs 默认界面扫码
| 对比维度 | 默认界面扫码 | 自定义界面扫码 |
|---|---|---|
| 接入方式 | 一行代码 | 需要完整实现 UI 和交互 |
| UI 风格 | 系统统一风格 | 完全自定义 |
| 相机权限 | 系统预授权 | 需要申请相机权限 |
| 闪光灯控制 | 系统自动管理 | 手动调用 API 控制 |
| 变焦控制 | 不支持 | 支持 |
| 对焦控制 | 不支持 | 支持 |
| 多码交互 | 蓝点标记 | 完全自定义 |
| YUV 数据 | 不提供 | 可选提供 |
| 开发灵活性 | 低 | 极高 |
1.3 核心能力清单
自定义界面扫码提供以下核心能力:
- 相机流控制:初始化、开启、暂停、释放、重新扫码
- 闪光灯控制:状态获取、开启、关闭、自动监听
- 变焦控制:获取变焦比、设置变焦比
- 对焦控制:设置对焦点、恢复默认对焦模式
- 多码识别:支持单码和多码的扫描识别
- YUV 数据:获取每帧相机预览流数据
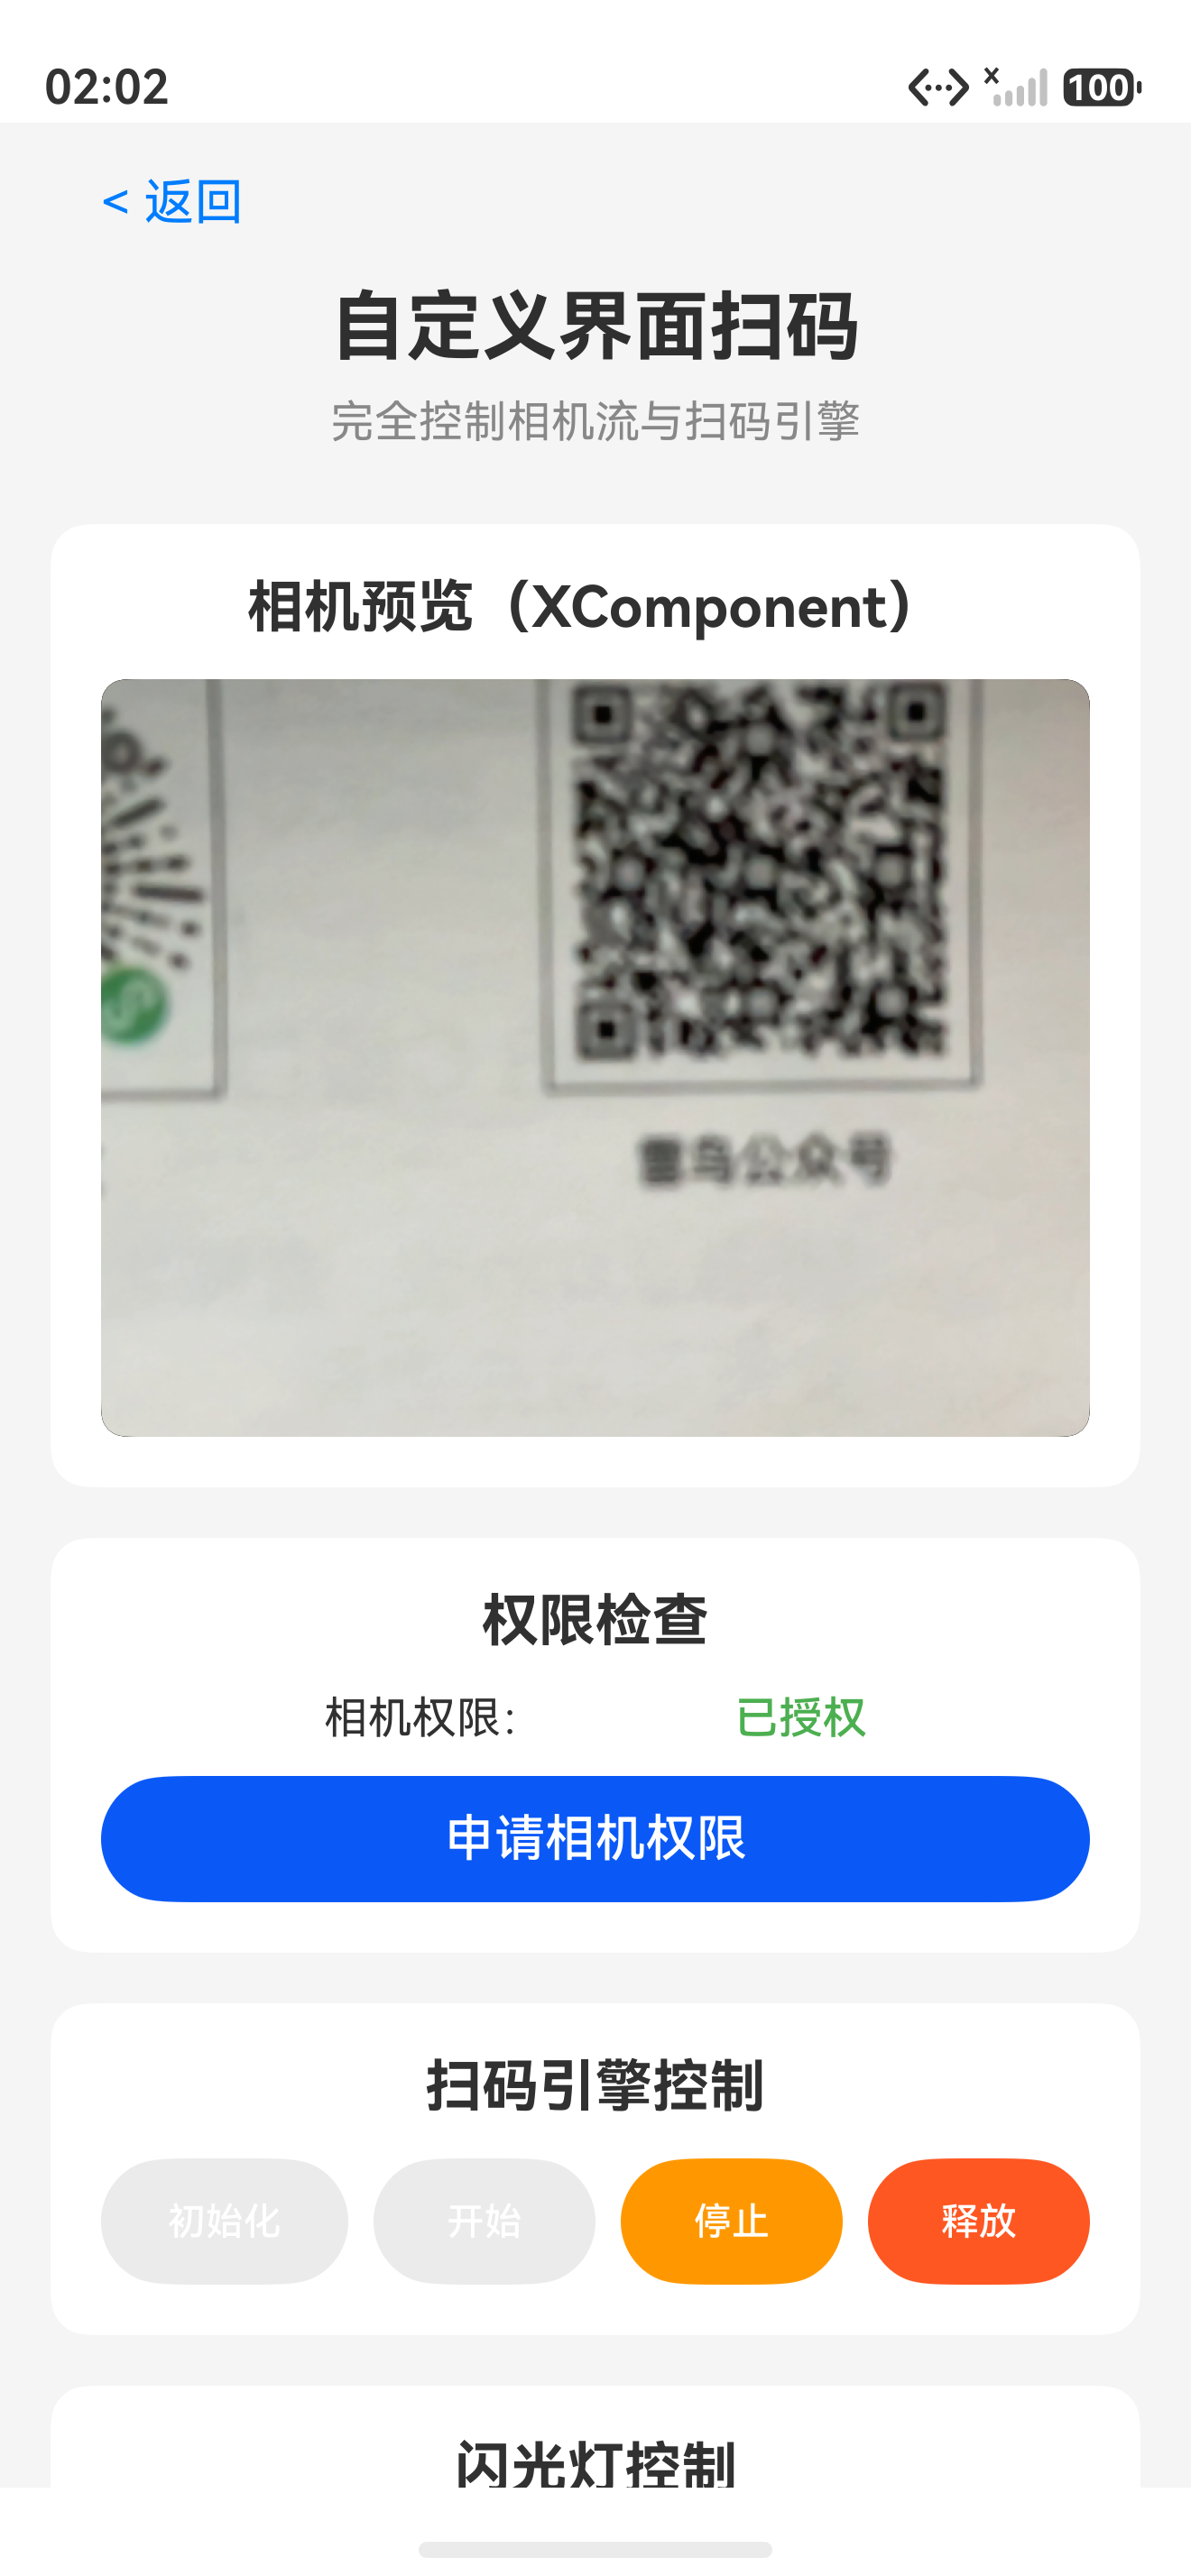
自定义界面扫码允许开发者完全自定义扫码界面的视觉风格,包括扫码框颜色、四角装饰、扫描线动画等
二、约束与限制
2.1 使用限制
| 限制项 | 说明 |
|---|---|
| 相机权限 | 需要申请 ohos.permission.CAMERA 权限 |
| UI 实现 | 需要开发者自行实现扫码的人机交互界面 |
| 多码场景 | 需要暂停相机流,由用户选择一个码图进行识别 |
| 设备支持 | Phone、Tablet、Wearable(API 23+,需后置相机) |
| 设备兼容性检查 | API 26+ 支持 isCustomScanSupported 接口 |
2.2 权限声明
在 module.json5 中声明相机权限:
{
  "module": {
    "requestPermissions": [
      {
        "name": "ohos.permission.CAMERA",
        "reason": "$string:camera_permission_reason",
        "usedScene": {
          "abilities": ["EntryAbility"],
          "when": "inuse"
        }
      }
    ]
  }
}
三、业务流程
3.1 完整业务流程
自定义界面扫码的完整业务流程如下:
- 发起请求:用户发起扫码请求,应用拉起自定义扫码界面
- 申请授权:应用向用户申请相机权限授权
- 初始化引擎:调用
init接口初始化自定义界面扫码,加载资源 - 启动扫码:相机流初始化结束后,调用
start接口开始扫码 - 相机操作:根据需要调整闪光灯、变焦、对焦等参数
- 获取结果:Scan Kit 返回扫码结果(含 YUV 数据,可选)
- 释放资源:调用
release接口释放扫码资源
3.2 生命周期管理
自定义界面扫码的完整生命周期:
init() → start() → [stop() → start()] → rescan() → release()
其中 stop() 和 start() 可用于前后台切换等场景的暂停/恢复。
四、接口说明
4.1 核心接口一览
| 接口名 | 功能描述 | 返回形式 |
|---|---|---|
customScan.init(options) | 初始化扫码引擎 | Promise |
customScan.start(viewControl) | 启动扫码 | Promise / Callback |
customScan.stop() | 暂停扫码 | void |
customScan.release() | 释放扫码资源 | Promise |
customScan.rescan() | 重新触发扫码 | Promise / Callback |
customScan.getFlashLightStatus() | 获取闪光灯状态 | Promise / Callback |
customScan.openFlashLight() | 打开闪光灯 | Promise / Callback |
customScan.closeFlashLight() | 关闭闪光灯 | Promise / Callback |
customScan.setZoom(ratio) | 设置变焦比 | Promise / Callback |
customScan.getZoom() | 获取变焦比 | Promise / Callback |
customScan.setFocusPoint(point) | 设置对焦位置 | Promise / Callback |
customScan.resetFocus() | 恢复默认对焦模式 | Promise / Callback |
customScan.on('lightingFlash') | 监听闪光灯事件 | void |
customScan.off('lightingFlash') | 取消监听闪光灯事件 | void |
4.2 关键参数说明
// 扫码引擎初始化参数
interface InitOptions {
  scanTypes?: scanCore.ScanType[];  // 指定扫码类型
  enableScanMultiCode?: boolean;    // 是否开启多码识别
  needYuv?: boolean;                // 是否需要 YUV 数据
}

// 相机流控制参数
interface ViewControl {
  width: number;    // 预览流宽度
  height: number;   // 预览流高度
  surfaceId: string; // XComponent 的 Surface ID
}
五、开发步骤
5.1 导入模块
import { customScan, scanCore, scanBarcode } from '@kit.ScanKit';
import { common } from '@kit.AbilityKit';
import { BusinessError } from '@kit.BasicServicesKit';
import { hilog } from '@kit.PerformanceAnalysisKit';
import { abilityAccessCtrl, Permissions } from '@kit.AbilityKit';
5.2 权限申请
在启动自定义界面扫码前,需要先申请相机权限:
const TAG: string = '[CustomScan]';

export class PermissionHelper {
  /**
   * 申请相机权限
   */
  static async requestCameraPermission(context: common.Context): Promise<boolean> {
    const atManager: abilityAccessCtrl.AtManager =
      abilityAccessCtrl.createAtManager();

    try {
      const grantStatus: abilityAccessCtrl.GrantStatus =
        await atManager.requestPermissionsFromUser(context, [
          'ohos.permission.CAMERA'
        ]);

      return grantStatus.authResults[0] ===
        abilityAccessCtrl.GrantStatus.PERMISSION_GRANTED;
    } catch (err) {
      hilog.error(0x0001, TAG,
        `Failed to request camera permission: ${JSON.stringify(err)}`);
      return false;
    }
  }

  /**
   * 检查相机权限状态
   */
  static async checkCameraPermission(context: common.Context): Promise<boolean> {
    const atManager: abilityAccessCtrl.AtManager =
      abilityAccessCtrl.createAtManager();

    const grantStatus: abilityAccessCtrl.GrantStatus =
      atManager.checkAccessTokenSync(
        context.applicationInfo.accessTokenId,
        'ohos.permission.CAMERA'
      );

    return grantStatus === abilityAccessCtrl.GrantStatus.PERMISSION_GRANTED;
  }
}
5.3 完整自定义扫码页面
以下是一个完整的自定义界面扫码页面实现,包含 XComponent 渲染、扫码引擎初始化、闪光灯控制等功能:
import { customScan, scanCore, scanBarcode } from '@kit.ScanKit';
import { common } from '@kit.AbilityKit';
import { BusinessError } from '@kit.BasicServicesKit';
import { hilog } from '@kit.PerformanceAnalysisKit';
import { PermissionHelper } from '../utils/PermissionHelper';

const TAG: string = '[CustomScanPage]';

@Entry
@Component
struct CustomScanPage {
  // XComponent 控制器
  private mXComponentController: XComponentController =
    new XComponentController();

  // 扫码状态
  @State isInitialized: boolean = false;
  @State isScanning: boolean = false;
  @State flashLightOn: boolean = false;
  @State zoomRatio: number = 1.0;
  @State scanResult: string = '';

  // 屏幕尺寸
  @State displayWidth: number = 0;
  @State displayHeight: number = 0;

  // Surface ID
  private surfaceId: string = '';

  aboutToAppear(): void {
    // 获取屏幕尺寸
    const displayInfo = display.getDefaultDisplaySync();
    this.displayWidth = displayInfo.width;
    this.displayHeight = displayInfo.height;
  }

  aboutToDisappear(): void {
    // 页面销毁时释放资源
    this.releaseScan();
  }

  build() {
    Stack() {
      // 相机预览层
      XComponent({
        id: 'cameraPreview',
        type: XComponentType.SURFACE,
        controller: this.mXComponentController,
        libraryname: 'customScan'
      })
        .width('100%')
        .height('100%')
        .onLoad(() => {
          // 获取 Surface ID
          this.surfaceId = this.mXComponentController.getXComponentSurfaceId();
          hilog.info(0x0001, TAG,
            `Surface ID: ${this.surfaceId}`);
        })

      // 扫码框覆盖层
      Column() {
        // 顶部区域
        Row() {
          Button('返回')
            .backgroundColor(Color.Transparent)
            .fontColor(Color.White)
            .onClick(() => {
              router.back();
            })
        }
        .width('100%')
        .padding(16)
        .justifyContent(FlexAlign.Start)

        // 中间扫码区域
        Column() {
          // 扫码框
          Column()
            .width(280)
            .height(280)
            .border({
              width: 2,
              color: '#00FF00',
              style: BorderStyle.Solid
            })
            .borderRadius(8)
        }
        .width('100%')
        .layoutWeight(1)
        .justifyContent(FlexAlign.Center)

        // 底部控制区
        Row() {
          // 相册按钮
          Button('相册')
            .backgroundColor(Color.Transparent)
            .fontColor(Color.White)
            .onClick(() => {
              this.openAlbum();
            })

          // 扫码按钮
          Button(this.isScanning ? '暂停' : '开始扫码')
            .onClick(() => {
              if (this.isScanning) {
                this.stopScan();
              } else {
                this.startScan();
              }
            })

          // 闪光灯按钮
          Button(this.flashLightOn ? '关灯' : '开灯')
            .backgroundColor(Color.Transparent)
            .fontColor(Color.White)
            .onClick(() => {
              this.toggleFlashLight();
            })
        }
        .width('100%')
        .padding(20)
        .justifyContent(FlexAlign.SpaceAround)
        .backgroundColor('#80000000')
      }
      .width('100%')
      .height('100%')

      // 扫码结果弹窗
      if (this.scanResult) {
        Column() {
          Text('扫码结果')
            .fontSize(18)
            .fontWeight(FontWeight.Bold)
            .margin({ bottom: 10 })

          Text(this.scanResult)
            .fontSize(14)
            .margin({ bottom: 20 })

          Button('确定')
            .onClick(() => {
              this.scanResult = '';
              this.rescan();
            })
        }
        .width('80%')
        .padding(20)
        .backgroundColor(Color.White)
        .borderRadius(12)
        .shadow({ radius: 10 })
      }
    }
    .width('100%')
    .height('100%')
  }

  /**
   * 初始化扫码引擎
   */
  private async initScan(): Promise<void> {
    try {
      // 检查权限
      const hasPermission = await PermissionHelper
        .checkCameraPermission(getContext(this) as common.Context);
      if (!hasPermission) {
        const granted = await PermissionHelper
          .requestCameraPermission(getContext(this) as common.Context);
        if (!granted) {
          hilog.error(0x0001, TAG, 'Camera permission denied');
          return;
        }
      }

      // 初始化扫码引擎
      const initOptions: customScan.InitOptions = {
        scanTypes: [scanCore.ScanType.QR_CODE, scanCore.ScanType.EAN_13],
        enableScanMultiCode: true,
        needYuv: false
      };

      await customScan.init(initOptions);
      this.isInitialized = true;

      hilog.info(0x0001, TAG, 'Scan engine initialized');
    } catch (err) {
      const error = err as BusinessError;
      hilog.error(0x0001, TAG,
        `Failed to init scan engine: ${error.message}`);
    }
  }

  /**
   * 启动扫码
   */
  private async startScan(): Promise<void> {
    if (!this.isInitialized) {
      await this.initScan();
    }

    if (!this.surfaceId) {
      hilog.error(0x0001, TAG, 'Surface ID not available');
      return;
    }

    try {
      const viewControl: customScan.ViewControl = {
        width: this.displayWidth,
        height: this.displayHeight,
        surfaceId: this.surfaceId
      };

      customScan.start(viewControl).then((results: scanBarcode.ScanResult[]) => {
        hilog.info(0x0001, TAG,
          `Scan result count: ${results.length}`);

        if (results.length > 0) {
          this.scanResult = results[0].originalValue;
          this.isScanning = false;
        }
      }).catch((err: BusinessError) => {
        hilog.error(0x0001, TAG,
          `Failed to start scan: ${err.message}`);
      });

      this.isScanning = true;
      hilog.info(0x0001, TAG, 'Scan started');
    } catch (err) {
      const error = err as BusinessError;
      hilog.error(0x0001, TAG,
        `Failed to start scan: ${error.message}`);
    }
  }

  /**
   * 暂停扫码
   */
  private stopScan(): void {
    try {
      customScan.stop();
      this.isScanning = false;
      hilog.info(0x0001, TAG, 'Scan stopped');
    } catch (err) {
      const error = err as BusinessError;
      hilog.error(0x0001, TAG,
        `Failed to stop scan: ${error.message}`);
    }
  }

  /**
   * 重新扫码
   */
  private rescan(): void {
    try {
      customScan.rescan().then((results: scanBarcode.ScanResult[]) => {
        if (results.length > 0) {
          this.scanResult = results[0].originalValue;
        }
      }).catch((err: BusinessError) => {
        hilog.error(0x0001, TAG,
          `Failed to rescan: ${err.message}`);
      });
    } catch (err) {
      const error = err as BusinessError;
      hilog.error(0x0001, TAG,
        `Failed to rescan: ${error.message}`);
    }
  }

  /**
   * 释放扫码资源
   */
  private async releaseScan(): Promise<void> {
    try {
      if (this.isInitialized) {
        await customScan.release();
        this.isInitialized = false;
        this.isScanning = false;
        hilog.info(0x0001, TAG, 'Scan resources released');
      }
    } catch (err) {
      const error = err as BusinessError;
      hilog.error(0x0001, TAG,
        `Failed to release scan: ${error.message}`);
    }
  }
}
六、相机控制实战
6.1 闪光灯控制
完整的闪光灯控制实现,包括状态获取、开关切换和自动监听:
const TAG: string = '[FlashLight]';

export class FlashLightController {
  private isLightOn: boolean = false;

  /**
   * 获取闪光灯状态
   */
  async getStatus(): Promise<boolean> {
    try {
      const status = await customScan.getFlashLightStatus();
      this.isLightOn = status;
      hilog.info(0x0001, TAG, `FlashLight status: ${status}`);
      return status;
    } catch (err) {
      const error = err as BusinessError;
      hilog.error(0x0001, TAG,
        `Failed to get flash light status: ${error.message}`);
      return false;
    }
  }

  /**
   * 打开闪光灯
   */
  async turnOn(): Promise<void> {
    try {
      await customScan.openFlashLight();
      this.isLightOn = true;
      hilog.info(0x0001, TAG, 'FlashLight turned on');
    } catch (err) {
      const error = err as BusinessError;
      hilog.error(0x0001, TAG,
        `Failed to open flash light: ${error.message}`);
    }
  }

  /**
   * 关闭闪光灯
   */
  async turnOff(): Promise<void> {
    try {
      await customScan.closeFlashLight();
      this.isLightOn = false;
      hilog.info(0x0001, TAG, 'FlashLight turned off');
    } catch (err) {
      const error = err as BusinessError;
      hilog.error(0x0001, TAG,
        `Failed to close flash light: ${error.message}`);
    }
  }

  /**
   * 切换闪光灯
   */
  async toggle(): Promise<boolean> {
    if (this.isLightOn) {
      await this.turnOff();
    } else {
      await this.turnOn();
    }
    return this.isLightOn;
  }

  /**
   * 注册闪光灯自动监听
   */
  registerLightingListener(): void {
    customScan.on('lightingFlash', (data: boolean) => {
      hilog.info(0x0001, TAG,
        `Lighting flash event: ${data}`);
      // 根据光线条件自动开关闪光灯
      if (data && !this.isLightOn) {
        this.turnOn();
      }
    });
  }

  /**
   * 取消闪光灯监听
   */
  unregisterLightingListener(): void {
    customScan.off('lightingFlash');
  }
}
6.2 变焦控制
实现数码变焦功能,适用于远距离扫码场景:
const TAG: string = '[ZoomControl]';

export class ZoomController {
  private currentZoom: number = 1.0;
  private readonly MIN_ZOOM: number = 1.0;
  private readonly MAX_ZOOM: number = 5.0;
  private readonly ZOOM_STEP: number = 0.5;

  /**
   * 获取当前变焦比
   */
  async getZoom(): Promise<number> {
    try {
      this.currentZoom = await customScan.getZoom();
      hilog.info(0x0001, TAG, `Current zoom: ${this.currentZoom}`);
      return this.currentZoom;
    } catch (err) {
      const error = err as BusinessError;
      hilog.error(0x0001, TAG,
        `Failed to get zoom: ${error.message}`);
      return this.currentZoom;
    }
  }

  /**
   * 设置变焦比
   */
  async setZoom(ratio: number): Promise<void> {
    // 限制变焦范围
    const clampedRatio = Math.max(
      this.MIN_ZOOM,
      Math.min(this.MAX_ZOOM, ratio)
    );

    try {
      await customScan.setZoom(clampedRatio);
      this.currentZoom = clampedRatio;
      hilog.info(0x0001, TAG, `Zoom set to: ${clampedRatio}`);
    } catch (err) {
      const error = err as BusinessError;
      hilog.error(0x0001, TAG,
        `Failed to set zoom: ${error.message}`);
    }
  }

  /**
   * 放大
   */
  async zoomIn(): Promise<void> {
    await this.setZoom(this.currentZoom + this.ZOOM_STEP);
  }

  /**
   * 缩小
   */
  async zoomOut(): Promise<void> {
    await this.setZoom(this.currentZoom - this.ZOOM_STEP);
  }

  /**
   * 重置变焦
   */
  async resetZoom(): Promise<void> {
    await this.setZoom(this.MIN_ZOOM);
  }
}
6.3 对焦控制
手动设置对焦位置,适用于特定区域的扫码:
const TAG: string = '[FocusControl]';

export class FocusController {
  /**
   * 设置对焦位置
   * @param x 对焦点 X 坐标(0-1,相对扫码区域的比例)
   * @param y 对焦点 Y 坐标(0-1,相对扫码区域的比例)
   */
  async setFocusPoint(x: number, y: number): Promise<void> {
    try {
      // 限制坐标范围
      const clampedX = Math.max(0, Math.min(1, x));
      const clampedY = Math.max(0, Math.min(1, y));

      const point: customScan.Point = {
        x: clampedX,
        y: clampedY
      };

      await customScan.setFocusPoint(point);
      hilog.info(0x0001, TAG,
        `Focus point set to: (${clampedX}, ${clampedY})`);
    } catch (err) {
      const error = err as BusinessError;
      hilog.error(0x0001, TAG,
        `Failed to set focus point: ${error.message}`);
    }
  }

  /**
   * 恢复默认对焦模式
   */
  async resetFocus(): Promise<void> {
    try {
      await customScan.resetFocus();
      hilog.info(0x0001, TAG, 'Focus reset to default');
    } catch (err) {
      const error = err as BusinessError;
      hilog.error(0x0001, TAG,
        `Failed to reset focus: ${error.message}`);
    }
  }

  /**
   * 点击预览区域设置对焦
   */
  async focusOnTap(
    tapX: number,
    tapY: number,
    previewWidth: number,
    previewHeight: number
  ): Promise<void> {
    const normalizedX = tapX / previewWidth;
    const normalizedY = tapY / previewHeight;
    await this.setFocusPoint(normalizedX, normalizedY);
  }
}
七、自定义扫码框动画
7.1 扫描线动画效果
实现经典的扫描线上下移动动画:
@Entry
@Component
struct ScanAnimation {
  @State scanLineY: number = 0;
  @State animationDirection: number = 1;

  private readonly SCAN_FRAME_SIZE: number = 280;
  private readonly SCAN_LINE_HEIGHT: number = 3;
  private readonly ANIMATION_DURATION: number = 2000;

  aboutToAppear(): void {
    this.startScanLineAnimation();
  }

  build() {
    Stack() {
      // 扫码框
      Column()
        .width(this.SCAN_FRAME_SIZE)
        .height(this.SCAN_FRAME_SIZE)
        .border({
          width: 2,
          color: '#00FF00',
          style: BorderStyle.Solid
        })
        .borderRadius(8)

      // 四角装饰
      this.CornerDecorator()

      // 扫描线
      Row()
        .width(this.SCAN_FRAME_SIZE - 20)
        .height(this.SCAN_LINE_HEIGHT)
        .backgroundColor('#00FF00')
        .position({
          x: 10,
          y: this.scanLineY
        })
        .linearGradient({
          direction: GradientDirection.Right,
          colors: [
            ['#00000000', 0],
            ['#00FF00', 0.5],
            ['#00000000', 1]
          ]
        })
        .animation({
          duration: this.ANIMATION_DURATION,
          curve: Curve.Linear,
          iterations: -1,
          playMode: PlayMode.Alternate
        })
    }
    .width(this.SCAN_FRAME_SIZE)
    .height(this.SCAN_FRAME_SIZE)
  }

  @Builder
  CornerDecorator() {
    // 四角装饰线
    Stack() {
      // 左上角
      Row()
        .width(20)
        .height(3)
        .backgroundColor('#00FF00')
        .position({ x: -2, y: -2 })
      Column()
        .width(3)
        .height(20)
        .backgroundColor('#00FF00')
        .position({ x: -2, y: -2 })

      // 右上角
      Row()
        .width(20)
        .height(3)
        .backgroundColor('#00FF00')
        .position({ x: this.SCAN_FRAME_SIZE - 18, y: -2 })
      Column()
        .width(3)
        .height(20)
        .backgroundColor('#00FF00')
        .position({ x: this.SCAN_FRAME_SIZE - 1, y: -2 })

      // 左下角
      Row()
        .width(20)
        .height(3)
        .backgroundColor('#00FF00')
        .position({ x: -2, y: this.SCAN_FRAME_SIZE - 1 })
      Column()
        .width(3)
        .height(20)
        .backgroundColor('#00FF00')
        .position({ x: -2, y: this.SCAN_FRAME_SIZE - 18 })

      // 右下角
      Row()
        .width(20)
        .height(3)
        .backgroundColor('#00FF00')
        .position({ x: this.SCAN_FRAME_SIZE - 18, y: this.SCAN_FRAME_SIZE - 1 })
      Column()
        .width(3)
        .height(20)
        .backgroundColor('#00FF00')
        .position({ x: this.SCAN_FRAME_SIZE - 1, y: this.SCAN_FRAME_SIZE - 18 })
    }
  }

  private startScanLineAnimation(): void {
    // 扫描线动画通过 animation 属性实现
    // 使用 Alternate 模式自动上下移动
  }
}
八、前后台切换处理
8.1 生命周期管理
正确处理应用前后台切换时的扫码状态:
import { customScan } from '@kit.ScanKit';
import { common } from '@kit.AbilityKit';
import { hilog } from '@kit.PerformanceAnalysisKit';

const TAG: string = '[LifecycleManager]';

export class ScanLifecycleManager {
  private isScanning: boolean = false;

  /**
   * 注册前后台切换监听
   */
  registerLifecycleListener(context: common.Context): void {
    const uiAbilityContext = context as common.UIAbilityContext;

    // 监听前后台切换
    uiAbilityContext.on('AbilityLifecycle', (data: string) => {
      hilog.info(0x0001, TAG,
        `Lifecycle event: ${data}`);

      switch (data) {
        case 'onForeground':
          this.onForeground();
          break;
        case 'onBackground':
          this.onBackground();
          break;
      }
    });
  }

  /**
   * 应用回到前台
   */
  private async onForeground(): Promise<void> {
    hilog.info(0x0001, TAG, 'App came to foreground');

    if (this.isScanning) {
      // 重新启动扫码
      try {
        // customScan.start() 需要重新传入 viewControl
        // 这里需要根据实际情况重新获取 surfaceId
        hilog.info(0x0001, TAG, 'Restarting scan...');
      } catch (err) {
        hilog.error(0x0001, TAG,
          `Failed to restart scan: ${JSON.stringify(err)}`);
      }
    }
  }

  /**
   * 应用进入后台
   */
  private onBackground(): void {
    hilog.info(0x0001, TAG, 'App went to background');

    if (this.isScanning) {
      // 暂停扫码
      try {
        customScan.stop();
        hilog.info(0x0001, TAG, 'Scan stopped due to background');
      } catch (err) {
        hilog.error(0x0001, TAG,
          `Failed to stop scan: ${JSON.stringify(err)}`);
      }
    }
  }
}
九、设备兼容性检查
9.1 检查自定义界面扫码支持
import { scanCore } from '@kit.ScanKit';
import { hilog } from '@kit.PerformanceAnalysisKit';

const TAG: string = '[DeviceCheck]';

@Entry
@Component
struct CustomScanDeviceCheck {
  @State isCustomScanSupported: boolean = false;
  @State isDefaultScanSupported: boolean = false;

  aboutToAppear(): void {
    this.checkSupport();
  }

  build() {
    Column() {
      Text('设备扫码能力检查')
        .fontSize(20)
        .fontWeight(FontWeight.Bold)
        .margin({ bottom: 20 })

      // 检查结果
      Column() {
        Row() {
          Text('自定义界面扫码:')
            .fontSize(16)
          Text(this.isCustomScanSupported ? '支持' : '不支持')
            .fontSize(16)
            .fontColor(this.isCustomScanSupported ? '#4CAF50' : '#F44336')
        }
        .margin({ bottom: 10 })

        Row() {
          Text('默认界面扫码:')
            .fontSize(16)
          Text(this.isDefaultScanSupported ? '支持' : '不支持')
            .fontSize(16)
            .fontColor(this.isDefaultScanSupported ? '#4CAF50' : '#F44336')
        }
        .margin({ bottom: 10 })
      }
      .width('100%')
      .padding(16)
    }
    .width('100%')
    .height('100%')
    .justifyContent(FlexAlign.Center)
  }

  private checkSupport(): void {
    try {
      this.isCustomScanSupported = scanCore.isCustomScanSupported();
      this.isDefaultScanSupported = scanCore.isDefaultScanSupported();

      hilog.info(0x0001, TAG,
        `Custom scan: ${this.isCustomScanSupported}, Default scan: ${this.isDefaultScanSupported}`);
    } catch (err) {
      hilog.error(0x0001, TAG,
        `Failed to check device support: ${JSON.stringify(err)}`);
    }
  }
}
十、模拟器开发
10.1 模拟器使用说明
在模拟器上进行自定义界面扫码开发时:
- 模拟器支持自定义界面扫码功能
- 需要在模拟器中配置虚拟相机
- 推荐使用相册扫码方式进行功能验证
- 完整的相机流控制建议在真机上测试
10.2 开发建议
- 先在模拟器上验证 UI 布局和基础逻辑
- 相机流控制、变焦、对焦等功能需要真机验证
- 建议基于 官方示例工程 进行个性化修改
总结
本文深入讲解了 HarmonyOS Scan Kit 自定义界面扫码的完整开发流程,覆盖了从 XComponent 渲染、权限申请、扫码引擎初始化到相机控制(闪光灯、变焦、对焦)的全链路实现。
自定义界面扫码为开发者提供了最大的灵活性,你可以:
- 完全自定义扫码界面的视觉风格
- 精细控制相机参数(闪光灯、变焦、对焦)
- 实现个性化的动画效果和交互逻辑
- 获取 YUV 数据用于扫码 + 识物综合场景
在下一篇文章中,我们将讲解图像识码与码图生成的完整开发流程。
如果这篇文章对你有帮助,欢迎点赞👍、收藏⭐、关注🔔,你的支持是我持续创作的动力!
相关资源:

讨论HarmonyOS开发技术,专注于API与组件、DevEco Studio、测试、元服务和应用上架分发等。
更多推荐


 4
4 0
0- 0


 已为社区贡献87条内容

所有评论(0)