HarmonyOS Scan Kit 图像识码与码图生成全攻略:从图片解析到二维码生成
HarmonyOS Scan Kit 图像识码与码图生成全攻略:从图片解析到二维码生成
前言
除了实时相机扫码,HarmonyOS Scan Kit 还提供了两大重要能力:图像识码(从本地图片或图像数据中识别码图)和码图生成(将文本或字节数组转换为码图)。这两项能力在内容加工、离线扫码、信息分享等场景中发挥着不可替代的作用。
本文将全面讲解图像识码(本地图片识别 + 图像数据识别)和码图生成(文本生成 + 字节数组生成)的完整开发流程,包含详细的 API 说明、参数配置和实战代码。
核心价值:图像识码让你从相册或相机流中提取码图信息;码图生成让你将任意文本或二进制数据编码为标准的 QR Code 或条形码,两者结合可覆盖完整的内容加工场景。
一、图像识码概述
1.1 什么是图像识码
图像识码是 Scan Kit 提供的离线扫码能力,支持对图库中的码图或图像数据进行扫描识别。它包含两种输入方式:
- 本地图片识别(
decode接口):通过图片路径(URI)输入,识别图片中的码图 - 图像数据识别(
decodeImage接口):通过字节数组(NV21 格式)输入,识别图像数据中的码图
1.2 图像识码的应用场景
| 场景 | 输入方式 | 典型应用 |
|---|---|---|
| 相册图片识别 | 本地图片 URI | 识别微信/QQ 收到的二维码截图 |
| 相机预览流识别 | NV21 字节数组 | 扫码 + 识物综合场景 |
| 截图识别 | 本地图片 URI | 识别网页截图中的二维码 |
| 文档扫描 | 本地图片 URI | 识别 PDF 文档中的条形码 |
1.3 两种识别方式对比
| 对比维度 | 本地图片识别(decode) | 图像数据识别(decodeImage) |
|---|---|---|
| 输入方式 | InputImage(URI) | ByteImage(字节数组) |
| 适用场景 | 相册图片、截图 | 相机预览流 |
| 数据来源 | PhotoViewPicker | Camera Kit ImageReceiver |
| 格式要求 | 无特殊限制 | 仅支持 NV21 格式 |
| 多码识别 | 支持 | 支持 |
二、本地图片识别(decode)
2.1 接口说明
本地图片识别通过 detectBarcode.decode 接口实现:
| 接口签名 | 描述 |
|---|---|
decode(inputImage: InputImage, options?: ScanOptions): Promise<Array<ScanResult>> | Promise 异步回调 |
decode(inputImage: InputImage, options: ScanOptions, callback: AsyncCallback<Array<ScanResult>>): void | Callback 异步回调 |
decode(inputImage: InputImage, callback: AsyncCallback<Array<ScanResult>>): void | Callback 异步回调(无参数) |
2.2 核心数据结构
// 待识别的图片信息
interface InputImage {
  uri: string;  // 图片路径,例如 file://media/Photo/x/xxx.jpg
}

// 识码结果
interface DetectResult {
  scanResult: scanBarcode.ScanResult[];  // 识码结果数组
}

// 字节图像数据
interface ByteImage {
  byteBuffer: ArrayBuffer;    // 图像数据字节数组
  width: number;              // 图像宽度
  height: number;             // 图像高度
  format: ImageFormat;        // 图像格式(NV21)
}

// 图像格式枚举
enum ImageFormat {
  NV21 = 0
}
2.3 完整开发示例
以下是一个完整的本地图片识别实现:
import { scanCore, scanBarcode, detectBarcode } from '@kit.ScanKit';
import { photoAccessHelper } from '@kit.MediaLibraryKit';
import { BusinessError } from '@kit.BasicServicesKit';
import { hilog } from '@kit.PerformanceAnalysisKit';

const TAG: string = '[ImageDecode]';

@Entry
@Component
struct ImageDecodePage {
  @State decodeResults: string[] = [];
  @State selectedImageUri: string = '';

  build() {
    Column() {
      Text('本地图片识码')
        .fontSize(20)
        .fontWeight(FontWeight.Bold)
        .margin({ bottom: 20 })

      // 识码结果
      if (this.decodeResults.length > 0) {
        List() {
          ForEach(this.decodeResults, (result: string, index: number) => {
            ListItem() {
              Text(`结果 ${index + 1}: ${result}`)
                .fontSize(14)
                .padding(10)
                .width('100%')
            }
          })
        }
        .width('90%')
        .height('40%')
        .margin({ bottom: 20 })
        .backgroundColor($r('sys.color.ohos_id_color_sub_background'))
        .borderRadius(8)
      }

      // 选择图片按钮
      Button('选择图片并识别')
        .width('80%')
        .onClick(() => {
          this.selectAndDecodeImage();
        })

      Text('支持识别图片中的二维码和条形码')
        .fontSize(12)
        .fontColor($r('sys.color.ohos_id_color_text_secondary'))
        .margin({ top: 12 })
    }
    .width('100%')
    .height('100%')
    .justifyContent(FlexAlign.Center)
  }

  /**
   * 选择图片并进行识码
   */
  private async selectAndDecodeImage(): Promise<void> {
    try {
      // 1. 使用 PhotoViewPicker 选择图片
      const uri = await this.selectPhoto();
      if (!uri) {
        return;
      }

      this.selectedImageUri = uri;
      hilog.info(0x0001, TAG, `Selected image: ${uri}`);

      // 2. 调用 decode 接口识码
      await this.decodeImage(uri);
    } catch (err) {
      const error = err as BusinessError;
      hilog.error(0x0001, TAG,
        `Failed to decode image: ${error.message}`);
      this.decodeResults = [`识别失败: ${error.message}`];
    }
  }

  /**
   * 使用 PhotoViewPicker 选择图片
   */
  private async selectPhoto(): Promise<string | undefined> {
    const photoSelectOptions = new photoAccessHelper.PhotoSelectOptions();
    photoSelectOptions.MIMEType = photoAccessHelper.PhotoViewMIMETypes.IMAGE_TYPE;
    photoSelectOptions.maxSelectNumber = 1;
    photoSelectOptions.isPhotoTakingSupported = false;
    photoSelectOptions.isEditSupported = false;

    const photoPicker = new photoAccessHelper.PhotoViewPicker();

    try {
      const data: photoAccessHelper.PhotoSelectResult =
        await photoPicker.select(photoSelectOptions);

      if (!data || !data.photoUris || data.photoUris.length === 0) {
        hilog.warn(0x0001, TAG, 'No photo selected');
        return undefined;
      }

      return data.photoUris[0];
    } catch (err) {
      const error = err as BusinessError;
      hilog.error(0x0001, TAG,
        `Failed to select photo: ${error.message}`);
      return undefined;
    }
  }

  /**
   * 对图片进行识码
   */
  private async decodeImage(uri: string): Promise<void> {
    // 构建 InputImage 对象
    const inputImage: detectBarcode.InputImage = {
      uri: uri
    };

    // 配置识码参数
    const options: scanBarcode.ScanOptions = {
      scanTypes: [scanCore.ScanType.ALL],
      enableMultiMode: true
    };

    try {
      const results: scanBarcode.ScanResult[] =
        await detectBarcode.decode(inputImage, options);

      hilog.info(0x0001, TAG,
        `Decode success, found ${results.length} codes`);

      // 格式化结果
      this.decodeResults = results.map((result, index) => {
        return `码 ${index + 1}: ${result.originalValue} (类型: ${result.scanType})`;
      });

      if (this.decodeResults.length === 0) {
        this.decodeResults = ['未识别到码图'];
      }
    } catch (err) {
      const error = err as BusinessError;
      hilog.error(0x0001, TAG,
        `Decode failed: ${error.message}`);
      throw error;
    }
  }
}
2.4 封装通用图像识码服务
import { scanCore, scanBarcode, detectBarcode } from '@kit.ScanKit';
import { photoAccessHelper } from '@kit.MediaLibraryKit';
import { BusinessError } from '@kit.BasicServicesKit';
import { hilog } from '@kit.PerformanceAnalysisKit';

const TAG: string = '[ImageDecodeService]';

/**
 * 图像识码结果
 */
export interface ImageDecodeResult {
  success: boolean;
  message: string;
  codes: Array<{
    originalValue: string;
    scanType: string;
  }>;
}

/**
 * 通用图像识码服务
 */
export class ImageDecodeService {
  /**
   * 从相册选择图片并识码
   */
  static async decodeFromPhoto(): Promise<ImageDecodeResult> {
    try {
      // 1. 选择图片
      const photoUri = await this.selectPhoto();
      if (!photoUri) {
        return {
          success: false,
          message: '未选择图片',
          codes: []
        };
      }

      // 2. 识码
      return await this.decodeFromUri(photoUri);
    } catch (err) {
      const error = err as BusinessError;
      return {
        success: false,
        message: `识码异常: ${error.message}`,
        codes: []
      };
    }
  }

  /**
   * 从指定 URI 识码
   */
  static async decodeFromUri(uri: string): Promise<ImageDecodeResult> {
    const inputImage: detectBarcode.InputImage = { uri: uri };

    const options: scanBarcode.ScanOptions = {
      scanTypes: [scanCore.ScanType.ALL],
      enableMultiMode: true
    };

    try {
      const results = await detectBarcode.decode(inputImage, options);

      return {
        success: true,
        message: `识别到 ${results.length} 个码图`,
        codes: results.map(r => ({
          originalValue: r.originalValue,
          scanType: r.scanType.toString()
        }))
      };
    } catch (err) {
      const error = err as BusinessError;
      return {
        success: false,
        message: `识码失败: ${error.message}`,
        codes: []
      };
    }
  }

  /**
   * 选择照片
   */
  private static async selectPhoto(): Promise<string | undefined> {
    const options = new photoAccessHelper.PhotoSelectOptions();
    options.MIMEType = photoAccessHelper.PhotoViewMIMETypes.IMAGE_TYPE;
    options.maxSelectNumber = 1;

    const picker = new photoAccessHelper.PhotoViewPicker();
    const result = await picker.select(options);

    if (result?.photoUris?.length) {
      return result.photoUris[0];
    }
    return undefined;
  }
}
三、图像数据识别(decodeImage)
3.1 场景说明
图像数据识别适用于从相机预览流中实时识别码图,需要配合 Camera Kit 使用。典型应用场景包括:
- 扫码 + 识物综合场景
- 需要自定义相机流处理的场景
- 需要同时处理码图和图像内容的场景
3.2 开发步骤
以下是与 Camera Kit 配合使用的图像数据识码流程:
import { detectBarcode, scanBarcode, scanCore } from '@kit.ScanKit';
import { camera } from '@kit.CameraKit';
import { image } from '@kit.ImageKit';
import { BusinessError } from '@kit.BasicServicesKit';
import { hilog } from '@kit.PerformanceAnalysisKit';

const TAG: string = '[ImageDataDecode]';

/**
 * 图像数据识码服务
 */
export class ImageDataDecodeService {
  /**
   * 从 ImageReceiver 获取的图像数据中识码
   */
  static async decodeFromImageBuffer(
    imgComponent: image.Component,
    width: number,
    height: number
  ): Promise<scanBarcode.ScanResult[]> {
    const stride: number = imgComponent.rowStride;
    let imgByteBuffer: ArrayBuffer = imgComponent.byteBuffer;

    // 图像数据的宽 width 与行距 stride 不一致时,需要处理
    if (stride !== width) {
      const dstBufferSize: number = width * height * 1.5;
      const dstArr = new Uint8Array(dstBufferSize);

      for (let j = 0; j < height * 1.5; j++) {
        const srcBuf = new Uint8Array(imgByteBuffer, j * stride, width);
        dstArr.set(srcBuf, j * width);
      }

      imgByteBuffer = dstArr.buffer as ArrayBuffer;
    }

    // 构建 ByteImage 对象
    const byteImg: detectBarcode.ByteImage = {
      byteBuffer: imgByteBuffer,
      width: width,
      height: height,
      format: detectBarcode.ImageFormat.NV21
    };

    // 配置识码参数
    const options: scanBarcode.ScanOptions = {
      scanTypes: [scanCore.ScanType.QR_CODE],
      enableMultiMode: false
    };

    try {
      const detectResult = await detectBarcode.decodeImage(byteImg, options);
      hilog.info(0x0001, TAG,
        `DecodeImage success, found ${detectResult.scanResult.length} codes`);

      return detectResult.scanResult;
    } catch (err) {
      const error = err as BusinessError;
      hilog.error(0x0001, TAG,
        `DecodeImage failed: ${error.message}`);
      throw error;
    }
  }
}
四、码图生成概述
4.1 什么是码图生成
码图生成是 Scan Kit 提供的码图创建能力,支持通过文本或字节数组生成码图。目前已支持 13 种码制式(QR Code、Data Matrix、PDF417、Aztec 及 9 种条形码),暂不支持 MULTIFUNCTIONAL CODE 生成。
4.2 两种生成方式对比
| 对比维度 | 文本生成码图 | 字节数组生成码图 |
|---|---|---|
| 输入类型 | string | ArrayBuffer |
| 支持码制式 | 13 种(全部) | 仅 QR Code |
| 适用场景 | 网址、ID、文本 | 加密数据、二进制协议 |
| 数据限制 | 按码类型限制长度 | 按纠错等级限制字节长度 |
| 尺寸要求 | 根据码类型不同 | width 必须等于 height |
4.3 纠错等级说明
QR Code 生成支持四种纠错等级:
| 纠错等级 | 常量值 | 纠错率 | 适用场景 |
|---|---|---|---|
| LEVEL_L | 0 | 7% | 数据量大、码图清晰场景 |
| LEVEL_M | 1 | 15% | 一般场景 |
| LEVEL_Q | 2 | 25% | 需要一定容错能力 |
| LEVEL_H | 3 | 30% | 高度容错、码图可能受损 |
五、文本生成码图
5.1 接口说明
文本生成码图通过 generateBarcode.createBarcode 接口实现:

使用 Scan Kit 的 generateBarcode 模块生成的 QR Code 二维码效果,支持自定义尺寸、纠错等级和颜色
// 文本生成码图
createBarcode(
  content: string,
  options: CreateOptions
): Promise<image.PixelMap>
5.2 CreateOptions 参数说明
| 参数名 | 类型 | 必填 | 说明 |
|---|---|---|---|
| scanType | scanCore.ScanType | 是 | 码图类型 |
| width | number | 是 | 码图宽度,px,取值范围 [200, 4096] |
| height | number | 是 | 码图高度,px,取值范围 [200, 4096] |
| margin | number | 否 | 最小边距,默认 1,取值范围 [1, 10] |
| level | ErrorCorrectionLevel | 否 | 纠错水平,默认 LEVEL_H,仅 QR Code 有效 |
| backgroundColor | number | 否 | 背景颜色,HEX 格式,默认 0xFFFFFF(白色) |
| pixelMapColor | number | 否 | 码图颜色,HEX 格式,默认 0x000000(黑色) |
5.3 生成 QR Code 示例
import { scanCore, generateBarcode } from '@kit.ScanKit';
import { image } from '@kit.ImageKit';
import { BusinessError } from '@kit.BasicServicesKit';
import { hilog } from '@kit.PerformanceAnalysisKit';

const TAG: string = '[QRGenerator]';

@Entry
@Component
struct QRCodeGeneratorPage {
  @State pixelMap: image.PixelMap | undefined = undefined;
  @State inputText: string = 'https://www.example.com';

  build() {
    Column() {
      Text('QR Code 生成器')
        .fontSize(20)
        .fontWeight(FontWeight.Bold)
        .margin({ bottom: 20 })

      // 输入框
      TextInput({ text: this.inputText })
        .width('80%')
        .placeholder('请输入要生成的内容')
        .onChange((value: string) => {
          this.inputText = value;
        })
        .margin({ bottom: 20 })

      // 生成的二维码
      if (this.pixelMap) {
        Column() {
          Image(this.pixelMap)
            .width(300)
            .height(300)
            .objectFit(ImageFit.Contain)
            .backgroundColor(Color.White)
            .borderRadius(8)

          Text('生成成功!')
            .fontSize(14)
            .fontColor('#4CAF50')
            .margin({ top: 10 })
        }
        .alignItems(HorizontalAlign.Center)
        .margin({ bottom: 20 })
      }

      // 生成按钮
      Button('生成 QR Code')
        .width('80%')
        .onClick(() => {
          this.generateQRCode();
        })

      Button('清空')
        .width('80%')
        .margin({ top: 10 })
        .onClick(() => {
          this.pixelMap = undefined;
        })
    }
    .width('100%')
    .height('100%')
    .justifyContent(FlexAlign.Center)
  }

  /**
   * 生成 QR Code
   */
  private generateQRCode(): void {
    if (!this.inputText) {
      AlertDialog.show({
        title: '提示',
        message: '请输入要生成的内容',
        confirm: { value: '确定', action: () => { } }
      });
      return;
    }

    const options: generateBarcode.CreateOptions = {
      scanType: scanCore.ScanType.QR_CODE,
      width: 400,
      height: 400,
      margin: 2,
      level: generateBarcode.ErrorCorrectionLevel.LEVEL_H,
      backgroundColor: 0xFFFFFF,
      pixelMapColor: 0x000000
    };

    try {
      generateBarcode.createBarcode(this.inputText, options)
        .then((pixelMap: image.PixelMap) => {
          this.pixelMap = pixelMap;
          hilog.info(0x0001, TAG, 'QR code generated successfully');
        })
        .catch((err: BusinessError) => {
          hilog.error(0x0001, TAG,
            `Failed to generate QR code. Code: ${err.code}, message: ${err.message}`);

          AlertDialog.show({
            title: '生成失败',
            message: `错误码: ${err.code}\n${err.message}`,
            confirm: { value: '确定', action: () => { } }
          });
        });
    } catch (err) {
      const error = err as BusinessError;
      hilog.error(0x0001, TAG,
        `Failed to createBarcode: ${error.message}`);
    }
  }
}
5.4 生成 EAN-13 商品条形码
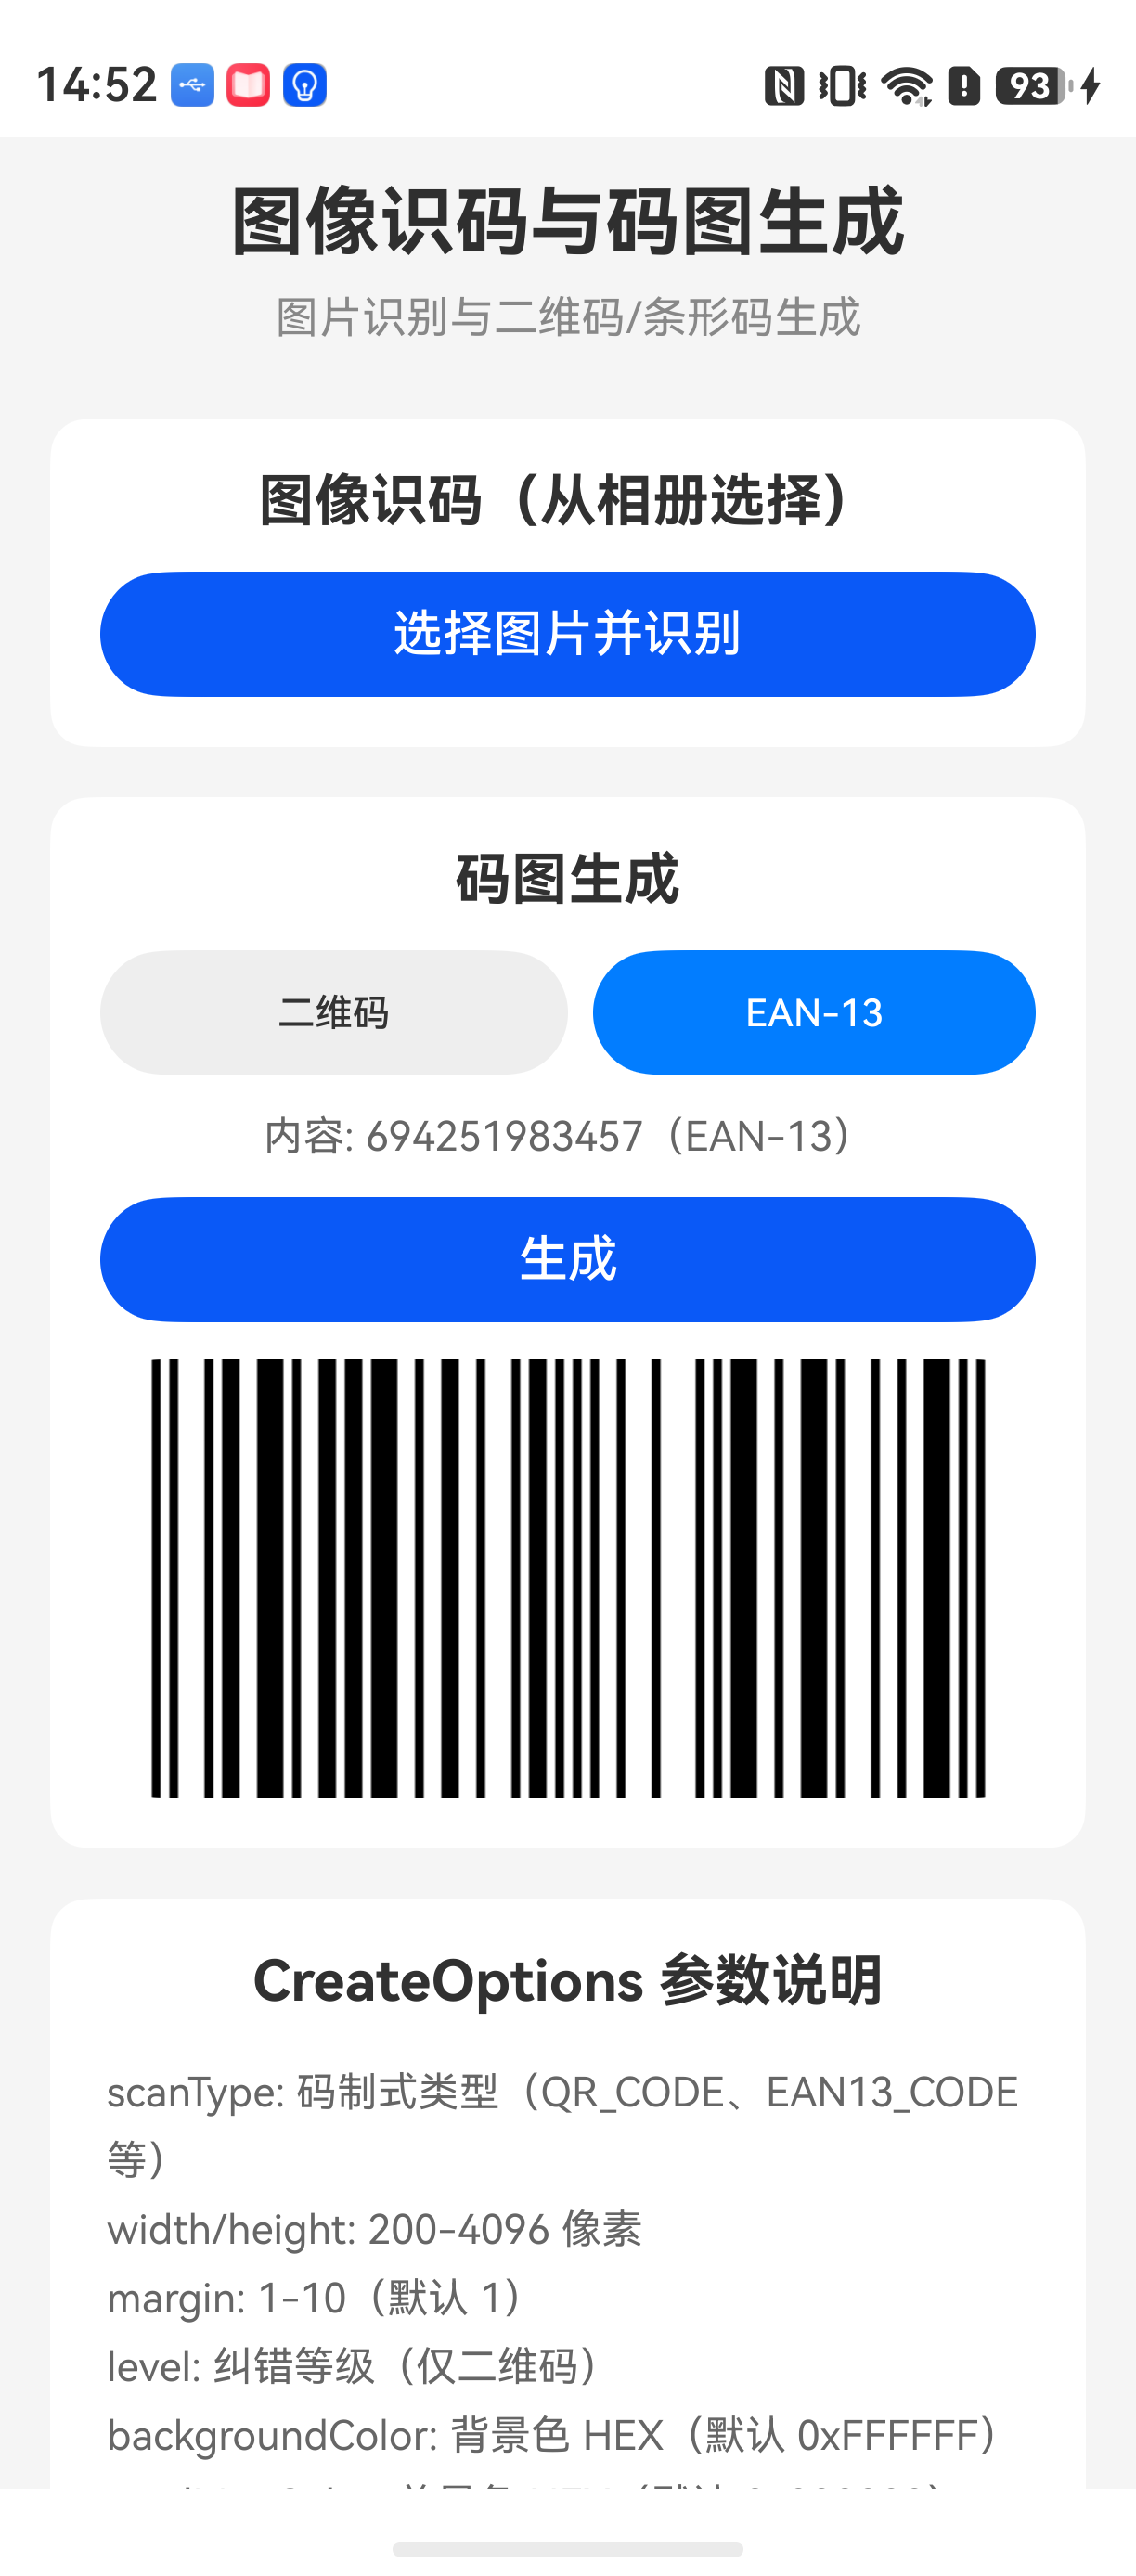
使用 Scan Kit 生成的 EAN-13 标准商品条形码,支持零售场景的 POS 扫码结算
import { scanCore, generateBarcode } from '@kit.ScanKit';
import { image } from '@kit.ImageKit';
import { BusinessError } from '@kit.BasicServicesKit';
import { hilog } from '@kit.PerformanceAnalysisKit';

const TAG: string = '[BarcodeGen]';

@Entry
@Component
struct BarcodeGeneratorPage {
  @State pixelMap: image.PixelMap | undefined = undefined;

  build() {
    Column() {
      Text('商品条形码生成器')
        .fontSize(20)
        .fontWeight(FontWeight.Bold)
        .margin({ bottom: 20 })

      if (this.pixelMap) {
        Column() {
          Image(this.pixelMap)
            .width(300)
            .height(150)
            .objectFit(ImageFit.Contain)
            .backgroundColor(Color.White)
            .borderRadius(8)

          Text('EAN-13 条形码')
            .fontSize(14)
            .fontColor($r('sys.color.ohos_id_color_text_secondary'))
            .margin({ top: 10 })
        }
        .alignItems(HorizontalAlign.Center)
        .margin({ bottom: 20 })
      }

      Button('生成 EAN-13 条形码')
        .width('80%')
        .onClick(() => {
          this.generateEAN13();
        })
    }
    .width('100%')
    .height('100%')
    .justifyContent(FlexAlign.Center)
  }

  /**
   * 生成 EAN-13 商品条形码
   * EAN-13 规范:12 位数字,首位非 0
   */
  private generateEAN13(): void {
    // EAN-13 编码内容(12 位数字)
    const content: string = '694251983457';

    const options: generateBarcode.CreateOptions = {
      scanType: scanCore.ScanType.EAN_13,
      // 条形码建议宽高比 2:1
      width: 400,
      height: 200,
      margin: 2
    };

    try {
      generateBarcode.createBarcode(content, options)
        .then((pixelMap: image.PixelMap) => {
          this.pixelMap = pixelMap;
          hilog.info(0x0001, TAG, 'EAN-13 barcode generated');
        })
        .catch((err: BusinessError) => {
          hilog.error(0x0001, TAG,
            `Failed to generate EAN-13: ${err.message}`);
        });
    } catch (err) {
      const error = err as BusinessError;
      hilog.error(0x0001, TAG,
        `createBarcode error: ${error.message}`);
    }
  }
}
六、字节数组生成码图
6.1 接口说明
字节数组生成码图适用于交通卡、支付令牌等需要二进制编码的场景:
// 字节数组生成码图(仅支持 QR Code)
createBarcode(
  content: ArrayBuffer,
  options: CreateOptions
): Promise<image.PixelMap>
6.2 交通卡二维码生成示例
import { scanCore, generateBarcode } from '@kit.ScanKit';
import { image } from '@kit.ImageKit';
import { buffer } from '@kit.ArkTS';
import { BusinessError } from '@kit.BasicServicesKit';
import { hilog } from '@kit.PerformanceAnalysisKit';

const TAG: string = '[TransportCardQR]';

@Entry
@Component
struct TransportCardQRPage {
  @State pixelMap: image.PixelMap | undefined = undefined;

  build() {
    Column() {
      Text('交通卡二维码生成')
        .fontSize(20)
        .fontWeight(FontWeight.Bold)
        .margin({ bottom: 20 })

      if (this.pixelMap) {
        Column() {
          Image(this.pixelMap)
            .width(300)
            .height(300)
            .objectFit(ImageFit.Contain)
            .backgroundColor(Color.White)
            .borderRadius(8)

          Text('交通卡 QR Code')
            .fontSize(14)
            .fontColor($r('sys.color.ohos_id_color_text_secondary'))
            .margin({ top: 10 })
        }
        .alignItems(HorizontalAlign.Center)
        .margin({ bottom: 20 })
      }

      Button('生成交通卡二维码')
        .width('80%')
        .onClick(() => {
          this.generateTransportQR();
        })
    }
    .width('100%')
    .height('100%')
    .justifyContent(FlexAlign.Center)
  }

  /**
   * 生成交通卡二维码
   */
  private generateTransportQR(): void {
    // 1. 准备十六进制数据(交通卡加密数据)
    const hexData: string =
      '0177C10DD10F7768600000000000000000000000000000000000000000000000';

    // 2. 将十六进制字符串转换为 ArrayBuffer
    const contentBuffer: ArrayBuffer = buffer.from(hexData, 'hex').buffer;

    // 3. 配置参数(字节数组生成仅支持 QR Code)
    const options: generateBarcode.CreateOptions = {
      scanType: scanCore.ScanType.QR_CODE,
      // 字节数组生成必须 width === height
      width: 400,
      height: 400,
      margin: 2,
      // 交通卡推荐 25% 纠错率
      level: generateBarcode.ErrorCorrectionLevel.LEVEL_Q,
      backgroundColor: 0xFFFFFF,
      pixelMapColor: 0x000000
    };

    try {
      generateBarcode.createBarcode(contentBuffer, options)
        .then((pixelMap: image.PixelMap) => {
          this.pixelMap = pixelMap;
          hilog.info(0x0001, TAG, 'Transport QR code generated');
        })
        .catch((err: BusinessError) => {
          hilog.error(0x0001, TAG,
            `Failed to generate transport QR: ${err.message}`);
        });
    } catch (err) {
      const error = err as BusinessError;
      hilog.error(0x0001, TAG,
        `createBarcode error: ${error.message}`);
    }
  }
}
6.3 Base64 数据生成二维码
处理从后端接口返回的 Base64 编码数据:
import { scanCore, generateBarcode } from '@kit.ScanKit';
import { image } from '@kit.ImageKit';
import { buffer, util } from '@kit.ArkTS';
import { BusinessError } from '@kit.BasicServicesKit';
import { hilog } from '@kit.PerformanceAnalysisKit';

const TAG: string = '[Base64QR]';

export class Base64QRGenerator {
  /**
   * 从 Base64 字符串生成二维码
   * @param base64Content Base64 编码的内容
   * @param size 码图尺寸
   */
  static async generateFromBase64(
    base64Content: string,
    size: number = 400
  ): Promise<image.PixelMap> {
    // 1. Base64 解码
    const base64Helper = new util.Base64Helper();
    const decodedArray = base64Helper.decodeSync(
      base64Content,
      util.Type.MIME
    );

    // 2. ISO-8859-1 编码(Latin1)
    const str = buffer.from(decodedArray.buffer).toString();
    const contentBuffer: ArrayBuffer = buffer.from(str, 'latin1').buffer;

    hilog.info(0x0001, TAG,
      `Buffer length: ${contentBuffer.byteLength}`);

    // 3. 配置生成参数
    const options: generateBarcode.CreateOptions = {
      scanType: scanCore.ScanType.QR_CODE,
      width: size,
      height: size,
      margin: 2,
      level: generateBarcode.ErrorCorrectionLevel.LEVEL_Q,
      backgroundColor: 0xFFFFFF,
      pixelMapColor: 0x000000
    };

    // 4. 生成码图
    return generateBarcode.createBarcode(contentBuffer, options);
  }
}
七、生成带 Logo 的二维码
7.1 使用 Canvas 叠加 Logo
通过 Canvas 组件将二维码与 Logo 图片叠加:
import { image } from '@kit.ImageKit';
import { generateBarcode, scanCore } from '@kit.ScanKit';
import { BusinessError } from '@kit.BasicServicesKit';
import { hilog } from '@kit.PerformanceAnalysisKit';

const TAG: string = '[LogoQR]';

@Entry
@Component
struct LogoQRCodePage {
  @State pixelMap: image.PixelMap | undefined = undefined;
  private settings: RenderingContextSettings =
    new RenderingContextSettings(true);
  private context: CanvasRenderingContext2D =
    new CanvasRenderingContext2D(this.settings);
  private logoImg: ImageBitmap =
    new ImageBitmap('common/logo.png');
  private qrCodeSize: number = 300;

  build() {
    Column() {
      Text('带 Logo 的二维码')
        .fontSize(20)
        .fontWeight(FontWeight.Bold)
        .margin({ bottom: 20 })

      // Canvas 渲染二维码 + Logo
      Canvas(this.context)
        .width(this.qrCodeSize)
        .height(this.qrCodeSize)
        .backgroundColor(Color.White)
        .onReady(() => {
          this.createLogoQRCode();
        })
        .borderRadius(8)
        .margin({ bottom: 20 })

      Text('点击按钮重新生成')
        .fontSize(12)
        .fontColor($r('sys.color.ohos_id_color_text_secondary'))
    }
    .width('100%')
    .height('100%')
    .justifyContent(FlexAlign.Center)
  }

  /**
   * 创建带 Logo 的二维码
   */
  private createLogoQRCode(): void {
    this.pixelMap = undefined;
    const content: string = 'https://www.example.com/scan';

    const options: generateBarcode.CreateOptions = {
      scanType: scanCore.ScanType.QR_CODE,
      height: this.qrCodeSize,
      width: this.qrCodeSize
    };

    generateBarcode.createBarcode(content, options)
      .then((pixelMap: image.PixelMap) => {
        this.pixelMap = pixelMap;

        // 绘制二维码
        this.context.drawImage(
          this.pixelMap,
          0, 0, this.qrCodeSize, this.qrCodeSize,
          0, 0, this.qrCodeSize, this.qrCodeSize
        );

        // 在二维码中心叠加 Logo
        const logoSize: number = 80;
        const logoX: number = (this.qrCodeSize - logoSize) / 2;
        const logoY: number = (this.qrCodeSize - logoSize) / 2;

        this.context.drawImage(
          this.logoImg,
          0, 0, logoSize, logoSize,
          logoX, logoY, logoSize, logoSize
        );

        hilog.info(0x0001, TAG, 'Logo QR code created');
      })
      .catch((err: BusinessError) => {
        hilog.error(0x0001, TAG,
          `Failed to create logo QR: ${err.message}`);
      });
  }
}
八、码图生成参数规范
8.1 尺寸建议
| 码类型 | 宽高关系 | 建议尺寸 | 说明 |
|---|---|---|---|
| QR Code | width = height | 400 x 400 | 正方形二维码 |
| Data Matrix | width = height | 400 x 400 | 正方形码图 |
| Aztec | width = height | 400 x 400 | 正方形码图 |
| EAN-13 | width : height = 2:1 | 400 x 200 | 宽条形码 |
| EAN-8 | width : height = 2:1 | 400 x 200 | 宽条形码 |
| Code 128 | width : height = 2:1 | 400 x 200 | 宽条形码 |
| PDF417 | width : height = 2:1 | 400 x 200 | 宽条形码 |
8.2 颜色建议
- 建议使用默认颜色:黑色码图、白色背景
- 码图颜色和背景对比度较小会影响识别率
- 自定义颜色时确保对比度 > 70%
8.3 常见错误
| 错误码 | 原因 | 解决方案 |
|---|---|---|
| 202 | 参数非法 | 检查 width/height 是否在 [200, 4096] 范围内 |
| 202 | 字节数组生成尺寸不匹配 | 确保 width === height |
| 内容超长 | 码类型不支持当前长度 | 使用 QR Code 或分段生成 |
九、综合应用场景
9.1 生成 + 识别闭环
实现码图生成后立即识别的完整闭环:
import { scanCore, generateBarcode, detectBarcode } from '@kit.ScanKit';
import { image } from '@kit.ImageKit';
import { BusinessError } from '@kit.BasicServicesKit';
import { hilog } from '@kit.PerformanceAnalysisKit';

const TAG: string = '[QRVerify]';

@Entry
@Component
struct QRVerifyPage {
  @State pixelMap: image.PixelMap | undefined = undefined;
  @State verifyResult: string = '';

  build() {
    Column() {
      Text('码图生成与验证')
        .fontSize(20)
        .fontWeight(FontWeight.Bold)
        .margin({ bottom: 20 })

      if (this.pixelMap) {
        Image(this.pixelMap)
          .width(300)
          .height(300)
          .backgroundColor(Color.White)
          .margin({ bottom: 20 })
      }

      if (this.verifyResult) {
        Text(`验证结果: ${this.verifyResult}`)
          .fontSize(14)
          .fontColor('#4CAF50')
          .margin({ bottom: 20 })
      }

      Button('生成并验证')
        .onClick(() => {
          this.generateAndVerify();
        })
    }
    .width('100%')
    .height('100%')
    .justifyContent(FlexAlign.Center)
  }

  private async generateAndVerify(): Promise<void> {
    const content: string = 'VerifyTest_' + Date.now();

    const options: generateBarcode.CreateOptions = {
      scanType: scanCore.ScanType.QR_CODE,
      width: 400,
      height: 400,
      level: generateBarcode.ErrorCorrectionLevel.LEVEL_H
    };

    try {
      // 生成码图
      const pixelMap = await generateBarcode.createBarcode(content, options);
      this.pixelMap = pixelMap;

      // 验证:将 PixelMap 转为可识别的格式
      // 实际项目中需要保存到文件再通过 decode 识别
      this.verifyResult = `生成成功!原始内容: ${content}`;
    } catch (err) {
      const error = err as BusinessError;
      this.verifyResult = `生成失败: ${error.message}`;
    }
  }
}
十、最佳实践总结
10.1 码图生成建议
- QR Code 使用默认尺寸:400x400 px 是推荐的平衡点
- 条形码遵循 2:1 比例:确保条形码宽度足够扫描
- 字节数组生成注意尺寸:width 必须等于 height
- 选择合适的纠错等级:LEVEL_H(30%)适合可能受损的场景
- Base64 数据注意编码:使用 Latin1 编码而非直接 TextEncoder
10.2 图像识码建议
- 优先使用本地图片识别:
decode接口简单易用 - 图像数据识别注意格式:仅支持 NV21 格式
- 处理 stride 问题:图像数据的宽与行距不一致时需要转换
- 多码识别:设置
enableMultiMode: true
总结
本文全面讲解了 HarmonyOS Scan Kit 的图像识码和码图生成能力。图像识码支持从本地图片和图像数据中提取码图信息,码图生成支持通过文本和字节数组创建 13 种码制式的码图。
这两项能力是 Scan Kit 的内容加工层,与实时扫码能力互补,形成了完整的码图处理闭环:
- 生成:将信息编码为码图 → 分发:码图被用户使用
- 扫描:用户实时扫描码图 → 识码:从图片中识别码图
在最后一篇文章中,我们将讲解Scan Kit 高级应用场景与最佳实践,覆盖综合实战案例和性能优化。
如果这篇文章对你有帮助,欢迎点赞👍、收藏⭐、关注🔔,你的支持是我持续创作的动力!
相关资源:
- 图像识码:图像识码
- 识别本地图片:识别本地图片
- 识别图像数据:识别图像数据
- 码图生成:码图生成
- 通过文本生成码图:文本生成码图
- detectBarcode API:detectBarcode
- generateBarcode API:generateBarcode
- 官方示例工程:Sample Code

讨论HarmonyOS开发技术,专注于API与组件、DevEco Studio、测试、元服务和应用上架分发等。
更多推荐
 5
5 0
0- 0


 已为社区贡献87条内容

所有评论(0)