依托HarmonyOS 6.1最新特性实现图片编辑APP(二):Image Kit图片解码详解
依托HarmonyOS 6.1最新特性实现图片编辑APP(二):Image Kit图片解码详解
前言
在上一篇文章中,我们介绍了 Image Kit 的整体架构和ImageEditor Pro APP的设计方案。从本文开始,我们将逐一深入讲解每个核心模块的实现细节。图片解码(Image Decoding)是图片处理的第一步,也是整个处理链路的基础——只有将图片文件高效地解析为可操作的PixelMap对象,后续的编辑、滤镜、编码等操作才能顺利进行。
Image Kit 提供了强大的图片解码能力,支持 JPEG、PNG、GIF、WebP、HEIC、AVIF 等十余种图片格式,并支持区域解码、下采样解码、多图对象解码等高级特性。
图片解码是指将所支持格式的图片文件解析并转换为PixelMap或Picture等图像对象的过程,用于后续显示或图像处理。理解解码原理和优化技巧,对于构建高性能图片应用至关重要。
一、图片解码基础概念
1.1 解码流程概览
Image Kit 中图片解码的标准流程如下:
- 获取图片数据源(文件路径、文件描述符、ArrayBuffer或RawFileDescriptor)
- 创建 ImageSource 实例
- 配置 DecodingOptions 解码参数
- 调用解码方法获取 PixelMap 或 Picture 对象
- 解码完成后释放资源
1.2 图片数据源获取方式
在HarmonyOS中,获取图片数据源有以下四种方式:
| 方式 | 参数类型 | 适用场景 | 依赖模块 |
|---|---|---|---|
| 沙箱路径 | string | 应用沙箱中的图片文件 | @kit.CoreFileKit |
| 文件描述符 | number (fd) | 需要精确控制文件访问 | @kit.CoreFileKit |
| ArrayBuffer | ArrayBuffer | 资源文件或网络下载的图片 | @kit.LocalizationKit |
| RawFileDescriptor | RawFileDescriptor | HAP包中的资源文件 | @kit.LocalizationKit |
1.3 解码参数配置
DecodingOptions 是解码过程中的关键配置,决定了输出图片的格式和质量:
| 参数 | 类型 | 说明 |
|---|---|---|
| editable | boolean | 是否支持编辑,设置为true后PixelMap可进行编辑操作 |
| desiredPixelFormat | PixelMapFormat | 期望的像素格式,如RGBA_8888、RGB_565等 |
| desiredDynamicRange | DecodingDynamicRange | 动态范围策略,AUTO/SDR/HDR |
| desiredSize | Size | 期望输出尺寸,用于下采样解码 |
| desiredRegion | Region | 期望解码区域,用于区域解码 |
二、ImageSource创建与基础解码
2.1 创建ImageSource实例
import { image } from '@kit.ImageKit';
import { fileIo } from '@kit.CoreFileKit';
import { resourceManager } from '@kit.LocalizationKit';
import { common } from '@kit.AbilityKit';

// 方法一:通过沙箱路径创建ImageSource
function createImageSourceFromPath(filePath: string): image.ImageSource {
  const imageSource: image.ImageSource = image.createImageSource(filePath);
  console.info('ImageSource created from path successfully.');
  return imageSource;
}

// 方法二:通过文件描述符创建ImageSource
function createImageSourceFromFd(context: common.Context, fileName: string): image.ImageSource | undefined {
  try {
    const filePath: string = context.cacheDir + '/' + fileName;
    const file: fileIo.File = fileIo.openSync(filePath, fileIo.OpenMode.READ_ONLY);
    const fd: number = file.fd;
    const imageSource: image.ImageSource = image.createImageSource(fd);
    console.info('ImageSource created from fd successfully.');
    return imageSource;
  } catch (err) {
    console.error(`Failed to create ImageSource from fd: ${err}`);
    return undefined;
  }
}

// 方法三:通过ArrayBuffer创建ImageSource
async function createImageSourceFromBuffer(context: common.Context, fileName: string): Promise<image.ImageSource | undefined> {
  try {
    const resourceMgr: resourceManager.ResourceManager = context.resourceManager;
    const fileData: Uint8Array = await resourceMgr.getRawFileContent(fileName);
    const buffer: ArrayBuffer = fileData.buffer.slice(0);
    const imageSource: image.ImageSource = image.createImageSource(buffer);
    console.info('ImageSource created from buffer successfully.');
    return imageSource;
  } catch (error) {
    console.error(`Failed to create ImageSource from buffer: ${error}`);
    return undefined;
  }
}

// 方法四:通过RawFileDescriptor创建ImageSource
async function createImageSourceFromRawFd(context: common.Context, fileName: string): Promise<image.ImageSource | undefined> {
  try {
    const resourceMgr: resourceManager.ResourceManager = context.resourceManager;
    const rawFileDescriptor: resourceManager.RawFileDescriptor = await resourceMgr.getRawFd(fileName);
    const imageSource: image.ImageSource = image.createImageSource(rawFileDescriptor);
    console.info('ImageSource created from RawFileDescriptor successfully.');
    return imageSource;
  } catch (error) {
    console.error(`Failed to create ImageSource from RawFileDescriptor: ${error}`);
    return undefined;
  }
}
2.2 查询设备解码能力
不同设备对图片格式的支持能力可能存在差异,建议在解码前查询设备支持情况:
import { image } from '@kit.ImageKit';

// 获取当前设备支持的解码格式列表
function getSupportedFormats(): string[] {
  let formats = image.getImageSourceSupportedFormats();
  console.info('Supported formats: ' + formats);
  return formats;
}

// 检查指定格式是否支持解码
function isFormatSupported(format: string): boolean {
  let formats = image.getImageSourceSupportedFormats();
  return formats.includes(format);
}

// 使用示例
function checkDeviceCapabilities(): void {
  const formats = getSupportedFormats();
  console.info(`设备支持 ${formats.length} 种图片格式`);

  if (isFormatSupported('image/heic')) {
    console.info('当前设备支持HEIC格式解码');
  } else {
    console.info('当前设备不支持HEIC格式解码');
  }

  if (isFormatSupported('image/avif')) {
    console.info('当前设备支持AVIF格式解码');
  } else {
    console.info('当前设备不支持AVIF格式解码');
  }
}
2.3 完整解码示例
以下是一个完整的图片解码示例,整合了数据源获取、ImageSource创建和解码参数配置:
import { image } from '@kit.ImageKit';
import { BusinessError } from '@kit.BasicServicesKit';
import { common } from '@kit.AbilityKit';

// 图片解码工具类
class ImageDecoderUtil {

  // 通过沙箱路径解码图片
  async decodeFromPath(context: common.Context, fileName: string): Promise<image.PixelMap | undefined> {
    const filePath: string = context.cacheDir + '/' + fileName;

    try {
      // 创建ImageSource
      const imageSource: image.ImageSource = image.createImageSource(filePath);

      // 配置解码选项
      let decodingOptions: image.DecodingOptions = {
        editable: true,                                    // 允许编辑
        desiredPixelFormat: image.PixelMapFormat.RGBA_8888, // RGBA格式
        desiredDynamicRange: image.DecodingDynamicRange.AUTO // 自动HDR策略
      };

      // 执行解码
      const pixelMap = await imageSource.createPixelMap(decodingOptions);

      if (pixelMap) {
        console.info('Create PixelMap successfully.');

        // 获取图片信息
        let imageInfo = await pixelMap.getImageInfo();
        console.info(`Image size: ${imageInfo.size.width} x ${imageInfo.size.height}`);
        console.info(`Image isHdr: ${imageInfo.isHdr}`);

        // 释放ImageSource(pixelMap独立存在,可以安全释放)
        await imageSource.release();

        return pixelMap;
      } else {
        console.info('Create PixelMap failed.');
        return undefined;
      }
    } catch (error) {
      console.error(`Failed to create PixelMap: ${error}`);
      return undefined;
    }
  }

  // 释放资源
  async releasePixelMap(pixelMap: image.PixelMap | undefined): Promise<void> {
    if (pixelMap) {
      await pixelMap.release();
      console.info('PixelMap released successfully.');
    }
  }
}
三、高级解码特性
3.1 区域解码(Region Decode)
区域解码允许仅解码图片的指定矩形区域,非常适合大图局部查看和裁剪预览场景,能大幅减少内存占用:
// 区域解码示例:仅解码图片的左上角200x200区域
async function regionDecodeExample(imageSource: image.ImageSource): Promise<void> {
  try {
    // 配置区域解码选项
    let regionDecodingOptions: image.DecodingOptions = {
      editable: true,
      desiredPixelFormat: image.PixelMapFormat.RGBA_8888,
      desiredRegion: {
        x: 0,        // 起始横坐标
        y: 0,        // 起始纵坐标
        size: {
          width: 200,   // 解码区域宽度
          height: 200   // 解码区域高度
        }
      }
    };

    const regionPixelMap = await imageSource.createPixelMap(regionDecodingOptions);
    console.info('Region decode completed successfully.');

    // 使用区域解码后的PixelMap进行局部预览
    // ...

    await regionPixelMap.release();
  } catch (error) {
    console.error(`Region decode failed: ${error}`);
  }
}
3.2 下采样解码(Downsampling Decode)
下采样解码在解码时直接缩放到目标尺寸,避免解码后再缩放的性能开销,适用于缩略图生成:
// 下采样解码示例:生成缩略图
async function downsamplingDecodeExample(imageSource: image.ImageSource): Promise<image.PixelMap | undefined> {
  try {
    // 获取原图信息
    let sourceInfo = await imageSource.getImageInfo();
    console.info(`Original size: ${sourceInfo.size.width} x ${sourceInfo.size.height}`);

    // 计算缩略图目标尺寸(保持宽高比,最大边长200px)
    let targetWidth = 200;
    let targetHeight = 200;
    if (sourceInfo.size.width > sourceInfo.size.height) {
      targetHeight = Math.round(200 * sourceInfo.size.height / sourceInfo.size.width);
    } else {
      targetWidth = Math.round(200 * sourceInfo.size.width / sourceInfo.size.height);
    }

    // 配置下采样解码选项
    let downsamplingOptions: image.DecodingOptions = {
      editable: false,  // 缩略图通常不需要编辑
      desiredPixelFormat: image.PixelMapFormat.RGB_565, // 缩略图可用低精度格式节省内存
      desiredSize: {
        width: targetWidth,
        height: targetHeight
      }
    };

    const thumbnailPixelMap = await imageSource.createPixelMap(downsamplingOptions);
    console.info(`Thumbnail created: ${targetWidth} x ${targetHeight}`);

    return thumbnailPixelMap;
  } catch (error) {
    console.error(`Downsampling decode failed: ${error}`);
    return undefined;
  }
}
3.3 内存优化解码
Image Kit 提供了内存优化解码选项,支持使用DMA内存和YUV像素格式降低内存占用:
import { image } from '@kit.ImageKit';

// 内存优化解码:使用DMA内存和YUV格式
async function optimizedDecode(imageSource: image.ImageSource): Promise<image.PixelMap | undefined> {
  try {
    // 配置内存优化解码选项
    let optimizedOptions: image.DecodingOptions = {
      editable: true,
      // 使用YUV格式降低内存占用
      desiredPixelFormat: image.PixelMapFormat.NV12,
      // 设置内存分配类型为DMA
      allocatorType: image.AllocatorType.DMA
    };

    const pixelMap = await imageSource.createPixelMap(optimizedOptions);

    if (pixelMap) {
      let imageInfo = await pixelMap.getImageInfo();
      console.info(`Optimized decode - Size: ${imageInfo.size.width} x ${imageInfo.size.height}`);
      console.info(`Pixel format: ${imageInfo.pixelFormat}`);
    }

    return pixelMap;
  } catch (error) {
    console.error(`Optimized decode failed: ${error}`);
    return undefined;
  }
}
3.4 多图对象解码(Picture Decoding)
Picture(多图对象)由主图和辅助图组成,用于处理HDR图片和HEIF专业格式:
// 多图对象解码示例
async function pictureDecodeExample(imageSource: image.ImageSource): Promise<image.Picture | undefined> {
  try {
    // 解码为Picture多图对象
    const picture = await imageSource.createPicture();

    if (picture) {
      console.info('Picture object created successfully.');

      // 获取主图
      const mainPixelMap = await picture.getMainPixelMap();
      if (mainPixelMap) {
        console.info('Main pixel map obtained.');
      }

      // 检查是否有辅助图(如GainMap、DepthMap等)
      const auxiliaryTypes = await picture.getAuxiliaryPictureTypes();
      console.info(`Auxiliary picture types: ${auxiliaryTypes}`);

      return picture;
    }
    return undefined;
  } catch (error) {
    console.error(`Picture decode failed: ${error}`);
    return undefined;
  }
}
3.5 RAW数据获取
对于专业相机拍摄的RAW格式图片,Image Kit 支持获取RAW数据:
// 获取RAW数据示例
async function getRawDataExample(imageSource: image.ImageSource): Promise<ArrayBuffer | undefined> {
  try {
    // 获取图片信息,确认是否为RAW格式
    let imageInfo = await imageSource.getImageInfo();
    console.info(`Image format: ${imageInfo.encodedFormat}`);

    // 获取RAW数据
    const rawData = await imageSource.getRawData();
    if (rawData) {
      console.info(`Raw data size: ${rawData.byteLength} bytes`);
      return rawData;
    }
    return undefined;
  } catch (error) {
    console.error(`Failed to get raw data: ${error}`);
    return undefined;
  }
}
四、ImageEditor Pro中的解码模块实现
4.1 解码工具类设计
在 ImageEditor Pro APP中,我们封装了一个统一的解码工具类,整合了多种解码方式:
import { image } from '@kit.ImageKit';
import { BusinessError } from '@kit.BasicServicesKit';
import { common } from '@kit.AbilityKit';
import { fileIo } from '@kit.CoreFileKit';
import { resourceManager } from '@kit.LocalizationKit';

// 解码配置类型
interface DecodeConfig {
  editable: boolean;
  pixelFormat: image.PixelMapFormat;
  dynamicRange: image.DecodingDynamicRange;
  maxSize?: number;    // 最大尺寸限制
  region?: image.Region; // 可选区域解码
}

// 统一的图片解码工具类
export class ImageDecodeManager {
  private context: common.Context;

  constructor(context: common.Context) {
    this.context = context;
  }

  // 主解码入口:根据输入类型选择解码方式
  async decode(input: string | number | ArrayBuffer, config: DecodeConfig): Promise<image.PixelMap | undefined> {
    try {
      let imageSource: image.ImageSource;

      if (typeof input === 'string') {
        imageSource = image.createImageSource(input);
      } else if (typeof input === 'number') {
        imageSource = image.createImageSource(input);
      } else {
        imageSource = image.createImageSource(input);
      }

      // 构建解码选项
      let decodingOptions: image.DecodingOptions = {
        editable: config.editable,
        desiredPixelFormat: config.pixelFormat,
        desiredDynamicRange: config.dynamicRange
      };

      // 如果设置了最大尺寸,启用下采样
      if (config.maxSize) {
        let sourceInfo = await imageSource.getImageInfo();
        let ratio = Math.min(1, config.maxSize / Math.max(sourceInfo.size.width, sourceInfo.size.height));
        if (ratio < 1) {
          decodingOptions.desiredSize = {
            width: Math.round(sourceInfo.size.width * ratio),
            height: Math.round(sourceInfo.size.height * ratio)
          };
        }
      }

      // 如果设置了区域,启用区域解码
      if (config.region) {
        decodingOptions.desiredRegion = config.region;
      }

      const pixelMap = await imageSource.createPixelMap(decodingOptions);
      await imageSource.release();

      return pixelMap;
    } catch (error) {
      console.error(`Decode failed: ${error}`);
      return undefined;
    }
  }

  // 快速缩略图解码
  async decodeThumbnail(filePath: string, maxSize: number = 200): Promise<image.PixelMap | undefined> {
    return this.decode(filePath, {
      editable: false,
      pixelFormat: image.PixelMapFormat.RGB_565,
      dynamicRange: image.DecodingDynamicRange.SDR,
      maxSize: maxSize
    });
  }

  // 可编辑全图解码
  async decodeEditable(filePath: string): Promise<image.PixelMap | undefined> {
    return this.decode(filePath, {
      editable: true,
      pixelFormat: image.PixelMapFormat.RGBA_8888,
      dynamicRange: image.DecodingDynamicRange.AUTO
    });
  }
}
4.2 图片加载页面实现
// 图片选择与加载页面
@Entry
@Component
struct ImagePickerPage {
  @State pixelMap: image.PixelMap | undefined = undefined;
  @State isLoading: boolean = false;
  @State statusMessage: string = '请选择一张图片';
  private decodeManager: ImageDecodeManager = new ImageDecodeManager(getContext(this));

  // 加载图片
  async loadImage(filePath: string): Promise<void> {
    this.isLoading = true;
    this.statusMessage = '正在解码图片...';

    try {
      const result = await this.decodeManager.decodeEditable(filePath);
      if (result) {
        this.pixelMap = result;
        let imageInfo = await result.getImageInfo();
        this.statusMessage = `加载成功: ${imageInfo.size.width} x ${imageInfo.size.height}`;
      } else {
        this.statusMessage = '图片解码失败';
      }
    } catch (error) {
      this.statusMessage = `加载出错: ${error}`;
    } finally {
      this.isLoading = false;
    }
  }

  build() {
    Column() {
      // 状态显示
      Text(this.statusMessage)
        .fontSize(16)
        .padding(10)

      // 图片预览区
      if (this.pixelMap) {
        Image(this.pixelMap)
          .width('100%')
          .height('60%')
          .objectFit(ImageFit.Contain)
      }

      // 加载按钮
      if (this.isLoading) {
        LoadingProgress()
          .width(50)
          .height(50)
      }

      Button('选择图片')
        .onClick(() => {
          // 触发图片选择器
          this.loadImage('/data/storage/el2/base/cache/demo.jpg');
        })
    }
    .width('100%')
    .height('100%')
  }
}
五、解码性能对比
5.1 不同解码方式内存占用对比
以下是在实际测试中不同解码方式对同一张4000x3000像素图片的内存占用对比:
| 解码方式 | 像素格式 | 输出尺寸 | 内存占用(估算) | 解码耗时 | 适用场景 |
|---|---|---|---|---|---|
| 全图解码 | RGBA_8888 | 4000x3000 | ~48MB | 基准 | 编辑模式 |
| 下采样解码 | RGBA_8888 | 400x300 | ~0.48MB | 快 | 缩略图 |
| 区域解码 | RGBA_8888 | 200x200 | ~0.16MB | 快 | 局部预览 |
| DMA优化 | NV12 | 4000x3000 | ~18MB | 较快 | 大图预览 |
| RGB_565 | RGB_565 | 4000x3000 | ~24MB | 相近 | 不带透明通道的预览 |
5.2 性能优化建议
Image Kit 解码性能优化的核心要点:
- 按需选择解码方式:预览用缩略图,编辑用全图,局部查看用区域解码
- 选择合适的像素格式:不需要透明通道时使用RGB_565,节省一半内存
- 及时释放资源:解码完成后及时释放ImageSource,页面切换时释放PixelMap
- 使用DMA内存:对需要GPU处理的场景,使用DMA内存减少数据拷贝
- 查询设备解码能力:在使用特定格式前先查询,避免解码失败
// 资源释放最佳实践
class ResourceManager {
  private pixelMaps: Map<string, image.PixelMap> = new Map();

  // 缓存PixelMap
  cachePixelMap(key: string, pixelMap: image.PixelMap): void {
    this.pixelMaps.set(key, pixelMap);
  }

  // 释放指定PixelMap
  async releasePixelMap(key: string): Promise<void> {
    const pixelMap = this.pixelMaps.get(key);
    if (pixelMap) {
      await pixelMap.release();
      this.pixelMaps.delete(key);
      console.info(`PixelMap ${key} released.`);
    }
  }

  // 释放所有PixelMap(页面退出时调用)
  async releaseAll(): Promise<void> {
    for (const [key, pixelMap] of this.pixelMaps) {
      await pixelMap.release();
    }
    this.pixelMaps.clear();
    console.info('All PixelMaps released.');
  }
}
六、常见问题与解决方案
6.1 解码失败常见原因
| 问题 | 可能原因 | 解决方案 |
|---|---|---|
| 创建ImageSource失败 | 文件路径不存在 | 检查文件路径是否正确 |
| 解码后PixelMap为空 | 图片格式不支持 | 使用getImageSourceSupportedFormats()查询 |
| 内存溢出 | 解码大图未使用下采样 | 设置desiredSize参数 |
| HDR图片显示异常 | 设备不支持HDR解码 | 使用AUTO动态范围策略 |
| 解码HEIC失败 | 设备硬件不支持 | 使用getImageSourceSupportedFormats()查询 |
6.2 调试技巧
// 解码调试工具
class DecodeDebugger {
  // 打印图片详细信息
  static async printImageInfo(imageSource: image.ImageSource): Promise<void> {
    try {
      let info = await imageSource.getImageInfo();
      console.info('=== Image Info ===');
      console.info(`Encoded format: ${info.encodedFormat}`);
      console.info(`Size: ${info.size.width} x ${info.size.height}`);
      console.info(`Pixel format: ${info.pixelFormat}`);
      console.info(`Is HDR: ${info.isHdr}`);
      console.info('==================');
    } catch (error) {
      console.error(`Failed to get image info: ${error}`);
    }
  }

  // 检查设备解码能力
  static checkDeviceCapability(): void {
    let formats = image.getImageSourceSupportedFormats();
    console.info('=== Device Decode Capability ===');
    console.info(`Supported formats: ${formats.join(', ')}`);
    console.info('===============================');
  }
}
总结
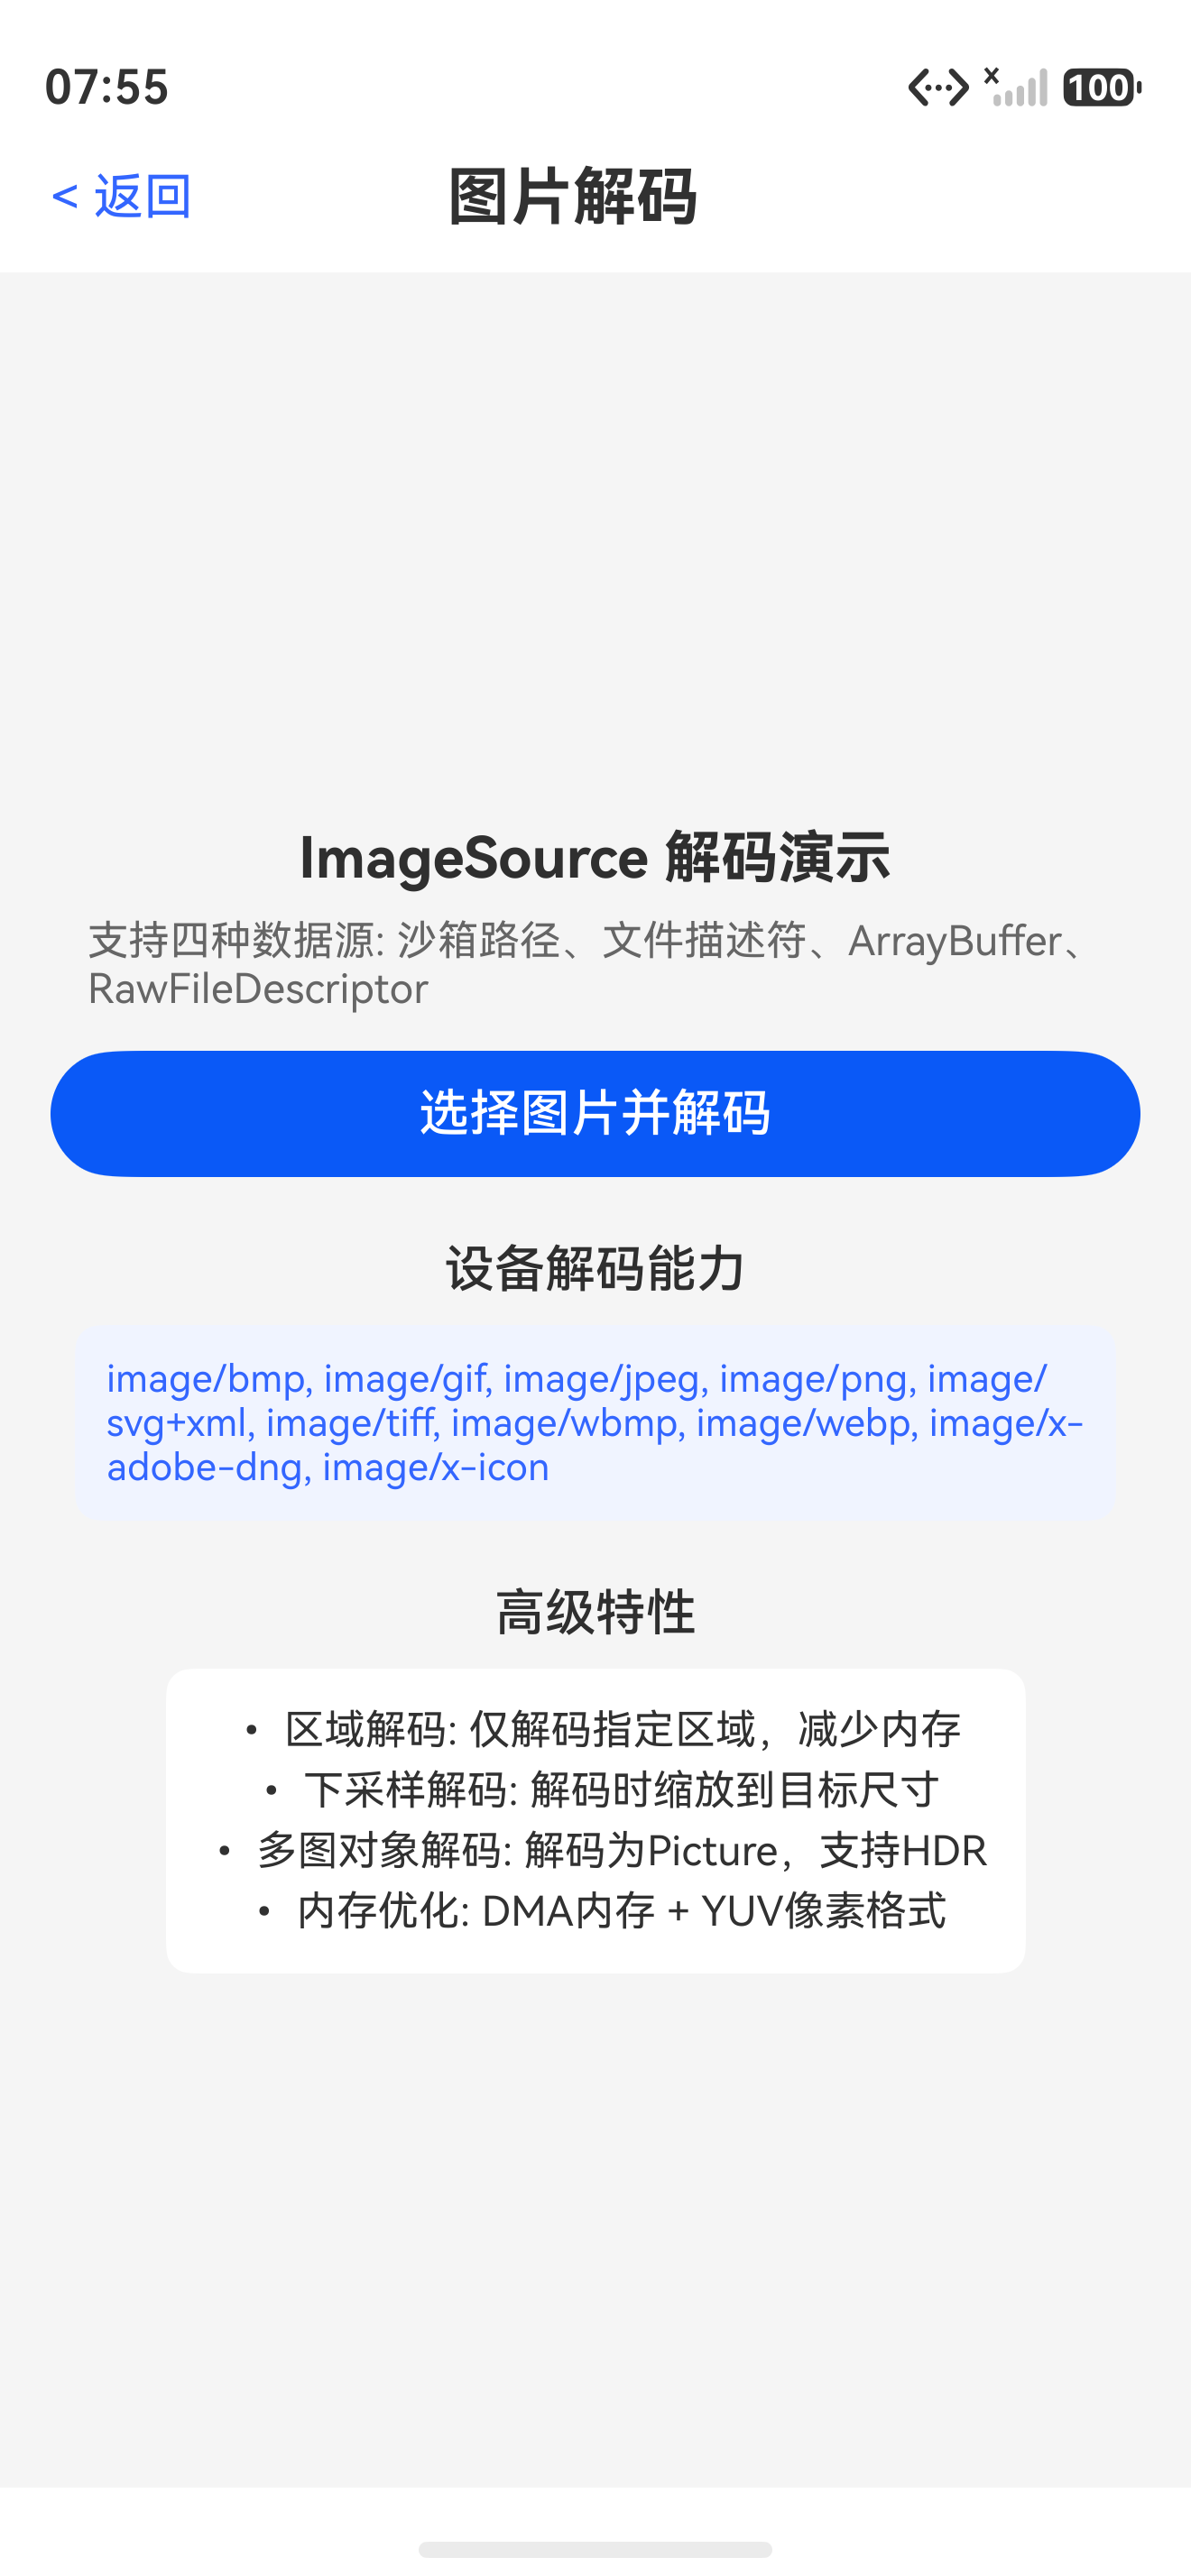
本文详细介绍了 HarmonyOS 6.1 Image Kit 的图片解码能力,包括ImageSource的四种创建方式、DecodingOptions参数配置、区域解码、下采样解码、多图对象解码和RAW数据获取等高级特性。图片解码是图片处理链路的起点,掌握高效的解码技巧对于构建高性能图片应用至关重要。
下一篇文章,我们将介绍图片编码(Image Encoding)——如何将编辑处理后的 PixelMap 编码为指定的图片格式并保存到文件系统中。
如果这篇文章对你有帮助,欢迎点赞👍、收藏⭐、关注🔔,你的支持是我持续创作的动力!
相关资源:
- 图片解码官方文档:使用ImageSource完成图片解码
- 图片解码内存优化:内存优化解码
- 区域解码与下采样:图片区域解码与下采样
- 多图对象解码:使用ImageSource完成多图对象解码
- RAW数据获取:使用ImageSource获取RAW数据
- ImageSource接口:ImageSource API
- 图片获取与保存示例:水印添加能力
- 开源鸿蒙跨平台社区:社区链接

讨论HarmonyOS开发技术,专注于API与组件、DevEco Studio、测试、元服务和应用上架分发等。
更多推荐



 7
7 0
0- 0


 已为社区贡献64条内容

所有评论(0)