HarmonyOS Scan Kit 高级应用场景与最佳实践:从实战案例到性能优化
HarmonyOS Scan Kit 高级应用场景与最佳实践:从实战案例到性能优化
前言
在前五篇文章中,我们系统学习了 Scan Kit 的五大核心能力:概述与开发准备、扫码直达服务、默认界面扫码、自定义界面扫码以及图像识码与码图生成。本文作为系列收官之作,将聚焦于综合实战案例、性能优化策略、常见问题排查以及企业级架构设计,帮助你将 Scan Kit 的能力真正落地到生产环境中。
本文将涵盖:支付扫码完整方案、设备绑定场景、扫码充电服务、性能优化技巧、常见错误码处理、企业级架构设计以及版本兼容性策略。
阅读建议:本文假定你已经阅读过前五篇文章或具备 Scan Kit 基础开发经验。如果你是新手,建议从第一篇文章开始阅读。
一、综合实战案例:支付扫码完整方案
1.1 场景描述
支付扫码是 Scan Kit 最典型的应用场景之一。用户扫描商户的收款码后,应用需要解析码值、展示支付信息并完成支付流程。
1.2 架构设计
支付扫码架构包含以下组件:
- 扫码入口:默认界面扫码(应用内) + 扫码直达(系统入口)
- 码值解析:解析扫码结果,提取商户信息和金额
- 支付确认:展示支付信息,用户确认支付
- 支付执行:调用支付接口完成交易
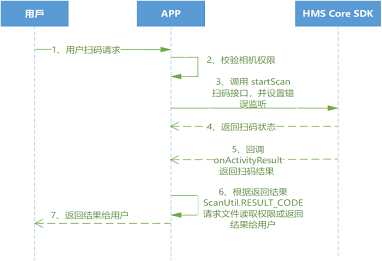
支付扫码从扫描商户收款码到完成支付的完整业务流程
1.3 完整代码实现
import { scanBarcode, scanCore } from '@kit.ScanKit';
import { common } from '@kit.AbilityKit';
import { BusinessError } from '@kit.BasicServicesKit';
import { hilog } from '@kit.PerformanceAnalysisKit';
import { router } from '@kit.ArkUI';
import { http } from '@kit.NetworkKit';

const TAG: string = '[PaymentScan]';

/**
 * 支付码解析结果
 */
interface PaymentCodeInfo {
  type: 'merchant_qr' | 'personal_qr' | 'unknown';
  merchantId?: string;
  merchantName?: string;
  amount?: string;
  description?: string;
  rawValue: string;
}

/**
 * 支付扫码服务
 */
export class PaymentScanService {
  /**
   * 启动支付扫码
   */
  static async startPaymentScan(context: common.Context): Promise<void> {
    const options: scanBarcode.ScanOptions = {
      scanTypes: [scanCore.ScanType.QR_CODE],
      enableMultiMode: false,
      enableAlbum: false
    };

    try {
      const result = await scanBarcode.startScanForResult(context, options);
      const codeValue = result.originalValue || '';

      hilog.info(0x0001, TAG, `Payment scan result: ${codeValue}`);

      // 解析支付码
      const paymentInfo = this.parsePaymentCode(codeValue);

      if (paymentInfo.type === 'unknown') {
        AlertDialog.show({
          title: '无效支付码',
          message: '请扫描有效的支付二维码',
          confirm: { value: '确定', action: () => { } }
        });
        return;
      }

      // 跳转到支付确认页面
      router.pushUrl({
        url: 'pages/PaymentConfirm',
        params: {
          paymentInfo: paymentInfo
        }
      });
    } catch (err) {
      const error = err as BusinessError;
      if (error.code !== 10005001) {
        hilog.error(0x0001, TAG,
          `Payment scan failed: ${error.message}`);
      }
    }
  }

  /**
   * 解析支付码
   */
  private static parsePaymentCode(code: string): PaymentCodeInfo {
    // 支付宝支付码格式
    if (code.startsWith('https://qr.alipay.com/')) {
      return {
        type: 'merchant_qr',
        merchantId: this.extractParam(code, 'merchantId'),
        rawValue: code
      };
    }

    // 微信支付码格式
    if (code.startsWith('wxp://')) {
      return {
        type: 'merchant_qr',
        merchantId: this.extractParam(code, 'mch_id'),
        rawValue: code
      };
    }

    // 通用 HTTPS 支付链接
    if (code.startsWith('https://') && code.includes('pay')) {
      return {
        type: 'merchant_qr',
        merchantId: 'unknown',
        rawValue: code
      };
    }

    return { type: 'unknown', rawValue: code };
  }

  /**
   * 从 URL 中提取参数
   */
  private static extractParam(url: string, key: string): string {
    try {
      const urlObj = new URL(url);
      return urlObj.searchParams.get(key) || '';
    } catch {
      return '';
    }
  }
}

/**
 * 支付确认页面
 */
@Entry
@Component
struct PaymentConfirmPage {
  @State paymentInfo: PaymentCodeInfo = {
    type: 'unknown',
    rawValue: ''
  };
  @State isLoading: boolean = false;
  @State merchantName: string = '加载中...';
  @State amount: string = '';

  aboutToAppear(): void {
    const params = router.getParams() as Record<string, Object>;
    if (params && params['paymentInfo']) {
      this.paymentInfo = params['paymentInfo'] as PaymentCodeInfo;
      this.loadMerchantInfo();
    }
  }

  build() {
    Column() {
      // 页面标题
      Row() {
        Button('返回')
          .backgroundColor(Color.Transparent)
          .onClick(() => router.back())

        Text('确认支付')
          .fontSize(20)
          .fontWeight(FontWeight.Bold)
          .layoutWeight(1)
          .textAlign(TextAlign.Center)
      }
      .width('100%')
      .padding(16)

      // 支付信息
      Column() {
        Text('收款方')
          .fontSize(14)
          .fontColor($r('sys.color.ohos_id_color_text_secondary'))
          .margin({ bottom: 5 })

        Text(this.merchantName)
          .fontSize(20)
          .fontWeight(FontWeight.Bold)
          .margin({ bottom: 20 })

        Divider().margin({ bottom: 20 })

        Text('支付金额')
          .fontSize(14)
          .fontColor($r('sys.color.ohos_id_color_text_secondary'))
          .margin({ bottom: 5 })

        TextInput({ text: this.amount, placeholder: '请输入支付金额' })
          .type(InputType.Number)
          .fontSize(32)
          .fontWeight(FontWeight.Bold)
          .textAlign(TextAlign.Center)
          .width('80%')
          .margin({ bottom: 30 })
      }
      .width('100%')
      .padding(20)
      .layoutWeight(1)

      // 支付按钮
      Button(this.isLoading ? '支付中...' : '确认支付')
        .width('90%')
        .height(48)
        .fontSize(18)
        .enabled(!this.isLoading)
        .margin({ bottom: 30 })
        .onClick(() => {
          this.executePayment();
        })
    }
    .width('100%')
    .height('100%')
    .backgroundColor($r('sys.color.ohos_id_color_sub_background'))
  }

  /**
   * 加载商户信息
   */
  private async loadMerchantInfo(): Promise<void> {
    try {
      // 模拟从后端获取商户信息
      await this.delay(500);
      this.merchantName = '示例商户';
    } catch (err) {
      this.merchantName = '获取失败';
    }
  }

  /**
   * 执行支付
   */
  private async executePayment(): Promise<void> {
    if (!this.amount || parseFloat(this.amount) <= 0) {
      AlertDialog.show({
        title: '提示',
        message: '请输入有效的支付金额',
        confirm: { value: '确定', action: () => { } }
      });
      return;
    }

    this.isLoading = true;

    try {
      // 模拟支付请求
      await this.delay(2000);

      AlertDialog.show({
        title: '支付成功',
        message: `已向 ${this.merchantName} 支付 ${this.amount} 元`,
        confirm: {
          value: '确定',
          action: () => {
            router.back();
          }
        }
      });
    } catch (err) {
      AlertDialog.show({
        title: '支付失败',
        message: '请稍后重试',
        confirm: { value: '确定', action: () => { } }
      });
    } finally {
      this.isLoading = false;
    }
  }

  private delay(ms: number): Promise<void> {
    return new Promise(resolve => setTimeout(resolve, ms));
  }
}
二、综合实战案例:扫码充电服务
2.1 场景描述
扫码充电是 O2O 商业模式的典型场景。用户扫描充电桩上的二维码,进入充电服务页面,选择充电参数并开始充电。
2.2 代码实现
import { scanBarcode, scanCore } from '@kit.ScanKit';
import { common } from '@kit.AbilityKit';
import { BusinessError } from '@kit.BasicServicesKit';
import { hilog } from '@kit.PerformanceAnalysisKit';
import { router } from '@kit.ArkUI';

const TAG: string = '[ChargeScan]';

/**
 * 充电桩信息
 */
interface ChargeStation {
  stationId: string;
  stationName: string;
  location: string;
  availablePorts: number;
  pricePerKwh: number;
}

/**
 * 扫码充电服务
 */
export class ChargeScanService {
  // 已知充电桩信息(实际项目中从后端获取)
  private static stations: Map<string, ChargeStation> = new Map([
    ['CS001', {
      stationId: 'CS001',
      stationName: '地下车库A区充电桩',
      location: 'B1层A区12号车位',
      availablePorts: 3,
      pricePerKwh: 1.2
    }],
    ['CS002', {
      stationId: 'CS002',
      stationName: '地面停车场充电桩',
      location: '地面停车场东侧',
      availablePorts: 5,
      pricePerKwh: 1.5
    }]
  ]);

  /**
   * 启动扫码充电
   */
  static async startChargeScan(context: common.Context): Promise<void> {
    const options: scanBarcode.ScanOptions = {
      scanTypes: [scanCore.ScanType.QR_CODE],
      enableMultiMode: false,
      enableAlbum: false
    };

    try {
      const result = await scanBarcode.startScanForResult(context, options);
      const codeValue = result.originalValue || '';

      hilog.info(0x0001, TAG, `Charge scan result: ${codeValue}`);

      // 解析充电桩 ID
      const stationId = this.parseStationId(codeValue);

      if (!stationId || !this.stations.has(stationId)) {
        AlertDialog.show({
          title: '无效充电码',
          message: '请扫描充电桩上的二维码',
          confirm: { value: '确定', action: () => { } }
        });
        return;
      }

      const station = this.stations.get(stationId)!;

      // 跳转到充电页面
      router.pushUrl({
        url: 'pages/ChargeService',
        params: {
          station: station
        }
      });
    } catch (err) {
      const error = err as BusinessError;
      if (error.code !== 10005001) {
        hilog.error(0x0001, TAG,
          `Charge scan failed: ${error.message}`);
      }
    }
  }

  /**
   * 解析充电桩 ID
   */
  private static parseStationId(code: string): string | null {
    // 支持格式: https://charge.example.com/station/CS001
    const match = code.match(/station\/([A-Z0-9]+)/);
    return match ? match[1] : null;
  }
}

/**
 * 充电服务页面
 */
@Entry
@Component
struct ChargeServicePage {
  @State station: ChargeStation = {
    stationId: '',
    stationName: '',
    location: '',
    availablePorts: 0,
    pricePerKwh: 0
  };
  @State isCharging: boolean = false;
  @State chargeProgress: number = 0;
  @State chargeCost: string = '0.00';

  aboutToAppear(): void {
    const params = router.getParams() as Record<string, Object>;
    if (params && params['station']) {
      this.station = params['station'] as ChargeStation;
    }
  }

  build() {
    Column() {
      // 充电桩信息
      Column() {
        Text(this.station.stationName)
          .fontSize(20)
          .fontWeight(FontWeight.Bold)
          .margin({ bottom: 10 })

        Text(`位置: ${this.station.location}`)
          .fontSize(14)
          .fontColor($r('sys.color.ohos_id_color_text_secondary'))
          .margin({ bottom: 5 })

        Text(`可用端口: ${this.station.availablePorts} 个`)
          .fontSize(14)
          .fontColor($r('sys.color.ohos_id_color_text_secondary'))
          .margin({ bottom: 5 })

        Text(`单价: ${this.station.pricePerKwh} 元/度`)
          .fontSize(14)
          .fontColor('#4CAF50')
      }
      .width('90%')
      .padding(16)
      .backgroundColor($r('sys.color.ohos_id_color_sub_background'))
      .borderRadius(8)
      .margin({ bottom: 20 })

      // 充电控制
      if (this.isCharging) {
        Column() {
          // 充电进度
          Progress({
            value: this.chargeProgress,
            total: 100,
            type: ProgressType.Ring
          })
            .width(120)
            .height(120)
            .margin({ bottom: 20 })

          Text(`充电中... ${this.chargeProgress}%`)
            .fontSize(16)
            .margin({ bottom: 10 })

          Text(`已消费: ¥${this.chargeCost}`)
            .fontSize(14)
            .fontColor($r('sys.color.ohos_id_color_text_secondary'))
            .margin({ bottom: 20 })

          Button('停止充电')
            .width('80%')
            .backgroundColor('#FF5722')
            .onClick(() => {
              this.stopCharging();
            })
        }
        .alignItems(HorizontalAlign.Center)
      } else {
        Button('开始充电')
          .width('80%')
          .height(48)
          .fontSize(18)
          .onClick(() => {
            this.startCharging();
          })
      }
    }
    .width('100%')
    .height('100%')
    .justifyContent(FlexAlign.Center)
  }

  private startCharging(): void {
    this.isCharging = true;
    this.chargeProgress = 0;
    this.chargeCost = '0.00';

    // 模拟充电进度更新
    const interval = setInterval(() => {
      if (this.chargeProgress >= 100 || !this.isCharging) {
        clearInterval(interval);
        return;
      }
      this.chargeProgress += 5;
      this.chargeCost = (
        (this.chargeProgress / 100) * 10 * this.station.pricePerKwh
      ).toFixed(2);
    }, 1000);
  }

  private stopCharging(): void {
    this.isCharging = false;
    AlertDialog.show({
      title: '充电完成',
      message: `本次充电消费 ¥${this.chargeCost}`,
      confirm: {
        value: '确定',
        action: () => {
          router.back();
        }
      }
    });
  }
}
三、性能优化策略
3.1 扫码速度优化
| 优化策略 | 说明 | 实现方式 |
|---|---|---|
| 指定码类型 | 减少码制式匹配范围 | 设置 scanTypes 为具体类型 |
| 关闭多码模式 | 单码场景无需多码检测 | 设置 enableMultiMode: false |
| 关闭相册入口 | 不需要相册扫码时关闭 | 设置 enableAlbum: false |
| 预热引擎 | 提前初始化扫码引擎 | 在页面加载时调用 init() |
3.2 指定码类型优化示例
import { scanBarcode, scanCore } from '@kit.ScanKit';
import { common } from '@kit.AbilityKit';
import { BusinessError } from '@kit.BasicServicesKit';
import { hilog } from '@kit.PerformanceAnalysisKit';

const TAG: string = '[SpeedOptimized]';

export class SpeedOptimizedScanService {
  /**
   * 高性能扫码:仅识别目标码类型
   */
  static async fastScan(
    context: common.Context,
    targetType: 'qr' | 'barcode' | 'all'
  ): Promise<string> {
    let scanTypes: scanCore.ScanType[];

    switch (targetType) {
      case 'qr':
        // 仅二维码,速度最快
        scanTypes = [scanCore.ScanType.QR_CODE];
        break;
      case 'barcode':
        // 仅条形码
        scanTypes = [
          scanCore.ScanType.EAN_8,
          scanCore.ScanType.EAN_13,
          scanCore.ScanType.CODE_128
        ];
        break;
      default:
        // 所有类型
        scanTypes = [scanCore.ScanType.ALL];
        break;
    }

    const options: scanBarcode.ScanOptions = {
      scanTypes: scanTypes,
      // 单码模式,减少多码检测开销
      enableMultiMode: false,
      // 不需要相册入口
      enableAlbum: false
    };

    const startTime = Date.now();

    try {
      const result = await scanBarcode.startScanForResult(context, options);
      const elapsed = Date.now() - startTime;

      hilog.info(0x0001, TAG,
        `Scan completed in ${elapsed}ms, type: ${targetType}`);

      return result.originalValue || '';
    } catch (err) {
      const error = err as BusinessError;
      if (error.code !== 10005001) {
        hilog.error(0x0001, TAG,
          `Fast scan failed: ${error.message}`);
      }
      return '';
    }
  }
}
3.3 内存管理最佳实践
import { customScan } from '@kit.ScanKit';
import { image } from '@kit.ImageKit';
import { hilog } from '@kit.PerformanceAnalysisKit';

const TAG: string = '[MemoryManager]';

export class ScanMemoryManager {
  private pixelMapCache: image.PixelMap | undefined = undefined;

  /**
   * 释放 PixelMap 资源
   */
  releasePixelMap(): void {
    if (this.pixelMapCache) {
      this.pixelMapCache.release();
      this.pixelMapCache = undefined;
      hilog.info(0x0001, TAG, 'PixelMap released');
    }
  }

  /**
   * 释放自定义扫码引擎
   */
  async releaseScanEngine(): Promise<void> {
    try {
      await customScan.release();
      hilog.info(0x0001, TAG, 'Scan engine released');
    } catch (err) {
      hilog.error(0x0001, TAG,
        `Failed to release scan engine: ${JSON.stringify(err)}`);
    }
  }

  /**
   * 页面销毁时释放所有资源
   */
  async releaseAll(): Promise<void> {
    this.releasePixelMap();
    await this.releaseScanEngine();
    hilog.info(0x0001, TAG, 'All scan resources released');
  }
}
四、常见错误码处理
4.1 错误码汇总
| 错误码 | 含义 | 处理建议 |
|---|---|---|
| 10005001 | 用户取消扫码 | 正常业务逻辑,不提示错误 |
| 401 | 参数校验失败 | 检查传入参数格式和范围 |
| 801 | 系统能力不可用 | 检查设备兼容性 |
| 202 | 参数非法 | 检查 width/height 范围 |
| 101 | 权限不足 | 引导用户授权相机权限 |
4.2 统一错误处理
import { BusinessError } from '@kit.BasicServicesKit';
import { hilog } from '@kit.PerformanceAnalysisKit';

const TAG: string = '[ErrorHandler]';

/**
 * 扫码错误处理结果
 */
export interface ScanErrorResult {
  shouldShowDialog: boolean;
  title: string;
  message: string;
  action: 'retry' | 'cancel' | 'settings';
}

/**
 * 统一扫码错误处理
 */
export class ScanErrorHandler {
  /**
   * 处理扫码错误
   */
  static handleScanError(error: BusinessError): ScanErrorResult {
    hilog.error(0x0001, TAG,
      `Scan error - Code: ${error.code}, Message: ${error.message}`);

    switch (error.code) {
      case 10005001:
        // 用户取消,不提示
        return {
          shouldShowDialog: false,
          title: '',
          message: '',
          action: 'cancel'
        };

      case 401:
        return {
          shouldShowDialog: true,
          title: '参数错误',
          message: '扫码参数配置有误,请检查代码',
          action: 'cancel'
        };

      case 801:
        return {
          shouldShowDialog: true,
          title: '功能不可用',
          message: '当前设备不支持扫码功能',
          action: 'cancel'
        };

      case 101:
        return {
          shouldShowDialog: true,
          title: '权限不足',
          message: '需要相机权限才能使用扫码功能,请前往设置授权',
          action: 'settings'
        };

      default:
        return {
          shouldShowDialog: true,
          title: '扫码异常',
          message: `扫码失败(${error.code}): ${error.message}`,
          action: 'retry'
        };
    }
  }

  /**
   * 显示错误对话框
   */
  static showErrorDialog(result: ScanErrorResult): void {
    if (!result.shouldShowDialog) {
      return;
    }

    AlertDialog.show({
      title: result.title,
      message: result.message,
      confirm: {
        value: result.action === 'retry' ? '重试' : '确定',
        action: () => { }
      },
      cancel: result.action === 'retry' ? () => { } : undefined
    });
  }
}
五、企业级架构设计
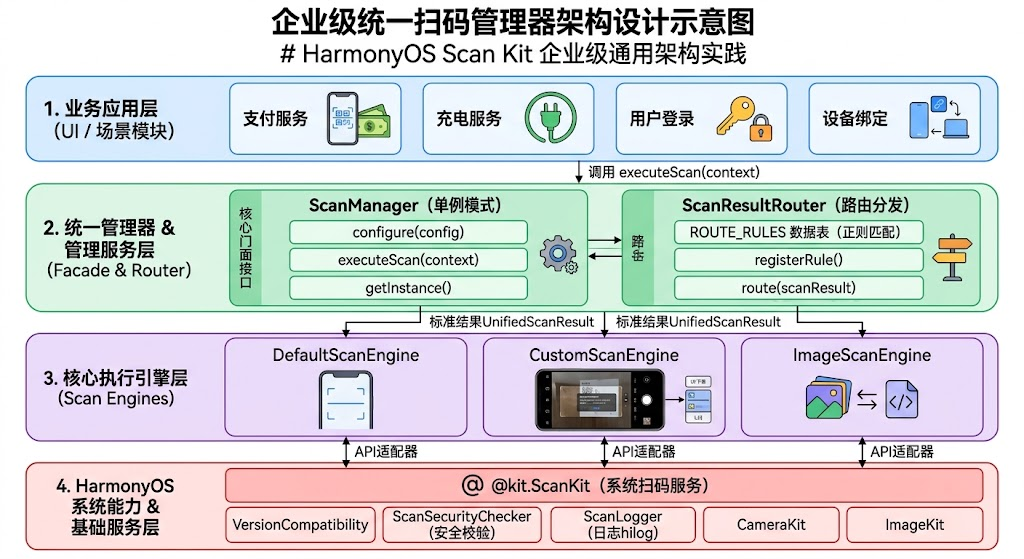
企业级扫码架构:统一扫码管理器对外提供一致接口,内部根据配置选择不同扫码实现
5.1 扫码能力统一管理
在企业级应用中,建议将扫码能力抽象为统一的接口层:
import { scanBarcode, scanCore, customScan, detectBarcode, generateBarcode } from '@kit.ScanKit';
import { common } from '@kit.AbilityKit';
import { image } from '@kit.ImageKit';
import { BusinessError } from '@kit.BasicServicesKit';
import { hilog } from '@kit.PerformanceAnalysisKit';

const TAG: string = '[ScanManager]';

/**
 * 扫码配置
 */
export interface ScanConfig {
  mode: 'default' | 'custom' | 'image' | 'direct';
  scanTypes?: scanCore.ScanType[];
  enableMultiMode?: boolean;
  enableAlbum?: boolean;
}

/**
 * 统一扫码结果
 */
export interface UnifiedScanResult {
  success: boolean;
  code: number;
  message: string;
  data?: {
    originalValue: string;
    scanType: string;
    timestamp: number;
  };
}

/**
 * 统一扫码管理器
 * 对外提供一致的扫码接口,内部根据配置选择不同的扫码实现
 */
export class ScanManager {
  private static instance: ScanManager;
  private config: ScanConfig = {
    mode: 'default',
    scanTypes: [scanCore.ScanType.ALL],
    enableMultiMode: false,
    enableAlbum: true
  };

  static getInstance(): ScanManager {
    if (!ScanManager.instance) {
      ScanManager.instance = new ScanManager();
    }
    return ScanManager.instance;
  }

  /**
   * 配置扫码模式
   */
  configure(config: Partial<ScanConfig>): void {
    this.config = { ...this.config, ...config };
  }

  /**
   * 执行扫码
   */
  async executeScan(context: common.Context): Promise<UnifiedScanResult> {
    const startTime = Date.now();

    try {
      let result: UnifiedScanResult;

      switch (this.config.mode) {
        case 'default':
          result = await this.executeDefaultScan(context);
          break;
        case 'custom':
          result = await this.executeCustomScan();
          break;
        case 'image':
          result = await this.executeImageScan();
          break;
        default:
          result = {
            success: false,
            code: -1,
            message: '不支持的扫码模式'
          };
      }

      const elapsed = Date.now() - startTime;
      hilog.info(0x0001, TAG,
        `Scan completed in ${elapsed}ms, mode: ${this.config.mode}`);

      return result;
    } catch (err) {
      const error = err as BusinessError;
      return {
        success: false,
        code: error.code || -1,
        message: error.message || '未知错误'
      };
    }
  }

  /**
   * 默认界面扫码
   */
  private async executeDefaultScan(
    context: common.Context
  ): Promise<UnifiedScanResult> {
    const options: scanBarcode.ScanOptions = {
      scanTypes: this.config.scanTypes,
      enableMultiMode: this.config.enableMultiMode,
      enableAlbum: this.config.enableAlbum
    };

    const result = await scanBarcode.startScanForResult(context, options);

    return {
      success: true,
      code: 0,
      message: '扫码成功',
      data: {
        originalValue: result.originalValue,
        scanType: result.scanType.toString(),
        timestamp: Date.now()
      }
    };
  }

  /**
   * 自定义界面扫码
   */
  private async executeCustomScan(): Promise<UnifiedScanResult> {
    // 自定义扫码需要更多上下文信息(surfaceId等)
    return {
      success: false,
      code: -1,
      message: '自定义扫码需要额外配置'
    };
  }

  /**
   * 图像识码
   */
  private async executeImageScan(): Promise<UnifiedScanResult> {
    // 图像识码需要图片 URI
    return {
      success: false,
      code: -1,
      message: '图像识码需要图片 URI'
    };
  }
}
5.2 扫码结果路由
统一的扫码结果处理与路由分发:
import { router } from '@kit.ArkUI';
import { hilog } from '@kit.PerformanceAnalysisKit';

const TAG: string = '[ScanRouter]';

/**
 * 路由规则
 */
interface RouteRule {
  pattern: RegExp;
  targetPage: string;
  description: string;
}

/**
 * 扫码结果路由器
 */
export class ScanResultRouter {
  /**
   * 路由规则表
   */
  private static readonly ROUTE_RULES: RouteRule[] = [
    {
      pattern: /^https:\/\/qr\.alipay\.com\//,
      targetPage: 'pages/PaymentConfirm',
      description: '支付宝支付'
    },
    {
      pattern: /^wxp:\/\//,
      targetPage: 'pages/PaymentConfirm',
      description: '微信支付'
    },
    {
      pattern: /^https:\/\/charge\.example\.com\//,
      targetPage: 'pages/ChargeService',
      description: '扫码充电'
    },
    {
      pattern: /^https:\/\/login\.example\.com\//,
      targetPage: 'pages/LoginConfirm',
      description: '扫码登录'
    },
    {
      pattern: /^https:\/\/bind\.example\.com\//,
      targetPage: 'pages/DeviceBind',
      description: '设备绑定'
    },
    {
      pattern: /^https?:\/\//,
      targetPage: 'pages/WebView',
      description: '网页链接'
    }
  ];

  /**
   * 根据扫码结果路由到对应页面
   */
  static route(scanResult: string): void {
    hilog.info(0x0001, TAG, `Routing scan result: ${scanResult}`);

    for (const rule of this.ROUTE_RULES) {
      if (rule.pattern.test(scanResult)) {
        hilog.info(0x0001, TAG,
          `Matched rule: ${rule.description} -> ${rule.targetPage}`);

        router.pushUrl({
          url: rule.targetPage,
          params: {
            scanResult: scanResult,
            source: 'scan'
          }
        });
        return;
      }
    }

    // 未匹配任何规则,显示原始结果
    hilog.warn(0x0001, TAG, 'No route rule matched');

    router.pushUrl({
      url: 'pages/ScanResult',
      params: {
        scanResult: scanResult,
        source: 'scan'
      }
    });
  }

  /**
   * 注册自定义路由规则
   */
  static registerRule(rule: RouteRule): void {
    this.ROUTE_RULES.push(rule);
    hilog.info(0x0001, TAG,
      `Registered custom rule: ${rule.description}`);
  }
}
六、版本兼容性策略
6.1 API 版本差异
| 能力 | API 11 (4.1) | API 20 (6.0) | API 23 (6.1) | API 26 |
|---|---|---|---|---|
| 默认界面扫码 | 基础支持 | 支持悬浮屏/分屏 | 标题动态显示 | isDefaultScanSupported |
| 自定义界面扫码 | 基础支持 | - | 支持 Wearable | isCustomScanSupported |
| 图像识码 | 支持 | - | 支持 Wearable | 元服务支持 |
| 码图生成 | 支持 | - | 支持 Wearable | 元服务支持 |
| 扫码直达 | 支持 | - | - | - |
6.2 版本兼容代码
import { scanCore } from '@kit.ScanKit';
import { deviceInfo } from '@kit.BasicServicesKit';
import { hilog } from '@kit.PerformanceAnalysisKit';

const TAG: string = '[VersionCompat]';

export class VersionCompatibility {
  /**
   * 检查设备是否支持默认界面扫码
   */
  static isDefaultScanSupported(): boolean {
    try {
      // API 26+ 支持此接口
      if (typeof scanCore.isDefaultScanSupported === 'function') {
        return scanCore.isDefaultScanSupported();
      }
      // 低版本默认返回 true
      return true;
    } catch (err) {
      hilog.warn(0x0001, TAG,
        `isDefaultScanSupported not available: ${JSON.stringify(err)}`);
      return true;
    }
  }

  /**
   * 检查设备是否支持自定义界面扫码
   */
  static isCustomScanSupported(): boolean {
    try {
      if (typeof scanCore.isCustomScanSupported === 'function') {
        return scanCore.isCustomScanSupported();
      }
      return true;
    } catch (err) {
      hilog.warn(0x0001, TAG,
        `isCustomScanSupported not available: ${JSON.stringify(err)}`);
      return true;
    }
  }

  /**
   * 获取最佳扫码模式
   */
  static getBestScanMode(): 'default' | 'custom' | 'fallback' {
    if (this.isDefaultScanSupported()) {
      return 'default';
    }
    if (this.isCustomScanSupported()) {
      return 'custom';
    }
    return 'fallback';
  }
}
七、常见问题排查
7.1 问题排查清单
| 问题 | 可能原因 | 排查步骤 |
|---|---|---|
| 二维码生成后无法识别 | 尺寸/颜色不合适 | 检查尺寸范围、颜色对比度 |
| 字节数组生成失败 | 参数错误 | 检查 width=height、纠错等级 |
| 扫码直达不生效 | 域名配置错误 | 检查 App Linking 配置 |
| 自定义扫码黑屏 | 权限未授权 | 检查相机权限申请状态 |
| 图像识码返回空 | 图片格式不支持 | 检查图片质量和格式 |
| Base64 生成二维码无法使用 | 编码方式错误 | 使用 Latin1 编码 |
7.2 调试日志规范
import { hilog } from '@kit.PerformanceAnalysisKit';

/**
 * 扫码调试日志工具
 */
export class ScanLogger {
  private static readonly DOMAIN: number = 0x0001;
  private static readonly TAG_PREFIX: string = '[ScanKit]';

  /**
   * 记录扫码开始
   */
  static logScanStart(mode: string, params: object): void {
    hilog.info(this.DOMAIN, this.TAG_PREFIX,
      `Scan started - Mode: ${mode}, Params: ${JSON.stringify(params)}`);
  }

  /**
   * 记录扫码成功
   */
  static logScanSuccess(result: string, elapsed: number): void {
    hilog.info(this.DOMAIN, this.TAG_PREFIX,
      `Scan success - Result: ${result}, Elapsed: ${elapsed}ms`);
  }

  /**
   * 记录扫码取消
   */
  static logScanCancel(): void {
    hilog.info(this.DOMAIN, this.TAG_PREFIX, 'Scan cancelled by user');
  }

  /**
   * 记录扫码错误
   */
  static logScanError(code: number, message: string): void {
    hilog.error(this.DOMAIN, this.TAG_PREFIX,
      `Scan error - Code: ${code}, Message: ${message}`);
  }
}
八、安全最佳实践
8.1 安全建议
- 扫码结果验证:始终验证扫码结果的有效性,防止恶意二维码
- HTTPS 强制:扫码直达链接使用 HTTPS 协议
- 敏感数据加密:交通卡等场景的字节数组数据使用加密传输
- 权限最小化:仅申请必要的权限,默认界面扫码无需相机权限
- 日志脱敏:日志中不要输出完整的敏感码值
8.2 扫码结果安全校验
const TAG: string = '[SecurityCheck]';

export class ScanSecurityChecker {
  // 白名单域名列表
  private static readonly ALLOWED_DOMAINS: string[] = [
    'example.com',
    'alipay.com',
    'weixin.qq.com'
  ];

  // 危险协议列表
  private static readonly DANGEROUS_SCHEMES: string[] = [
    'javascript:',
    'data:',
    'file:'
  ];

  /**
   * 验证扫码结果安全性
   */
  static validateScanResult(result: string): boolean {
    // 1. 检查危险协议
    for (const scheme of this.DANGEROUS_SCHEMES) {
      if (result.toLowerCase().startsWith(scheme)) {
        hilog.warn(0x0001, TAG,
          `Dangerous scheme detected: ${scheme}`);
        return false;
      }
    }

    // 2. 如果是 URL,检查域名白名单
    if (result.startsWith('https://')) {
      try {
        const url = new URL(result);
        const isAllowed = this.ALLOWED_DOMAINS.some(domain =>
          url.hostname === domain || url.hostname.endsWith('.' + domain)
        );

        if (!isAllowed) {
          hilog.warn(0x0001, TAG,
            `Domain not in whitelist: ${url.hostname}`);
          return false;
        }
      } catch {
        hilog.warn(0x0001, TAG, 'Invalid URL format');
        return false;
      }
    }

    return true;
  }
}
九、开发效率提升
9.1 推荐开发流程
- 先读文档:阅读 Scan Kit 开发指南
- 参考示例:基于 官方示例工程 开发
- 优先默认界面:通用场景优先使用默认界面扫码
- 按需自定义:仅在需要个性化 UI 时使用自定义界面
- 真机测试:相机相关功能必须在真机上验证
9.2 开发工具链
| 工具 | 用途 | 链接 |
|---|---|---|
| DevEco Studio | HarmonyOS 开发 IDE | 下载 |
| AppGallery Connect | 服务配置管理 | AGC |
| 官方示例工程 | 参考代码 | GitCode |
| 开发者社区 | 问题求助 | 社区 |
| 工单系统 | 问题反馈 | 工单 |
十、系列总结
10.1 六篇文章回顾
本系列六篇文章完整覆盖了 HarmonyOS Scan Kit 的全部核心能力:
| 篇目 | 主题 | 核心内容 |
|---|---|---|
| 第一篇 | 概述与开发准备 | Scan Kit 概念、架构、13种码制式、开发准备 |
| 第二篇 | 扫码直达服务 | App Linking 配置、URI 解析、冷热启动处理 |
| 第三篇 | 默认界面扫码 | 一行代码接入、ScanOptions 配置、多码识别 |
| 第四篇 | 自定义界面扫码 | XComponent 渲染、相机控制、动画效果 |
| 第五篇 | 图像识码与码图生成 | decode/decodeImage、文本/字节数组生成 |
| 第六篇 | 高级应用与最佳实践 | 综合案例、性能优化、错误处理、架构设计 |
10.2 能力选型指南
| 你的需求 | 推荐方案 | 接入成本 |
|---|---|---|
| 最快的扫码接入 | 默认界面扫码 | 极低(一行代码) |
| 系统级扫码入口 | 扫码直达 | 中(需配置域名) |
| 个性化扫码 UI | 自定义界面扫码 | 高(需完整 UI 开发) |
| 识别相册中的二维码 | 图像识码(decode) | 低 |
| 生成二维码/条形码 | 码图生成 | 低 |
| 扫码 + 识物 | 图像数据识别(decodeImage) | 高 |
总结
本文作为 Scan Kit 系列教程的收官之作,通过支付扫码、扫码充电等综合实战案例,展示了 Scan Kit 各能力的组合应用。同时,我们从性能优化、错误处理、企业级架构设计、版本兼容性、安全实践等多个维度,系统性地总结了生产环境中的最佳实践。
HarmonyOS Scan Kit(统一扫码服务) 作为软硬协同的系统级能力,为开发者提供了从扫码直达到码图生成的全链路扫码解决方案。通过本系列六篇文章的学习,你应该已经掌握了从入门到精通的所有必要知识。
回顾整个系列,Scan Kit 的核心价值可以概括为:
- 简单:一行代码接入,包体 0 增加
- 强大:AI 算法加持,复杂场景优化
- 创新:扫码直达,一步到位的用户体验
- 全面:13 种码制式,覆盖全球主流标准
希望本系列教程能帮助你在 HarmonyOS 开发中快速构建高质量的扫码功能!
如果这篇文章对你有帮助,欢迎点赞👍、收藏⭐、关注🔔,你的支持是我持续创作的动力!
相关资源:
- Scan Kit 开发指南:开发指南
- Scan Kit 简介:Scan Kit简介
- 开发准备:开发准备
- 接入"扫码直达"服务:扫码直达
- 默认界面扫码:默认界面扫码
- 自定义界面扫码:自定义界面扫码
- 图像识码:图像识码
- 码图生成:码图生成
- 官方示例工程:Sample Code
- 开发者社区:社区

讨论HarmonyOS开发技术,专注于API与组件、DevEco Studio、测试、元服务和应用上架分发等。
更多推荐
 6
6 0
0- 0


 已为社区贡献87条内容

所有评论(0)