《键盘沉浸式样式》三、输入法键盘沉浸式样式案例指南
HarmonyOS 基于 Search 组件 keyboardAppearance 实现沉浸式光感音乐搜索应用:完整开发指南
前言
本文将手把手带你开发一个基于 HarmonyOS Search 组件 keyboardAppearance 属性的沉浸式光感音乐搜索应用。该应用采用状态管理 V2(@ComponentV2、@ObservedV2、@Trace、@Local、@Param)进行开发,界面采用深色沉浸式光感效果风格,搜索框拉起输入法时呈现沉浸式键盘样式,为用户提供一致的视觉体验。
技术栈:HarmonyOS 6.1.0 Release SDK / API Version 23 / DevEco Studio 6.1.0 Release
状态管理:State Management V2(@ComponentV2、@ObservedV2、@Trace)
效果
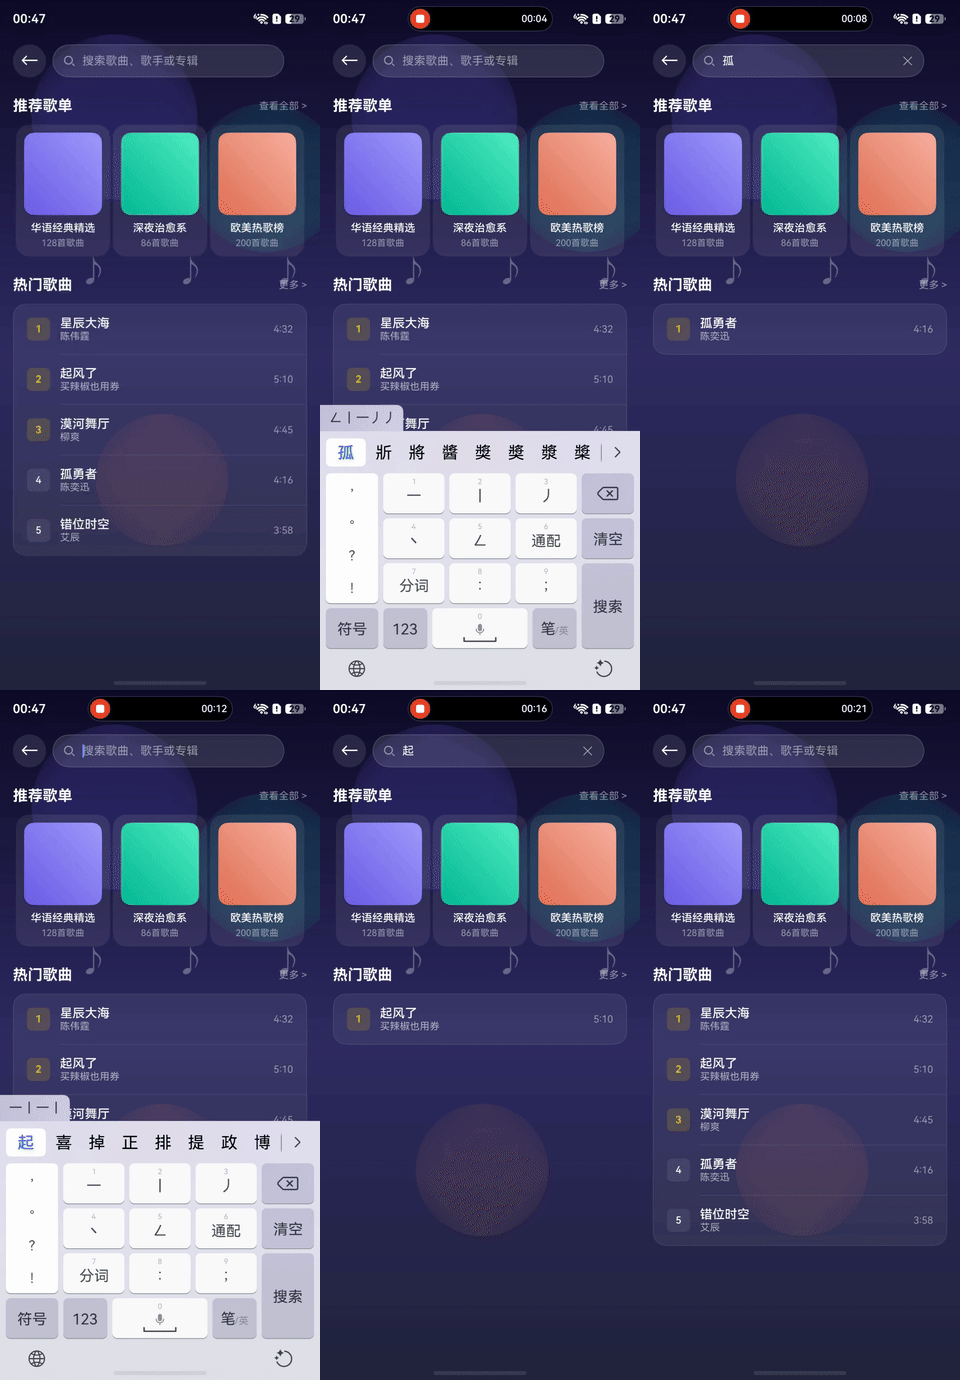
一、项目概述
1.1 功能特性
- 沉浸式光感深色背景(多层渐变 + 光晕效果)
- Search 搜索框带
keyboardAppearance(KeyboardAppearance.IMMERSIVE)沉浸式键盘 - 实时搜索过滤歌曲列表
- 推荐歌单横向卡片展示
- 热门歌曲排行榜
- 全屏布局 + 状态栏/导航条避让
- 全部使用状态管理 V2 开发
1.2 效果预览
应用整体采用深蓝色至紫色的渐变背景,配合多色光晕点缀,营造沉浸式的宇宙光感氛围。搜索框位于页面顶部,点击后输入法键盘以沉浸式样式呈现,与应用背景融为一体。
1.3 工程目录结构
entry/src/main/
├── ets/
│   ├── common/
│   │   └── Constants.ets              // 应用常量与数据
│   ├── entryability/
│   │   └── EntryAbility.ets           // Ability入口(全屏+避让)
│   ├── model/
│   │   ├── SongModel.ets              // 歌曲数据模型(V2)
│   │   └── PlaylistModel.ets          // 歌单数据模型(V2)
│   └── pages/
│       └── Index.ets                  // 主页面(V2组件)
├── resources/
│   └── base/
│       ├── element/
│       │   ├── color.json
│       │   ├── float.json
│       │   └── string.json
│       └── profile/
│           └── main_pages.json
└── module.json5
二、环境准备
2.1 开发工具
- 安装 DevEco Studio 6.1.0 Release 及以上版本
- 配置 HarmonyOS 6.1.0 Release SDK
- 确保 API Version 设置为 23 及以上
2.2 创建项目
- 打开 DevEco Studio,选择 File → New → Create Project
- 选择 Empty Ability 模板
- 项目名称填写
MusicSearchApp - 选择 ArkTS 语言,Stage 模型
- 完成创建
2.3 配置 module.json5
在 entry/src/main/module.json5 中确保 deviceTypes 包含 "phone":
{
  "module": {
    "name": "entry",
    "type": "entry",
    "mainElement": "EntryAbility",
    "deviceTypes": ["phone"],
    "pages": "$profile:main_pages",
    "abilities": [
      {
        "name": "EntryAbility",
        "srcEntry": "./ets/entryability/EntryAbility.ets",
        "exported": true,
        "skills": [
          {
            "entities": ["entity.system.home"],
            "actions": ["action.system.home"]
          }
        ]
      }
    ]
  }
}
2.4 配置页面路由
在 entry/src/main/resources/base/profile/main_pages.json 中注册页面:
{
  "src": [
    "pages/Index"
  ]
}
三、数据模型开发(状态管理 V2)
3.1 歌曲数据模型
使用 @ObservedV2 和 @Trace 装饰器创建可观察的数据模型,实现细粒度响应式更新:
// entry/src/main/ets/model/SongModel.ets
@ObservedV2
export class SongItem {
  @Trace id: number = 0;
  @Trace title: string = '';
  @Trace artist: string = '';
  @Trace duration: string = '';
  @Trace coverColor: string = '';

  constructor(id: number, title: string, artist: string, duration: string, coverColor: string) {
    this.id = id;
    this.title = title;
    this.artist = artist;
    this.duration = duration;
    this.coverColor = coverColor;
  }
}
关键代码讲解:
@ObservedV2:标记类为 V2 可观察对象,替代 V1 的@Observed@Trace:标记需要被追踪的属性,当属性值变化时,依赖该属性的 UI 组件会自动更新- 与 V1 的
@Observed不同,@ObservedV2+@Trace提供属性级别的精确追踪,避免不必要的整体重渲染
3.2 歌单数据模型
// entry/src/main/ets/model/PlaylistModel.ets
@ObservedV2
export class PlaylistItem {
  @Trace id: number = 0;
  @Trace name: string = '';
  @Trace count: number = 0;
  @Trace gradientStart: string = '';
  @Trace gradientEnd: string = '';

  constructor(id: number, name: string, count: number, gradientStart: string, gradientEnd: string) {
    this.id = id;
    this.name = name;
    this.count = count;
    this.gradientStart = gradientStart;
    this.gradientEnd = gradientEnd;
  }
}
3.3 V1 与 V2 数据模型对比
| 特性 | V1 (@Observed) |
V2 (@ObservedV2 + @Trace) |
|---|---|---|
| 观察粒度 | 整个对象 | 单个属性 |
| 嵌套属性 | 需要 @ObjectLink |
自动追踪 |
| 性能 | 粗粒度更新 | 细粒度更新 |
| 推荐场景 | 兼容旧项目 | 新项目首选 |
四、常量与数据定义
// entry/src/main/ets/common/Constants.ets
import { SongItem } from '../model/SongModel';
import { PlaylistItem } from '../model/PlaylistModel';

export class AppConstants {
  static readonly FULL_PERCENT: string = '100%';
  static readonly ASPECT_RATIO_1: number = 1;
  static readonly DOUBLE_MARGIN_16: number = 32;
  static readonly BACK_ICON_AND_MARGIN: number = 56;
  static readonly OPACITY_BG: number = 0.12;
  static readonly OPACITY_CARD: number = 0.18;
  static readonly FONT_WEIGHT_NORMAL: number = 400;
  static readonly FONT_WEIGHT_MEDIUM: number = 500;
  static readonly FONT_WEIGHT_BOLD: number = 700;
  static readonly RANK_OFFSET: number = 1;
}

export const HOT_SONGS: SongItem[] = [
  new SongItem(1, '星辰大海', '陈伟霆', '4:32', '#6C5CE7'),
  new SongItem(2, '起风了', '买辣椒也用券', '5:10', '#00B894'),
  new SongItem(3, '漠河舞厅', '柳爽', '4:45', '#E17055'),
  new SongItem(4, '孤勇者', '陈奕迅', '4:16', '#0984E3'),
  new SongItem(5, '错位时空', '艾辰', '3:58', '#FDCB6E')
];

export const RECOMMEND_PLAYLISTS: PlaylistItem[] = [
  new PlaylistItem(1, '华语经典精选', 128, '#6C5CE7', '#A29BFE'),
  new PlaylistItem(2, '深夜治愈系', 86, '#00B894', '#55EFC4'),
  new PlaylistItem(3, '欧美热歌榜', 200, '#E17055', '#FAB1A0')
];
五、EntryAbility 全屏与避让配置
这是实现沉浸式效果的基础,需要在 Ability 中设置窗口全屏并获取避让区域数据:
// entry/src/main/ets/entryability/EntryAbility.ets
import { AbilityConstant, ConfigurationConstant, UIAbility, Want } from '@kit.AbilityKit';
import { hilog } from '@kit.PerformanceAnalysisKit';
import { window } from '@kit.ArkUI';
import { BusinessError } from '@kit.BasicServicesKit';

export default class EntryAbility extends UIAbility {
  onCreate(want: Want, launchParam: AbilityConstant.LaunchParam): void {
    // 设置深色模式,配合沉浸式光感效果
    this.context.getApplicationContext()
      .setColorMode(ConfigurationConstant.ColorMode.COLOR_MODE_DARK);
  }

  onWindowStageCreate(windowStage: window.WindowStage): void {
    windowStage.loadContent('pages/Index', (err) => {
      if (err.code) return;

      const windowClass: window.Window = windowStage.getMainWindowSync();

      // 步骤1:设置窗口全屏
      windowClass.setWindowLayoutFullScreen(true).then(() => {
        hilog.info(0x0000, 'testTag', 'Succeeded in setting full-screen mode.');
      }).catch((err: BusinessError) => {
        hilog.error(0x0000, 'testTag', 'Failed to set full-screen mode.');
      });

      // 步骤2:获取导航条避让区域高度(单位:px)
      const navArea = windowClass.getWindowAvoidArea(
        window.AvoidAreaType.TYPE_NAVIGATION_INDICATOR
      );
      AppStorage.setOrCreate('bottomRectHeight', navArea.bottomRect.height);

      // 步骤3:获取状态栏避让区域高度(单位:px)
      const sysArea = windowClass.getWindowAvoidArea(
        window.AvoidAreaType.TYPE_SYSTEM
      );
      AppStorage.setOrCreate('topRectHeight', sysArea.topRect.height);

      // 步骤4:动态监听避让区域变化
      windowClass.on('avoidAreaChange', (data) => {
        if (data.type === window.AvoidAreaType.TYPE_SYSTEM) {
          AppStorage.setOrCreate('topRectHeight', data.area.topRect.height);
        } else if (data.type === window.AvoidAreaType.TYPE_NAVIGATION_INDICATOR) {
          AppStorage.setOrCreate('bottomRectHeight', data.area.bottomRect.height);
        }
      });
    });
  }
}
关键代码讲解:
setColorMode(COLOR_MODE_DARK):全局设置为深色模式,与光感沉浸式背景配合setWindowLayoutFullScreen(true):开启全屏布局,让应用内容延伸到状态栏和导航条区域getWindowAvoidArea():获取系统 UI 区域的高度数据,用于页面内容避让AppStorage.setOrCreate():将避让区域数据存入全局状态,供页面组件读取on('avoidAreaChange'):动态监听避让区域变化(如屏幕旋转),实时更新布局
六、主页面开发(V2 组件)
6.1 子组件:SongRow(歌曲行)
使用 @ComponentV2 + @Param 接收父组件传入的数据:
@ComponentV2
struct SongRow {
  @Param song: SongItem = new SongItem(0, '', '', '', '#6C5CE7');
  @Param rank: number = 0;

  build() {
    Row() {
      // 排名标签
      Text(`${this.rank + AppConstants.RANK_OFFSET}`)
        .fontSize(12)
        .fontWeight(AppConstants.FONT_WEIGHT_MEDIUM)
        .fontColor(this.rank < 3 ? '#FFD700' : '#FFFFFF')
        .width(28)
        .height(28)
        .textAlign(TextAlign.Center)
        .backgroundColor(
          this.rank < 3 ? 'rgba(255,215,0,0.15)' : 'rgba(255,255,255,0.08)'
        )
        .borderRadius(6)

      // 歌曲信息
      Column() {
        Text(this.song.title)
          .fontSize(15)
          .fontWeight(AppConstants.FONT_WEIGHT_MEDIUM)
          .fontColor('#FFFFFF')
        Text(this.song.artist)
          .fontSize(12)
          .fontColor('rgba(255,255,255,0.6)')
      }
      .margin({ left: 12 })
      .layoutWeight(1)

      // 时长
      Text(this.song.duration)
        .fontSize(12)
        .fontColor('rgba(255,255,255,0.5)')
    }
    .width('100%')
    .height(60)
    .padding({ left: 16, right: 16 })
  }
}
V2 特性讲解:
@ComponentV2:使用 V2 组件装饰器,替代 V1 的@Component@Param:从父组件接收参数,替代 V1 的@Prop,支持单向数据流- 当
song或rank的值变化时,只有依赖这些属性的 UI 片段会更新
6.2 子组件:PlaylistCard(歌单卡片)
@ComponentV2
struct PlaylistCard {
  @Param playlist: PlaylistItem = new PlaylistItem(0, '', 0, '#6C5CE7', '#A29BFE');

  build() {
    Column() {
      // 渐变色封面
      Stack() {
        Column()
          .width('100%')
          .height(100)
          .borderRadius(12)
          .linearGradient({
            direction: GradientDirection.RightTop,
            colors: [
              [this.playlist.gradientStart, 0.0],
              [this.playlist.gradientEnd, 1.0]
            ]
          })

        Text('♪')
          .fontSize(36)
          .fontColor('rgba(255,255,255,0.3)')
      }

      Text(this.playlist.name)
        .fontSize(13)
        .fontColor('#FFFFFF')
        .margin({ top: 8 })

      Text(`${this.playlist.count}首歌曲`)
        .fontSize(11)
        .fontColor('rgba(255,255,255,0.5)')
    }
    .width('32%')
    .padding(10)
    .backgroundColor('rgba(255,255,255,0.08)')
    .borderRadius(16)
  }
}
6.3 主页面:Index
主页面是整个应用的核心,集成了搜索、推荐和歌曲列表三大功能区:
@Entry
@ComponentV2
struct Index {
  @Local screenWidth: number = 360;
  @Local searchWidth: number = 280;
  @Local searchText: string = '';
  @Local filteredSongs: SongItem[] = HOT_SONGS;
  @Local uiContext: UIContext = this.getUIContext();
  @Local bottomRectHeight: number = 0;
  @Local topRectHeight: number = 0;
  private controller: SearchController = new SearchController();

  aboutToAppear(): void {
    display.getAllDisplays((err, data) => {
      if (err) return;
      this.screenWidth = data[0].width;
      this.searchWidth = this.uiContext.px2vp(this.screenWidth)
        - AppConstants.DOUBLE_MARGIN_16
        - AppConstants.BACK_ICON_AND_MARGIN;
    });

    // 从 AppStorage 读取 EntryAbility 中存入的避让区域高度(px)
    const rawTop = AppStorage.get<number>('topRectHeight') ?? 0;
    const rawBottom = AppStorage.get<number>('bottomRectHeight') ?? 0;
    this.topRectHeight = this.uiContext.px2vp(rawTop);
    this.bottomRectHeight = this.uiContext.px2vp(rawBottom);
  }

  build() {
    Stack({ alignContent: Alignment.TopStart }) {
      // 沉浸式渐变背景
      Column()
        .width('100%')
        .height('100%')
        .linearGradient({
          direction: GradientDirection.Bottom,
          colors: [['#0F0C29', 0.0], ['#302B63', 0.5], ['#24243E', 1.0]]
        })

      // 光晕效果
      Stack() {
        Column().width(200).height(200).borderRadius(100)
          .backgroundColor('rgba(108,92,231,0.2)').blur(80)
          .position({ x: '10%', y: '5%' })

        Column().width(180).height(180).borderRadius(90)
          .backgroundColor('rgba(0,184,148,0.15)').blur(80)
          .position({ x: '60%', y: '15%' })

        Column().width(160).height(160).borderRadius(80)
          .backgroundColor('rgba(225,112,85,0.12)').blur(80)
          .position({ x: '30%', y: '60%' })
      }

      // 主内容滚动区
      Scroll() {
        Column() {
          this.searchBar()      // 搜索栏
          this.recommendSection()  // 推荐歌单
          this.hotSongsSection()   // 热门歌曲
        }
        .padding({
          top: this.topRectHeight + 8,
          bottom: this.bottomRectHeight + 20
        })
      }
    }
    .width('100%')
    .height('100%')
  }
}
关键代码讲解:
@Local:V2 中的本地状态装饰器,替代 V1 的@State。当值变化时,依赖该状态的 UI 会自动更新AppStorage.get<number>():从全局AppStorage读取 EntryAbility 存入的避让区域高度(px),在aboutToAppear中通过px2vp()转换后赋值给@Local变量Stack层叠布局:将背景、光晕、内容三层叠加,实现沉浸式光感效果linearGradient:多色渐变背景,从深蓝到紫色过渡blur(80):高斯模糊效果,为光晕元素创造柔和的发光感
为什么不用
@Consumer? V2 的@Consumer装饰器需要祖先组件通过@Provider提供数据,它无法直接读取AppStorage中的值。对于从AppStorage读取初始值的场景,应在aboutToAppear中使用AppStorage.get()获取数据并赋值给@Local变量。
七、搜索栏与沉浸式键盘(核心功能)
7.1 搜索栏 Builder
@Builder
searchBar(): void {
  Row() {
    Text('←')
      .fontSize(22)
      .fontColor('#FFFFFF')
      .width(40)
      .height(40)
      .textAlign(TextAlign.Center)
      .backgroundColor('rgba(255,255,255,0.1)')
      .borderRadius(20)
      .margin({ left: 8, right: 8 })

    Stack() {
      Search({ placeholder: '搜索歌曲、歌手或专辑', controller: this.controller })
        .width(this.searchWidth)
        .searchIcon({ color: 'rgba(255,255,255,0.5)' })
        .placeholderFont({ size: 14, weight: AppConstants.FONT_WEIGHT_NORMAL })
        .placeholderColor('rgba(255,255,255,0.5)')
        .fontColor('#FFFFFF')
        .textFont({ size: 14, weight: AppConstants.FONT_WEIGHT_NORMAL })
        .keyboardAppearance(KeyboardAppearance.IMMERSIVE)  // ★ 沉浸式键盘核心
        .onChange((value: string) => {
          this.searchText = value;
          this.filterSongs(value);
        })
        .onSubmit(() => { /* 提交搜索 */ })
        .backgroundColor('transparent')
    }
    .width(this.searchWidth)
    .height(40)
    .borderRadius(20)
    .backgroundColor('rgba(255,255,255,0.12)')
    .borderWidth(1)
    .borderColor('rgba(255,255,255,0.15)')
  }
  .width('100%')
  .padding({ top: 8, bottom: 8, left: 8, right: 8 })
}
核心属性解读:
| 属性 | 作用 | 沉浸式效果说明 |
|---|---|---|
keyboardAppearance(KeyboardAppearance.IMMERSIVE) |
设置键盘为沉浸式 | 键盘背景半透明,与应用界面融合 |
backgroundColor('transparent') |
搜索框背景透明 | 融入外层渐变背景 |
placeholderColor('rgba(255,255,255,0.5)') |
占位文本半透明白色 | 在深色背景上柔和显示 |
fontColor('#FFFFFF') |
输入文本白色 | 深色背景上的高对比度 |
borderColor('rgba(255,255,255,0.15)') |
微光边框 | 增加光感质感 |
7.2 实时搜索过滤
private filterSongs(keyword: string): void {
  if (keyword.length === 0) {
    this.filteredSongs = HOT_SONGS;
    return;
  }
  const lowerKeyword = keyword.toLowerCase();
  this.filteredSongs = HOT_SONGS.filter((song: SongItem) =>
    song.title.toLowerCase().includes(lowerKeyword) ||
    song.artist.toLowerCase().includes(lowerKeyword)
  );
}
效果说明:当用户在搜索框中输入关键词时,onChange 事件实时触发 filterSongs 方法,过滤后的歌曲列表通过 @Local filteredSongs 自动更新 UI,实现无延迟的搜索体验。
八、光感效果实现原理
8.1 三层叠加结构
┌──────────────────────────────────────┐
│  第一层:深色渐变背景                  │
│  linearGradient: #0F0C29 → #302B63  │
│               → #24243E              │
├──────────────────────────────────────┤
│  第二层:光晕装饰                      │
│  紫色光晕 (108,92,231) blur:80       │
│  绿色光晕 (0,184,148)  blur:80       │
│  橙色光晕 (225,112,85) blur:80       │
├──────────────────────────────────────┤
│  第三层:主内容区                      │
│  搜索栏 + 推荐歌单 + 歌曲列表          │
└──────────────────────────────────────┘
8.2 光晕实现技巧
使用半透明圆形 + 高斯模糊创造光晕效果:
Column()
  .width(200)
  .height(200)
  .borderRadius(100)            // 圆形
  .backgroundColor('rgba(108,92,231,0.2)')  // 半透明紫色
  .blur(80)                     // 高斯模糊半径
  .position({ x: '10%', y: '5%' })  // 绝对定位
参数调整建议:
blur值越大,光晕越柔和、扩散越广backgroundColor的 alpha 值控制光晕强度(0.1~0.3 较适合)- 多个光晕元素叠加可创造更丰富的光影层次
九、状态管理 V2 关键特性总结
9.1 本项目使用的 V2 装饰器
| 装饰器 | 用途 | 对应 V1 | 本项目使用位置 |
|---|---|---|---|
@ComponentV2 |
V2 组件 | @Component |
Index、SongRow、PlaylistCard |
@ObservedV2 |
可观察类 | @Observed |
SongItem、PlaylistItem |
@Trace |
属性追踪 | 无直接对应 | 模型类的所有属性 |
@Local |
本地状态 | @State |
Index 中的搜索文本、歌曲列表等 |
@Param |
组件参数 | @Prop |
SongRow、PlaylistCard 的数据接收 |
@Local |
本地状态 | @State |
Index 中的所有状态(含避让区域高度) |
9.2 V2 的优势
- 细粒度更新:
@Trace只追踪标记的属性,未变化的属性不会触发 UI 更新 - 简化嵌套观察:V2 的
@ObservedV2类嵌套属性自动被追踪,无需@ObjectLink - 性能更优:减少不必要的组件重渲染,提升列表滚动流畅度
十、运行与调试
10.1 编译运行
- 在 DevEco Studio 中打开项目
- 选择真机或模拟器(需支持 API 23)
- 点击 Run 按钮编译运行
- 等待安装完成后,点击搜索框查看沉浸式键盘效果
10.2 调试要点
| 调试项 | 验证方法 |
|---|---|
| 全屏布局 | 状态栏区域是否显示应用背景 |
| 避让区域 | 内容是否被状态栏/导航条遮挡 |
| 沉浸式键盘 | 点击搜索框后键盘是否半透明 |
| 实时搜索 | 输入关键词后列表是否实时过滤 |
| 光感效果 | 背景渐变和光晕是否正常显示 |
10.3 常见问题排查
Q:沉浸式键盘效果不明显
A:确保以下条件均满足:
EntryAbility中已调用setWindowLayoutFullScreen(true)- Search 组件已设置
.keyboardAppearance(KeyboardAppearance.IMMERSIVE) - 使用的是系统内置输入法
Q:搜索框被状态栏遮挡
A:检查是否在 aboutToAppear 中正确通过 AppStorage.get() 读取状态栏高度并赋值给 @Local 变量,同时注意 px2vp() 单位转换。
Q:列表项不更新
A:确保数据模型使用 @ObservedV2 + @Trace,且组件使用 @ComponentV2 + @Param。
十一、总结
本案例完整展示了基于 HarmonyOS Search 组件 keyboardAppearance 属性开发沉浸式音乐搜索应用的全流程,核心技术要点包括:
- 沉浸式键盘:通过
.keyboardAppearance(KeyboardAppearance.IMMERSIVE)实现键盘与应用界面的视觉融合 - 光感效果:深色渐变背景 + 多色高斯模糊光晕,营造沉浸式宇宙光感氛围
- 状态管理 V2:全面采用
@ComponentV2、@ObservedV2、@Trace、@Local、@Param等 V2 装饰器 - 全屏布局:
EntryAbility中配置全屏 + 避让区域 + 动态监听 - 实时搜索:
onChange事件驱动数据过滤,@Local驱动 UI 自动更新
参考文档:

讨论HarmonyOS开发技术,专注于API与组件、DevEco Studio、测试、元服务和应用上架分发等。
更多推荐
 14
14 0
0- 0


 已为社区贡献47条内容

所有评论(0)