《键盘沉浸式样式》二、输入法应用沉浸模式指南
HarmonyOS 输入法应用沉浸模式开发指南:从前台应用到输入法的全链路沉浸式体验
前言
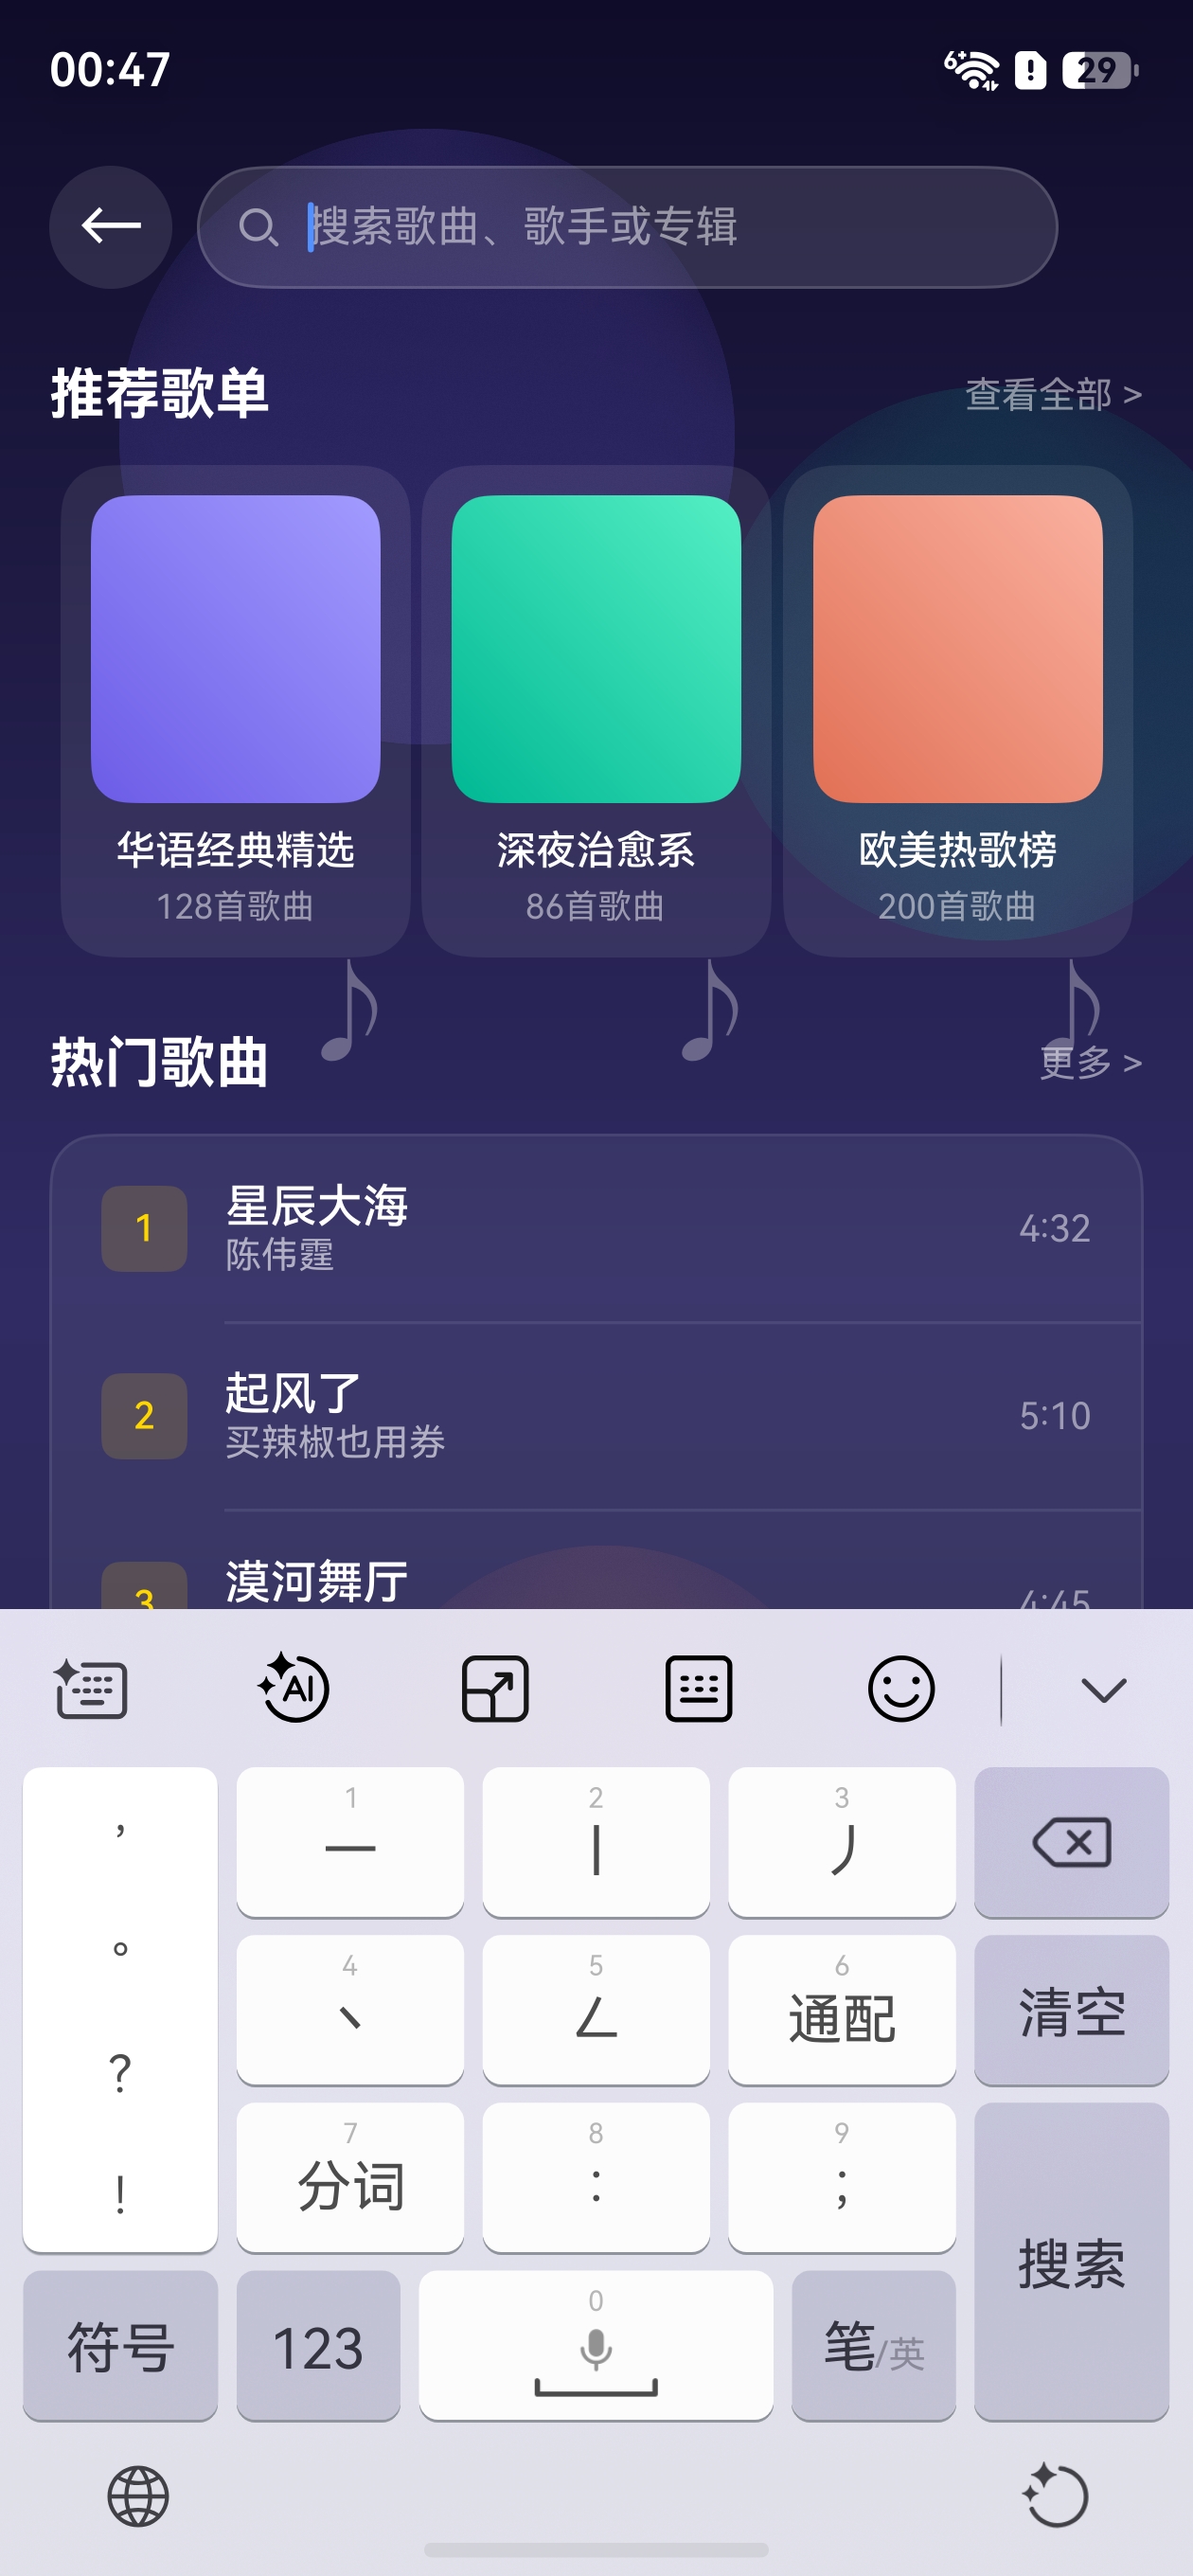
在 HarmonyOS 应用开发中,沉浸式体验已经成为提升用户感知品质的关键要素。当用户在搜索、编辑等场景中使用输入法时,如果键盘区域与应用界面之间存在明显的视觉断裂,会严重影响整体体验。
HarmonyOS 提供了完整的前台应用与输入法应用之间的沉浸模式通信机制,使得输入法应用能够感知前台应用的沉浸模式期望,并据此设置最终的沉浸模式,为用户打造一致的沉浸式体验。
本文将从框架原理入手,详细讲解前台应用和输入法应用两侧的接入方法,并通过示例代码帮助开发者快速上手。
效果
一、沉浸模式框架原理
1.1 三角色通信模型
输入法沉浸模式涉及三个角色的协作:
┌─────────────┐    设置沉浸模式期望    ┌─────────────┐    传递期望给输入法    ┌─────────────┐
│  前台应用    │ ──────────────────> │  输入法框架   │ ──────────────────> │ 输入法应用   │
│  (Search等)  │                     │  (系统IME Kit) │                     │ (自定义键盘)  │
└─────────────┘                     └─────────────┘                     └─────────────┘
                                                                           │
                                                                           │ 设置最终沉浸模式
                                                                           ▼
                                                                    ┌─────────────┐
                                                                    │  输入法框架   │
                                                                    └─────────────┘
1.2 工作流程
- 前台应用设置编辑框的沉浸模式期望(如
KeyboardAppearance.IMMERSIVE) - 输入法框架在拉起输入法应用时,将前台应用的沉浸模式期望传递给输入法应用
- 输入法应用根据前台应用的期望决定最终的沉浸模式,并设置给输入法框架
1.3 ImmersiveMode 枚举值
| 枚举值 | 说明 | 可设置方 |
|---|---|---|
ImmersiveMode.LIGHT_IMMERSIVE |
浅色沉浸模式 | 输入法应用 |
ImmersiveMode.DARK_IMMERSIVE |
深色沉浸模式 | 输入法应用 |
ImmersiveMode.IMMERSIVE |
由输入法应用决定 | 仅前台应用(输入法不可设置) |
重要提示:输入法应用不能将
IMMERSIVE模式设置给输入法框架。如果输入法应用收到前台应用期望的沉浸模式为IMMERSIVE,建议根据当前系统颜色模式选择LIGHT_IMMERSIVE或DARK_IMMERSIVE。
二、前台应用侧接入
2.1 设置编辑框沉浸模式
前台应用通过编辑框组件的 keyboardAppearance 属性设置期望的沉浸模式。支持该属性的组件包括:
Search(搜索框组件)TextInput(单行输入框组件)TextArea(多行输入框组件)
Search 组件示例
Search({ placeholder: '搜索内容', controller: this.controller })
  .keyboardAppearance(KeyboardAppearance.IMMERSIVE)
TextInput 组件示例
TextInput({ placeholder: '请输入' })
  .keyboardAppearance(KeyboardAppearance.IMMERSIVE)
TextArea 组件示例
TextArea({ placeholder: '多行输入' })
  .keyboardAppearance(KeyboardAppearance.IMMERSIVE)
2.2 配合全屏布局
为了获得完整的沉浸式效果,前台应用需要设置窗口全屏布局,并正确处理避让区域:
import { window } from '@kit.ArkUI';

// 在 EntryAbility 的 onWindowStageCreate 中
onWindowStageCreate(windowStage: window.WindowStage): void {
  windowStage.loadContent('pages/Index', (err) => {
    if (err.code) return;

    const win = windowStage.getMainWindowSync();

    // 1. 设置窗口全屏
    win.setWindowLayoutFullScreen(true);

    // 2. 获取状态栏避让区域
    const sysArea = win.getWindowAvoidArea(window.AvoidAreaType.TYPE_SYSTEM);
    AppStorage.setOrCreate('topRectHeight', sysArea.topRect.height);

    // 3. 获取导航条避让区域
    const navArea = win.getWindowAvoidArea(window.AvoidAreaType.TYPE_NAVIGATION_INDICATOR);
    AppStorage.setOrCreate('bottomRectHeight', navArea.bottomRect.height);

    // 4. 监听避让区域动态变化
    win.on('avoidAreaChange', (data) => {
      if (data.type === window.AvoidAreaType.TYPE_SYSTEM) {
        AppStorage.setOrCreate('topRectHeight', data.area.topRect.height);
      } else if (data.type === window.AvoidAreaType.TYPE_NAVIGATION_INDICATOR) {
        AppStorage.setOrCreate('bottomRectHeight', data.area.bottomRect.height);
      }
    });
  });
}
2.3 前台应用侧完整示例
@Entry
@Component
struct ImmersiveFrontApp {
  @StorageProp('topRectHeight') topHeight: number = 0;
  @StorageProp('bottomRectHeight') bottomHeight: number = 0;
  private controller: SearchController = new SearchController();

  build() {
    Column() {
      Search({ placeholder: '沉浸式搜索体验', controller: this.controller })
        .width('85%')
        .searchIcon({ color: '#FFFFFF' })
        .placeholderColor('rgba(255,255,255,0.5)')
        .placeholderFont({ size: 14, weight: 400 })
        .fontColor('#FFFFFF')
        .textFont({ size: 14, weight: 400 })
        .backgroundColor('rgba(255,255,255,0.12)')
        .borderRadius(20)
        .keyboardAppearance(KeyboardAppearance.IMMERSIVE) // 关键:设置沉浸式

      Text('点击搜索框查看沉浸式键盘效果')
        .fontSize(14)
        .fontColor('rgba(255,255,255,0.6)')
        .margin({ top: 20 })
    }
    .width('100%')
    .height('100%')
    .padding({ top: this.topHeight, bottom: this.bottomHeight })
    .linearGradient({
      direction: GradientDirection.Bottom,
      colors: [['#141E30', 0.0], ['#243B55', 1.0]]
    })
  }
}
三、输入法应用侧接入
3.1 输入法应用架构概述
输入法应用基于 InputMethodExtensionAbility 开发,核心组件包括:
| 组件 | 说明 |
|---|---|
InputMethodExtensionAbility |
输入法应用入口,管理生命周期 |
inputMethodEngine |
输入法引擎,提供面板创建和事件监听 |
Panel |
输入法面板窗口,承载键盘 UI |
InputClient |
与前台应用通信的客户端 |
KeyboardController |
封装键盘逻辑的控制器 |
3.2 工程结构
/src/main/
├── ets/
│   ├── InputMethodExtensionAbility/
│   │   ├── model/
│   │   │   └── KeyboardController.ts    # 键盘控制逻辑
│   │   ├── InputMethodService.ts        # 输入法服务入口
│   │   └── pages/
│   │       ├── Index.ets                # 键盘 UI 页面
│   │       └── KeyboardKeyData.ts       # 按键数据定义
│   └── ...
├── resources/
│   └── base/
│       └── profile/
│           └── main_pages.json
└── module.json5
3.3 订阅编辑框属性变化事件
输入法应用通过 inputMethodEngine.getKeyboardDelegate() 订阅 editorAttributeChanged 事件,感知前台应用的沉浸模式期望:
import { inputMethodEngine } from '@kit.IMEKit';

// 订阅编辑框属性变化事件
inputMethodEngine.getKeyboardDelegate().on(
  "editorAttributeChanged",
  (attr: inputMethodEngine.EditorAttribute) => {
    console.info('沉浸模式期望值: ' + attr.immersiveMode);

    if (attr.immersiveMode === 1) {
      // 前台应用期望使用沉浸模式
      // 输入法应用根据当前系统主题决定最终沉浸模式
      // 此处需要根据系统颜色模式选择浅色或深色沉浸
    }
  }
);
3.4 设置沉浸模式
获取到 Panel 实例后,通过 setImmersiveMode 方法设置最终的沉浸模式:
import { inputMethodEngine } from '@kit.IMEKit';

// 根据系统主题选择沉浸模式
const currentColorMode = /* 获取当前系统颜色模式 */;

if (currentColorMode === ConfigurationConstant.ColorMode.COLOR_MODE_DARK) {
  // 深色主题 → 深色沉浸模式
  this.panel?.setImmersiveMode(inputMethodEngine.ImmersiveMode.DARK_IMMERSIVE);
} else {
  // 浅色主题 → 浅色沉浸模式
  this.panel?.setImmersiveMode(inputMethodEngine.ImmersiveMode.LIGHT_IMMERSIVE);
}

// 验证设置结果
console.info('当前沉浸模式: ' + this.panel?.getImmersiveMode());
3.5 KeyboardController 完整示例
import { inputMethodEngine } from '@kit.IMEKit';
import { ConfigurationConstant } from '@kit.AbilityKit';

export class KeyboardController {
  private panel: inputMethodEngine.Panel | undefined;

  constructor() {
    this.initPanel();
    this.subscribeEditorAttribute();
  }

  private initPanel(): void {
    // 创建输入法面板
    this.panel = inputMethodEngine.createPanel(
      inputMethodEngine.PanelType.SOFT_KEYBOARD,
      'pages/Index'
    );

    // 设置面板尺寸
    this.panel?.setWindowFrame(0, 0, 360, 280);
  }

  private subscribeEditorAttribute(): void {
    // 监听编辑框属性变化
    inputMethodEngine.getKeyboardDelegate().on(
      'editorAttributeChanged',
      (attr: inputMethodEngine.EditorAttribute) => {
        console.info('immersiveMode: ' + attr.immersiveMode);

        if (attr.immersiveMode === 1) {
          // 前台应用期望沉浸模式
          // 根据系统颜色模式设置对应沉浸模式
          this.panel?.setImmersiveMode(
            inputMethodEngine.ImmersiveMode.DARK_IMMERSIVE
          );
        }
      }
    );
  }

  showKeyboard(): void {
    this.panel?.show();
  }

  hideKeyboard(): void {
    this.panel?.hide();
  }

  destroyKeyboard(): void {
    if (this.panel) {
      inputMethodEngine.destroyPanel(this.panel);
      this.panel = undefined;
    }
  }
}
3.6 InputMethodService 入口示例
import { InputMethodExtensionAbility } from '@kit.IMEKit';
import { Want } from '@kit.AbilityKit';
import { inputMethodEngine } from '@kit.IMEKit';

export default class InputMethodService extends InputMethodExtensionAbility {
  private keyboardController: KeyboardController = new KeyboardController();

  onCreate(want: Want): void {
    console.info('输入法应用创建');

    // 监听输入开始事件
    inputMethodEngine.on('inputStart', (kbController, inputClient) => {
      console.info('输入开始');
      this.keyboardController.showKeyboard();
    });

    // 监听输入结束事件
    inputMethodEngine.on('inputStop', () => {
      console.info('输入结束');
      this.keyboardController.hideKeyboard();
    });
  }

  onDestroy(): void {
    console.info('输入法应用销毁');

    // 注销事件监听
    inputMethodEngine.off('inputStart');
    inputMethodEngine.off('inputStop');

    // 销毁面板
    this.keyboardController.destroyKeyboard();
  }
}
3.7 module.json5 注册输入法扩展
在 module.json5 中注册 InputMethodExtensionAbility,注意 type 必须为 "inputMethod":
{
  "module": {
    "extensionAbilities": [
      {
        "name": "InputMethodExtensionAbility",
        "srcEntry": "./ets/InputMethodExtensionAbility/InputMethodService.ts",
        "type": "inputMethod",
        "exported": true,
        "description": "自定义输入法",
        "icon": "$media:app_icon"
      }
    ]
  }
}
四、前台应用与输入法应用的配合机制
4.1 使用系统内置输入法
当应用使用系统内置输入法时,只需在前台应用的编辑框上设置 keyboardAppearance(KeyboardAppearance.IMMERSIVE),系统输入法会自动处理沉浸模式。
前台应用设置 IMMERSIVE → 系统输入法自动适配 → 沉浸式键盘效果
4.2 使用自定义输入法
当用户使用自定义输入法时,需要输入法应用主动配合:
前台应用设置 IMMERSIVE
         ↓
输入法框架传递期望
         ↓
输入法应用订阅 editorAttributeChanged
         ↓
感知到 immersiveMode === 1
         ↓
根据系统颜色模式设置 DARK_IMMERSIVE 或 LIGHT_IMMERSIVE
         ↓
沉浸式键盘效果
4.3 颜色模式适配建议
| 系统颜色模式 | 建议设置的沉浸模式 | 视觉效果 |
|---|---|---|
COLOR_MODE_LIGHT |
LIGHT_IMMERSIVE |
键盘区域浅色半透明 |
COLOR_MODE_DARK |
DARK_IMMERSIVE |
键盘区域深色半透明 |
COLOR_MODE_NOT_SET |
根据设备当前实际模式判断 | 跟随系统 |
五、调试与测试
5.1 日志排查
在输入法应用的关键位置添加日志:
import { hilog } from '@kit.PerformanceAnalysisKit';

const TAG = 'ImmersiveIME';

// 在 editorAttributeChanged 回调中
hilog.info(0x0000, TAG, '收到编辑框属性变化,immersiveMode: %{public}d', attr.immersiveMode);

// 在设置沉浸模式后
hilog.info(0x0000, TAG, '设置沉浸模式完成,当前模式: %{public}d', this.panel?.getImmersiveMode());
5.2 测试清单
| 测试项 | 预期结果 |
|---|---|
| 前台应用设置 IMMERSIVE + 系统输入法 | 键盘背景半透明,与界面融合 |
| 前台应用设置 IMMERSIVE + 自定义输入法(已接入) | 自定义键盘面板半透明 |
| 前台应用设置 LIGHT + 任意输入法 | 键盘浅色样式 |
| 前台应用设置 DARK + 任意输入法 | 键盘深色样式 |
| 深色主题下设置 IMMERSIVE | 键盘深色沉浸 |
| 浅色主题下设置 IMMERSIVE | 键盘浅色沉浸 |
六、常见问题
6.1 沉浸模式不生效
可能原因:
- 未设置窗口全屏布局
- 避让区域未正确配置
- API 版本低于 15
排查步骤:
- 确认已调用
setWindowLayoutFullScreen(true) - 确认已通过
getWindowAvoidArea()获取并应用避让区域 - 确认 SDK 版本 >= API 15
6.2 自定义输入法无法感知沉浸模式
可能原因:未订阅 editorAttributeChanged 事件。
解决方案:确保在 InputMethodExtensionAbility.onCreate() 中调用 inputMethodEngine.getKeyboardDelegate().on('editorAttributeChanged', ...)。
6.3 输入法应用设置了 IMMERSIVE 报错
原因:ImmersiveMode.IMMERSIVE 只能由前台应用设置,输入法应用不能设置此值。
解决方案:输入法应用应根据系统颜色模式选择 LIGHT_IMMERSIVE 或 DARK_IMMERSIVE。
七、总结
HarmonyOS 输入法沉浸模式的核心设计思路是前台应用表达期望,输入法应用决定最终效果:
- 前台应用:通过
keyboardAppearance(KeyboardAppearance.IMMERSIVE)表达沉浸期望 - 输入法框架:作为中间桥梁,传递期望给输入法应用
- 输入法应用:通过订阅
editorAttributeChanged感知期望,根据系统主题设置最终沉浸模式
这种设计保证了前台应用和输入法应用之间的解耦,同时实现了灵活的沉浸式体验定制。
参考文档:

讨论HarmonyOS开发技术,专注于API与组件、DevEco Studio、测试、元服务和应用上架分发等。
更多推荐

 4
4 0
0- 0



 已为社区贡献47条内容

所有评论(0)