HarmonyOS 路由导航:页面跳转与参数传递
一、引言
任何多页面应用都离不开页面导航。从首页进入详情页、从列表进入编辑页、页面间的参数传递与返回,这些都是路由导航要解决的核心问题。HarmonyOS 提供了两套页面导航方案:Router(经典路由)和 Navigation(新式导航组件)。
本文将以一个侧边栏风格的演示页面为主线,深入讲解 Router 路由的使用方法、参数传递机制和最佳实践,帮助读者掌握页面导航的核心技能。
二、路由方案概览
2.1 Router 路由
Router 是 HarmonyOS 提供的基础路由能力,通过路由表管理页面跳转:
| API | 说明 |
|---|---|
router.pushUrl() | 压栈跳转,保留当前页面 |
router.replaceUrl() | 替换当前页面 |
router.back() | 返回上一页 |
router.getParams() | 获取跳转参数 |
router.clear() | 清空路由栈 |
2.2 Navigation 导航组件
Navigation 是 ArkUI 提供的组件化导航方案,支持页面栈管理、路由拦截等高级能力:
Navigation(this.pathStack) {
  // 页面内容
}
2.3 Router 与 Navigation 对比
| 特性 | Router | Navigation |
|---|---|---|
| 使用方式 | 全局 API | 组件化 |
| 页面注册 | main_pages.json | NavDestination |
| 参数传递 | getParams | NavPathInfo |
| 高级能力 | 较少 | 路由拦截、转场自定义 |
| 适用场景 | 简单跳转 | 复杂导航 |
三、路由注册
使用 Router 跳转前,必须在 main_pages.json 中注册页面:
{
  "src": [
    "pages/Index",
    "pages/HttpPage",
    "pages/AnimationPage",
    "pages/MultimediaPage",
    "pages/ConcurrencyPage"
  ]
}
代码说明:
src数组列出所有需要注册的页面路径。- 路径相对于
entry/src/main/ets目录。 - 每个被跳转的页面都必须在此注册,否则跳转会失败。
四、实战代码:侧边栏导航页面
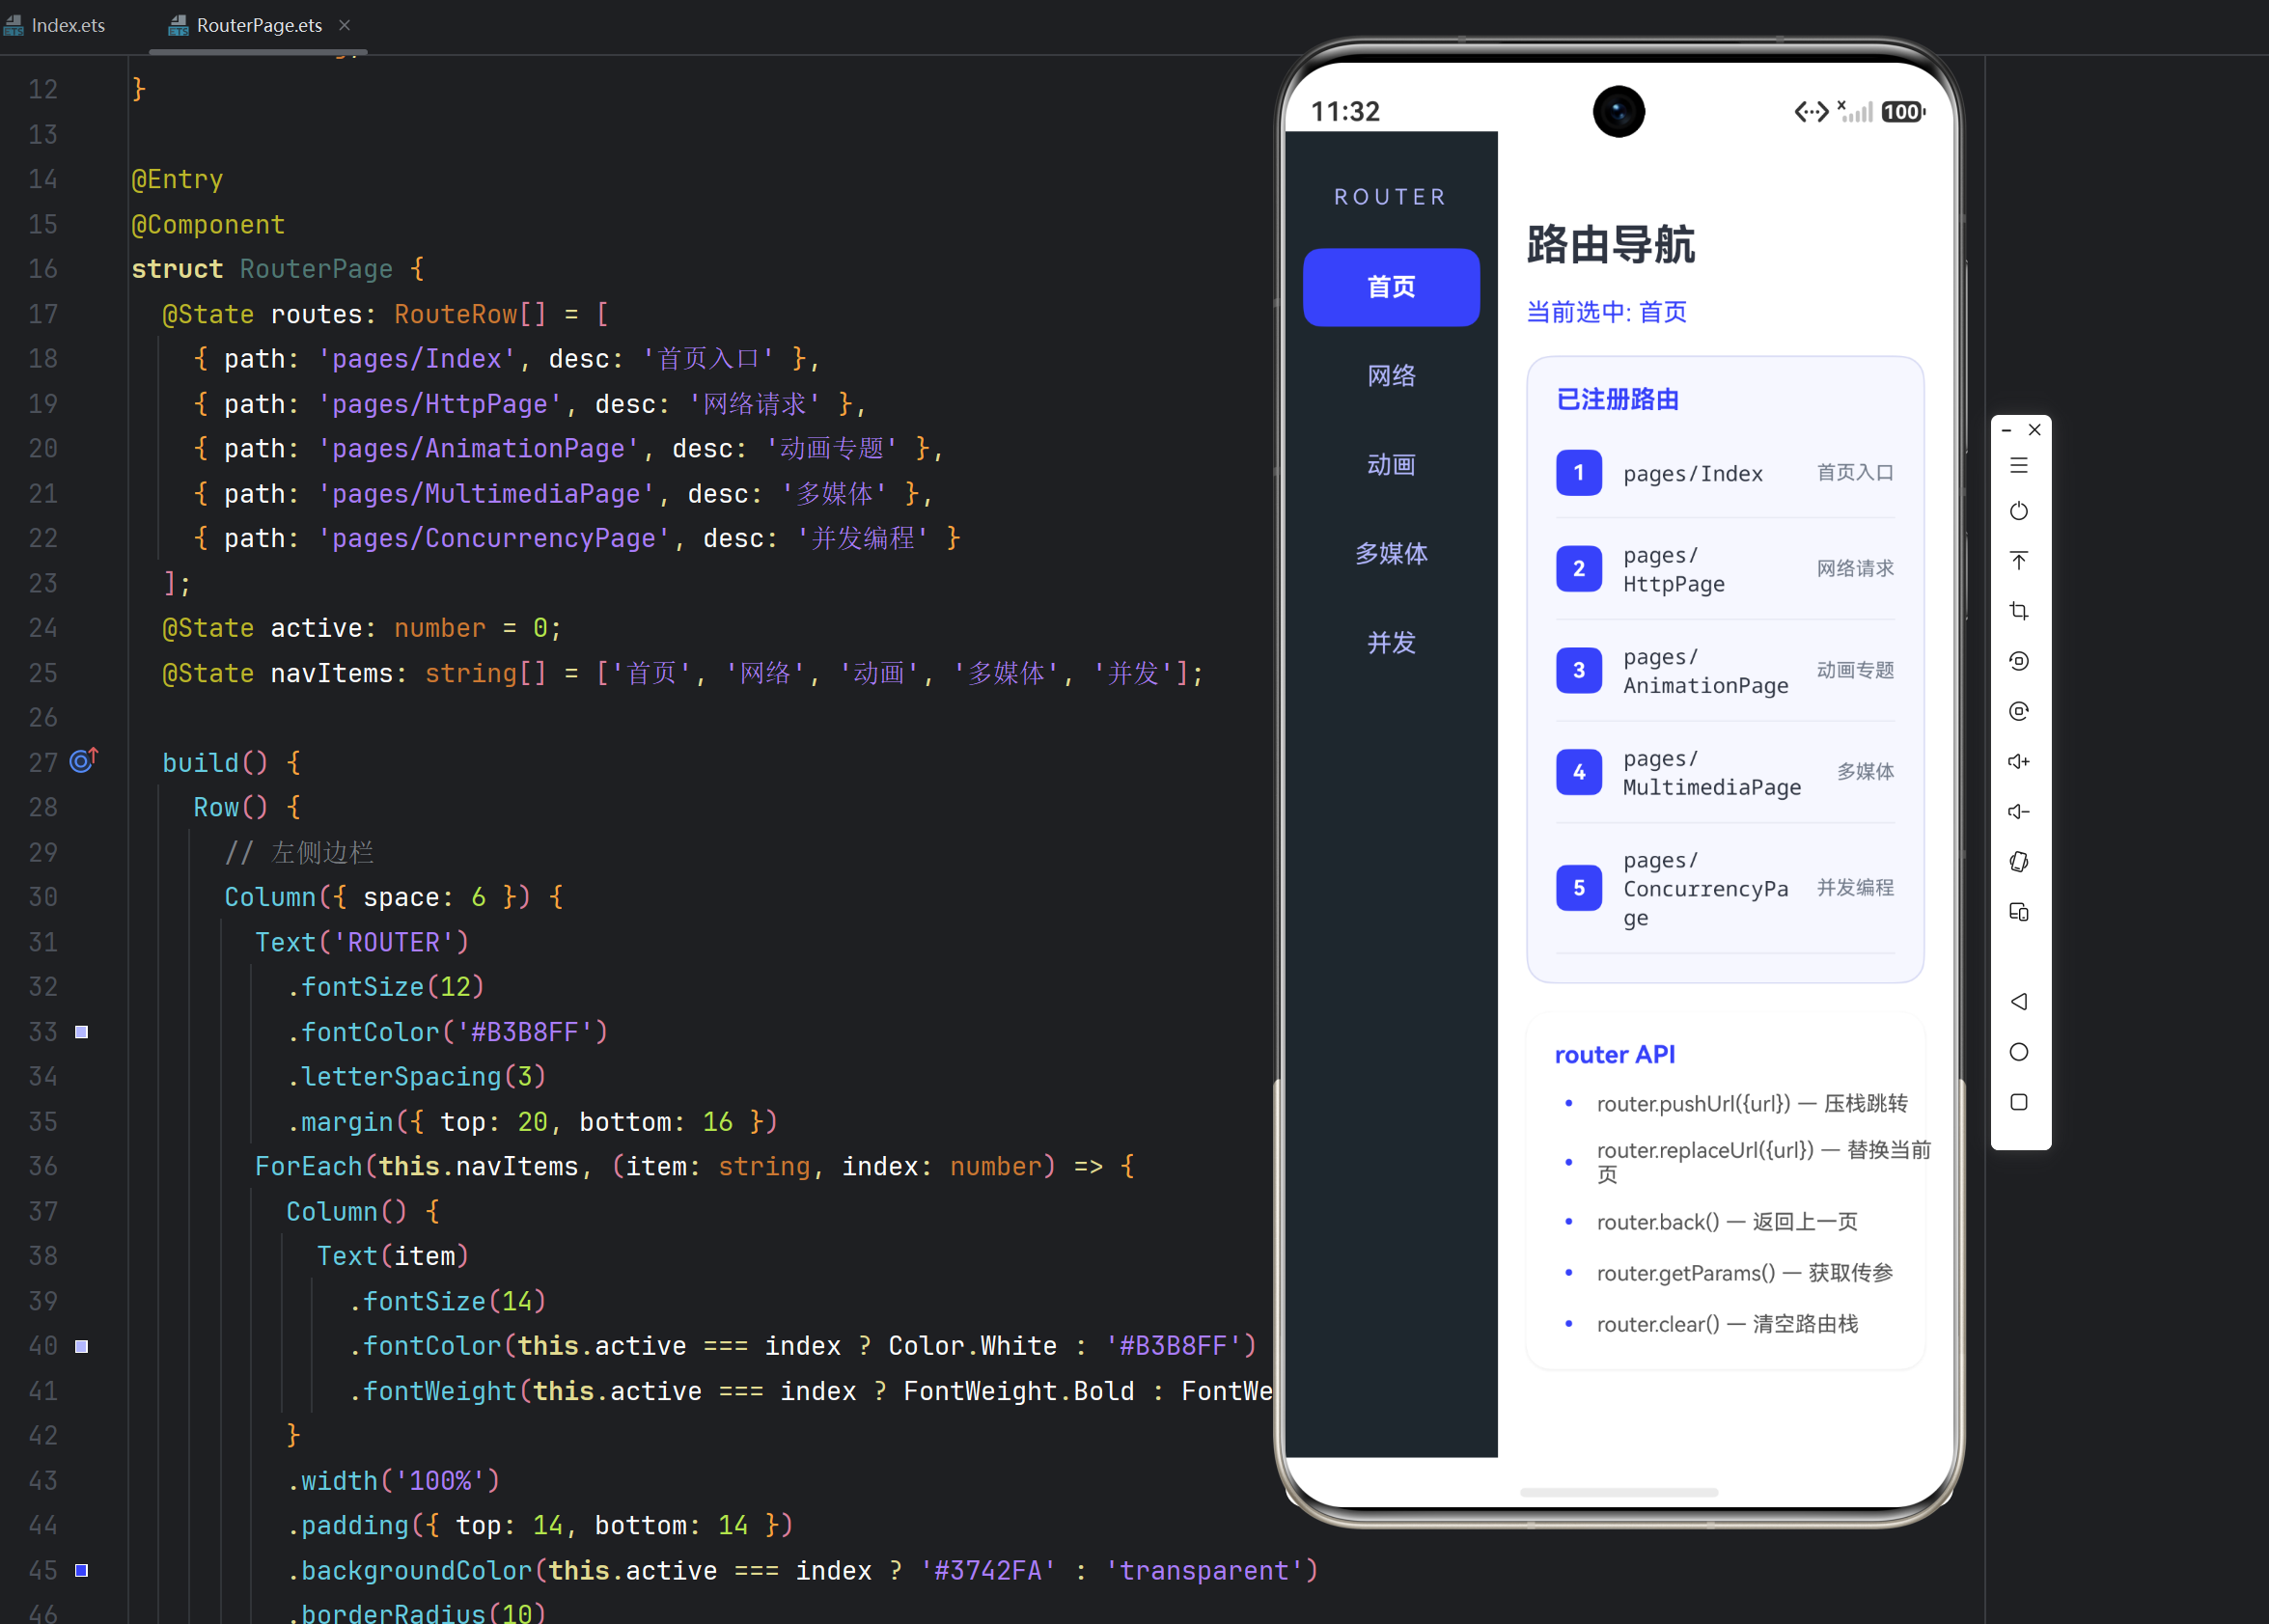
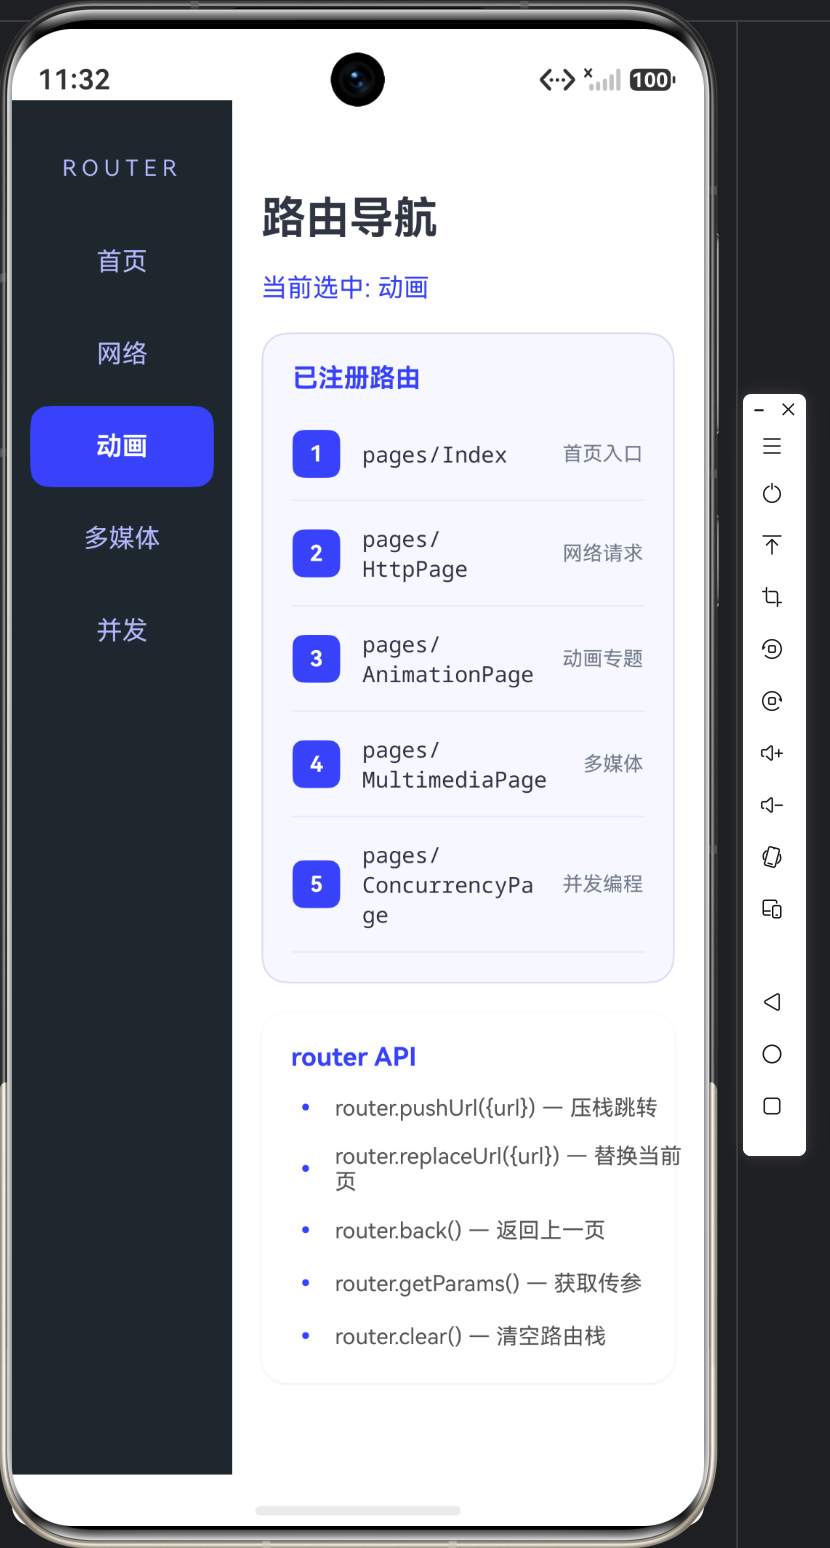
下面我们实现一个侧边栏风格的导航演示页面,左侧是导航菜单,右侧是内容区。
4.1 定义数据结构
interface RouteRow {
  path: string;
  desc: string;
}
代码说明:
RouteRow 接口描述路由表格中的一行数据,包含页面路径和说明。
4.2 组件状态定义
@Entry
@Component
struct RouterPage {
  @State routes: RouteRow[] = [
    { path: 'pages/Index', desc: '首页入口' },
    { path: 'pages/HttpPage', desc: '网络请求' },
    { path: 'pages/AnimationPage', desc: '动画专题' },
    { path: 'pages/MultimediaPage', desc: '多媒体' },
    { path: 'pages/ConcurrencyPage', desc: '并发编程' }
  ];
  @State active: number = 0;
  @State navItems: string[] = ['首页', '网络', '动画', '多媒体', '并发'];
代码说明:
@State routes:已注册的路由列表数据。@State active:当前选中的导航项索引。@State navItems:侧边栏导航项名称。
4.3 构建 UI:侧边栏
build() {
  Row() {
    // 左侧边栏
    Column({ space: 6 }) {
      Text('ROUTER')
        .fontSize(12)
        .fontColor('#B3B8FF')
        .letterSpacing(3)
        .margin({ top: 20, bottom: 16 })
      ForEach(this.navItems, (item: string, index: number) => {
        Column() {
          Text(item)
            .fontSize(14)
            .fontColor(this.active === index ? Color.White : '#B3B8FF')
            .fontWeight(this.active === index ? FontWeight.Bold : FontWeight.Normal)
        }
        .width('100%')
        .padding({ top: 14, bottom: 14 })
        .backgroundColor(this.active === index ? '#3742FA' : 'transparent')
        .borderRadius(10)
        .onClick(() => {
          this.active = index;
          if (index === 0) {
            router.back();
          } else if (index === 1) {
            router.pushUrl({ url: 'pages/HttpPage' });
          } else if (index === 2) {
            router.pushUrl({ url: 'pages/AnimationPage' });
          } else if (index === 3) {
            router.pushUrl({ url: 'pages/MultimediaPage' });
          } else if (index === 4) {
            router.pushUrl({ url: 'pages/ConcurrencyPage' });
          }
        })
      })
    }
    .width(120)
    .height('100%')
    .padding(10)
    .backgroundColor('#1E272E')
代码说明:
侧边栏是页面的核心导航区:
-
Row 布局:页面整体使用
Row水平布局,左侧是固定宽度的侧边栏,右侧是自适应内容区。 -
侧边栏标题:“ROUTER” 文字作为侧边栏标识。
-
导航项:
ForEach遍历navItems数组生成导航项:- 选中项(
active === index)使用靛蓝色背景(#3742FA)、白色加粗文字。 - 未选中项使用透明背景、浅色文字。
- 通过条件判断实现选中高亮效果。
- 选中项(
-
导航逻辑:点击导航项时:
- 更新
active索引,切换高亮。 - 根据索引执行不同跳转:
- 索引 0(首页):
router.back()返回首页。 - 其他索引:
router.pushUrl({ url: 'pages/xxxPage' })跳转到对应页面。
- 索引 0(首页):
- 更新
-
关键理解:
router.pushUrl是压栈操作,跳转后当前页面保留在路由栈中,用户可以通过back()返回。
4.4 构建 UI:内容区
      // 右侧内容区
      Scroll() {
        Column({ space: 16 }) {
          Text('路由导航')
            .fontSize(24)
            .fontWeight(FontWeight.Bold)
            .fontColor('#2F3542')
            .alignSelf(ItemAlign.Start)
          Text('当前选中: ' + this.navItems[this.active])
            .fontSize(14)
            .fontColor('#3742FA')
            .alignSelf(ItemAlign.Start)

          // 路由表格
          Column() {
            Text('已注册路由')
              .fontSize(14)
              .fontWeight(FontWeight.Bold)
              .fontColor('#3742FA')
              .alignSelf(ItemAlign.Start)
              .margin({ bottom: 8 })
            ForEach(this.routes, (row: RouteRow, index: number) => {
              Row({ space: 12 }) {
                Text(`${index + 1}`)
                  .fontSize(12)
                  .fontWeight(FontWeight.Bold)
                  .fontColor(Color.White)
                  .width(26)
                  .height(26)
                  .textAlign(TextAlign.Center)
                  .borderRadius(6)
                  .backgroundColor('#3742FA')
                Text(row.path)
                  .fontSize(12)
                  .fontFamily('monospace')
                  .fontColor('#2F3542')
                  .layoutWeight(1)
                Text(row.desc)
                  .fontSize(11)
                  .fontColor('#747D8C')
              }
              .width('100%')
              .padding({ top: 12, bottom: 12 })
              .border({ width: { bottom: 1 }, color: '#E9EBF5' })
            })
          }
          .width('100%')
          .padding(16)
          .backgroundColor('#F6F7FF')
          .borderRadius(14)
          .border({ width: 1, color: '#D9DCF5' })
代码说明:
右侧内容区展示路由信息:
-
标题区:显示"路由导航"标题和当前选中的导航项。
-
路由表格:展示已注册的路由列表:
- 每行包含序号(靛蓝方块)、页面路径(等宽字体)、说明。
- 序号方块使用
borderRadius(6)圆角,形成标签效果。 - 行间用浅色边框分隔,形成表格效果。
五、参数传递
5.1 跳转时传递参数
// 跳转并传递参数
router.pushUrl({
  url: 'pages/DetailPage',
  params: {
    id: 1001,
    name: 'HarmonyOS',
    isVip: true
  }
});
5.2 接收参数
// 目标页面接收参数
import { router } from '@kit.ArkUI';

@Entry
@Component
struct DetailPage {
  @State id: number = 0;
  @State name: string = '';
  @State isVip: boolean = false;

  aboutToAppear(): void {
    // 获取参数
    const params = router.getParams() as Record<string, Object>;
    if (params) {
      this.id = params.id as number;
      this.name = params.name as string;
      this.isVip = params.isVip as boolean;
    }
  }
}
代码说明:
router.pushUrl的params字段传递参数对象。- 目标页面通过
router.getParams()获取参数。 - 返回类型需要断言为
Record<string, Object>,再通过as断言为具体类型。
5.3 返回并传递结果
// 返回时传递结果
router.back({
  url: 'pages/Index',
  params: { result: '操作成功' }
});
六、路由栈管理
6.1 路由栈机制
Router 使用栈(Stack)数据结构管理页面:
pushUrl:将新页面压入栈顶。back:弹出栈顶页面。replaceUrl:替换栈顶页面。
6.2 常用栈操作
// 返回上一页
router.back();

// 返回指定页
router.back({ url: 'pages/Index' });

// 返回到指定层数
router.back({ delta: 2 });

// 清空路由栈
router.clear();

// 获取路由栈长度
const length = router.getLength();
代码说明:
router.back({ delta: 2 }):返回两层。router.clear():清空整个路由栈,常用于退出到首页。router.getLength():获取当前路由栈长度,可用于判断页面层级。
七、页面间通信方式对比
除了路由参数,页面间通信还有多种方式:
| 方式 | 适用场景 | 特点 |
|---|---|---|
| 路由参数 | 一次性传参 | 简单直接 |
| AppStorage | 全局共享 | 跨页面实时同步 |
| LocalStorage | 页面级共享 | 页面内共享 |
| 事件总线 | 解耦通信 | 需要实现 |
7.1 AppStorage 全局状态
// 写入全局状态
AppStorage.setOrCreate('userName', '张三');

// 其他页面读取
@StorageProp('userName') userName: string = '';

// 或
const name = AppStorage.get('userName') as string;
7.2 LocalStorage 页面级状态
// 创建页面级存储
const storage = new LocalStorage();
storage.setOrCreate('count', 0);

// 页面使用
@Entry(storage)
@Component
struct PageA {
  @LocalStorageProp('count') count: number = 0;
}
八、最佳实践
8.1 页面路径常量管理
建议将页面路径定义为常量,避免字符串拼写错误:
export class Routes {
  static readonly INDEX = 'pages/Index';
  static readonly HTTP = 'pages/HttpPage';
  static readonly ANIMATION = 'pages/AnimationPage';
}

// 使用
router.pushUrl({ url: Routes.HTTP });
8.2 参数类型安全
传递参数时使用明确的类型,接收时进行类型断言,避免类型错误。
8.3 避免路由栈过深
过深的路由栈会占用大量内存,建议合理设计页面层级,必要时使用 replaceUrl 或 clear。
8.4 处理跳转异常
跳转不存在的页面会抛异常,建议统一处理:
try {
  router.pushUrl({ url: 'pages/NotFound' });
} catch (e) {
  console.error(`跳转失败: ${JSON.stringify(e)}`);
}
九、常见问题
9.1 页面跳转失败
原因:页面没有在 main_pages.json 中注册,或路径拼写错误。
解决:检查页面注册和路径。
9.2 参数获取为 undefined
原因:跳转时没有传参数,或参数名不匹配。
解决:检查 params 传递和 getParams 读取的参数名。
9.3 返回时页面状态丢失
原因:页面被销毁后重新创建,状态需要重新初始化。
解决:在 aboutToAppear 中重新加载数据,或使用 AppStorage 持久化关键状态。
十、总结
本文深入讲解了 HarmonyOS 路由导航,通过一个侧边栏风格的演示页面实战演示了页面跳转、参数传递、路由栈管理等核心能力。
核心要点回顾:
- Router 是基础路由,Navigation 是组件化导航。
- 页面必须在
main_pages.json中注册。 pushUrl压栈跳转,back返回,replaceUrl替换。- 通过
params和getParams传递参数。 - 路由栈管理:
delta、clear、getLength。 - 页面间通信:路由参数、AppStorage、LocalStorage。
路由导航是应用架构的基础,掌握它才能构建结构清晰、导航流畅的多页面应用。下一篇我们将讲解 HarmonyOS 弹窗与提示。

讨论HarmonyOS开发技术,专注于API与组件、DevEco Studio、测试、元服务和应用上架分发等。
更多推荐

 0
0 0
0- 0


 已为社区贡献104条内容

所有评论(0)