HarmonyOS应用开发实战:猫猫大作战-排行榜页面完整实战——LoadingProgress 加载态、List 列表、难度筛选与奖牌样式
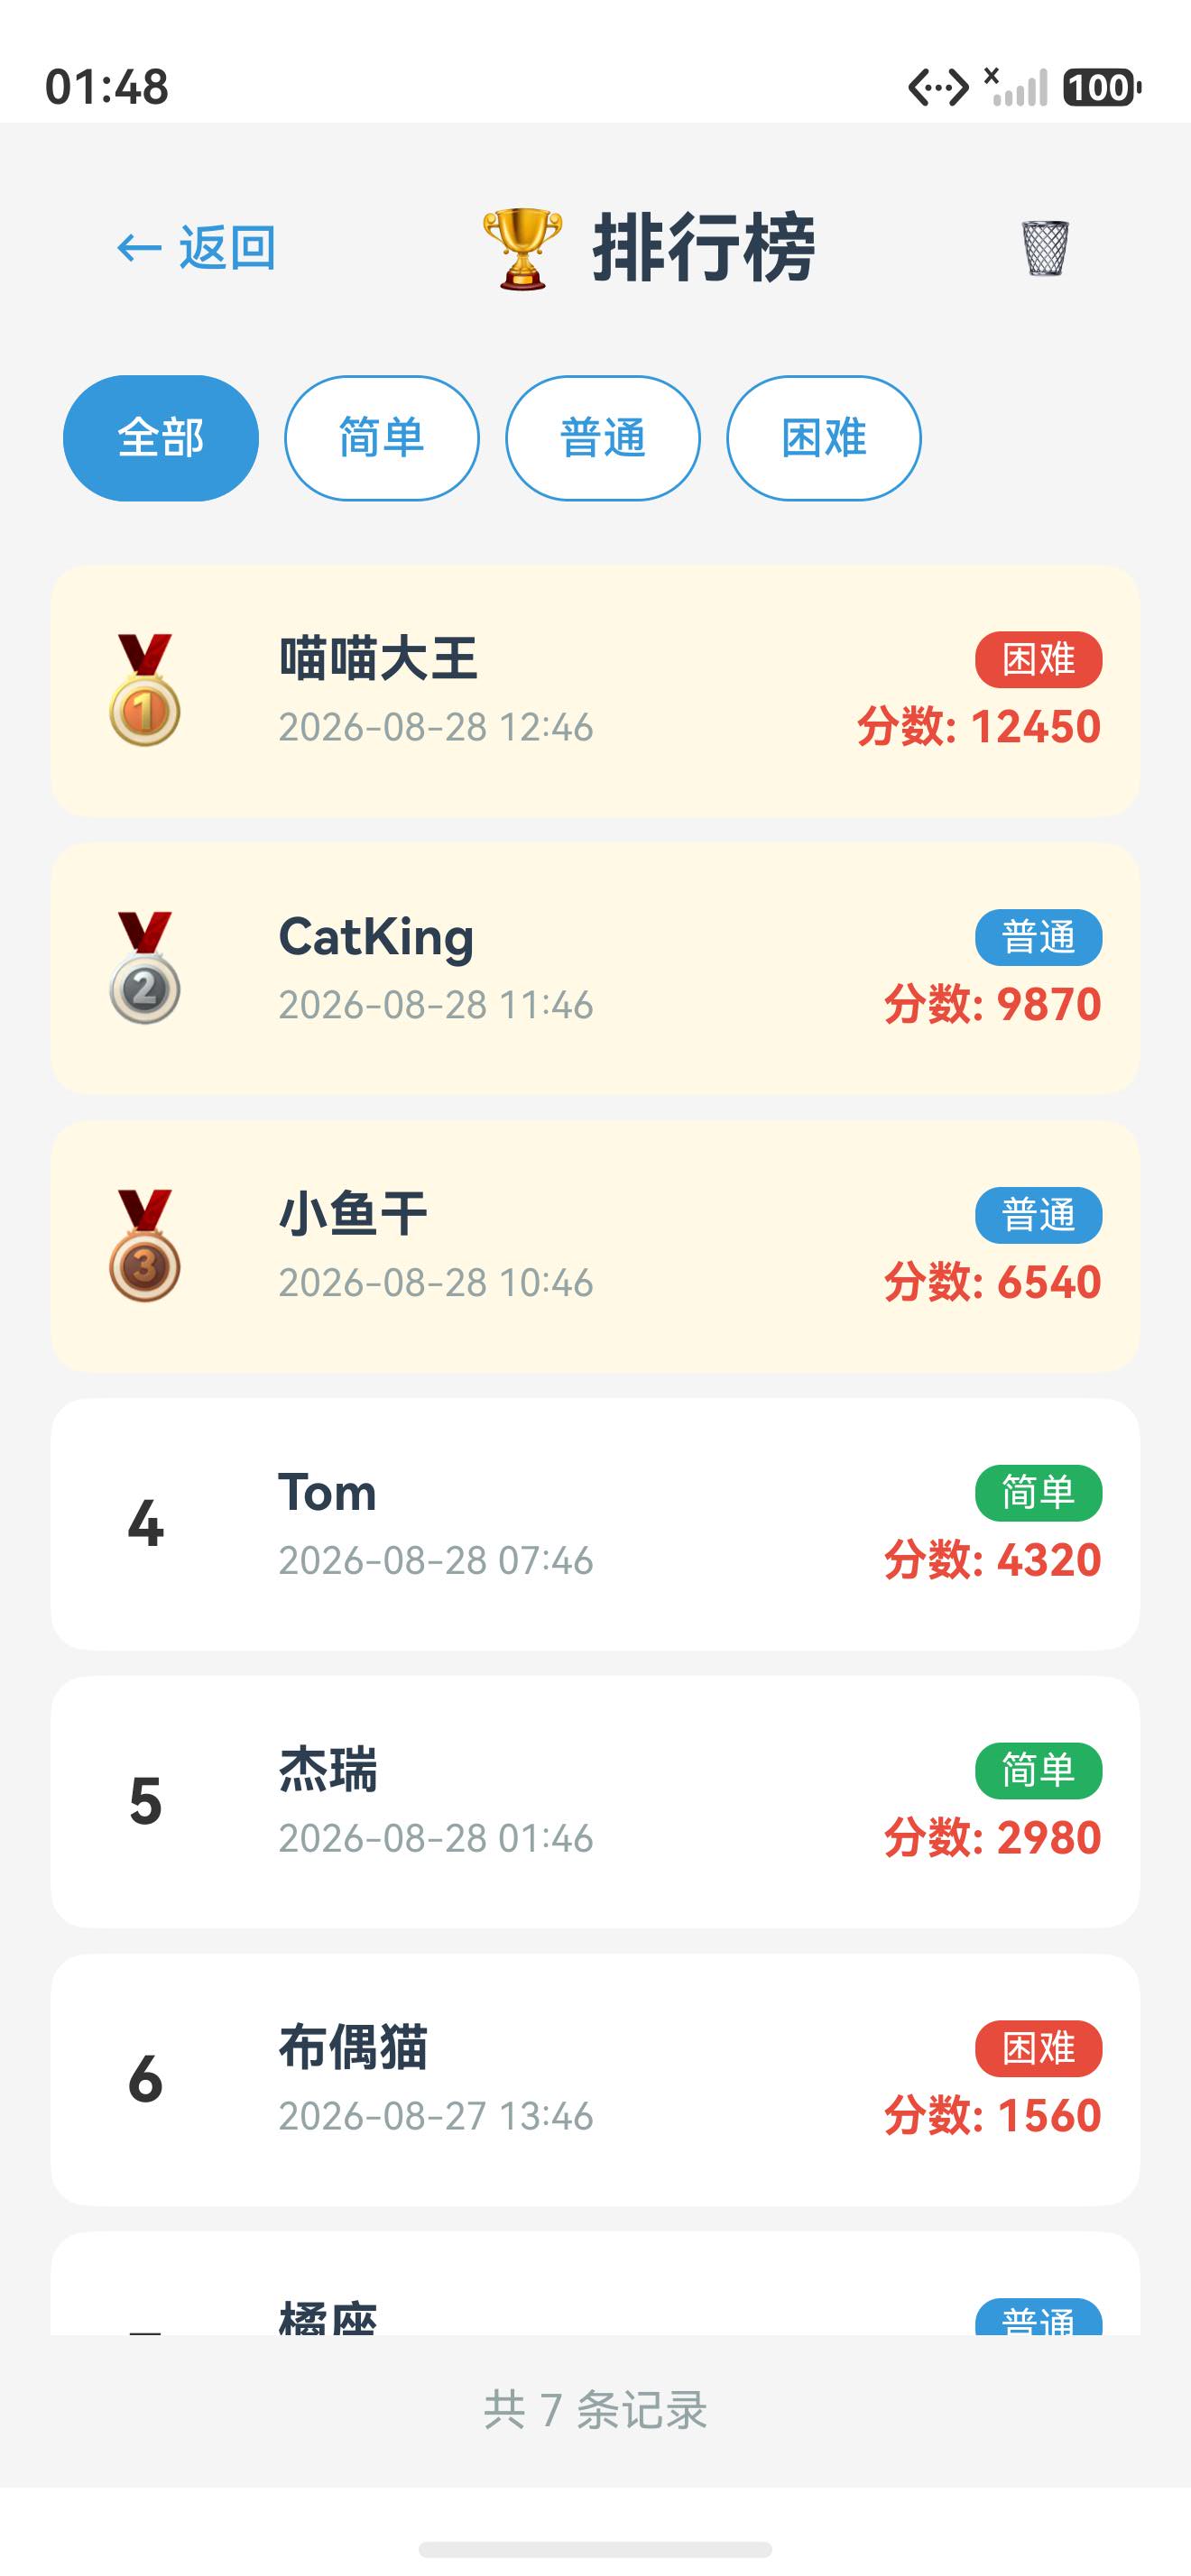
上图是「猫猫大作战」排行榜页面在 HarmonyOS 模拟器上的真实效果:顶部标题栏 + 难度筛选栏,中间是带奖牌的排行榜列表,底部显示记录总数。本文就以这个页面为锚点,完整拆解它的实现。
前言
在「猫猫大作战」系列前 200 篇中,我们已经把 UI 组件、状态管理、持久化、并发和 Kit 集成逐个拆解过。但一个真实应用往往不是单页面、单组件堆砌出来的——它是页面与数据的完整闭环。排行榜页面就是最好的例子:它同时用到 LoadingProgress 加载态、List 虚拟列表、ForEach 动态筛选按钮、AlertDialog 确认弹窗、奖牌样式、空态设计,以及 preferences 的增删查。
本篇我们围绕 LeaderboardPage.ets 这个真实页面,讲清楚四件事:
- 排行榜数据从哪里来、如何排序与截断;
- 页面如何用「加载中 / 有数据 / 空数据」三态正确渲染;
- 难度筛选栏和奖牌样式是怎么用
ForEach+ 条件样式做出来的; - 实战中最容易踩的坑——页面直接进入时数据读不出来,以及为什么。
提示:本文假设你已经掌握 ArkTS 基础语法与
@State、@Builder等装饰器用法,不再重复环境搭建。项目源码位于dazhuozha/entry/src/main/ets/pages/LeaderboardPage.ets。
一、排行榜页面的功能拆解
1.1 页面职责与四层结构
排行榜页面(LeaderboardPage)的职责很单一:从本地存储读取战绩,按分数降序展示。页面从上到下分为四层:
| 层级 | 区域 | 用到的组件/特性 |
|---|---|---|
| 第 1 层 | 标题栏(返回 + 标题 + 清空) | Row、Button、Blank、AlertDialog |
| 第 2 层 | 难度筛选栏 | ForEach、Button 条件样式 |
| 第 3 层 | 排行榜列表 | List、ListItem、LoadingProgress、EdgeEffect.Spring |
| 第 4 层 | 底部记录统计 | Text、justifyContent |
build() {
  Column() {
    // 第 1 层:标题栏
    Row() { /* 返回按钮 + 标题 + 清空按钮 */ }

    // 第 2 层:难度筛选栏
    Row() { /* ForEach 渲染四个筛选按钮 */ }

    // 第 3 层:三态切换(加载中 / 空数据 / 列表)
    if (this.isLoading) { /* LoadingProgress */ }
    else if (this.getFilteredEntries().length === 0) { /* 空态 */ }
    else { /* List 列表 */ }

    // 第 4 层:底部统计
    Row() { Text(`共 ${...} 条记录`) }
  }
}
提示:页面是「容器 + 三态」结构,
if / else if / else分支互斥,同一时刻只有一个分支参与渲染。这是 ArkUI 条件渲染的标准套路。
1.2 数据从哪里来:DataStorage 单例
排行榜数据存在 preferences 里,由 DataStorage 这个单例统一封装。页面不直接碰 preferences API,而是调用 DataStorage.getInstance():
import { DataStorage, LeaderboardEntry } from '../components/DataStorage';

@Entry
@Component
struct LeaderboardPage {
  @State leaderboardEntries: LeaderboardEntry[] = [];
  @State selectedDifficulty: string = 'ALL';
  @State isLoading: boolean = true;

  private storage: DataStorage = DataStorage.getInstance();
  // ...
}
DataStorage 在构造函数里不初始化 preferences,而是提供 init(context) 方法延迟初始化。这是鸿蒙数据层的常见模式:preferences.getPreferences 是异步的,需要 Context,所以放在显式 init 里做。
二、LoadingProgress 加载态设计
2.1 LoadingProgress 组件声明与属性
排行榜读取是异步的(await this.storage.getLeaderboard()),在数据回来之前页面需要展示加载态。ArkUI 提供了 LoadingProgress 加载动画组件:
Column() {
  LoadingProgress()
    .width(50)
    .height(50)
    .color('#3498DB')

  Text('加载中...')
    .fontSize(16)
    .fontColor('#7F8C8D')
    .margin({ top: 16 })
}
.width('100%')
.height('100%')
.justifyContent(FlexAlign.Center)
LoadingProgress 的常用属性:
| 属性 | 说明 | 本项目取值 |
|---|---|---|
width / height | 加载圈尺寸(vp) | 50 × 50 |
color | 加载圈颜色 | '#3498DB'(与主题蓝一致) |
style | 加载样式:Circular(环形)/ Linear(线性) | 默认环形 |
提示:
LoadingProgress是纯装饰组件,不参与点击交互。它的动画由系统驱动,无需setInterval或animateTo手动控制,渲染开销很低,适合列表页、详情页的加载占位。
2.2 三态页面骨架
页面用 isLoading 和列表长度两个信号做三态切换:
if (this.isLoading) {
  // 状态 1:加载中
  Column() {
    LoadingProgress().width(50).height(50).color('#3498DB')
    Text('加载中...').fontSize(16).fontColor('#7F8C8D').margin({ top: 16 })
  }
  .width('100%').height('100%').justifyContent(FlexAlign.Center)
} else if (this.getFilteredEntries().length === 0) {
  // 状态 2:空数据
  Column() {
    Text('📊').fontSize(60)
    Text('暂无排行榜数据').fontSize(18).fontColor('#7F8C8D').margin({ top: 16 })
    Text('快去游戏创造高分吧!').fontSize(14).fontColor('#95A5A6').margin({ top: 8 })
  }
  .width('100%').height('100%').justifyContent(FlexAlign.Center)
} else {
  // 状态 3:有数据 → List 列表
  List() { /* ... */ }
}
三态切换的关键代码在 loadLeaderboard 里:
async loadLeaderboard() {
  this.isLoading = true;
  try {
    this.leaderboardEntries = await this.storage.getLeaderboard();
  } catch (error) {
    console.error('加载排行榜失败', error);
  }
  this.isLoading = false;
}
isLoading 从 true 变为 false 时,ArkUI 会自动重渲染,从「加载中」切到「空数据」或「列表」。这就是状态驱动的核心:UI 永远跟随 @State,不需要手动刷新。
三、排行榜数据模型与存取
3.1 LeaderboardEntry 接口
先看数据长什么样。DataStorage.ets 里定义了排行榜条目接口:
// 排行榜条目接口
export interface LeaderboardEntry {
  playerName: string;       // 玩家名
  score: number;            // 分数
  difficulty: Difficulty;   // 难度(easy / normal / hard)
  timestamp: number;        // 完成时间戳
  rank?: number;            // 排名(显示用,可空)
}
rank 是可选字段,读取时动态计算,不落盘——这样新增一条记录后排名会自动更新,不用改历史数据。
3.2 读取与排序:getLeaderboard
读取的核心逻辑在 DataStorage.getLeaderboard():
async getLeaderboard(): Promise<LeaderboardEntry[]> {
  if (!this.preferences) return [];

  try {
    const leaderboardJson = await this.preferences.get('leaderboard', '[]');
    const entries = JSON.parse(leaderboardJson as string) as LeaderboardEntry[];

    // 按分数降序排序,并添加排名
    entries.sort((a, b) => b.score - a.score);
    entries.forEach((entry, index) => {
      entry.rank = index + 1;
    });

    return entries;
  } catch (error) {
    console.error('获取排行榜失败', error);
    return [];
  }
}
这段代码有三个要点:
- 默认值
'[]':preferences.get的第二个参数是默认值,首次启动时没有leaderboard键,直接拿到空数组字符串。 - JSON 序列化存储:整个榜单是一个 JSON 字符串,读写都是一次
JSON.parse/JSON.stringify,简单直接。 - 降序排序 + 排名回填:
sort((a, b) => b.score - a.score)从高到低,然后按索引回填rank。
3.3 写入与截断:addToLeaderboard
游戏结束时写入一条新成绩:
async addToLeaderboard(entry: LeaderboardEntry): Promise<void> {
  if (!this.preferences) return;

  try {
    const leaderboardJson = await this.preferences.get('leaderboard', '[]');
    const entries = JSON.parse(leaderboardJson as string) as LeaderboardEntry[];

    // 添加新条目
    entries.push(entry);

    // 按分数降序排序
    entries.sort((a, b) => b.score - a.score);

    // 只保留前50名
    const maxEntries = 50;
    const trimmedEntries = entries.slice(0, maxEntries);

    // 保存
    await this.preferences.put('leaderboard', JSON.stringify(trimmedEntries));
    await this.preferences.flush();
  } catch (error) {
    console.error('添加排行榜条目失败', error);
  }
}
榜单上限 50 条,超出后 slice(0, 50) 直接截断。flush() 是必须的——put 只写内存,flush 才落盘。
3.4 进入门槛:canEnterLeaderboard
在写入前先判断分数够不够格上榜:
async canEnterLeaderboard(score: number): Promise<boolean> {
  const entries = await this.getLeaderboard();

  // 如果排行榜未满,可以进入
  if (entries.length < 50) {
    return true;
  }

  // 如果分数高于最后一名,可以进入
  const lastEntry = entries[entries.length - 1];
  return score > lastEntry.score;
}
这其实是「第 50 名守门」逻辑:未满 50 直接进,满了要比最后一名高才替换。这个函数返回 Promise<boolean>,调用方必须 await——这是异步方法最常见的误用点。
四、难度筛选栏
4.1 ForEach 动态按钮组
筛选栏四个按钮不是手写的,而是 ForEach 遍历一个数组生成的:
Row() {
  ForEach(['ALL', 'EASY', 'NORMAL', 'HARD'], (difficulty: string) => {
    Button(this.getDifficultyLabel(difficulty))
      .fontSize(14)
      .fontColor(this.selectedDifficulty === difficulty ? '#FFFFFF' : '#3498DB')
      .backgroundColor(this.selectedDifficulty === difficulty ? '#3498DB' : '#FFFFFF')
      .borderRadius(16)
      .border({ width: 1, color: '#3498DB' })
      .margin({ right: 8 })
      .onClick(() => {
        this.selectedDifficulty = difficulty;
      })
  })
}
.width('100%')
.padding({ left: 20, right: 20, bottom: 20 })
.justifyContent(FlexAlign.Start)
getDifficultyLabel 把枚举值翻译成中文:
private getDifficultyLabel(difficulty: string): string {
  switch (difficulty) {
    case 'ALL':    return '全部';
    case 'EASY':   return '简单';
    case 'NORMAL': return '普通';
    case 'HARD':   return '困难';
    default:       return '未知';
  }
}
4.2 选中态样式
选中态用三元表达式条件样式实现:选中时白字蓝底,未选中时蓝字白底。
.fontColor(this.selectedDifficulty === difficulty ? '#FFFFFF' : '#3498DB')
.backgroundColor(this.selectedDifficulty === difficulty ? '#3498DB' : '#FFFFFF')
提示:筛选栏没有用
Tabs,因为这里只是 4 个互斥选项,ForEach+ 三元表达式更轻量。如果选项超过 5 个或需要滑动切换,再考虑Tabs。本系列第 89 篇讲过Tabs的声明式用法。
4.3 筛选逻辑:getFilteredEntries
列表渲染的数据来自筛选函数,而不是直接渲染 leaderboardEntries:
getFilteredEntries(): LeaderboardEntry[] {
  if (this.selectedDifficulty === 'ALL') {
    return this.leaderboardEntries;
  }

  const difficultyMap: Record<string, Difficulty> = {
    'EASY': Difficulty.EASY,
    'NORMAL': Difficulty.NORMAL,
    'HARD': Difficulty.HARD
  };

  return this.leaderboardEntries.filter(entry =>
    entry.difficulty === difficultyMap[this.selectedDifficulty]
  );
}
Record<string, Difficulty> 把 UI 层的字符串和业务层的枚举桥接起来,filter 一行完成筛选。UI 状态(selectedDifficulty)改变 → 派生数据(getFilteredEntries())自动变化 → 列表重渲染,整个过程没有手动刷新。
五、List 列表渲染排行榜
5.1 List + ListItem 基本结构
排行榜主体是一个 List 容器,每条记录是一个 ListItem:
List({ space: 8 }) {
  ForEach(this.getFilteredEntries(), (entry: LeaderboardEntry, index: number) => {
    ListItem() {
      Row() {
        // 排名列
        Column() {
          Text(this.getRankIcon(entry.rank || index + 1))
            .fontSize(entry.rank && entry.rank <= 3 ? 32 : 20)
            .fontColor(this.getRankColor(entry.rank || index + 1))
            .fontWeight(FontWeight.Bold)
        }
        .width(60)
        .justifyContent(FlexAlign.Center)

        // 玩家信息列
        Column() {
          Row() {
            Text(entry.playerName).fontSize(16).fontWeight(FontWeight.Bold)
            Blank()
            Text(this.getDifficultyName(entry.difficulty)) /* 难度标签 */
          }
          .width('100%')

          Row() {
            Text(this.formatDate(entry.timestamp)).fontSize(12).fontColor('#95A5A6')
            Blank()
            Text(`分数: ${entry.score}`).fontSize(14).fontColor('#E74C3C')
          }
          .width('100%')
          .margin({ top: 4 })
        }
        .layoutWeight(1)
        .alignItems(HorizontalAlign.Start)
        .padding({ left: 12, right: 12 })
      }
      .width('100%')
      .height(80)
      .backgroundColor(entry.rank && entry.rank <= 3 ? '#FFF9E6' : '#FFFFFF')
      .borderRadius(12)
      .margin({ bottom: 8 })
      .shadow({ radius: 2, color: '#00000020', offsetX: 0, offsetY: 2 })
    }
    .padding({ left: 16, right: 16 })
  })
}
.width('100%')
.layoutWeight(1)
.edgeEffect(EdgeEffect.Spring)
每个条目的内部布局用到了三个经典技巧:
Blank()撑开两侧:玩家名在最左、难度标签在最右,中间用Blank()自动占满剩余空间。layoutWeight(1)弹性宽度:信息列占据剩余宽度,排名列固定 60vp。- 前三名高亮:
entry.rank <= 3时背景换成淡黄#FFF9E6,视觉上突出领奖台。
5.2 三列布局结构
| 列 | 内容 | 宽度策略 |
|---|---|---|
| 排名列 | 奖牌 Emoji / 数字 | 固定 60vp,居中 |
| 信息列(上) | 玩家名 + 难度标签 | layoutWeight(1),弹性 |
| 信息列(下) | 时间 + 分数 | layoutWeight(1),弹性 |
5.3 edgeEffect 回弹效果
.edgeEffect(EdgeEffect.Spring)
EdgeEffect 控制列表滚到边缘时的效果,三个可选值:
Spring:回弹(本项目使用,手感接近 iOS)Fade:渐隐None:无效果
提示:
List的space参数设置条目间距为 8vp,而每个ListItem内部又用margin.bottom(8)拉开条目与条目之间的距离。二者是不同层级,别混淆。
六、前三名奖牌样式
6.1 getRankIcon:奖牌映射
排行榜的仪式感来自前三名的奖牌。用一个函数把排名映射成 Emoji:
getRankIcon(rank: number): string {
  switch (rank) {
    case 1: return '🥇';
    case 2: return '🥈';
    case 3: return '🥉';
    default: return `${rank}`;
  }
}
6.2 getRankColor:奖牌配色
奖牌 Emoji 自带颜色,但数字排名需要手动配色,保持金银铜的语义:
getRankColor(rank: number): string {
  switch (rank) {
    case 1: return '#FFD700';  // 金
    case 2: return '#C0C0C0';  // 银
    case 3: return '#CD7F32';  // 铜
    default: return '#333333';
  }
}
使用处同时把字号也做了差异化:前三名 fontSize(32),其余 fontSize(20)。样式表达式中 entry.rank && entry.rank <= 3 ? 32 : 20 是短路求值——rank 为空时走默认分支。
七、难度标签与时间格式化
7.1 难度标签:getDifficultyColor / getDifficultyName
每条记录右侧有一个彩色难度标签(简单=绿 / 普通=蓝 / 困难=红):
getDifficultyColor(difficulty: Difficulty): string {
  switch (difficulty) {
    case Difficulty.EASY:   return '#27AE60';
    case Difficulty.NORMAL: return '#3498DB';
    case Difficulty.HARD:   return '#E74C3C';
    default:                return '#95A5A6';
  }
}
渲染处用「双层 switch 函数 + 内联样式」组合:
Text(this.getDifficultyName(entry.difficulty))
  .fontSize(12)
  .fontColor('#FFFFFF')
  .backgroundColor(this.getDifficultyColor(entry.difficulty))
  .borderRadius(8)
  .padding({ left: 8, right: 8, top: 2, bottom: 2 })
7.2 时间格式化:formatDate
时间戳转成「年-月-日 时:分」可读格式:
formatDate(timestamp: number): string {
  const date = new Date(timestamp);
  const year = date.getFullYear();
  const month = String(date.getMonth() + 1).padStart(2, '0');
  const day = String(date.getDate()).padStart(2, '0');
  const hour = String(date.getHours()).padStart(2, '0');
  const minute = String(date.getMinutes()).padStart(2, '0');
  return `${year}-${month}-${day} ${hour}:${minute}`;
}
padStart(2, '0') 是格式化日期的高频技巧:5 → 05,保证两位对齐。
八、空态设计
当排行榜一条数据都没有时,页面不能白屏,要给出友好引导:
Column() {
  Text('📊').fontSize(60)
  Text('暂无排行榜数据').fontSize(18).fontColor('#7F8C8D').margin({ top: 16 })
  Text('快去游戏创造高分吧!').fontSize(14).fontColor('#95A5A6').margin({ top: 8 })
}
.width('100%')
.height('100%')
.justifyContent(FlexAlign.Center)
空态设计三要素:
- 大图标(60vp 的 Emoji)—— 一眼抓住注意力;
- 主文案(暂无排行榜数据)—— 说明状态;
- 行动引导(快去游戏创造高分吧!)—— 暗示下一步动作。
提示:空态、加载态、错误态统称页面异常态,是体验设计里最容易忽略的一环。一个成熟应用至少要为每个列表页设计「加载中 + 空 + 有数据」三种状态。
九、AlertDialog 清空确认
标题栏的 🗑️ 按钮会弹出确认框,防止误删:
Button('🗑️')
  .fontSize(16)
  .fontColor('#E74C3C')
  .backgroundColor(Color.Transparent)
  .onClick(() => {
    AlertDialog.show({
      title: '确认清空排行榜?',
      message: '此操作不可恢复',
      primaryButton: {
        value: '取消',
        action: () => {}
      },
      secondaryButton: {
        value: '确认',
        fontColor: '#E74C3C',
        action: async () => {
          await this.storage.clearLeaderboard();
          await this.loadLeaderboard();
        }
      }
    });
  })
AlertDialog.show 的要点:
primaryButton/secondaryButton对应左右两个按钮,value是文案,action是回调;- 确认按钮
fontColor: '#E74C3C'用红色强调危险操作语义; - 确认回调是
async,先清空存储再重新加载,页面立即回到空态。
清空逻辑本身很简单,一行 put('leaderboard', '[]'):
async clearLeaderboard(): Promise<void> {
  if (!this.preferences) return;
  try {
    await this.preferences.put('leaderboard', '[]');
    await this.preferences.flush();
  } catch (error) {
    console.error('清空排行榜失败', error);
  }
}
十、踩坑记录:aboutToAppear 必须初始化 DataStorage
这是本篇最重要的实战教训。最初的 LeaderboardPage.aboutToAppear 只调了 loadLeaderboard():
// ❌ 错误写法:没有 init,getLeaderboard 永远返回 []
aboutToAppear() {
  this.loadLeaderboard();
}
运行结果:页面永远停在「暂无排行榜数据」,即使 preferences 文件里明明有数据。原因在 DataStorage 的 getLeaderboard 第一行:
async getLeaderboard(): Promise<LeaderboardEntry[]> {
  if (!this.preferences) return [];   // ← preferences 未初始化!
  // ...
}
preferences 是 private preferences: preferences.Preferences | null = null,只有 init() 被调用后才非空。排行榜页直接进入时没有走游戏页的初始化流程,this.preferences 一直是 null,所以永远返回空数组。
正确写法是先 init 再 load:
aboutToAppear() {
  this.initAndLoad();
}

async initAndLoad() {
  // 初始化数据存储(必须先 init 才能读取排行榜数据)
  const storage = DataStorage.getInstance();
  await storage.init(getContext(this) as Context);
  await this.loadLeaderboard();
}
修复后的完整时序:
aboutToAppear触发(页面即将显示);storage.init(context)异步初始化preferences;loadLeaderboard()读取并排序榜单;isLoading = false,页面渲染出排行榜。
提示:凡是直接进入某个页面(DeepLink、路由直达)且该页面要读数据,都必须自己完成数据层初始化。不要假设「肯定是从游戏页跳过来的、数据肯定初始化好了」。这也是我们把截图流程从「模拟点击」升级为「DeepLink 直达」后立刻暴露出来的真实 bug——用
aa start --ps targetRoute pages/LeaderboardPage直达页面,比一步步点击更容易踩中初始化遗漏。
十一、性能与最佳实践
List+ForEach渲染 50 条足够快:本页面最多 50 条数据,ForEach全量渲染即可。如果榜单规模上千,就要换成LazyForEach+IDataSource(本系列第 70 篇讲过)。- 不要在
build()里做重计算:getFilteredEntries()、formatDate()这类纯函数每次渲染都会调用,保持它们轻量;如果计算很贵,把结果缓存到@State。 preferences读写都在数据层封装:页面只依赖DataStorage的语义化方法(getLeaderboard/addToLeaderboard/clearLeaderboard),不直接接触 key 字符串——未来换成 RDB(本系列第 135 篇)时页面零改动。EdgeEffect.Spring提升手感:列表回弹是小成本大收益的交互细节,值得每个列表页都加上。
总结
本篇以「猫猫大作战」排行榜页面为锚点,完整拆解了一个数据驱动页面的四种核心能力:LoadingProgress 加载态、preferences 榜单的排序与截断、ForEach 动态筛选按钮、前三名奖牌样式与空态设计,并记录了「页面直达时数据层未初始化」这个真实 bug 的定位与修复。核心方法论就一条:UI 永远跟随 @State,数据层永远显式初始化,页面永远设计好三态。
下一篇我们继续「猫猫大作战」的页面级实战,拆解成就殿堂页面的进度环、成就卡片与解锁交互——那是 Circle 描边、List 复用与 @Builder 卡片封装的综合演练。
如果这篇文章对你有帮助,欢迎点赞👍、收藏⭐、关注🔔,你的支持是我持续创作的动力!
相关资源:
- 「猫猫大作战」项目源码:本仓库
dazhuozha/entry/src/main/ets/pages/LeaderboardPage.ets - List 列表组件官方文档
- LoadingProgress 加载动画官方文档
- AlertDialog 警告弹窗官方文档
- 偏好数据存储 (Preferences) 官方指南
- ForEach 循环渲染官方文档
- 开源鸿蒙跨平台社区
- HarmonyOS 开发者官方文档首页
- EdgeEffect 边缘效果参考
- 系列索引:本仓库
articles/INDEX.md

讨论HarmonyOS开发技术,专注于API与组件、DevEco Studio、测试、元服务和应用上架分发等。
更多推荐


 4
4 0
0- 0


 已为社区贡献98条内容

所有评论(0)