ArkUI 深色航空蓝风布局实战:出行旅居行业·港澳台旅居服务·七 Tab 异构布局·Vision Kit 卡证识别全解析
引言:当跨境出行遇上声明式 UI 框架
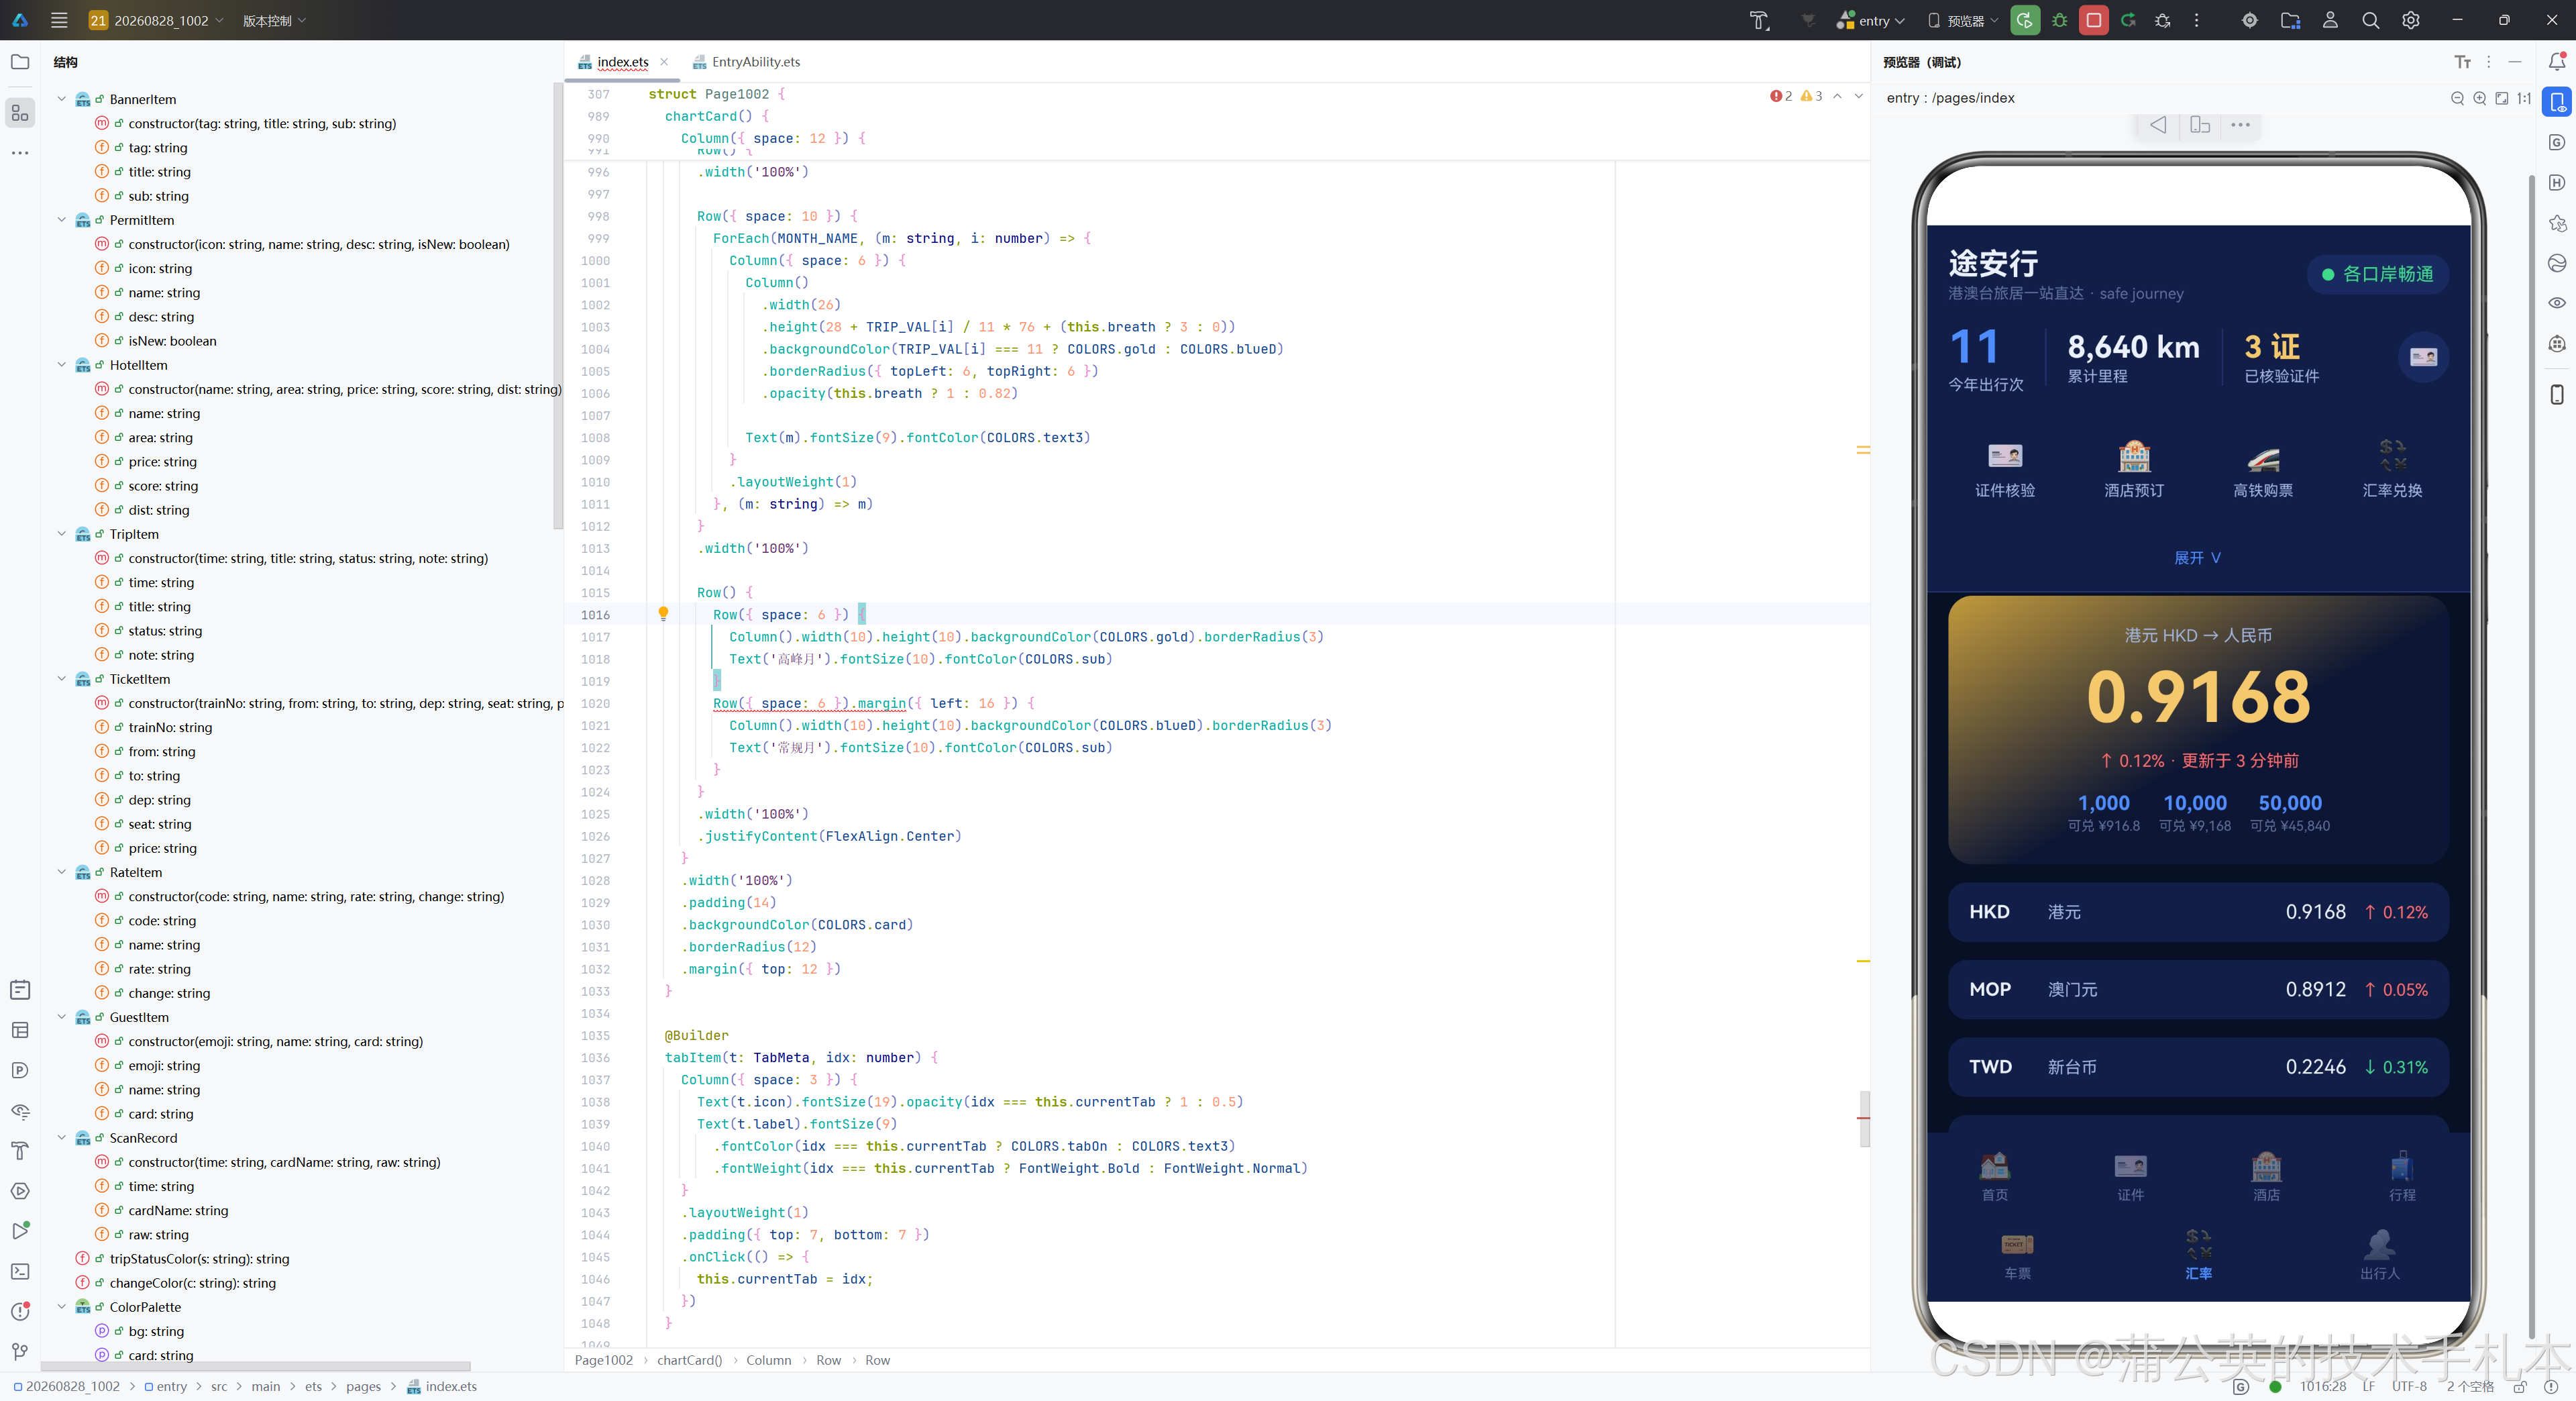
在粤港澳大湾区深度融通、两岸经贸文化交流日益频繁的今天,港澳台居民在内地的旅居需求呈现出前所未有的多元化趋势。从证件核验到酒店预订,从高铁购票到汇率兑换,从行程管理到口岸动态查询——一个覆盖全链路旅居场景的移动应用,需要承载极其复杂的业务逻辑与交互模式。而如何用技术手段构建一个既美观又实用的旅居服务平台,是每一位 HarmonyOS 生态开发者都需要深入思考的课题。
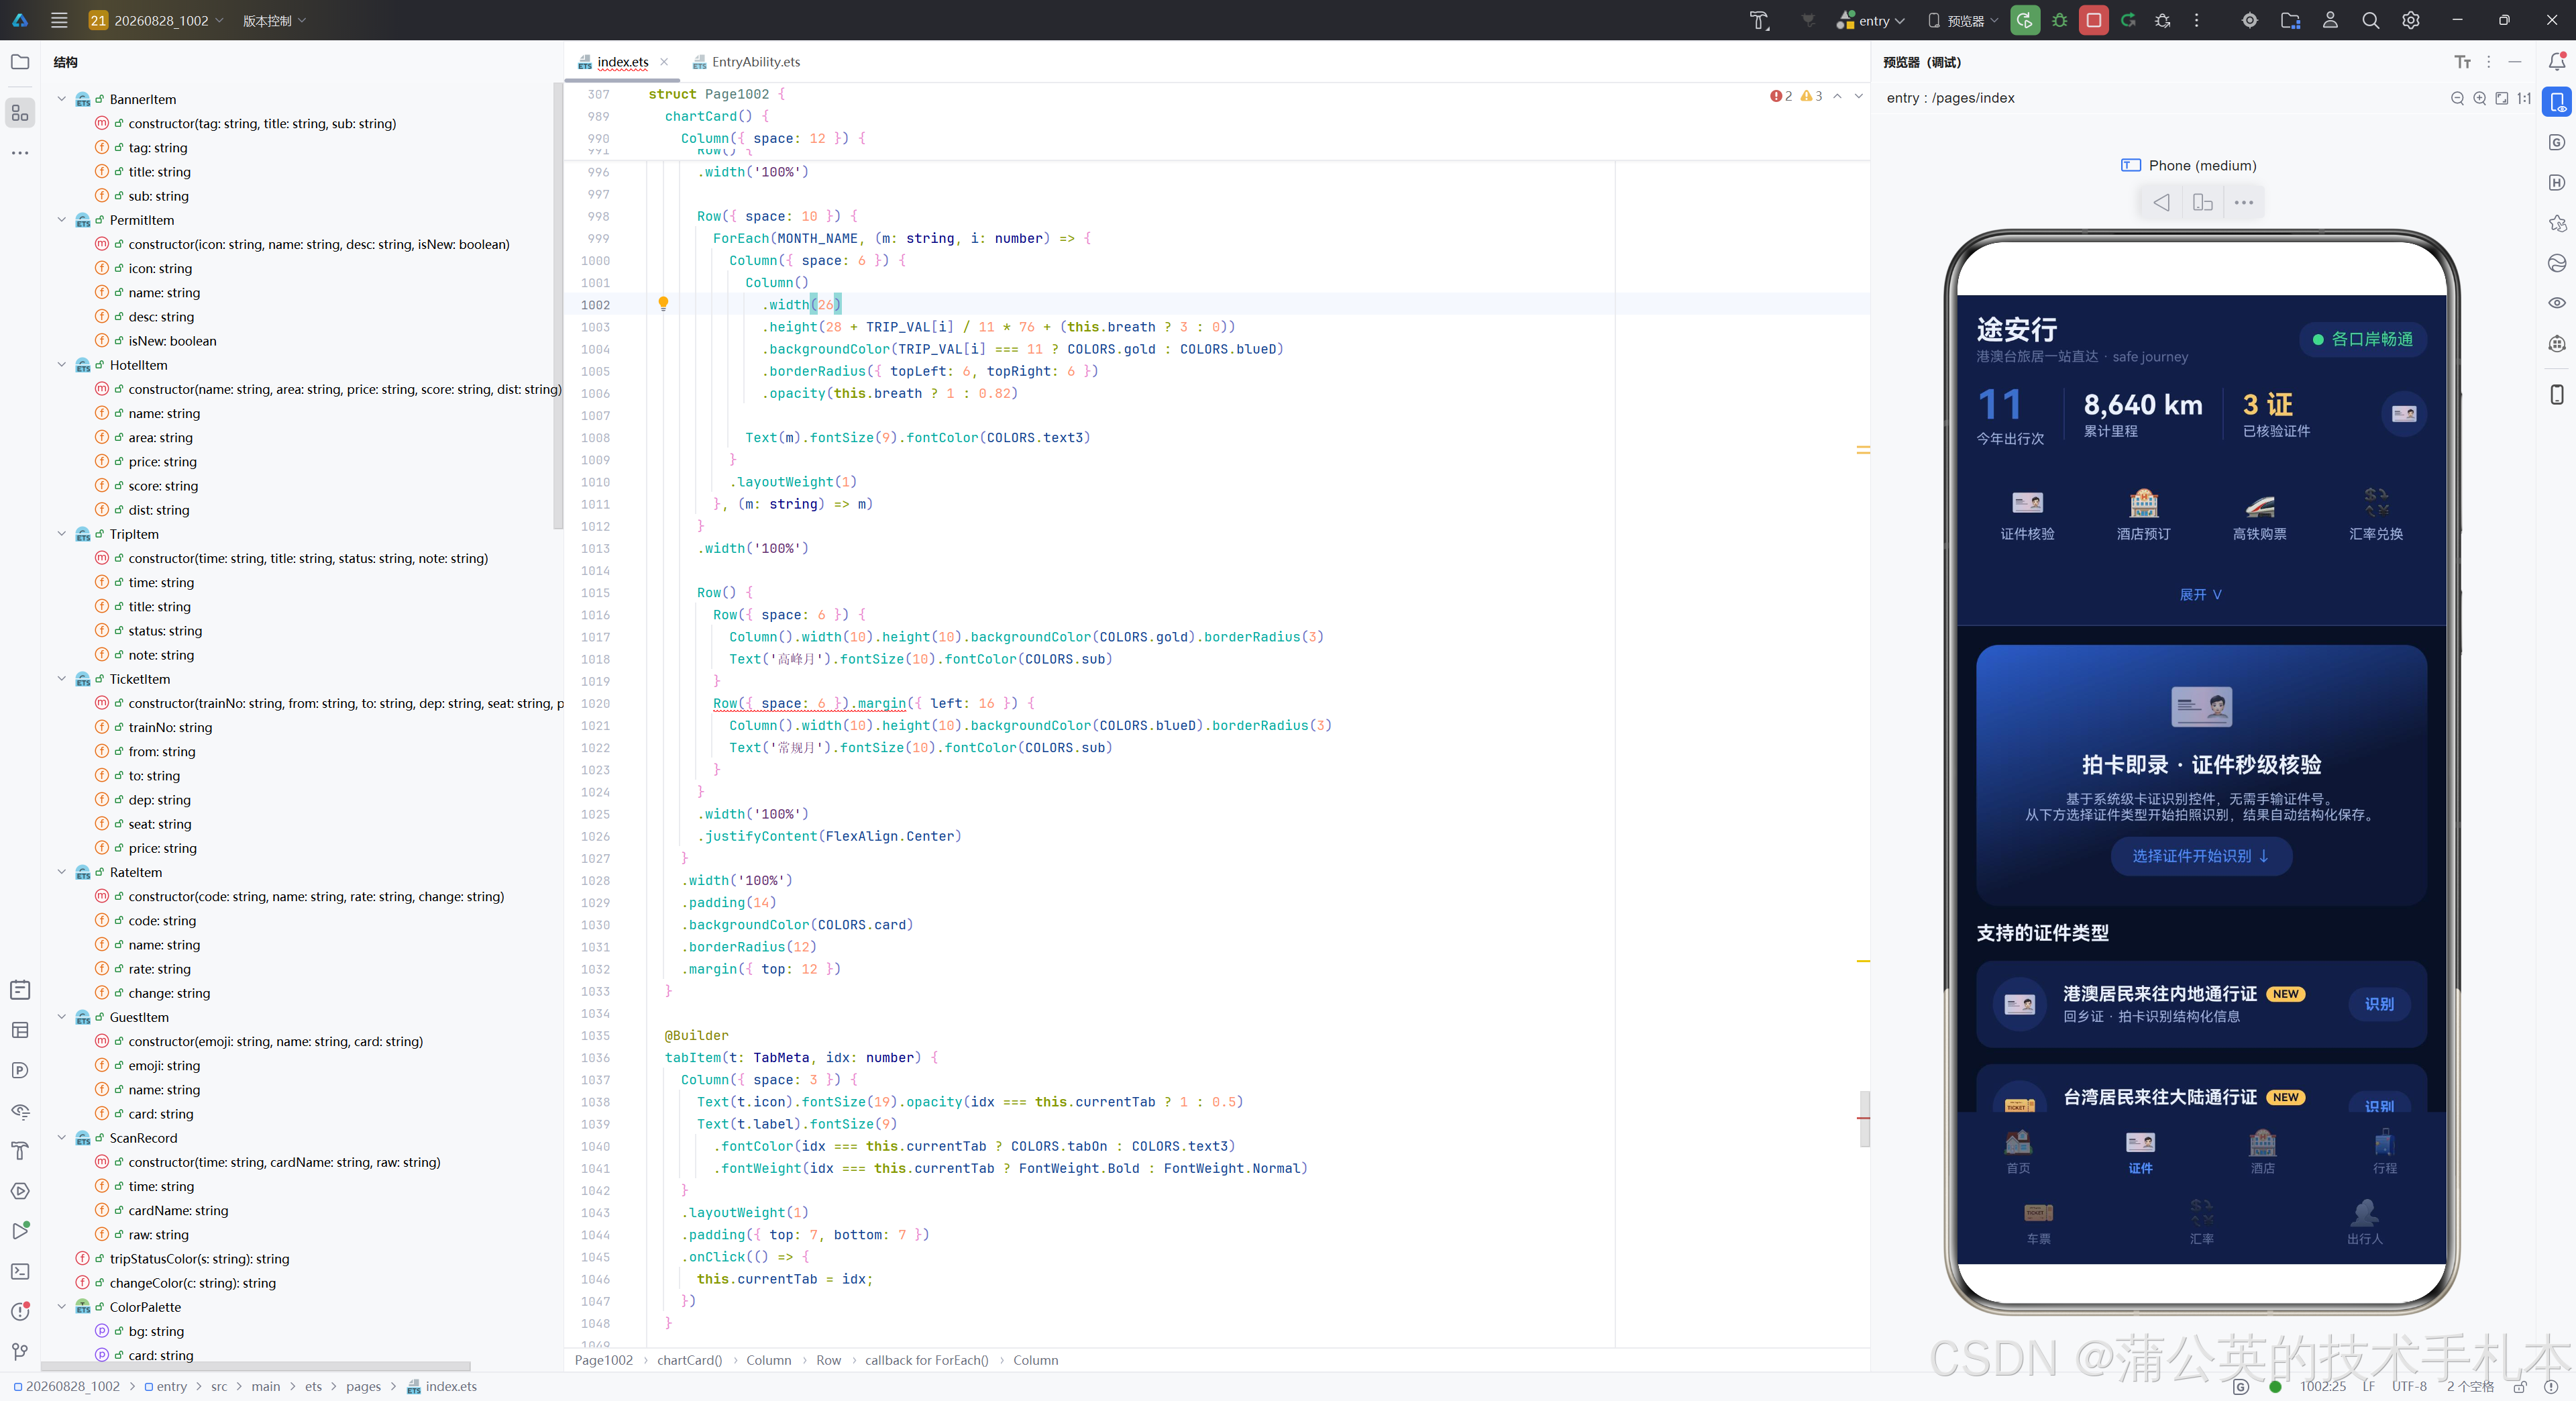
本文将以一个名为「途安行」的港澳台旅居服务平台为案例,从架构设计、颜色系统、数据模型、布局策略、卡证识别、弹窗交互、动画效果等多个维度,逐段拆解 ArkUI 声明式 UI 框架在复杂出行行业场景中的实战应用。整个应用采用深色主题搭配航空蓝与香槟金的双色点缀,营造出出行场景特有的专业感与信赖感,同时通过 Vision Kit 的 CardRecognition 控件实现了系统级的证件拍卡识别能力。
技术背景概述
ArkUI 是 HarmonyOS/OpenHarmony 生态中的声明式 UI 开发框架,采用 ArkTS 语言(TypeScript 的超集),通过 @Entry、@Component、@State、@Builder、@Observed 等装饰器实现了声明式的状态驱动渲染。与 React 的 JSX 不同,ArkUI 使用链式调用的方式构建组件树,每一个 UI 元素都通过 Text().fontSize().fontColor() 这样的链式 API 进行属性配置,形成了一种独特的"声明式链式编程"范式。
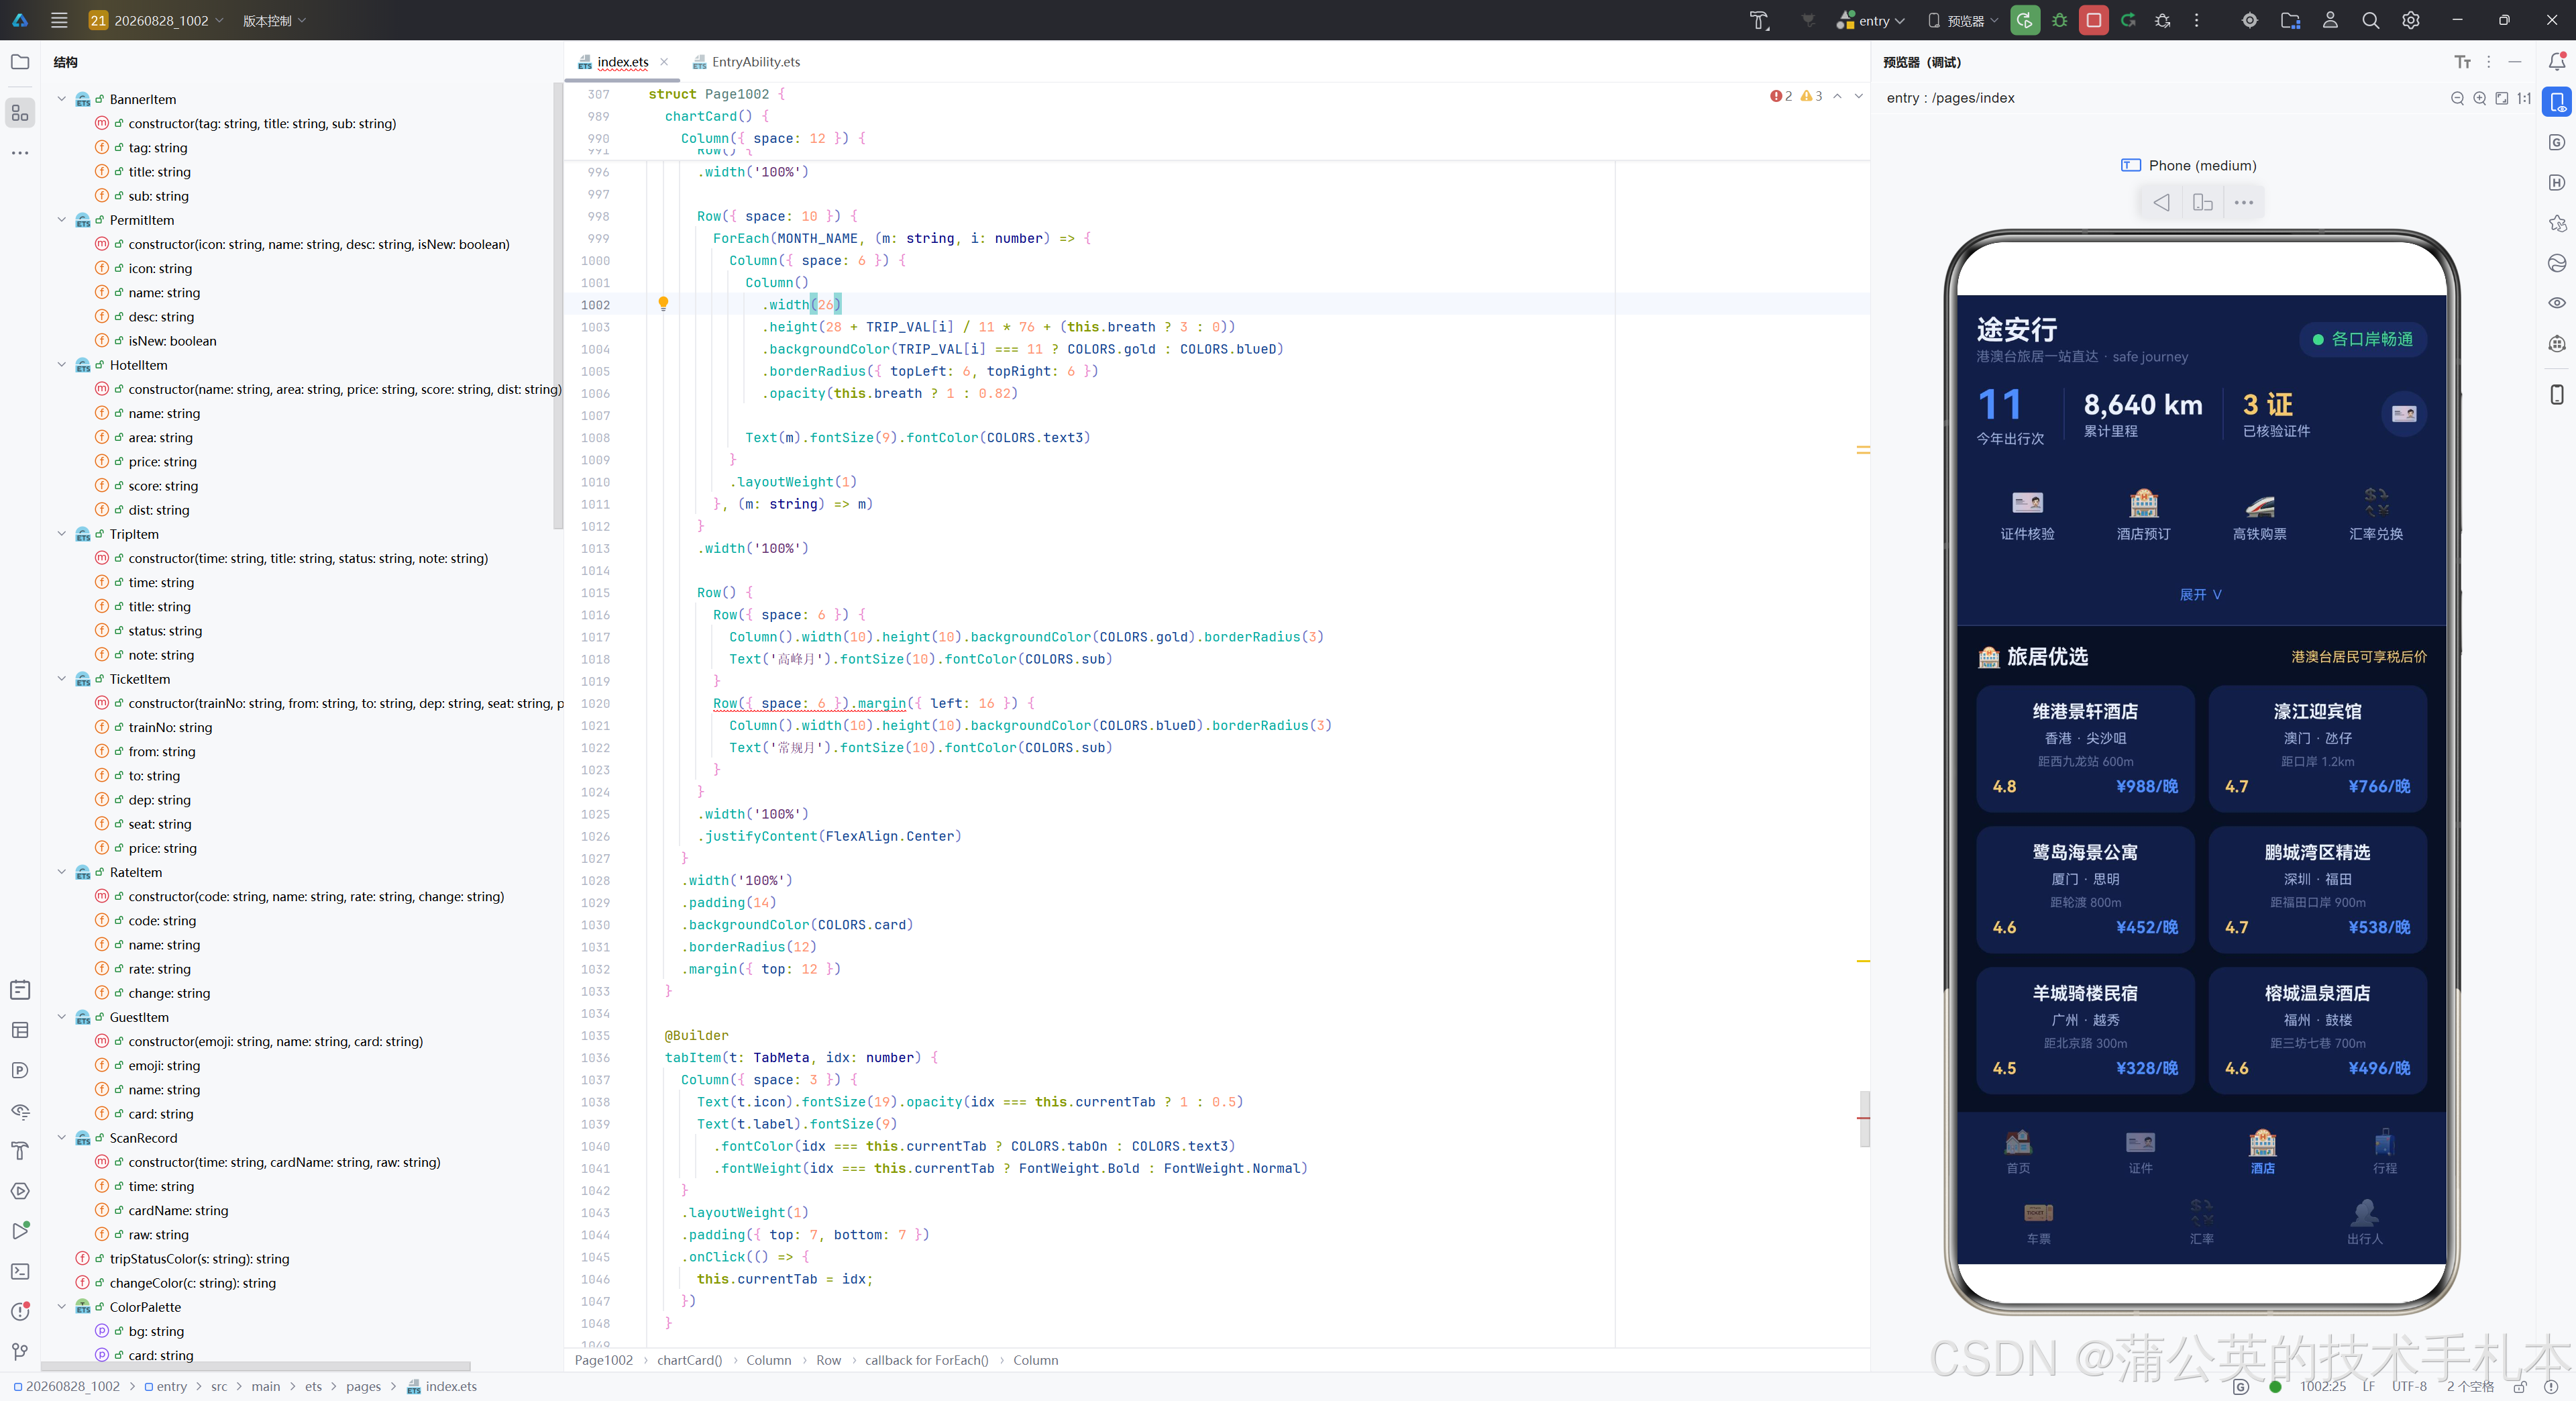
在跨境出行应用场景中,ArkUI 的声明式特性带来了显著的开发效率优势:状态变化自动触发 UI 刷新,开发者只需关注数据流与状态管理,无需手动操作 DOM 节点。同时,HarmonyOS 6.1.1 版本新增的 Vision Kit CardRecognition 控件支持港澳居民来往内地通行证和台湾居民来往大陆通行证两类证件的系统级识别,为港澳台旅居场景提供了原生的卡证识别能力。
应用整体架构概览
在深入代码之前,我们先用一张架构流程图来展示整个应用的结构设计:
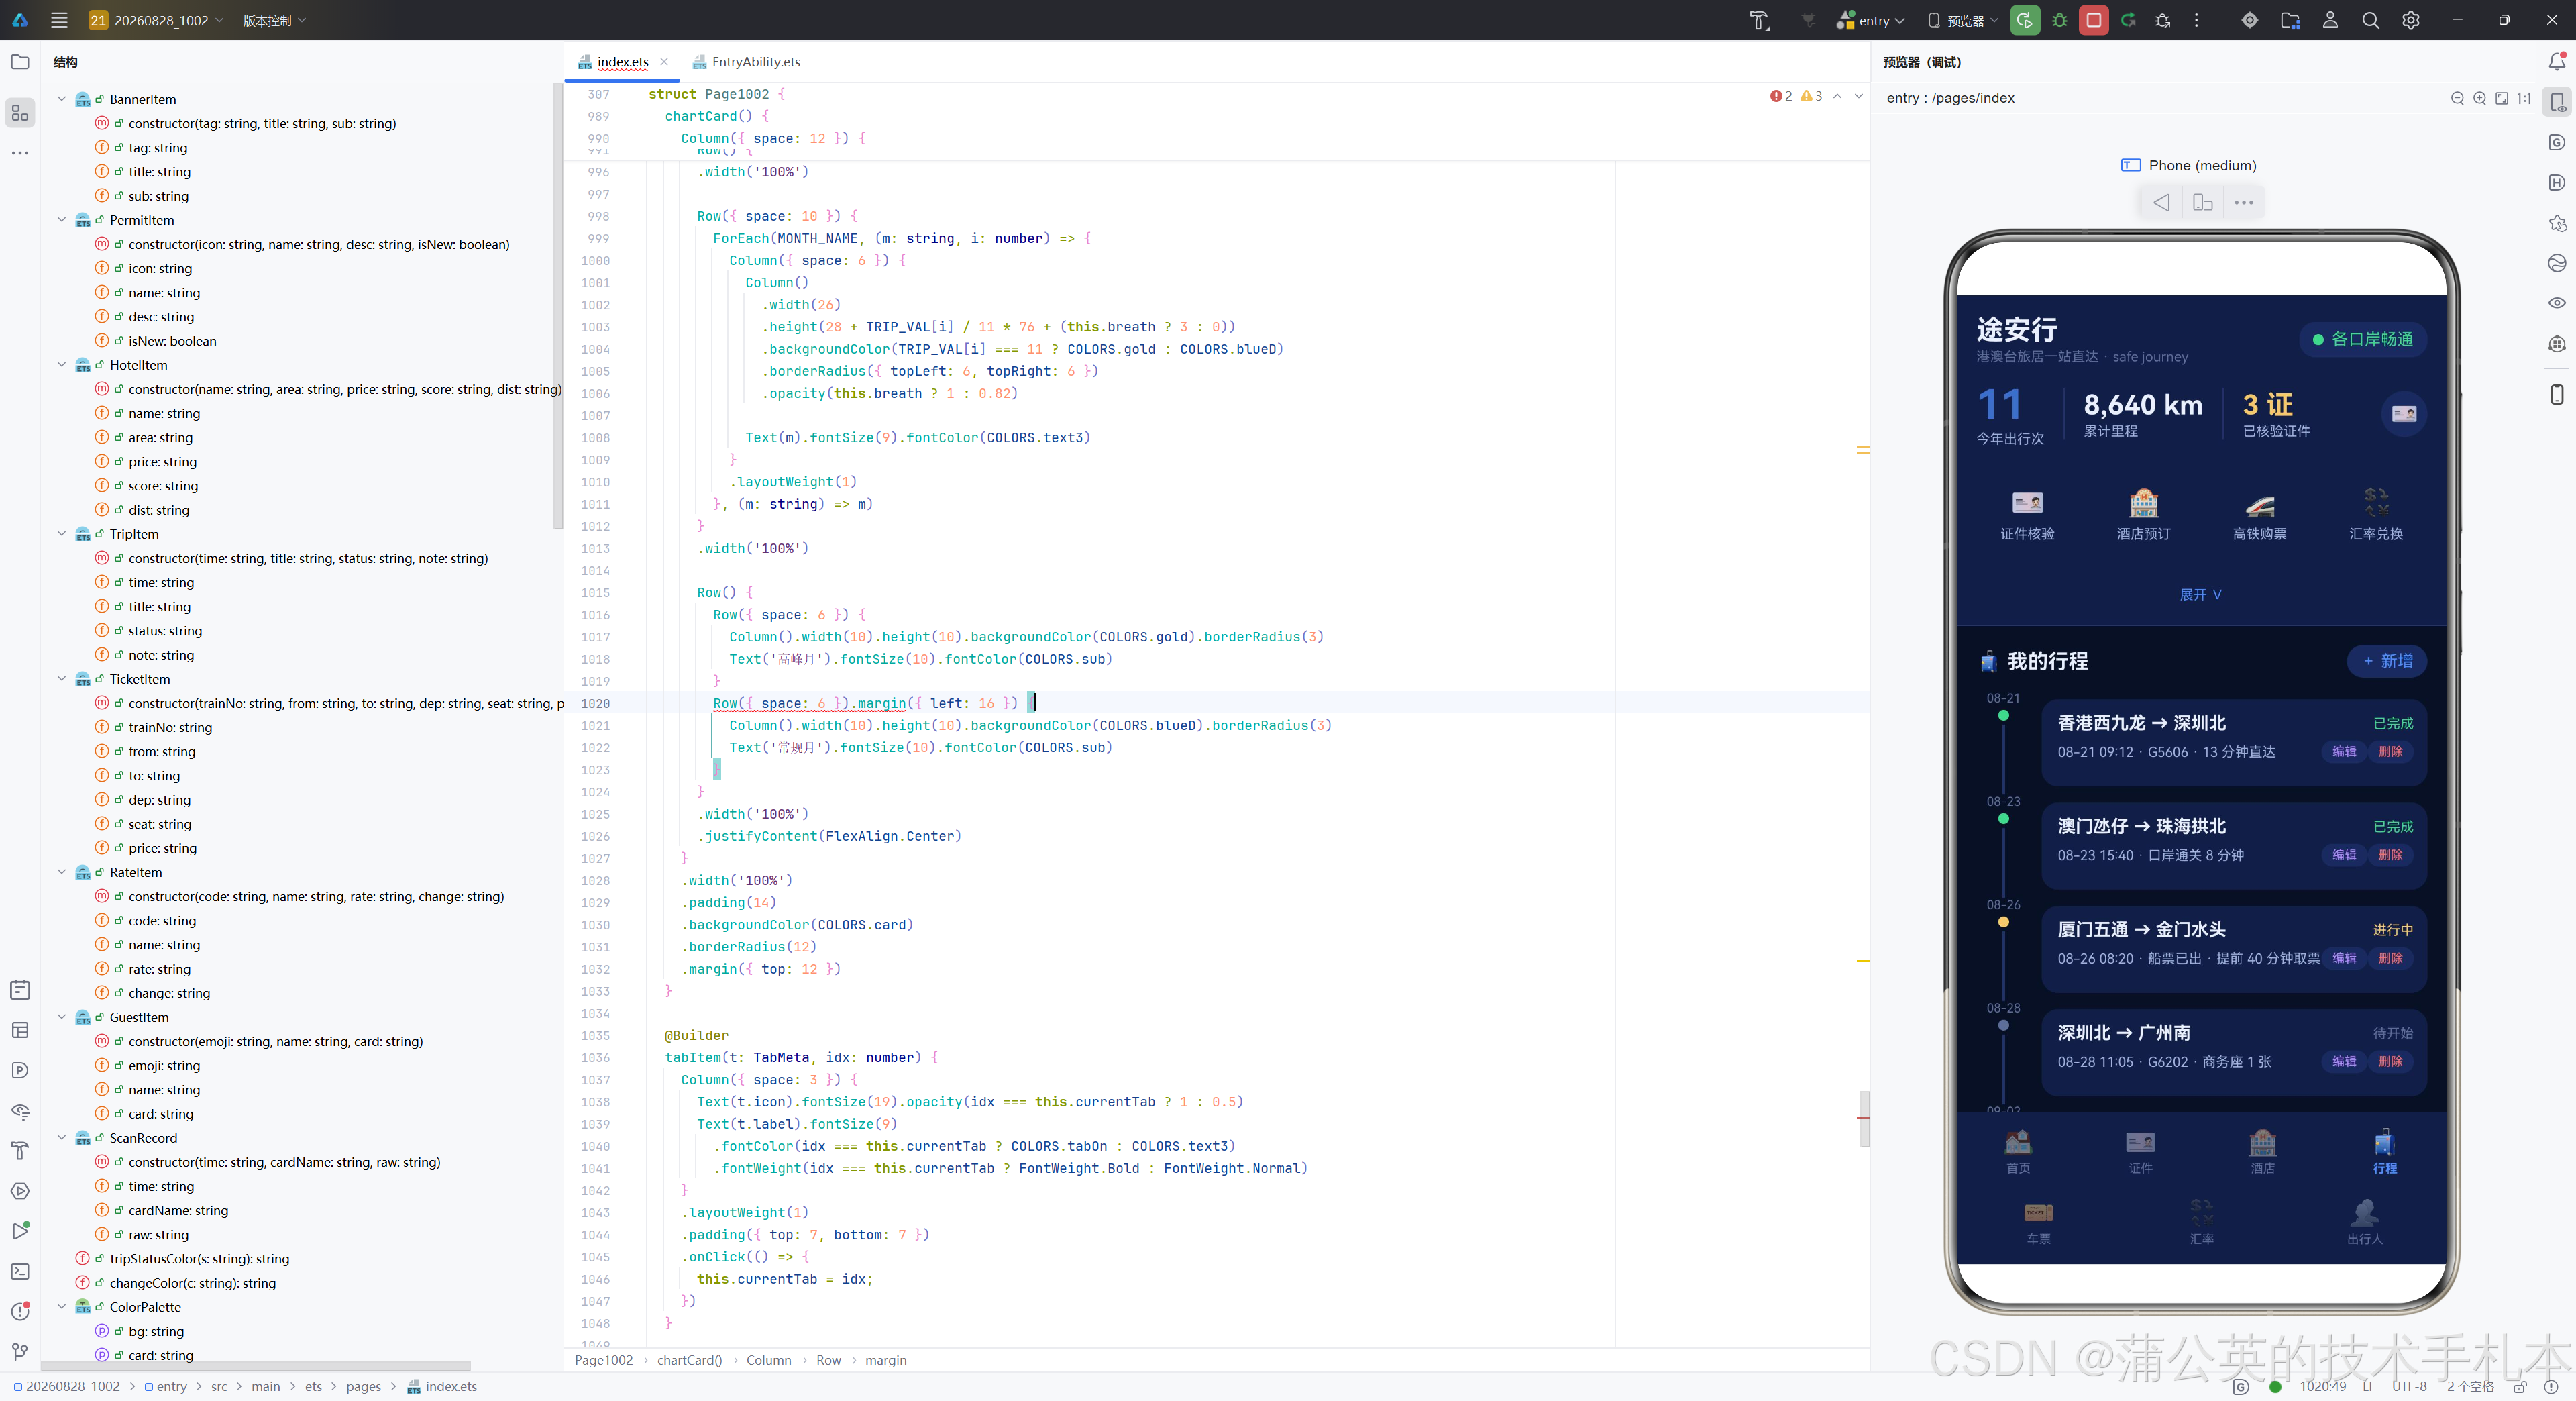
从架构图可以看出,整个应用采用「单页面 + 多 Tab」的架构模式,通过 currentTab 状态变量驱动条件渲染,在同一个 Scroll 容器中切换七个完全不同的布局页面。底部 Tab 栏分为两行(4+3 布局),每个 Tab 对应一种独立的布局风格,避免了千篇一律的列表式展示。同时,Vision Kit 的 CardRecognition 控件以全屏独占方式运行,识别完成后自动返回结果并更新 ScanRecord 列表。
下面,我们将按照代码的自然结构顺序,逐段进行深度解析。
一、颜色系统设计:深色航空蓝主题的视觉基石
1.1 ColorPalette 接口定义
interface ColorPalette {
  bg: string;
  card: string;
  chip: string;
  dark: string;
  title: string;
  sub: string;
  text3: string;
  blue: string;
  blueD: string;
  gold: string;
  goldD: string;
  red: string;
  green: string;
  purple: string;
  line: string;
  tabOn: string;
  mask: string;
}
这是整个应用的颜色管理接口。在大型应用开发中,颜色管理是一个常被低估但极其重要的工程环节。这里通过 interface 定义了一个包含 17 个颜色字段的结构体,覆盖了从背景到文字、从主色到辅色、从分割线到遮罩的全场景色彩需求。
逐字段来看:
bg(背景色):应用的全局背景,采用极深的午夜蓝色调,为深色主题奠定基础。card(卡片色):各功能卡片的背景色,比bg稍浅,通过微妙的色差形成层次感。chip(标签色):用于标签、按钮背景等小面积色块,是 UI 中出现频率最高的中间色。dark(深色):比card更深的色调,用于特殊卡片或渐变背景的深色端。title(标题色):主文字颜色,采用接近白色的浅蓝色调,保证深色背景下的可读性。sub(副标题色):次级文字颜色,饱和度较低的灰蓝色。text3(三级文字色):辅助说明文字颜色,用于最不重要的文字信息。blue/blueD(航空蓝及其深色变体):主题色之一,代表专业、可靠与出行。gold/goldD(香槟金及其深色变体):主题色之二,代表尊贵与汇率/价格。red(警示红):用于删除、警告、汇率上涨等场景。green(成功绿):用于完成状态、汇率下跌(利好方向)等场景。purple(紫色):用于编辑操作标签等辅助场景。line(分割线色):极暗的蓝色,用于分隔不同区域。tabOn(Tab 激活色):底部 Tab 栏选中状态的颜色,复用航空蓝。mask(遮罩色):弹窗背景遮罩,使用 rgba 半透明格式实现毛玻璃效果。
1.2 颜色常量实例化
const COLORS: ColorPalette = {
  bg: '#0A1024',
  card: '#141F45',
  chip: '#1C2A5C',
  dark: '#0D1634',
  title: '#EAF0FF',
  sub: '#9FB2DC',
  text3: '#5E6E9A',
  blue: '#4D8DFF',
  blueD: '#2A5CC9',
  gold: '#F5C86B',
  goldD: '#C29A3C',
  red: '#FF6B6B',
  green: '#3FD98C',
  purple: '#B388FF',
  line: '#253266',
  tabOn: '#4D8DFF',
  mask: 'rgba(4,8,20,0.66)',
};
这段代码将颜色接口实例化为全局常量 COLORS。值得注意的是,颜色值的选择并非随意而为,而是遵循了一套精心设计的色彩学逻辑。
背景色层次分析:从 bg(#0A1024)到 dark(#0D1634)再到 card(#141F45)再到 chip(#1C2A5C),这四个色值在 RGB 空间中呈现阶梯式递增的关系。以蓝色通道为例,分别为 0x24、0x34、0x45、0x5C,形成了从深到浅的四级灰阶。这种设计确保了不同层级之间的视觉区分度足够清晰,同时又不会因为色差过大而产生割裂感。
主题色搭配策略:航空蓝 #4D8DFF 和香槟金 #F5C86B 是一对精心搭配的主题色。在 HSL 色彩空间中,蓝色位于 220° 附近,金色位于 40° 附近,两者色相差约 180°,属于经典的互补色关系。但通过控制饱和度和明度的差异,避免了正互补色可能产生的视觉对抗感。在出行场景中,蓝色代表"专业"和"信赖",金色代表"尊贵"和"价值",两者结合完美呼应了港澳台旅居服务的高端定位。
文字可读性保障:title 色值 #EAF0FF 是带有极浅蓝色调的近白色,其亮度值约为 95%,而背景 bg 的亮度约为 8%,对比度远超 WCAG 2.1 AAA 标准要求的 7:1。副标题 sub 的亮度约为 70%,三级文字 text3 约为 45%,形成清晰的视觉层级。
二、常量定义与导航配置
2.1 Tab 元数据接口与数据
interface TabMeta {
  icon: string;
  label: string;
}

const TAB_ROW1: TabMeta[] = [
  { icon: '🏠', label: '首页' },
  { icon: '🪪', label: '证件' },
  { icon: '🏨', label: '酒店' },
  { icon: '🧳', label: '行程' },
];

const TAB_ROW2: TabMeta[] = [
  { icon: '🎫', label: '车票' },
  { icon: '💱', label: '汇率' },
  { icon: '👥', label: '出行人' },
];
TabMeta 接口定义了底部导航栏每个 Tab 的元数据结构,包含 icon(图标)和 label(标签文字)两个字段。这里使用 Emoji 作为图标,避免了图片资源依赖,同时也保持了跨平台一致性。
Tab 被拆分为两行:TAB_ROW1 包含前 4 个 Tab(首页、证件、酒店、行程),TAB_ROW2 包含后 3 个 Tab(车票、汇率、出行人)。这种 4+3 的两行布局在移动端有显著优势:当 Tab 数量超过 5 个时,单行布局会导致每个 Tab 的可点击区域过小,影响用户体验。两行布局虽然占用了更多垂直空间,但每个 Tab 的点击区域更加宽裕,误触率更低。
2.2 首页快捷宫格入口
interface EntryMeta {
  icon: string;
  label: string;
}

const HOME_ENTRY: EntryMeta[] = [
  { icon: '🪪', label: '证件核验' },
  { icon: '🏨', label: '酒店预订' },
  { icon: '🚄', label: '高铁购票' },
  { icon: '💱', label: '汇率兑换' },
  { icon: '🛂', label: '口岸动态' },
  { icon: '📖', label: '旅居攻略' },
  { icon: '🏥', label: '跨境医疗' },
  { icon: '🎯', label: '更多服务' },
];
首页的快捷宫格入口定义了 8 个功能入口点,覆盖了港澳台旅居的核心场景。EntryMeta 接口与 TabMeta 结构一致,但语义不同——这里的入口是首页内的功能导航,而非 Tab 切换。
值得注意的设计细节是:这 8 个入口在 UI 上支持收起/展开两种状态。收起时只显示前 4 个(首行),展开时显示全部 8 个(两行),通过高度动画实现平滑过渡。这种"渐进式信息披露"模式在移动端非常常见,它允许用户在快速浏览核心功能和深入探索全部功能之间自由切换。
2.3 卡证识别类型映射
const SCAN_TYPES: CardType[] = [
  CardType.CARD_ID,                              // 身份证
  CardType.CARD_BANK,                            // 银行卡
  CardType.CARD_PASSPORT,                        // 护照
  CardType.CARD_DRIVER_LICENSE,                  // 驾驶证
  CardType.CARD_VEHICLE_LICENSE,                 // 行驶证
  CardType.CARD_MAINLAND_TRAVEL_PERMIT_HK_MO,    // 港澳居民来往内地通行证
  CardType.CARD_MAINLAND_TRAVEL_PERMIT_TW        // 台湾居民来往大陆通行证
];
这是一个关键的常量定义,它将证件列表的索引与 Vision Kit 的 CardType 枚举进行一一映射。SCAN_TYPES 数组的顺序与下方 PERMIT_LIST 数据模型完全对应,确保用户点击第 N 个证件时,CardRecognition 控件能够正确识别对应类型的证件。
特别值得关注的是最后两个枚举值:CARD_MAINLAND_TRAVEL_PERMIT_HK_MO 和 CARD_MAINLAND_TRAVEL_PERMIT_TW 是 HarmonyOS 6.1.1 版本新增的卡证类型,分别对应港澳居民来往内地通行证(回乡证)和台湾居民来往大陆通行证(台胞证)。这两类证件的识别能力是本应用区别于其他出行应用的核心差异化功能。
2.4 图表数据与辅助常量
const MONTH_NAME: string[] = ['03', '04', '05', '06', '07', '08'];
const TRIP_VAL: number[] = [4, 6, 5, 9, 7, 11];

const DASH_IDX: number[] = [0, 1, 2, 3, 4, 5, 6, 7, 8, 9, 10, 11, 12, 13, 14, 15, 16, 17, 18, 19, 20, 21, 22, 23];
MONTH_NAME 和 TRIP_VAL 分别存储了近 6 个月的月份标签和出行次数数据,用于底部柱状图的绘制。DASH_IDX 是一个有趣的设计——由于 ArkUI 的 Divider 组件不支持 strokeDashArray 属性(即虚线样式),开发者通过创建 24 个等宽小段来模拟虚线分隔线的效果。这种"曲线救国"的方案体现了对框架限制的创造性应对。
三、辅助函数:状态色彩映射
function tripStatusColor(s: string): string {
  if (s === '已完成') return COLORS.green;
  if (s === '进行中') return COLORS.gold;
  return COLORS.text3;
}

function changeColor(c: string): string {
  if (c.indexOf('↑') >= 0) return COLORS.red;
  return COLORS.green;
}
两个辅助函数分别处理行程状态和汇率变动的颜色映射。
tripStatusColor 函数将行程状态映射为语义色彩:已完成用绿色(成功)、进行中用金色(活跃)、待开始用灰色(待定)。这种语义化色彩设计让用户无需阅读文字就能快速识别行程状态。
changeColor 函数处理汇率变动方向的颜色:上涨(↑)用红色、下跌用绿色。注意这里采用的是中国金融市场的惯例——红涨绿跌,与欧美市场正好相反。函数通过检查字符串中是否包含 ↑ 符号来判断方向,这种实现方式简洁但有效。
四、数据模型设计:@Observed 装饰器的响应式数据
4.1 Banner 轮播数据模型
@Observed export class BannerItem {
  tag: string;
  title: string;
  sub: string;

  constructor(tag: string, title: string, sub: string) {
    this.tag = tag;
    this.title = title;
    this.sub = sub;
  }
}
BannerItem 是首页横滑轮播卡片的数据模型,包含 tag(标签)、title(标题)和 sub(副标题)三个字段。使用 @Observed 装饰器标记该类,使其实例在被 @State 变量引用时能够触发 UI 响应式更新。export 关键字允许该类在其他模块中被复用。
4.2 Banner 数据实例
const BANNER_LIST: BannerItem[] = [
  new BannerItem('新特性', '港澳台通行证识别上线', '拍卡即录 · 全流程实名核验'),
  new BannerItem('暑期', '大湾区酒店 8 折起', '港澳居民专享 · 含税价'),
  new BannerItem('攻略', '台北-厦门航线恢复', '每周 14 班 · 行前必读'),
];
三条 Banner 数据分别对应新功能推广、酒店优惠和航线恢复三个主题,内容紧密围绕港澳台旅居场景。每条数据都经过精心设计,标签简短醒目、标题信息明确、副标题补充关键细节。
4.3 证件类型数据模型
@Observed export class PermitItem {
  icon: string;
  name: string;
  desc: string;
  isNew: boolean;

  constructor(icon: string, name: string, desc: string, isNew: boolean) {
    this.icon = icon;
    this.name = name;
    this.desc = desc;
    this.isNew = isNew;
  }
}
PermitItem 模型增加了 isNew 布尔字段,用于标识新增的证件类型。在 UI 渲染时,isNew 为 true 的证件会显示一个金色的"NEW"标签,引导用户关注新增功能。
4.4 证件列表数据
const PERMIT_LIST: PermitItem[] = [
  new PermitItem('🪪', '港澳居民来往内地通行证', '回乡证 · 拍卡识别结构化信息', true),
  new PermitItem('🎫', '台湾居民来往大陆通行证', '台胞证 · 拍卡识别结构化信息', true),
  new PermitItem('👤', '居民身份证', '大陆二代证 · 支持双面识别', false),
  new PermitItem('📖', '护照', '中国护照 · 单面识别', false),
  new PermitItem('🚗', '驾驶证', '机动车驾驶证 · 双面识别', false),
  new PermitItem('🚙', '行驶证', '机动车行驶证 · 双面识别', false),
  new PermitItem('💳', '银行卡', '主流银行卡 · 单面识别', false),
];
证件列表包含了 7 种证件类型,前两项(回乡证和台胞证)标记为 isNew: true,因为它们是 6.1.1 版本新增的识别能力。列表顺序与 SCAN_TYPES 数组完全对应,这种一一对应关系是卡证识别功能正确运行的基础。
4.5 酒店数据模型与实例
@Observed export class HotelItem {
  name: string;
  area: string;
  price: string;
  score: string;
  dist: string;

  constructor(name: string, area: string, price: string, score: string, dist: string) {
    this.name = name;
    this.area = area;
    this.price = price;
    this.score = score;
    this.dist = dist;
  }
}
HotelItem 包含酒店名称、地区、价格、评分和距离五个字段。这里的价格使用字符串类型而非数字,因为显示格式需要包含货币符号和单位(如"¥988/晚"),直接使用字符串避免了运行时的格式化开销。
const HOTEL_LIST: HotelItem[] = [
  new HotelItem('维港景轩酒店', '香港 · 尖沙咀', '¥988/晚', '4.8', '距西九龙站 600m'),
  new HotelItem('濠江迎宾馆', '澳门 · 氹仔', '¥766/晚', '4.7', '距口岸 1.2km'),
  new HotelItem('鹭岛海景公寓', '厦门 · 思明', '¥452/晚', '4.6', '距轮渡 800m'),
  new HotelItem('鹏城湾区精选', '深圳 · 福田', '¥538/晚', '4.7', '距福田口岸 900m'),
  new HotelItem('羊城骑楼民宿', '广州 · 越秀', '¥328/晚', '4.5', '距北京路 300m'),
  new HotelItem('榕城温泉酒店', '福州 · 鼓楼', '¥496/晚', '4.6', '距三坊七巷 700m'),
];
6 条酒店数据覆盖了港澳台及大湾区主要城市,每条数据都包含真实的地理信息和口岸距离参考,体现了数据模型的实用性。
4.6 行程数据模型与实例
@Observed export class TripItem {
  time: string;
  title: string;
  status: string;
  note: string;

  constructor(time: string, title: string, status: string, note: string) {
    this.time = time;
    this.title = title;
    this.status = status;
    this.note = note;
  }
}
TripItem 包含时间、标题、状态和备注四个字段。状态字段使用字符串而非枚举,因为状态值需要在 UI 中直接显示,使用字符串省去了枚举到显示文本的转换步骤。
const TRIP_LIST: TripItem[] = [
  new TripItem('08-21 09:12', '香港西九龙 → 深圳北', '已完成', 'G5606 · 13 分钟直达'),
  new TripItem('08-23 15:40', '澳门氹仔 → 珠海拱北', '已完成', '口岸通关 8 分钟'),
  new TripItem('08-26 08:20', '厦门五通 → 金门水头', '进行中', '船票已出 · 提前 40 分钟取票'),
  new TripItem('08-28 11:05', '深圳北 → 广州南', '待开始', 'G6202 · 商务座 1 张'),
  new TripItem('09-02 14:30', '台北松山 → 厦门高崎', '待开始', '需台胞证办理值机'),
  new TripItem('09-10 10:00', '香港 → 澳门 港珠澳大桥穿梭巴士', '待开始', '金巴 · 全程 40 分钟'),
];
行程数据覆盖了高铁、口岸通关、轮渡、航班、巴士等多种出行方式,充分体现了港澳台旅居场景的复杂性和多样性。
4.7 车票数据模型
@Observed export class TicketItem {
  trainNo: string;
  from: string;
  to: string;
  dep: string;
  seat: string;
  price: string;

  constructor(trainNo: string, from: string, to: string, dep: string, seat: string, price: string) {
    this.trainNo = trainNo;
    this.from = from;
    this.to = to;
    this.dep = dep;
    this.seat = seat;
    this.price = price;
  }
}
TicketItem 包含车次、出发站、到达站、发车时间、座位和价格六个字段,模拟了电子车票的核心信息结构。
4.8 汇率数据模型
@Observed export class RateItem {
  code: string;
  name: string;
  rate: string;
  change: string;

  constructor(code: string, name: string, rate: string, change: string) {
    this.code = code;
    this.name = name;
    this.rate = rate;
    this.change = change;
  }
}
RateItem 包含货币代码、货币名称、汇率和变动方向四个字段。change 字段使用包含箭头符号(↑/↓)的字符串,既直观又便于 changeColor 函数解析。
4.9 出行人数据模型
@Observed export class GuestItem {
  emoji: string;
  name: string;
  card: string;

  constructor(emoji: string, name: string, card: string) {
    this.emoji = emoji;
    this.name = name;
    this.card = card;
  }
}
GuestItem 使用 Emoji 字符作为头像替代品,包含姓名和证件信息两个字段。证件号经过脱敏处理(如"H6***821"),在展示必要信息的同时保护用户隐私。
4.10 识别记录数据模型
@Observed export class ScanRecord {
  time: string;
  cardName: string;
  raw: string;

  constructor(time: string, cardName: string, raw: string) {
    this.time = time;
    this.cardName = cardName;
    this.raw = raw;
  }
}
ScanRecord 记录每次卡证识别的结果,包含识别时间、证件名称和原始识别数据。raw 字段存储的是 JSON 序列化后的识别结果,在 UI 中以折叠文本形式展示,用户可以快速浏览而不会被大量原始数据干扰。
五、组件主体:状态管理与生命周期
5.1 组件声明与 Tab 状态
@Entry
@Component
struct Page1002 {
  // --- Tab 状态 ---
  @State currentTab: number = 0;
@Entry 装饰器标记该组件为页面入口,@Component 声明这是一个自定义组件。@State currentTab 是整个应用的核心状态变量,它驱动了 7 个 Tab 页面的条件渲染。初始值为 0,即默认显示首页。
当用户点击底部 Tab 时,currentTab 被更新,ArkUI 框架自动检测到状态变化并重新执行 build 方法中依赖该状态的条件分支,实现页面切换。这种声明式的状态驱动渲染是 ArkUI 的核心能力。
5.2 头部宫格状态
  // --- 头部宫格收起/展开 ---
  @State gridExpand: boolean = true;
gridExpand 控制首页快捷宫格的展开/收起状态。初始值为 true(展开),用户可以通过点击底部按钮切换。状态变化后,Grid 组件的 rowsTemplate 和 height 属性会自动更新,配合 .animation() 实现平滑的高度过渡动画。
5.3 弹窗状态管理
  // --- 弹窗状态 ---
  @State addModal: boolean = false;
  @State editModal: boolean = false;
  @State delModal: boolean = false;
  @State editIdx: number = -1;
  @State delIdx: number = -1;
三个布尔变量分别控制新增、编辑、删除三种弹窗的显示状态。两个索引变量 editIdx 和 delIdx 记录当前操作的数据条目索引,初始值为 -1 表示未选中任何条目。
这种"状态变量 + 条件渲染"的弹窗实现方式是 ArkUI 的典型模式。与命令式的 dialog.show() 不同,声明式弹窗通过状态变量控制渲染,框架自动管理弹窗的创建和销毁。
5.4 弹窗表单状态
  // --- 弹窗表单 ---
  @State addTitle: string = '';
  @State addNote: string = '';
新增行程弹窗的两个表单字段:行程名称和备注。使用 @State 标记确保用户输入时 UI 能够实时响应。这两个变量在弹窗关闭时会被重置为空字符串,为下次打开做准备。
5.5 动画状态与定时器
  // --- 动画状态 ---
  @State breath: boolean = false;
  timer: number = -1;
breath 是一个"呼吸"动画的状态变量,每秒在 true 和 false 之间切换。timer 存储定时器 ID,注意它没有使用 @State 标记——因为定时器 ID 不需要触发 UI 更新,它只是一个内部管理变量。
5.6 卡证识别状态
  // --- 卡证识别状态 ---
  @State scanning: boolean = false;
  @State scanIdx: number = -1;
  @State scanRecords: ScanRecord[] = [];
三个变量共同管理 Vision Kit 卡证识别的完整流程:scanning 控制识别界面的显示,scanIdx 记录当前识别的证件类型索引,scanRecords 存储所有识别结果。当 scanning 为 true 且 scanIdx >= 0 时,CardRecognition 控件全屏独占显示。
5.7 数据数组状态
  // --- 数据数组 ---
  @State bannerList: BannerItem[] = BANNER_LIST;
  @State hotelList: HotelItem[] = HOTEL_LIST;
  @State tripList: TripItem[] = TRIP_LIST;
  @State ticketList: TicketItem[] = TICKET_LIST;
  @State guestList: GuestItem[] = GUEST_LIST;
将全局常量赋值给 @State 变量,使数据成为组件的可变状态。这样做的好处是:当用户通过弹窗新增、编辑或删除数据时,@State 的变化会自动触发对应 UI 区域的重新渲染。特别注意 tripList 是唯一会被弹窗操作修改的数组。
5.8 生命周期方法
  aboutToAppear() {
    this.timer = setInterval(() => {
      this.breath = !this.breath;
    }, 1000);
  }

  aboutToDisappear() {
    clearInterval(this.timer);
  }
aboutToAppear 在组件即将出现时被调用,这里启动了一个每秒执行一次的定时器,不断翻转 breath 状态。这个呼吸动画被多个 UI 元素引用:头部数字的透明度变化、证件识别入口的 Emoji 透明度、汇率大数字的透明度等,营造出"活"的动态感。
aboutToDisappear 在组件即将销毁时被调用,清除定时器以避免内存泄漏。这是 ArkUI 生命周期的标准实践,确保资源在组件销毁时被正确释放。
六、build 根布局:Stack 容器与条件渲染
6.1 Stack 根容器
  build() {
    Stack() {
      if (this.scanning && this.scanIdx >= 0) {
        this.scanView()
      } else {
        Column() {
          this.headerTravel()
          Divider().strokeWidth(1).color(COLORS.line)
          Scroll() {
            Column() {
              if (this.currentTab === 0) {
                this.tabHome()
              } else if (this.currentTab === 1) {
                this.tabPermit()
build 方法是组件的渲染入口,使用 Stack 作为根容器。Stack 是层叠布局容器,子元素按顺序从下往上叠加。这里利用 Stack 的层叠特性实现了两种互斥的视图状态:
- 当
scanning为true时,显示全屏的CardRecognition识别界面 - 否则显示正常的 Column 布局(头部 + 滚动内容 + Tab 栏)
这种设计确保了卡证识别时不会有任何 UI 元素遮挡识别控件,符合 Vision Kit 的全屏独占要求。
6.2 滚动内容区与 Tab 条件渲染
          Scroll() {
            Column() {
              if (this.currentTab === 0) {
                this.tabHome()
              } else if (this.currentTab === 1) {
                this.tabPermit()
              } else if (this.currentTab === 2) {
                this.tabHotel()
              } else if (this.currentTab === 3) {
                this.tabTrip()
              } else if (this.currentTab === 4) {
                this.tabTicket()
              } else if (this.currentTab === 5) {
                this.tabRate()
              } else {
                this.tabGuest()
              }
              this.chartCard()
            }
            .padding({ left: 14, right: 14, top: 14, bottom: 18 })
          }
          .layoutWeight(1)
          .scrollBar(BarState.Off)
Scroll 容器内的 Column 通过 if-else 链实现 7 个 Tab 页面的条件渲染。每次只有一个 Tab 的内容被渲染,其他 Tab 的 Builder 函数不会被调用,确保了渲染性能。
特别注意 chartCard() 位于所有条件分支之外,这意味着无论用户在哪个 Tab,底部的月度出行次数柱状图都会显示。这是一种"常驻信息"设计,让用户在任何页面都能快速查看出行趋势。
Scroll 组件设置了 .layoutWeight(1) 使其占据头部和 Tab 栏之间的所有可用空间,.scrollBar(BarState.Off) 隐藏了滚动条以保持视觉简洁。
6.3 弹窗条件渲染
        if (this.addModal) {
          this.panelAdd(() => {
            this.addModal = false;
          })
        }
        if (this.editModal) {
          this.panelEdit(() => {
            this.editModal = false;
          })
        }
        if (this.delModal) {
          this.panelDel(() => {
            this.delModal = false;
          })
        }
三种弹窗通过独立的 if 条件渲染,它们可以与正常页面共存(因为 Stack 是层叠容器)。每个弹窗接收一个 onClose 回调函数,在弹窗内部关闭时调用,将对应的状态变量设为 false,从而触发条件渲染移除弹窗。
这种"回调函数注入"模式是 ArkUI 中处理弹窗关闭的常见做法,它将关闭逻辑的控制权交给了调用方,使弹窗组件更加通用。
七、头部区域:数据条与宫格动画
7.1 品牌标题与口岸状态
  @Builder
  headerTravel() {
    Column({ space: 12 }) {
      Row() {
        Column({ space: 2 }) {
          Text('途安行').fontSize(20).fontWeight(FontWeight.Bold).fontColor(COLORS.title)
          Text('港澳台旅居一站直达 · safe journey').fontSize(10).fontColor(COLORS.text3)
        }
        .alignItems(HorizontalAlign.Start)

        Column().layoutWeight(1)

        Row({ space: 6 }) {
          Circle().width(8).height(8).fill(COLORS.green)
          Text('各口岸畅通').fontSize(12).fontColor(COLORS.green)
        }
        .padding({ left: 10, right: 10, top: 6, bottom: 6 })
        .backgroundColor(COLORS.chip)
        .borderRadius(12)
      }
      .width('100%')
头部区域的第一行包含品牌标题和口岸状态指示器。左侧是"途安行"品牌名和英文副标题,右侧是一个绿色圆点+文字的口岸状态标签,使用 Circle 组件绘制状态指示灯,配合绿色文字传达"各口岸畅通"的积极信号。
Column().layoutWeight(1) 是一个弹性占位组件,将左右两侧的元素推开,实现两端对齐的布局效果。
7.2 数据统计条
      Row({ space: 14 }) {
        Column({ space: 2 }) {
          Text('11').fontSize(30).fontWeight(FontWeight.Bold).fontColor(COLORS.blue)
            .opacity(this.breath ? 1 : 0.72)
          Text('今年出行次').fontSize(10).fontColor(COLORS.sub)
        }
        .alignItems(HorizontalAlign.Start)

        Column().width(1).height(38).backgroundColor(COLORS.line)

        Column({ space: 2 }) {
          Text('8,640 km').fontSize(20).fontWeight(FontWeight.Bold).fontColor(COLORS.title)
          Text('累计里程').fontSize(10).fontColor(COLORS.sub)
        }
        .alignItems(HorizontalAlign.Start)
数据统计条展示三个关键指标:今年出行次数、累计里程、已核验证件数。第一个数字"11"使用了呼吸动画——通过 .opacity(this.breath ? 1 : 0.72) 实现透明度的周期性变化,让数字看起来在"呼吸",增强了动态感。
三个数据块之间使用 1px 宽的 Column 作为竖直分割线,比 Divider 组件更灵活(Divider 只支持水平方向)。
7.3 宫格入口与展开/收起动画
      Grid() {
        ForEach(HOME_ENTRY, (e: EntryMeta, i: number) => {
          if (i < 4 || this.gridExpand) {
            GridItem() {
              Column({ space: 6 }) {
                Text(e.icon).fontSize(20)
                Text(e.label).fontSize(10).fontColor(COLORS.sub)
              }
              .width('100%')
              .padding({ top: 10, bottom: 10 })
            }
            .onClick(() => {
              if (e.label === '证件核验') {
                this.currentTab = 1;
              }
            })
          }
        }, (e: EntryMeta) => e.label)
      }
      .columnsTemplate('1fr 1fr 1fr 1fr')
      .rowsTemplate(this.gridExpand ? '1fr 1fr' : '1fr')
      .columnsGap(10)
      .rowsGap(10)
      .width('100%')
      .height(this.gridExpand ? 150 : 75)
      .animation({ duration: 220, curve: Curve.EaseInOut })
这是头部宫格的核心实现。ForEach 遍历 HOME_ENTRY 数组,通过 if (i < 4 || this.gridExpand) 条件控制:收起时只渲染前 4 项,展开时渲染全部 8 项。
Grid 的 rowsTemplate 和 height 都根据 gridExpand 状态动态切换,配合 .animation({ duration: 220, curve: Curve.EaseInOut }) 实现平滑的高度过渡。当用户点击"收起/展开"按钮时,Grid 的高度从 150px 动画过渡到 75px(或反向),同时行模板从两行变为一行,视觉效果流畅自然。
点击事件处理也值得注意:只有"证件核验"入口会触发 Tab 切换(跳转到证件 Tab),其他入口可以后续扩展。
7.4 收起/展开按钮
      Row() {
        Text(this.gridExpand ? '收起 ∧' : '展开 ∨')
          .fontSize(10)
          .fontColor(COLORS.blue)
          .padding({ left: 14, right: 14, top: 4, bottom: 2 })
      }
      .width('100%')
      .justifyContent(FlexAlign.Center)
      .onClick(() => {
        this.gridExpand = !this.gridExpand;
      })
收起/展开按钮使用文本+箭头符号实现,简洁直观。点击后翻转 gridExpand 状态,触发 Grid 的动画过渡。justifyContent(FlexAlign.Center) 确保按钮文字居中显示。
八、首页 Tab:横滑 Banner 与口岸提醒
  @Builder
  tabHome() {
    Column({ space: 12 }) {
      Scroll() {
        Row({ space: 12 }) {
          ForEach(this.bannerList, (b: BannerItem) => {
            Column({ space: 6 }) {
              Text(b.tag).fontSize(9).fontColor(COLORS.gold)
                .padding({ left: 8, right: 8, top: 2, bottom: 2 })
                .backgroundColor(COLORS.dark).borderRadius(8)
              Text(b.title).fontSize(15).fontWeight(FontWeight.Bold).fontColor(COLORS.title)
                .maxLines(1)
                .textOverflow({ overflow: TextOverflow.Ellipsis })
              Text(b.sub).fontSize(10).fontColor(COLORS.sub)
                .maxLines(1)
                .textOverflow({ overflow: TextOverflow.Ellipsis })
            }
            .width(220)
            .alignItems(HorizontalAlign.Start)
            .padding(14)
            .backgroundColor(COLORS.card)
            .borderRadius(14)
          }, (b: BannerItem) => b.title)
        }
      }
      .scrollable(ScrollDirection.Horizontal)
      .scrollBar(BarState.Off)
      .width('100%')
首页 Banner 采用横向滚动布局。外层 Scroll 设置 .scrollable(ScrollDirection.Horizontal) 启用横向滚动。每张 Banner 卡片宽度固定为 220px,包含标签、标题和副标题三层信息。
.maxLines(1) 和 .textOverflow({ overflow: TextOverflow.Ellipsis }) 确保长文本以省略号截断,保持卡片高度一致。ForEach 的第三个参数 (b: BannerItem) => b.title 是键值生成器,用于框架的列表 diff 优化。
      Row({ space: 10 }) {
        Text('🛂').fontSize(24)
        Column({ space: 2 }) {
          Text('今日口岸客流 · 高峰提醒').fontSize(13).fontWeight(FontWeight.Bold).fontColor(COLORS.title)
          Text('罗湖 08:00-10:00 拥堵 · 建议改走深圳湾').fontSize(10).fontColor(COLORS.sub)
        }
        .alignItems(HorizontalAlign.Start)
        .layoutWeight(1)

        Text('查看').fontSize(12).fontWeight(FontWeight.Bold).fontColor(COLORS.dark)
          .padding({ left: 14, right: 14, top: 8, bottom: 8 })
          .backgroundColor(COLORS.gold).borderRadius(14)
      }
      .width('100%')
      .padding(14)
      .backgroundColor(COLORS.card)
      .borderRadius(14)
首页的第二部分是口岸客流提醒卡片,左侧 Emoji 图标,中间标题和描述文字,右侧金色"查看"按钮。这种左中右三段式布局是信息卡片的经典设计模式。
九、证件 Tab:Vision Kit 卡证识别核心
9.1 中心大卡:识别入口
  @Builder
  tabPermit() {
    Column({ space: 12 }) {
      Column({ space: 10 }) {
        Text('🪪').fontSize(40)
          .opacity(this.breath ? 1 : 0.75)
        Text('拍卡即录 · 证件秒级核验').fontSize(16).fontWeight(FontWeight.Bold).fontColor(COLORS.title)
        Text('基于系统级卡证识别控件,无需手输证件号。\n从下方选择证件类型开始拍照识别,结果自动结构化保存。')
          .fontSize(10)
          .fontColor(COLORS.sub)
          .textAlign(TextAlign.Center)
证件 Tab 的核心是一个中心大卡片,包含呼吸动画的 Emoji、标题和说明文字。说明文字使用了 \n 换行符,配合 .textAlign(TextAlign.Center) 实现多行居中文本,清晰地向用户传达了卡证识别的工作方式和使用流程。
9.2 渐变背景效果
        Text('选择证件开始识别 ↓').fontSize(11).fontColor(COLORS.blue)
          .padding({ left: 16, right: 16, top: 8, bottom: 8 })
          .backgroundColor(COLORS.chip)
          .borderRadius(14)
      }
      .width('100%')
      .padding(22)
      .backgroundColor(COLORS.dark)
      .borderRadius(16)
      .linearGradient({
        angle: 160,
        colors: [[COLORS.blueD, 0.0], [COLORS.dark, 0.6]]
      })
中心大卡使用 linearGradient 属性实现线性渐变背景。渐变从 160° 方向开始(左上到右下),从 blueD(深蓝)渐变到 dark(极深蓝),前 60% 的区域完成渐变过渡。这种渐变效果让卡片从单调的纯色变为有深度感的视觉层次,是深色主题应用中常用的设计技巧。
9.3 证件类型列表
      ForEach(PERMIT_LIST, (p: PermitItem, i: number) => {
        Row({ space: 12 }) {
          Text(p.icon).fontSize(20)
            .width(40).height(40).textAlign(TextAlign.Center)
            .backgroundColor(COLORS.chip).borderRadius(20)

          Column({ space: 3 }) {
            Row({ space: 6 }) {
              Text(p.name).fontSize(13).fontWeight(FontWeight.Bold).fontColor(COLORS.title)
                .maxLines(1)
                .textOverflow({ overflow: TextOverflow.Ellipsis })
              if (p.isNew) {
                Text('NEW').fontSize(8).fontWeight(FontWeight.Bold).fontColor(COLORS.dark)
                  .padding({ left: 5, right: 5, top: 1, bottom: 1 })
                  .backgroundColor(COLORS.gold).borderRadius(6)
              }
            }

            Text(p.desc).fontSize(10).fontColor(COLORS.sub)
              .maxLines(1)
              .textOverflow({ overflow: TextOverflow.Ellipsis })
          }
          .layoutWeight(1)
          .alignItems(HorizontalAlign.Start)

          Text('识别').fontSize(11).fontWeight(FontWeight.Bold).fontColor(COLORS.blue)
            .padding({ left: 12, right: 12, top: 6, bottom: 6 })
            .backgroundColor(COLORS.chip).borderRadius(12)
        }
        .width('100%')
        .padding(12)
        .backgroundColor(COLORS.card)
        .borderRadius(12)
        .onClick(() => {
          this.scanIdx = i;
          this.scanning = true;
        })
      }, (p: PermitItem) => p.name)
证件类型列表使用 Row 组件构建左中右三段式布局:左侧圆形 Emoji 图标、中间证件名称和描述、右侧"识别"按钮。每行的点击事件设置 scanIdx 和 scanning 状态,触发 CardRecognition 控件的全屏显示。
isNew 为 true 的证件行会额外渲染一个金色"NEW"标签,使用 if 条件渲染控制显示,这是响应式 UI 的典型应用。
9.4 识别记录展示
      if (this.scanRecords.length === 0) {
        Text('暂无识别记录,点击上方证件类型开始拍卡识别')
          .fontSize(10)
          .fontColor(COLORS.text3)
          .width('100%')
          .padding(16)
          .textAlign(TextAlign.Center)
          .backgroundColor(COLORS.card)
          .borderRadius(12)
      } else {
        ForEach(this.scanRecords, (r: ScanRecord) => {
          Column({ space: 6 }) {
            Row() {
              Text(r.cardName).fontSize(12).fontWeight(FontWeight.Bold).fontColor(COLORS.blue)
              Column().layoutWeight(1)
              Text(r.time).fontSize(9).fontColor(COLORS.text3)
            }
            .width('100%')

            Text(r.raw).fontSize(9).fontColor(COLORS.sub)
              .maxLines(4)
              .textOverflow({ overflow: TextOverflow.Ellipsis })
              .width('100%')
          }
          .width('100%')
          .padding(12)
          .backgroundColor(COLORS.card)
          .borderRadius(12)
        }, (r: ScanRecord, i: number) => `${r.time}-${i}`)
      }
识别记录区域根据 scanRecords.length 是否为 0 展示两种不同的 UI:空状态显示引导文案,有记录时遍历展示每条识别结果。每条记录卡片包含证件名称(蓝色加粗)、识别时间(灰色小字)和原始识别数据(最多 4 行,超出部分省略)。
十、酒店 Tab:双列卡片网格
  @Builder
  tabHotel() {
    Column({ space: 12 }) {
      Row() {
        Text('🏨 旅居优选').fontSize(15).fontWeight(FontWeight.Bold).fontColor(COLORS.title)
        Column().layoutWeight(1)
        Text('港澳台居民可享税后价').fontSize(10).fontColor(COLORS.gold)
      }
      .width('100%')

      Grid() {
        ForEach(this.hotelList, (h: HotelItem) => {
          GridItem() {
            Column({ space: 6 }) {
              Text(h.name).fontSize(13).fontWeight(FontWeight.Bold).fontColor(COLORS.title)
                .maxLines(1)
                .textOverflow({ overflow: TextOverflow.Ellipsis })
              Text(h.area).fontSize(10).fontColor(COLORS.sub)
              Text(h.dist).fontSize(9).fontColor(COLORS.text3)
                .maxLines(1)
                .textOverflow({ overflow: TextOverflow.Ellipsis })

              Row() {
                Text(h.score).fontSize(12).fontWeight(FontWeight.Bold).fontColor(COLORS.gold)
                Column().layoutWeight(1)
                Text(h.price).fontSize(12).fontWeight(FontWeight.Bold).fontColor(COLORS.blue)
              }
              .width('100%')
            }
            .width('100%')
            .padding(12)
            .backgroundColor(COLORS.card)
            .borderRadius(12)
          }
        }, (h: HotelItem) => h.name)
      }
      .columnsTemplate('1fr 1fr')
      .columnsGap(10)
      .rowsGap(10)
      .width('100%')
      .height(360)
    }
    .width('100%')
    .alignItems(HorizontalAlign.Start)
  }
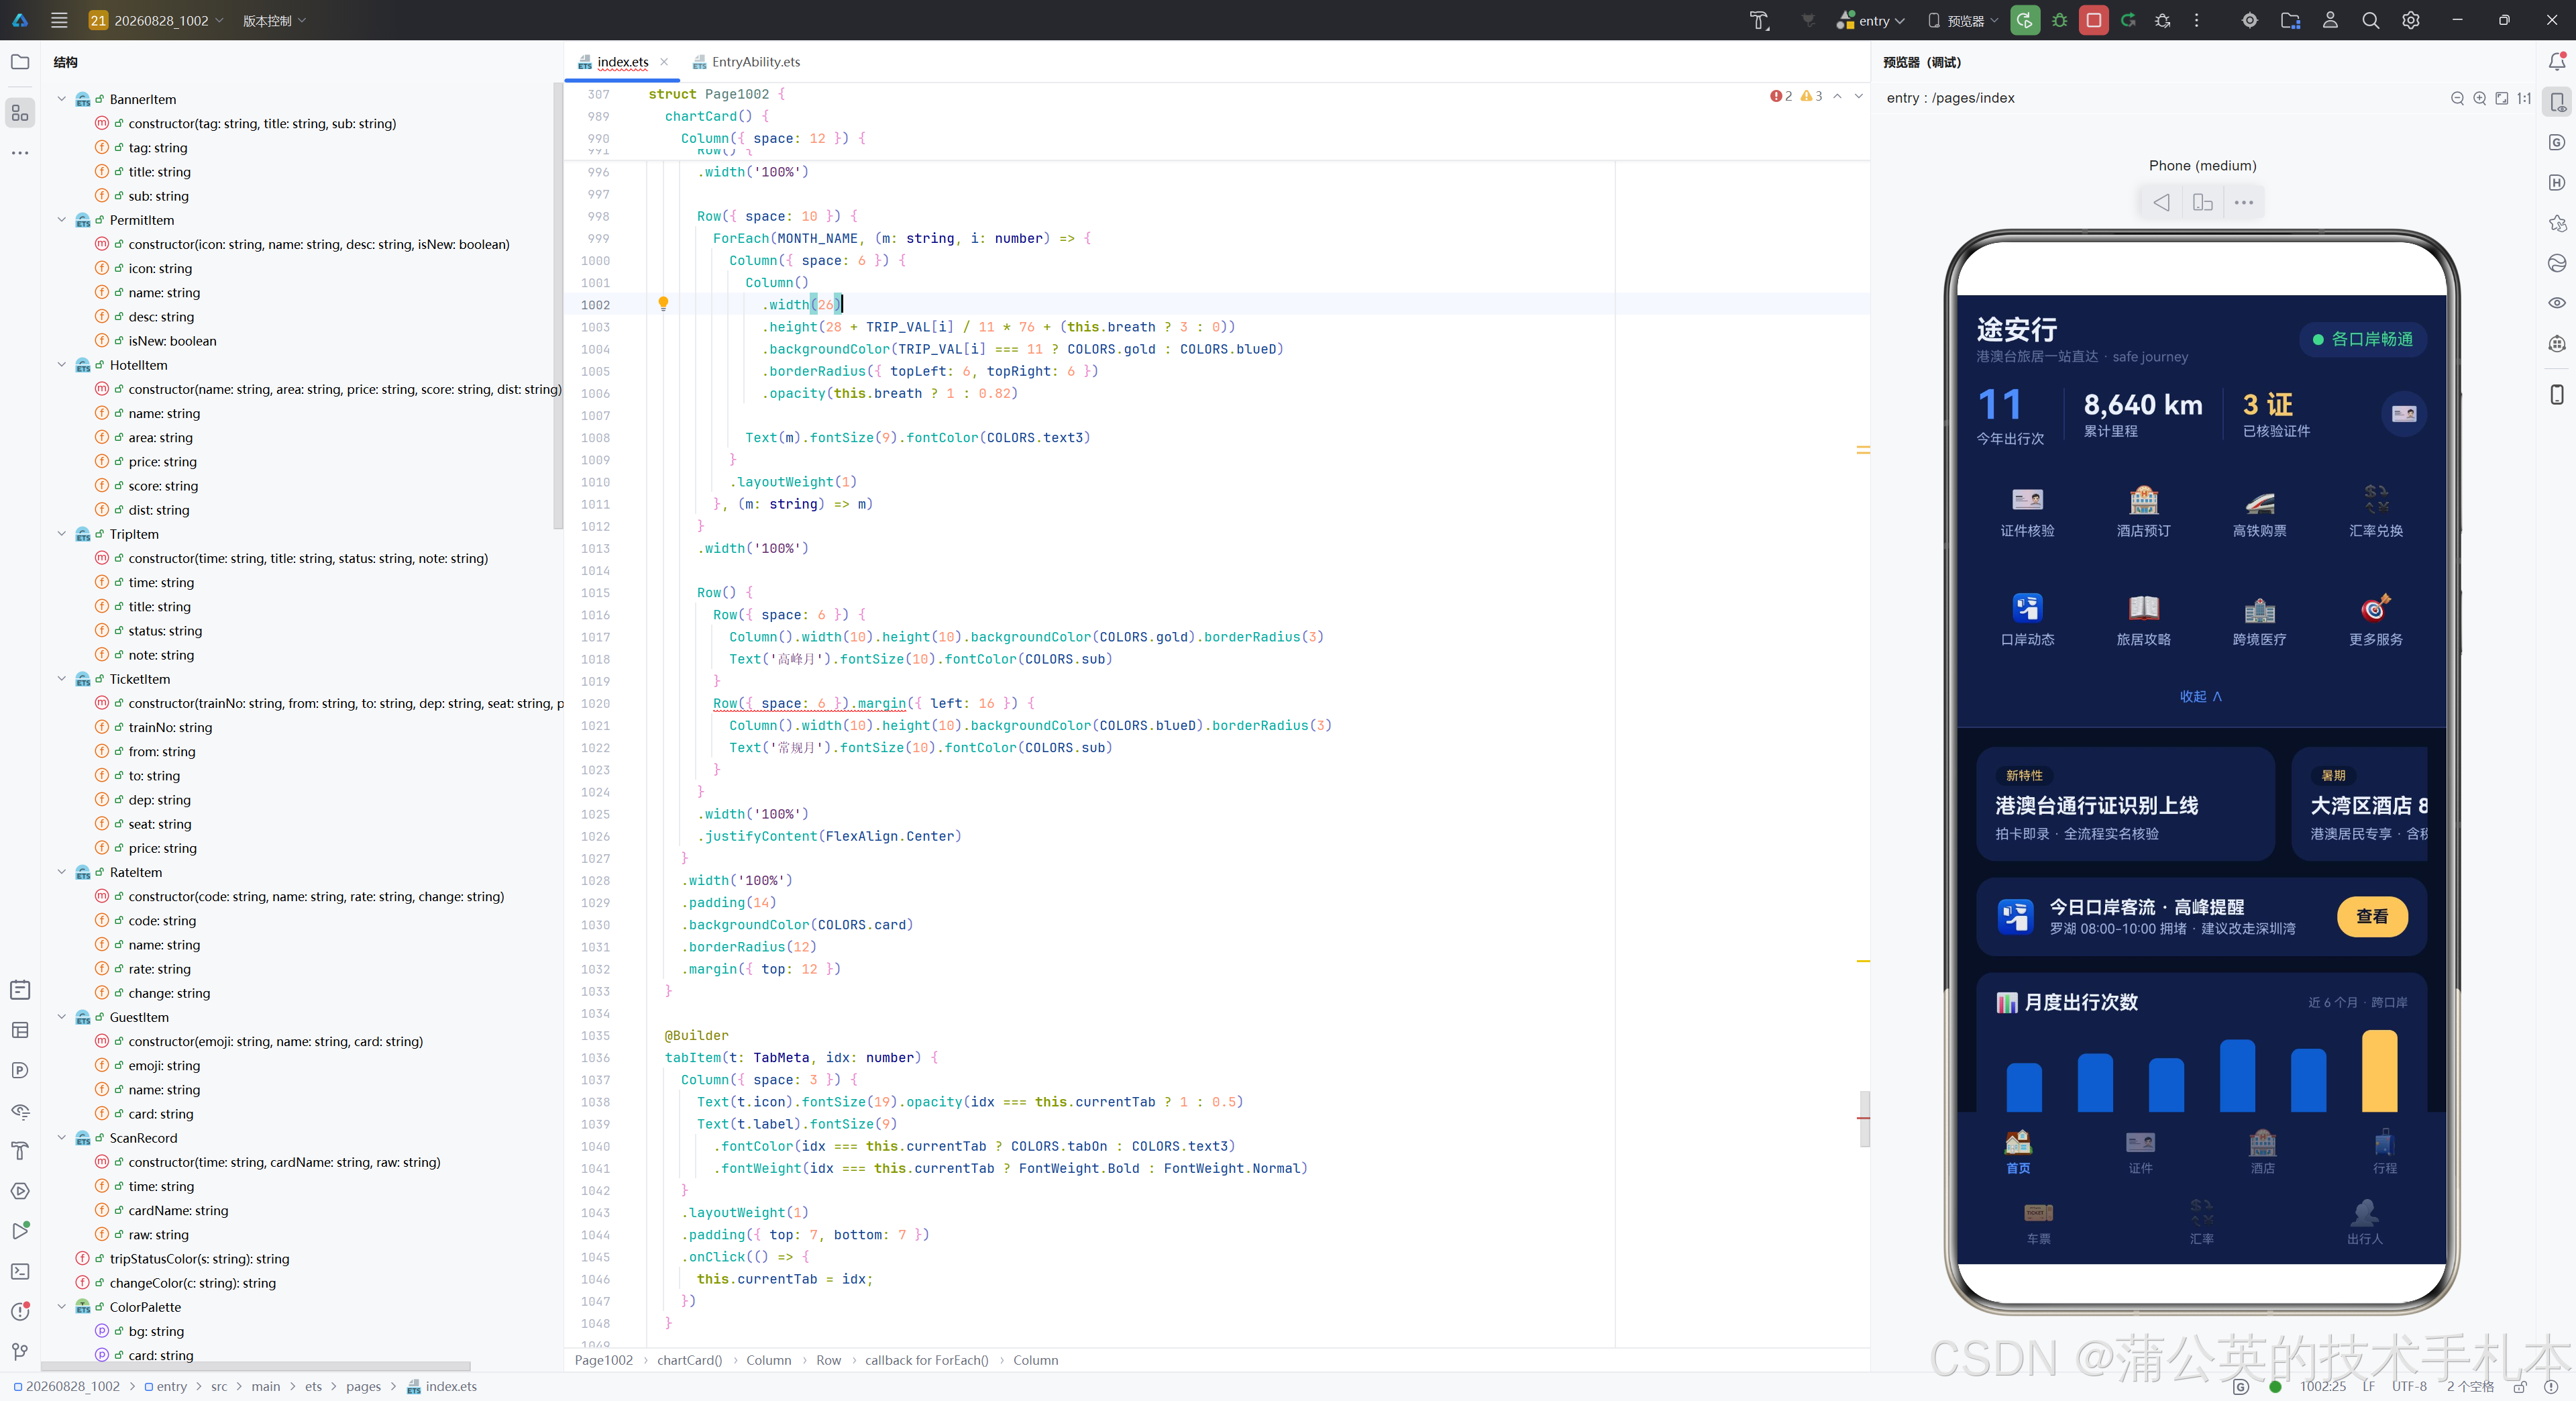
酒店 Tab 使用双列 Grid 布局,每张卡片包含酒店名称、地区、距离参考、评分和价格。卡片底部使用 Row 实现评分(左金色)和价格(右蓝色)的两端对齐布局。
Grid 设置了固定高度 360px,通过 columnsTemplate('1fr 1fr') 实现双列等宽布局。固定高度确保 Grid 不会在内容不足时拉伸,保持了视觉一致性。
十一、行程 Tab:状态时间轴布局
11.1 新增行程按钮
  @Builder
  tabTrip() {
    Column() {
      Row() {
        Text('🧳 我的行程').fontSize(15).fontWeight(FontWeight.Bold).fontColor(COLORS.title)
        Column().layoutWeight(1)
        Text('+ 新增').fontSize(12).fontColor(COLORS.blue)
          .padding({ left: 10, right: 10, top: 5, bottom: 5 })
          .backgroundColor(COLORS.chip).borderRadius(12)
          .onClick(() => {
            this.addModal = true;
          })
      }
      .width('100%')
      .margin({ bottom: 10 })
行程 Tab 的标题行右侧有一个"+ 新增"按钮,点击后设置 addModal = true 触发新增弹窗。按钮使用 chip 色背景和蓝色文字,视觉上轻量但清晰可辨。
11.2 时间轴卡片
      ForEach(this.tripList, (t: TripItem, i: number) => {
        Row({ space: 8 }) {
          Column() {
            Text(t.time.substring(0, 5)).fontSize(9).fontColor(COLORS.text3)
            Circle().width(8).height(8).fill(tripStatusColor(t.status)).margin({ top: 3 })
            if (i < this.tripList.length - 1) {
              Column().width(2).layoutWeight(1).backgroundColor(COLORS.line).margin({ top: 3 })
            }
          }
          .width(40)
          .height(76)
          .alignItems(HorizontalAlign.Center)

          Column({ space: 5 }) {
            Row() {
              Text(t.title).fontSize(13).fontWeight(FontWeight.Bold).fontColor(COLORS.title)
                .maxLines(1)
                .textOverflow({ overflow: TextOverflow.Ellipsis })
                .layoutWeight(1)
              Text(t.status).fontSize(10).fontColor(tripStatusColor(t.status))
            }
            .width('100%')
行程列表采用时间轴布局,每条行程的左侧是一个 40px 宽的时间轴列:顶部显示时间(截取前 5 个字符如"08-21"),中间是状态色彩圆点,下方是连接线(最后一条不显示)。
时间轴列的高度固定为 76px,右侧内容卡片高度为 64px,时间轴比卡片高 12px 确保连接线的视觉连续性。这是在项目实践中总结出的关键经验——在无界高度链中使用固定高度而非 layoutWeight(1) 来避免无限拉伸问题。
11.3 行程操作按钮
            Row() {
              Text(`${t.time} · ${t.note}`).fontSize(10).fontColor(COLORS.sub)
                .maxLines(1)
                .textOverflow({ overflow: TextOverflow.Ellipsis })
                .layoutWeight(1)
              Text('编辑').fontSize(9).fontColor(COLORS.purple)
                .padding({ left: 8, right: 8, top: 3, bottom: 3 })
                .backgroundColor(COLORS.chip).borderRadius(9)
                .onClick(() => {
                  this.editIdx = i;
                  this.editModal = true;
                })
              Text('删除').fontSize(9).fontColor(COLORS.red)
                .padding({ left: 8, right: 8, top: 3, bottom: 3 })
                .backgroundColor(COLORS.chip).borderRadius(9)
                .onClick(() => {
                  this.delIdx = i;
                  this.delModal = true;
                })
            }
            .width('100%')
每条行程的底部行包含时间+备注文本和编辑/删除两个操作按钮。编辑按钮使用紫色文字,删除按钮使用红色文字,通过色彩差异区分操作性质。点击分别设置 editIdx/delIdx 和对应弹窗状态。
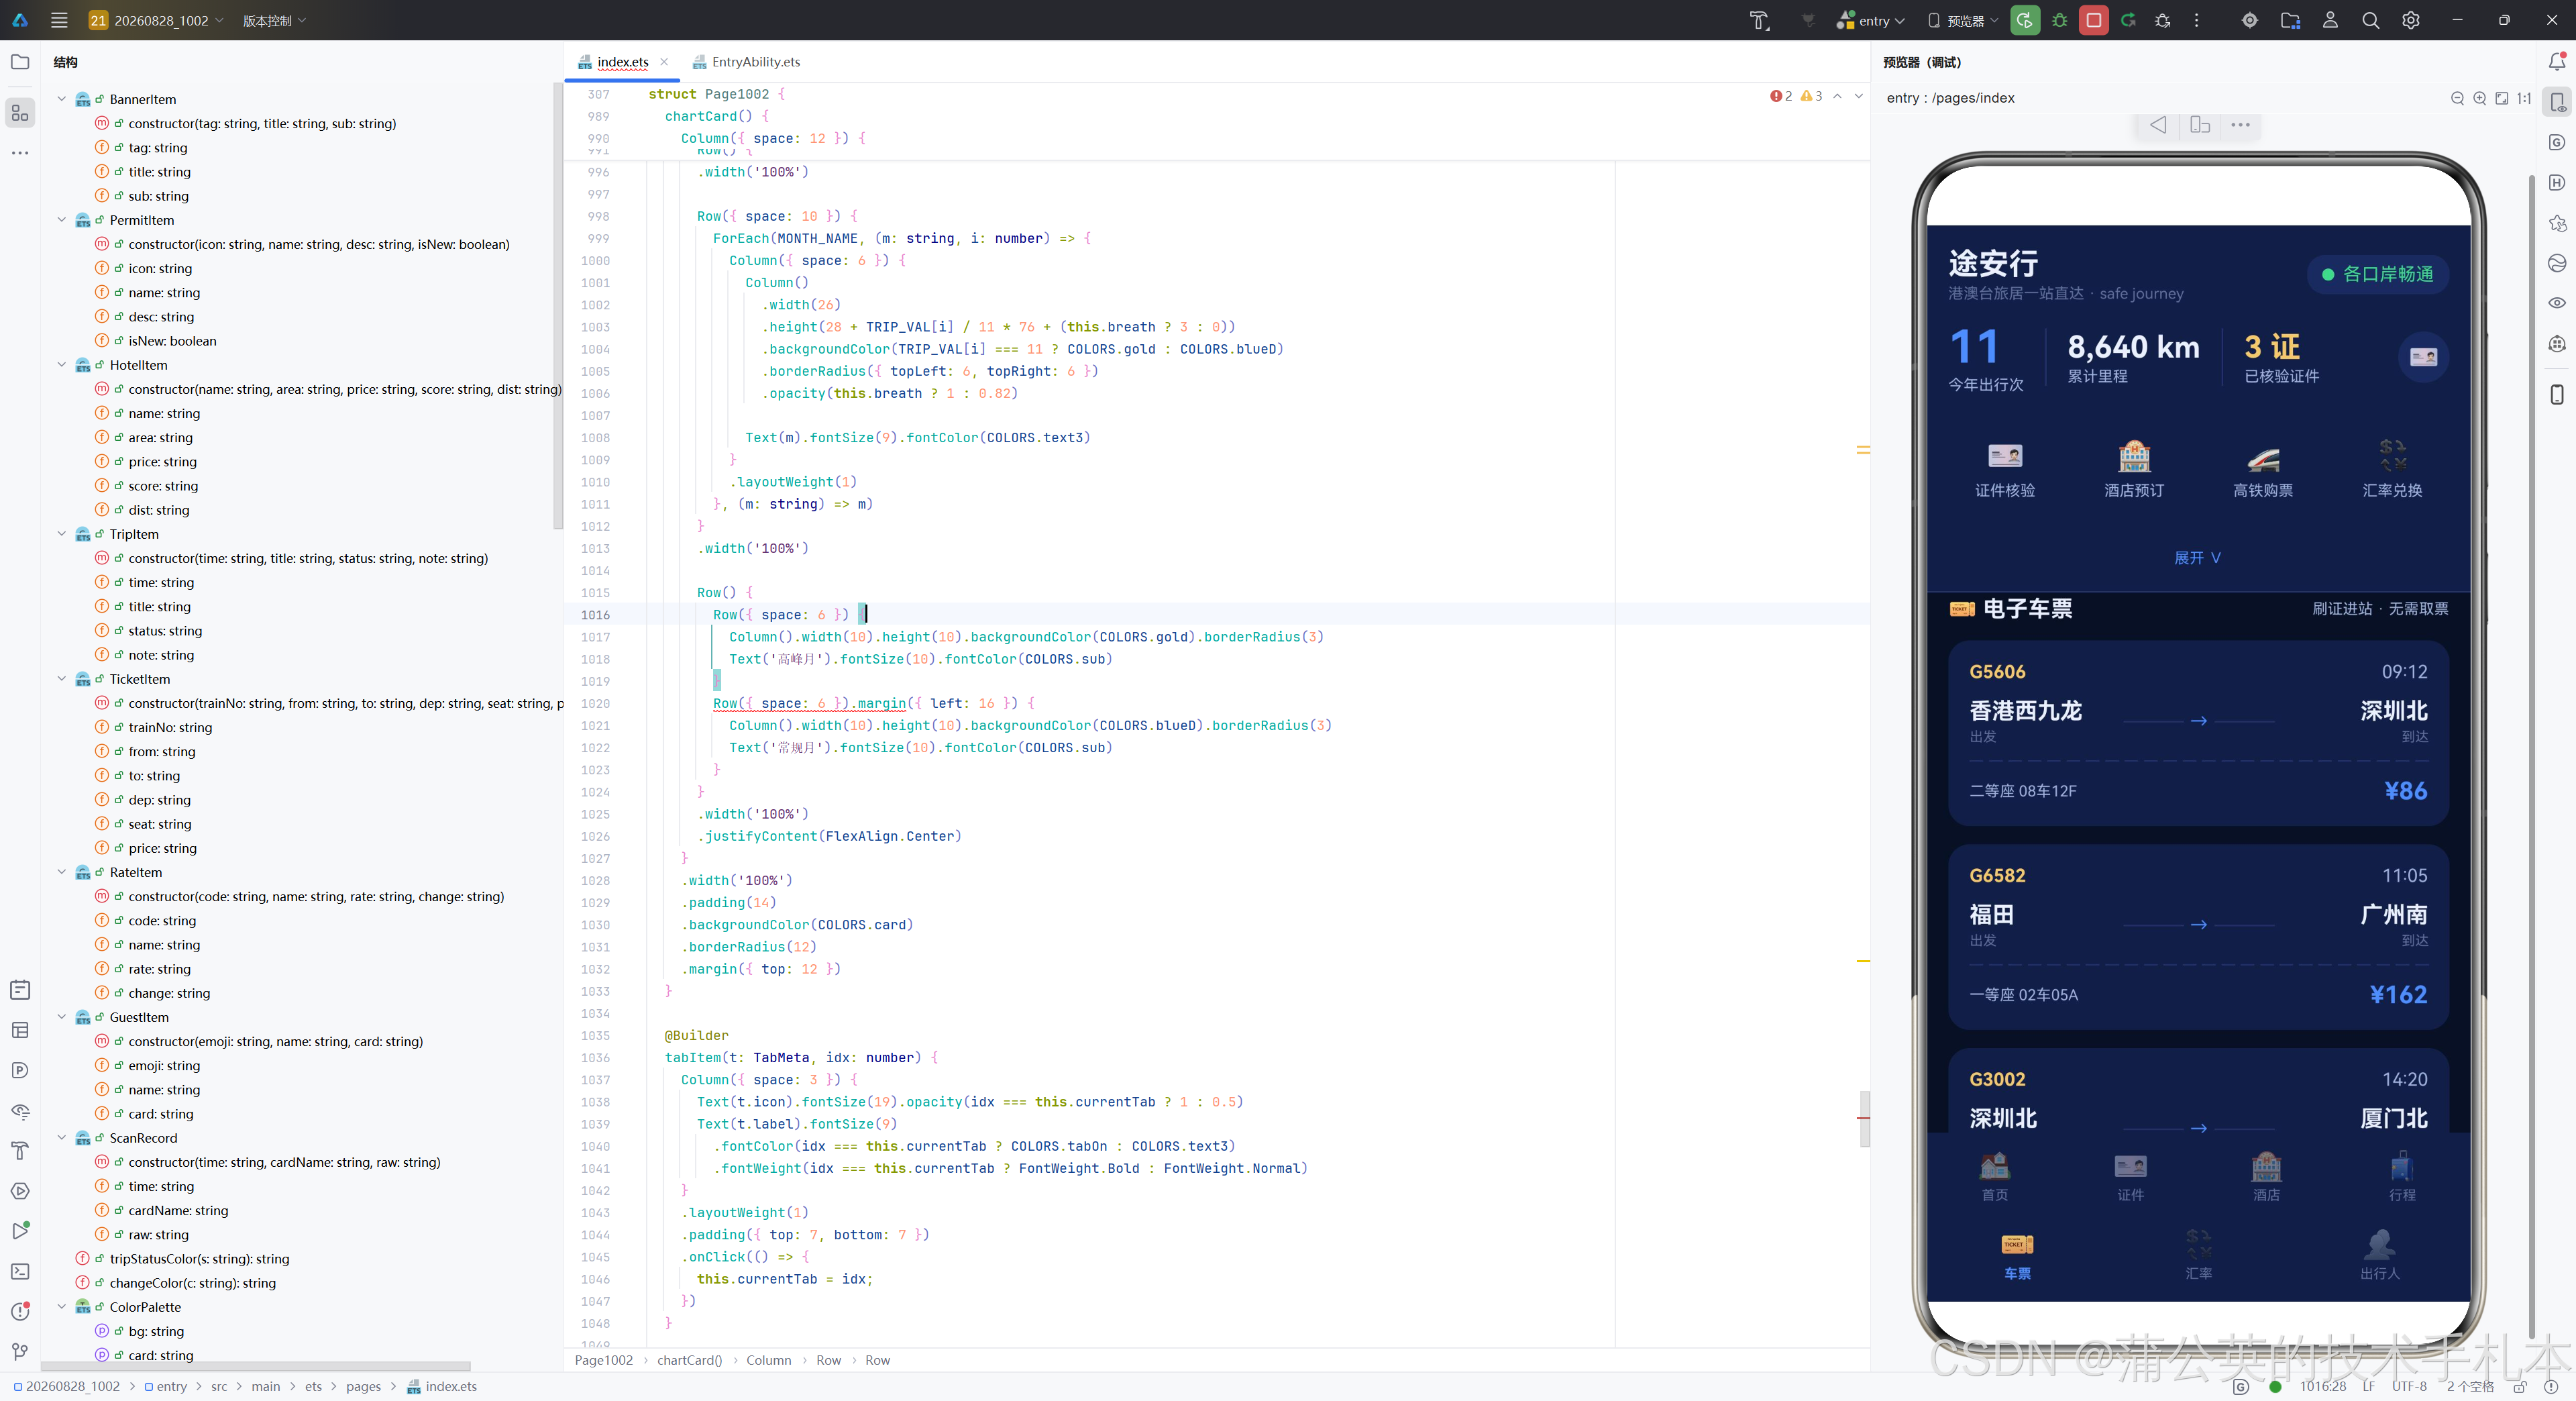
十二、车票 Tab:两段式票券卡片
12.1 票券头部
  @Builder
  tabTicket() {
    Column({ space: 12 }) {
      Row() {
        Text('🎫 电子车票').fontSize(15).fontWeight(FontWeight.Bold).fontColor(COLORS.title)
        Column().layoutWeight(1)
        Text('刷证进站 · 无需取票').fontSize(10).fontColor(COLORS.sub)
      }
      .width('100%')

      ForEach(this.ticketList, (t: TicketItem) => {
        Column({ space: 10 }) {
          Row() {
            Text(t.trainNo).fontSize(12).fontWeight(FontWeight.Bold).fontColor(COLORS.gold)
            Column().layoutWeight(1)
            Text(t.dep).fontSize(12).fontColor(COLORS.sub)
          }
          .width('100%')
车票 Tab 采用两段式票券卡片设计,模拟真实火车票的视觉形态。卡片顶部行显示车次号(金色加粗)和发车时间,通过两端对齐布局形成"票据头"的视觉效果。
12.2 出发到达信息
          Row({ space: 10 }) {
            Column({ space: 3 }) {
              Text(t.from).fontSize(15).fontWeight(FontWeight.Bold).fontColor(COLORS.title)
                .maxLines(1)
                .textOverflow({ overflow: TextOverflow.Ellipsis })
              Text('出发').fontSize(9).fontColor(COLORS.text3)
            }
            .alignItems(HorizontalAlign.Start)
            .layoutWeight(1)

            Row({ space: 4 }) {
              Column().width(40).height(1).backgroundColor(COLORS.line)
              Text('→').fontSize(12).fontColor(COLORS.blue)
              Column().width(40).height(1).backgroundColor(COLORS.line)
            }

            Column({ space: 3 }) {
              Text(t.to).fontSize(15).fontWeight(FontWeight.Bold).fontColor(COLORS.title)
                .maxLines(1)
                .textOverflow({ overflow: TextOverflow.Ellipsis })
              Text('到达').fontSize(9).fontColor(COLORS.text3)
            }
            .alignItems(HorizontalAlign.End)
            .layoutWeight(1)
          }
          .width('100%')
出发到达信息行采用三段式布局:左侧出发站、中间箭头指示符、右侧到达站。中间的箭头指示符使用两条 40px 宽的水平线(Column().width(40).height(1))夹一个蓝色箭头,模拟铁路车票上的路线指示符号。
12.3 虚线分隔与底部信息
          Row({ space: 4 }) {
            ForEach(DASH_IDX, (d: number) => {
              Column().height(1).layoutWeight(1).backgroundColor(COLORS.line)
            }, (d: number) => d.toString())
          }
          .width('100%')
          .margin({ left: -12, right: -12 })

          Row() {
            Text(t.seat).fontSize(10).fontColor(COLORS.sub)
            Column().layoutWeight(1)
            Text(t.price).fontSize(16).fontWeight(FontWeight.Bold).fontColor(COLORS.blue)
          }
          .width('100%')
虚线分隔线使用 ForEach 遍历 24 个索引,每个小段使用 Column().height(1).layoutWeight(1) 等宽排列,形成虚线效果。.margin({ left: -12, right: -12 }) 让虚线超出卡片内边距,形成"撕裂线"的视觉效果,增强票券的真实感。
底部行显示座位信息和价格,价格使用 16px 蓝色加粗字体,是卡片中最大的文字,突出价格信息的重要性。
十三、汇率 Tab:渐变大数字卡与清单行
13.1 渐变大数字卡
  @Builder
  tabRate() {
    Column({ space: 12 }) {
      Column({ space: 8 }) {
        Text('港元 HKD → 人民币').fontSize(11).fontColor(COLORS.sub)
        Text('0.9168').fontSize(46).fontWeight(FontWeight.Bold).fontColor(COLORS.gold)
          .opacity(this.breath ? 1 : 0.8)
        Text('↑ 0.12% · 更新于 3 分钟前').fontSize(11).fontColor(COLORS.red)

        Row({ space: 12 }) {
          Column({ space: 2 }) {
            Text('1,000').fontSize(13).fontWeight(FontWeight.Bold).fontColor(COLORS.blue)
            Text('可兑 ¥916.8').fontSize(9).fontColor(COLORS.text3)
          }
          Column({ space: 2 }) {
            Text('10,000').fontSize(13).fontWeight(FontWeight.Bold).fontColor(COLORS.blue)
            Text('可兑 ¥9,168').fontSize(9).fontColor(COLORS.text3)
          }
          Column({ space: 2 }) {
            Text('50,000').fontSize(13).fontWeight(FontWeight.Bold).fontColor(COLORS.blue)
            Text('可兑 ¥45,840').fontSize(9).fontColor(COLORS.text3)
          }
        }
        .margin({ top: 6 })
      }
      .width('100%')
      .padding(20)
      .backgroundColor(COLORS.dark)
      .borderRadius(16)
      .linearGradient({
        angle: 150,
        colors: [[COLORS.goldD, 0.0], [COLORS.dark, 0.55]]
      })
汇率 Tab 的核心是一个大数字卡片,展示港元兑人民币的实时汇率。46px 的金色大数字配合呼吸动画的透明度变化,营造出实时跳动的汇率展示效果。
卡片使用 150° 方向的线性渐变,从 goldD(深金色)渐变到 dark(极深蓝),前 55% 的区域完成过渡。金色到深蓝的渐变在视觉上形成强烈的温度对比,突出汇率信息的焦点地位。
大数字下方是三个金额换算示例(1000/10000/50000),帮助用户快速估算不同金额的兑换结果。
13.2 汇率清单行
      ForEach(RATE_LIST, (r: RateItem) => {
        Row() {
          Text(r.code).fontSize(12).fontWeight(FontWeight.Bold).fontColor(COLORS.title).width(52)
          Text(r.name).fontSize(11).fontColor(COLORS.sub).layoutWeight(1)
          Text(r.rate).fontSize(13).fontColor(COLORS.title)
          Text(r.change).fontSize(11).fontColor(changeColor(r.change)).margin({ left: 10 })
        }
        .width('100%')
        .padding({ top: 12, bottom: 12, left: 14, right: 14 })
        .backgroundColor(COLORS.card)
        .borderRadius(12)
      }, (r: RateItem) => r.code)
汇率清单行采用四列布局:货币代码(固定 52px 宽,加粗白色)、货币名称(弹性宽度,灰色)、汇率值(白色)、变动方向(红/绿色)。changeColor 函数根据变动方向的箭头符号返回对应颜色。
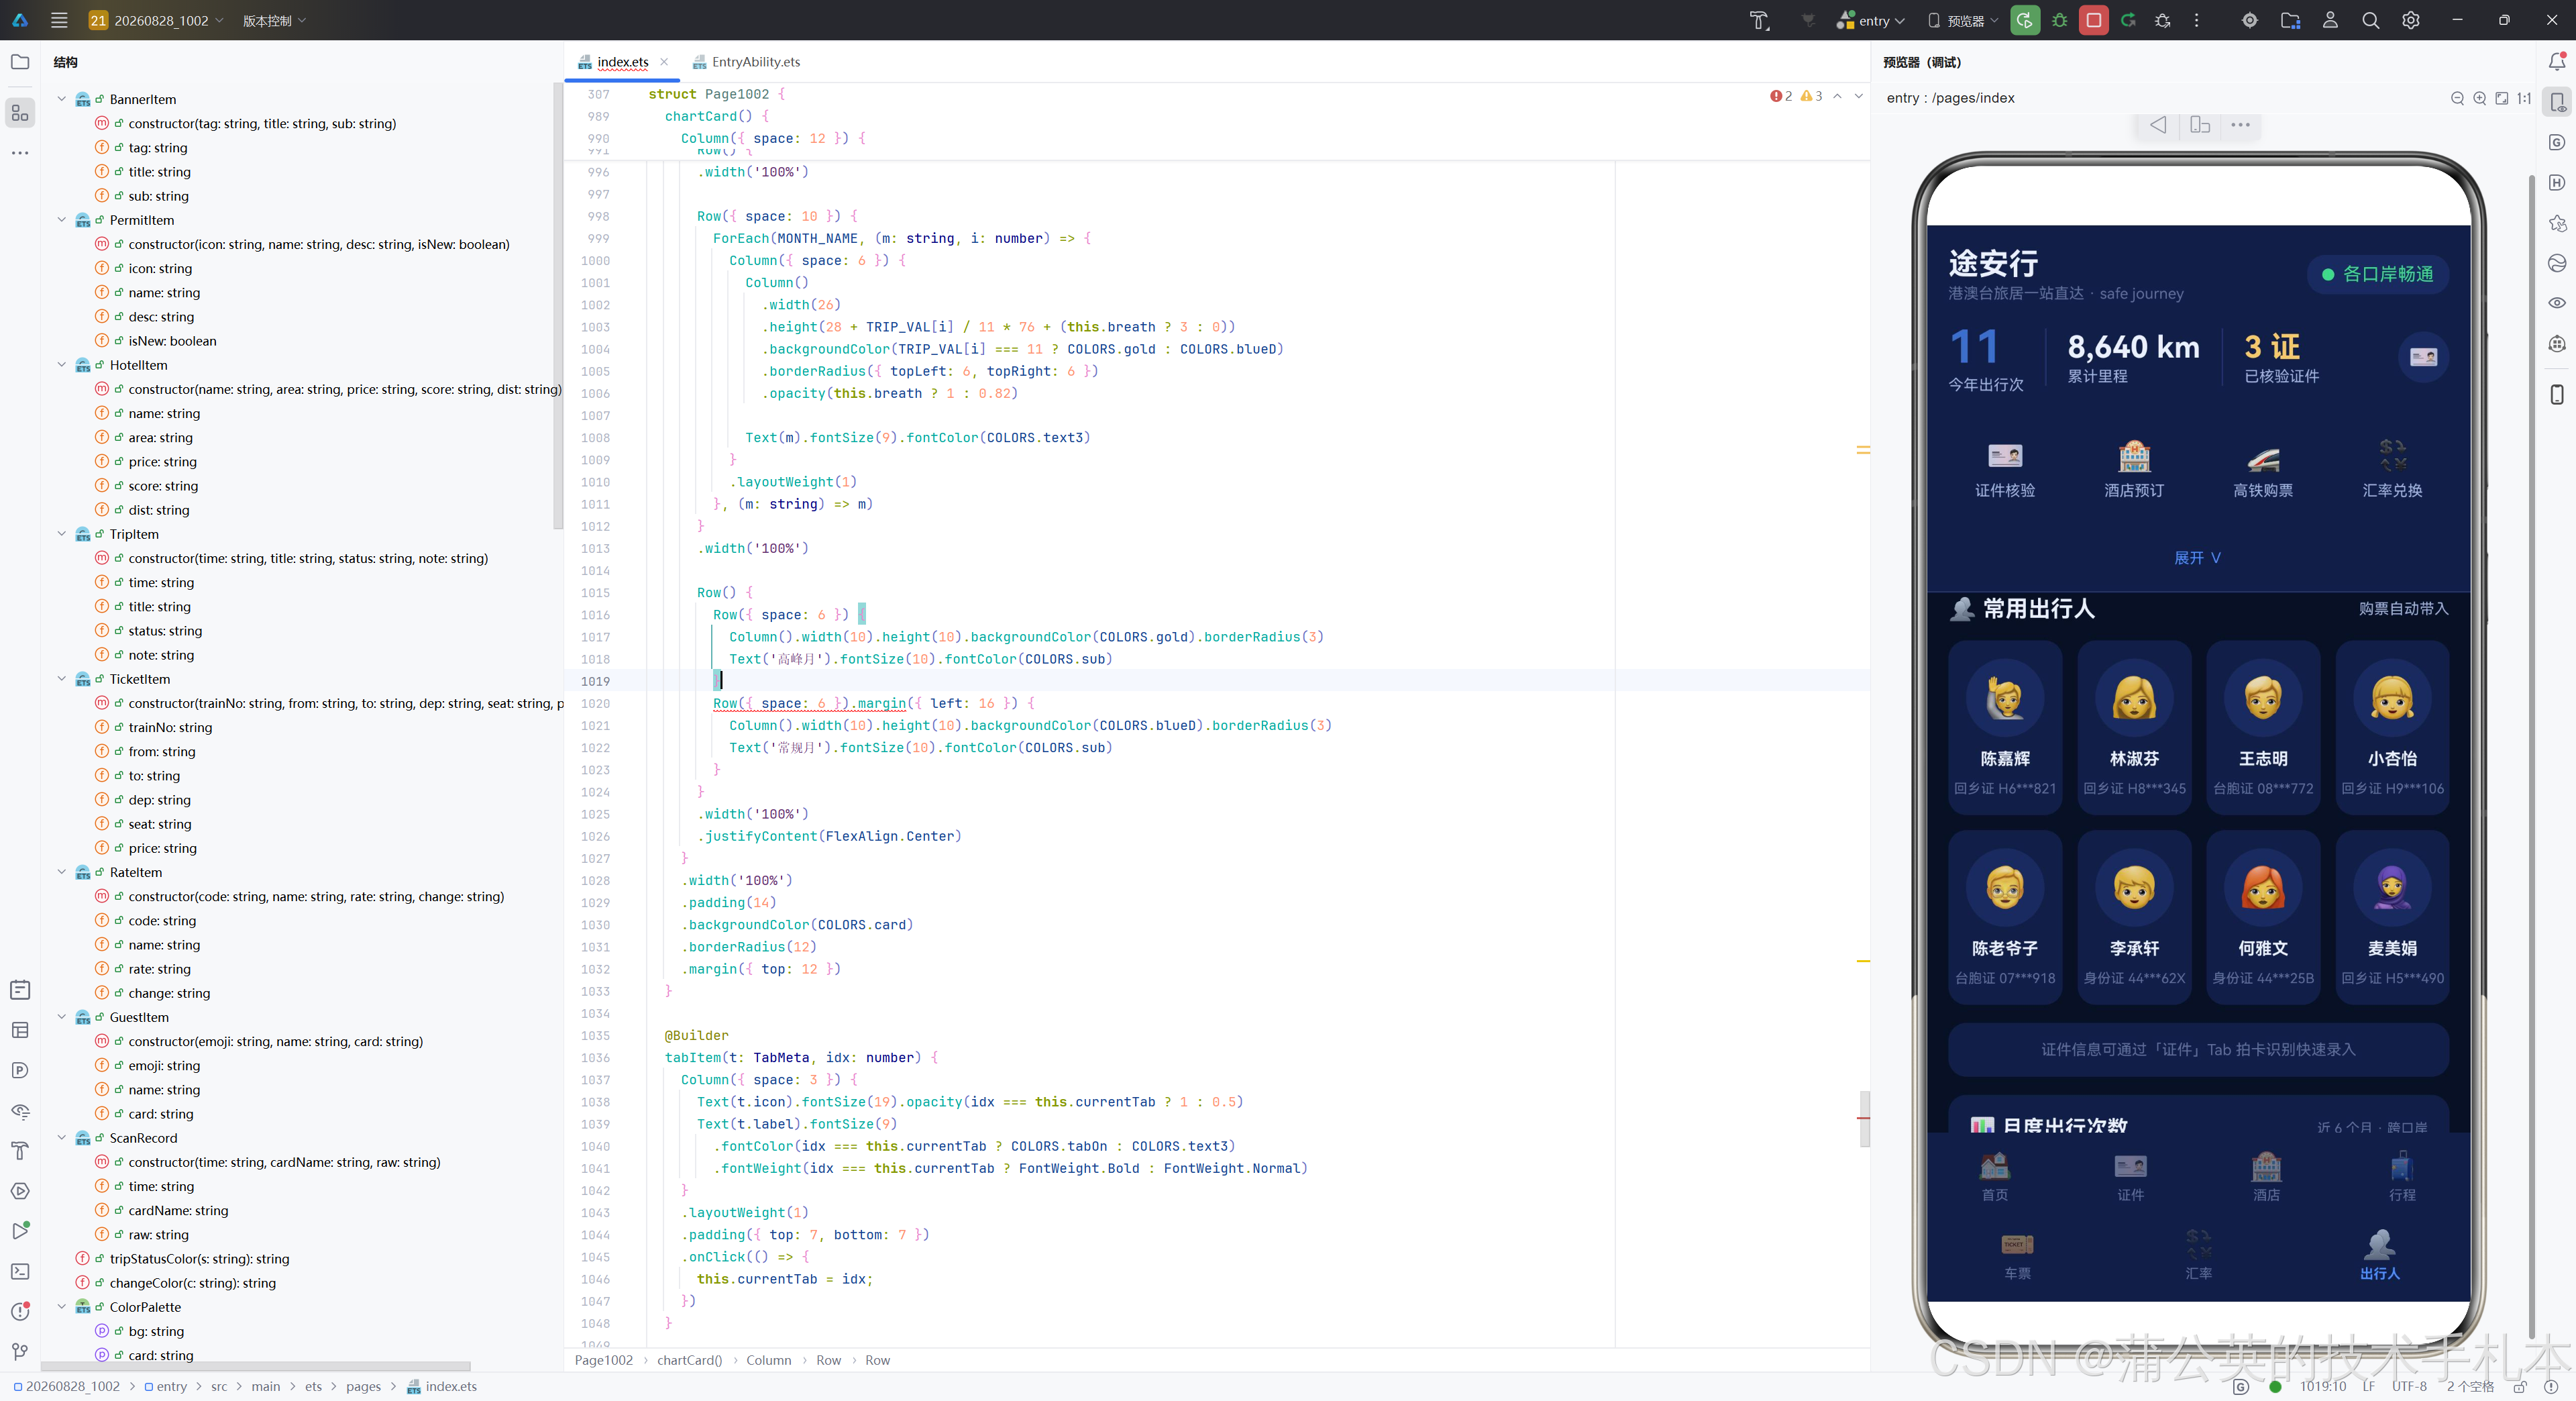
十四、出行人 Tab:四列头像墙
  @Builder
  tabGuest() {
    Column({ space: 12 }) {
      Row() {
        Text('👥 常用出行人').fontSize(15).fontWeight(FontWeight.Bold).fontColor(COLORS.title)
        Column().layoutWeight(1)
        Text('购票自动带入').fontSize(10).fontColor(COLORS.sub)
      }
      .width('100%')

      Grid() {
        ForEach(this.guestList, (g: GuestItem) => {
          GridItem() {
            Column({ space: 8 }) {
              Text(g.emoji).fontSize(26)
                .width(52).height(52).textAlign(TextAlign.Center)
                .backgroundColor(COLORS.chip).borderRadius(26)
              Text(g.name).fontSize(11).fontWeight(FontWeight.Bold).fontColor(COLORS.title)
              Text(g.card).fontSize(9).fontColor(COLORS.text3)
                .maxLines(1)
                .textOverflow({ overflow: TextOverflow.Ellipsis })
            }
            .width('100%')
            .padding({ top: 12, bottom: 12 })
            .backgroundColor(COLORS.card)
            .borderRadius(12)
          }
        }, (g: GuestItem) => g.name)
      }
      .columnsTemplate('1fr 1fr 1fr 1fr')
      .columnsGap(10)
      .rowsGap(10)
      .width('100%')
出行人 Tab 使用四列 Grid 头像墙布局,每个出行人卡片包含圆形 Emoji 头像(52x52px 圆形背景)、姓名和脱敏证件号。四列布局在移动端屏幕上可以展示更多出行人,适合常用出行人数量较多的场景。
卡片底部的提示文字"证件信息可通过证件 Tab 拍卡识别快速录入"带有点击事件,点击后跳转到证件 Tab,实现了功能间的联动引导。
十五、月度趋势图:CSS 柱状图实现
  @Builder
  chartCard() {
    Column({ space: 12 }) {
      Row() {
        Text('📊 月度出行次数').fontSize(14).fontWeight(FontWeight.Bold).fontColor(COLORS.title)
        Column().layoutWeight(1)
        Text('近 6 个月 · 跨口岸').fontSize(9).fontColor(COLORS.text3)
      }
      .width('100%')

      Row({ space: 10 }) {
        ForEach(MONTH_NAME, (m: string, i: number) => {
          Column({ space: 6 }) {
            Column()
              .width(26)
              .height(28 + TRIP_VAL[i] / 11 * 76 + (this.breath ? 3 : 0))
              .backgroundColor(TRIP_VAL[i] === 11 ? COLORS.gold : COLORS.blueD)
              .borderRadius({ topLeft: 6, topRight: 6 })
              .opacity(this.breath ? 1 : 0.82)

            Text(m).fontSize(9).fontColor(COLORS.text3)
          }
          .layoutWeight(1)
        }, (m: string) => m)
      }
      .width('100%')
月度趋势图使用纯 CSS 方式绘制柱状图,无需 Canvas 绘图。每根柱子使用 Column 组件,高度通过公式 28 + TRIP_VAL[i] / 11 * 76 + (this.breath ? 3 : 0) 计算:
- 基础高度 28px 确保最小可见性
TRIP_VAL[i] / 11 * 76按数据值比例计算增量高度(11 是最大值)this.breath ? 3 : 0添加呼吸动画的微小高度变化
颜色方面,最大值(11 次)的柱子使用金色高亮,其他柱子使用深蓝色。顶部圆角 borderRadius({ topLeft: 6, topRight: 6 }) 让柱子看起来更精致。
15.1 图例
      Row() {
        Row({ space: 6 }) {
          Column().width(10).height(10).backgroundColor(COLORS.gold).borderRadius(3)
          Text('高峰月').fontSize(10).fontColor(COLORS.sub)
        }
        Row({ space: 6 }).margin({ left: 16 }) {
          Column().width(10).height(10).backgroundColor(COLORS.blueD).borderRadius(3)
          Text('常规月').fontSize(10).fontColor(COLORS.sub)
        }
      }
      .width('100%')
      .justifyContent(FlexAlign.Center)
图例使用两个小色块+文字组成,居中对齐。金色代表高峰月,深蓝色代表常规月,与柱状图的颜色编码一致。
十六、底部 Tab 栏:两行导航布局
16.1 Tab 项构建
  @Builder
  tabItem(t: TabMeta, idx: number) {
    Column({ space: 3 }) {
      Text(t.icon).fontSize(19).opacity(idx === this.currentTab ? 1 : 0.5)
      Text(t.label).fontSize(9)
        .fontColor(idx === this.currentTab ? COLORS.tabOn : COLORS.text3)
        .fontWeight(idx === this.currentTab ? FontWeight.Bold : FontWeight.Normal)
    }
    .layoutWeight(1)
    .padding({ top: 7, bottom: 7 })
    .onClick(() => {
      this.currentTab = idx;
    })
  }
tabItem 是单个 Tab 项的构建器,接收 Tab 元数据和索引参数。通过比较 idx 和 currentTab 来决定激活状态的样式:激活时图标完全不透明、文字蓝色加粗;未激活时图标半透明、文字灰色常规。
.layoutWeight(1) 确保所有 Tab 项等宽分布,点击事件更新 currentTab 触发页面切换。
16.2 Tab 栏容器
  @Builder
  tabBar() {
    Column({ space: 2 }) {
      Row() {
        ForEach(TAB_ROW1, (t: TabMeta, i: number) => {
          this.tabItem(t, i)
        }, (t: TabMeta) => t.label)
      }
      .width('100%')

      Row() {
        ForEach(TAB_ROW2, (t: TabMeta, i: number) => {
          this.tabItem(t, i + 4)
        }, (t: TabMeta) => t.label)
      }
      .width('100%')
    }
    .width('100%')
    .padding({ top: 4, bottom: 6 })
    .backgroundColor(COLORS.card)
  }
Tab 栏容器使用 Column 包含两个 Row,分别渲染 TAB_ROW1(前 4 个)和 TAB_ROW2(后 3 个)。第二行的索引从 4 开始(i + 4),确保与 currentTab 的值正确对应。
十七、Vision Kit 卡证识别控件
17.1 CardRecognition 控件配置
  @Builder
  scanView() {
    CardRecognition({
      supportType: SCAN_TYPES[this.scanIdx],
      cardRecognitionConfig: {
        defaultShootingMode: ShootingMode.MANUAL,
        isPhotoSelectionSupported: true
      },
      onResult: ((params: CardRecognitionResult) => {
        if (params.code !== 200) {
          this.scanning = false;
          return;
        }
        const parts: string[] = [];
        if (params.cardInfo?.front !== undefined) {
          parts.push(JSON.stringify(params.cardInfo.front));
        }
        if (params.cardInfo?.back !== undefined) {
          parts.push(JSON.stringify(params.cardInfo.back));
        }
        if (params.cardInfo?.main !== undefined) {
          parts.push(JSON.stringify(params.cardInfo.main));
        }
        this.scanRecords.push(new ScanRecord('刚刚', PERMIT_LIST[this.scanIdx].name, parts.join('\n')));
        this.scanning = false;
      })
    })
    .width('100%')
    .height('100%')
  }
scanView 是 Vision Kit 卡证识别的核心实现。CardRecognition 控件接收三个关键参数:
supportType:从SCAN_TYPES数组中按scanIdx索引获取对应的CardType枚举值,确保识别正确的证件类型。cardRecognitionConfig:配置识别行为,defaultShootingMode: ShootingMode.MANUAL设置为手动拍摄模式,isPhotoSelectionSupported: true允许从相册选择照片识别。onResult:识别结果回调函数,接收CardRecognitionResult参数。
17.2 识别结果处理
回调函数中首先检查 params.code !== 200,如果不等于 200(识别失败或取消),直接关闭识别界面。如果识别成功,依次检查 cardInfo 的 front(正面)、back(背面)和 main(主页)三个字段,将存在的部分 JSON 序列化后拼接成完整结果。
最终创建 ScanRecord 实例并 push 到 scanRecords 数组,UI 自动更新识别记录列表。设置 scanning = false 关闭识别界面。
这种处理方式灵活地支持了不同证件类型的识别结果结构:身份证有正反两面、护照只有主页、银行卡只有正面等。
十八、弹窗系统:新增/编辑/删除
18.1 遮罩层
  @Builder
  modalOverlay(onClose: () => void) {
    Column()
      .width('100%')
      .height('100%')
      .backgroundColor(COLORS.mask)
      .onClick(() => onClose())
  }
modalOverlay 是弹窗的遮罩层,使用半透明背景色覆盖全屏,点击遮罩区域时调用 onClose 回调关闭弹窗。这是弹窗交互的标准模式——点击遮罩区域关闭弹窗,提升用户体验。
18.2 新增行程弹窗
  @Builder
  panelAdd(onClose: () => void) {
    Stack() {
      this.modalOverlay(onClose)

      Column({ space: 12 }) {
        Text('+ 新增行程').fontSize(15).fontWeight(FontWeight.Bold).fontColor(COLORS.title)

        Column({ space: 6 }) {
          Text('行程名称').fontSize(11).fontColor(COLORS.sub)
          TextInput({ placeholder: '如:香港西九龙 → 珠海拱北' })
            .fontSize(13)
            .fontColor(COLORS.title)
            .placeholderColor(COLORS.text3)
            .backgroundColor(COLORS.chip)
            .borderRadius(10)
            .onChange((v: string) => {
              this.addTitle = v;
            })
        }
        .width('100%')
        .alignItems(HorizontalAlign.Start)
新增弹窗使用 Stack 层叠遮罩和内容面板,内容面板从底部弹出(alignContent(Alignment.Bottom))。弹窗包含两个 TextInput 输入框:行程名称和备注,以及取消和保存两个按钮。
TextInput 的 onChange 回调实时更新 addTitle 和 addNote 状态变量,确保用户输入的数据在点击保存时可用。
18.3 保存逻辑
        Row({ space: 10 }) {
          Button('取消')
            .fontSize(13)
            .fontColor(COLORS.sub)
            .backgroundColor(COLORS.chip)
            .borderRadius(14)
            .layoutWeight(1)
            .onClick(() => onClose())
          Button('保存')
            .fontSize(13)
            .fontColor(COLORS.dark)
            .backgroundColor(COLORS.blue)
            .borderRadius(14)
            .layoutWeight(1)
            .onClick(() => {
              const title: string = this.addTitle === '' ? '自定义行程' : this.addTitle;
              const note: string = this.addNote === '' ? '待补充' : this.addNote;
              this.tripList.push(new TripItem('今天', title, '待开始', note));
              this.addTitle = '';
              this.addNote = '';
              this.addModal = false;
            })
        }
保存按钮的逻辑包含默认值处理:如果用户未输入行程名称,使用"自定义行程"作为默认值;未输入备注,使用"待补充"。保存后创建新的 TripItem 实例并 push 到 tripList,然后清空表单字段并关闭弹窗。
18.4 编辑弹窗
  @Builder
  panelEdit(onClose: () => void) {
    Stack() {
      this.modalOverlay(onClose)

      Column({ space: 12 }) {
        Text('编辑行程状态').fontSize(15).fontWeight(FontWeight.Bold).fontColor(COLORS.title)
        Text(this.editIdx >= 0 ? this.tripList[this.editIdx].title : '')
          .fontSize(12)
          .fontColor(COLORS.sub)
          .maxLines(1)
          .textOverflow({ overflow: TextOverflow.Ellipsis })

        Row({ space: 8 }) {
          ForEach(['已完成', '进行中', '待开始'], (s: string) => {
            Text(s).fontSize(12).fontColor(tripStatusColor(s))
              .padding({ left: 14, right: 14, top: 8, bottom: 8 })
              .backgroundColor(COLORS.chip)
              .borderRadius(14)
              .onClick(() => {
                if (this.editIdx >= 0) {
                  const t = this.tripList[this.editIdx];
                  this.tripList[this.editIdx] = new TripItem(t.time, t.title, s, t.note);
                }
                this.editModal = false;
              })
          }, (s: string) => s)
        }
编辑弹窗提供三个状态选项(已完成/进行中/待开始),每个选项使用对应的状态色彩。点击后创建新的 TripItem 实例替换原数据(因为 ArkUI 的 @Observed 对象需要重新赋值才能触发更新),然后关闭弹窗。
18.5 删除弹窗
  @Builder
  panelDel(onClose: () => void) {
    Stack() {
      this.modalOverlay(onClose)

      Column({ space: 14 }) {
        Text('⚠️ 删除行程').fontSize(15).fontWeight(FontWeight.Bold).fontColor(COLORS.red)
        Text(this.delIdx >= 0 ? `确定删除「${this.tripList[this.delIdx].title}」吗?` : '')
          .fontSize(12)
          .fontColor(COLORS.sub)

        Row({ space: 10 }) {
          Button('再想想')
            .fontSize(13)
            .fontColor(COLORS.sub)
            .backgroundColor(COLORS.chip)
            .borderRadius(14)
            .layoutWeight(1)
            .onClick(() => onClose())
          Button('确认删除')
            .fontSize(13)
            .fontColor(COLORS.title)
            .backgroundColor(COLORS.red)
            .borderRadius(14)
            .layoutWeight(1)
            .onClick(() => {
              if (this.delIdx >= 0) {
                this.tripList.splice(this.delIdx, 1);
              }
              this.delModal = false;
            })
        }
      }
      .width('72%')
      .padding(18)
      .backgroundColor(COLORS.card)
      .borderRadius(16)
    }
    .width('100%')
    .height('100%')
    .alignContent(Alignment.Center)
  }
删除弹窗采用居中定位(alignContent(Alignment.Center)),宽度为 72%,形成居中对话框的视觉效果。弹窗包含警告标题、确认文案和两个按钮(再想想/确认删除)。确认删除后使用 splice 方法从数组中移除指定索引的元素。
十九、七 Tab 布局对比
| Tab 名称 | 布局类型 | 核心组件 | 数据驱动 | 特色设计 |
|---|---|---|---|---|
| 首页 | 横滑 Banner + 提醒卡片 | Scroll(Horizontal) + Row | bannerList | 口岸客流实时提醒 |
| 证件 | 中心大卡 + 列表行 | linearGradient + ForEach | PERMIT_LIST + scanRecords | Vision Kit 卡证识别全屏独占 |
| 酒店 | 双列 Grid 卡片 | Grid(1fr 1fr) | hotelList | 评分+价格两端对齐 |
| 行程 | 固定高度时间轴 | Row + Column(时间轴) | tripList | 状态色彩圆点 + 连接线 |
| 车票 | 两段式票券卡 | Column + 虚线 | ticketList | ForEach 模拟虚线撕裂效果 |
| 汇率 | 渐变大数字 + 清单行 | linearGradient + Row | RATE_LIST | 46px 大数字 + 呼吸动画 |
| 出行人 | 四列头像墙 | Grid(1fr×4) | guestList | Emoji 头像 + 证件脱敏 |
布局多样性分析
本应用的 7 个 Tab 采用了 7 种完全不同的布局风格,这在同类应用中非常少见。通常的做法是所有 Tab 共用一种列表布局模板,通过数据差异化来呈现不同内容。而本应用通过布局本身的差异化设计,让每个 Tab 都有独特的视觉体验:
- 首页 采用横向滚动 Banner,是最常见的"信息流入口"模式
- 证件 采用中心大卡 + 列表的"功能引导"模式,视觉焦点集中在识别入口
- 酒店 采用双列 Grid,平衡了信息密度和浏览效率
- 行程 采用时间轴布局,线性展示行程的时序关系
- 车票 采用票券式卡片,模拟真实票据的视觉形态
- 汇率 采用大数字 + 清单的"仪表盘"模式,突出核心数据
- 出行人 采用四列头像墙,最大化展示人数
二十、总结与技术回顾
20.1 架构设计总结
本文详细解析了一个基于 ArkUI 框架的港澳台旅居服务平台的技术实现。从整体架构来看,应用采用了「单页面 + 多 Tab + 条件渲染」的核心架构模式,通过 @State 状态变量驱动 7 个完全异构的布局页面。这种架构在中小型应用中具有显著优势:避免了多页面跳转的上下文切换开销,同时通过条件渲染确保了每次只有一个 Tab 的内容被渲染,性能表现优异。
20.2 Vision Kit 集成经验
Vision Kit 的 CardRecognition 控件是本应用的核心差异化功能。通过 SCAN_TYPES 数组将证件列表与 CardType 枚举一一映射的设计,实现了用户选择与识别类型的解耦。识别结果的 onResult 回调通过检查 code === 200 判断成功,并灵活处理 cardInfo 的 front/back/main 三种可能的识别结果结构,适应了不同证件类型的识别结果差异。
特别值得一提的是,HarmonyOS 6.1.1 版本新增的 CARD_MAINLAND_TRAVEL_PERMIT_HK_MO 和 CARD_MAINLAND_TRAVEL_PERMIT_TW 两类通行证识别能力,使得应用能够直接支持港澳台居民的证件核验需求,无需依赖第三方 OCR 服务,在识别精度和数据安全方面都有显著优势。
20.3 状态管理模式
应用的状态管理采用了"扁平化 @State 变量"的策略:每个状态变量独立管理一个维度的数据,互不干扰。这种模式的优势在于简单直观,开发者可以清晰地追踪每个状态变量的变化路径。弹窗系统通过"状态变量 + 回调函数注入"的模式实现了高度可复用的弹窗组件,每个弹窗接收一个 onClose 回调,将关闭逻辑的控制权交给了调用方。
20.4 动画与交互设计
呼吸动画是贯穿整个应用的微交互设计。通过 aboutToAppear 中启动的 1 秒定时器,breath 状态变量在 true 和 false 之间持续翻转,被头部数字、证件 Emoji、汇率大数字、柱状图等多个 UI 元素引用。这种"一源多用"的动画设计既保证了视觉一致性,又避免了多个定时器的资源浪费。
宫格的展开/收起动画通过 .animation({ duration: 220, curve: Curve.EaseInOut }) 实现,配合 rowsTemplate 和 height 的动态切换,达到了流畅的过渡效果。220ms 的时长和 EaseInOut 曲线是移动端交互动画的常用参数,既不会太短让用户感觉突兀,也不会太长影响操作效率。
20.5 工程实践启示
从工程实践角度,本应用的代码组织遵循了清晰的分层结构:颜色系统 → 常量定义 → 辅助函数 → 数据模型 → 组件主体 → Builder 函数群。每一层都有明确的职责边界,代码可读性和可维护性都得到了保障。
@Observed 装饰器的使用确保了数据模型的响应式能力,当数据被修改时 UI 自动更新。而 ForEach 的键值生成器参数(如 (b: BannerItem) => b.title)为框架的列表 diff 提供了优化依据,避免了不必要的全量重新渲染。
总体而言,本应用展示了 ArkUI 框架在复杂行业场景中的实战能力:从 Vision Kit 的系统级卡证识别到 7 种异构布局的灵活切换,从呼吸微交互到弹窗状态管理,每一个技术点都经过了精心设计和实践验证。这些经验对于 HarmonyOS 生态中的应用开发具有广泛的参考价值。
附录:DevEco Studio 创建新项目与查看 SDK 版本
本章节演示如何使用 DevEco Studio 创建一个 HarmonyOS 新项目,并查看当前 IDE 已安装的 SDK 版本,适合作为其他技术博文的补充操作指南。
一、创建新项目
1.1 进入欢迎界面
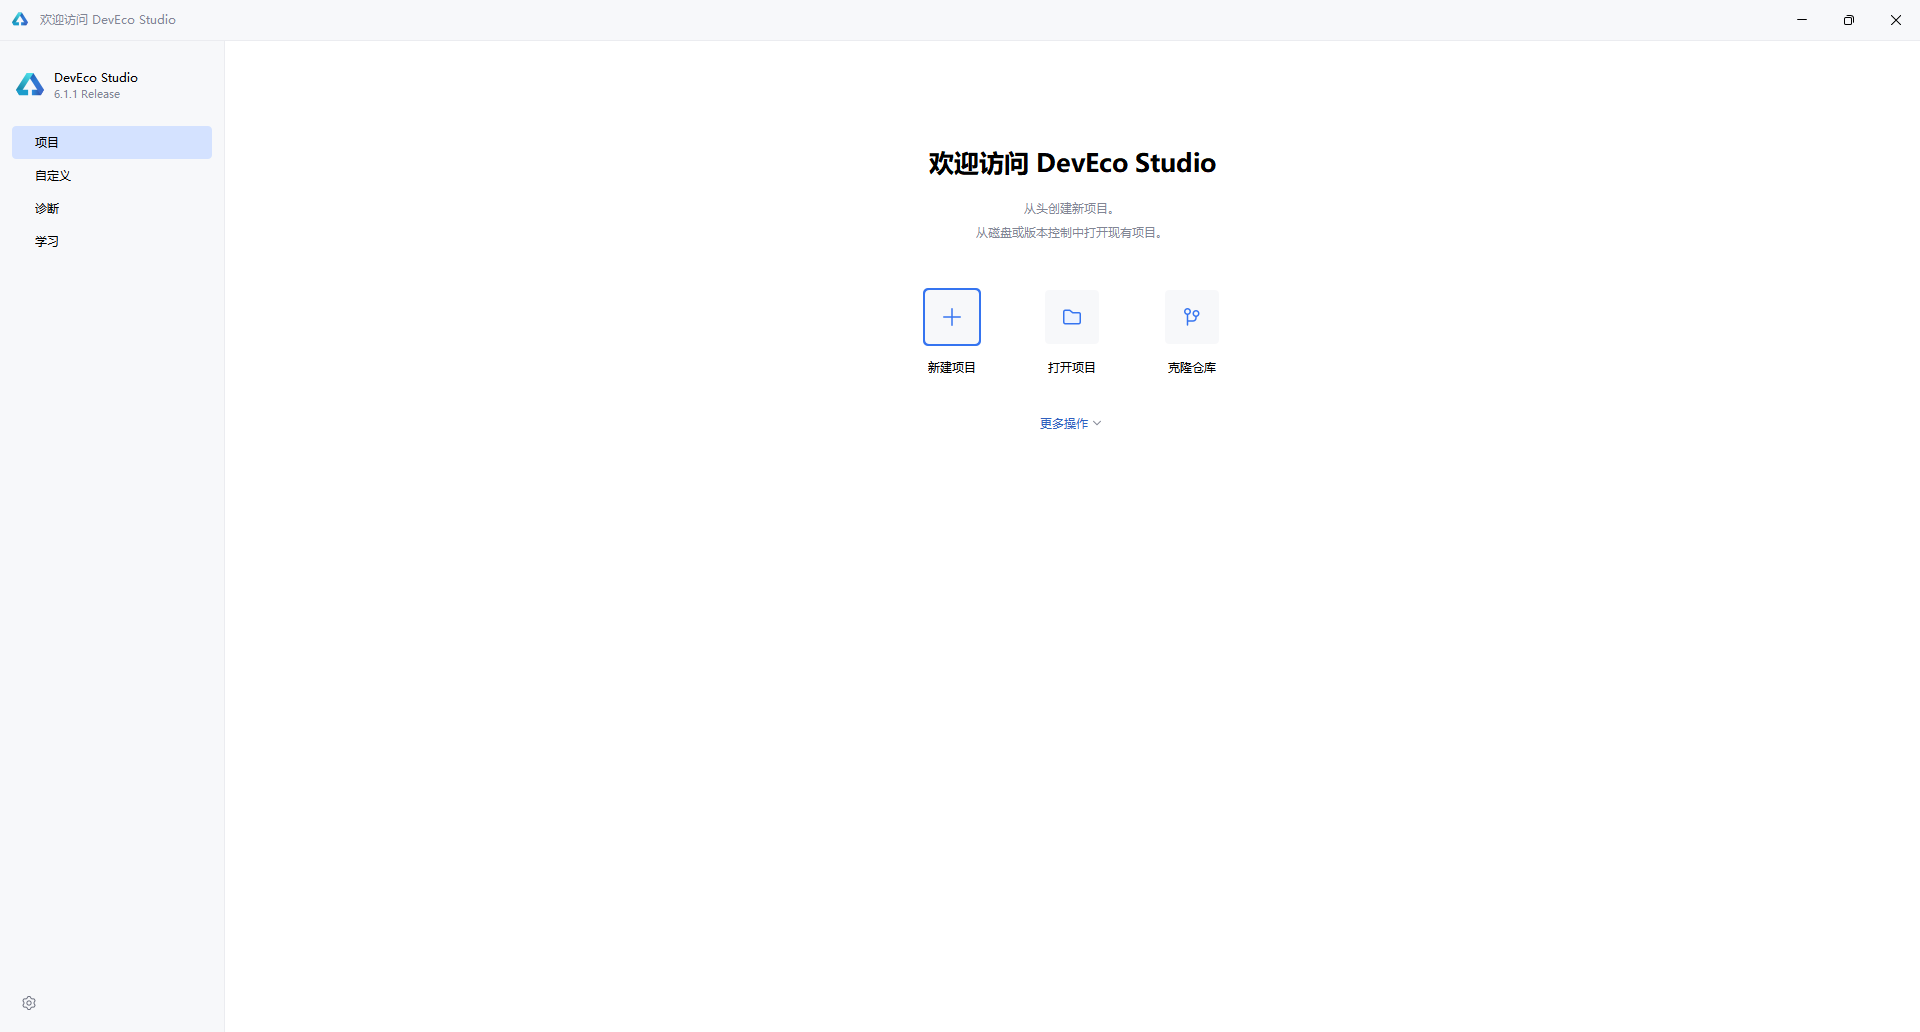
启动 DevEco Studio 后,首先看到的是欢迎界面。左侧导航栏默认选中 “项目”,右侧提供三个主要入口:
- 新建项目:从头创建新项目
- 打开项目:打开本地已有项目
- 克隆仓库:从 Git 等版本控制拉取代码
点击 “新建项目” 按钮,进入项目创建向导。
1.2 选择项目模板
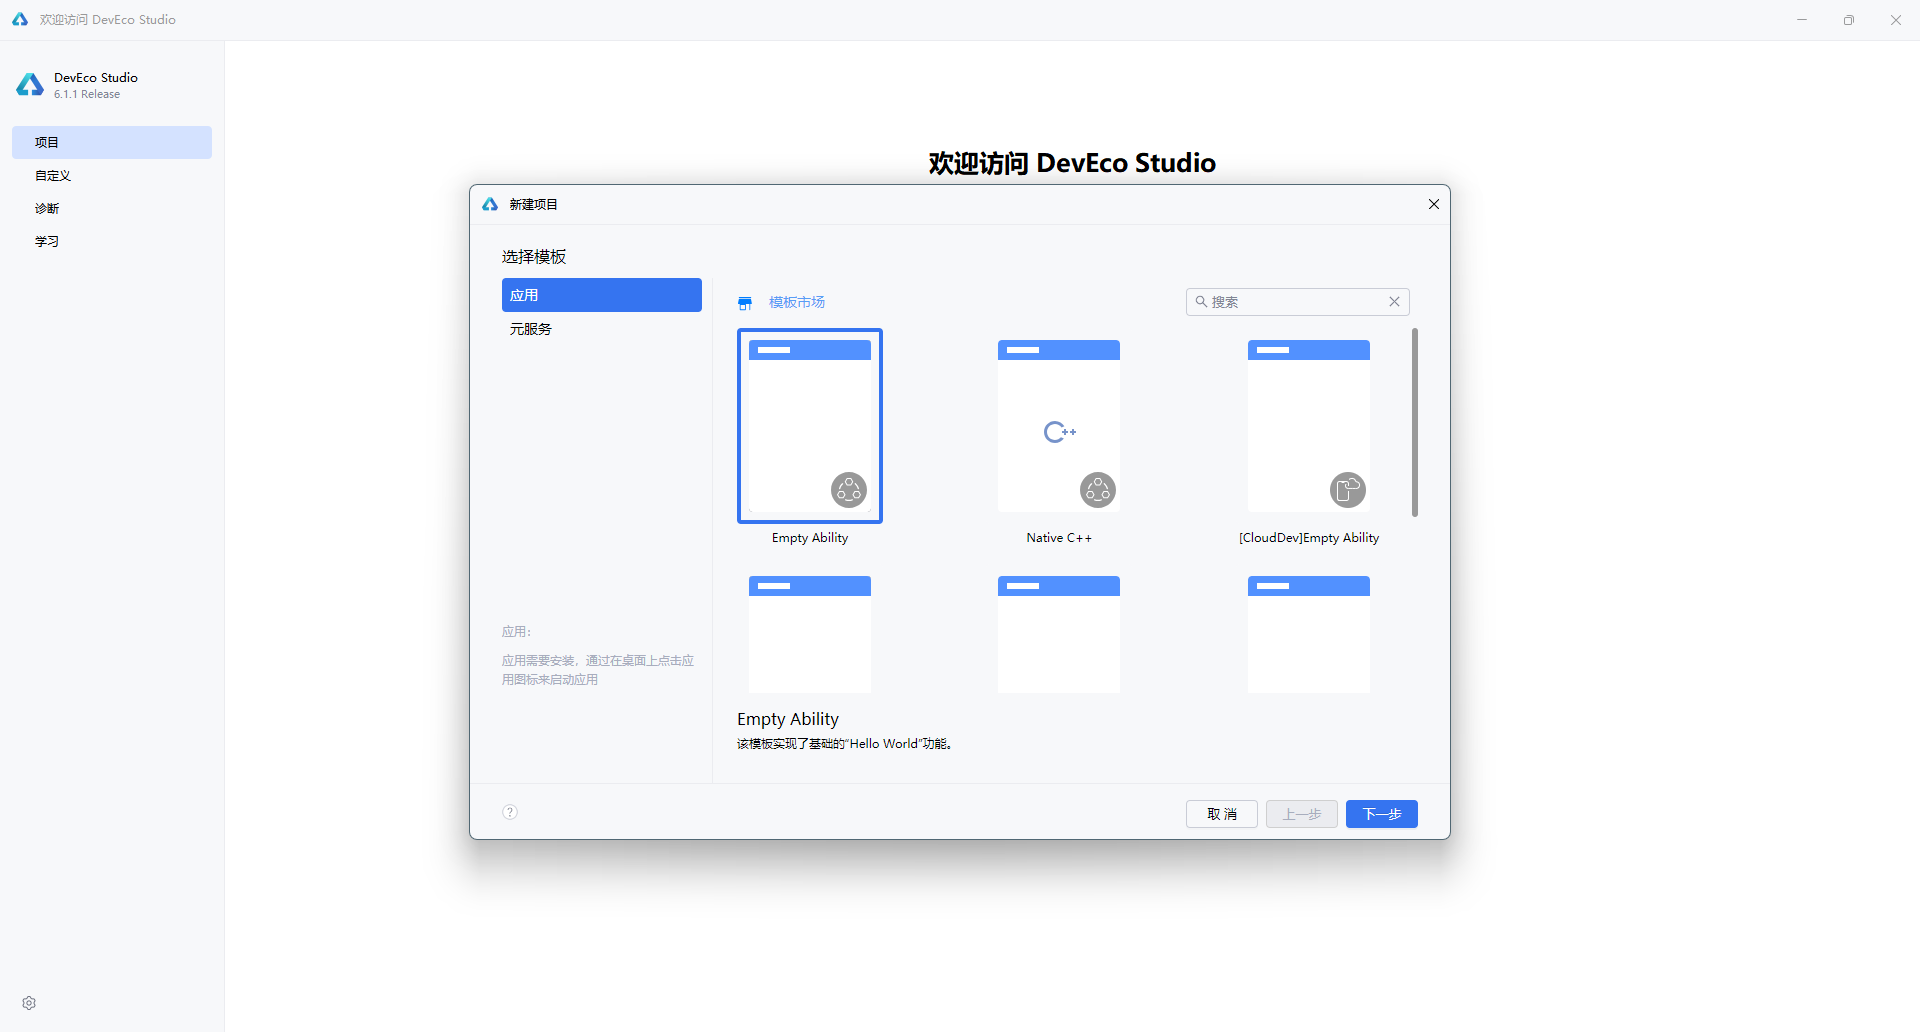
在弹出的"新建项目"对话框中,左侧分类标签提供了两种项目类型:
| 类型 | 说明 |
|---|---|
| 应用(Application) | 开发标准的 HarmonyOS 应用,具备完整的 Ability 生命周期 |
| 元服务(Atomic Service) | 开发轻量级的原子化服务,无需安装即可使用 |
选择 “应用” 标签后,右侧展示多种模板。对于大多数场景,推荐选择 “Empty Ability” —— 这是一个最基础的入门模板,仅包含 Hello World 功能,适合从零开始构建应用。
1.3 配置项目信息
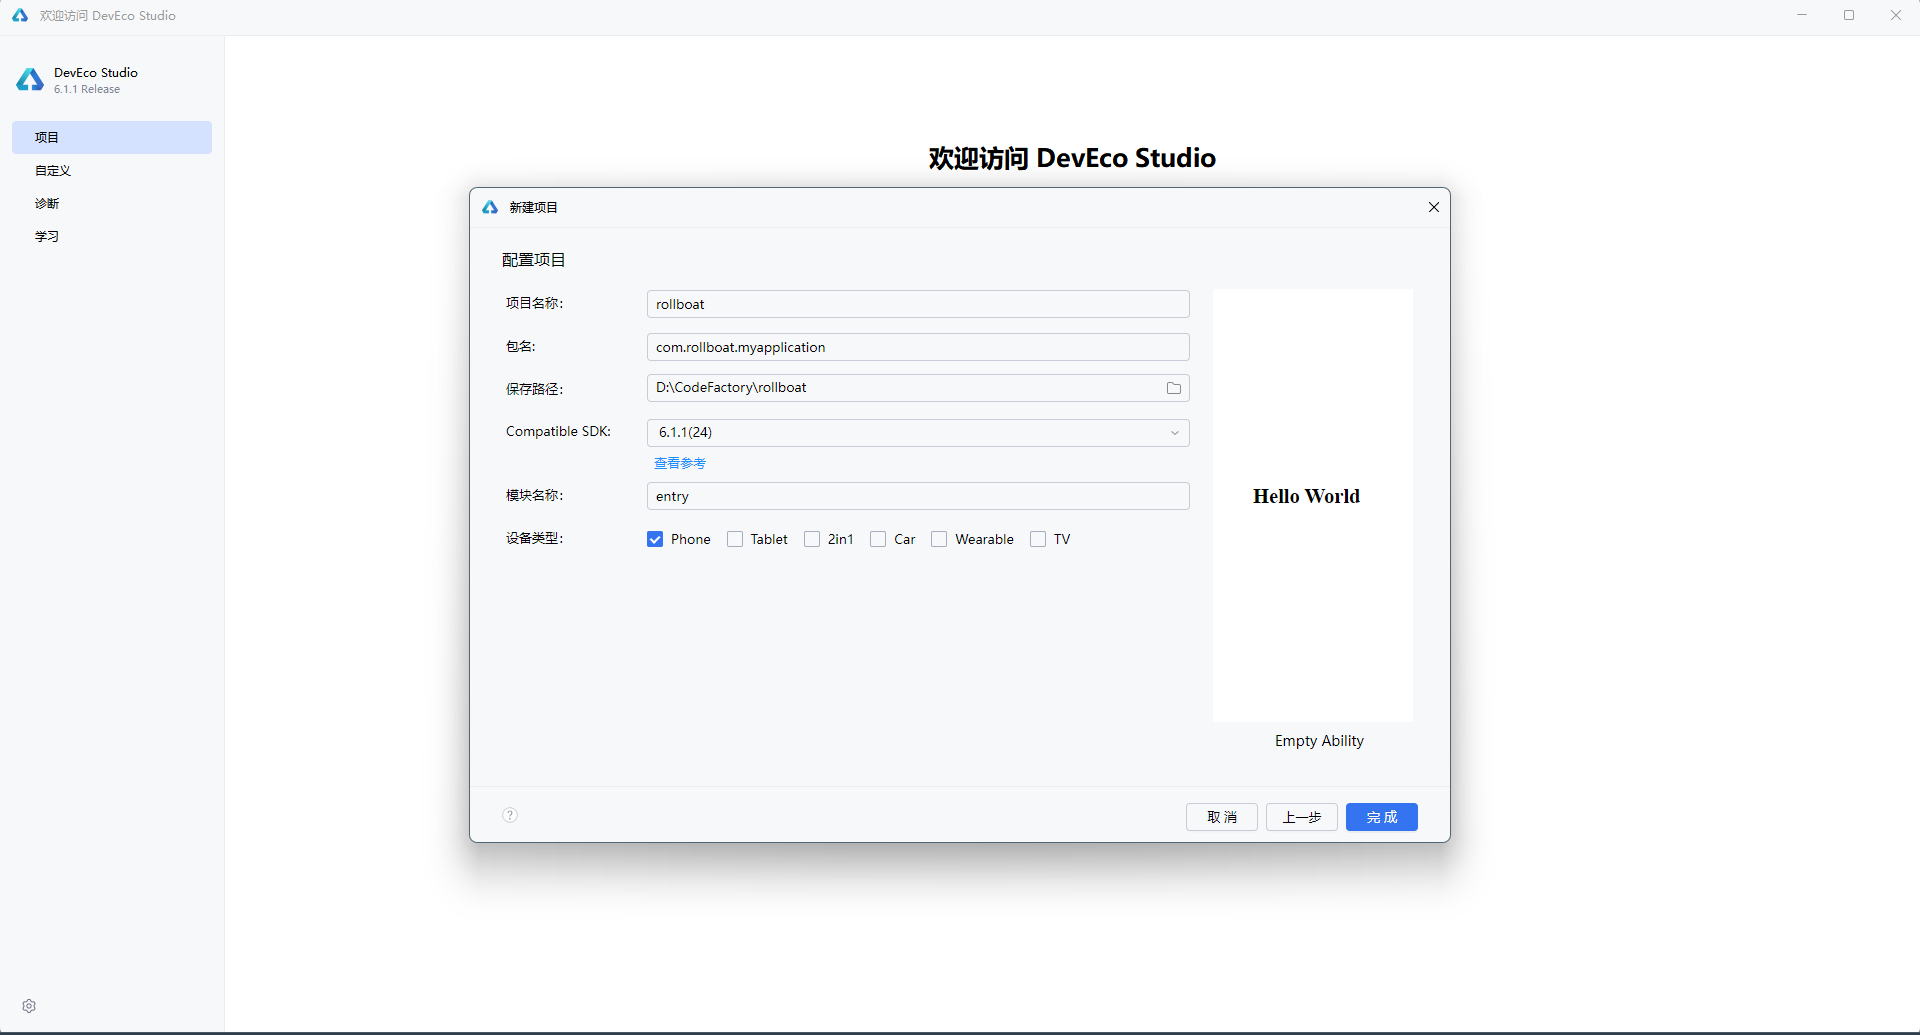
点击 “下一步” 后,进入项目配置界面,需要填写以下核心参数:
| 配置项 | 示例值 | 说明 |
|---|---|---|
| 项目名称(Project name) | rollboat | 应用的项目名称,建议使用英文命名 |
| 包名(Bundle name) | com.rollboat.myapplication | 应用唯一标识,采用反向域名格式 |
| 保存路径(Save location) | D:\CodeFactory\rollboat | 项目本地存储路径,避免使用中文和空格 |
| 兼容 SDK(Compatible SDK) | 6.1.1(24) | 目标 HarmonyOS API 版本,点击"查看参考"可了解各版本差异 |
| 模块名称(Module name) | entry | 主模块名称,默认 entry 为应用入口模块 |
| 设备类型(Device types) | ☑ Phone | 勾选目标设备:Phone / Tablet / 2in1 / Car / Wearable / TV |
右侧预览区会实时展示当前模板的默认效果 —— 一个居中显示的 “Hello World” 文本。
1.4 完成创建
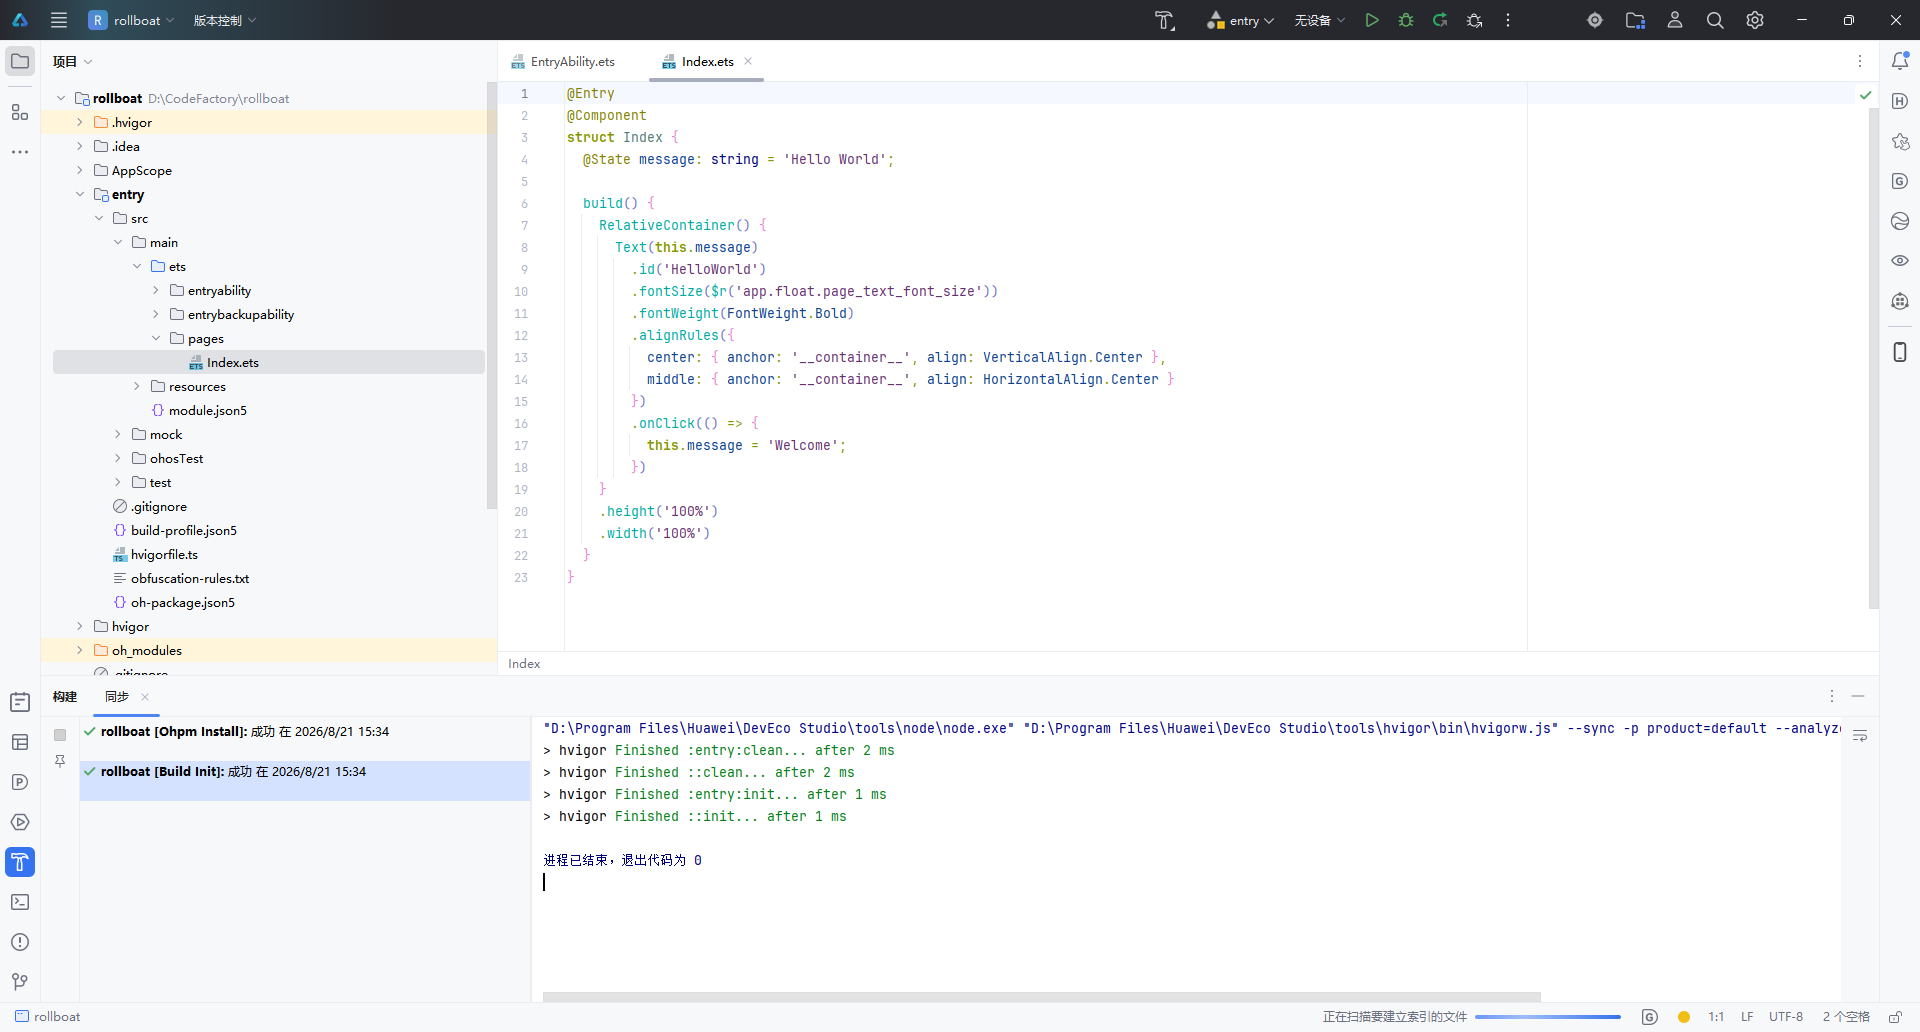
确认配置无误后,点击右下角 “完成” 按钮,IDE 将自动执行以下操作:
- 生成项目骨架(Stage 模型目录结构)
- 执行
ohpm install安装依赖 - 运行 Hvigor 构建初始化(
Build Init)
构建日志中显示 “退出代码为 0” 表示项目初始化成功。
1.5 项目结构概览
创建完成后,左侧项目面板展示的是标准的 Stage 模型 目录结构:
rollboat/
├── .hvigor/                   # Hvigor 构建工具缓存
├── .idea/                     # IDE 配置文件
├── AppScope/                  # 应用级全局配置
│   └── app.json5
├── entry/                     # 主模块(入口模块)
│   ├── src/main/ets/
│   │   ├── entryability/      # Ability 生命周期管理
│   │   │   └── EntryAbility.ets
│   │   └── pages/             # UI 页面
│   │       └── Index.ets      # 首页(默认 Hello World)
│   ├── src/main/resources/    # 资源文件
│   ├── module.json5           # 模块配置
│   └── build-profile.json5    # 构建配置
├── oh_modules/                # OHPM 依赖包
├── build-profile.json5        # 工程构建配置
├── hvigorfile.ts              # Hvigor 构建脚本
└── oh-package.json5           # 包管理配置
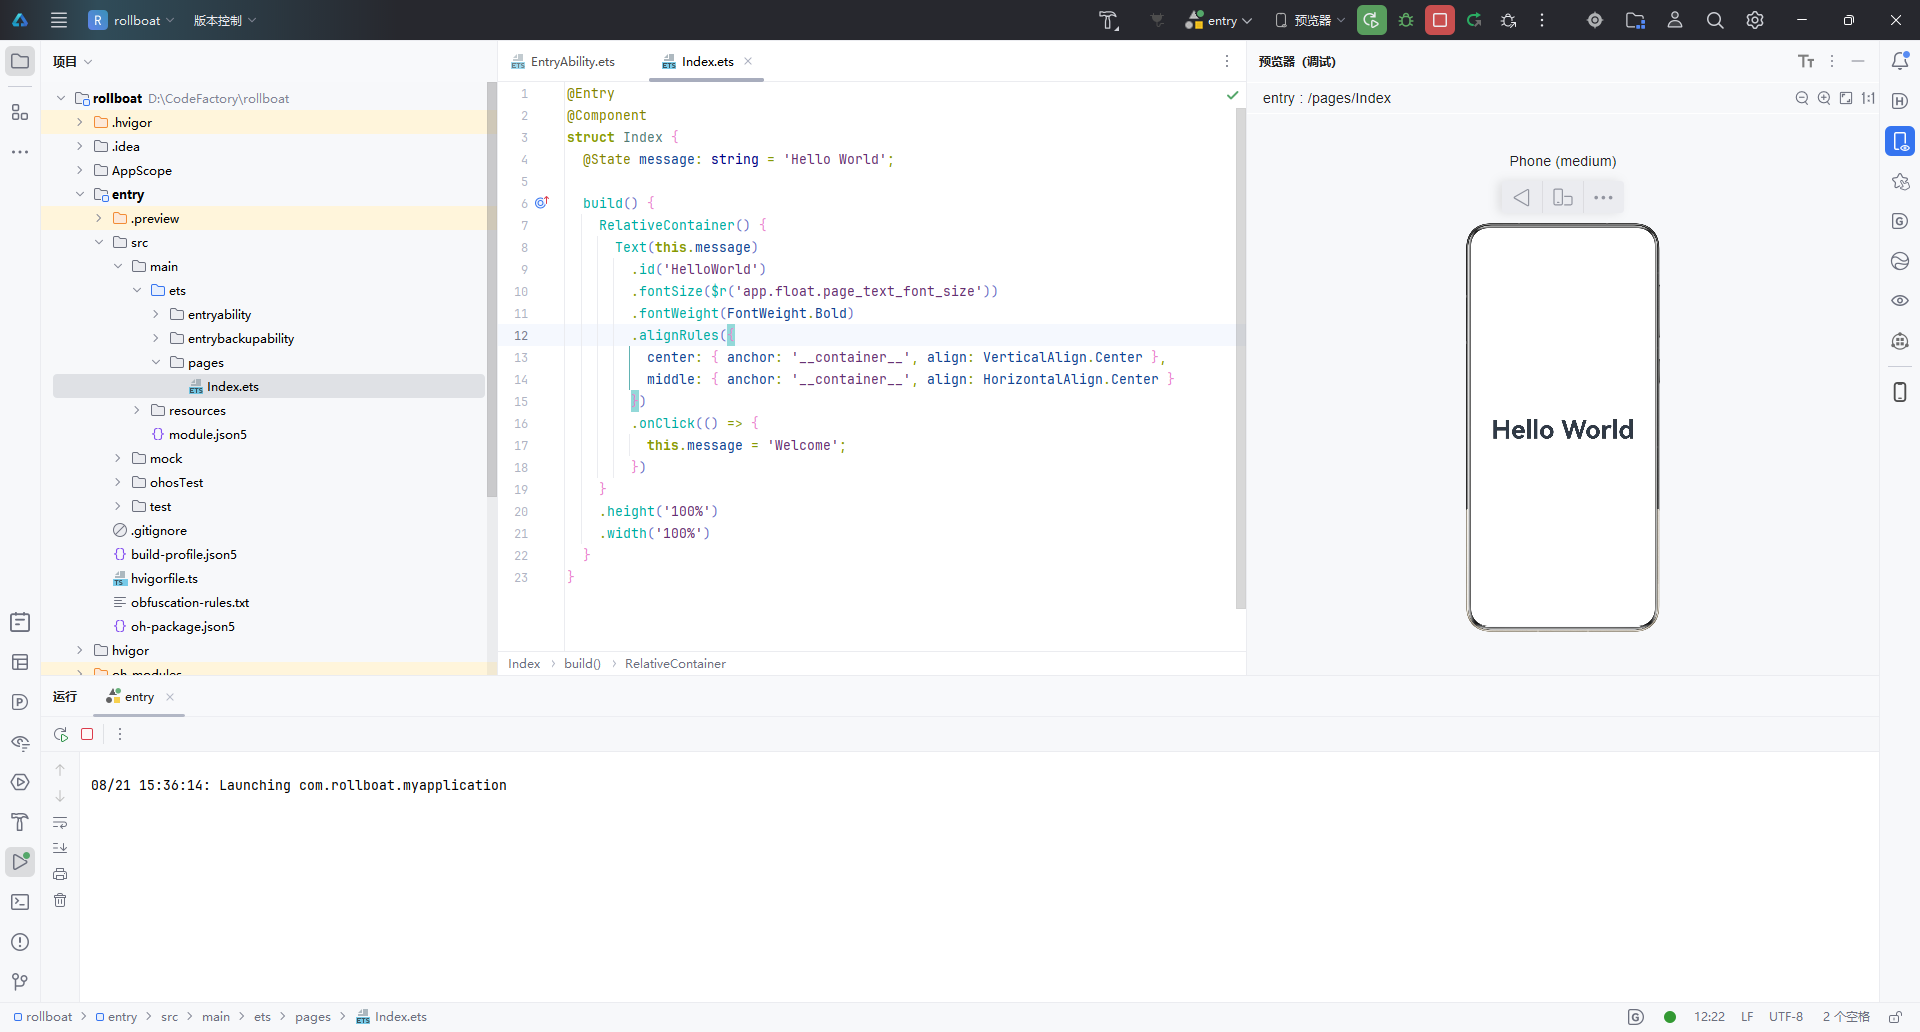
核心文件 Index.ets 的默认代码如下,采用 ArkTS 声明式 UI 语法:
@Entry
@Component
struct Index {
  @State message: string = 'Hello World';

  build() {
    RelativeContainer() {
      Text(this.message)
        .id('HelloWorld')
        .fontSize($r('app.float.page_text_font_size'))
        .fontWeight(FontWeight.Bold)
        .alignRules({
          center: { anchor: '__container__', align: VerticalAlign.Center },
          middle: { anchor: '__container__', align: HorizontalAlign.Center }
        })
        .onClick(() => {
          this.message = 'Welcome';
        })
    }
    .height('100%')
    .width('100%')
  }
}
| 关键语法 | 作用 |
|---|---|
@Entry | 标记为页面入口,可用于路由跳转 |
@Component | 声明为自定义组件 |
@State | 状态变量,数据变更时自动触发 UI 刷新 |
RelativeContainer | 相对布局容器,替代传统线性布局 |
.onClick() | 点击事件,此处点击后文本变为 “Welcome” |
打开右侧 Previewer(预览器),选择 Phone 设备,即可实时预览 Hello World 效果,无需连接真机或启动模拟器。
二、查看 SDK 版本
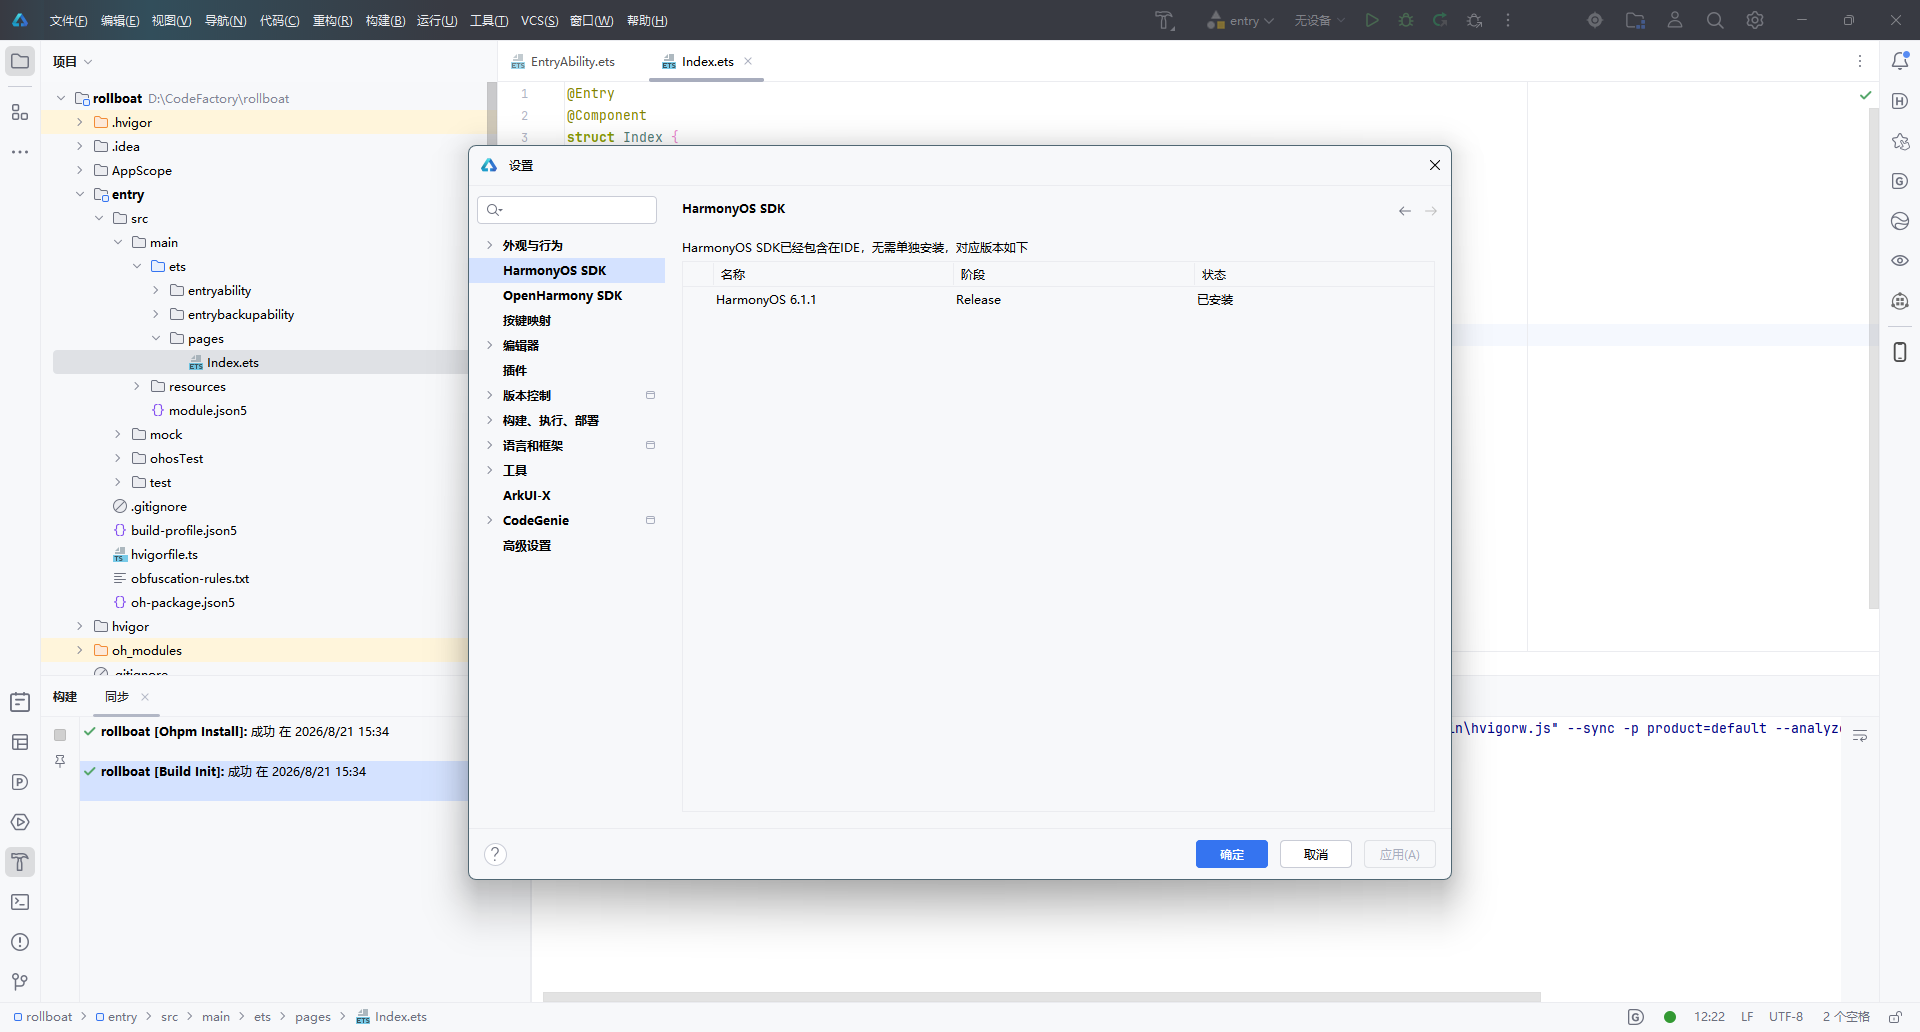
2.1 查看 HarmonyOS SDK
DevEco Studio 安装时已内置 HarmonyOS SDK,无需单独下载。通过以下路径查看:
文件 → 设置 → HarmonyOS SDK(或快捷键
Ctrl + Alt + S搜索 “HarmonyOS SDK”)
在设置面板中,可以看到当前已安装的 SDK 版本信息:
| 名称 | 阶段 | 状态 |
|---|---|---|
| HarmonyOS 6.1.1 | Release | ✅ 已安装 |
界面顶部提示:“HarmonyOS SDK 已经包含在 IDE,无需单独安装”,省去了手动配置 SDK 的繁琐步骤。
2.2 查看 ArkUI-X SDK(跨平台扩展)
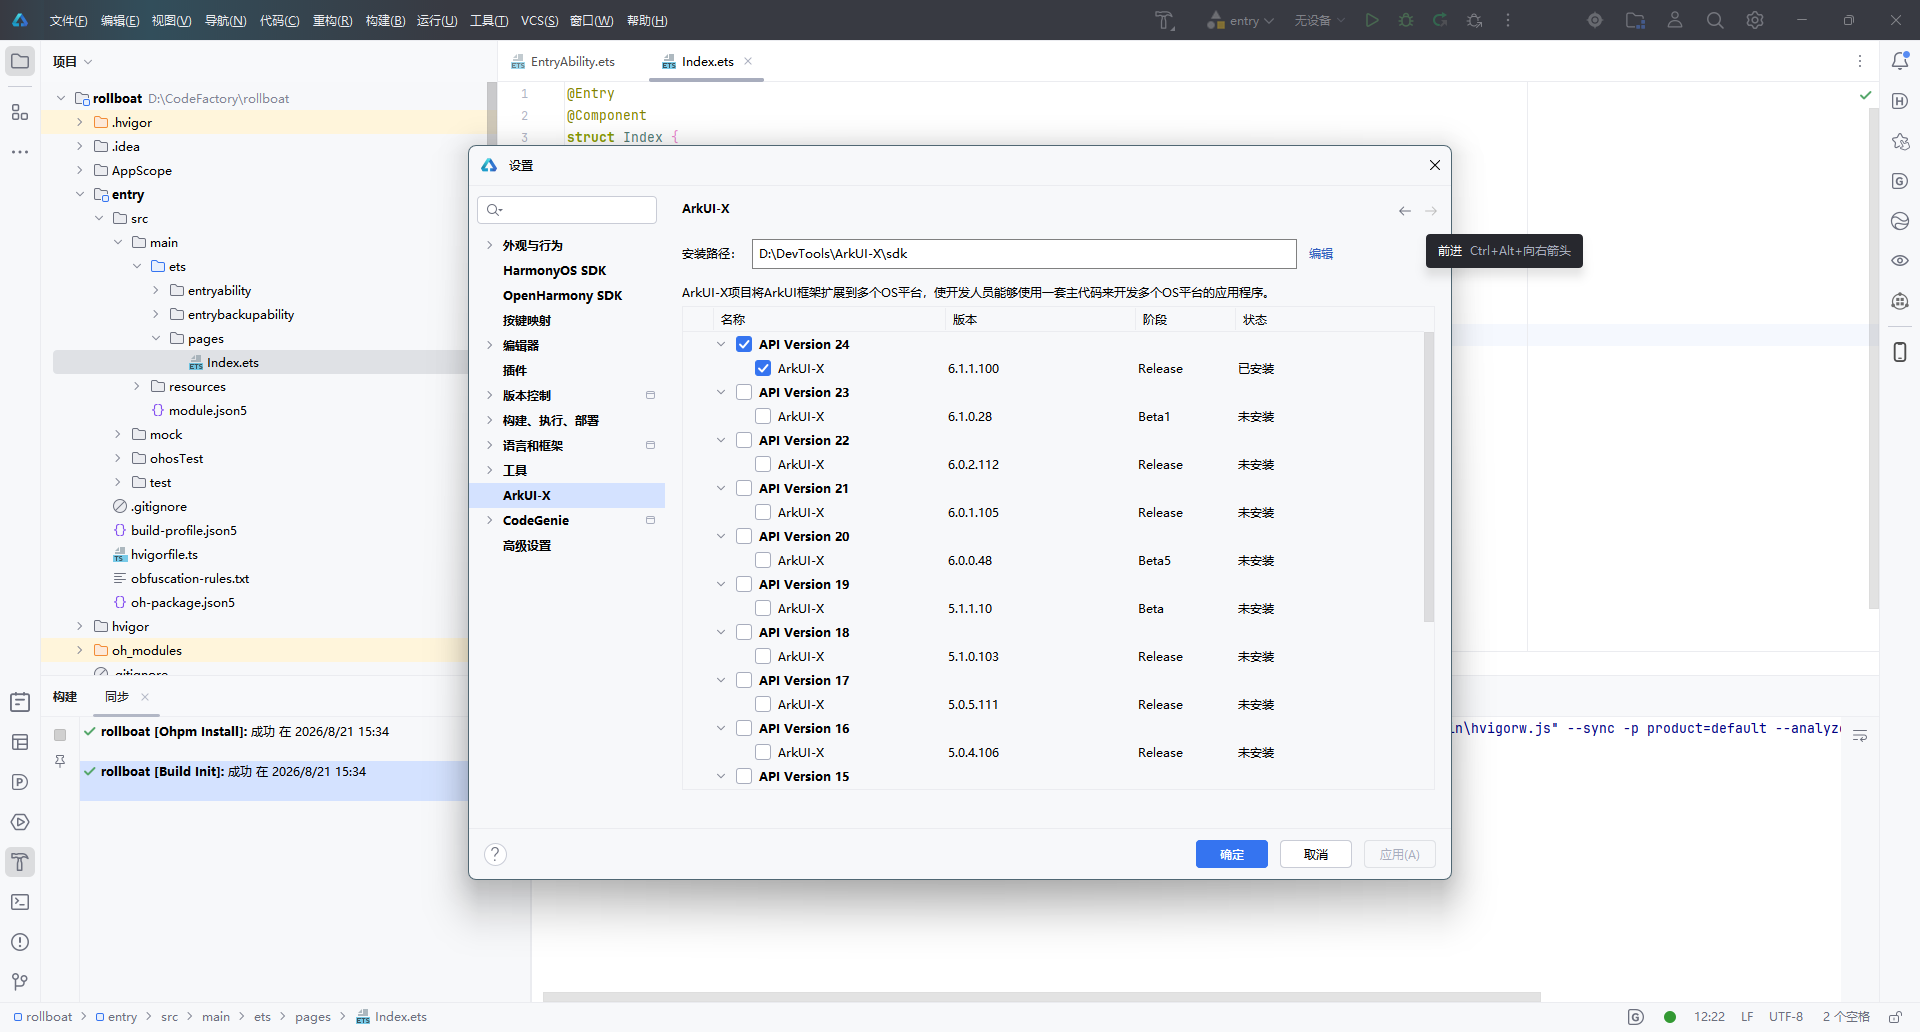
如果项目需要将 ArkUI 框架扩展到多个 OS 平台(Android / iOS / OpenHarmony),还需要配置 ArkUI-X SDK。路径如下:
文件 → 设置 → 语言和框架 → ArkUI-X
在这里可以查看已安装和可选的 ArkUI-X SDK 版本:
| 版本 | SDK 版本号 | 阶段 | 状态 |
|---|---|---|---|
| API Version 24 | 6.1.1.100 | Release | ✅ 已安装 |
| API Version 23 | 6.1.0.28 | Beta1 | 未安装 |
| API Version 22 | 6.0.2.112 | Release | 未安装 |
安装路径示例:D:\DevTools\ArkUI-X\sdk
说明:ArkUI-X 允许开发者使用一套 ArkTS 主代码,同时构建多平台应用。如果仅开发 HarmonyOS 原生应用,无需额外安装 ArkUI-X SDK。
三、小结
| 步骤 | 操作 | 关键点 |
|---|---|---|
| 创建项目 | 欢迎页 → 新建项目 → 选择 Empty Ability 模板 → 配置项目信息 → 完成 | 使用 Stage 模型 + ArkTS 语言 |
| 查看 SDK | 设置 → HarmonyOS SDK | SDK 已内置,无需手动安装 |
| 跨平台扩展 | 设置 → ArkUI-X | 根据需要安装对应 API 版本 |
至此,DevEco Studio 的项目创建与 SDK 环境确认全部完成,可以开始 HarmonyOS 应用的功能开发。
本文基于 DevEco Studio 6.1.1 Release 版本编写,不同版本界面可能存在细微差异。

讨论HarmonyOS开发技术,专注于API与组件、DevEco Studio、测试、元服务和应用上架分发等。
更多推荐

 8
8 0
0- 0


 已为社区贡献13条内容

所有评论(0)