HarmonyOS 相机 + 文字识别实现拍照识字 37 识别结果处理与展示
37 识别结果处理与展示
引言
一次拍照识别的产出,最终要落到用户眼前的一行行文字。这个过程中有两个容易被忽略的关键点:一是识别"失败/无结果"时如何给用户一个体面的反馈,而不是把空字符串或异常直接抛到界面上;二是识别文本如何从相机回调一路流动到弹窗里的 Text 组件,并在长文本、长按复制等交互细节上做到位。本文以工程中 Camera.ets、Index.ets、CustomDialogView.ets 的真实代码为线索,逐段讲解识别结果的判空兜底、@Watch 状态同步链路,以及 Scroll + copyOption 的展示方案。
正文知识点
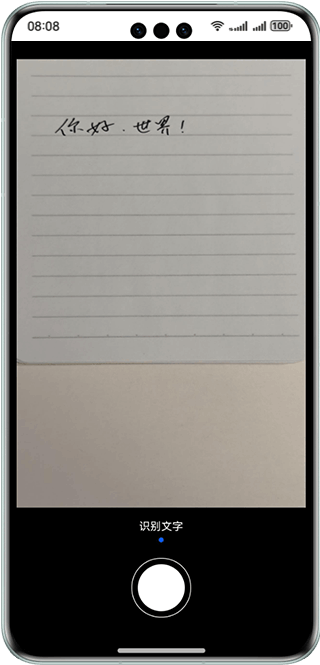
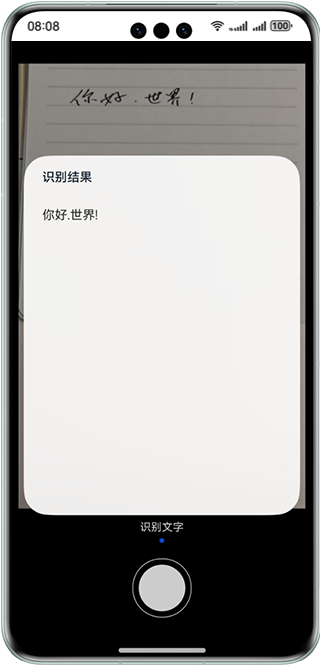
1. 三层兜底:空结果、设备不支持、异常
recognizeImage 的输出是 Promise<string>,理论上一定能返回一个字符串,但返回值的"含义"分三种情况:
- 识别无结果:调用成功但
TextRecognitionResult.value === ''。可能的原因包括画面中根本没有文字、文字过小、严重模糊等。工程的处理是替换成资源文案app.string.unrecognizable("未识别到文字,请重新拍摄"),避免把空串展示给用户; - 设备不支持:
canIUse('SystemCapability.AI.OCR.TextRecognition')为false,说明当前设备(如模拟器)没有 OCR 能力。工程返回app.string.Device_not_support("当前设备不支持 OCR")并记录 error 日志; - 异常:
recognizeText抛出BusinessError(常见错误码如 200 超时、401 参数错误、1001400001/1001400002 服务异常),工程用hilog.error记录code与message,recognitionString保持空串。
2. 结果传递链路:@Watch 监听 + @State 同步 + 弹窗
识别完成后,数据流向分三步:
Camera.ets中photoAvailable回调拿到 JPEG 字节,this.result = await this.recognizeImage(buffer)把结果写回Camera的公开字段result;Index.ets用@Watch('watchedCamera')装饰camera状态,Camera.result一旦变化就触发watchedCamera(),把结果同步到页面级@State recognitionResult,并调用dialogController.open()打开弹窗;- 弹窗组件
CustomDialogExample的text属性与this.recognitionResult绑定,Text(this.text)完成最终渲染。
@Watch 在这里起到了"桥"的作用:Camera 是普通类,其字段变化本身不会触发 UI 刷新,但把 Camera 实例放进 @State 后,对实例属性的赋值同样会被观测到(状态管理 V1 对 @State 对象属性赋值是生效的),watchedCamera 因此得以在 result 更新后立即执行。
3. 长文本滚动与长按复制
弹窗内容区用 Scroll(this.scroller) { Text(this.text) } 包裹,识别结果再长也能滚动查看;Text 的 copyOption(CopyOptions.LocalDevice) 赋予文本长按选中、复制到本机剪贴板的能力。CopyOptions 有三个取值:
LocalDevice:允许复制到本机;InApp:允许在本应用内复制;CrossDevice:允许跨设备复制(需配合系统能力)。
LocalDevice 是合理且安全的选择。
4. 关闭弹窗后恢复预览
CustomDialogController 的 cancel 回调指向 Index.refresh(),其内部执行 this.camera.captureSession!.start()。因为拍照(photoOutput.capture())会让会话暂时停止输出预览,关闭弹窗时重新 start() 即可恢复取景画面,支持连续拍照识别。
代码示例
先看结果处理段(源码参考:entry/src/main/ets/common/utils/Camera.ets):
async recognizeImage(buffer: ArrayBuffer): Promise<string> {
  // ...创建 imageSource / pixelMap / visionInfo / textConfiguration...
  let recognitionString: string = '';
  const context: common.UIAbilityContext = AppStorage.get('context') as common.UIAbilityContext;
  try {
    if (canIUse('SystemCapability.AI.OCR.TextRecognition')) {
      await textRecognition.recognizeText(visionInfo, textConfiguration).then((TextRecognitionResult) => {
        if (TextRecognitionResult.value === '') {
          // 识别成功但没文字:换成"未识别到"文案
          recognitionString = context.resourceManager.getStringSync($r('app.string.unrecognizable').id);
        } else {
          recognitionString = TextRecognitionResult.value;
        }
      })
      pixelMapInstance.release();
      imageResource.release();
    } else {
      // 设备不支持:换成"设备不支持"文案
      recognitionString = context.resourceManager.getStringSync($r('app.string.Device_not_support').id);
      Logger.error(TAG, `device not support`);
    }
  } catch (error) {
    let err = error as BusinessError;
    hilog.error(0x0000, 'Camera', `recognizeImage failed. code=${err.code}, message=${err.message}`);
  }
  return recognitionString;
}再来看状态同步(源码参考:entry/src/main/ets/pages/Index.ets):
@State private recognitionResult: string = '';
@Watch('watchedCamera') @State private camera: Camera = new Camera();

watchedCamera() {
  if (this.camera.result !== this.recognitionResult) {
    this.recognitionResult = this.camera.result;   // 同步到 @State,驱动 UI
    if (this.recognitionResult) {                   // 非空才弹窗
      this.dialogController.open();
    }
  }
}

dialogController: CustomDialogController = new CustomDialogController({
  builder: CustomDialogExample({
    text: this.recognitionResult,
  }),
  cancel: this.refresh
});

refresh() {
  try {
    this.camera.captureSession!.start();            // 恢复预览,支持连续识别
  } catch (error) {
    let err = error as BusinessError;
    hilog.error(0x0000, 'Index', 'Failed to refresh. Code: %{public}d, message: %{public}s', err.code, err.message);
  }
}最后是弹窗展示(源码参考:entry/src/main/ets/view/CustomDialogView.ets):
@CustomDialog
export struct CustomDialogExample {
  text: string = '';
  cancel: () => void = () => {};
  private scroller: Scroller = new Scroller();
  controller: CustomDialogController = new CustomDialogController({
    builder: CustomDialogExample({ text: this.text }),
    maskColor: CommonConstants.DIALOG_TEXT_MASK_COLOR,
    cancel: this.cancel
  })

  build() {
    Column() {
      Text($r('app.string.Recognize_result'))       // 弹窗标题
        // ...高度/字号/颜色/内边距等修饰...
      Column() {
        Scroll(this.scroller) {                     // 长文本可滚动
          Text(this.text)                           // 绑定识别结果
            .width(CommonConstants.FULL_WIDTH)
            // ...字号/行高/对齐/内边距...
            .copyOption(CopyOptions.LocalDevice)    // 长按复制到本机
        }
        .width(CommonConstants.FULL_WIDTH)
      }
      .width(CommonConstants.FULL_WIDTH)
      .height($r('app.float.dialog_result_text_height'))
    }
    // ...
  }
}
运行效果与注意事项
- 弹窗打开时机:
watchedCamera里if (this.recognitionResult)的判断保证只有"有内容"时才弹窗;Camera.takePicture()开头会执行this.result = '',为下一次识别清空旧值,避免把上一次的结果重复弹出来。 - 连续拍照:关闭弹窗触发
cancel → refresh → captureSession.start(),预览恢复后即可再拍;如果遇到"拍完不弹窗",优先检查是否漏掉start()或result未被置空。 - 长文本体验:
Text默认自动换行,配合Scroll可以放下任意长度的识别结果;建议像工程一样显式设置lineHeight和textAlign(TextAlign.Start),多语言混排时观感更稳定。 - 复制范围:识别内容涉及隐私(身份证、票据号)时,
CopyOptions.LocalDevice是默认且稳妥的选择;如需在应用内跨组件复用,可改InApp。
总结
识别结果处理看似简单,实则是一条"源头兜底 → 状态同步 → 弹窗展示 → 会话恢复"的完整链路:recognizeImage 把"空结果/不支持/异常"统一收敛为可展示文案;@Watch('watchedCamera') 把普通类字段的变化桥接进 ArkUI 状态管理;Scroll 与 copyOption(CopyOptions.LocalDevice) 则保证了长文本的可读与可复制。理解这条链路,后续无论是加"识别历史"还是"结果编辑",都知道该在哪里动手。
*本系列文章基于 HarmonyOS 5.0.5 SDK(API 12)与示例工程 aicharacter-recognition 编写,文中接口以对应版本 API 参考为准。*

讨论HarmonyOS开发技术,专注于API与组件、DevEco Studio、测试、元服务和应用上架分发等。
更多推荐


 0
0 0
0- 0


 已为社区贡献20条内容

所有评论(0)