HarmonyOS 相机 + 文字识别实现拍照识字 35 拍照即识别:数据链路完整串联
35 拍照即识别:数据链路完整串联
引言
前四篇文章分别拆解了 PixelMap 操作、ImageReceiver、CoreVisionKit 能力检测与 OCR 接口本身。本文把它们拼回"拍照识别文字"这个完整工程:从用户按下快门到弹窗展示识别结果,数据在相机、图像、AI、UI 四层之间流转,形态经历 相机帧 → ArrayBuffer → PixelMap → string 的多次变换,最后由响应式状态驱动界面刷新。看懂这条链路,就能理解为什么工程里那么多 await、为什么 @Watch 能自动触发弹窗、为什么拍照后要 refresh。
正文知识点
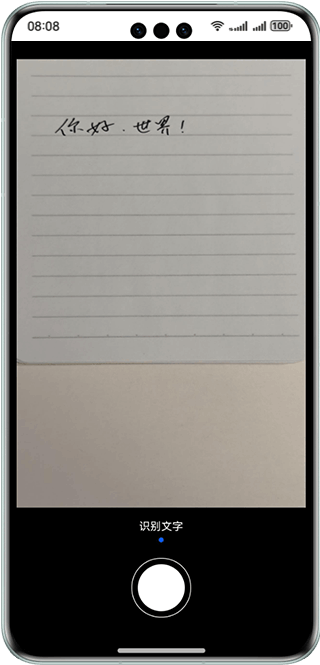
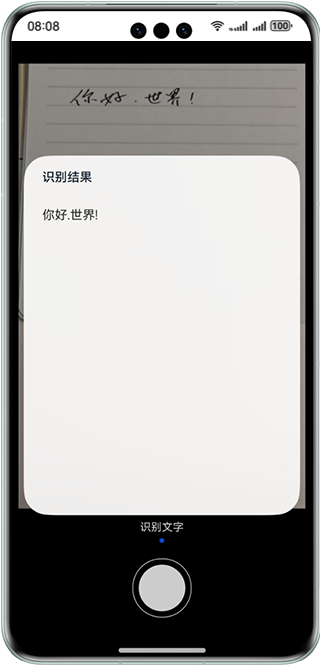
全链路总览
┌─────────────┐  ①onClick   ┌──────────────┐  ②capture   ┌─────────────┐
│  Index.ets   │ ─────────▶ │ Camera.ets    │ ─────────▶ │ 相机服务     │
│  拍照按钮     │             │ takePicture() │             │ 底层成像     │
└─────────────┘             └──────────────┘             └──────┬──────┘
        ▲                                                        │ ③photoAvailable
        │                                                        ▼
        │                                              ┌──────────────────┐
        │             ⑦@Watch 监听 result              │ photo.main 取组件  │
┌───────┴───────┐  ◀────────────────────────────────── │ getComponent(JPEG)│
│ @State camera │                                      └────────┬─────────┘
│  .result 变化  │                                               │ ④byteBuffer
└───────────────┘                                               ▼
        │                                              ┌──────────────────┐
        │ ⑧dialogController.open()                     │ recognizeImage   │
        ▼                                              │ createImageSource│
┌────────────────┐                                     │ createPixelMap   │
│ CustomDialog   │                                     │ recognizeText    │
│ 展示识别结果     │       ⑥ this.result = await ...    │ 返回 string      │
└────────────────┘  ◀──────────────────────────────  └──────────────────┘
数据形态变换:链路的"物理单位"
| 环节 | 数据形态 | 产生位置 |
| 相机成像 | Surface 帧流(相机内部) | photoOutput.capture() |
| JPEG 编码数据 | ArrayBuffer(component.byteBuffer) |
photo.main.getComponent(JPEG) |
| 解码句柄 | image.ImageSource |
image.createImageSource(buffer) |
| 内存位图 | image.PixelMap |
imageResource.createPixelMap() |
| 识别结果 | string(TextRecognitionResult.value) |
textRecognition.recognizeText |
| UI 状态 | @State string |
this.recognitionResult |
每次形态变换都是一个"卡点":ArrayBuffer 只有字节、PixelMap 才能被 OCR 消费、string 才能被 ArkUI 直接渲染。工程里两次 await(createPixelMap、recognizeText)正是这些卡点的异步闸门。
环节①-②:拍照触发
用户点击拍照按钮(Index.ets 第 138-140 行):
.onClick(() => {
  this.camera.takePicture();
})
takePicture 先清空上一次结果,再驱动相机(Camera.ets 第 72-77 行):
async takePicture() {
  this.result = '';   // 关键:清空旧结果,为 @Watch 提供"变化"信号
  this.photoOutput!.capture().catch((error: BusinessError) => {
    hilog.error(0x0000, 'Camera', `capture failed. code=${error.code}, message=${error.message}`);
  });
}
注意 this.result = '' 这一步:如果不清空,第二次拍到相同文本时 result 值不变,@Watch 不会触发,弹窗就不会再弹。
环节③-④:photoAvailable 与 JPEG Buffer
拍照完成后系统异步回调 photoAvailable(Camera.ets 第 50-60 行):
this.photoOutput.on('photoAvailable', (errCode: BusinessError, photo: camera.Photo): void => {
  let imageObj = photo.main;
  imageObj.getComponent(image.ComponentType.JPEG, async (errCode: BusinessError, component: image.Component) => {
    if (errCode || component === undefined) {
      return;
    }
    let buffer: ArrayBuffer;
    buffer = component.byteBuffer;                       // ④ 形态①:JPEG 字节流
    this.result = await this.recognizeImage(buffer);     // ⑤ 进入识别管线
  })
})
photo.main 是主图像,getComponent(image.ComponentType.JPEG) 取出其中的 JPEG 分量,component.byteBuffer 即待识别的原始字节——链路的第一种关键形态 ArrayBuffer 在这里诞生。
环节⑤:识别管线(形态②→③→④)
recognizeImage(Camera.ets 第 79-110 行)完成三次形态变换:ArrayBuffer → PixelMap → string。核心脉络:
let imageResource = image.createImageSource(buffer);          // ArrayBuffer → ImageSource
let pixelMapInstance = await imageResource.createPixelMap();  // ImageSource → PixelMap
let visionInfo: textRecognition.VisionInfo = { pixelMap: pixelMapInstance };
let textConfiguration: textRecognition.TextRecognitionConfiguration = {
  isDirectionDetectionSupported: true
};
if (canIUse('SystemCapability.AI.OCR.TextRecognition')) {
  await textRecognition.recognizeText(visionInfo, textConfiguration).then((result) => {
    recognitionString = result.value === '' ? getString($r('app.string.unrecognizable')) : result.value;
  })
  pixelMapInstance.release();
  imageResource.release();
} else {
  recognitionString = getString($r('app.string.Device_not_support'));  // 降级文案
}
return recognitionString;  // ④ 形态:string
注意 await 让 this.result 的赋值发生在识别真正完成后——这是整个链路唯一耗时环节(首帧常达数百毫秒)。
环节⑥-⑧:响应式回传与弹窗展示
识别结果通过 this.result 回传到 Index.ets(第 30-44 行):
@State private recognitionResult: string = '';
@Watch('watchedCamera') @State private camera: Camera = new Camera();

watchedCamera() {
  if (this.camera.result !== this.recognitionResult) {   // 变化检测
    this.recognitionResult = this.camera.result;
    if (this.recognitionResult) {
      this.dialogController.open();                       // 打开结果弹窗
    }
  }
}
@State camera 使 camera.result 被响应式追踪,@Watch 在其变化时回调 watchedCamera:先同步到本地 @State recognitionResult(弹窗数据源),再打开弹窗。弹窗本体 CustomDialogExample(view/CustomDialogView.ets)用 Scroll 包裹 Text(this.text),支持长文本滚动与 copyOption(CopyOptions.LocalDevice) 复制。
弹窗关闭时触发 cancel: this.refresh(Index.ets 第 90 行),refresh 重新执行 captureSession.start() 恢复取景,为下一次拍照做好准备——这就是工程里"拍完还能继续拍"的原因。
完整时序
- 用户点击 →
takePicture(),result清空,capture()下发; - 相机成像完成 →
photoAvailable异步回调; getComponent(JPEG)→ 拿到ArrayBuffer;recognizeImage:解码 → PixelMap → OCR →string;this.result赋值 →@Watch触发 → 弹窗展示;- 关闭弹窗 →
refresh()→ 会话重启,链路回到 1。
代码示例
以时序为主线串联两端真实代码(源码参考:entry/src/main/ets/pages/Index.ets 与 entry/src/main/ets/common/utils/Camera.ets):
// ===== Index.ets(UI 层)=====
@Entry
@Component
struct Index {
  @State private recognitionResult: string = '';
  // @Watch 监听 camera.result,识别结果一到位自动开弹窗
  @Watch('watchedCamera') @State private camera: Camera = new Camera();
  private xcomponentController: XComponentController = new XComponentController();

  watchedCamera() {
    if (this.camera.result !== this.recognitionResult) {
      this.recognitionResult = this.camera.result;
      if (this.recognitionResult) {
        this.dialogController.open();
      }
    }
  }

  async XComponentinit() {
    this.xcomponentController.setXComponentSurfaceRect({
      surfaceWidth: CommonConstants.SURFACE_WIDTH,
      surfaceHeight: CommonConstants.SURFACE_HEIGHT
    });
    // XComponent 的 Surface 作为预览输出目标
    this.surfaceId = this.xcomponentController.getXComponentSurfaceId();
    await this.camera.initCamera(this.surfaceId);
  }

  refresh() {   // 弹窗关闭后恢复会话
    try {
      this.camera.captureSession!.start();
    } catch (error) { /* hilog.error ... */ }
  }

  dialogController: CustomDialogController = new CustomDialogController({
    builder: CustomDialogExample({ text: this.recognitionResult }),
    cancel: this.refresh
  })

  build() {
    // XComponent 预览区 + 圆形拍照按钮,onClick 触发 this.camera.takePicture()
  }
}

// ===== Camera.ets(相机 + 识别层)=====
async takePicture() {
  this.result = '';
  this.photoOutput!.capture().catch((error: BusinessError) => { /* hilog.error */ });
}

// initCamera 中注册:
this.photoOutput.on('photoAvailable', (errCode, photo) => {
  let imageObj = photo.main;
  imageObj.getComponent(image.ComponentType.JPEG, async (errCode, component) => {
    if (errCode || component === undefined) return;
    let buffer: ArrayBuffer = component.byteBuffer;      // 形态①
    this.result = await this.recognizeImage(buffer);     // 形态④:string
  })
})
两端通过 camera.result 一个字段完成解耦:相机层只负责"把结果算出来",UI 层只负责"结果变了就弹窗",中间靠 @Watch 响应式机制粘合,不需要任何手动通知。
运行效果与注意事项
- 空结果不弹窗:
recognizeImage返回空串(无法识别)时watchedCamera中if (this.recognitionResult)为假,不弹窗——"没字"时安静无扰; - 重复拍照信号:
takePicture先清空result再拍照,保证每拍一次@Watch必触发;若删掉清空逻辑,连续拍出相同内容将不弹窗; - 耗时感知:识别耗时集中在
recognizeText,期间 UI 不阻塞(异步),但按钮无反馈;如需"识别中"提示,可在photoAvailable前设置 loading 状态; - 资源释放:
recognizeImage内pixelMap.release()与imageResource.release()成对出现,多拍多识别时是防 OOM 的关键(第 31 篇已强调); - 会话恢复:弹窗
cancel指向refresh,若用户直接退页,onPageHide/aboutToDisappear会调用releaseCamera完整释放,两条退出路径都要覆盖(工程均已实现); - 调试建议:用 DevEco Studio 的 HiLog 过滤
Camera/IndexPage两个 TAG,可完整追踪photoAvailable → recognizeImage → watchedCamera的时间线。
总结
"拍照即识别"看起来是一句口号,工程实现上是一条严格的数据管道:点击(UI)→ capture(相机)→ photoAvailable → JPEG Buffer(ArrayBuffer)→ createImageSource/createPixelMap(PixelMap)→ recognizeText(string)→ result(状态)→ @Watch → 弹窗(UI)。每一段都有明确的职责与数据形态,await 串起异步节奏,@State + @Watch 完成跨层通信,资源释放兜住内存底线。把这条链路装进脑中,任何"采集 → 处理 → 回显"类功能(帧识别、卡证识别、翻译)都能照此骨架快速搭建。

讨论HarmonyOS开发技术,专注于API与组件、DevEco Studio、测试、元服务和应用上架分发等。
更多推荐


 0
0 0
0- 0


 已为社区贡献20条内容

所有评论(0)