【共创稿事节】HarmonyOS 翻页时钟:从 0 到 1 实现一个丝滑的 3D 翻转动画
前言
用了一下午的时间终于捣鼓出来这个效果了,虽然有瑕疵但是思路应该是对的,就是有些麻烦,这篇文章把整个实现过程拆开讲,看完你也能自己撸一个出来。
最终效果
效果演示如下图所示
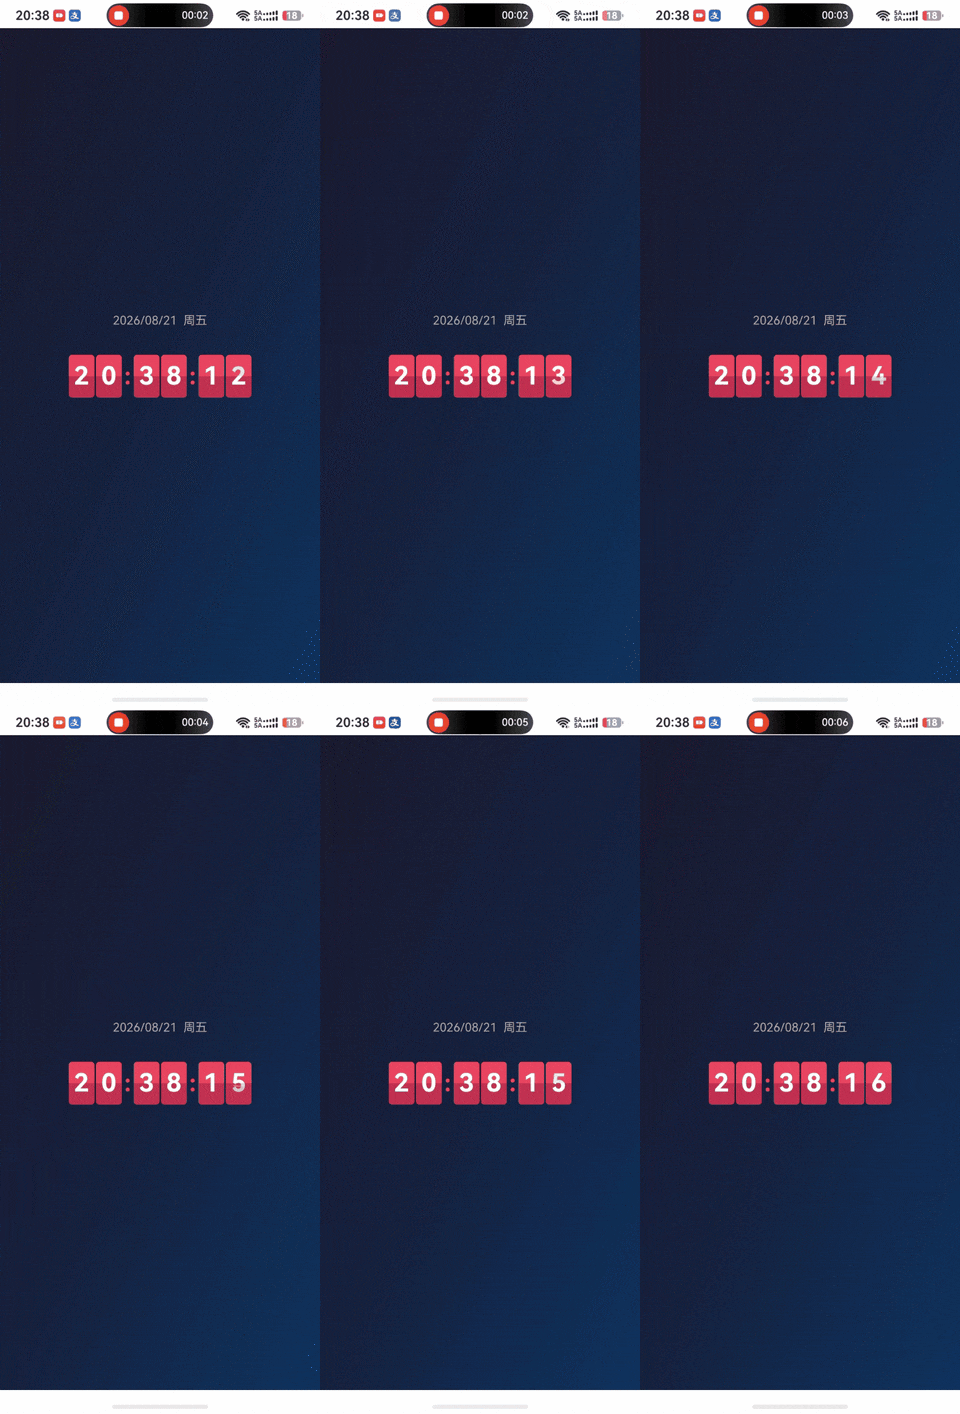
整体思路
翻页时钟的核心难点不是布局,而是动画状态怎么管。
我试过两种方案:
| 方案 | 做法 | 问题 |
|---|---|---|
| 子组件自治 | 子组件 @Watch 监听 digit 变化,自己管理翻转动画 | @Watch 在定时器场景下经常不触发,数字卡住 |
| 父组件全权驱动 | 父组件持有所有动画状态,通过 @Prop 注入子组件 | 状态多但控制精准,不会卡死 |
第二种方案更可靠。整个架构变成:
- 父组件 Qa7:持有 6 组动画状态数组,
setInterval每秒检测变化,驱动animateTo翻页 - 子组件 FlipDigit:纯展示,6 个
@Prop接收视觉状态,自己不管任何逻辑
划重点:子组件只做渲染,不做状态管理,这是避免动画卡死的根本。
常量定义
先把尺寸定好,后面所有组件共用:
const CARD_W: number = 30;        // 单卡宽度
const FONT_SIZE: number = 30;     // 字形字号
const HALF_H: number = 25;        // 半卡高度
const TEXT_H: number = HALF_H * 2; // 整卡高度 50
const RADIUS: number = 4;         // 圆角
const COLON_FONT: number = 28;    // 冒号字号
const COLON_MARGIN: number = 1;   // 冒号左右间距
const ROW_SPACE: number = 2;      // 卡片之间间距
const DIGITS: number = 6;         // 时(2)+分(2)+秒(2) 共 6 个数字位
一个数字卡片拆成上下两半,每半高度 25vp,合起来 50vp。字体大小 30vp,比半卡高,这样做裁剪时每个半卡只能看到字的上半或下半。
翻页卡片的结构
这是整篇文章最关键的部分。一个数字翻页卡片由 4 层 叠放组成:
┌─────────────────┐
│   上层静止(新)   │ ← topStatic:翻页完成后露出的新数字上半
│─────────────────│ ── 翻折线 ──
│   下层静止(旧)   │ ← bottomStatic:翻入前保留的旧数字下半
└─────────────────┘

┌─────────────────┐
│   上叶片(旧)     │ ← flipTop + angleTop:旧数字上半,绕底边翻下 0°→90°
│─────────────────│ ── 翻折线 ──
│   下叶片(新)     │ ← flipBottom + angleBottom:新数字下半,绕顶边翻入 -90°→0°
└─────────────────┘
动画分两个阶段:
- 上叶片翻走:
angleTop从 0° 到 90°,旧数字上半向前翻下,露出topStatic(新数字上半) - 下叶片翻入:
angleBottom从 -90° 到 0°,新数字下半向前翻上来,盖住bottomStatic(旧数字下半)
DigitText 组件
单个字形组件,高度占满整卡(TEXT_H),靠外层半卡 .clip(true) 裁剪只露半边:
@Component
struct DigitText {
  @Prop d: string = '0';
  @Prop isTop: boolean = true;

  build() {
    Text(this.d)
      .fontSize(FONT_SIZE)
      .fontColor('#ffffff')
      .fontWeight(FontWeight.Bold)
      .textAlign(TextAlign.Center)
      .height(TEXT_H)       // 占满整卡高
      .width('100%')
      .flexShrink(0)        // 禁止被 HALF_H 容器压缩
      .margin({ top: this.isTop ? 0 : -HALF_H })  // 下半卡时向上偏移
  }
}
下半卡要显示文字下半部分,靠 margin({ top: -HALF_H }) 把字往上推 25vp,这样裁剪后正好露出字的下半。
FlipDigit 组件
6 个 @Prop,全是父组件注入,自己没有任何状态逻辑:
@Component
struct FlipDigit {
  @Prop topStatic: string = '0';      // 上层静止(新数字上半)
  @Prop bottomStatic: string = '0';   // 下层静止(旧数字下半)
  @Prop flipTop: string = '0';        // 上叶片:显示旧数字
  @Prop flipBottom: string = '0';     // 下叶片:显示新数字
  @Prop angleTop: number = 0;         // 0 -> 90(向前翻下)
  @Prop angleBottom: number = -90;    // -90 -> 0(向前翻入)

  build() {
    Stack() {
      // 第1层:上层静止
      Column() {
        DigitText({ d: this.topStatic, isTop: true })
      }
      .width(CARD_W).height(HALF_H)
      .backgroundColor('#e94560')
      .borderRadius({ topLeft: RADIUS, topRight: RADIUS })
      .clip(true)
      .position({ x: 0, y: 0 })

      // 第2层:下层静止
      Column() {
        DigitText({ d: this.bottomStatic, isTop: false })
      }
      .width(CARD_W).height(HALF_H)
      .backgroundColor('#c23152')
      .borderRadius({ bottomLeft: RADIUS, bottomRight: RADIUS })
      .clip(true)
      .position({ x: 0, y: HALF_H })

      // 第3层:上叶片(翻转动画)
      Column() {
        DigitText({ d: this.flipTop, isTop: true })
      }
      .width(CARD_W).height(HALF_H)
      .backgroundColor('#e94560')
      .borderRadius({ topLeft: RADIUS, topRight: RADIUS })
      .clip(true)
      .position({ x: 0, y: 0 })
      .rotate({
        angleX: this.angleTop,
        centerX: '50%', centerY: '100%',  // 绕底边中轴翻
        perspective: 1000                   // 3D 透视
      })
      .zIndex(2)
      .opacity(this.angleTop < 90 ? 1 : 0)  // 翻到 90° 时隐藏

      // 第4层:下叶片(翻入动画)
      Column() {
        DigitText({ d: this.flipBottom, isTop: false })
      }
      .width(CARD_W).height(HALF_H)
      .backgroundColor('#c23152')
      .borderRadius({ bottomLeft: RADIUS, bottomRight: RADIUS })
      .clip(true)
      .position({ x: 0, y: HALF_H })
      .rotate({
        angleX: this.angleBottom,
        centerX: '50%', centerY: '0%',   // 绕顶边中轴翻
        perspective: 1000
      })
      .zIndex(2)
      .opacity(this.angleBottom > -90 ? 1 : 0)  // 翻入前隐藏
    }
    .width(CARD_W).height(TEXT_H)
    .clip(true)
  }
}
有几个细节:
.position()绝对定位:不用 Stack 默认居中,精确控制上下半卡位置.rotate()的 3D 参数:angleX控制 X 轴旋转,centerY: '100%'表示绕底边旋转(上叶片),centerY: '0%'绕顶边旋转(下叶片),perspective: 1000给 3D 透视效果.opacity()条件控制:上叶片翻到 90° 时设为不可见(此时已经翻到垂直朝向用户,不该显示),下叶片初始角度 -90° 时也不可见(藏在后面)- 上下色差:上半用
#e94560,下半用#c23152,略深一点,模拟真实翻页钟的光影
父组件:状态管理与动画驱动
这是核心逻辑所在。父组件维护 6 个数字位的所有视觉状态:
@Entry
@Component
struct Qa7 {
  // 每个数字位 6 个视觉状态(数组形式,父组件统一驱动)
  @State topStatic: string[] = new Array(DIGITS).fill('0');
  @State bottomStatic: string[] = new Array(DIGITS).fill('0');
  @State flipTop: string[] = new Array(DIGITS).fill('0');
  @State flipBottom: string[] = new Array(DIGITS).fill('0');
  @State angleTop: number[] = new Array(DIGITS).fill(0);
  @State angleBottom: number[] = new Array(DIGITS).fill(-90);

  @State dateStr: string = '';
  @State weekday: string = '';
  private prevDigits: string[] = new Array(DIGITS).fill('0');
  private timer: number = -1;
  // ...
}
6 个数字位,每个位 6 个状态,用数组管理。为什么不用 6 个 FlipDigit 各自管状态?因为 @Watch 在定时器场景下有概率不触发,这是血泪教训。
初始化与定时器
aboutToAppear(): void {
  const d: string[] = this.computeDigits();
  this.prevDigits = d.slice();
  // 初始化所有视觉状态为当前数字(静止态)
  this.topStatic = d.slice();
  this.bottomStatic = d.slice();
  this.flipTop = d.slice();
  this.flipBottom = d.slice();
  this.angleTop = new Array(DIGITS).fill(0);
  this.angleBottom = new Array(DIGITS).fill(-90);
  this.updateDate();

  this.timer = setInterval(() => {
    const nextDigits: string[] = this.computeDigits();
    this.updateDate();
    this.flipTo(nextDigits);
  }, 1000);
}

aboutToDisappear(): void {
  if (this.timer !== -1) {
    clearInterval(this.timer);
  }
}
启动时设好初始状态,每秒检测一次数字变化并触发翻转。
获取当前时间数字
private padZero(num: number): string {
  return num < 10 ? `0${num}` : `${num}`;
}

private computeDigits(): string[] {
  const now: Date = new Date();
  const h: string = this.padZero(now.getHours());
  const m: string = this.padZero(now.getMinutes());
  const s: string = this.padZero(now.getSeconds());
  return [h[0], h[1], m[0], m[1], s[0], s[1]];
}
flipTo:翻页动画的核心逻辑
这是最复杂的部分,分三步走:
private flipTo(newD: string[]): void {
  const oldD: string[] = this.prevDigits;

  // 没变化就跳过
  let changed: boolean = false;
  for (let i = 0; i < DIGITS; i++) {
    if (newD[i] !== oldD[i]) {
      changed = true;
      break;
    }
  }
  if (!changed) return;

  const ctx = this.getUIContext();

  // ===== 第1步:准备阶段 =====
  // 只对变化的位铺好翻页初始层
  const ft: string[] = this.flipTop.slice();
  const fb: string[] = this.flipBottom.slice();
  const ts: string[] = this.topStatic.slice();
  const bs: string[] = this.bottomStatic.slice();
  const at: number[] = this.angleTop.slice();
  const ab: number[] = this.angleBottom.slice();

  for (let i = 0; i < DIGITS; i++) {
    if (newD[i] !== oldD[i]) {
      ft[i] = oldD[i];   // 上叶片先显旧数字
      fb[i] = newD[i];   // 下叶片准备好新数字
      ts[i] = newD[i];   // 上叶片翻走后露出新上层
      bs[i] = oldD[i];   // 下叶片到位前下层仍是旧数字
      at[i] = 0;         // 上叶片起始角度
      ab[i] = -90;       // 下叶片起始角度(藏在后面)
    }
  }
  this.flipTop = ft;
  this.flipBottom = fb;
  this.topStatic = ts;
  this.bottomStatic = bs;
  this.angleTop = at;
  this.angleBottom = ab;

  // ===== 第2步:动画阶段 =====
  // 延后一帧触发,确保准备阶段的状态已渲染
  setTimeout(() => {
    if (ctx) {
      const atArr = this.angleTop.slice();
      for (let i = 0; i < DIGITS; i++) {
        if (newD[i] !== oldD[i]) {
          atArr[i] = 90;
        }
      }
      // 第一阶段:上叶片 0° → 90°
      ctx.animateTo({
        duration: 260,
        curve: Curve.EaseIn,
        onFinish: () => {
          const abArr = this.angleBottom.slice();
          const btArr = this.bottomStatic.slice();
          for (let i = 0; i < DIGITS; i++) {
            if (newD[i] !== oldD[i]) {
              abArr[i] = 0;
              btArr[i] = newD[i];
            }
          }
          // 第二阶段:下叶片 -90° → 0°
          ctx.animateTo({
            duration: 260,
            curve: Curve.EaseOut
          }, () => {
            this.angleBottom = abArr;
            this.bottomStatic = btArr;
          });
        }
      }, () => {
        this.angleTop = atArr;
      });
    } else {
      commit();
    }
  }, 0);

  // ===== 第3步:兜底 =====
  // 700ms 后强制落位,防止动画被静默丢弃导致数字卡死
  const commit = (): void => {
    const atArr = this.angleTop.slice();
    const abArr = this.angleBottom.slice();
    const btArr = this.bottomStatic.slice();
    for (let i = 0; i < DIGITS; i++) {
      if (newD[i] !== oldD[i]) {
        atArr[i] = 90;
        abArr[i] = 0;
        btArr[i] = newD[i];
      }
    }
    this.angleTop = atArr;
    this.angleBottom = abArr;
    this.bottomStatic = btArr;
  };
  setTimeout(commit, 700);

  this.prevDigits = newD.slice();
}
拆开来看逻辑链路:
- 准备阶段:先铺好所有层的初始状态——上叶片显示旧数字、下叶片藏好新数字、静态层准备好目标数字
- 动画阶段:用
animateTo驱动两段串行动画。第一阶段上叶片翻走,onFinish后触发第二阶段下叶片翻入 - 兜底机制:700ms 后强制把角度设到终态。这是保险措施——万一动画被系统静默丢弃(切后台、帧率不足等),数字也不会卡死
布局
build() {
  Column() {
    Text(this.dateStr + '  ' + this.weekday)
      .fontSize(14)
      .fontColor('#aaaaaa')
      .margin({ bottom: 32 })

    Row({ space: ROW_SPACE }) {
      FlipDigit({
        topStatic: this.topStatic[0], bottomStatic: this.bottomStatic[0],
        flipTop: this.flipTop[0], flipBottom: this.flipBottom[0],
        angleTop: this.angleTop[0], angleBottom: this.angleBottom[0]
      })
      FlipDigit({
        topStatic: this.topStatic[1], bottomStatic: this.bottomStatic[1],
        flipTop: this.flipTop[1], flipBottom: this.flipBottom[1],
        angleTop: this.angleTop[1], angleBottom: this.angleBottom[1]
      })
      this.Colon()
      FlipDigit({
        topStatic: this.topStatic[2], bottomStatic: this.bottomStatic[2],
        flipTop: this.flipTop[2], flipBottom: this.flipBottom[2],
        angleTop: this.angleTop[2], angleBottom: this.angleBottom[2]
      })
      FlipDigit({
        topStatic: this.topStatic[3], bottomStatic: this.bottomStatic[3],
        flipTop: this.flipTop[3], flipBottom: this.flipBottom[3],
        angleTop: this.angleTop[3], angleBottom: this.angleBottom[3]
      })
      this.Colon()
      FlipDigit({
        topStatic: this.topStatic[4], bottomStatic: this.bottomStatic[4],
        flipTop: this.flipTop[4], flipBottom: this.flipBottom[4],
        angleTop: this.angleTop[4], angleBottom: this.angleBottom[4]
      })
      FlipDigit({
        topStatic: this.topStatic[5], bottomStatic: this.bottomStatic[5],
        flipTop: this.flipTop[5], flipBottom: this.flipBottom[5],
        angleTop: this.angleTop[5], angleBottom: this.angleBottom[5]
      })
    }
    .justifyContent(FlexAlign.Center)
  }
  .width('100%')
  .height('100%')
  .justifyContent(FlexAlign.Center)
  .linearGradient({
    direction: GradientDirection.RightBottom,
    colors: [['#1a1a2e', 0.0], ['#16213e', 0.5], ['#0f3460', 1.0]]
  })
}
冒号用 @Builder 抽出来:
@Builder
Colon() {
  Text(':')
    .fontSize(COLON_FONT)
    .fontColor('#e94560')
    .fontWeight(FontWeight.Bold)
    .margin({ left: COLON_MARGIN, right: COLON_MARGIN })
}
6 个 FlipDigit 手动展开传入索引,不用 ForEach。原因是 ForEach 在这个场景下可能引起组件复用导致动画状态混乱,手动展开更可控。
踩坑记录
坑 1:@Watch 在定时器里不触发
最开始我在 FlipDigit 里用 @Watch('onDigitChange') 监听 digit 变化来触发翻转。在页面内测试没问题,但一旦放到定时器场景里,@Watch 经常不触发,数字就卡住了。
原因:ArkUI 的 @Watch 机制在定时器回调中更新状态时,有一定概率被框架跳过(尤其是同一属性短时间内多次变化的情况)。
解法:放弃 @Watch,改由父组件在定时器回调中直接驱动所有动画状态。
坑 2:@State 数组按索引赋值不触发刷新
试过这样写:
this.angleTop[0] = 90; // ❌ 不触发 UI 刷新
ArkUI 对 @State 数组的按索引赋值在部分版本不触发刷新,必须整体重赋值:
const at = this.angleTop.slice();
at[0] = 90;
this.angleTop = at;  // ✅ 整数组替换
这个坑卡了我大半天,调试的时候状态值确实变了但界面纹丝不动。
坑 3:animateTo 的回调不执行
切后台或者帧率不足时,animateTo 的 onFinish 可能不执行,导致第二段动画(下叶片翻入)永远不触发。
解法:加兜底定时器,700ms 后强制设置终态。宁可动画跳帧,也不能让数字卡死。
坑 4:3D 翻转没有透视感
如果 .rotate() 不加 perspective 参数,翻转效果就是正交投影,看起来像 2D 缩放而不是 3D 旋转。加上 perspective: 1000 就有真实的纵深感了。
完整代码
下面我将完整代码贴出来,感兴趣的话运行下看看。
// 翻页时钟:自适应小尺寸,整套宽度约 300vp,适配任意手机屏幕
//       子组件 FlipDigit 仅做纯展示,从根上避免子组件状态监听不触发导致的不切换问题。
const CARD_W: number = 30;       // 单卡宽度
const FONT_SIZE: number = 30;    // 字形字号
const HALF_H: number = 25;       // 半卡高度
const TEXT_H: number = HALF_H * 2; // 整卡高度 50
const RADIUS: number = 4;        // 圆角
const COLON_FONT: number = 28;   // 冒号字号
const COLON_MARGIN: number = 1;  // 冒号左右间距
const ROW_SPACE: number = 2;     // 卡片之间间距
const DIGITS: number = 6;         // 时(2)+分(2)+秒(2) 共 6 个数字位

// 单个字形:占满 TEXT_H 高,靠外层半卡裁剪只露半边;flexShrink(0) 禁止被 HALF_H 容器压缩
@Component
struct DigitText {
  @Prop d: string = '0';
  @Prop isTop: boolean = true;

  build() {
    Text(this.d)
      .fontSize(FONT_SIZE)
      .fontColor('#ffffff')
      .fontWeight(FontWeight.Bold)
      .textAlign(TextAlign.Center)
      .height(TEXT_H)
      .width('100%')
      .flexShrink(0)
      .margin({ top: this.isTop ? 0 : -HALF_H })
  }
}

// 单数字翻页卡片:纯展示组件,所有视觉状态由父组件通过 @Prop 注入
@Component
struct FlipDigit {
  @Prop topStatic: string = '0';      // 上层静止(翻走后露出的新数字上半)
  @Prop bottomStatic: string = '0';  // 下层静止(翻入过程中保留旧数字下半)
  @Prop flipTop: string = '0';        // 上叶片:显示旧数字
  @Prop flipBottom: string = '0';     // 下叶片:显示新数字
  @Prop angleTop: number = 0;         // 0 -> 90(向前翻下)
  @Prop angleBottom: number = -90;    // -90 -> 0(向前翻入)

  build() {
    // 四层叠放:静态上/下 + 上叶片(旧,绕底边中轴翻下) + 下叶片(新,绕顶边中轴翻入)
    // 半卡用 .position() 绝对定位(上卡 y=0、下卡 y=HALF_H),摆脱 Stack 默认居中
    Stack() {
      Column() {
        DigitText({ d: this.topStatic, isTop: true })
      }
      .width(CARD_W)
      .height(HALF_H)
      .justifyContent(FlexAlign.Start)
      .alignItems(HorizontalAlign.Center)
      .backgroundColor('#e94560')
      .borderRadius({ topLeft: RADIUS, topRight: RADIUS })
      .clip(true)
      .position({ x: 0, y: 0 })

      Column() {
        DigitText({ d: this.bottomStatic, isTop: false })
      }
      .width(CARD_W)
      .height(HALF_H)
      .justifyContent(FlexAlign.Start)
      .alignItems(HorizontalAlign.Center)
      .backgroundColor('#c23152')
      .borderRadius({ bottomLeft: RADIUS, bottomRight: RADIUS })
      .clip(true)
      .position({ x: 0, y: HALF_H })

      Column() {
        DigitText({ d: this.flipTop, isTop: true })
      }
      .width(CARD_W)
      .height(HALF_H)
      .justifyContent(FlexAlign.Start)
      .alignItems(HorizontalAlign.Center)
      .backgroundColor('#e94560')
      .borderRadius({ topLeft: RADIUS, topRight: RADIUS })
      .clip(true)
      .position({ x: 0, y: 0 })
      .rotate({ angleX: this.angleTop, centerX: '50%', centerY: '100%', perspective: 1000 })
      .zIndex(2)
      .opacity(this.angleTop < 90 ? 1 : 0)

      Column() {
        DigitText({ d: this.flipBottom, isTop: false })
      }
      .width(CARD_W)
      .height(HALF_H)
      .justifyContent(FlexAlign.Start)
      .alignItems(HorizontalAlign.Center)
      .backgroundColor('#c23152')
      .borderRadius({ bottomLeft: RADIUS, bottomRight: RADIUS })
      .clip(true)
      .position({ x: 0, y: HALF_H })
      .rotate({ angleX: this.angleBottom, centerX: '50%', centerY: '0%', perspective: 1000 })
      .zIndex(2)
      .opacity(this.angleBottom > -90 ? 1 : 0)
    }
    .width(CARD_W)
    .height(TEXT_H)
    .clip(true)
  }
}

@Entry
@Component
struct Qa7 {
  // 每个数字位 6 个视觉状态(数组形式,父组件统一驱动)
  @State topStatic: string[] = new Array(DIGITS).fill('0');
  @State bottomStatic: string[] = new Array(DIGITS).fill('0');
  @State flipTop: string[] = new Array(DIGITS).fill('0');
  @State flipBottom: string[] = new Array(DIGITS).fill('0');
  @State angleTop: number[] = new Array(DIGITS).fill(0);
  @State angleBottom: number[] = new Array(DIGITS).fill(-90);

  // 时间文本与上一帧数字
  @State dateStr: string = '';
  @State weekday: string = '';
  private prevDigits: string[] = new Array(DIGITS).fill('0');
  private timer: number = -1;

  aboutToAppear(): void {
    const d: string[] = this.computeDigits();
    this.prevDigits = d.slice();
    // 初始化所有视觉状态为当前数字(静止态),整数组赋值确保 ArkUI 刷新
    this.topStatic = d.slice();
    this.bottomStatic = d.slice();
    this.flipTop = d.slice();
    this.flipBottom = d.slice();
    this.angleTop = new Array(DIGITS).fill(0);
    this.angleBottom = new Array(DIGITS).fill(-90);
    this.updateDate();
    // 每秒直接驱动翻页,避免 @Watch 在定时器场景下未触发导致时间卡住
    this.timer = setInterval(() => {
      const nextDigits: string[] = this.computeDigits();
      this.updateDate();
      this.flipTo(nextDigits);
    }, 1000);
  }

  aboutToDisappear(): void {
    if (this.timer !== -1) {
      clearInterval(this.timer);
    }
  }

  private padZero(num: number): string {
    return num < 10 ? `0${num}` : `${num}`;
  }

  // 取当前时分秒的 6 个字符:h0 h1 m0 m1 s0 s1
  private computeDigits(): string[] {
    const now: Date = new Date();
    const h: string = this.padZero(now.getHours());
    const m: string = this.padZero(now.getMinutes());
    const s: string = this.padZero(now.getSeconds());
    return [h[0], h[1], m[0], m[1], s[0], s[1]];
  }

  private updateDate(): void {
    const now: Date = new Date();
    this.dateStr = `${now.getFullYear()}/${this.padZero(now.getMonth() + 1)}/${this.padZero(now.getDate())}`;
    const days: string[] = ['周日', '周一', '周二', '周三', '周四', '周五', '周六'];
    this.weekday = days[now.getDay()];
  }

  private flipTo(newD: string[]): void {
    const oldD: string[] = this.prevDigits;
    let changed: boolean = false;
    for (let i = 0; i < DIGITS; i++) {
      if (newD[i] !== oldD[i]) {
        changed = true;
        break;
      }
    }
    if (!changed) {
      return;
    }

    const ctx = this.getUIContext();
    // 准备阶段:仅对变化的位铺好翻页初始层
    // 注意:@State 数组按索引赋值(this.x[i]=v)在部分版本不触发刷新,必须整数组重赋值
    const ft: string[] = this.flipTop.slice();
    const fb: string[] = this.flipBottom.slice();
    const ts: string[] = this.topStatic.slice();
    const bs: string[] = this.bottomStatic.slice();
    const at: number[] = this.angleTop.slice();
    const ab: number[] = this.angleBottom.slice();
    for (let i = 0; i < DIGITS; i++) {
      if (newD[i] !== oldD[i]) {
        ft[i] = oldD[i];   // 上叶片先显旧数字
        fb[i] = newD[i];   // 下叶片准备好新数字
        ts[i] = newD[i];   // 上叶片翻走后露出新上层
        bs[i] = oldD[i];   // 下叶片到位前下层仍是旧数字
        at[i] = 0;
        ab[i] = -90;
      }
    }
    this.flipTop = ft;
    this.flipBottom = fb;
    this.topStatic = ts;
    this.bottomStatic = bs;
    this.angleTop = at;
    this.angleBottom = ab;

    // 强制落到最终态(即使动画被静默丢弃,数字也一定切换,不再卡死)
    const commit = (): void => {
      const at = this.angleTop.slice();
      const ab = this.angleBottom.slice();
      const bt = this.bottomStatic.slice();
      for (let i = 0; i < DIGITS; i++) {
        if (newD[i] !== oldD[i]) {
          at[i] = 90;
          ab[i] = 0;
          bt[i] = newD[i];
        }
      }
      this.angleTop = at;
      this.angleBottom = ab;
      this.bottomStatic = bt;
    };

    // 主方案:延后一帧触发属性动画(父组件上下文,必定有效)
    setTimeout(() => {
      if (ctx) {
        const at = this.angleTop.slice();
        for (let i = 0; i < DIGITS; i++) {
          if (newD[i] !== oldD[i]) {
            at[i] = 90;
          }
        }
        // 第一阶段:上叶片 0 -> 90 翻走,露出新上层
        ctx.animateTo({
          duration: 260,
          curve: Curve.EaseIn,
          onFinish: () => {
            const ab = this.angleBottom.slice();
            const bt = this.bottomStatic.slice();
            for (let i = 0; i < DIGITS; i++) {
              if (newD[i] !== oldD[i]) {
                ab[i] = 0;
                bt[i] = newD[i];
              }
            }
            // 第二阶段:下叶片 -90 -> 0 翻入,盖住旧下层
            ctx.animateTo({
              duration: 260,
              curve: Curve.EaseOut
            }, () => {
              this.angleBottom = ab;
              this.bottomStatic = bt;
            });
          }
        }, () => {
          this.angleTop = at;
        });
      } else {
        commit();
      }
    }, 0);

    // 兜底:700ms 后强制落位
    setTimeout(commit, 700);
    this.prevDigits = newD.slice();
  }

  @Builder
  Colon() {
    Text(':')
      .fontSize(COLON_FONT)
      .fontColor('#e94560')
      .fontWeight(FontWeight.Bold)
      .margin({ left: COLON_MARGIN, right: COLON_MARGIN })
  }

  build() {
    Column() {
      Text(this.dateStr + '  ' + this.weekday)
        .fontSize(14)
        .fontColor('#aaaaaa')
        .margin({ bottom: 32 })

      Row({ space: ROW_SPACE }) {
        FlipDigit({
          topStatic: this.topStatic[0], bottomStatic: this.bottomStatic[0],
          flipTop: this.flipTop[0], flipBottom: this.flipBottom[0],
          angleTop: this.angleTop[0], angleBottom: this.angleBottom[0]
        })
        FlipDigit({
          topStatic: this.topStatic[1], bottomStatic: this.bottomStatic[1],
          flipTop: this.flipTop[1], flipBottom: this.flipBottom[1],
          angleTop: this.angleTop[1], angleBottom: this.angleBottom[1]
        })
        this.Colon()
        FlipDigit({
          topStatic: this.topStatic[2], bottomStatic: this.bottomStatic[2],
          flipTop: this.flipTop[2], flipBottom: this.flipBottom[2],
          angleTop: this.angleTop[2], angleBottom: this.angleBottom[2]
        })
        FlipDigit({
          topStatic: this.topStatic[3], bottomStatic: this.bottomStatic[3],
          flipTop: this.flipTop[3], flipBottom: this.flipBottom[3],
          angleTop: this.angleTop[3], angleBottom: this.angleBottom[3]
        })
        this.Colon()
        FlipDigit({
          topStatic: this.topStatic[4], bottomStatic: this.bottomStatic[4],
          flipTop: this.flipTop[4], flipBottom: this.flipBottom[4],
          angleTop: this.angleTop[4], angleBottom: this.angleBottom[4]
        })
        FlipDigit({
          topStatic: this.topStatic[5], bottomStatic: this.bottomStatic[5],
          flipTop: this.flipTop[5], flipBottom: this.flipBottom[5],
          angleTop: this.angleTop[5], angleBottom: this.angleBottom[5]
        })
      }
      .justifyContent(FlexAlign.Center)
    }
    .width('100%')
    .height('100%')
    .justifyContent(FlexAlign.Center)
    .linearGradient({
      direction: GradientDirection.RightBottom,
      colors: [['#1a1a2e', 0.0], ['#16213e', 0.5], ['#0f3460', 1.0]]
    })
  }
}
总结
翻页时钟看着是个小需求,但要做到"丝滑"二字,细节真不少。4 层叠放、两段串行动画、兜底机制、3D 透视参数——每一个细节都是踩过坑才定下来的。
其中最关键的经验就一条:在 ArkUI 里,动画状态最好由父组件统一管控,子组件只做纯展示。这能帮你避开 @Watch 不触发、数组索引赋值不刷新等一系列暗坑。
如果你也在做类似的翻页效果,希望这篇能帮你少踩几个坑。

讨论HarmonyOS开发技术,专注于API与组件、DevEco Studio、测试、元服务和应用上架分发等。
更多推荐


 0
0 0
0- 0


 已为社区贡献397条内容

所有评论(0)