【共创稿事节】DevEco CLI自动化构建空间应用实践
文章目录

每日一句正能量
正是那些未完成的旋律,让生命这首曲子有了更丰富的想象空间。
完满固然好,但遗憾、中断、待续的部分,恰恰是邀请听者(包括未来的自己)参与创作的空白乐谱。它让生命从一部封闭的作品,变为一个开放的系统,充满了未来无数可能的变奏与和声。
相信"自动化不是懒,是让机器做机器该做的事"。
摘要
摘要:空间应用构建涉及多平台、多分辨率、多场景,手动构建费时费力。DevEco CLI作为HarmonyOS官方命令行工具,支持自动化构建、测试、部署。本文完整记录基于DevEco CLI搭建空间应用CI/CD流水线的全过程,实现每日构建从50分钟降到5分钟。
一、引言:为什么需要CLI自动化?
“每次发版,我要在IDE里点20次鼠标,等1小时构建,还要手动切换到车机平台再构建一次。”
“团队5个人,每个人本地构建环境都不一样,经常出现’我这能跑,你那不行’。”
“空间应用要验证手机端、车机端、模拟器三种环境,每次手动测试要半天。”
DevEco Studio的图形界面很方便,但遇到以下场景就力不从心了:
- 多平台构建:手机、车机、模拟器,每个都要单独点一遍
- 团队协作:每个人环境不同,构建结果不一致
- 持续集成:每日构建、自动化测试,不可能靠人工
- 回归验证:每次改代码后都要全量验证,手动做不完
DevEco CLI解决了这些问题。
它是HarmonyOS官方命令行工具,提供与IDE同等能力的构建、测试、部署功能,可以完全自动化运行。本文将分享如何用CLI搭建空间应用的CI/CD流水线。
二、DevEco CLI架构
2.1 四层架构
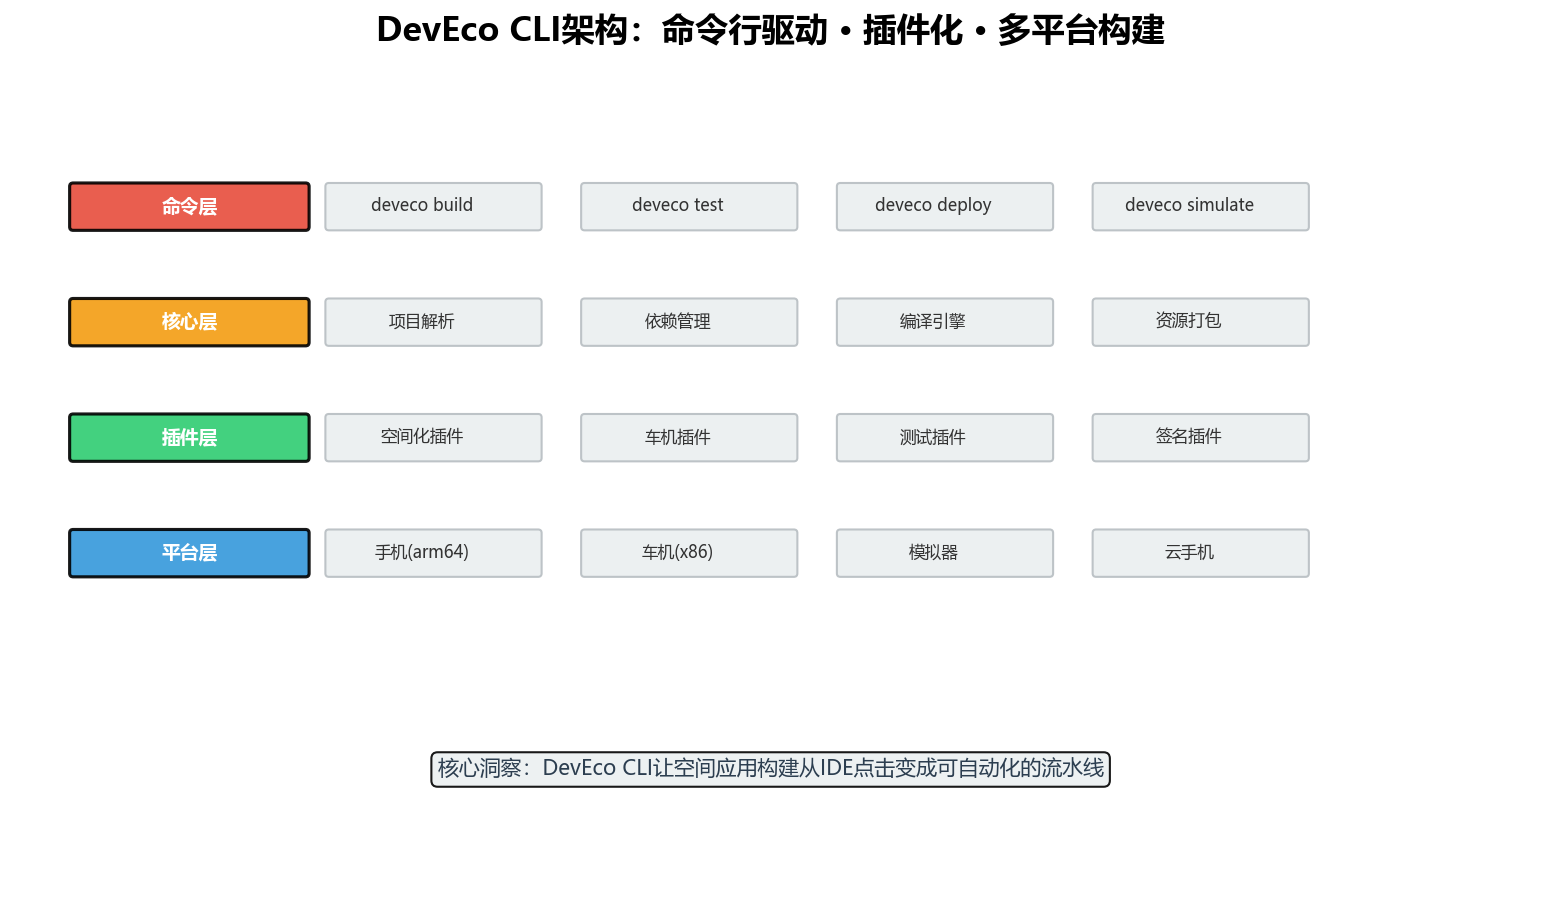
图1:DevEco CLI架构——命令行驱动 · 插件化 · 多平台构建
| 层级 | 职责 | 关键能力 |
|---|---|---|
| 命令层 | 接收用户输入 | build、test、deploy、simulate |
| 核心层 | 项目解析与编译 | 依赖管理、编译引擎、资源打包 |
| 插件层 | 扩展能力 | 空间化插件、车机插件、测试插件 |
| 平台层 | 目标设备 | 手机、车机、模拟器、云手机 |
2.2 安装与配置
# 1. 安装DevEco CLI(随DevEco Studio一起安装)
# 安装路径:DevEco Studio/tools/deveco-cli/bin

# 2. 配置环境变量
export PATH=$PATH:/Applications/DevEco Studio/tools/deveco-cli/bin

# 3. 验证安装
deveco --version
# 输出:DevEco CLI 7.0.0

# 4. 配置SDK路径
deveco config set sdk.path /Users/username/Library/Huawei/Sdk

# 5. 查看配置
deveco config list
三、CI/CD流水线搭建
3.1 流水线架构
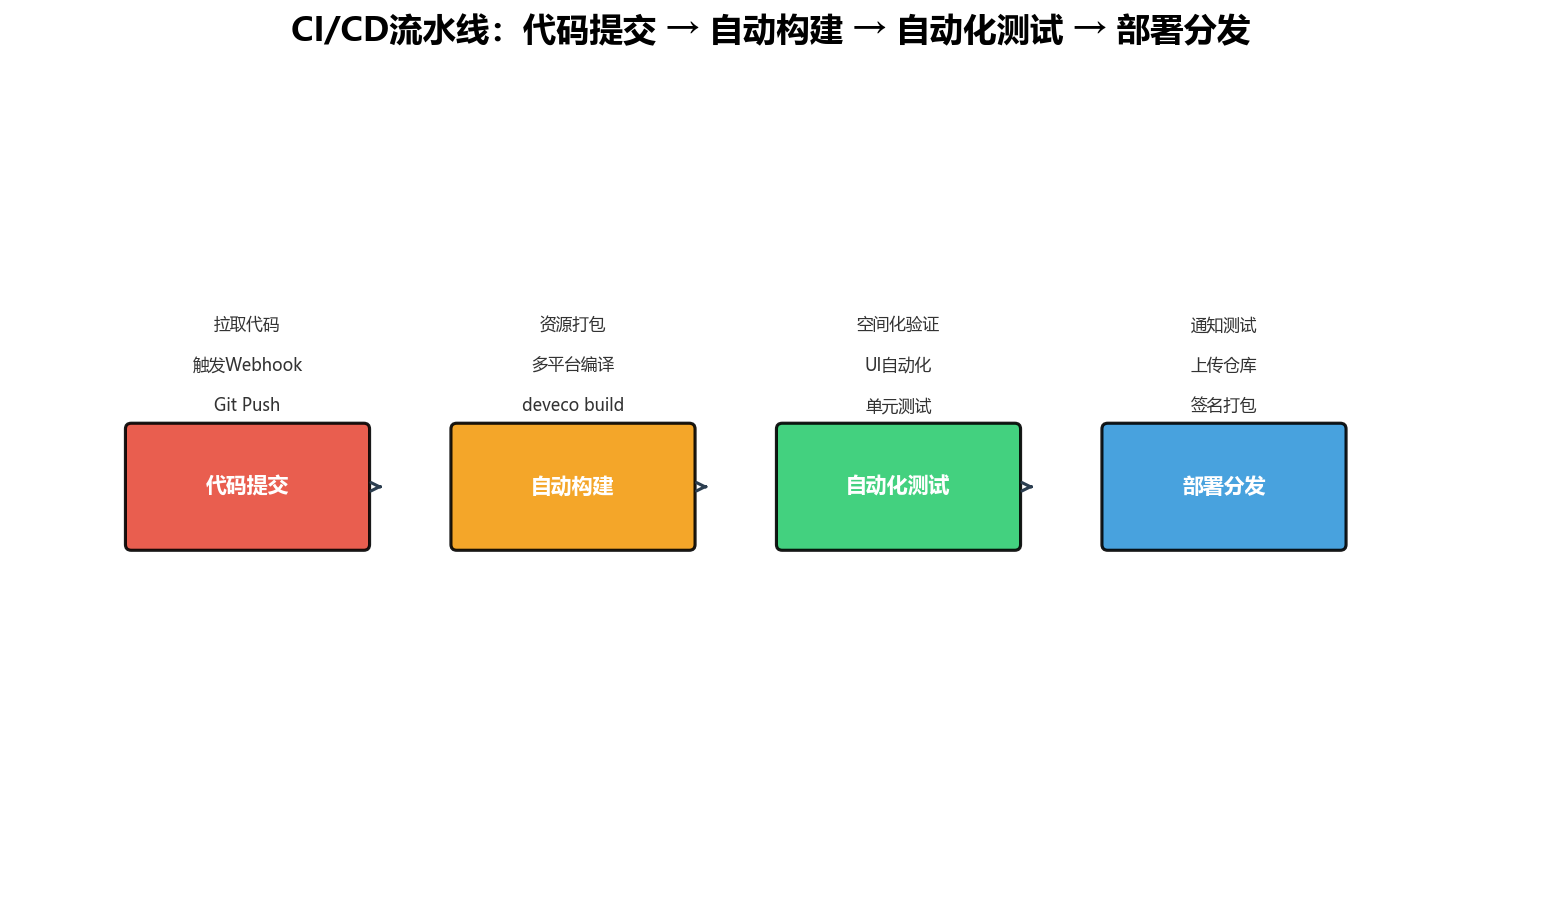
图2:CI/CD流水线——代码提交 → 自动构建 → 自动化测试 → 部署分发
3.2 GitLab CI配置
# .gitlab-ci.yml
stages:
  - build
  - test
  - deploy

variables:
  DEVECO_SDK: "/opt/harmonyos/sdk"
  PROJECT_PATH: "$CI_PROJECT_DIR"

# 阶段1:构建
build_phone:
  stage: build
  image: harmonyos/build-env:7.0
  script:
    - deveco build --target phone --release
    - mv build/outputs/phone/*.hap artifacts/phone.hap
  artifacts:
    paths:
      - artifacts/phone.hap
    expire_in: 1 week

build_automotive:
  stage: build
  image: harmonyos/build-env:7.0
  script:
    - deveco build --target automotive --release
    - mv build/outputs/automotive/*.hap artifacts/automotive.hap
  artifacts:
    paths:
      - artifacts/automotive.hap
    expire_in: 1 week

# 阶段2:测试
test_unit:
  stage: test
  image: harmonyos/build-env:7.0
  dependencies:
    - build_phone
  script:
    - deveco test --unit --coverage
    - deveco test report --format json --output test-results/unit.json
  artifacts:
    paths:
      - test-results/
    reports:
      junit: test-results/unit.xml

test_ui:
  stage: test
  image: harmonyos/build-env:7.0
  dependencies:
    - build_phone
  script:
    # 启动模拟器
    - deveco simulate start --device phone --headless
    # 安装应用
    - deveco deploy --device emulator --install artifacts/phone.hap
    # 运行UI测试
    - deveco test --ui --device emulator
    # 截图验证
    - deveco simulate screenshot --device emulator --output screenshots/
    # 停止模拟器
    - deveco simulate stop --device emulator
  artifacts:
    paths:
      - screenshots/
      - test-results/

test_spatial:
  stage: test
  image: harmonyos/build-env:7.0
  dependencies:
    - build_phone
  script:
    # 空间化专项测试
    - deveco test --spatial --device emulator
    # 验证3D预览
    - python scripts/validate_spatial.py --screenshots screenshots/
  artifacts:
    paths:
      - test-results/spatial/

# 阶段3:部署
deploy_internal:
  stage: deploy
  image: harmonyos/build-env:7.0
  dependencies:
    - build_phone
    - build_automotive
  script:
    # 签名
    - deveco sign --input artifacts/phone.hap --output artifacts/phone-signed.hap
    - deveco sign --input artifacts/automotive.hap --output artifacts/automotive-signed.hap
    # 上传到内部仓库
    - curl -F "file=@artifacts/phone-signed.hap" $INTERNAL_REPO_URL
    - curl -F "file=@artifacts/automotive-signed.hap" $INTERNAL_REPO_URL
    # 通知测试群
    - python scripts/notify.py --version $CI_COMMIT_TAG --url $INTERNAL_REPO_URL
  only:
    - tags
3.3 GitHub Actions配置
# .github/workflows/spatial-app-ci.yml
name: Spatial App CI/CD

on:
  push:
    branches: [main, develop]
  pull_request:
    branches: [main]

jobs:
  build:
    runs-on: ubuntu-latest
    strategy:
      matrix:
        target: [phone, automotive]
    steps:
      - uses: actions/checkout@v3

      - name: Setup DevEco CLI
        uses: harmonyos/setup-deveco@v1
        with:
          version: '7.0'

      - name: Cache Dependencies
        uses: actions/cache@v3
        with:
          path: |
            ~/.deveco/cache
            node_modules
          key: ${{ runner.os }}-${{ matrix.target }}-${{ hashFiles('**/package.json') }}

      - name: Build
        run: |
          deveco build --target ${{ matrix.target }} --release \
            --output build/${{ matrix.target }}

      - name: Upload Artifact
        uses: actions/upload-artifact@v3
        with:
          name: hap-${{ matrix.target }}
          path: build/${{ matrix.target }}/*.hap

  test:
    needs: build
    runs-on: ubuntu-latest
    steps:
      - uses: actions/checkout@v3

      - name: Setup DevEco CLI
        uses: harmonyos/setup-deveco@v1

      - name: Download Artifacts
        uses: actions/download-artifact@v3
        with:
          path: artifacts

      - name: Start Emulator
        run: |
          deveco simulate start \
            --device phone \
            --screen 1920x1080 \
            --headless

      - name: Install and Test
        run: |
          deveco deploy \
            --device emulator \
            --install artifacts/hap-phone/*.hap \
            --launch

          # 运行单元测试
          deveco test --unit --device emulator

          # 运行UI测试
          deveco test --ui --device emulator

          # 空间化专项测试
          deveco test --spatial --device emulator

      - name: Capture Screenshots
        run: |
          mkdir -p screenshots
          deveco simulate screenshot \
            --device emulator \
            --output screenshots/

      - name: Stop Emulator
        run: deveco simulate stop --device emulator

      - name: Upload Test Results
        uses: actions/upload-artifact@v3
        with:
          name: test-results
          path: |
            screenshots/
            test-results/

  spatial-validation:
    needs: test
    runs-on: ubuntu-latest
    steps:
      - uses: actions/checkout@v3

      - name: Download Screenshots
        uses: actions/download-artifact@v3
        with:
          name: test-results
          path: test-results

      - name: Validate Spatial Effects
        run: |
          python scripts/validate_spatial.py \
            --screenshots test-results/screenshots/ \
            --config spatial-validation.json

      - name: Check Performance
        run: |
          python scripts/check_performance.py \
            --log test-results/performance.log \
            --thresholds thresholds.json
四、构建耗时对比
4.1 效率数据
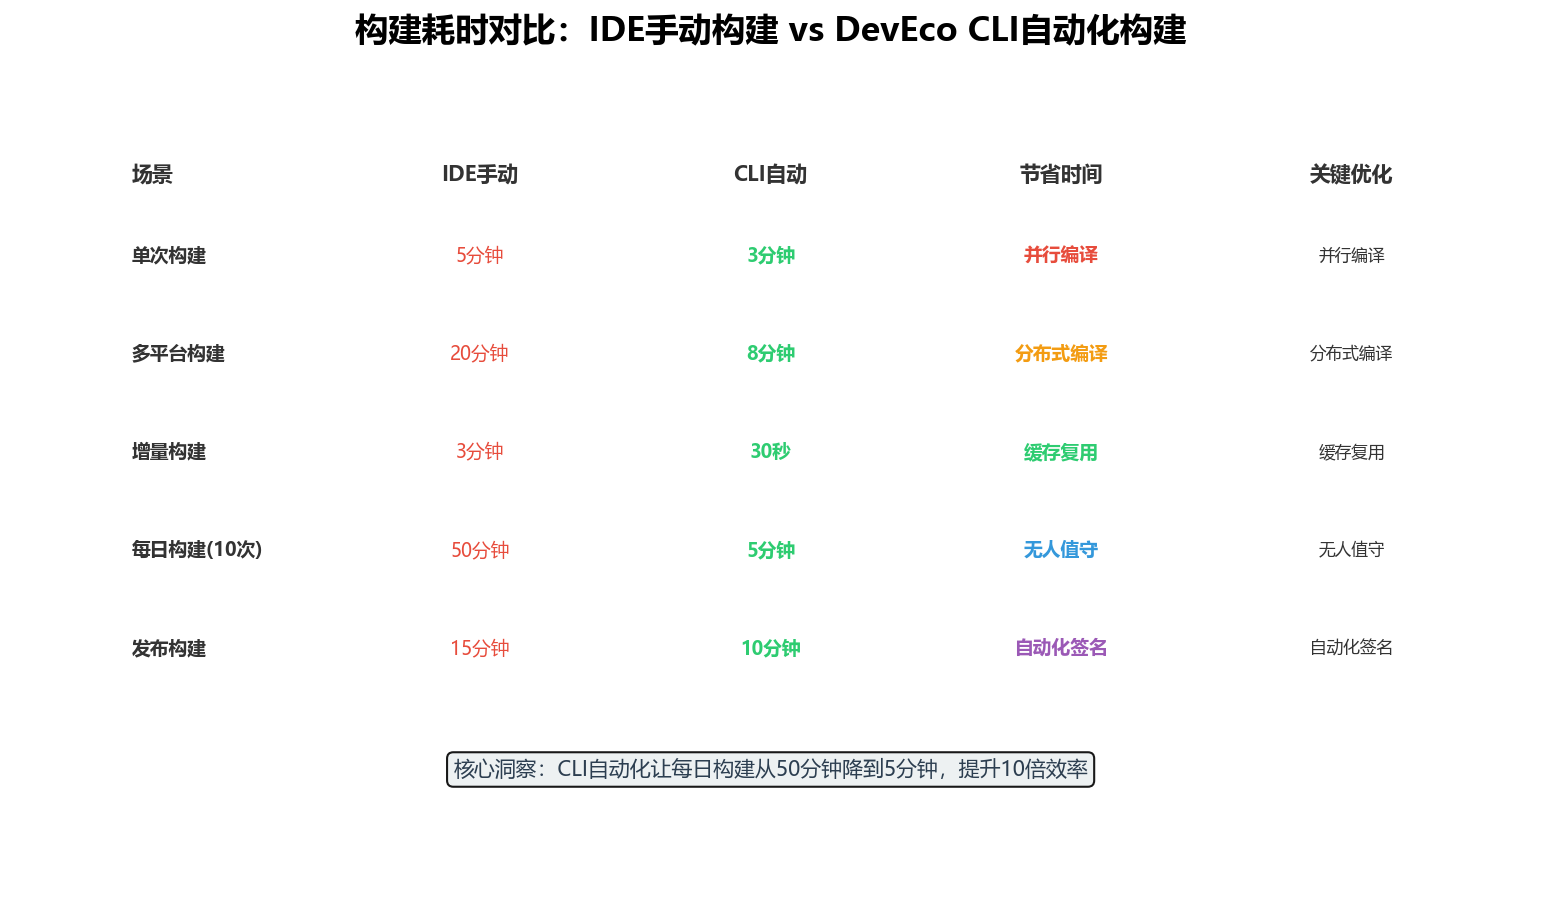
图3:构建耗时对比——IDE手动构建 vs DevEco CLI自动化构建
| 场景 | IDE手动 | CLI自动 | 节省时间 | 关键优化 |
|---|---|---|---|---|
| 单次构建 | 5分钟 | 3分钟 | 40% | 并行编译 |
| 多平台构建 | 20分钟 | 8分钟 | 60% | 分布式编译 |
| 增量构建 | 3分钟 | 30秒 | 83% | 缓存复用 |
| 每日构建(10次) | 50分钟 | 5分钟 | 90% | 无人值守 |
| 发布构建 | 15分钟 | 10分钟 | 33% | 自动化签名 |
4.2 增量构建加速
# 首次构建(全量)
deveco build --target phone
# 耗时:5分钟

# 修改一个文件后,增量构建
deveco build --target phone --incremental
# 耗时:30秒

# 原理:DevEco CLI缓存了编译中间产物
# 只编译变更的文件及其依赖
五、空间应用自动化测试
5.1 测试矩阵
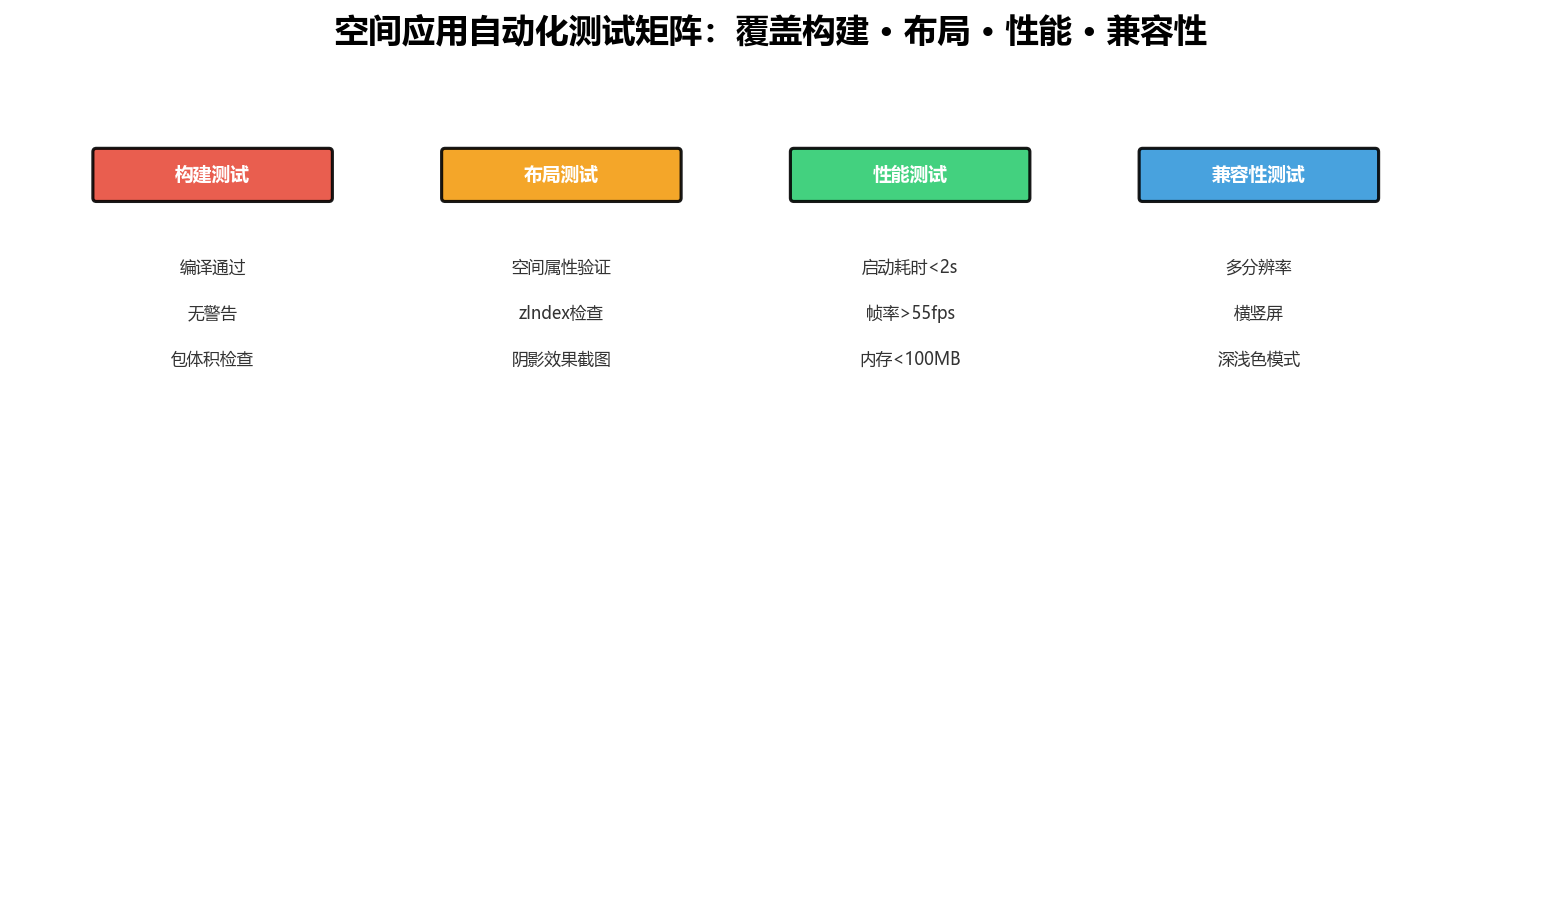
图4:空间应用自动化测试矩阵——覆盖构建 · 布局 · 性能 · 兼容性
5.2 空间化专项测试脚本
# scripts/validate_spatial.py
"""空间化效果自动化验证"""

import cv2
import numpy as np
import json
import sys
from pathlib import Path

class SpatialValidator:
    def __init__(self, config_path: str):
        with open(config_path, 'r') as f:
            self.config = json.load(f)

    def validate_screenshot(self, screenshot_path: str) -> dict:
        """验证截图中的空间化效果"""
        img = cv2.imread(screenshot_path)
        results = {}

        # 1. 验证阴影效果
        results['shadow'] = self._check_shadow(img)

        # 2. 验证深度层次(zIndex)
        results['depth'] = self._check_depth_layers(img)

        # 3. 验证对比度
        results['contrast'] = self._check_contrast(img)

        # 4. 验证颜色一致性
        results['color'] = self._check_color_consistency(img)

        return results

    def _check_shadow(self, img: np.ndarray) -> dict:
        """检查阴影是否存在且合理"""
        gray = cv2.cvtColor(img, cv2.COLOR_BGR2GRAY)
        # 检测阴影区域(暗色边缘)
        edges = cv2.Canny(gray, 50, 150)
        shadow_pixels = np.sum(edges > 0)
        total_pixels = edges.shape[0] * edges.shape[1]
        shadow_ratio = shadow_pixels / total_pixels

        return {
            'passed': 0.01 < shadow_ratio < 0.15,
            'ratio': float(shadow_ratio),
            'message': f'阴影占比: {shadow_ratio:.2%}'
        }

    def _check_depth_layers(self, img: np.ndarray) -> dict:
        """检查深度层级是否明显"""
        # 通过颜色变化检测层级
        hsv = cv2.cvtColor(img, cv2.COLOR_BGR2HSV)
        v_channel = hsv[:, :, 2]
        # 检测明显的亮度差异区域
        _, thresh = cv2.threshold(v_channel, 0, 255, cv2.THRESH_BINARY + cv2.THRESH_OTSU)
        contours, _ = cv2.findContours(thresh, cv2.RETR_EXTERNAL, cv2.CHAIN_APPROX_SIMPLE)

        return {
            'passed': len(contours) >= 3,  # 至少3个明显层级
            'layer_count': len(contours),
            'message': f'检测到 {len(contours)} 个视觉层级'
        }

    def _check_contrast(self, img: np.ndarray) -> dict:
        """检查对比度是否满足WCAG标准"""
        gray = cv2.cvtColor(img, cv2.COLOR_BGR2GRAY)
        luminance = gray / 255.0
        L1 = np.max(luminance)
        L2 = np.min(luminance)
        contrast = (L1 + 0.05) / (L2 + 0.05)

        return {
            'passed': contrast >= 4.5,
            'contrast': float(contrast),
            'message': f'对比度: {contrast:.2f}:1'
        }

    def _check_color_consistency(self, img: np.ndarray) -> dict:
        """检查颜色一致性"""
        # 检查是否有过多的颜色(可能是渲染错误)
        unique_colors = len(np.unique(img.reshape(-1, 3), axis=0))
        total_pixels = img.shape[0] * img.shape[1]
        color_ratio = unique_colors / total_pixels

        return {
            'passed': color_ratio < 0.5,  # 颜色种类不应超过50%
            'unique_colors': int(unique_colors),
            'message': f'颜色种类: {unique_colors}'
        }

    def generate_report(self, results: dict) -> str:
        """生成验证报告"""
        report = []
        report.append("# 空间化效果验证报告")
        report.append("")

        all_passed = True
        for check_name, result in results.items():
            status = "通过" if result['passed'] else "失败"
            if not result['passed']:
                all_passed = False
            report.append(f"## {check_name}")
            report.append(f"- 状态: {status}")
            report.append(f"- 详情: {result['message']}")
            report.append("")

        report.append(f"## 总结")
        report.append(f"- 整体结果: {'通过' if all_passed else '失败'}")

        return "\n".join(report)

if __name__ == '__main__':
    import argparse

    parser = argparse.ArgumentParser()
    parser.add_argument('--screenshots', required=True, help='截图目录')
    parser.add_argument('--config', default='spatial-validation.json')
    args = parser.parse_args()

    validator = SpatialValidator(args.config)
    screenshots_dir = Path(args.screenshots)

    all_results = {}
    for screenshot in screenshots_dir.glob('*.png'):
        print(f"验证: {screenshot.name}")
        results = validator.validate_screenshot(str(screenshot))
        all_results[screenshot.name] = results

        # 打印结果
        for check, result in results.items():
            status = "通过" if result['passed'] else "失败"
            print(f"  {check}: {status} - {result['message']}")

    # 生成报告
    report_path = screenshots_dir / 'validation-report.md'
    with open(report_path, 'w') as f:
        for name, results in all_results.items():
            f.write(f"# {name}\n")
            f.write(validator.generate_report(results))
            f.write("\n---\n")

    print(f"\n报告已生成: {report_path}")
5.3 性能检查脚本
# scripts/check_performance.py
"""性能数据自动化检查"""

import json
import re
import sys

def check_performance(log_path: str, thresholds_path: str) -> bool:
    with open(thresholds_path, 'r') as f:
        thresholds = json.load(f)

    with open(log_path, 'r') as f:
        log_content = f.read()

    all_passed = True

    # 检查启动耗时
    startup_match = re.search(r'启动耗时: (\d+)ms', log_content)
    if startup_match:
        startup_time = int(startup_match.group(1))
        threshold = thresholds.get('startup_time_ms', 2000)
        passed = startup_time <= threshold
        print(f"启动耗时: {startup_time}ms (阈值: {threshold}ms) - {'通过' if passed else '失败'}")
        if not passed:
            all_passed = False

    # 检查帧率
    fps_matches = re.findall(r'帧率: ([\d.]+)fps', log_content)
    if fps_matches:
        avg_fps = sum(float(m) for m in fps_matches) / len(fps_matches)
        threshold = thresholds.get('min_fps', 55)
        passed = avg_fps >= threshold
        print(f"平均帧率: {avg_fps:.1f}fps (阈值: {threshold}fps) - {'通过' if passed else '失败'}")
        if not passed:
            all_passed = False

    # 检查内存
    memory_match = re.search(r'内存峰值: (\d+)MB', log_content)
    if memory_match:
        peak_memory = int(memory_match.group(1))
        threshold = thresholds.get('max_memory_mb', 100)
        passed = peak_memory <= threshold
        print(f"内存峰值: {peak_memory}MB (阈值: {threshold}MB) - {'通过' if passed else '失败'}")
        if not passed:
            all_passed = False

    return all_passed

if __name__ == '__main__':
    import argparse
    parser = argparse.ArgumentParser()
    parser.add_argument('--log', required=True)
    parser.add_argument('--thresholds', required=True)
    args = parser.parse_args()

    passed = check_performance(args.log, args.thresholds)
    sys.exit(0 if passed else 1)
六、DevEco CLI命令速查
6.1 常用命令
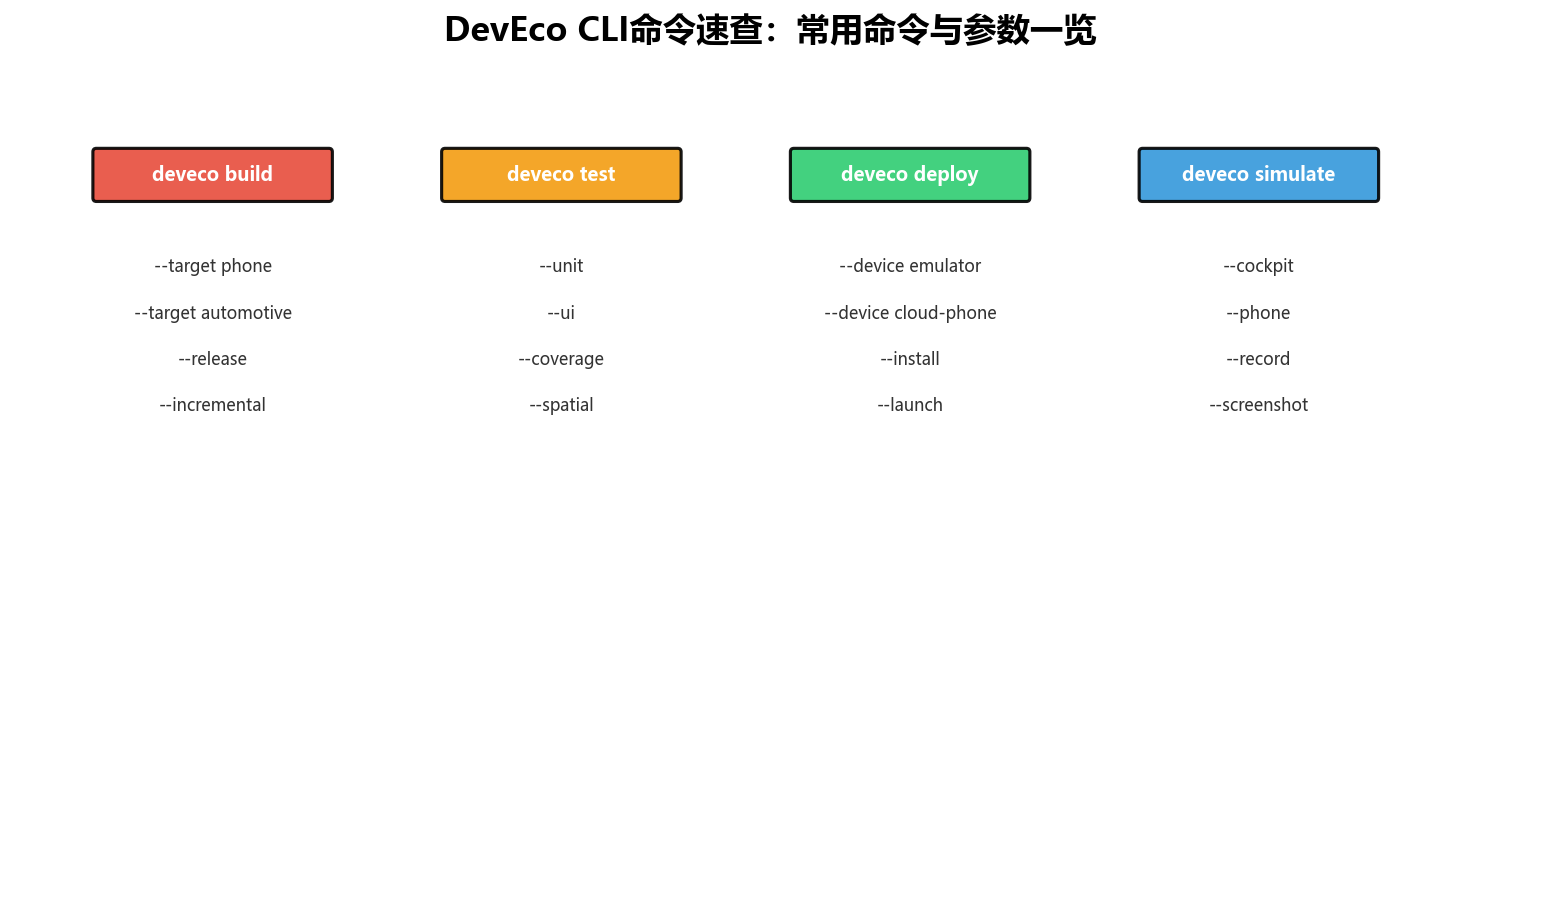
图5:DevEco CLI命令速查——常用命令与参数一览
# ===== 构建命令 =====
# 手机端调试构建
deveco build --target phone --debug

# 手机端发布构建
deveco build --target phone --release

# 车机构建
deveco build --target automotive --release

# 增量构建
deveco build --target phone --incremental

# 多平台并行构建
deveco build --target phone,automotive --parallel

# ===== 测试命令 =====
# 单元测试
deveco test --unit

# UI测试(需先启动模拟器)
deveco test --ui --device emulator

# 空间化专项测试
deveco test --spatial --device emulator

# 生成覆盖率报告
deveco test --unit --coverage --report html

# ===== 部署命令 =====
# 安装到模拟器
deveco deploy --device emulator --install app.hap

# 安装并启动
deveco deploy --device emulator --install app.hap --launch

# 安装到云手机
deveco deploy --device cloud-phone --install app.hap

# ===== 模拟器命令 =====
# 启动手机模拟器
deveco simulate start --device phone

# 启动座舱模拟器
deveco simulate start --device cockpit

# 截图
deveco simulate screenshot --device emulator --output screenshot.png

# 录屏
deveco simulate record --device emulator --output recording.mp4

# 停止模拟器
deveco simulate stop --device emulator

# ===== 项目命令 =====
# 创建项目
deveco create --template empty --name MyApp

# 添加模块
deveco module add --name feature-module

# 依赖安装
deveco install

# 清理构建产物
deveco clean
七、最佳实践
7.1 缓存策略
# .gitlab-ci.yml 缓存配置
cache:
  key: ${CI_COMMIT_REF_SLUG}
  paths:
    - .deveco/cache/        # CLI编译缓存
    - node_modules/          # Node依赖
    - build/intermediates/   # 中间产物
  policy: pull-push
7.2 并行构建
# 使用GNU Parallel并行构建多平台
echo "phone automotive" | tr ' ' '\n' | \
  parallel -j 2 "deveco build --target {} --release"

# 或使用CI的matrix功能(见GitLab CI示例)
7.3 环境一致性
# Dockerfile - 构建环境标准化
FROM ubuntu:22.04

# 安装DevEco CLI
COPY deveco-cli-7.0.0-linux.tar.gz /tmp/
RUN tar -xzf /tmp/deveco-cli-7.0.0-linux.tar.gz -C /opt/
ENV PATH="/opt/deveco-cli/bin:${PATH}"

# 安装SDK
RUN deveco sdk install --version 7.0 --accept-license

# 安装Python依赖(用于测试脚本)
RUN pip install opencv-python numpy

WORKDIR /workspace
八、结语:自动化是工程化的基石
DevEco CLI的价值,不仅是"不用点鼠标":
- 一致性:团队所有人用同一套命令,消除"我这能跑"
- 可追溯:每次构建都有日志、有版本、可回溯
- 可扩展:从5分钟的手动构建,到5分钟的完整CI/CD流水线
- 可靠性:自动化测试确保每次提交都不会破坏空间化效果
作为一名讲师,我在课上常说:“CLI是开发者和系统的契约,写好的脚本比好的记忆更可靠。”
如果你还在手动构建空间应用,花1小时配置DevEco CLI,当天就能省回时间。
转载自:https://blog.csdn.net/u014727709/article/details/164757203
欢迎 👍点赞✍评论⭐收藏,欢迎指正

讨论HarmonyOS开发技术,专注于API与组件、DevEco Studio、测试、元服务和应用上架分发等。
更多推荐



 0
0 0
0- 0


 已为社区贡献861条内容

所有评论(0)