React Native 鸿蒙实战:image-marker 图片水印在 HarmonyOS 上的接入与使用
React Native 鸿蒙实战:image-marker 图片水印在 HarmonyOS 上的接入与使用
库版本:@react-native-ohos/react-native-image-marker 1.5.0-beta.2(OpenHarmony 适配版)
上游依赖:react-native-image-marker ^1.12.0
适配仓库:https://atomgit.com/CPF-RN/rntpc_react-native-image-marker
验证环境:RNOH 0.86.1(对齐 React Native 0.86.3)
设备:鸿蒙 PC(OpenHarmony,2in1 形态)
一、环境搭建
React Native 鸿蒙环境搭建请参考官方文档:RNOH 环境搭建指南
本章不重复展开。搭建完成后,确认 pnpm --version 输出 10.x 以上,DevEco Studio 可正常创建鸿蒙工程即可。
二、应用背景
2.1 当前的应用场景与痛点
图片水印是内容保护、品牌标识、版权追溯的常见需求。React Native 在 Android 和 iOS 上通过 react-native-image-marker 提供成熟的图片水印方案,但鸿蒙系统使用完全不同的 ArkUI 图像处理体系(drawing.Canvas + image.PixelMap + imagePacker),开发者如果自行适配,需要:
- 对接鸿蒙 ArkUI 的 drawing.Canvas 2D 绘制 API 和 image.PixelMap 像素操作,与 RN 的 JS 层模型不同;
- 处理文字水印的字体注册(font.registerFont)、图片水印的缩放旋转、混合水印的图层顺序;
- 编写 ArkTS 原生 TurboModule 桥接 JS 调用、图片解码(ImageSource)、编码落盘(imagePacker)与临时文件管理;
- 配置 codegen spec、HAR 包编译、autolinking 注册等 RNOH 构建流程。
2.2 为什么需要这个库
@react-native-ohos/react-native-image-marker 是 RNOH 社区基于 react-native-image-marker 进行鸿蒙适配的三方库,在 OpenHarmony 平台上通过 ArkTS TurboModule 重新实现了原生层:图片解码走 image.createPixelMap,水印绘制走 drawing.Canvas,编码输出走 imagePacker,字体注册走 font.registerFont。JS 层 API 与上游 react-native-image-marker 保持一致,React Native 鸿蒙应用无需编写原生代码,即可完成文字水印、图片水印和混合水印的添加。
2.3 解决什么问题
一句话总结:为 React Native 鸿蒙应用提供开箱即用的图片水印能力。具体包括:
- 文字水印(markText,支持多行文字、自定义字体、颜色、旋转角度、透明度);
- 图片水印(markImage,支持缩放、旋转、位置控制);
- 混合水印(mark,文字和图片水印按图层顺序叠加);
- 9 种位置枚举(topLeft / top / topRight / left / center / right / bottomLeft / bottom / bottomRight);
- 多种输出格式(PNG / JPG / Base64);
- 远程图片支持(背景图和水印图均支持网络 URL,自动下载处理);
- 文件路径返回(file:// 前缀,可直接交给 Image 组件预览)。
三、功能介绍
| 功能 | 说明 | 适用场景 |
|---|---|---|
| 文字水印 | Marker.markText(),支持多行文字叠加 | 版权标注、品牌水印 |
| 图片水印 | Marker.markImage(),支持图片叠加 | Logo 水印、图标标记 |
| 混合水印 | Marker.mark(),文字 + 图片按序叠加 | 复合水印场景 |
| 位置控制 | Position 枚举 9 种锚点 | 控制水印位置 |
| 输出格式 | PNG / JPG / Base64 | 平衡质量与体积 |
| 远程图片 | 背景图和水印图支持网络 URL | 在线素材水印 |
| 文件返回 | file:// 路径,Image 可直接预览 | 预览、分享、上传 |
四、使用方法
4.1 引入三方库
在 RNOH 工程中接入该库需要完成两个配置(npm 依赖本地引入、HAR 包引用)。该库支持 autolinking,HAR 打包规范无已知缺陷,无需手动修复。
第一步:克隆适配仓库并添加 npm 依赖
将适配仓库克隆到根 node_modules:
cd node_modules/@react-native-oh-tpl
git clone https://atomgit.com/CPF-RN/rntpc_react-native-image-marker.git react-native-image-marker
在 tester 的 package.json 的 dependencies 中添加:
{
  "dependencies": {
    "@react-native-oh-tpl/react-native-image-marker": "file:../../node_modules/@react-native-oh-tpl/react-native-image-marker"
  }
}
执行 pnpm install 拉取依赖。
第二步:添加 HAR 包引用
在 harmony/oh-package.json5 的 dependencies 中添加 HAR 文件引用:
{
  "dependencies": {
    "@react-native-ohos/react-native-image-marker": "file:../../../node_modules/@react-native-oh-tpl/react-native-image-marker/harmony/image_marker.har"
  }
}
注意 HAR 路径从 oh-package.json5 所在目录(harmony/)算起,回退三级到根 node_modules。路径写错会导致 ohpm 安装失败。
4.2 核心 API
库导出一个 Marker 类和 Position、ImageFormat 枚举:
import Marker, {Position, ImageFormat} from '@react-native-oh-tpl/react-native-image-marker';

// 方式一:添加文字水印
const result = await Marker.markText({
  backgroundImage: {src: {uri: 'https://example.com/bg.jpg', width: 800, height: 600}},
  watermarkTexts: [
    {
      text: 'Hello HarmonyOS',
      position: Position.bottomRight,  // 位置枚举
      color: '#FFFFFF',
      fontSize: 36,
      rotate: -15,
      opacity: 0.8,
    },
  ],
  saveFormat: ImageFormat.png,
  quality: 90,
});
// result 为 file:// 开头的本地路径

// 方式二:添加图片水印
const imageResult = await Marker.markImage({
  backgroundImage: {src: {uri: 'https://example.com/bg.jpg', width: 800, height: 600}},
  watermarkImage: {src: {uri: 'https://example.com/logo.png', width: 200, height: 200}},
  position: Position.bottomRight,
  saveFormat: ImageFormat.png,
  quality: 90,
});

// 方式三:混合水印(文字 + 图片按图层顺序叠加)
const mixedResult = await Marker.mark({
  backgroundImage: {src: {uri: 'https://example.com/bg.jpg', width: 800, height: 600}},
  watermarks: [
    {
      type: 'text',
      text: 'Mixed Watermark',
      position: {position: Position.center},  // 注意:mark() 的 position 是 PositionOptions 对象
    },
    {
      type: 'image',
      src: {uri: 'https://example.com/logo.png', width: 200, height: 200},
      position: {position: Position.bottomLeft},
    },
  ],
  saveFormat: ImageFormat.png,
  quality: 90,
});
注意:markText 和 markImage 的 position 直接传 Position 枚举值,而 mark 的 watermarks 中每个图层的 position 需要传 PositionOptions 对象(形如 {position: Position.center})。这是上游 API 的设计差异,传错会导致类型错误或运行时异常。返回值为 file:// 开头的本地路径,可直接交给 Image 组件预览。
4.3 完整示例代码
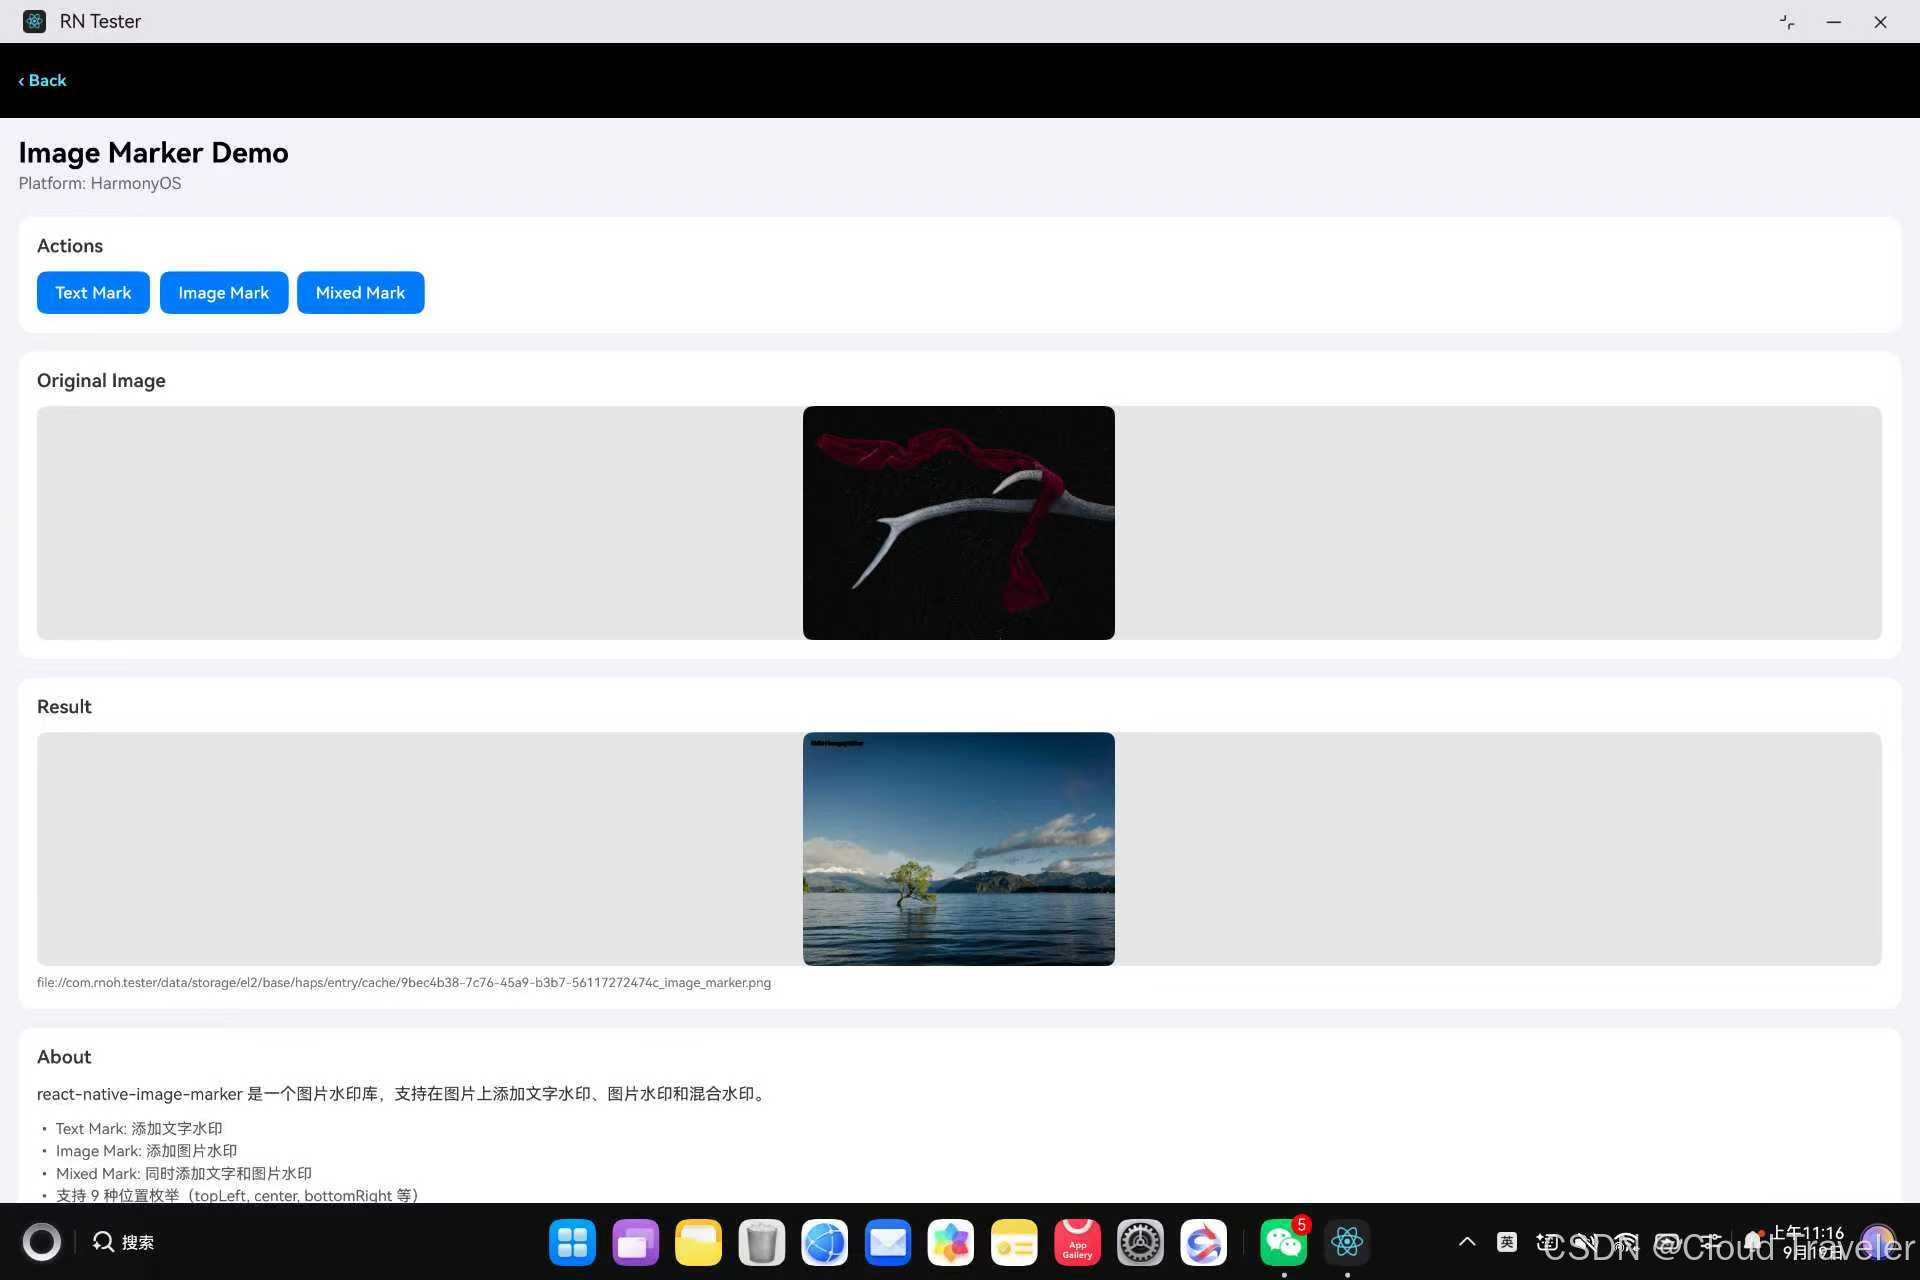
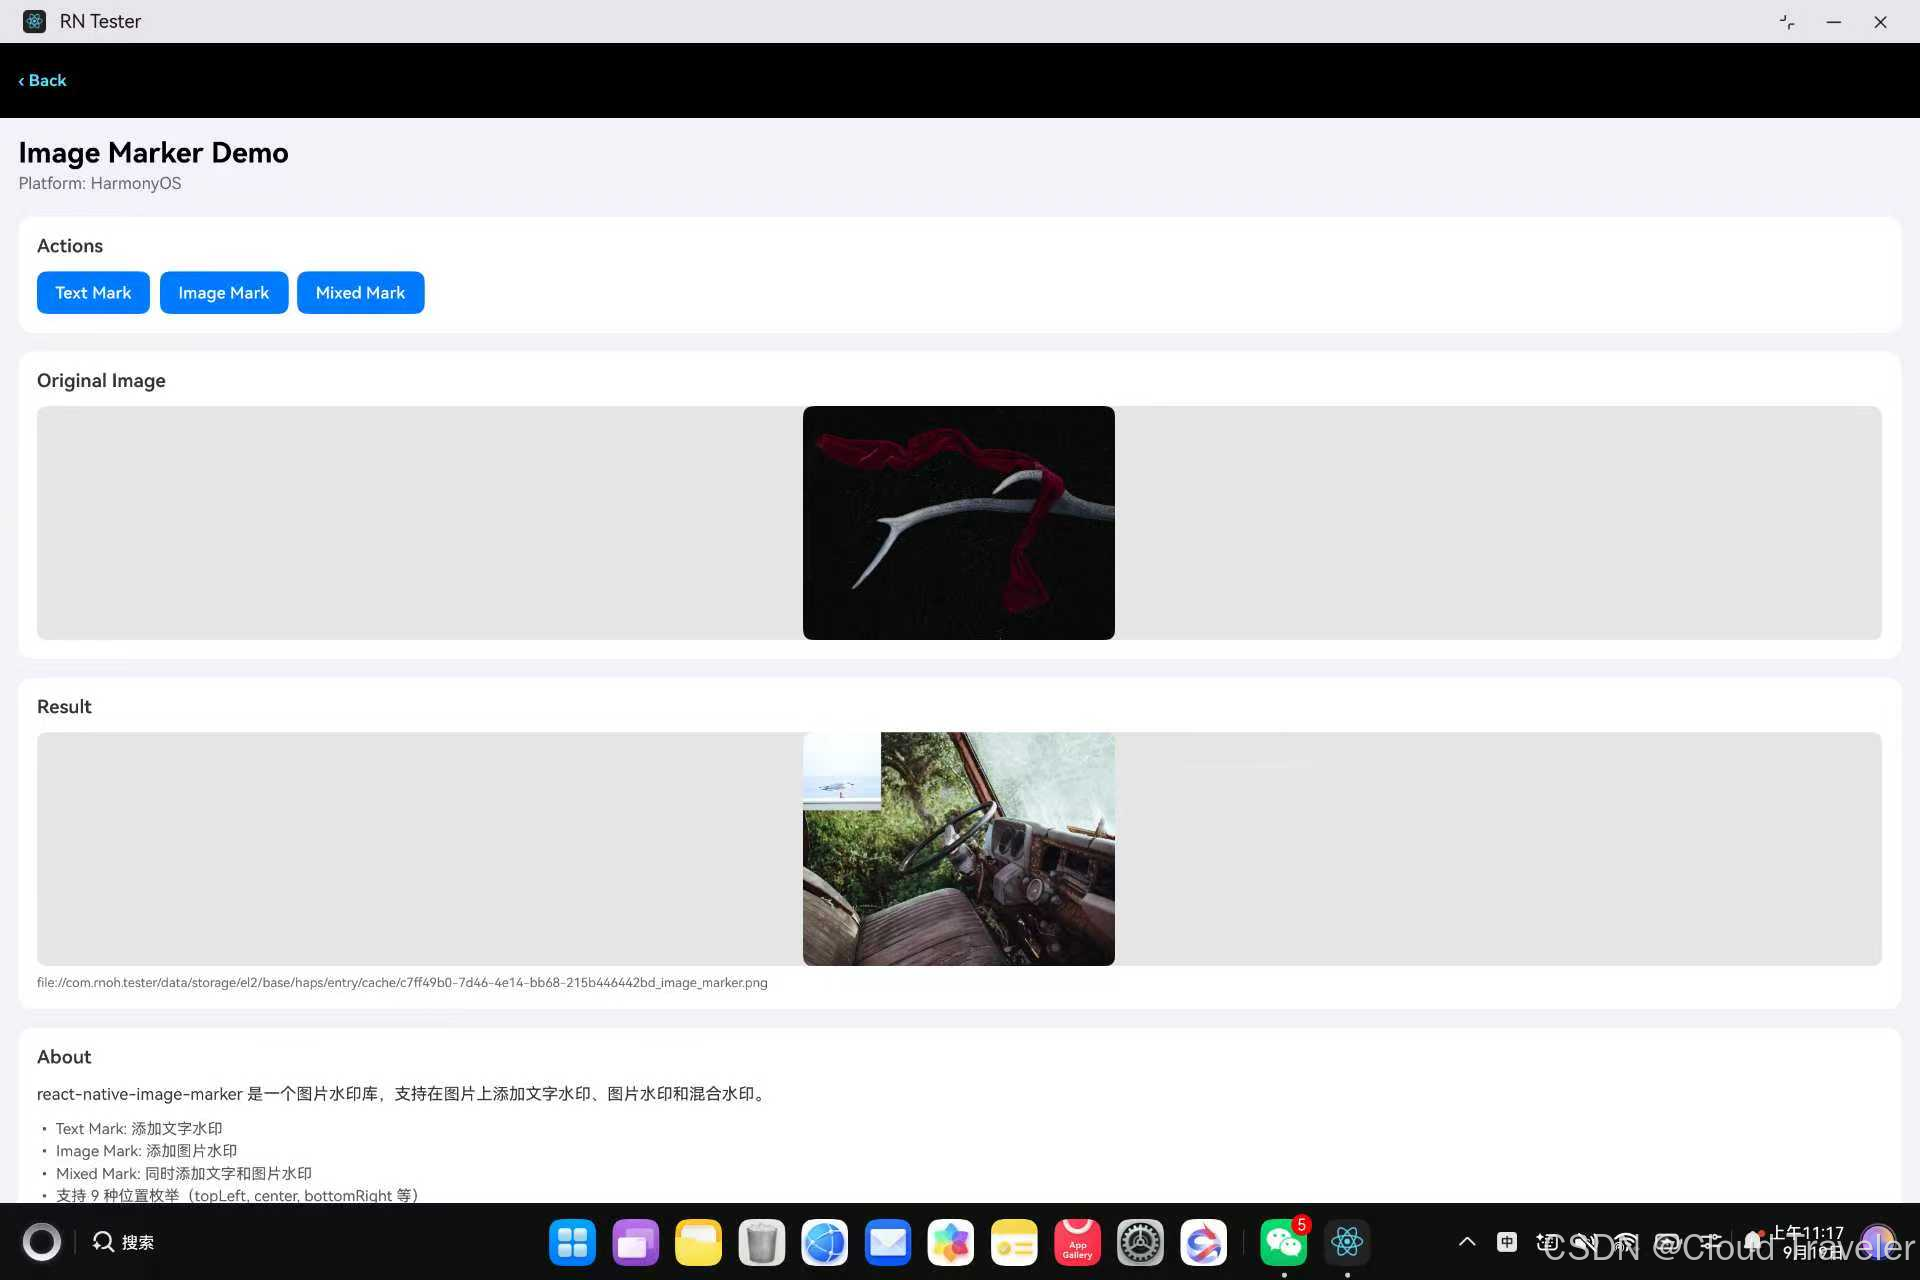
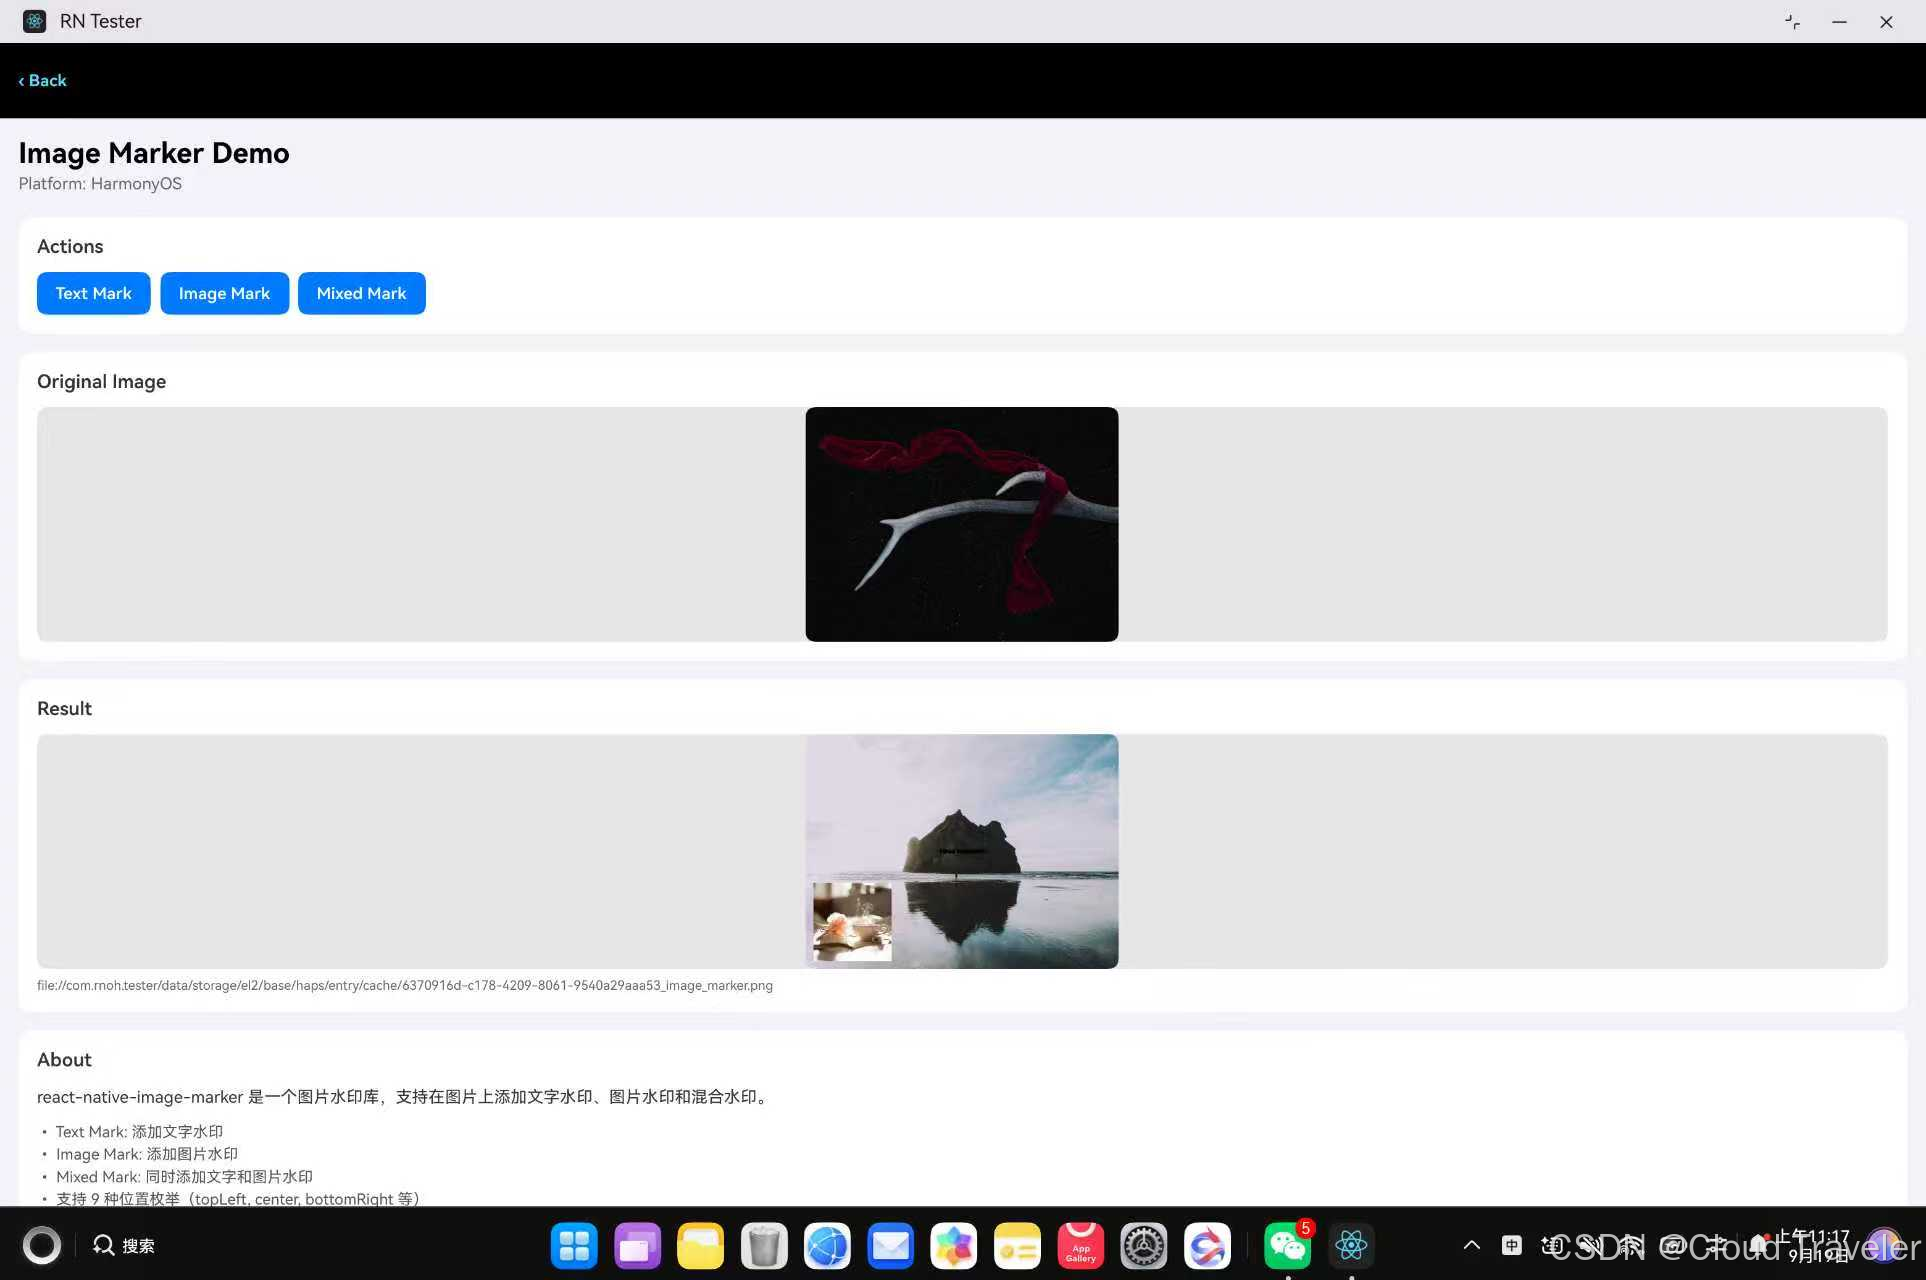
以下是在 RNOH tester 工程中验证通过的完整示例(ImageMarkerExample.tsx),提供文字水印、图片水印和混合水印三个操作按钮,并在页面中部预览原图、底部展示水印结果:
import React, {useState} from 'react';
import {
  View,
  Text,
  StyleSheet,
  ScrollView,
  Image,
  Platform,
  Alert,
} from 'react-native';
import Marker, {Position, ImageFormat} from '@react-native-oh-tpl/react-native-image-marker';

// 测试用的背景图片(使用远程图片 URL)
const BACKGROUND_IMAGE = {
  uri: 'https://picsum.photos/800/600?random=1',
  width: 800,
  height: 600,
};

// 水印图片
const WATERMARK_IMAGE = {
  uri: 'https://picsum.photos/200/200?random=2',
  width: 200,
  height: 200,
};

export function ImageMarkerExample() {
  const [resultImage, setResultImage] = useState<string | null>(null);
  const [loading, setLoading] = useState(false);

  const handleTextMark = async () => {
    setLoading(true);
    try {
      const result = await Marker.markText({
        backgroundImage: {src: BACKGROUND_IMAGE},
        watermarkTexts: [
          {
            text: 'Hello HarmonyOS',
            position: Position.bottomRight,
            color: '#FFFFFF',
            fontSize: 36,
            rotate: -15,
            opacity: 0.8,
          },
          {
            text: 'RNOH Image Marker',
            position: Position.topLeft,
            color: '#FFD700',
            fontSize: 28,
          },
        ],
        saveFormat: ImageFormat.png,
        quality: 90,
      });
      setResultImage(result);
    } catch (e) {
      Alert.alert('Error', String(e));
    } finally {
      setLoading(false);
    }
  };

  const handleImageMark = async () => {
    setLoading(true);
    try {
      const result = await Marker.markImage({
        backgroundImage: {src: BACKGROUND_IMAGE},
        watermarkImage: {src: WATERMARK_IMAGE},
        position: Position.bottomRight,
        saveFormat: ImageFormat.png,
        quality: 90,
      });
      setResultImage(result);
    } catch (e) {
      Alert.alert('Error', String(e));
    } finally {
      setLoading(false);
    }
  };

  const handleMixedMark = async () => {
    setLoading(true);
    try {
      const result = await Marker.mark({
        backgroundImage: {src: BACKGROUND_IMAGE},
        watermarks: [
          {
            type: 'text',
            text: 'Mixed Watermark',
            position: {position: Position.center},
          },
          {
            type: 'image',
            src: WATERMARK_IMAGE,
            position: {position: Position.bottomLeft},
          },
        ],
        saveFormat: ImageFormat.png,
        quality: 90,
      });
      setResultImage(result);
    } catch (e) {
      Alert.alert('Error', String(e));
    } finally {
      setLoading(false);
    }
  };

  return (
    <ScrollView style={styles.container}>
      <Text style={styles.title}>Image Marker Demo</Text>
      <Text style={styles.subtitle}>
        Platform: {Platform.OS === 'harmony' ? 'HarmonyOS' : Platform.OS}
      </Text>

      {/* 操作按钮 */}
      <View style={styles.card}>
        <Text style={styles.cardTitle}>Actions</Text>
        <View style={styles.buttonRow}>
          <View style={styles.button} onTouchEnd={handleTextMark}>
            <Text style={styles.buttonText}>
              {loading ? 'Processing...' : 'Text Mark'}
            </Text>
          </View>
          <View style={styles.button} onTouchEnd={handleImageMark}>
            <Text style={styles.buttonText}>Image Mark</Text>
          </View>
          <View style={styles.button} onTouchEnd={handleMixedMark}>
            <Text style={styles.buttonText}>Mixed Mark</Text>
          </View>
        </View>
      </View>

      {/* 原图预览 */}
      <View style={styles.card}>
        <Text style={styles.cardTitle}>Original Image</Text>
        <Image source={BACKGROUND_IMAGE} style={styles.previewImage} resizeMode="contain" />
      </View>

      {/* 结果预览 */}
      {resultImage && (
        <View style={styles.card}>
          <Text style={styles.cardTitle}>Result</Text>
          <Image source={{uri: resultImage}} style={styles.previewImage} resizeMode="contain" />
          <Text style={styles.resultPath} numberOfLines={2}>
            {resultImage}
          </Text>
        </View>
      )}

      {/* 说明 */}
      <View style={styles.card}>
        <Text style={styles.cardTitle}>About</Text>
        <Text style={styles.description}>
          react-native-image-marker 是一个图片水印库,支持在图片上添加文字水印、图片水印和混合水印。
        </Text>
        <Text style={styles.featureText}>• Text Mark: 添加文字水印</Text>
        <Text style={styles.featureText}>• Image Mark: 添加图片水印</Text>
        <Text style={styles.featureText}>• Mixed Mark: 同时添加文字和图片水印</Text>
        <Text style={styles.featureText}>• 支持 9 种位置枚举(topLeft, center, bottomRight 等)</Text>
        <Text style={styles.featureText}>• 支持 PNG/JPG/Base64 输出格式</Text>
      </View>
    </ScrollView>
  );
}

const styles = StyleSheet.create({
  container: {flex: 1, padding: 16, backgroundColor: '#F2F2F7'},
  title: {fontSize: 24, fontWeight: '700', marginBottom: 4, color: '#000'},
  subtitle: {fontSize: 14, color: '#666', marginBottom: 20},
  card: {
    backgroundColor: '#fff',
    borderRadius: 12,
    padding: 16,
    marginBottom: 16,
  },
  cardTitle: {fontSize: 16, fontWeight: '600', color: '#333', marginBottom: 12},
  buttonRow: {
    flexDirection: 'row',
    flexWrap: 'wrap',
    gap: 8,
  },
  button: {
    paddingHorizontal: 16,
    paddingVertical: 10,
    borderRadius: 8,
    backgroundColor: '#007AFF',
  },
  buttonText: {color: '#fff', fontSize: 14, fontWeight: '600'},
  previewImage: {
    width: '100%',
    height: 200,
    borderRadius: 8,
    backgroundColor: '#E5E5E5',
  },
  resultPath: {
    fontSize: 11,
    color: '#666',
    marginTop: 8,
  },
  description: {
    fontSize: 14,
    color: '#333',
    marginBottom: 12,
    lineHeight: 20,
  },
  featureText: {
    fontSize: 13,
    color: '#555',
    marginBottom: 4,
  },
});
运行效果:页面显示四张白色圆角卡片——第一张是三个操作按钮(Text Mark / Image Mark / Mixed Mark),第二张是原图预览(使用 resizeMode contain 完整展示),第三张在水印操作完成后出现,展示水印结果预览和 file:// 路径,第四张是功能说明。
五、FAQ
5.1 常见问题
Q1:mark() 混合水印报类型错误或运行时异常
mark() 方法的 watermarks 数组中,每个图层的 position 字段需要传 PositionOptions 对象(形如 {position: Position.center}),而非直接传 Position 枚举值。这是上游 API 的设计——markText 和 markImage 的 position 直接接受 Position 枚举,但 mark 的 watermarks 图层使用 PositionOptions 以支持额外的 X / Y 偏移和 edgeInset 参数:
// markText / markImage:直接传 Position 枚举
Marker.markText({
  backgroundImage: {src: bgImage},
  watermarkTexts: [{text: 'Hello', position: Position.bottomRight}],
});

// mark:watermarks 图层的 position 需要传 PositionOptions 对象
Marker.mark({
  backgroundImage: {src: bgImage},
  watermarks: [
    {type: 'text', text: 'Hello', position: {position: Position.center}},
    {type: 'image', src: logoImage, position: {position: Position.bottomLeft}},
  ],
});
如果直接传 Position 枚举,TypeScript 编译期会报类型不匹配,运行时原生层解析 position 对象也会出错。
Q2:原图预览被裁剪、显示不完整
Image 组件设置了固定高度(如 height: 200),但原图宽高比与容器不一致时,默认 resizeMode 为 cover,会裁剪超出部分。解决方法是给 Image 添加 resizeMode contain,让图片等比缩放完整显示在容器内:
// 裁剪模式(默认),图片可能被裁切
<Image source={BACKGROUND_IMAGE} style={styles.previewImage} />

// 完整展示模式,图片等比缩放
<Image source={BACKGROUND_IMAGE} style={styles.previewImage} resizeMode="contain" />
结果预览图同理,水印输出的图片尺寸可能与预览容器不一致,也需要设置 resizeMode contain。
Q3:水印结果图预览空白
Marker 返回的是 file:// 开头的本地路径。如果 Image 组件加载空白,检查以下两点:
- 路径是否以 file:// 开头——鸿蒙 RNOH 的 Image 组件需要 file:// 前缀才能加载本地文件。image-marker 的 ArkTS 原生层已通过 fileUri.getUriFromPath 返回带 file:// 前缀的路径,无需额外处理(与 view-shot 不同,view-shot 的旧版需要手动加前缀);
- Image 组件是否设置了 resizeMode——如果图片宽高比与容器差异大,默认 cover 模式可能只显示局部颜色相近区域,看起来像空白。
Q4:重建或替换 HAR 后 Sync,运行行为仍是旧版
ohpm 有缓存机制。即使 HAR 文件已更新,只要包名 + 版本哈希没变,ohpm 不会重新解压到 oh_modules,编译时读到的仍然是旧文件。
解决方法是手动清除 ohpm 缓存目录,然后重新安装:
rm -rf harmony/oh_modules/.ohpm/@react-native-ohos+react-native-image-marker*
rm -rf harmony/oh_modules/@react-native-ohos/react-native-image-marker
ohpm install
Q5:HAR 安装失败(ohpm Sync 报错)
检查 oh-package.json5 中 HAR 路径是否正确。路径从 harmony/ 目录算起,到根 node_modules 需要回退三级:
"@react-native-ohos/react-native-image-marker": "file:../../../node_modules/@react-native-oh-tpl/react-native-image-marker/harmony/image_marker.har"
路径层级写错会导致 ohpm 找不到 HAR 文件。
Q6:真机安装失败(HAP 安装报错)
用 DevEco Studio 打开工程,进入 File > Project Structure > Signing Configs,勾选 Automatically generate signature 后重新运行。
5.2 库本身存在问题:如何提交 Issue
- 打开适配仓库 https://atomgit.com/CPF-RN/rntpc_react-native-image-marker 的 Issues 页面,点击"新建 Issue";
- 标题格式:[Bug] 一句话现象,例如 [Bug] mark() 混合水印 position 格式不兼容;
- 正文必须包含:复现步骤 / 期望结果 / 实际结果 / 设备与系统版本 / RNOH 版本 / 最小复现代码、日志或截图;
- 提交后跟踪仓库维护者回复,修复发布后关注对应 Tag 更新依赖版本。
5.3 能自己解决:如何提交 PR
- Fork 适配仓库 https://atomgit.com/CPF-RN/rntpc_react-native-image-marker 到个人 AtomGit 账号;
- git clone 自己的 fork,基于 master 新建分支:git checkout -b fix/xxx;
- 修改代码(如 ArkTS 侧 TurboModule 实现、JS 侧类型声明)并 commit;
- push 到自己的 fork,在原仓库发起 Pull Request;
- PR 描述写清:问题背景 / 修改点 / 鸿蒙真机验证结果(附运行截图),等待维护者评审合入。
六、其他内容
6.1 总结
@react-native-ohos/react-native-image-marker 为 React Native 鸿蒙应用补齐了图片水印能力。底层是 ArkTS TurboModule:图片解码走 image.createPixelMap,水印绘制走 drawing.Canvas,编码输出走 imagePacker,字体注册走 font.registerFont。接入时注意三点:oh-package.json5 中 HAR 路径层级要正确、mark() 的 watermarks 图层 position 需传 PositionOptions 对象而非 Position 枚举、Image 预览需设置 resizeMode contain 确保完整展示。该库 HAR 打包规范,oh-package.json5 使用 main 字段、根目录为 package/,无需手动修复。建议生产环境锁定依赖版本,遇到问题优先查看适配仓库 Issues。
6.2 参考链接
RNOH 社区入口和三方库资源统一在这里:

讨论HarmonyOS开发技术,专注于API与组件、DevEco Studio、测试、元服务和应用上架分发等。
更多推荐
 0
0 0
0- 0


 已为社区贡献2条内容

所有评论(0)