【共创稿事节】HarmonyOS7 人脸比对实战:CoreVisionKit 人脸相似度检测从零实现
文章目录
前言
人脸比对的核心不是比较两张图片的像素差异,而是比较其中人脸特征的相似程度。HarmonyOS 7 的 @kit.CoreVisionKit 提供了端侧 faceComparator,可以直接接收两张 PixelMap 并返回相似度与判定结果。本文围绕“选图、解码、比对、展示”这条链路实现一个可运行的示例。
这个案例要解决的问题是:在 HarmonyOS7 上,如何用端侧 AI 能力实现两张照片的人脸比对,并直观展示相似度与判定结果?
CoreVisionKit 的 faceComparator 模块提供了 init() → compareFaces() → release() 三步式 API。输入两张包含人脸的图片(PixelMap),输出 FaceCompareResult,包含 similarity(0~1 的相似度值)和 isSamePerson(是否同一人的布尔判定)。整个推理过程在端侧 NPU 完成,不上传云端,隐私安全、响应快。
但光有比对能力不够,交互体验同样关键。这个案例里我实现了:
- 深色主题界面,顶部标题栏 + 中间双图展示区 + 底部操作面板
- 选择照片后双图并排展示,未选图时显示"+"占位
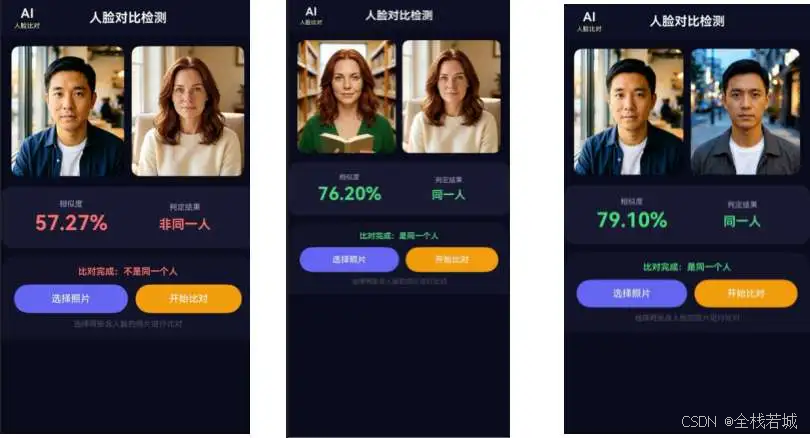
- 比对完成后显示相似度百分比和"同一人 / 非同一人"判定,颜色区分(绿/红)
- 比对过程中显示环形进度条,按钮禁用防止重复操作
最终效果:选两张照片 → 点击比对 → 看结果,三步搞定。
效果演示
项目准备
创建工程
在 DevEco Studio 中新建 Empty Ability 工程,API 版本选择 26(HarmonyOS7),Stage 模型。
权限配置
人脸比对需要从相册选择图片,在 entry/src/main/module.json5 中声明读取权限:
{
  "module": {
    "requestPermissions": [
      {
        "name": "ohos.permission.READ_IMAGEVIDEO",
        "reason": "$string:read_imagevideo_reason",
        "usedScene": {
          "abilities": ["EntryAbility"],
          "when": "inuse"
        }
      }
    ]
  }
}
READ_IMAGEVIDEO:从相册选择图片时需要读取权限。这是用户授权权限(user_grant),系统会在首次选择图片时自动弹出授权弹窗。
如果后续需要保存比对结果到相册,还需添加 WRITE_IMAGEVIDEO 权限,本案例暂不涉及。
核心实现:a5.ets 完整拆解
导入与常量
import { faceComparator } from '@kit.CoreVisionKit';
import { image } from '@kit.ImageKit';
import { hilog } from '@kit.PerformanceAnalysisKit';
import { BusinessError } from '@kit.BasicServicesKit';
import { fileIo } from '@kit.CoreFileKit';
import { photoAccessHelper } from '@kit.MediaLibraryKit';
各 Kit 的职责:
@kit.CoreVisionKit:核心——faceComparator提供人脸比对的 init / compareFaces / release 全套 API@kit.ImageKit:图片解码——ImageSource从文件描述符解码为PixelMap@kit.CoreFileKit:文件读写——fileIo.open通过 URI 拿到文件描述符@kit.MediaLibraryKit:相册选择——photoAccessHelper.PhotoViewPicker调起系统图库@kit.PerformanceAnalysisKit:日志输出@kit.BasicServicesKit:BusinessError类型用于错误处理
const DOMAIN: number = 0x0000;
const TAG: string = 'FaceComparator';
hilog 的 DOMAIN 和 TAG 常量,DOMAIN = 0x0000 是应用级域。
组件状态定义
@Entry
@Component
struct A5 {
  @State image1: PixelMap | undefined = undefined;
  @State image2: PixelMap | undefined = undefined;
  @State statusText: string = '请选择两张含人脸的照片';
  @State similarity: string = '';
  @State isSamePerson: boolean = false;
  @State hasResult: boolean = false;
  @State isComparing: boolean = false;
  @State isInitialized: boolean = false;
}
状态分四组:
- 图片数据:
image1、image2——两张待比对的图片,类型是PixelMap - 比对结果:
similarity(相似度百分比字符串)、isSamePerson(是否同一人)、hasResult(是否已有比对结果,控制结果区域显示) - 流程控制:
isComparing(是否正在比对中)、isInitialized(人脸比对服务是否初始化完成) - 状态提示:
statusText——界面上显示的提示文字,随流程推进动态更新
isInitialized 是关键守卫——如果 faceComparator.init() 失败,后续所有比对操作都不能执行,按钮点击时会提示"人脸比对服务未初始化"。
服务生命周期:init 与 release
async aboutToAppear(): Promise<void> {
  try {
    const initResult: boolean = await faceComparator.init();
    this.isInitialized = initResult;
    hilog.info(DOMAIN, TAG, `Face comparator init result: ${initResult}`);
    if (!initResult) {
      this.statusText = '初始化人脸比对服务失败';
    }
  } catch (error) {
    const err: BusinessError = error as BusinessError;
    hilog.error(DOMAIN, TAG, `Init failed: ${err.code}, ${err.message}`);
    this.statusText = '初始化失败';
  }
}
faceComparator.init() 是异步方法,加载端侧人脸比对模型到 NPU。返回 boolean——true 表示初始化成功,false 表示失败(比如设备不支持、NPU 资源被占用)。
注意:faceComparator 的初始化模式和 imageSuperResolution 不同。超分用的是 ImageSRAnalyzer.create() 工厂方法创建实例,而人脸比对用的是 faceComparator.init() 单例初始化——faceComparator 本身就是模块级单例,不需要创建实例,直接 init() 激活即可。
async aboutToDisappear(): Promise<void> {
  if (this.isInitialized) {
    try {
      await faceComparator.release();
      hilog.info(DOMAIN, TAG, 'Face comparator released');
    } catch (error) {
      hilog.error(DOMAIN, TAG, 'Release failed');
    }
  }
}
页面销毁时必须调用 faceComparator.release() 释放 NPU 资源。用 isInitialized 做守卫,只有初始化成功才释放,避免对未初始化的服务调用 release 导致报错。
坑:如果你有多个页面使用 faceComparator,要注意 init/release 的配对——A 页面 init 后跳到 B 页面,B 页面也 init,可能没问题(内部可能是引用计数);但如果 A 页面 release 了,B 页面的比对就会失败。建议在应用的 EntryAbility 里统一管理生命周期,或者只在一个页面里用。
图片选择:PhotoViewPicker 多选
private async selectImages(): Promise<void> {
  try {
    const options: photoAccessHelper.PhotoSelectOptions = new photoAccessHelper.PhotoSelectOptions();
    options.MIMEType = photoAccessHelper.PhotoViewMIMETypes.IMAGE_TYPE;
    options.maxSelectNumber = 2;
    const picker: photoAccessHelper.PhotoViewPicker = new photoAccessHelper.PhotoViewPicker();
    const result: photoAccessHelper.PhotoSelectResult = await picker.select(options);
    if (result.photoUris.length < 2) {
      this.statusText = '请选择两张照片';
      return;
    }
    await this.loadImages(result.photoUris[0], result.photoUris[1]);
  } catch (error) {
    const err: BusinessError = error as BusinessError;
    hilog.error(DOMAIN, TAG, `Select failed: ${err.code}, ${err.message}`);
    this.statusText = '选择图片失败';
  }
}
和超分修复案例的单选不同,人脸比对需要同时选两张照片,所以 maxSelectNumber = 2。选择完成后检查 photoUris.length < 2,如果用户只选了一张就提示"请选择两张照片"。
两张照片的 URI 通过 result.photoUris[0] 和 result.photoUris[1] 获取,传给 loadImages 方法一次性加载。
图片加载:URI → PixelMap(批量)
private async loadImages(uri1: string, uri2: string): Promise<void> {
  try {
    const file1: fileIo.File = await fileIo.open(uri1, fileIo.OpenMode.READ_ONLY);
    const source1: image.ImageSource = image.createImageSource(file1.fd);
    this.image1 = await source1.createPixelMap();
    await source1.release();

    const file2: fileIo.File = await fileIo.open(uri2, fileIo.OpenMode.READ_ONLY);
    const source2: image.ImageSource = image.createImageSource(file2.fd);
    this.image2 = await source2.createPixelMap();
    await source2.release();

    await fileIo.close(file1);
    await fileIo.close(file2);

    this.hasResult = false;
    this.similarity = '';
    this.statusText = '照片已就绪,点击开始比对';
  } catch (error) {
    const err: BusinessError = error as BusinessError;
    hilog.error(DOMAIN, TAG, `Load failed: ${err.code}, ${err.message}`);
    this.statusText = '加载图片失败';
  }
}
加载流程对两张照片完全一致,每张图都走 URI → fileIo.open → ImageSource → createPixelMap 这条链路。几个关键点:
资源释放顺序:每张图解码完成后立即 source.release() 释放 ImageSource,两张都解码完再 fileIo.close() 关闭文件描述符。为什么不先关文件再 release ImageSource?因为 ImageSource 内部可能还在引用 fd,先关文件可能导致 release 异常。顺序是:解码 → release ImageSource → 关文件。
状态重置:加载新照片后,hasResult = false 和 similarity = '' 清空上一次的比对结果,确保切换照片时不会残留旧数据。
坑:fileIo.open 返回的 File 对象包含 fd 属性,image.createImageSource(file1.fd) 用的是这个 fd 的值(number 类型)。如果 fd 无效(比如文件已被删除或权限不足),createImageSource 会抛异常,被外层 catch 捕获。
核心处理:人脸比对推理
private async compareFaces(): Promise<void> {
  if (!this.image1 || !this.image2) {
    this.statusText = '请先选择两张照片';
    return;
  }
  if (!this.isInitialized) {
    this.statusText = '人脸比对服务未初始化';
    return;
  }
  this.isComparing = true;
  this.statusText = '正在比对中...';
  try {
    const visionInfo1: faceComparator.VisionInfo = {
      pixelMap: this.image1!
    };
    const visionInfo2: faceComparator.VisionInfo = {
      pixelMap: this.image2!
    };
    const data: faceComparator.FaceCompareResult =
      await faceComparator.compareFaces(visionInfo1, visionInfo2);
    this.similarity = `${(data.similarity * 100).toFixed(2)}%`;
    this.isSamePerson = data.isSamePerson;
    this.hasResult = true;
    this.statusText = data.isSamePerson ? '比对完成:是同一个人' : '比对完成:不是同一个人';
    hilog.info(DOMAIN, TAG, `Similarity: ${this.similarity}, isSamePerson: ${data.isSamePerson}`);
  } catch (error) {
    const err: BusinessError = error as BusinessError;
    hilog.error(DOMAIN, TAG, `Compare failed: ${err.code}, ${err.message}`);
    this.statusText = `比对失败: ${err.message}`;
  }
  this.isComparing = false;
}
这是整个案例最核心的部分,逐步拆解:
前置守卫:两个检查——图片是否已加载、服务是否已初始化。任何一项不满足就直接 return,避免空指针或未初始化调用。
构造输入:faceComparator.VisionInfo 只有一个字段 pixelMap。和超分修复的 visionBase.Request 模型不同,人脸比对的输入更简单——直接把 PixelMap 包装进 VisionInfo 就行,不需要额外的 Request 层。
执行比对:faceComparator.compareFaces(visionInfo1, visionInfo2) 是核心调用,输入两张图片的 VisionInfo,返回 FaceCompareResult:
similarity:0~1 的浮点数,0 表示完全不相似,1 表示完全一致isSamePerson:布尔值,框架内部的判定阈值判断是否同一人
结果处理:similarity 乘以 100 再 toFixed(2) 转成百分比字符串显示,如 "87.53%"。isSamePerson 决定界面上的判定文字和颜色——绿色表示同一人,红色表示非同一人。
this.image1! 的非空断言:前面已经用 if (!this.image1 || !this.image2) 做了守卫,走到构造 VisionInfo 时 image1 一定不为 undefined,所以用 ! 非空断言是安全的。
坑:compareFaces 对输入图片有隐含要求——图片中必须包含可检测到的人脸。如果图片里没有人脸,或者人脸太小、角度太偏,API 会抛异常(错误码通常是通用的服务异常)。界面上会显示"比对失败"加错误信息。如果比对失败频繁出现,先检查图片质量——正面、清晰、人脸占比足够大。
顶部标题栏
@Builder
headerBar() {
  Row() {
    Column() {
      Text('AI')
        .fontSize(20)
        .fontWeight(FontWeight.Bold)
        .fontColor('#FFFFFF')
      Text('人脸比对')
        .fontSize(10)
        .fontColor('#FFFFFFAA')
        .margin({ top: 2 })
    }
    .alignItems(HorizontalAlign.Center)

    Blank()

    Text('人脸对比检测')
      .fontSize(20)
      .fontWeight(FontWeight.Bold)
      .fontColor('#FFFFFF')
      .layoutWeight(1)
      .textAlign(TextAlign.Center)

    Blank()

    Column()
      .width(40)
  }
  .width('100%')
  .height(56)
  .padding({ left: 20, right: 20 })
  .alignItems(VerticalAlign.Center)
  .backgroundColor('#0F0F23')
}
标题栏采用对称布局:左侧"AI 人脸比对"标签 + 中间标题 + 右侧占位(空 Column 40px 保持对称)。两个 Blank() 把中间标题挤到正中央。
#FFFFFFAA 中的 AA 是透明度(约 67%),让副标题比主标题稍微淡一些,形成层级区分。
双图展示区
@Builder
imageArea() {
  Row({ space: 12 }) {
    Column() {
      if (this.image1) {
        Image(this.image1)
          .objectFit(ImageFit.Cover)
          .width('100%')
          .height('100%')
          .borderRadius(12)
      } else {
        Column() {
          Text('+')
            .fontSize(36)
            .fontColor('#555577')
          Text('照片 1')
            .fontSize(12)
            .fontColor('#555577')
            .margin({ top: 4 })
        }
        .width('100%')
        .height('100%')
        .justifyContent(FlexAlign.Center)
        .backgroundColor('#1A1A33')
        .borderRadius(12)
      }
    }
    .layoutWeight(1)
    .height(200)

    Column() {
      if (this.image2) {
        Image(this.image2)
          .objectFit(ImageFit.Cover)
          .width('100%')
          .height('100%')
          .borderRadius(12)
      } else {
        Column() {
          Text('+')
            .fontSize(36)
            .fontColor('#555577')
          Text('照片 2')
            .fontSize(12)
            .fontColor('#555577')
            .margin({ top: 4 })
        }
        .width('100%')
        .height('100%')
        .justifyContent(FlexAlign.Center)
        .backgroundColor('#1A1A33')
        .borderRadius(12)
      }
    }
    .layoutWeight(1)
    .height(200)
  }
  .width('100%')
  .padding({ left: 16, right: 16, top: 16 })
}
双图并排展示,用 Row({ space: 12 }) 横向排列,两个 Column 各占 layoutWeight(1) 等宽,高度固定 200px。
两种状态的切换:
- 未选图时:显示"+"号和"照片 1/2"占位,深蓝背景
#1A1A33,居中对齐 - 已选图后:显示
Image(this.image1)/Image(this.image2),ImageFit.Cover裁切填充
两个占位 Column 的结构完全一致,只是文字"照片 1"和"照片 2"不同。如果后续要扩展为支持分别选择两张照片(点击占位区单独选图),这种 if/else 结构也很容易改——把 selectImages 拆成两个方法,分别绑定到两个占位区的 onClick 即可。
结果展示区
@Builder
resultArea() {
  if (this.hasResult) {
    Column() {
      Row() {
        Column() {
          Text('相似度')
            .fontSize(12)
            .fontColor('#AAAACC')
          Text(this.similarity)
            .fontSize(32)
            .fontWeight(FontWeight.Bold)
            .fontColor(this.isSamePerson ? '#4ADE80' : '#F87171')
            .margin({ top: 4 })
        }
        .layoutWeight(1)
        .alignItems(HorizontalAlign.Center)

        Column() {
          Text('判定结果')
            .fontSize(12)
            .fontColor('#AAAACC')
          Text(this.isSamePerson ? '同一人' : '非同一人')
            .fontSize(20)
            .fontWeight(FontWeight.Bold)
            .fontColor(this.isSamePerson ? '#4ADE80' : '#F87171')
            .margin({ top: 8 })
        }
        .layoutWeight(1)
        .alignItems(HorizontalAlign.Center)
      }
      .width('100%')
    }
    .width('100%')
    .padding(20)
    .backgroundColor('#1A1A33')
    .borderRadius(16)
    .margin({ left: 16, right: 16, top: 16 })
  }
}
结果区由 hasResult 控制显示——只有比对完成后才出现,避免初始状态就显示空白结果区。
双列布局:左侧"相似度"显示百分比数字(32px 大字),右侧"判定结果"显示"同一人"或"非同一人"。颜色随判定结果变化:
#4ADE80(绿色):同一人#F87171(红色):非同一人
为什么相似度用 32px 大字? 相似度是人脸比对最直观的量化指标,是用户最关注的数据,所以字号最大、最醒目。判定结果是定性结论,20px 就够了。
底部操作面板
@Builder
controlPanel() {
  Column() {
    Text(this.statusText)
      .fontSize(14)
      .fontColor(this.hasResult ? (this.isSamePerson ? '#4ADE80' : '#F87171') : '#CCCCDD')
      .fontWeight(this.hasResult ? FontWeight.Bold : FontWeight.Normal)
      .padding({ top: 16, bottom: 12 })

    if (this.isComparing) {
      Progress({ value: 0, total: 0, type: ProgressType.Ring })
        .width(32)
        .height(32)
        .color('#6366F1')
        .margin({ bottom: 12 })
    }

    Row() {
      Button('选择照片')
        .type(ButtonType.Capsule)
        .fontColor('#FFFFFF')
        .fontSize(15)
        .fontWeight(FontWeight.Medium)
        .backgroundColor('#6366F1')
        .layoutWeight(1)
        .height(44)
        .enabled(!this.isComparing)
        .onClick(() => {
          void this.selectImages();
        })

      Button(this.isComparing ? '比对中...' : '开始比对')
        .type(ButtonType.Capsule)
        .fontColor('#FFFFFF')
        .fontSize(15)
        .fontWeight(FontWeight.Medium)
        .backgroundColor(this.isComparing ? '#333355' : '#F59E0B')
        .layoutWeight(1)
        .height(44)
        .margin({ left: 12 })
        .enabled(!this.isComparing && this.image1 !== undefined && this.image2 !== undefined)
        .onClick(() => {
          void this.compareFaces();
        })
    }
    .width('100%')
    .padding({ left: 20, right: 20 })

    Text('选择两张含人脸的照片进行比对')
      .fontSize(12)
      .fontColor('#555566')
      .padding({ top: 10, bottom: 16 })
  }
  .width('100%')
  .backgroundColor('#141428')
  .borderRadius({ topLeft: 24, topRight: 24 })
  .shadow({ radius: 12, color: '#00000033', offsetY: -2 })
  .margin({ top: 12 })
}
按钮状态流转:
- 初始状态:只有"选择照片"可用,"开始比对"灰色禁用(
image1 === undefined || image2 === undefined) - 选图后:“选择照片” + “开始比对”(黄色)都可用
- 比对中:"选择照片"禁用(
!this.isComparing为 false),“开始比对"变灰显示"比对中…”,显示环形进度条 - 比对完成:两个按钮都恢复可用,状态文字变色显示结果
Progress({ value: 0, total: 0, type: ProgressType.Ring }) 是不确定进度模式——total 为 0 时自动显示无限循环动画。因为人脸比对没有进度回调,无法确定完成百分比,只能用这种方式告知用户"正在处理"。
"开始比对"按钮的 enabled 条件:!this.isComparing && this.image1 !== undefined && this.image2 !== undefined。三个条件缺一不可——防止比对中重复点击,防止图片未加载就点击。
面板顶部圆角 borderRadius({ topLeft: 24, topRight: 24 }) + shadow({ offsetY: -2 }) 做出卡片浮起效果,和上方图片区形成视觉分层。
主布局
build() {
  Column() {
    this.headerBar()
    this.imageArea()
    this.resultArea()
    this.controlPanel()
  }
  .width('100%')
  .height('100%')
  .backgroundColor('#0A0A1A')
}
整体纵向布局:顶部标题栏 → 双图展示区 → 结果展示区 → 底部操作面板。背景色 #0A0A1A 深蓝黑色,配合 #0F0F23、#141428、#1A1A33 形成深色主题的层次感。
和超分修复案例不同的是,结果区域(resultArea)不是固定布局的一部分——它由 hasResult 控制显隐,比对前不占空间,比对后出现,双图区自动上移让出位置。
常见问题与适用边界
图片中有人脸但比对失败
先排查人脸占比、清晰度、遮挡和角度。侧脸、强逆光、口罩遮挡或人脸过小都可能导致特征提取失败。相册图片还可能带有旋转方向信息;如果解码后方向异常,应在生成 PixelMap 时处理方向,再送入比对接口。
相似度很高却不是同一人
similarity 是模型输出的特征相似程度,isSamePerson 是框架按内部阈值得出的结果,两者都不应被当作法律意义上的身份认证结论。门禁、支付等高风险场景还需要活体检测、失败次数限制和其他身份因子,不能只依赖两张静态照片。
连续比对后内存占用上升
新选图片时应释放不再使用的 PixelMap,页面销毁时调用 faceComparator.release()。文件描述符和 ImageSource 也要在异常路径中释放,生产代码更适合用 finally 统一收口资源清理。
完整代码
把上面所有部分组合起来,就是完整案例代码:
import { faceComparator } from '@kit.CoreVisionKit';
import { image } from '@kit.ImageKit';
import { hilog } from '@kit.PerformanceAnalysisKit';
import { BusinessError } from '@kit.BasicServicesKit';
import { fileIo } from '@kit.CoreFileKit';
import { photoAccessHelper } from '@kit.MediaLibraryKit';

const DOMAIN: number = 0x0000;
const TAG: string = 'FaceComparator';

@Entry
@Component
struct A5 {
  @State image1: PixelMap | undefined = undefined;
  @State image2: PixelMap | undefined = undefined;
  @State statusText: string = '请选择两张含人脸的照片';
  @State similarity: string = '';
  @State isSamePerson: boolean = false;
  @State hasResult: boolean = false;
  @State isComparing: boolean = false;
  @State isInitialized: boolean = false;

  async aboutToAppear(): Promise<void> {
    try {
      const initResult: boolean = await faceComparator.init();
      this.isInitialized = initResult;
      hilog.info(DOMAIN, TAG, `Face comparator init result: ${initResult}`);
      if (!initResult) {
        this.statusText = '初始化人脸比对服务失败';
      }
    } catch (error) {
      const err: BusinessError = error as BusinessError;
      hilog.error(DOMAIN, TAG, `Init failed: ${err.code}, ${err.message}`);
      this.statusText = '初始化失败';
    }
  }

  async aboutToDisappear(): Promise<void> {
    if (this.isInitialized) {
      try {
        await faceComparator.release();
        hilog.info(DOMAIN, TAG, 'Face comparator released');
      } catch (error) {
        hilog.error(DOMAIN, TAG, 'Release failed');
      }
    }
  }

  private async selectImages(): Promise<void> {
    try {
      const options: photoAccessHelper.PhotoSelectOptions = new photoAccessHelper.PhotoSelectOptions();
      options.MIMEType = photoAccessHelper.PhotoViewMIMETypes.IMAGE_TYPE;
      options.maxSelectNumber = 2;
      const picker: photoAccessHelper.PhotoViewPicker = new photoAccessHelper.PhotoViewPicker();
      const result: photoAccessHelper.PhotoSelectResult = await picker.select(options);
      if (result.photoUris.length < 2) {
        this.statusText = '请选择两张照片';
        return;
      }
      await this.loadImages(result.photoUris[0], result.photoUris[1]);
    } catch (error) {
      const err: BusinessError = error as BusinessError;
      hilog.error(DOMAIN, TAG, `Select failed: ${err.code}, ${err.message}`);
      this.statusText = '选择图片失败';
    }
  }

  private async loadImages(uri1: string, uri2: string): Promise<void> {
    try {
      const file1: fileIo.File = await fileIo.open(uri1, fileIo.OpenMode.READ_ONLY);
      const source1: image.ImageSource = image.createImageSource(file1.fd);
      this.image1 = await source1.createPixelMap();
      await source1.release();

      const file2: fileIo.File = await fileIo.open(uri2, fileIo.OpenMode.READ_ONLY);
      const source2: image.ImageSource = image.createImageSource(file2.fd);
      this.image2 = await source2.createPixelMap();
      await source2.release();

      await fileIo.close(file1);
      await fileIo.close(file2);

      this.hasResult = false;
      this.similarity = '';
      this.statusText = '照片已就绪,点击开始比对';
    } catch (error) {
      const err: BusinessError = error as BusinessError;
      hilog.error(DOMAIN, TAG, `Load failed: ${err.code}, ${err.message}`);
      this.statusText = '加载图片失败';
    }
  }

  private async compareFaces(): Promise<void> {
    if (!this.image1 || !this.image2) {
      this.statusText = '请先选择两张照片';
      return;
    }
    if (!this.isInitialized) {
      this.statusText = '人脸比对服务未初始化';
      return;
    }
    this.isComparing = true;
    this.statusText = '正在比对中...';
    try {
      const visionInfo1: faceComparator.VisionInfo = {
        pixelMap: this.image1!
      };
      const visionInfo2: faceComparator.VisionInfo = {
        pixelMap: this.image2!
      };
      const data: faceComparator.FaceCompareResult =
        await faceComparator.compareFaces(visionInfo1, visionInfo2);
      this.similarity = `${(data.similarity * 100).toFixed(2)}%`;
      this.isSamePerson = data.isSamePerson;
      this.hasResult = true;
      this.statusText = data.isSamePerson ? '比对完成:是同一个人' : '比对完成:不是同一个人';
      hilog.info(DOMAIN, TAG, `Similarity: ${this.similarity}, isSamePerson: ${data.isSamePerson}`);
    } catch (error) {
      const err: BusinessError = error as BusinessError;
      hilog.error(DOMAIN, TAG, `Compare failed: ${err.code}, ${err.message}`);
      this.statusText = `比对失败: ${err.message}`;
    }
    this.isComparing = false;
  }

  @Builder
  headerBar() {
    Row() {
      Column() {
        Text('AI')
          .fontSize(20)
          .fontWeight(FontWeight.Bold)
          .fontColor('#FFFFFF')
        Text('人脸比对')
          .fontSize(10)
          .fontColor('#FFFFFFAA')
          .margin({ top: 2 })
      }
      .alignItems(HorizontalAlign.Center)

      Blank()

      Text('人脸对比检测')
        .fontSize(20)
        .fontWeight(FontWeight.Bold)
        .fontColor('#FFFFFF')
        .layoutWeight(1)
        .textAlign(TextAlign.Center)

      Blank()

      Column()
        .width(40)
    }
    .width('100%')
    .height(56)
    .padding({ left: 20, right: 20 })
    .alignItems(VerticalAlign.Center)
    .backgroundColor('#0F0F23')
  }

  @Builder
  imageArea() {
    Row({ space: 12 }) {
      Column() {
        if (this.image1) {
          Image(this.image1)
            .objectFit(ImageFit.Cover)
            .width('100%')
            .height('100%')
            .borderRadius(12)
        } else {
          Column() {
            Text('+')
              .fontSize(36)
              .fontColor('#555577')
            Text('照片 1')
              .fontSize(12)
              .fontColor('#555577')
              .margin({ top: 4 })
          }
          .width('100%')
          .height('100%')
          .justifyContent(FlexAlign.Center)
          .backgroundColor('#1A1A33')
          .borderRadius(12)
        }
      }
      .layoutWeight(1)
      .height(200)

      Column() {
        if (this.image2) {
          Image(this.image2)
            .objectFit(ImageFit.Cover)
            .width('100%')
            .height('100%')
            .borderRadius(12)
        } else {
          Column() {
            Text('+')
              .fontSize(36)
              .fontColor('#555577')
            Text('照片 2')
              .fontSize(12)
              .fontColor('#555577')
              .margin({ top: 4 })
          }
          .width('100%')
          .height('100%')
          .justifyContent(FlexAlign.Center)
          .backgroundColor('#1A1A33')
          .borderRadius(12)
        }
      }
      .layoutWeight(1)
      .height(200)
    }
    .width('100%')
    .padding({ left: 16, right: 16, top: 16 })
  }

  @Builder
  resultArea() {
    if (this.hasResult) {
      Column() {
        Row() {
          Column() {
            Text('相似度')
              .fontSize(12)
              .fontColor('#AAAACC')
            Text(this.similarity)
              .fontSize(32)
              .fontWeight(FontWeight.Bold)
              .fontColor(this.isSamePerson ? '#4ADE80' : '#F87171')
              .margin({ top: 4 })
          }
          .layoutWeight(1)
          .alignItems(HorizontalAlign.Center)

          Column() {
            Text('判定结果')
              .fontSize(12)
              .fontColor('#AAAACC')
            Text(this.isSamePerson ? '同一人' : '非同一人')
              .fontSize(20)
              .fontWeight(FontWeight.Bold)
              .fontColor(this.isSamePerson ? '#4ADE80' : '#F87171')
              .margin({ top: 8 })
          }
          .layoutWeight(1)
          .alignItems(HorizontalAlign.Center)
        }
        .width('100%')
      }
      .width('100%')
      .padding(20)
      .backgroundColor('#1A1A33')
      .borderRadius(16)
      .margin({ left: 16, right: 16, top: 16 })
    }
  }

  @Builder
  controlPanel() {
    Column() {
      Text(this.statusText)
        .fontSize(14)
        .fontColor(this.hasResult ? (this.isSamePerson ? '#4ADE80' : '#F87171') : '#CCCCDD')
        .fontWeight(this.hasResult ? FontWeight.Bold : FontWeight.Normal)
        .padding({ top: 16, bottom: 12 })

      if (this.isComparing) {
        Progress({ value: 0, total: 0, type: ProgressType.Ring })
          .width(32)
          .height(32)
          .color('#6366F1')
          .margin({ bottom: 12 })
      }

      Row() {
        Button('选择照片')
          .type(ButtonType.Capsule)
          .fontColor('#FFFFFF')
          .fontSize(15)
          .fontWeight(FontWeight.Medium)
          .backgroundColor('#6366F1')
          .layoutWeight(1)
          .height(44)
          .enabled(!this.isComparing)
          .onClick(() => {
            void this.selectImages();
          })

        Button(this.isComparing ? '比对中...' : '开始比对')
          .type(ButtonType.Capsule)
          .fontColor('#FFFFFF')
          .fontSize(15)
          .fontWeight(FontWeight.Medium)
          .backgroundColor(this.isComparing ? '#333355' : '#F59E0B')
          .layoutWeight(1)
          .height(44)
          .margin({ left: 12 })
          .enabled(!this.isComparing && this.image1 !== undefined && this.image2 !== undefined)
          .onClick(() => {
            void this.compareFaces();
          })
      }
      .width('100%')
      .padding({ left: 20, right: 20 })

      Text('选择两张含人脸的照片进行比对')
        .fontSize(12)
        .fontColor('#555566')
        .padding({ top: 10, bottom: 16 })
    }
    .width('100%')
    .backgroundColor('#141428')
    .borderRadius({ topLeft: 24, topRight: 24 })
    .shadow({ radius: 12, color: '#00000033', offsetY: -2 })
    .margin({ top: 12 })
  }

  build() {
    Column() {
      this.headerBar()
      this.imageArea()
      this.resultArea()
      this.controlPanel()
    }
    .width('100%')
    .height('100%')
    .backgroundColor('#0A0A1A')
  }
}
总结
这个案例拆下来,核心是三件事:
1. faceComparator 的使用范式。 init() 初始化 → 构造 VisionInfo 包装 PixelMap → compareFaces() 比对 → 从 FaceCompareResult 取相似度和判定结果。和 CoreVisionKit 下其他能力(超分修复、文字识别等)相比,人脸比对的 API 更简洁——不需要 visionBase.Request 包装层,直接 VisionInfo 入参。两个必须注意的点:服务用完必须 release() 释放 NPU 资源;输入图片必须包含可检测的人脸,否则 API 抛异常。
2. 图片选-载全链路。 PhotoViewPicker 多选(maxSelectNumber = 2)→ fileIo.open 拿 fd → ImageSource 解码 → createPixelMap() → release ImageSource → close File。这条链路和超分修复案例基本一致,区别只是从单选变成多选、单图加载变成双图加载。资源释放顺序不能乱:先 release ImageSource 再 close File,避免 fd 被提前关闭导致 release 异常。
3. 状态驱动的交互流程。 isInitialized → isComparing → hasResult 三个状态标志控制整个流程:初始化失败禁用比对按钮、比对中显示进度条和禁用按钮、比对完成后展示结果区域。状态文字、按钮文案、颜色全部跟随状态变化,用户不需要猜"现在到底在干嘛"。这套状态管理模式可以复用到任何异步处理场景。

讨论HarmonyOS开发技术,专注于API与组件、DevEco Studio、测试、元服务和应用上架分发等。
更多推荐



 1
1 0
0- 0


 已为社区贡献396条内容

所有评论(0)