【共创稿事节】HarmonyOS 7 ArkGraphics 3D 实战:搭建可交互的 3D 模型查看器
文章目录
前言
移动端做 3D 展示,难点往往不在“把模型画出来”,而在场景加载、相机姿态、灯光方向和交互更新这一整条链路。直接使用 OpenGL ES 或 Vulkan,开发者还要处理渲染管线与 Shader;如果需求只是模型预览,这套成本通常不划算。
HarmonyOS 7 提供的 @kit.ArkGraphics3D 更适合这类展示场景:应用可以直接加载 glTF/GLB 模型,再通过 Scene、Camera、Light 和 Component3D 组织场景。本文实现一个可运行的 3D 模型查看器,支持:
- 加载本地 GLB 模型;
- 环绕模型调整相机水平角、俯仰角、距离和视场角(FoV);
- 调整方向光的方向、RGB 颜色和强度;
- 通过
Slider驱动参数更新,并在加载失败时显示错误信息。
真正需要花时间处理的是“朝向”:相机和灯光节点使用四元数表示旋转,而界面控制使用水平角、俯仰角更直观。本文会用一个 lookAtNode 函数完成两者之间的转换。
效果预览
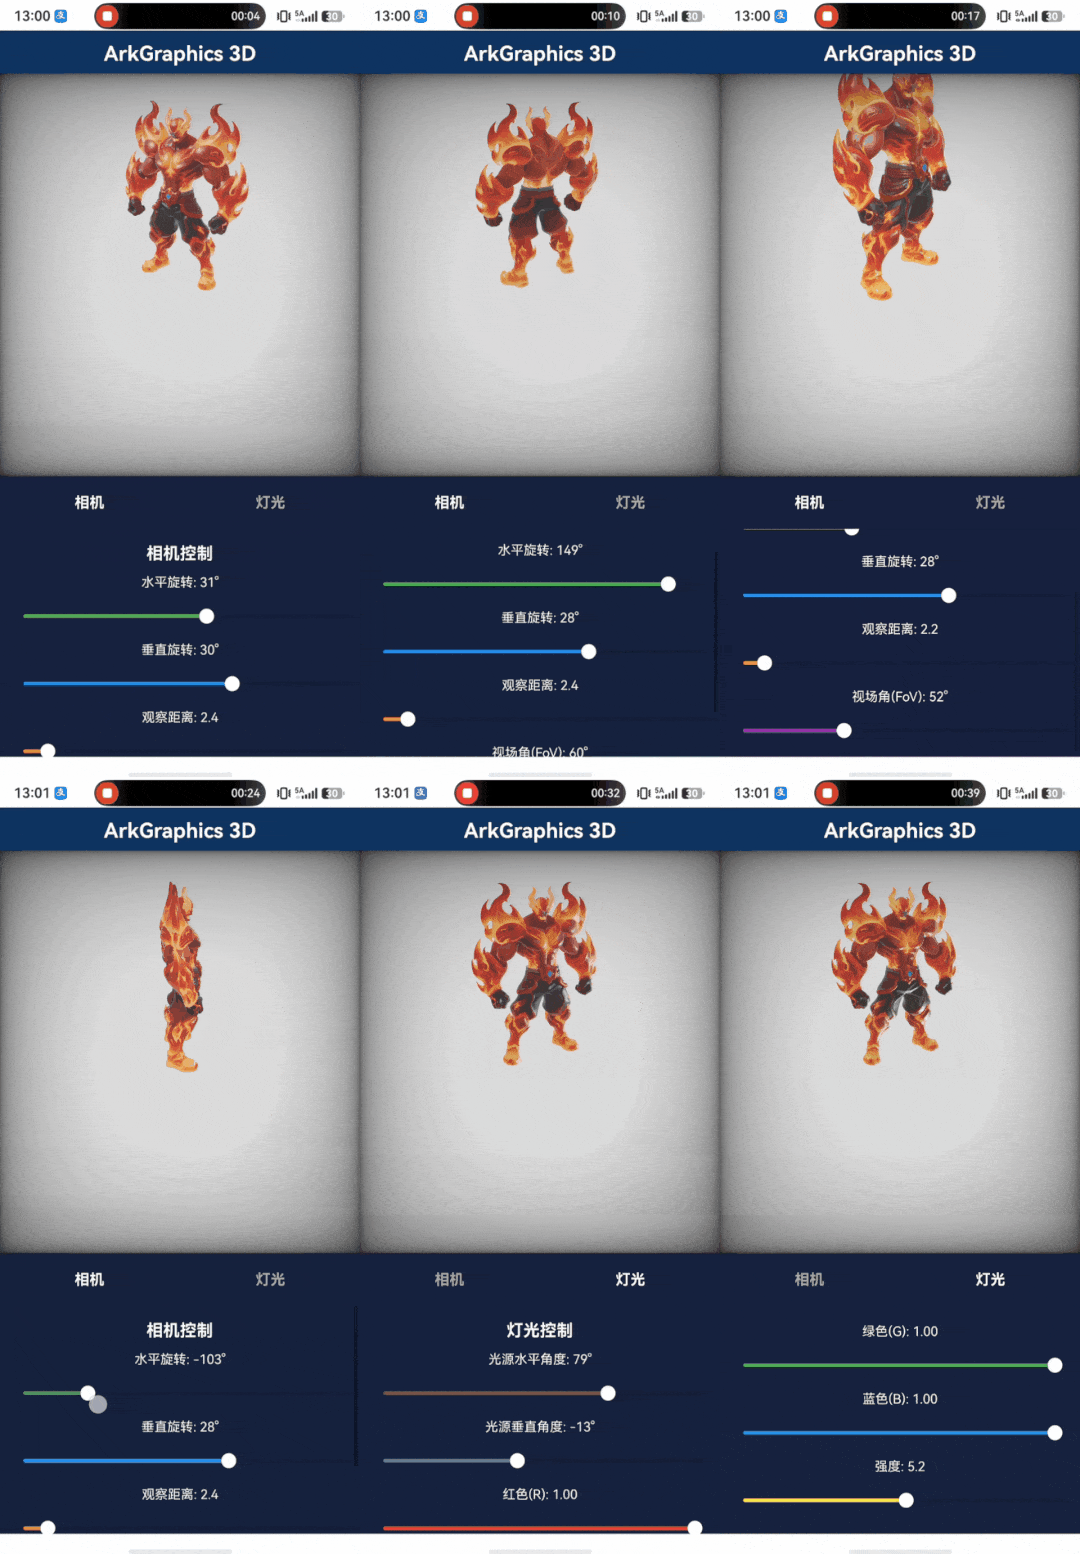
页面上半部分用于渲染模型,下半部分通过“相机”和“灯光”两个页签收纳控制项。本文示例在 Slider 松手时更新场景,以减少连续写入 3D 节点属性带来的开销。
项目准备
1. 创建工程
在 DevEco Studio 中新建 Empty Ability 工程,选择 Stage 模型,API 版本设为 26(HarmonyOS 7)。本文代码使用 ArkTS。
2. 准备 3D 模型文件
示例使用 DamagedHelmet.glb。将文件放入 entry/src/main/resources/rawfile/gltf/DamagedHelmet/glTF/:
resources/
└── rawfile/
    └── gltf/
        └── DamagedHelmet/
            └── glTF/
                └── DamagedHelmet.glb
换成自己的 GLB 文件时,需要同时修改 Scene.load($rawfile(...)) 中的相对路径。路径从 resources/rawfile/ 的下一层开始书写,文件名和目录名要严格匹配大小写。
模型可以由 Blender 等 DCC 工具导出,也可以来自合规的模型生成工具。替换模型后若出现尺寸过大、过小或不在画面中央的问题,先检查模型的原点、单位和包围盒,而不是只调相机距离。
3. 检查配置与资源
module.json5 不需要为 ArkGraphics3D 增加敏感权限,保持工程默认配置即可。运行前建议先核对三项:
| 检查项 | 要求 | 出错表现 |
|---|---|---|
| API 版本 | API 26 | 无法识别相关类型或接口 |
| 模型路径 | 与 $rawfile() 参数完全一致 | Scene.load 进入 catch |
| 模型坐标与尺寸 | 原点、单位、包围盒合理 | 加载成功但画面中看不到模型 |
核心实现:Index.ets 完整拆解
1. 导入与类型定义
import {
  Camera,
  Light,
  LightType,
  Scene,
  SceneNodeParameters,
  SceneResourceFactory,
  Vec3,
  Quaternion
} from '@kit.ArkGraphics3D';
从 @kit.ArkGraphics3D 导入核心类型。划重点:
Scene:3D 场景的根对象,通过Scene.load()加载 GLB 文件创建Camera/Light:场景节点,通过SceneResourceFactory创建Vec3/Quaternion:三维向量和四元数,用于位置和旋转LightType:灯光类型枚举,这里用DIRECTIONAL(方向光)SceneNodeParameters:创建相机/灯光时的参数容器
然后定义两个辅助接口:
interface LightColor {
  r: number;
  g: number;
  b: number;
  a: number;
}

interface LookAtResult {
  position: Vec3;
  rotation: Quaternion;
}
LightColor 给灯光颜色用,RGBA 四通道,取值 0~1。LookAtResult 是 lookAt 函数的返回值——包含位置和旋转四元数,后面相机和灯光的朝向都要靠它。
2. 向量与四元数工具函数
ArkGraphics3D 的 Vec3 和 Quaternion 是接口类型(只有数据没有方法),所以向量运算得自己写:
function Vec3Sub(l: Vec3, r: Vec3): Vec3 {
  return { x: l.x - r.x, y: l.y - r.y, z: l.z - r.z };
}

function Vec3Dot(l: Vec3, r: Vec3): number {
  return l.x * r.x + l.y * r.y + l.z * r.z;
}

function Vec3Normalize(l: Vec3): Vec3 {
  const d: number = Math.sqrt(Vec3Dot(l, l));
  return { x: l.x / d, y: l.y / d, z: l.z / d };
}

function Vec3Cross(l: Vec3, r: Vec3): Vec3 {
  return { x: (l.y * r.z - l.z * r.y), y: (l.z * r.x - l.x * r.z), z: (l.x * r.y - l.y * r.x) };
}

function QuatMul(q: Quaternion, d: number): Quaternion {
  return { x: q.x * d, y: q.y * d, z: q.z * d, w: q.w * d };
}
这五个函数覆盖了 3D 数学最基础的操作:减法(方向向量)、点积(长度/夹角)、归一化、叉积(垂直向量)、四元数标量乘。它们是 lookAt 函数的砖块。
3. lookAt 函数:从"看向目标"到"四元数旋转"
这是整个案例最核心的算法。输入:眼睛位置 eye、目标位置 center、上方向 up;输出:位置 + 四元数旋转。
function lookAtNode(eye: Vec3, center: Vec3, up: Vec3): LookAtResult {
  const f: Vec3 = Vec3Normalize(Vec3Sub(center, eye));
  const m0: Vec3 = Vec3Normalize(Vec3Cross(f, up));
  const m1: Vec3 = Vec3Cross(m0, f);
  const m2: Vec3 = { x: -f.x, y: -f.y, z: -f.z };
  let t: number;
  let q: Quaternion = { x: 0, y: 0, z: 0, w: 0 };

  if (m2.z < 0) {
    if (m0.x > m1.y) {
      t = 1.0 + m0.x - m1.y - m2.z;
      q = { x: t, y: m0.y + m1.x, z: m2.x + m0.z, w: m1.z - m2.y };
    } else {
      t = 1.0 - m0.x + m1.y - m2.z;
      q = { x: m0.y + m1.x, y: t, z: m1.z + m2.y, w: m2.x - m0.z };
    }
  } else {
    if (m0.x < -m1.y) {
      t = 1.0 - m0.x - m1.y + m2.z;
      q = { x: m2.x + m0.z, y: m1.z + m2.y, z: t, w: m0.y - m1.x };
    } else {
      t = 1.0 + m0.x + m1.y + m2.z;
      q = { x: m1.z - m2.y, y: m2.x - m0.z, z: m0.y - m1.x, w: t };
    }
  }
  return { position: eye, rotation: QuatMul(q, 0.5 / Math.sqrt(t)) };
}
这段代码可以分成两步理解。
先构造相机坐标系
f是从eye指向center的单位向量,可理解为“前方”;m0由f × up得到,表示“右方”;m1由m0 × f得到,用来重新校正“上方”;m2是f的反方向。
m0、m1、m2 组成一组正交基,也就是节点的旋转矩阵。这里不能只把水平角和垂直角直接写给节点,因为 Camera.rotation 与 Light.rotation 接收的是 Quaternion。
再把旋转矩阵转换为四元数
后面的分支根据矩阵元素选择计算路径,目的是避开数值不稳定的情况。最后用 0.5 / Math.sqrt(t) 缩放四元数,使结果保持单位长度。对业务代码而言,不必死记每个分支;更重要的是明确输入与输出:给定节点位置、目标点和世界上方向,函数返回节点位置及其朝向。
这段实现还有两个使用边界:
eye不能与center重合,否则方向向量长度为 0,归一化时会产生非法数值;- 视线方向不能与
up平行,否则叉积接近零向量,无法稳定构造“右方”。
因此,后文把垂直角限制在 -89°~89°,不让相机或灯光落到球面的正上方、正下方。生产项目如果参数来自手势、传感器或网络数据,建议在 Vec3Normalize 中增加长度阈值判断,并对输入角度做钳制。
4. 组件状态定义
@Entry
@Component
struct Index {
  @State sceneOpt: SceneOptions | null = null;
  @State cam: Camera | null = null;
  @State light: Light | null = null;
  @State scene: Scene | null = null;
  @State rf: SceneResourceFactory | null = null;

  @State orbitAngleH: number = 0;
  @State orbitAngleV: number = 30;
  @State orbitDistance: number = 5;
  @State fov: number = 60;
  @State lightAngleH: number = -45;
  @State lightAngleV: number = 45;
  @State lightR: number = 1.0;
  @State lightG: number = 1.0;
  @State lightB: number = 1.0;
  @State lightIntensity: number = 3.0;
  @State loadingText: string = '加载中...';
  @State currentTab: number = 0;
}
状态分为三组:
- 场景对象(
sceneOpt、cam、light、scene、rf):3D 渲染核心引用,初始化后不再变更 - 相机参数(
orbitAngleH、orbitAngleV、orbitDistance、fov):控制相机轨道旋转和视场角 - 灯光参数(
lightAngleH、lightAngleV、lightR/G/B、lightIntensity):控制方向光的角度、颜色和强度
初始值 orbitAngleH = 0、orbitAngleV = 30 表示相机从正前方偏上 30 度的位置看模型,orbitDistance = 5 是观察距离,fov = 60 是 60 度视场角。灯光从左上方照射(lightAngleH = -45、lightAngleV = 45),白色,强度 3.0。
5. 相机轨道更新
private updateCameraOrbit(): void {
  if (!this.cam) {
    return;
  }
  const hRad: number = this.orbitAngleH * Math.PI / 180;
  const vRad: number = this.orbitAngleV * Math.PI / 180;
  const x: number = this.orbitDistance * Math.sin(hRad) * Math.cos(vRad);
  const y: number = this.orbitDistance * Math.sin(vRad);
  const z: number = this.orbitDistance * Math.cos(hRad) * Math.cos(vRad);
  const eye: Vec3 = { x: x, y: y, z: z };
  const center: Vec3 = { x: 0, y: 0, z: 0 };
  const up: Vec3 = { x: 0, y: 1, z: 0 };
  const result: LookAtResult = lookAtNode(eye, center, up);
  this.cam.position = result.position;
  this.cam.rotation = result.rotation;
}
轨道相机的核心思路:相机始终看向原点 (0, 0, 0),在一个球面上移动。球坐标参数化:
- 水平角
hRad:在 XZ 平面上的旋转 - 垂直角
vRad:从 XZ 平面向 Y 轴方向的仰角 - 距离
orbitDistance:球面半径
转换为笛卡尔坐标:x = d * sin(h) * cos(v),y = d * sin(v),z = d * cos(h) * cos(v)。然后把 (eye, center, up) 传给 lookAtNode,得到四元数旋转,设置到 cam.position 和 cam.rotation。
up 向量固定为 (0, 1, 0)(Y 轴正方向),这保证了相机不会"翻滚"。垂直角限制在 -89~89 度(Slider 的 min/max),避免万向节锁。
6. 灯光方向更新
private updateLightDirection(): void {
  if (!this.light) {
    return;
  }
  const hRad: number = this.lightAngleH * Math.PI / 180;
  const vRad: number = this.lightAngleV * Math.PI / 180;
  const dist: number = 10;
  const x: number = dist * Math.sin(hRad) * Math.cos(vRad);
  const y: number = dist * Math.sin(vRad);
  const z: number = dist * Math.cos(hRad) * Math.cos(vRad);
  const eye: Vec3 = { x: x, y: y, z: z };
  const center: Vec3 = { x: 0, y: 0, z: 0 };
  const up: Vec3 = { x: 0, y: 1, z: 0 };
  const result: LookAtResult = lookAtNode(eye, center, up);
  this.light.position = result.position;
  this.light.rotation = result.rotation;
}
和相机轨道更新逻辑一模一样,区别是距离固定为 10(方向光的位置不影响光照效果,只影响方向)。灯光方向由 lightAngleH 和 lightAngleV 两个角度参数化,同样用 lookAtNode 转换为四元数。
7. 场景加载
private loadScene(): void {
  if (this.scene === null) {
    Scene.load($rawfile('gltf/DamagedHelmet/glTF/DamagedHelmet.glb'))
      .then(async (result: Scene) => {
        this.scene = result;
        this.rf = result.getResourceFactory();

        this.cam = await this.rf.createCamera({ name: 'MainCamera' } as SceneNodeParameters);
        if (this.cam) {
          this.cam.enabled = true;
          this.cam.fov = this.fov * Math.PI / 180;
          this.updateCameraOrbit();
        }

        this.light = await this.rf.createLight({ name: 'MainLight' } as SceneNodeParameters, LightType.DIRECTIONAL);
        if (this.light) {
          this.light.enabled = true;
          this.light.color = { r: this.lightR, g: this.lightG, b: this.lightB, a: 1.0 };
          this.light.intensity = this.lightIntensity;
          this.light.shadowEnabled = true;
          this.updateLightDirection();
        }

        this.sceneOpt = { scene: result, modelType: 1 } as SceneOptions;
        this.loadingText = '';
      })
      .catch((error: string) => {
        console.error('Scene load failed: ' + error);
        this.loadingText = '加载失败: ' + error;
      });
  }
}
这是整个页面的初始化入口,在 aboutToAppear 生命周期调用。逐步拆解:
-
Scene.load($rawfile(...)):从 rawfile 目录加载 GLB 文件,返回 Promise。$rawfile()是 HarmonyOS 的资源引用语法,指向resources/rawfile/下的文件 -
result.getResourceFactory():获取资源工厂,后续创建相机和灯光都要靠它 -
创建相机:
rf.createCamera({ name: 'MainCamera' }),创建后设置enabled = true、FOV(度转弧度),然后调用updateCameraOrbit()设置初始位置和朝向 -
创建灯光:
rf.createLight({ name: 'MainLight' }, LightType.DIRECTIONAL),第二个参数指定灯光类型为方向光。设置颜色(RGBA,取值 0~1)、强度、启用阴影,然后调用updateLightDirection()设置初始方向 -
sceneOpt = { scene: result, modelType: 1 }:构造SceneOptions传给Component3D渲染。modelType: 1表示使用 3D 渲染模式 -
加载完成后清空
loadingText,加载失败则显示错误信息
8. 相机控制面板
@Builder
CameraControlPanel() {
  Column({ space: 12 }) {
    Text('相机控制')
      .fontSize(18)
      .fontWeight(FontWeight.Bold)
      .fontColor(Color.White)

    Column({ space: 8 }) {
      Text('水平旋转: ' + this.orbitAngleH.toFixed(0) + '°')
        .fontSize(14)
        .fontColor(Color.White)
      Slider({
        value: this.orbitAngleH,
        min: -180,
        max: 180,
        step: 1,
        style: SliderStyle.OutSet
      })
        .selectedColor('#4CAF50')
        .onChange((value: number, mode: SliderChangeMode) => {
          this.orbitAngleH = value;
          if (mode === SliderChangeMode.End) {
            this.updateCameraOrbit();
          }
        })
      // ... 垂直旋转、观察距离、FoV 的 Slider 同理
    }
  }
  .width('100%')
  .padding(16)
}
四个 Slider 分别控制水平旋转(-180180°)、垂直旋转(-8989°)、观察距离(120)、视场角(20120°)。
关键细节在 onChange 回调里:mode === SliderChangeMode.End 时才调用 updateCameraOrbit()。这意味着只有手指松开时才更新 3D 场景,拖动过程中不更新。这样做是为了避免 Slider 拖动时频繁触发 3D 渲染更新导致卡顿。如果你希望实时预览,去掉 mode 判断即可,但要接受一定的性能开销。
FoV 的 Slider 直接修改 this.cam.fov,不需要经过 lookAt,因为 FOV 只影响投影矩阵,不影响相机朝向:
.onChange((value: number, mode: SliderChangeMode) => {
  this.fov = value;
  if (mode === SliderChangeMode.End && this.cam) {
    this.cam.fov = value * Math.PI / 180;
  }
})
注意 value * Math.PI / 180,API 要求弧度,Slider 给的是角度,必须转换。
9. 灯光控制面板
灯光面板有 6 个 Slider:水平角度、垂直角度、R/G/B 三通道、强度。
颜色 Slider 的处理方式值得注意——每个通道独立变化,但设置灯光颜色时需要组合所有通道:
.onChange((value: number, mode: SliderChangeMode) => {
  this.lightR = value;
  if (mode === SliderChangeMode.End && this.light) {
    const c: LightColor = { r: this.lightR, g: this.lightG, b: this.lightB, a: 1.0 };
    this.light.color = c;
  }
})
每次 R/G/B 任意一个通道变化,都从 this.lightR/G/B 三个状态变量重新构造完整的颜色对象赋值给 this.light.color。不能只改一个通道——Light.color 属性是整体赋值的,不支持单独修改某个分量。
强度 Slider 比较直接:
.onChange((value: number, mode: SliderChangeMode) => {
  this.lightIntensity = value;
  if (mode === SliderChangeMode.End && this.light) {
    this.light.intensity = value;
  }
})
范围 0~10,步长 0.1。默认 3.0 对于 DamagedHelmet 这个模型来说亮度刚好,你可以根据自己的模型调整。
10. 页面布局:3D 渲染区 + Tabs 控制面板
build() {
  Column() {
    Text('ArkGraphics 3D')
      .fontSize(22)
      .fontWeight(FontWeight.Bold)
      .fontColor(Color.White)
      .margin({ top: 12, bottom: 8 })

    Stack() {
      if (this.sceneOpt) {
        Component3D(this.sceneOpt)
          .width('100%')
          .height('100%')
      } else {
        Column() {
          Text(this.loadingText)
            .fontSize(18)
            .fontColor(Color.White)
          LoadingProgress()
            .color(Color.White)
            .width(48)
            .height(48)
            .margin({ top: 16 })
        }
        .justifyContent(FlexAlign.Center)
        .alignItems(HorizontalAlign.Center)
      }
    }
    .width('100%')
    .layoutWeight(1)
    .backgroundColor('#1a1a2e')

    Tabs({ index: this.currentTab }) {
      TabContent() {
        Scroll() {
          this.CameraControlPanel()
        }
      }
      .tabBar(this.TabBarItem('相机', 0))

      TabContent() {
        Scroll() {
          this.LightControlPanel()
        }
      }
      .tabBar(this.TabBarItem('灯光', 1))
    }
    .width('100%')
    .height(300)
    .barMode(BarMode.Fixed)
    .backgroundColor('#16213e')
    .onChange((index: number) => {
      this.currentTab = index;
    })
  }
  .width('100%')
  .height('100%')
  .backgroundColor('#0f3460')
}
布局分三层:
- 标题栏:顶部固定高度
- 3D 渲染区:
Stack+layoutWeight(1)占满剩余空间。加载完成时显示Component3D,加载中显示LoadingProgress。Component3D是 ArkGraphics3D 提供的专用渲染组件,接收SceneOptions参数 - 控制面板:底部固定高度 300 的
Tabs,分"相机"和"灯光"两个页签。每个页签内容用Scroll包裹,防止 Slider 太多超出屏幕
TabBarItem 用自定义 Builder 实现,当前选中的标签白色、未选中灰色:
@Builder
TabBarItem(title: string, index: number) {
  Text(title)
    .fontSize(16)
    .fontWeight(FontWeight.Bold)
    .fontColor(this.currentTab === index ? Color.White : '#aaaaaa')
    .padding({ bottom: 8, top: 8 })
}
整体配色深蓝色系(#0f3460、#1a1a2e、#16213e),白色文字,Slider 各自用不同颜色区分功能——绿色是水平旋转、蓝色是垂直旋转、橙色是距离、紫色是 FOV。灯光面板同理,R/G/B 各用红绿蓝标识,直觉上不会搞混。
完整代码
以下内容是本文的完整代码。复制前请确认模型已经放在前文约定的 rawfile 路径中:
import {
  Camera,
  Light,
  LightType,
  Scene,
  SceneNodeParameters,
  SceneResourceFactory,
  Vec3,
  Quaternion
} from '@kit.ArkGraphics3D';

interface LightColor {
  r: number;
  g: number;
  b: number;
  a: number;
}

interface LookAtResult {
  position: Vec3;
  rotation: Quaternion;
}

function Vec3Sub(l: Vec3, r: Vec3): Vec3 {
  return { x: l.x - r.x, y: l.y - r.y, z: l.z - r.z };
}

function Vec3Dot(l: Vec3, r: Vec3): number {
  return l.x * r.x + l.y * r.y + l.z * r.z;
}

function Vec3Normalize(l: Vec3): Vec3 {
  const d: number = Math.sqrt(Vec3Dot(l, l));
  return { x: l.x / d, y: l.y / d, z: l.z / d };
}

function Vec3Cross(l: Vec3, r: Vec3): Vec3 {
  return { x: (l.y * r.z - l.z * r.y), y: (l.z * r.x - l.x * r.z), z: (l.x * r.y - l.y * r.x) };
}

function QuatMul(q: Quaternion, d: number): Quaternion {
  return { x: q.x * d, y: q.y * d, z: q.z * d, w: q.w * d };
}

function lookAtNode(eye: Vec3, center: Vec3, up: Vec3): LookAtResult {
  const f: Vec3 = Vec3Normalize(Vec3Sub(center, eye));
  const m0: Vec3 = Vec3Normalize(Vec3Cross(f, up));
  const m1: Vec3 = Vec3Cross(m0, f);
  const m2: Vec3 = { x: -f.x, y: -f.y, z: -f.z };
  let t: number;
  let q: Quaternion = { x: 0, y: 0, z: 0, w: 0 };

  if (m2.z < 0) {
    if (m0.x > m1.y) {
      t = 1.0 + m0.x - m1.y - m2.z;
      q = { x: t, y: m0.y + m1.x, z: m2.x + m0.z, w: m1.z - m2.y };
    } else {
      t = 1.0 - m0.x + m1.y - m2.z;
      q = { x: m0.y + m1.x, y: t, z: m1.z + m2.y, w: m2.x - m0.z };
    }
  } else {
    if (m0.x < -m1.y) {
      t = 1.0 - m0.x - m1.y + m2.z;
      q = { x: m2.x + m0.z, y: m1.z + m2.y, z: t, w: m0.y - m1.x };
    } else {
      t = 1.0 + m0.x + m1.y + m2.z;
      q = { x: m1.z - m2.y, y: m2.x - m0.z, z: m0.y - m1.x, w: t };
    }
  }
  return { position: eye, rotation: QuatMul(q, 0.5 / Math.sqrt(t)) };
}

@Entry
@Component
struct Index {
  @State sceneOpt: SceneOptions | null = null;
  @State cam: Camera | null = null;
  @State light: Light | null = null;
  @State scene: Scene | null = null;
  @State rf: SceneResourceFactory | null = null;

  @State orbitAngleH: number = 0;
  @State orbitAngleV: number = 30;
  @State orbitDistance: number = 5;
  @State fov: number = 60;
  @State lightAngleH: number = -45;
  @State lightAngleV: number = 45;
  @State lightR: number = 1.0;
  @State lightG: number = 1.0;
  @State lightB: number = 1.0;
  @State lightIntensity: number = 3.0;
  @State loadingText: string = '加载中...';
  @State currentTab: number = 0;

  aboutToAppear(): void {
    this.loadScene();
  }

  private updateCameraOrbit(): void {
    if (!this.cam) {
      return;
    }
    const hRad: number = this.orbitAngleH * Math.PI / 180;
    const vRad: number = this.orbitAngleV * Math.PI / 180;
    const x: number = this.orbitDistance * Math.sin(hRad) * Math.cos(vRad);
    const y: number = this.orbitDistance * Math.sin(vRad);
    const z: number = this.orbitDistance * Math.cos(hRad) * Math.cos(vRad);
    const eye: Vec3 = { x: x, y: y, z: z };
    const center: Vec3 = { x: 0, y: 0, z: 0 };
    const up: Vec3 = { x: 0, y: 1, z: 0 };
    const result: LookAtResult = lookAtNode(eye, center, up);
    this.cam.position = result.position;
    this.cam.rotation = result.rotation;
  }

  private updateLightDirection(): void {
    if (!this.light) {
      return;
    }
    const hRad: number = this.lightAngleH * Math.PI / 180;
    const vRad: number = this.lightAngleV * Math.PI / 180;
    const dist: number = 10;
    const x: number = dist * Math.sin(hRad) * Math.cos(vRad);
    const y: number = dist * Math.sin(vRad);
    const z: number = dist * Math.cos(hRad) * Math.cos(vRad);
    const eye: Vec3 = { x: x, y: y, z: z };
    const center: Vec3 = { x: 0, y: 0, z: 0 };
    const up: Vec3 = { x: 0, y: 1, z: 0 };
    const result: LookAtResult = lookAtNode(eye, center, up);
    this.light.position = result.position;
    this.light.rotation = result.rotation;
  }

  private loadScene(): void {
    if (this.scene === null) {
      Scene.load($rawfile('gltf/DamagedHelmet/glTF/DamagedHelmet.glb'))
        .then(async (result: Scene) => {
          this.scene = result;
          this.rf = result.getResourceFactory();

          this.cam = await this.rf.createCamera({ name: 'MainCamera' } as SceneNodeParameters);
          if (this.cam) {
            this.cam.enabled = true;
            this.cam.fov = this.fov * Math.PI / 180;
            this.updateCameraOrbit();
          }

          this.light = await this.rf.createLight({ name: 'MainLight' } as SceneNodeParameters, LightType.DIRECTIONAL);
          if (this.light) {
            this.light.enabled = true;
            this.light.color = { r: this.lightR, g: this.lightG, b: this.lightB, a: 1.0 };
            this.light.intensity = this.lightIntensity;
            this.light.shadowEnabled = true;
            this.updateLightDirection();
          }

          this.sceneOpt = { scene: result, modelType: 1 } as SceneOptions;
          this.loadingText = '';
        })
        .catch((error: string) => {
          console.error('Scene load failed: ' + error);
          this.loadingText = '加载失败: ' + error;
        });
    }
  }

  @Builder
  CameraControlPanel() {
    Column({ space: 12 }) {
      Text('相机控制')
        .fontSize(18)
        .fontWeight(FontWeight.Bold)
        .fontColor(Color.White)

      Column({ space: 8 }) {
        Text('水平旋转: ' + this.orbitAngleH.toFixed(0) + '°')
          .fontSize(14)
          .fontColor(Color.White)
        Slider({
          value: this.orbitAngleH,
          min: -180,
          max: 180,
          step: 1,
          style: SliderStyle.OutSet
        })
          .selectedColor('#4CAF50')
          .onChange((value: number, mode: SliderChangeMode) => {
            this.orbitAngleH = value;
            if (mode === SliderChangeMode.End) {
              this.updateCameraOrbit();
            }
          })

        Text('垂直旋转: ' + this.orbitAngleV.toFixed(0) + '°')
          .fontSize(14)
          .fontColor(Color.White)
        Slider({
          value: this.orbitAngleV,
          min: -89,
          max: 89,
          step: 1,
          style: SliderStyle.OutSet
        })
          .selectedColor('#2196F3')
          .onChange((value: number, mode: SliderChangeMode) => {
            this.orbitAngleV = value;
            if (mode === SliderChangeMode.End) {
              this.updateCameraOrbit();
            }
          })

        Text('观察距离: ' + this.orbitDistance.toFixed(1))
          .fontSize(14)
          .fontColor(Color.White)
        Slider({
          value: this.orbitDistance,
          min: 1,
          max: 20,
          step: 0.1,
          style: SliderStyle.OutSet
        })
          .selectedColor('#FF9800')
          .onChange((value: number, mode: SliderChangeMode) => {
            this.orbitDistance = value;
            if (mode === SliderChangeMode.End) {
              this.updateCameraOrbit();
            }
          })

        Text('视场角(FoV): ' + this.fov.toFixed(0) + '°')
          .fontSize(14)
          .fontColor(Color.White)
        Slider({
          value: this.fov,
          min: 20,
          max: 120,
          step: 1,
          style: SliderStyle.OutSet
        })
          .selectedColor('#9C27B0')
          .onChange((value: number, mode: SliderChangeMode) => {
            this.fov = value;
            if (mode === SliderChangeMode.End && this.cam) {
              this.cam.fov = value * Math.PI / 180;
            }
          })
      }
    }
    .width('100%')
    .padding(16)
  }

  @Builder
  LightControlPanel() {
    Column({ space: 12 }) {
      Text('灯光控制')
        .fontSize(18)
        .fontWeight(FontWeight.Bold)
        .fontColor(Color.White)

      Column({ space: 8 }) {
        Text('光源水平角度: ' + this.lightAngleH.toFixed(0) + '°')
          .fontSize(14)
          .fontColor(Color.White)
        Slider({
          value: this.lightAngleH,
          min: -180,
          max: 180,
          step: 1,
          style: SliderStyle.OutSet
        })
          .selectedColor('#795548')
          .onChange((value: number, mode: SliderChangeMode) => {
            this.lightAngleH = value;
            if (mode === SliderChangeMode.End) {
              this.updateLightDirection();
            }
          })

        Text('光源垂直角度: ' + this.lightAngleV.toFixed(0) + '°')
          .fontSize(14)
          .fontColor(Color.White)
        Slider({
          value: this.lightAngleV,
          min: -89,
          max: 89,
          step: 1,
          style: SliderStyle.OutSet
        })
          .selectedColor('#607D8B')
          .onChange((value: number, mode: SliderChangeMode) => {
            this.lightAngleV = value;
            if (mode === SliderChangeMode.End) {
              this.updateLightDirection();
            }
          })

        Text('红色(R): ' + this.lightR.toFixed(2))
          .fontSize(14)
          .fontColor(Color.White)
        Slider({
          value: this.lightR,
          min: 0,
          max: 1,
          step: 0.01,
          style: SliderStyle.OutSet
        })
          .selectedColor('#F44336')
          .onChange((value: number, mode: SliderChangeMode) => {
            this.lightR = value;
            if (mode === SliderChangeMode.End && this.light) {
              const c: LightColor = { r: this.lightR, g: this.lightG, b: this.lightB, a: 1.0 };
              this.light.color = c;
            }
          })

        Text('绿色(G): ' + this.lightG.toFixed(2))
          .fontSize(14)
          .fontColor(Color.White)
        Slider({
          value: this.lightG,
          min: 0,
          max: 1,
          step: 0.01,
          style: SliderStyle.OutSet
        })
          .selectedColor('#4CAF50')
          .onChange((value: number, mode: SliderChangeMode) => {
            this.lightG = value;
            if (mode === SliderChangeMode.End && this.light) {
              const c: LightColor = { r: this.lightR, g: this.lightG, b: this.lightB, a: 1.0 };
              this.light.color = c;
            }
          })

        Text('蓝色(B): ' + this.lightB.toFixed(2))
          .fontSize(14)
          .fontColor(Color.White)
        Slider({
          value: this.lightB,
          min: 0,
          max: 1,
          step: 0.01,
          style: SliderStyle.OutSet
        })
          .selectedColor('#2196F3')
          .onChange((value: number, mode: SliderChangeMode) => {
            this.lightB = value;
            if (mode === SliderChangeMode.End && this.light) {
              const c: LightColor = { r: this.lightR, g: this.lightG, b: this.lightB, a: 1.0 };
              this.light.color = c;
            }
          })

        Text('强度: ' + this.lightIntensity.toFixed(1))
          .fontSize(14)
          .fontColor(Color.White)
        Slider({
          value: this.lightIntensity,
          min: 0,
          max: 10,
          step: 0.1,
          style: SliderStyle.OutSet
        })
          .selectedColor('#FFEB3B')
          .onChange((value: number, mode: SliderChangeMode) => {
            this.lightIntensity = value;
            if (mode === SliderChangeMode.End && this.light) {
              this.light.intensity = value;
            }
          })
      }
    }
    .width('100%')
    .padding(16)
  }

  @Builder
  TabBarItem(title: string, index: number) {
    Text(title)
      .fontSize(16)
      .fontWeight(FontWeight.Bold)
      .fontColor(this.currentTab === index ? Color.White : '#aaaaaa')
      .padding({ bottom: 8, top: 8 })
  }

  build() {
    Column() {
      Text('ArkGraphics 3D')
        .fontSize(22)
        .fontWeight(FontWeight.Bold)
        .fontColor(Color.White)
        .margin({ top: 12, bottom: 8 })

      Stack() {
        if (this.sceneOpt) {
          Component3D(this.sceneOpt)
            .width('100%')
            .height('100%')
        } else {
          Column() {
            Text(this.loadingText)
              .fontSize(18)
              .fontColor(Color.White)
            LoadingProgress()
              .color(Color.White)
              .width(48)
              .height(48)
              .margin({ top: 16 })
          }
          .justifyContent(FlexAlign.Center)
          .alignItems(HorizontalAlign.Center)
        }
      }
      .width('100%')
      .layoutWeight(1)
      .backgroundColor('#1a1a2e')

      Tabs({ index: this.currentTab }) {
        TabContent() {
          Scroll() {
            this.CameraControlPanel()
          }
        }
        .tabBar(this.TabBarItem('相机', 0))

        TabContent() {
          Scroll() {
            this.LightControlPanel()
          }
        }
        .tabBar(this.TabBarItem('灯光', 1))
      }
      .width('100%')
      .height(300)
      .barMode(BarMode.Fixed)
      .backgroundColor('#16213e')
      .onChange((index: number) => {
        this.currentTab = index;
      })
    }
    .width('100%')
    .height('100%')
    .backgroundColor('#0f3460')
  }
}
总结与适用边界
这个模型查看器的实现可以归纳为三条主线:
- 场景与节点初始化:用
Scene.load加载 GLB,通过getResourceFactory获取资源工厂,创建Camera与Light,最后将SceneOptions交给Component3D渲染。 - 轨道参数到节点朝向的转换:界面侧用水平角、垂直角和距离描述相机位置,节点侧通过
lookAtNode接收位置与四元数。这层转换让 UI 控制和 3D API 各自使用最合适的数据表达。 - 受控地更新渲染参数:Slider 先更新 ArkUI 状态,松手时再更新 3D 节点;颜色必须将 R、G、B 组合为一个完整对象后整体赋值。
ArkGraphics3D 很适合“加载模型并提供有限交互”的需求,例如商品 360° 展示、展厅导览或课程演示。它降低了场景搭建门槛,但也意味着可定制空间受 API 封装范围限制。涉及自定义材质、复杂特效、粒子系统或高频实时编辑时,应在方案阶段确认 ArkGraphics3D 是否覆盖所需能力。
后续可以在当前结构上继续增加双指缩放、单指旋转、模型切换、默认视角复位和参数持久化。无论扩展哪一项,都建议保留本文的两个约束:节点旋转通过稳定的 lookAt 流程生成,并为高频交互控制更新频率。

讨论HarmonyOS开发技术,专注于API与组件、DevEco Studio、测试、元服务和应用上架分发等。
更多推荐


 2
2 1
1- 0


 已为社区贡献399条内容

所有评论(0)