#跟着坚果学鸿蒙#自动调节字体大小
·
#跟着坚果学鸿蒙#Text 对象支持根据文本长度自动调整文本的字体大小和换行。 1. 设置自动换行、最大显示行数和自动调节字体大小。
<Text
 ohos:id="$+id:text1"
 ohos:width="90vp"
 ohos:height="match_content"
 ohos:min_height="30vp"
 ohos:text="T"
 ohos:text_color="blue"
 ohos:italic="true"
 ohos:text_weight="700"
 ohos:text_font="serif"
 ohos:multiple_lines="true" ohos:max_text_lines="1" ohos:auto_font_size="true"
 ohos:right_padding="8vp"
 ohos:left_padding="8vp"
 ohos:background_element="$graphic:textelement"/>
通过 setAutoFontSizeRule 设置自动调整规则,三个入参分别是最小的字体大 小、最大的字体大小、每次调整文本字体大小的步长。
// 设置自动调整规则
text.setAutoFontSizeRule(30, 100, 1);
// 设置点击一次增多一个"T"
text.setClickedListener(new Component.ClickedListener() {
 @Override
 public void onClick(Component Component) {
 text.setText(text.getText() + "T");
} }); 
跑马灯效果 当文本过长时,可以设置跑马灯效果,实现文本滚动显示。前提是文本换行关闭 且最大显示行数为 1,默认情况下即可满足前提要求。
<Text
 ohos:id="$+id:text"
 ohos:width="75vp"
 ohos:height="match_content"
 ohos:text="TextText"
 ohos:text_size="28fp"
 ohos:text_color="blue"
 ohos:italic="true"
 ohos:text_weight="700"
 ohos:text_font="serif"
 ohos:background_element="$graphic:textelement"/> // 跑马灯效果
text.setTruncationMode(Text.TruncationMode.AUTO_SCROLLING);
// 启动跑马灯效果
text.startAutoScrolling(); 
场景示例 利用文本组件实现一个标题栏和详细内容的界面。
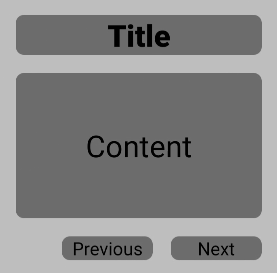
源码示例:
<?xml version="1.0" encoding="utf-8"?>
<DependentLayout
 xmlns:ohos="http://schemas.huawei.com/res/ohos"
 ohos:width="match_parent"
 ohos:height="match_content"
 ohos:background_element="$graphic:color_light_gray_element"> <Text
 ohos:id="$+id:text1"
 ohos:width="match_parent"
 ohos:height="match_content"
 ohos:text_size="25fp"
 ohos:top_margin="15vp"
 ohos:left_margin="15vp"
 ohos:right_margin="15vp"
 ohos:background_element="$graphic:textelement" ohos:text="Title"
 ohos:text_weight="1000"
 ohos:text_alignment="horizontal_center"/>
 <Text
 ohos:id="$+id:text3"
 ohos:width="match_parent"
 ohos:height="120vp"
 ohos:text_size="25fp"
 ohos:background_element="$graphic:textelement" ohos:text="Content"
 ohos:top_margin="15vp"
 ohos:left_margin="15vp"
 ohos:right_margin="15vp"
 ohos:bottom_margin="15vp"
 ohos:text_alignment="center"
 ohos:below="$id:text1"
 ohos:text_font="serif"/>
 <Button ohos:id="$+id:button1" ohos:width="75vp"
 ohos:height="match_content"
 ohos:text_size="15fp"
 ohos:background_element="$graphic:textelement"
 ohos:text="Previous"
 ohos:right_margin="15vp"
 ohos:bottom_margin="15vp"
 ohos:left_padding="5vp" ohos:right_padding="5vp"
 ohos:below="$id:text3"
 ohos:left_of="$id:button2"
 ohos:text_font="serif"/>
 <Button
 ohos:id="$+id:button2"
 ohos:width="75vp"
 ohos:height="match_content"
 ohos:text_size="15fp"
 ohos:background_element="$graphic:textelement"
 ohos:text="Next"
 ohos:right_margin="15vp" ohos:bottom_margin="15vp"
 ohos:left_padding="5vp"
 ohos:right_padding="5vp"
 ohos:align_parent_end="true"
 ohos:below="$id:text3"
 ohos:text_font="serif"/>
</DependentLayout>
color_light_gray_element.xml:
<?xml version="1.0" encoding="utf-8"?>
<shape xmlns:ohos="http://schemas.huawei.com/res/ohos"
 ohos:shape="rectangle">
 <solid
 ohos:color="#ffeeeeee"/>
</shape>
textelement.xml:
<?xml version="1.0" encoding="utf-8"?>
<shape xmlns:ohos="http://schemas.huawei.com/res/ohos"
 ohos:shape="rectangle">
 <corners
 ohos:radius="20"/>
 <solid
 ohos:color="#ff888888"/>
</shape>
Button
按钮(Button)是一种常见的组件,点击可以触发对应的操作,通常由文本或图 标组成,也可以由图标和文本共同组成。
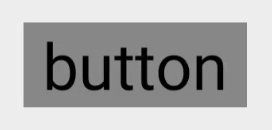

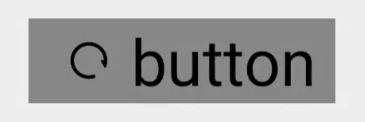
创建 Button 使用 Button 组件,可以生成形状、颜色丰富的按钮。
<Button
 ohos:id="$+id:button_sample"
 ohos:width="match_content"
 ohos:height="match_content"
 ohos:text_size="27fp"
 ohos:text="button"
 ohos:background_element="$graphic:button_element" ohos:left_margin="15vp"
 ohos:bottom_margin="15vp"
 ohos:right_padding="8vp"
 ohos:left_padding="8vp"
 ohos:element_left="$graphic:ic_btn_reload"
/>
button_element.xml:
<?xml version="1.0" encoding="utf-8"?>
<shape xmlns:ohos="http://schemas.huawei.com/res/ohos"
 ohos:shape="rectangle">
 <corners
 ohos:radius="10"/>
 <solid
 ohos:color="#FF007DFF"/>
</shape> 
响应点击事件 按钮的重要作用是当用户单击按钮时,会执行相应的操作或者界面出现相应的变 化。实际上用户点击按钮时,Button 对象将收到一个点击事件。 开发者可以自定义响应点击事件的方法。例如,通过创建一个 Component.ClickedListener 对象,然后通过调用 setClickedListener 将其分配给按钮。
//从定义的 xml 中获取 Button 对象
Button button = (Button)
rootLayout.findComponentById(ResourceTable.Id_button_sample);
// 为按钮设置点击事件回调
button.setClickedListener(new Component.ClickedListener() {
 public void onClick(Component v) {
 // 此处添加点击按钮后的事件处理逻辑
 }
});

讨论HarmonyOS开发技术,专注于API与组件、DevEco Studio、测试、元服务和应用上架分发等。
更多推荐


 0
0 0
0- 0


 已为社区贡献50条内容

所有评论(0)