仓颉编程语言并发编程核心机制详解
·
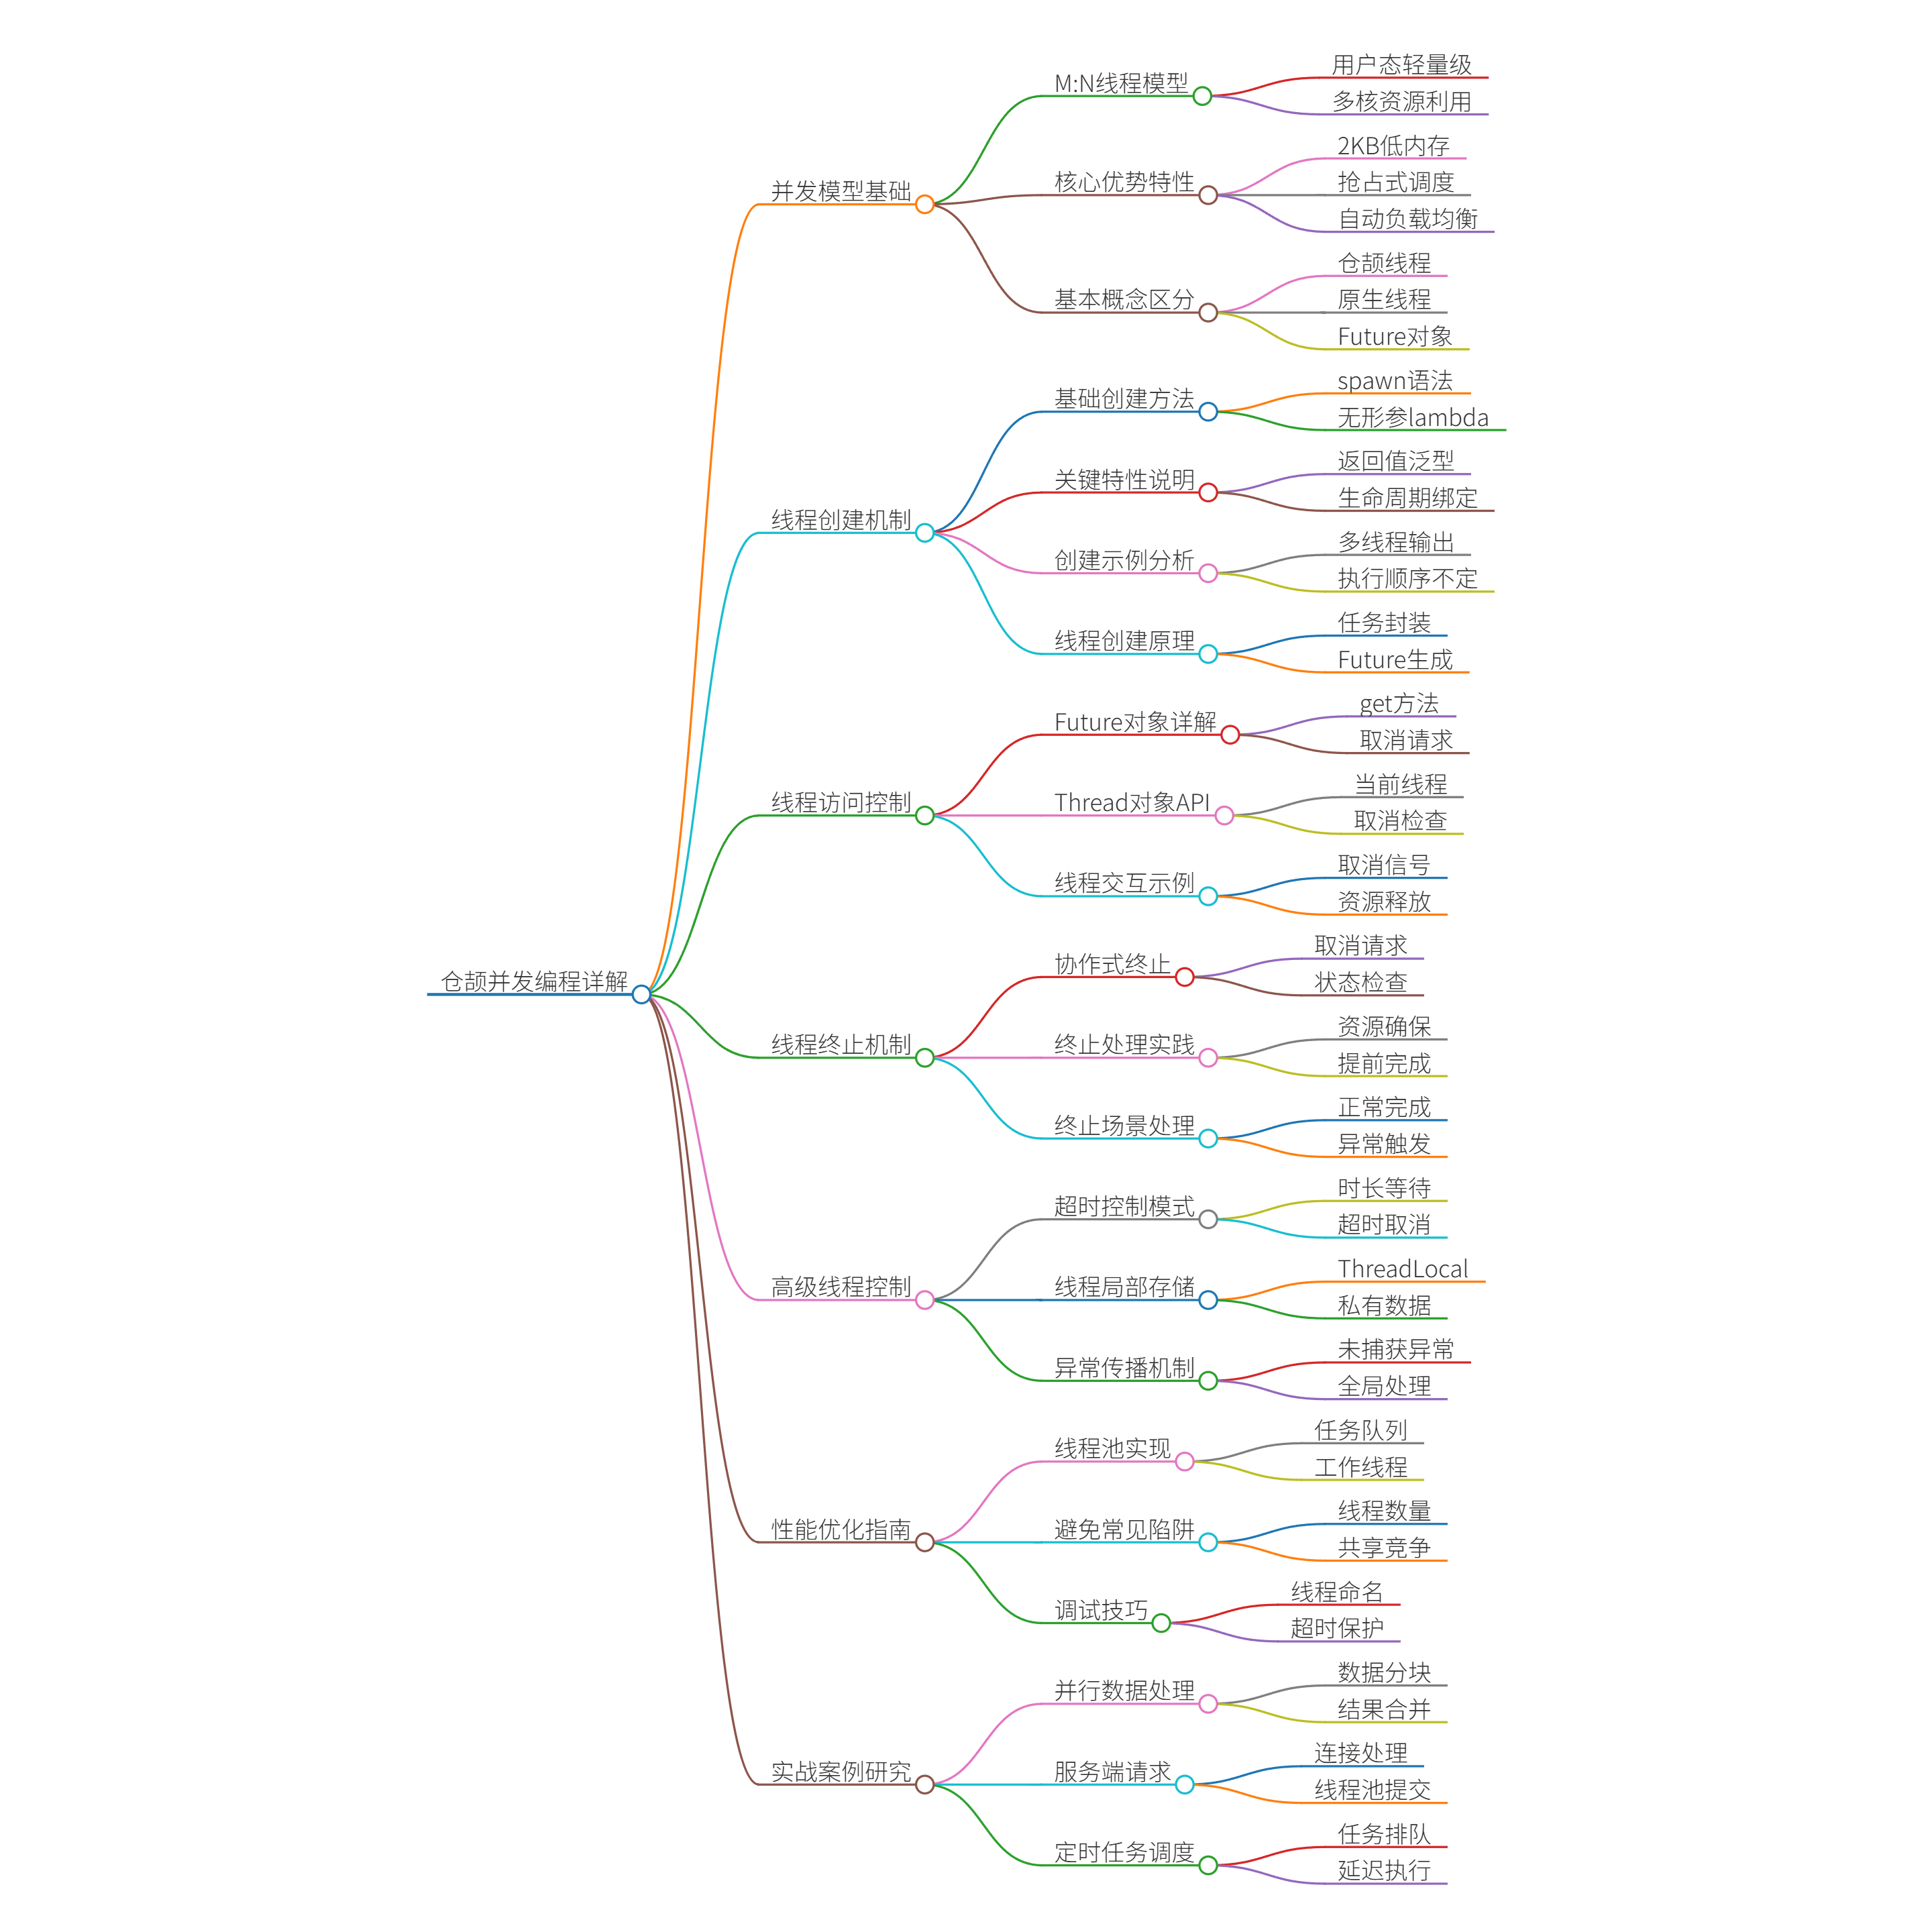
一、仓颉并发编程概述
1.1 并发模型基础
仓颉编程语言采用M:N线程模型实现并发编程,将M个用户态轻量级线程(称为"仓颉线程")映射到N个系统原生线程上执行。这种模型结合了用户态线程的轻量性和内核态线程的多核利用能力,既保持了创建线程的高效性,又能充分利用多核处理器资源。
1.2 核心优势特性
仓颉的并发模型具有以下显著特点:
- 轻量级线程:每个仓颉线程仅需约2KB内存,可创建数百万个并发线程
- 抢占式调度:系统自动分配时间片,无需手动让出CPU
- 自动负载均衡:运行时系统动态分配仓颉线程到原生线程
- 无缝集成:与语言特性深度集成,语法简洁直观
1.3 基本概念区分
- 仓颉线程:用户态轻量级线程,开发者直接操作的对象
- 原生线程:操作系统内核线程,实际执行单元
- Future对象:表示异步计算结果的句柄
- Thread对象:表示线程运行时状态的访问接口
二、线程创建机制
2.1 基础创建方法
使用spawn关键字创建新线程,基本语法结构为:
let future = spawn {
    // 在新线程中执行的代码块
    =>
    println("Executing in new thread")
    return 42  // 可选的返回值
}
2.2 关键特性说明
- 无形参lambda:spawn必须接受无形参的lambda表达式
- 返回值处理:lambda可返回任意类型,返回类型决定Future的泛型参数
- 生命周期绑定:默认情况下,子线程会随主线程结束而终止
2.3 创建示例分析
import std.sync.*
import std.time.*

main(): Int64 {
    // 创建并启动新线程
    spawn {
        =>
        for (i in 0..<5) {
            println("Child thread: ${i}")
            sleep(200 * Duration.millisecond)
        }
    }

    // 主线程继续执行
    for (i in 0..<3) {
        println("Main thread: ${i}")
        sleep(300 * Duration.millisecond)
    }

    return 0
}
输出可能为(实际顺序不确定):
Main thread: 0
Child thread: 0
Child thread: 1
Main thread: 1
Child thread: 2
Child thread: 3
Main thread: 2
Child thread: 4
2.4 线程创建原理
- 任务封装:将lambda表达式封装为可执行任务
- 线程分配:由运行时系统分配到空闲原生线程
- Future生成:立即返回Future对象用于结果获取
- 执行开始:由调度器决定具体执行时机
三、线程访问与控制
3.1 Future对象详解
spawn表达式返回的Future<T>对象提供以下核心功能:
| 方法/属性 | 说明 |
|---|---|
thread |
获取关联的Thread对象 |
get() |
阻塞等待线程完成并获取返回值 |
get(timeout) |
带超时的等待,超时抛出TimeoutException |
tryGet() |
非阻塞尝试获取结果,返回Option |
cancel() |
发送取消请求,需线程主动检查处理 |
3.2 Thread对象API
通过Future.thread或Thread.currentThread获取的Thread对象提供:
public class Thread {
    // 静态属性
    static prop currentThread: Thread

    // 实例属性
    prop id: Int64          // 线程唯一标识
    prop name: String       // 线程名称(可修改)
    prop hasPendingCancellation: Bool  // 检查取消请求

    // 方法
    func registerUncaughtExceptionHandler(handler: (Thread, Exception) -> Unit)
}
3.3 线程交互示例
main(): Unit {
    let future = spawn {
        =>
        let current = Thread.currentThread
        println("Thread ${current.id} started")

        // 检查取消请求
        while (!current.hasPendingCancellation) {
            println("Working...")
            sleep(500 * Duration.millisecond)
        }

        println("Thread ${current.id} received cancellation")
        return "Result"
    }

    sleep(2 * Duration.second)
    future.cancel()  // 发送取消信号

    let result = future.get()  // 等待线程结束
    println("Final result: ${result}")
}
四、线程终止机制
4.1 协作式终止模式
仓颉采用协作式取消而非强制终止,确保资源安全释放:
- 取消请求:通过
future.cancel()发送信号 - 状态检查:线程内定期检查
hasPendingCancellation - 清理退出:线程自行处理资源释放后退出
4.2 终止处理最佳实践
func workerTask(): String {
    let resource = acquireResource()
    defer {
        resource.release()  // 确保资源释放
    }

    while (!Thread.currentThread.hasPendingCancellation) {
        // 执行工作单元
        if (shouldStopEarly()) {
            return "Early completion"
        }
        sleep(100 * Duration.millisecond)
    }

    return "Cancelled"
}

main(): Unit {
    let worker = spawn { => workerTask() }

    sleep(1 * Duration.second)
    worker.cancel()

    println(worker.get())
}
4.3 终止场景处理
- 正常完成:线程自然执行结束
- 取消响应:线程检测到取消请求后退出
- 未捕获异常:触发未捕获异常处理机制
- 主线程退出:所有关联线程被终止
五、高级线程控制
5.1 超时控制模式
let future = spawn {
    =>
    sleep(10 * Duration.second)  // 模拟长时间任务
    return "Done"
}

try {
    let result = future.get(2 * Duration.second)  // 等待2秒
    println(result)
} catch (e: TimeoutException) {
    println("Task timeout, cancelling...")
    future.cancel()
}
5.2 线程局部存储
使用ThreadLocal<T>实现线程私有数据:
let threadLocalCounter = ThreadLocal<Int64>()

func worker(id: Int64) {
    threadLocalCounter.set(Some(id * 100))
    println("Thread ${id}: ${threadLocalCounter.get()}")
}

main(): Unit {
    let futures = Array<Future<Unit>>()

    for (i in 1..=3) {
        futures.add(spawn { => worker(i) })
    }

    for (f in futures) {
        f.get()
    }
}
5.3 异常传播机制
- 未捕获异常:自动传播到Future的get()调用处
- 自定义处理:通过Thread注册全局异常处理器
- 默认行为:未处理时打印堆栈并终止线程
Thread.handleUncaughtExceptionBy { (thread, ex) =>
    println("Thread ${thread.id} crashed: ${ex}")
}

spawn {
    =>
    throw Exception("Something went wrong")
}.get()  // 此处会重新抛出异常
六、性能优化指南
6.1 线程池模式实现
class ThreadPool {
    private let taskQueue = LinkedBlockingQueue<() -> Unit>()
    private let workers = Array<Future<Unit>>()

    public init(size: Int64) {
        for (_ in 0..<size) {
            workers.add(spawn { => workerLoop() })
        }
    }

    private func workerLoop() {
        while (!Thread.currentThread.hasPendingCancellation) {
            let task = taskQueue.take()  // 阻塞获取任务
            try {
                task()
            } catch (e: Exception) {
                println("Task failed: ${e}")
            }
        }
    }

    public func submit(task: () -> Unit): Unit {
        taskQueue.put(task)
    }

    public func shutdown(): Unit {
        for (w in workers) {
            w.cancel()
        }
    }
}
6.2 避免常见陷阱
- 过度创建线程:合理控制线程数量(建议不超过CPU核心数×2)
- 共享状态竞争:使用同步机制保护共享数据
- 取消响应延迟:在循环中定期检查取消状态
- 资源泄漏:确保使用defer或try-finally释放资源
6.3 调试技巧
- 线程命名:通过
Thread.currentThread.name设置诊断名称 - 日志标记:输出线程ID辅助诊断
println("[${Thread.currentThread.id}] Processing item ${i}") - 超时保护:为所有阻塞操作添加合理超时
七、实战案例研究
7.1 并行数据处理
func parallelProcess(data: Array<String>): Map<String, Int64> {
    let result = ConcurrentHashMap<String, Int64>()
    let chunkSize = data.size / 4 + 1

    let futures = data.chunked(chunkSize).map { chunk =>
        spawn {
            =>
            val localCount = HashMap<String, Int64>()
            for (item in chunk) {
                localCount[item] = localCount.getOrElse(item, {0}) + 1
            }
            result.putAll(localCount)
        }
    }

    for (f in futures) {
        f.get()
    }

    return result
}
7.2 服务端请求处理
class RequestHandler {
    private let listener = TcpListener("0.0.0.0", 8080)
    private let pool = ThreadPool(size = 16)

    public func start(): Unit {
        while (true) {
            val socket = try listener.accept()
            pool.submit { => handleConnection(socket) }
        }
    }

    private func handleConnection(socket: TcpSocket): Unit {
        defer { socket.close() }
        try {
            val request = socket.read()
            val response = processRequest(request)
            socket.write(response)
        } catch (e: Exception) {
            println("Error handling request: ${e}")
        }
    }
}
7.3 定时任务调度
class Scheduler {
    private let queue = PriorityQueue<ScheduledTask>()
    private let schedulerThread = spawn { => runScheduler() }

    public func schedule(task: () -> Unit, delay: Duration): Unit {
        synchronized(queue) {
            queue.add(ScheduledTask(
                executeAt = System.currentTimeMillis() + delay.toMillis(),
                task = task
            ))
        }
    }

    private func runScheduler(): Unit {
        while (!Thread.currentThread.hasPendingCancellation) {
            val now = System.currentTimeMillis()
            synchronized(queue) {
                while (!queue.isEmpty && queue.peek().executeAt <= now) {
                    val task = queue.poll()
                    spawn { => task.task() }  // 在新线程执行实际任务
                }
            }
            sleep(100 * Duration.millisecond)
        }
    }
}
仓颉的并发编程模型通过简洁的语法和强大的运行时支持,使开发者能够轻松构建高性能并发应用。掌握线程创建、访问和终止这些核心机制,结合合理的架构设计,可以充分发挥现代多核处理器的计算能力,同时保持代码的可维护性和可靠性。

讨论HarmonyOS开发技术,专注于API与组件、DevEco Studio、测试、元服务和应用上架分发等。
更多推荐

 1
1 0
0- 0


 已为社区贡献159条内容

所有评论(0)