鸿蒙【harmonyOS】如何上传图片至PicGo并获取图片公网URL展示在页面上
一)总体介绍我们可以通过上传图片到PicGo平台获取图片公网 URL ,用于鸿蒙应用内的图片展示(通过 Image 组件加载 )、上传至后端服务器关联业务数据,或直接分享给其他平台。(这个实例只是简单流程,实际会访问用户读取相册权限的校检,我们这里忽略)
一)总体介绍:
我们可以通过上传图片到PicGo平台获取图片公网 URL ,用于鸿蒙应用内的图片展示(通过 Image 组件加载 )、上传至后端服务器关联业务数据,或直接分享给其他平台。(这个实例只是简单流程,实际会访问用户读取相册权限的校检,我们这里忽略)
二)整个流程核心:
“用户选择图片:→拷贝图片至缓存目录→ 上传图片至PicGo→解析返回的公网 URL” 。
需注意网络权限配置(鸿蒙应用需在module.json5声明 ohos.permission.INTERNET )

接下来我们开始做,以下2.1,2.2,2.3 这三个步骤的函数都是返回promise我们可以一起封装在一个ets文件,使用的时候直接导入。代码可以直接复制粘贴,先导入模块。
//导入模块
import { fileIo } from "@kit.CoreFileKit"
import { photoAccessHelper } from "@kit.MediaLibraryKit";
import { promptAction } from "@kit.ArkUI";
import http from '@ohos.net.http';
import fs from '@ohos.file.fs';
import { util } from '@kit.ArkTS';
2.1)用户选择图片:
在鸿蒙系统中,使用PhotoViewPicker对象来实现图片选择功能。代码封装了一个函数负责引导用户选择图片,参数为选择图片数量。并返回存储图片的内存地址数组(URI)。
//获取系统相册
export async function selectImage(selectNumber:number):Promise<PhotoSelectResult> {
  try {
  let photoPicker = new photoAccessHelper.PhotoViewPicker()
  const res = await photoPicker.select({
    MIMEType: photoAccessHelper.PhotoViewMIMETypes.IMAGE_TYPE, //选择图片类型
    maxSelectNumber: selectNumber  //最多选择几张
  })
    if (res && res.photoUris && res.photoUris.length > 0) {
      return res  //返回选择图片的数组url // res.photoUris[0] 拿到第一张图片的路径
    }else {
       promptAction.showToast({
        message:"未选择任何图片",
        duration:2000
      })
      return res
    }
  }catch(err){
    console.log("选择图片失败");throw new Error
  }
}
2.2)拷贝图片至缓存目录
用户选择的图片只位于只读存储,我们要拷贝到应用的缓存目录下。我们可以利用时间戳生成唯一的的文件名,避免文件名冲突。此函数处理后返回一个文件名和一个缓存文件路径。我们需要拿到这两个值进行下一步网络请求操作。
export interface upFile {
  filename: string
  targetPath: string
}

//把本地文件缓存到沙箱目录
export  async function  processImageFile(url:string):Promise<upFile>{
    try {
      const cacheDir =getContext().cacheDir //沙箱路径
      const filename =`ima_${Date.now()}.jpg`  //随机生成一个文件名
      const targetPath =`${cacheDir}/${filename}` //生成路径
      const file=fileIo.openSync(url,fileIo.OpenMode.READ_ONLY)
      await fs.copyFileSync(file.fd,targetPath)  //拷贝
      console.log("复制成功")
      fileIo.closeSync(file.fd)
      return {filename,targetPath}
    }catch (err){
      console.log("复制失败")
      throw new Error
    }
}
2.3)上传图片至PicGo
传入上一步的返回值。我们以表单的形式发送请求。发送请求成功后服务器会返回公网URL地址。
let apiKey ="你的apiKey"
//上传图片操作

//上传图片到PicGo
export async function uploadImage(filePath: string, filename: string) {
  // 1. 创建HTTP实例
  const httpRequest = http.createHttp();

  // 2. 准备文件数据
  const file = await fs.open(filePath, fs.OpenMode.READ_ONLY);
  const fileStat = await fs.stat(filePath);
  const fileData = new ArrayBuffer(fileStat.size);
  await fs.read(file.fd, fileData);
  await fs.close(file);

  //3.手动构建multipart/form-data
  const boundary = `----WebKitFormBoundary` + Math.random().toString(16).substring(2)
  const build = (filename: string, fileData: ArrayBuffer): ArrayBuffer => {
    try {
      const textEncoder = new util.TextEncoder()
      const header = `--${boundary}\r\n` + `Content-Disposition: form-data; name="source"; filename="${filename}"\r\n` +
        'Content-Type: application/octet-stream\r\n\r\n'
      const headerBuffer = textEncoder.encode(header)
      const footer = `\r\n--${boundary}--\r\n`;
      const footerBuffer = textEncoder.encode(footer)
      console.log("打印头部", header)
      const totalLength = headerBuffer.byteLength + fileData.byteLength + footerBuffer.byteLength
      const combinedBuffer = new ArrayBuffer(totalLength)
      const combinedView = new Uint8Array(combinedBuffer)
      combinedView.set(new Uint8Array(headerBuffer), 0)
      combinedView.set(new Uint8Array(fileData), headerBuffer.byteLength)
      combinedView.set(new Uint8Array(footerBuffer), headerBuffer.byteLength + fileData.byteLength)
      return combinedBuffer;
    } catch (err) {
      throw new Error(`构建表单失败`)
    }
  }

  const requestBody = await build(filename, fileData)
  // 5. 发送请求并处理响应
  try {
    const response = await httpRequest.request(
      'https://www.picgo.net/api/1/upload', {
      method: http.RequestMethod.POST,
      extraData: requestBody,
      header: {
        'X-API-Key': apiKey,
        'Content-Type': `multipart/form-data; boundary=${boundary}`
      },
    }
    );

    if (response.responseCode >= 200 && response.responseCode < 300) {
      console.log('上传成功:', response.result);
      return response.result;
    } else {
      console.error(`失败状态码: ${response.responseCode}`, response.result);
      throw new Error(`HTTP ${response.responseCode}: ${response.result}`);
    }
  } finally {
    httpRequest.destroy(); // 销毁请求实例[7](@ref)
  }
}
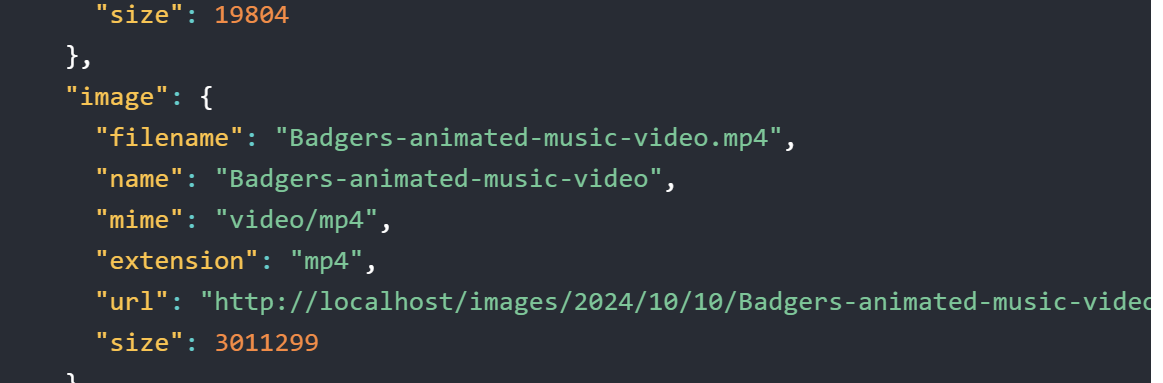
2.4)解析服务器返回的数据
图片上传成功后,会返回很多关于这个图片的信息。我们还需要解析JSON数据。可以查看下面链接往下滑看返回数据格式。如下,我们拿到下面URL地址,就是公网URL了!可以在浏览器查看图片,(注意,如果打不开可能是因为你的网络限制了,可以换个网络查看)
API Version 1.1 | Chevereto V4 Docs
这个是我写的解析模型接口,大家可以直接粘贴。
//上传图片到服务端的返回接口
export interface upLoadImage{
  status_code: number,
  success:success,
  image:image
  status_txt:string
}

interface success{
     message:string,
     code:number
}
interface file{
     resource:resource
}
interface resource{
     type: string
}
interface frame{
     filename:string,
     name:string,
     mime:string,
     extension: string,
     url:string,
     size:number
}
interface images{
     filename:string,
     name:string,
     mime: string,
     extension:string,
     url:string,
     size:number
}
interface thumb{
     filename:string,
     name:string,
     mime:string,
     extension:string,
     url:string,
     size:number
}
interface medium{
     filename:null,
     name:null,
     mime:null,
     extension:null,
     url:null
}
interface image{
     name:string,
     extension:string,
     size:number,
     width:number,
     height:number,
     date:string,
     date_gmt:string,
     title:string,
     tags:[],
     description:null,
     nsfw:number,
     storage_mode:string,
     md5:string,
     source_md5:null,
     original_filename:string,
     original_exifdata:null,
     views:number,
     category_id:null,
     chain: number,
     thumb_size:number,
     medium_size:number,
     frame_size:number,
     expiration_date_gmt:string,
     likes:number,
     is_animated:number,
     is_approved:number,
     is_360:number,
     duration:number,
     type:string,
     tags_string:string,
     file:file
     id_encoded:string,
     filename:string,
     mime:string,
     url:string,
     ratio:number,
     size_formatted:string,
     frame:frame
     image:images
     thumb:thumb
     url_frame:string,
     medium:medium
     duration_time:string,
     url_viewer:string,
     path_viewer:string,
     url_short:string,
     display_url:string,
     display_width:number,
     display_height:number,
     views_label:string,
     likes_label:string,
     how_long_ago:string,
     date_fixed_peer:string,
     title_truncated:string,
     title_truncated_html:string,
     is_use_loader:boolean,
     display_title:string,
     delete_url:string
}
下面是使用过程,我们直接按照步骤使用函数。因为我做的是整个页面只有一部分用到,所以只截图用到那部分代码给大家看,代码就不整个贴了。
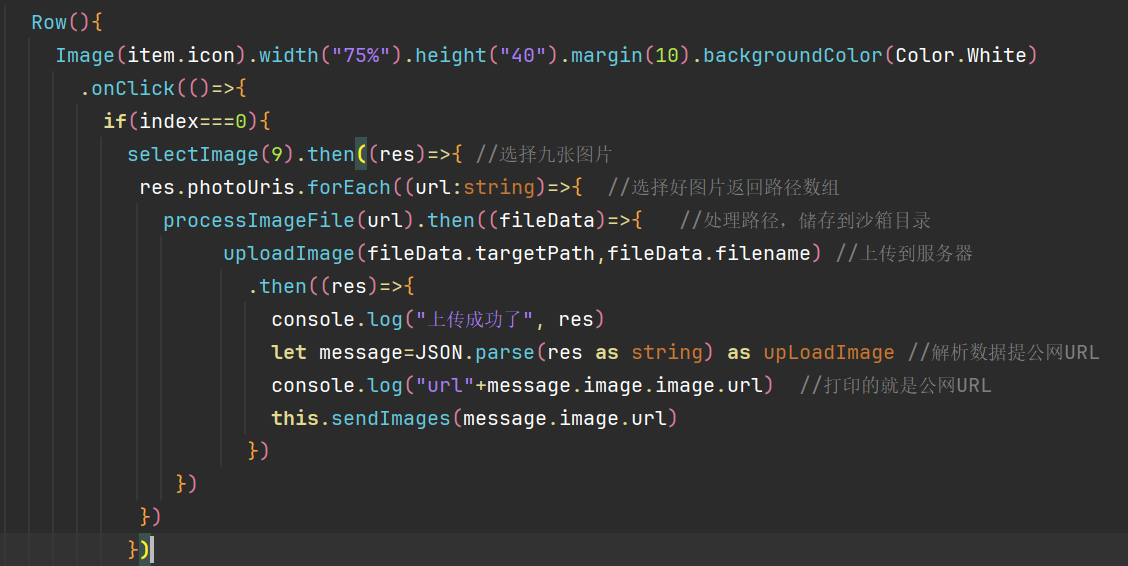
我们提完公网地址,就可以直接通过image()组件渲染图片了。还可以发送图片,只要有网络的情况下都可以通过这个URL访问图片了。

讨论HarmonyOS开发技术,专注于API与组件、DevEco Studio、测试、元服务和应用上架分发等。
更多推荐

 34
34 0
0- 0


 已为社区贡献1条内容

所有评论(0)