【HarmonyOS 6】底部悬浮导航的沉浸光感适配(API23)
往期回顾:【HarmonyOS 6】基于API23的底部悬浮导航
在上一篇中,我们完成了基于 API23 的 HdsTabs 底部悬浮导航栏搭建,实现了:
- API23+ 设备使用
HdsTabs悬浮底栏 +gradientMask渐变遮罩 - API22 及以下 自动回退到传统
Tabs+ 自定义玻璃导航栏
但当时我们只实现了"悬浮玻璃感",还没有接入官方提供的 沉浸光感材质能力。从 HarmonyOS 6.1.0(23) 版本开始,HDS 组件新增了 systemMaterialEffect 参数,可以为底部页签设置真正的系统级沉浸光感视效。
今天我们就来把这个能力接上。
一、什么是沉浸光感
沉浸光感是 HarmonyOS 6.1.0(23) 引入的一种 系统级材质效果,它能让 UI 组件与底层内容产生"毛玻璃 + 光影渗透"的高级视觉体验。
对于底部悬浮导航栏,通过 HdsTabsFloatingStyle 的 systemMaterialEffect 参数即可开启。
二、前置回顾:当前导航栏的调用方式
在接入沉浸光感之前,我们先快速回顾一下当前项目中底部导航栏的整体架构。
2.1 导入依赖
import { HdsTabs, HdsTabsController, hdsMaterial } from '@kit.UIDesignKit';
import { SymbolGlyphModifier } from '@kit.ArkUI';
注意:相比前一篇,这里我们新增导入了
hdsMaterial,这是开启沉浸光感的必要模块。
2.2 能力检测与路由分发
@State useApi23FloatingNav: boolean = false;
private hdsTabController: HdsTabsController = new HdsTabsController();

aboutToAppear(): void {
  this.detectApi23FloatingNav();
}

private detectApi23FloatingNav(): void {
  try {
    const sdkApiVersion: number = deviceInfo.sdkApiVersion;
    this.useApi23FloatingNav = sdkApiVersion >= 23;
  } catch (error) {
    this.useApi23FloatingNav = false;
  }
}

build() {
  if (this.isDesktopMode()) {
    Row() {
      this.DesktopSidebar()
      Column() { this.DesktopContent() }.layoutWeight(1).height('100%')
    }.width('100%').height('100%')
  } else {
    if (this.useApi23FloatingNav) {
      this.Api23FloatingMobileTabs();
    } else {
      this.LegacyMobileTabs();
    }
  }
}
这套"能力分流"的设计思路贯穿整个项目:先检测、再分支、最后兜底。
三、沉浸光感适配:改动点在哪里
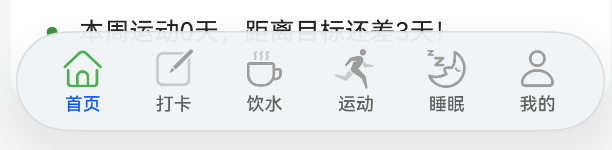
整个适配的核心改动集中在 一个位置:Api23FloatingMobileTabs() 方法中的 .barFloatingStyle() 配置。
3.1 适配前
这是上一篇文章中的配置:
.barFloatingStyle({
  barBottomMargin: 16,
  gradientMask: { maskColor: '#66F1F3F5', maskHeight: 92 }
})
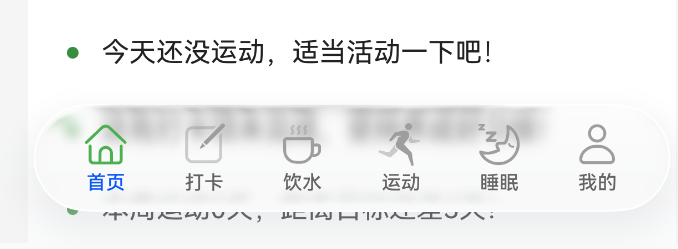
3.2 适配后(叠加沉浸光感)
在保留原有样式的基础上,新增 systemMaterialEffect 配置:
.barFloatingStyle({
  barBottomMargin: 16,
  gradientMask: { maskColor: '#66F1F3F5', maskHeight: 92 },
  systemMaterialEffect: {
    materialType: hdsMaterial.MaterialType.ADAPTIVE,
    materialLevel: hdsMaterial.MaterialLevel.ADAPTIVE
  }
})
就这 两行配置,底部悬浮页签就升级为"官方沉浸光感材质"。
四、完整实现代码
以下是我们项目 entry/src/main/ets/pages/Index.ets 中 API23 悬浮导航的完整真实实现:
@Builder
Api23FloatingMobileTabs() {
  HdsTabs({ controller: this.hdsTabController }) {
    TabContent() {
      this.HomeContent()
    }
    .tabBar(new BottomTabBarStyle({
      normal: this.buildTabSymbol(this.getTabSymbol(0), false),
      selected: this.buildTabSymbol(this.getTabSymbol(0), true)
    }, '首页'))

    TabContent() {
      CheckInTabContent()
    }
    .tabBar(new BottomTabBarStyle({
      normal: this.buildTabSymbol(this.getTabSymbol(1), false),
      selected: this.buildTabSymbol(this.getTabSymbol(1), true)
    }, '打卡'))

    TabContent() {
      WaterTabContent({ currentTab: this.currentTabIndex })
    }
    .tabBar(new BottomTabBarStyle({
      normal: this.buildTabSymbol(this.getTabSymbol(2), false),
      selected: this.buildTabSymbol(this.getTabSymbol(2), true)
    }, '饮水'))

    TabContent() {
      ExerciseTabContent()
    }
    .tabBar(new BottomTabBarStyle({
      normal: this.buildTabSymbol(this.getTabSymbol(3), false),
      selected: this.buildTabSymbol(this.getTabSymbol(3), true)
    }, '运动'))

    TabContent() {
      SleepTabContent()
    }
    .tabBar(new BottomTabBarStyle({
      normal: this.buildTabSymbol(this.getTabSymbol(4), false),
      selected: this.buildTabSymbol(this.getTabSymbol(4), true)
    }, '睡眠'))

    TabContent() {
      ProfileTabContent({ currentTab: this.currentTabIndex })
    }
    .tabBar(new BottomTabBarStyle({
      normal: this.buildTabSymbol(this.getTabSymbol(5), false),
      selected: this.buildTabSymbol(this.getTabSymbol(5), true)
    }, '我的'))
  }

  .width('100%')
  .height('100%')
  .barOverlap(true)
  .barPosition(BarPosition.End)
  .vertical(false)
  .barFloatingStyle({
    barBottomMargin: 16,
    gradientMask: { maskColor: '#66F1F3F5', maskHeight: 92 },
    systemMaterialEffect: {
      materialType: hdsMaterial.MaterialType.ADAPTIVE,
      materialLevel: hdsMaterial.MaterialLevel.ADAPTIVE
    }
  })

  .onChange((index: number) => {
    this.currentTabIndex = index;
    if (index === 0) {
      this.refreshHomeData();
    }
  })
}
配合图标构建方法:
private buildTabSymbol(symbol: Resource, selected: boolean): SymbolGlyphModifier {
  return new SymbolGlyphModifier(symbol)
    .fontColor([selected ? $r('app.color.primary_color') : $r('app.color.inactive_color')]);
}

private getTabSymbol(index: number): Resource {
  switch (index) {
    case 0:
      return $r('sys.symbol.house');
    case 1:
      return $r('sys.symbol.square_and_pencil');
    case 2:
      return $r('sys.symbol.cup');
    case 3:
      return $r('sys.symbol.figure_run');
    case 4:
      return $r('sys.symbol.sleep');
    default:
      return $r('sys.symbol.person');
  }
}
五、关键参数详解
5.1 systemMaterialEffect 的两个属性
| 属性 | 类型 | 选用的值 | 含义 |
|---|---|---|---|
materialType |
hdsMaterial.MaterialType |
ADAPTIVE |
材质类型交由系统自适应决定 |
materialLevel |
hdsMaterial.MaterialLevel |
ADAPTIVE |
材质等级交由系统自适应决定 |
开发者只需写一次配置,就能在所有设备上获得最佳体验。
5.3 MaterialType 与 MaterialLevel 可选值
如果不想用自适应,也可以手动指定:
MaterialType(材质类型):
| 枚举值 | 说明 |
|---|---|
ADAPTIVE |
系统自适应 |
IMMERSIVE |
沉浸式材质,需要设备支持 |
NONE |
无材质效果 |
MaterialLevel(材质等级):
| 枚举值 | 说明 |
|---|---|
ADAPTIVE |
系统自动选择 |
EXQUISITE |
精致效果 |
GENTLE |
柔和效果 |
SMOOTH |
平滑效果 |
如果选择自定义级别,建议先用
hdsMaterial.getSystemMaterialTypes()检测设备能力,不支持IMMERSIVE时降级为SMOOTH。
六、注意事项
- 最低版本要求:
systemMaterialEffect需要 API 23 (HarmonyOS 6.1.0) 及以上版本才生效。我们的代码中已有detectApi23FloatingNav()做版本检测,低版本会走LegacyMobileTabs()兜底,无需额外处理。

讨论HarmonyOS开发技术,专注于API与组件、DevEco Studio、测试、元服务和应用上架分发等。
更多推荐

 50
50 0
0- 0


 已为社区贡献27条内容

所有评论(0)