HarmonyOS NEXT 实战:从零开发一个高颜值番茄钟应用
HarmonyOS NEXT 番茄钟应用开发摘要 本文介绍了在HarmonyOS NEXT平台上开发番茄钟应用的关键实现: 项目架构: 采用MVVM模式分离UI与业务逻辑 状态机设计(IDLE/RUNNING/PAUSED)保证计时器状态清晰 会话类型包括工作/短休息/长休息三种模式 核心功能: 实现25分钟工作、5分钟短休息、15分钟长休息的计时循环 每完成4个番茄后自动触发长休息 支持开始/暂
HarmonyOS NEXT 实战:从零开发一个高颜值番茄钟应用
时间管理神器,专注从此开始!本文将带你从零开始,在 HarmonyOS NEXT 平台上开发一个功能完整、界面精美的番茄钟应用。通过 Canvas 绘制动态进度环、状态机管理计时逻辑、响应式 UI 切换等技术,打造属于你的专注力管理工具。
一、项目背景与需求分析
1.1 为什么选择番茄钟?
番茄工作法(Pomodoro Technique)是一种经典的时间管理方法:工作 25 分钟,休息 5 分钟,每完成 4 个番茄后进行 15 分钟长休息。这种方法简单高效,被广泛应用于个人 productivity 提升领域。
作为一个程序员,我深知「专注」的重要性。而 HarmonyOS NEXT 作为华为最新的操作系统,提供了强大的 ArkTS 框架和流畅的 UI 组件,非常适合开发这类轻量级工具应用。
1.2 功能需求
-
核心功能:
- 25 分钟工作时间计时
- 5 分钟短休息计时
- 15 分钟长休息计时(每 4 个番茄后)
- 开始/暂停/重置/跳过控制
- 已完成番茄数统计
-
UI 需求:
- 动态进度圆环显示
- 不同会话类型的颜色切换(工作/短休息/长休息)
- 番茄进度指示器
- 流畅的动画效果
1.3 项目结构
MyApplication/
├── AppScope/
│   └── app.json5              # 应用全局配置
├── entry/
│   ├── src/main/
│   │   ├── ets/
│   │   │   ├── entryability/
│   │   │   │   └── EntryAbility.ets    # 应用入口
│   │   │   └── pages/
│   │   │       ├── Index.ets           # 主界面
│   │   │       └── TimerViewModel.ets  # 计时器业务逻辑
│   │   └── resources/
│   │       └── base/
│   │           ├── element/            # 字符串、颜色资源
│   │           ├── media/               # 图片资源
│   │           └── profile/            # 页面路由配置
│   └── build-profile.json5
└── hvigor/                              # 构建配置
二、核心代码实现
2.1 计时器状态机设计
首先,我们需要设计一个清晰的计时器状态机。在 TimerViewModel.ets 中,我定义了两个枚举类型:
// 计时器状态
export enum TimerState {
  IDLE = 'IDLE',       // 空闲状态
  RUNNING = 'RUNNING', // 运行中
  PAUSED = 'PAUSED'   // 已暂停
}

// 会话类型
export enum SessionType {
  WORK = 'WORK',               // 工作时间
  SHORT_BREAK = 'SHORT_BREAK', // 短休息
  LONG_BREAK = 'LONG_BREAK'    // 长休息
}
这种状态机设计的好处是:
- 状态清晰:每个状态都有明确的含义,不会出现模糊的中间状态
- 易于扩展:如果以后需要添加「准备中」、「结束」等状态,只需在枚举中添加
- 类型安全:TypeScript/ArkTS 的枚举提供了编译时检查
2.2 TimerViewModel 核心类
接下来是计时器的核心业务逻辑类:
export class TimerViewModel {
  // 默认配置
  static readonly DEFAULT_WORK_DURATION = 25 * 60      // 25分钟工作
  static readonly DEFAULT_SHORT_BREAK = 5 * 60        // 5分钟短休息
  static readonly DEFAULT_LONG_BREAK = 15 * 60        // 15分钟长休息
  static readonly POMODOROS_BEFORE_LONG_BREAK = 4

  // 状态属性
  state: TimerState = TimerState.IDLE
  sessionType: SessionType = SessionType.WORK
  remainingSeconds: number = TimerViewModel.DEFAULT_WORK_DURATION
  completedPomodoros: number = 0
  totalPomodoros: number = 0

  // 回调函数
  onTick?: (remaining: number) => void
  onStateChange?: (state: TimerState) => void
  onSessionEnd?: (type: SessionType, pomodoros: number) => void

  private intervalId: number = -1
}
设计亮点:
- 静态常量配置:将时长配置作为静态只读属性,方便统一管理和修改
- 回调机制:通过
onTick、onStateChange、onSessionEnd回调,实现 UI 与业务逻辑的解耦 - 单一职责:ViewModel 只负责计时逻辑,不涉及任何 UI 渲染
2.3 计时器核心方法
开始计时
start(): void {
  if (this.state === TimerState.RUNNING) {
    return  // 防止重复启动
  }
  this.state = TimerState.RUNNING
  this.onStateChange?.(this.state)

  this.intervalId = setInterval(() => {
    if (this.remainingSeconds > 0) {
      this.remainingSeconds--
      this.onTick?.(this.remainingSeconds)
    } else {
      this.completeSession()
    }
  }, 1000)
}
这里使用了 setInterval 每秒触发一次计时,同时通过 onTick 回调通知 UI 更新显示时间。
暂停与重置
pause(): void {
  if (this.state !== TimerState.RUNNING) {
    return
  }
  clearInterval(this.intervalId)
  this.state = TimerState.PAUSED
  this.onStateChange?.(this.state)
}

reset(): void {
  clearInterval(this.intervalId)
  this.state = TimerState.IDLE
  this.remainingSeconds = this.getDuration(this.sessionType)
  this.onTick?.(this.remainingSeconds)
  this.onStateChange?.(this.state)
}
暂停时清除定时器,重置时恢复到当前会话类型的初始时长。
会话结束与切换
private completeSession(): void {
  clearInterval(this.intervalId)
  this.state = TimerState.IDLE

  // 如果是工作时间结束,增加番茄计数
  if (this.sessionType === SessionType.WORK) {
    this.completedPomodoros++
    this.totalPomodoros++
  }

  this.onSessionEnd?.(this.sessionType, this.completedPomodoros)
  this.transitionToNext()
}

private transitionToNext(): void {
  // 决定下一个会话类型
  if (this.sessionType === SessionType.WORK) {
    if (this.completedPomodoros > 0 &&
        this.completedPomodoros % TimerViewModel.POMODOROS_BEFORE_LONG_BREAK === 0) {
      this.sessionType = SessionType.LONG_BREAK
    } else {
      this.sessionType = SessionType.SHORT_BREAK
    }
  } else {
    this.sessionType = SessionType.WORK
  }

  this.remainingSeconds = this.getDuration(this.sessionType)
  this.onStateChange?.(this.state)
  this.onTick?.(this.remainingSeconds)
}
这里的逻辑是:
- 工作结束后,判断是否达到 4 个番茄,达到则进入长休息,否则进入短休息
- 休息结束后,切换回工作时间
2.4 进度计算与时间格式化
getProgress(): number {
  const total = this.getTotalDuration(this.sessionType)
  if (total === 0) return 0
  return 1 - (this.remainingSeconds / total)
}

formatTime(seconds: number): string {
  const m = Math.floor(seconds / 60)
  const s = seconds % 60
  return `${m.toString().padStart(2, '0')}:${s.toString().padStart(2, '0')}`
}

getSessionLabel(type: SessionType): string {
  switch (type) {
    case SessionType.WORK:
      return '🍅 工作时间'
    case SessionType.SHORT_BREAK:
      return '☕ 短休息'
    case SessionType.LONG_BREAK:
      return '🌿 长休息'
  }
}
进度值是一个 0-1 的浮点数,用于后续的进度环绘制;时间格式化为 MM:SS 的形式,符合日常习惯。
三、主界面 UI 实现
3.1 整体布局结构
主界面采用 Stack 布局,背景色占满全屏,内容居中显示:
@Entry
@Component
struct Index {
  @State displayTime: string = '25:00'
  @State timerState: TimerState = TimerState.IDLE
  @State sessionLabel: string = '🍅 工作时间'
  @State sessionColor: string = '#E74C3C'
  @State completedCount: number = 0
  @State totalPomodoros: number = 0
  @State progress: number = 0
  @State ringProgress: number = 0

  private timerVM: TimerViewModel = new TimerViewModel()

  build() {
    Stack({ alignContent: Alignment.Center }) {
      // 背景色
      Column()
        .width('100%')
        .height('100%')
        .backgroundColor(this.sessionColor)

      Column({ space: 20 }) {
        // 标题
        Text('🍅 番茄钟')
          .fontSize(26)
          .fontWeight(FontWeight.Bold)
          .fontColor('#FFFFFF')

        // 会话标签
        Text(this.sessionLabel)
          .fontSize(15)
          .fontColor('#FFFFFF')
          .opacity(0.88)

        // 计时器圆环(核心)
        // ...

        // 操作按钮
        // ...

        // 统计卡片
        // ...
      }
    }
  }
}
3.2 Canvas 绘制进度圆环
这是本应用最核心的 UI 组件。我使用 Canvas API 绘制一个动态的进度环:
@Component
struct ProgressRingCanvas {
  @Prop progress: number = 0
  ringColor: string = '#E74C3C'
  ringSize: number = 230
  strokeWidth: number = 14

  private settings: RenderingContextSettings = new RenderingContextSettings(true)
  private ctx: CanvasRenderingContext2D = new CanvasRenderingContext2D(this.settings)

  private drawRing(): void {
    const ctx = this.ctx
    const w = this.ringSize
    const h = this.ringSize
    const center = w / 2
    const radius = center - this.strokeWidth / 2 - 2
    const startAngle = -Math.PI / 2 // 从12点钟方向开始

    // 清空画布
    ctx.clearRect(0, 0, w, h)

    // 绘制背景弧(半透明)
    ctx.beginPath()
    ctx.arc(center, center, radius, 0, Math.PI * 2)
    ctx.strokeStyle = 'rgba(255,255,255,0.25)'
    ctx.lineWidth = this.strokeWidth
    ctx.lineCap = 'round'
    ctx.stroke()

    // 绘制进度弧
    const endAngle = startAngle + (Math.PI * 2 * Math.min(this.progress, 1))
    ctx.beginPath()
    ctx.arc(center, center, radius, startAngle, endAngle)
    ctx.strokeStyle = '#FFFFFF'  // 进度弧用白色,与背景形成对比
    ctx.lineWidth = this.strokeWidth
    ctx.lineCap = 'round'
    ctx.stroke()
  }

  build() {
    Canvas(this.ctx)
      .width(this.ringSize)
      .height(this.ringSize)
      .backgroundColor('rgba(0,0,0,0)')
  }
}
绘制逻辑:
- 先画一个完整的半透明圆环作为背景
- 根据进度值绘制白色弧线
- 使用
lineCap = 'round'让弧线末端圆润 - 起始角度
-Math.PI / 2确保从 12 点钟方向开始
3.3 控制按钮组
按钮组包含三个按钮:重置、开始/暂停、跳过:
Row({ space: 24 }) {
  // 重置按钮
  this.ctrlButton('🔄', () => {
    this.timerVM.reset()
    this.displayTime = this.timerVM.formatTime(this.timerVM.remainingSeconds)
    this.progress = 0
    this.ringProgress = 0
  })

  // 主按钮:开始/暂停
  Button({ type: ButtonType.Normal }) {
    Text(this.getMainButtonLabel())
      .fontSize(22)
      .fontWeight(FontWeight.Bold)
      .fontColor(this.sessionColor)
  }
  .width(130)
  .height(54)
  .backgroundColor('#FFFFFF')
  .borderRadius(27)
  .shadow({
    radius: 12,
    color: 'rgba(0,0,0,0.18)',
    offsetX: 0,
    offsetY: 4
  })
  .onClick(() => {
    if (this.timerState === TimerState.RUNNING) {
      this.timerVM.pause()
    } else {
      this.timerVM.start()
    }
  })

  // 跳过按钮
  this.ctrlButton('⏭', () => {
    this.timerVM.skip()
    this.displayTime = this.timerVM.formatTime(this.timerVM.remainingSeconds)
    this.progress = 0
    this.ringProgress = 0
    this.applySessionStyle(this.timerVM.sessionType)
  })
}
按钮使用 @Builder 装饰器封装:
@Builder
ctrlButton(emoji: string, handler: () => void): void {
  Button({ type: ButtonType.Normal }) {
    Text(emoji)
      .fontSize(22)
  }
  .width(52)
  .height(52)
  .backgroundColor('#FFFFFF')
  .borderRadius(26)
  .shadow({
    radius: 8,
    color: 'rgba(0,0,0,0.14)',
    offsetX: 0,
    offsetY: 2
  })
  .onClick(handler)
}
3.4 统计卡片与进度指示器
统计卡片显示已完成番茄数和总番茄数:
Row() {
  Column() {
    Text(`${this.completedCount}`)
      .fontSize(30)
      .fontWeight(FontWeight.Bold)
      .fontColor('#FFFFFF')
    Text('已完成')
      .fontSize(12)
      .fontColor('#FFFFFF')
      .opacity(0.8)
  }
  .alignItems(HorizontalAlign.Center)
  .layoutWeight(1)

  Divider()
    .vertical(true)
    .height(44)
    .backgroundColor('rgba(255,255,255,0.25)')

  Column() {
    Text(`${this.totalPomodoros}`)
      .fontSize(30)
      .fontWeight(FontWeight.Bold)
      .fontColor('#FFFFFF')
    Text('总番茄数')
      .fontSize(12)
      .fontColor('#FFFFFF')
      .opacity(0.8)
  }
  .alignItems(HorizontalAlign.Center)
  .layoutWeight(1)
}
.width('100%')
.padding({ top: 18, bottom: 18 })
.backgroundColor('rgba(255,255,255,0.18)')
.borderRadius(20)
番茄进度指示器显示当前周期完成情况:
Row({ space: 10 }) {
  Text('今日进度')
    .fontSize(12)
    .fontColor('#FFFFFF')
    .opacity(0.7)
  ForEach([0, 1, 2, 3], (i: number) => {
    Circle({ width: 14, height: 14 })
      .fill(i < (this.completedCount % 4) ? '#FFFFFF' : 'rgba(255,255,255,0.28)')
  })
  Text(`满4个自动长休息`)
    .fontSize(12)
    .fontColor('#FFFFFF')
    .opacity(0.7)
}
3.5 颜色主题切换
不同会话类型使用不同颜色,增强视觉区分:
// 颜色常量
const COLOR_WORK = '#E74C3C'        // 红色 - 工作
const COLOR_SHORT_BREAK = '#27AE60'  // 绿色 - 短休息
const COLOR_LONG_BREAK = '#2980B9'  // 蓝色 - 长休息

applySessionStyle(type: SessionType): void {
  this.sessionLabel = this.timerVM.getSessionLabel(type)
  if (type === SessionType.WORK) {
    this.sessionColor = COLOR_WORK
  } else if (type === SessionType.SHORT_BREAK) {
    this.sessionColor = COLOR_SHORT_BREAK
  } else {
    this.sessionColor = COLOR_LONG_BREAK
  }
}
四、生命周期与回调绑定
4.1 aboutToAppear 初始化
在组件即将出现时,绑定 ViewModel 的回调函数:
aboutToAppear(): void {
  // 绑定计时器回调
  this.timerVM.onTick = (remaining: number) => {
    this.displayTime = this.timerVM.formatTime(remaining)
    this.progress = this.timerVM.getProgress()
    this.ringProgress = this.timerVM.getProgress()
  }

  // 绑定状态变化回调
  this.timerVM.onStateChange = (state: TimerState) => {
    this.timerState = state
  }

  // 绑定会话结束回调
  this.timerVM.onSessionEnd = (type: SessionType, count: number) => {
    this.completedCount = count
    this.totalPomodoros = this.timerVM.totalPomodoros
    this.applySessionStyle(type)
    this.displayTime = this.timerVM.formatTime(this.timerVM.remainingSeconds)
    this.progress = 0
    this.ringProgress = 0
  }

  // 初始化显示
  this.displayTime = this.timerVM.formatTime(this.timerVM.remainingSeconds)
  this.sessionLabel = this.timerVM.getSessionLabel(this.timerVM.sessionType)
}
这种回调机制让 ViewModel 可以在不直接引用 UI 组件的情况下,通知 UI 更新,实现了良好的解耦。
五、踩坑记录与解决方案
5.1 Canvas 绘制不更新
问题:在 ProgressRingCanvas 组件中,当 progress 属性变化时,Canvas 没有自动重绘。
解决方案:使用 @Prop 接收进度值,并在 aboutToUpdate 生命周期中触发重绘:
@Component
struct ProgressRingCanvas {
  @Prop progress: number = 0  // 使用 @Prop 接收父组件传递的值

  aboutToUpdate(): void {
    this.drawRing()  // 属性变化时重绘
  }
}
5.2 定时器无法清除
问题:调用 pause() 或 reset() 后,定时器仍在运行。
原因:intervalId 需要在所有状态变化前清除。
解决方案:确保在每个可能改变状态的方法中先清除定时器:
reset(): void {
  clearInterval(this.intervalId)  // 先清除
  this.state = TimerState.IDLE    // 再改变状态
  // ...
}
5.3 进度环绘制方向错误
问题:进度环从 3 点钟方向开始绘制,而不是 12 点钟。
原因:Canvas 的 arc 方法默认从水平右侧(0 弧度)开始。
解决方案:设置起始角度为 -Math.PI / 2:
const startAngle = -Math.PI / 2  // -90度,即12点钟方向
ctx.arc(center, center, radius, startAngle, endAngle)
5.4 状态切换时颜色不更新
问题:会话结束时,背景颜色没有及时变化。
原因:sessionColor 状态更新后,Canvas 组件需要重新绑定颜色。
解决方案:在 onSessionEnd 回调中调用 applySessionStyle,并确保传递正确的会话类型:
this.timerVM.onSessionEnd = (type: SessionType, count: number) => {
  this.applySessionStyle(type)  // 先应用样式
  // 再更新其他状态
}
5.5 阴影效果渲染问题
问题:按钮阴影在某些设备上不显示。
原因:shadow 属性的 radius 参数在某些 API 版本上行为不一致。
解决方案:使用相对较小的 radius 值,并添加 offsetY 增强立体感:
.shadow({
  radius: 12,
  color: 'rgba(0,0,0,0.18)',
  offsetX: 0,
  offsetY: 4
})
六、功能扩展思路
6.1 数据持久化
使用 @ohos.data.preferences 保存番茄记录:
import preferences from '@ohos.data.preferences'

// 保存今日完成数
await preferences.put('todayPomodoros', this.totalPomodoros)
await preferences.flush()
6.2 通知提醒
计时结束时发送系统通知:
import notification from '@ohos.notification'

function sendNotification(title: string, text: string) {
  notification.publish({
    content: {
      notificationContentType: notification.ContentType.NOTIFICATION_CONTENT_BASIC_TEXT,
      normal: { title, text }
    }
  })
}
6.3 自定义时长
添加设置页面,允许用户修改工作/休息时长:
// 在 TimerViewModel 中添加配置属性
workDuration: number = 25 * 60
shortBreakDuration: number = 5 * 60
longBreakDuration: number = 15 * 60
6.4 统计图表
使用第三方图表库绘制每周番茄完成趋势图。
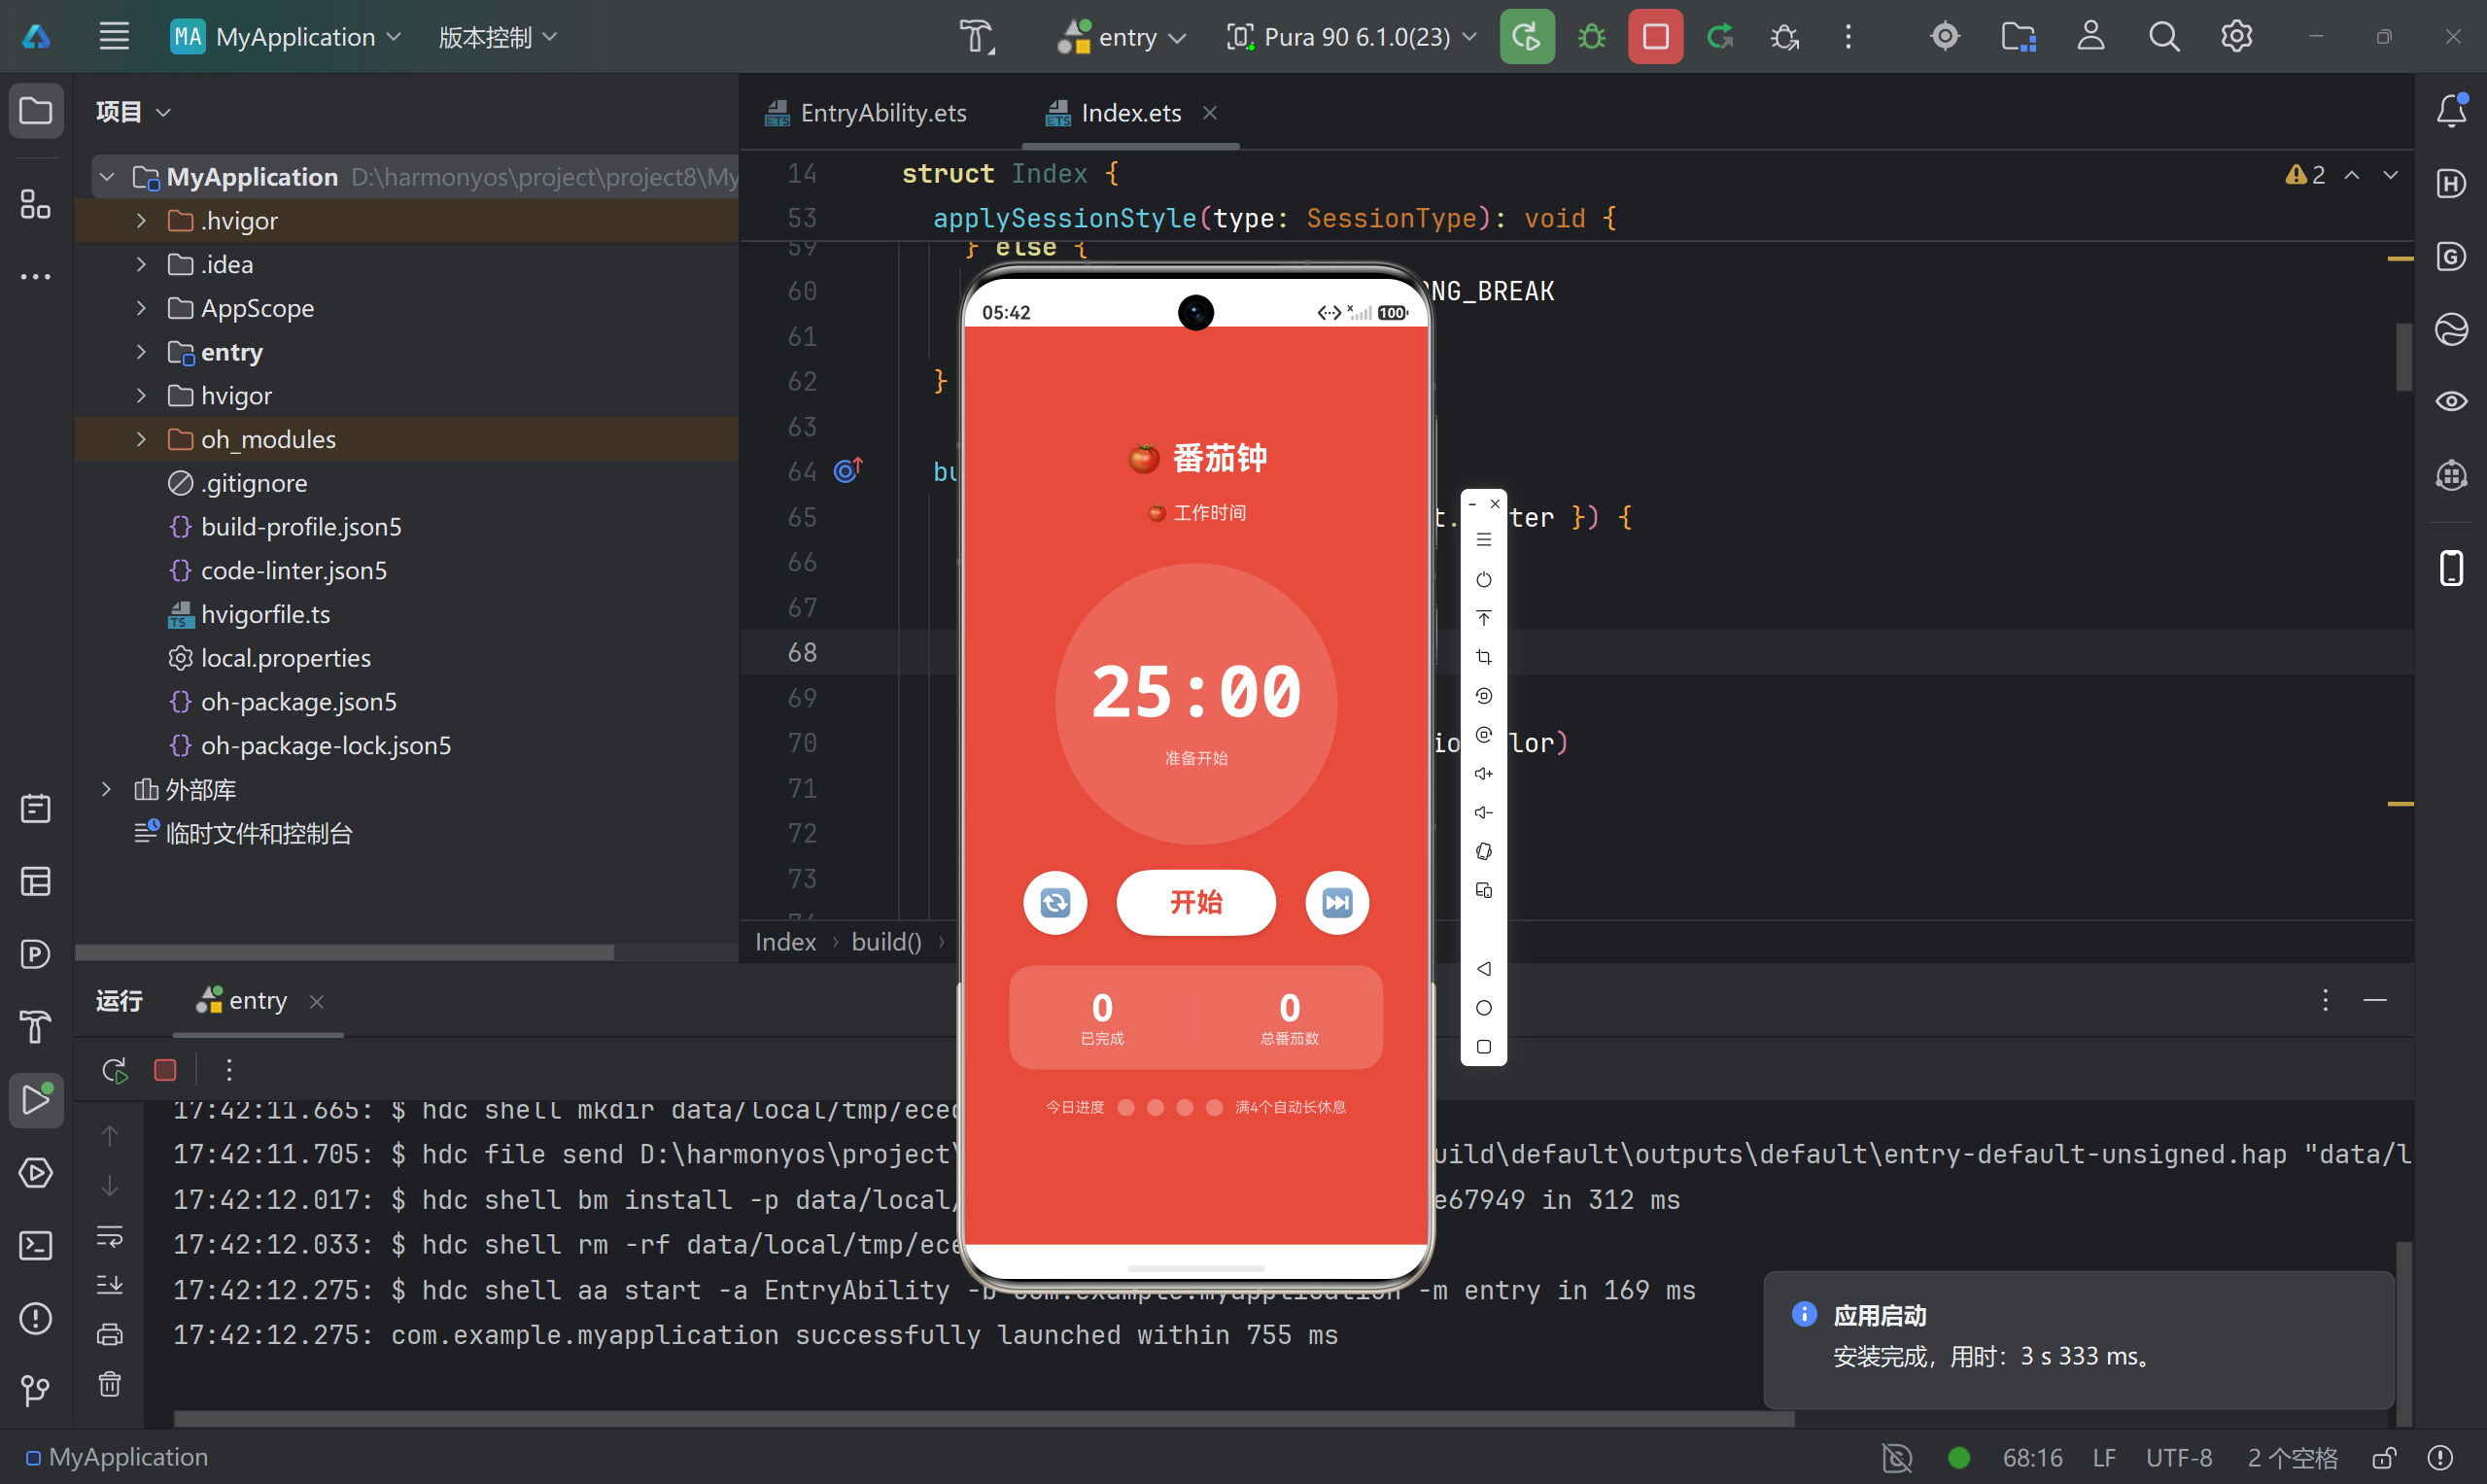
七、运行效果展示
八、总结
通过这个番茄钟应用的开发,我学到了很多 HarmonyOS NEXT 的核心技术:
- 状态管理:使用
@State、@Prop实现响应式 UI - Canvas 绘制:自定义进度环,实现流畅的动画效果
- 状态机模式:清晰管理计时器的多种状态
- MVVM 架构:分离业务逻辑与 UI,提高代码可维护性
- 回调机制:实现 ViewModel 与 View 的解耦通信
这个应用虽然功能简单,但涵盖了鸿蒙开发的多个核心知识点。希望这篇实战记录能帮助你快速入门 HarmonyOS NEXT 应用开发!
项目信息
- 包名:
com.example.myapplication - API 版本:API 23
- 开发工具:DevEco Studio
相关链接:
如果这篇文章对你有帮助,欢迎点赞收藏!有问题欢迎在评论区讨论~

讨论HarmonyOS开发技术,专注于API与组件、DevEco Studio、测试、元服务和应用上架分发等。
更多推荐
 8
8 0
0- 0


 已为社区贡献11条内容

所有评论(0)