ArkUI学习(5)
本文介绍了鸿蒙应用开发中的事件处理机制,主要包括点击事件和手势事件。点击事件通过@State装饰器和onClick()方法实现状态更新和UI响应,示例展示了点击计数功能。手势事件部分详细讲解了六种手势类型(点击、长按、拖动、捏合、旋转、滑动)及其实现方式,提供了拖动变色方块和缩放方块的代码示例。文章还介绍了手势组合的三种识别模式(顺序、并发、互斥),并通过语音输入界面案例展示了手势组合的实际应用。
官方学习视频链接:鸿蒙应用开发实战课-华为开发者学堂
今天学习的是点击事件,手势事件,bro习惯直接从项目中学习知识,所以就直接给案例了
@State:装饰器,用于声明组件的状态变量,当状态改变时,UI会自动更新
Button按钮组件,前面介绍过,这边不予复述
点击事件.onClick(),使用箭头函数()=>{}来定义点击后要执行的代码,一下案例代表的是每次点击计数加1,而后面的文本插值就要注意要使用反引号`包含的字符串,${变量名}可以插入变量的值
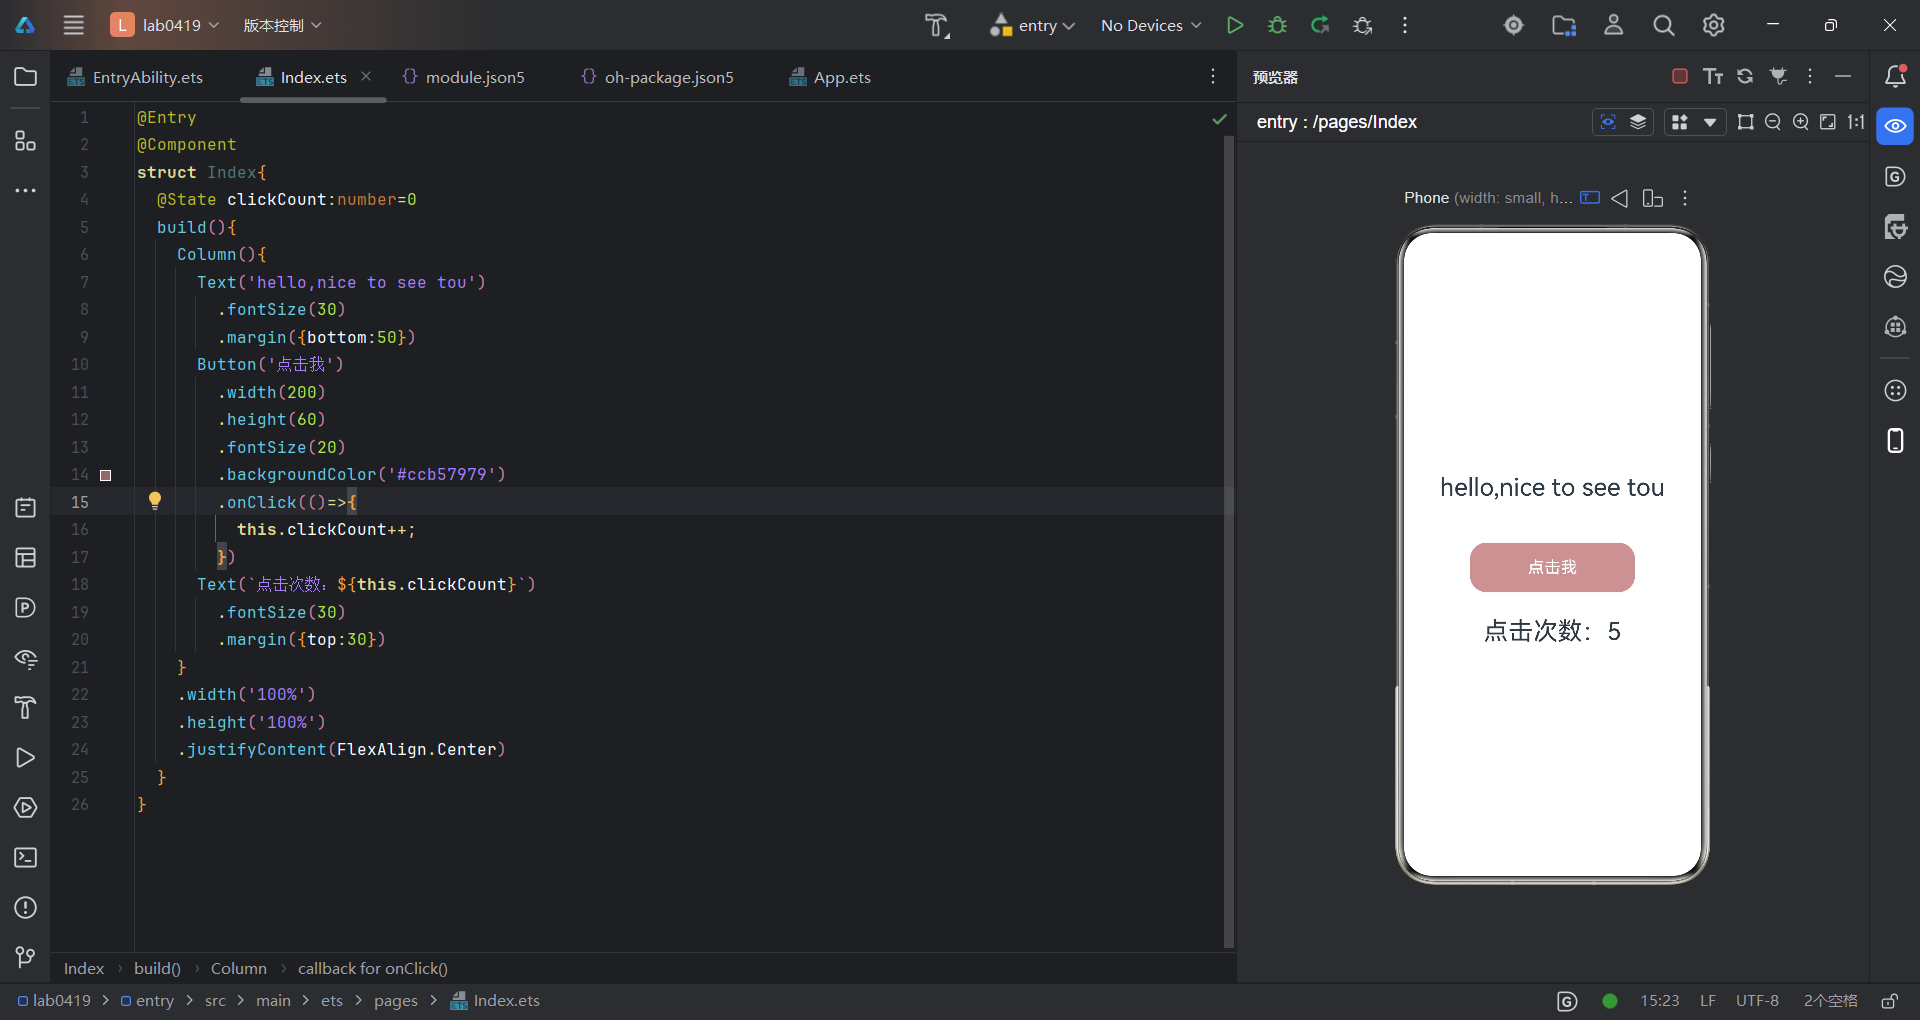
代码如下:
@Entry
@Component
struct Index{
  @State clickCount:number=0
  build(){
    Column(){
      Text('hello,nice to see tou')
        .fontSize(30)
        .margin({bottom:50})
      Button('点击我')
        .width(200)
        .height(60)
        .fontSize(20)
        .backgroundColor('#ccb57979')
        .onClick(()=>{
          this.clickCount++;
        })
      Text(`点击次数:${this.clickCount}`)
        .fontSize(30)
        .margin({top:30})
    }
    .width('100%')
    .height('100%')
    .justifyContent(FlexAlign.Center)
  }
}
以下是手势事件,可以实现对图形的滑动和捏合,这边有一个比较尴尬的事情,缩放的效果似乎没办法呈现(使用预览器没办法像手指一样同时给多个点击)
手势事件一般分为一下六种:
1、点击手势TapGesture:点击手势支持单次点击和多次点击
2、长按手势LongPressGesture:默认时长500毫秒触发
3、拖动手势PanGesture:默认滑动距离5vp触发
4、捏合手势PinchGesture:最少两指最多五指,默认最小捏合距离5vp触发
5、旋转手势RotationGesture:最少两指最多五指,默认最小旋转距离1度时触发
6、滑动手势SwipeGesture:最小识别触发速度为100vp/s
先给个示例,后面会详细介绍
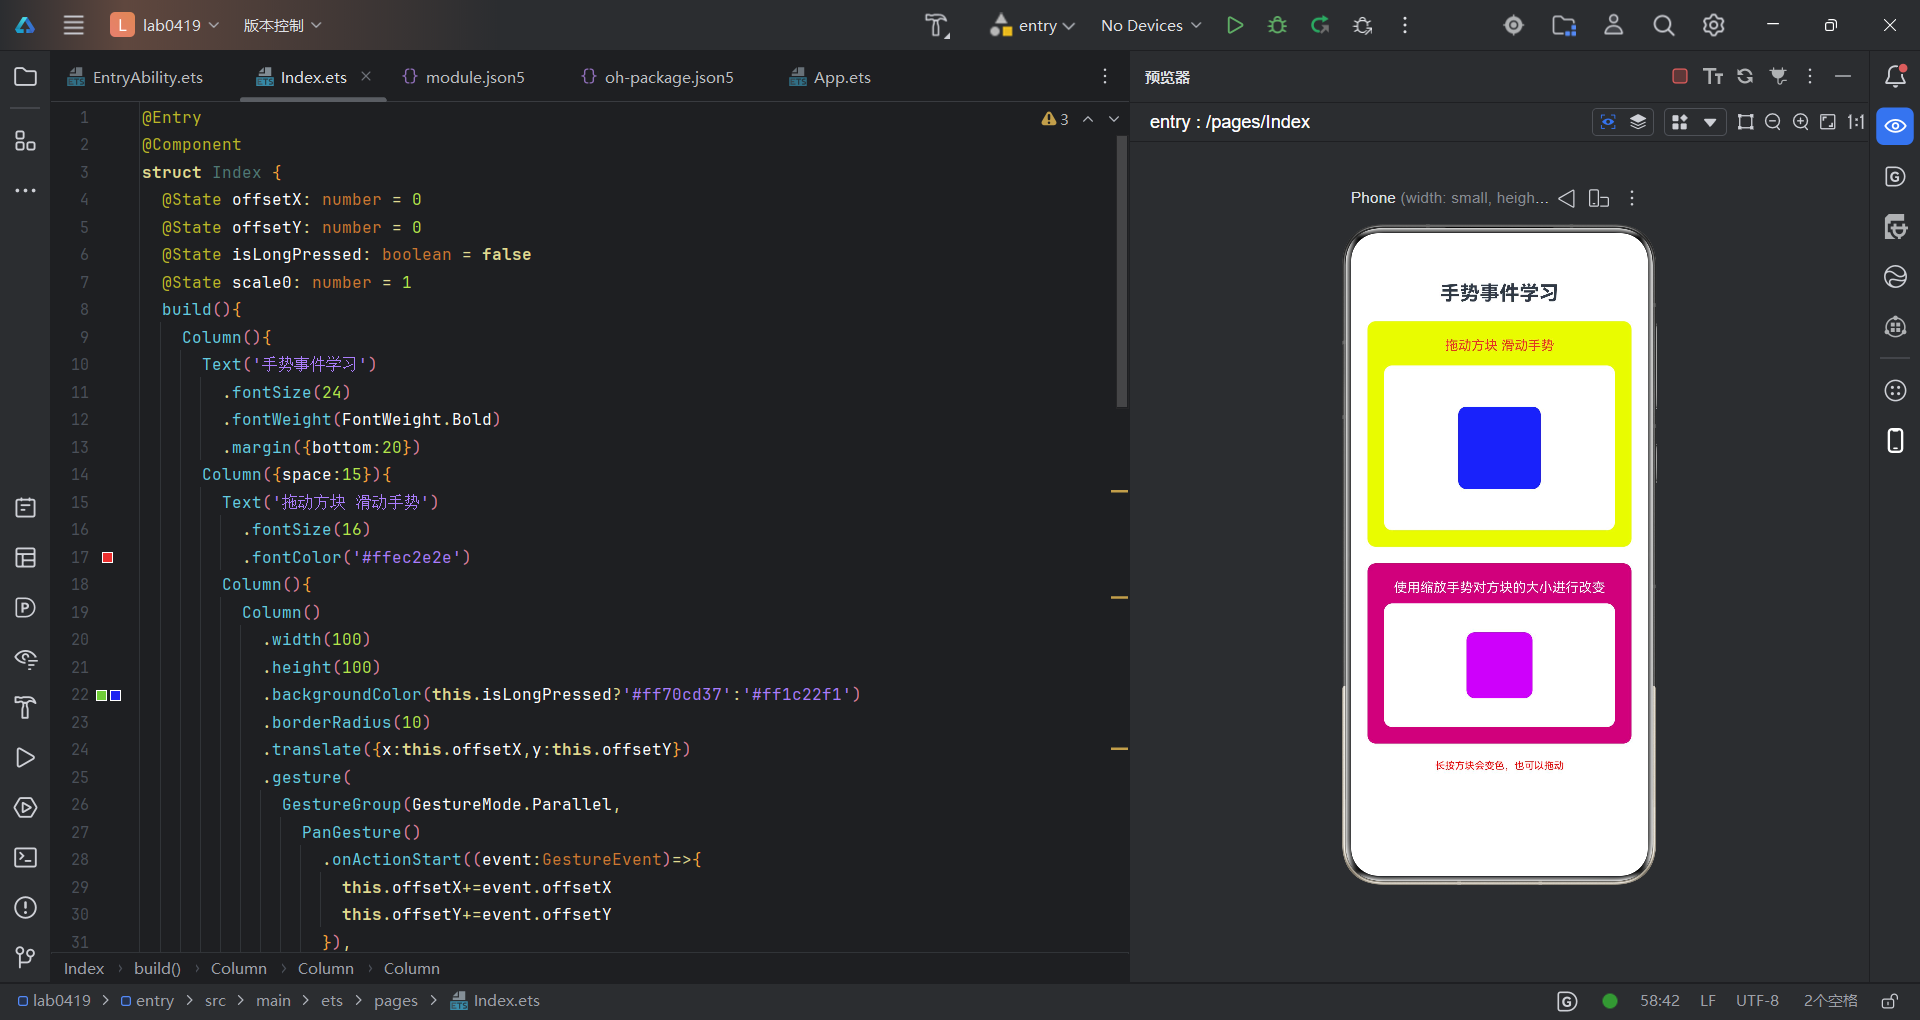
代码如下:
@Entry
@Component
struct Index {
  @State offsetX: number = 0
  @State offsetY: number = 0
  @State isLongPressed: boolean = false
  @State scale0: number = 1
  build(){
    Column(){
      Text('手势事件学习')
        .fontSize(24)
        .fontWeight(FontWeight.Bold)
        .margin({bottom:20})
      Column({space:15}){
        Text('拖动方块 滑动手势')
          .fontSize(16)
          .fontColor('#ffec2e2e')
        Column(){
          Column()
            .width(100)
            .height(100)
            .backgroundColor(this.isLongPressed?'#ff70cd37':'#ff1c22f1')
            .borderRadius(10)
            .translate({x:this.offsetX,y:this.offsetY})
            .gesture(
              GestureGroup(GestureMode.Parallel,
                PanGesture()
                  .onActionStart((event:GestureEvent)=>{
                    this.offsetX+=event.offsetX
                    this.offsetY+=event.offsetY
                  }),
                LongPressGesture()
                  .onAction(()=>{
                    this.isLongPressed=true
                  })
              )
            )
        }
        .width('100%')
        .height(200)
        .backgroundColor('#ffffffff')
        .borderRadius(10)
        .justifyContent(FlexAlign.Center)
      }
      .width('100%')
      .padding(20)
      .backgroundColor('#ffedfc0f')
      .borderRadius(10)
      .margin({bottom:20})
      Column({space:10}){
        Text('使用缩放手势对方块的大小进行改变')
          .fontSize(16)
          .fontColor('#ffffffff')
        Column(){
          Column()
            .width(80)
            .height(80)
            .backgroundColor('#ffbc10f3')
            .borderRadius(10)
            .scale({x:this.scale0,y:this.scale0})
            .gesture(
              PinchGesture()
                .onActionUpdate((event:GestureEvent)=>{
                  this.scale0=event.scale
                })
            )
        }
        .width('100%')
        .height(150)
        .backgroundColor('#ffffffff')
        .borderRadius(10)
        .justifyContent(FlexAlign.Center)
      }
      .width('100%')
      .padding(20)
      .backgroundColor('#ffbe067a')
      .borderRadius(10)
      Text('长按方块会变色,也可以拖动')
        .fontSize(12)
        .fontColor('#ffff0000')
        .margin({top:20})
    }
    .width('100%')
    .height('100%')
    .padding(20)
  }
}
点击事件需在组件中添加gesture属性,然后添加事件,下图中的四个选项就对应着开始,更新,结束和取消
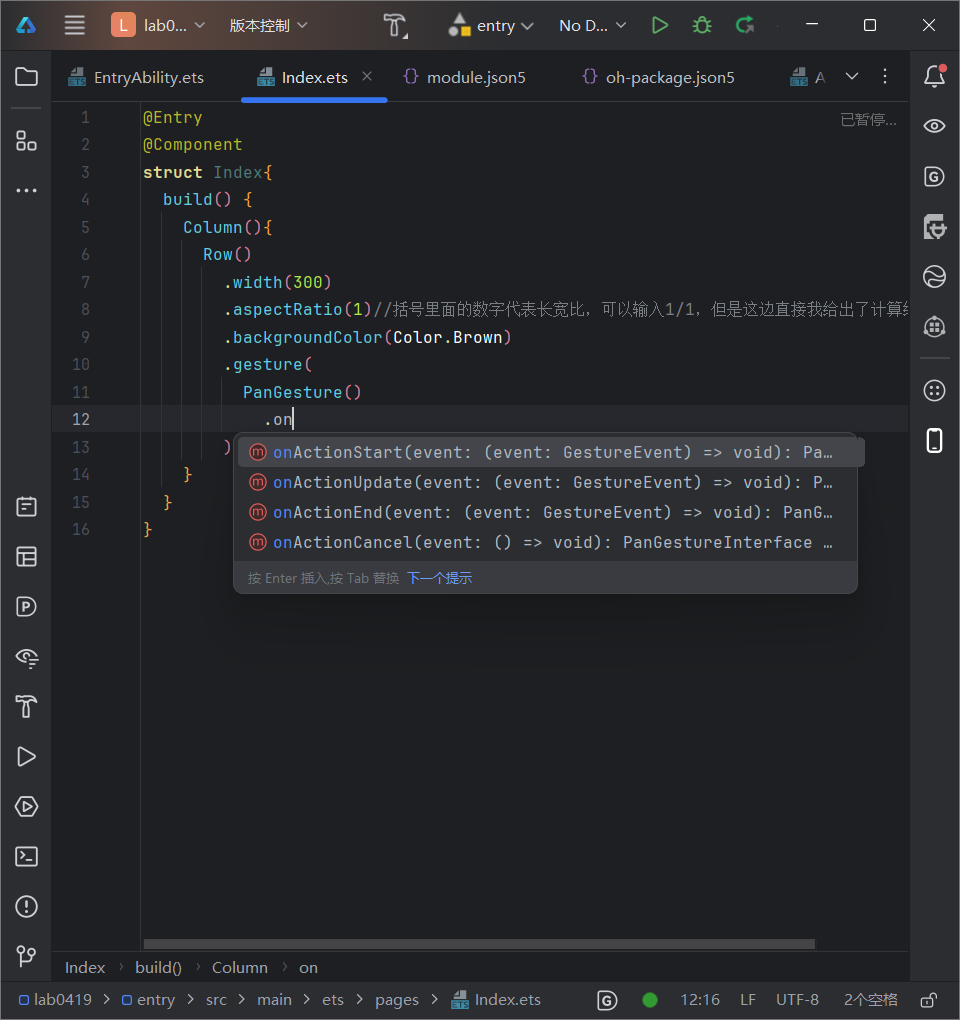
这是一个拖动事件显示对应坐标,只有在点击滑动的时候会显示坐标,点击但静止不动不会显示坐标,同理可得,在以下代码的基础上将PanGesture改为TapGesture就可以在点击的时候显示坐标
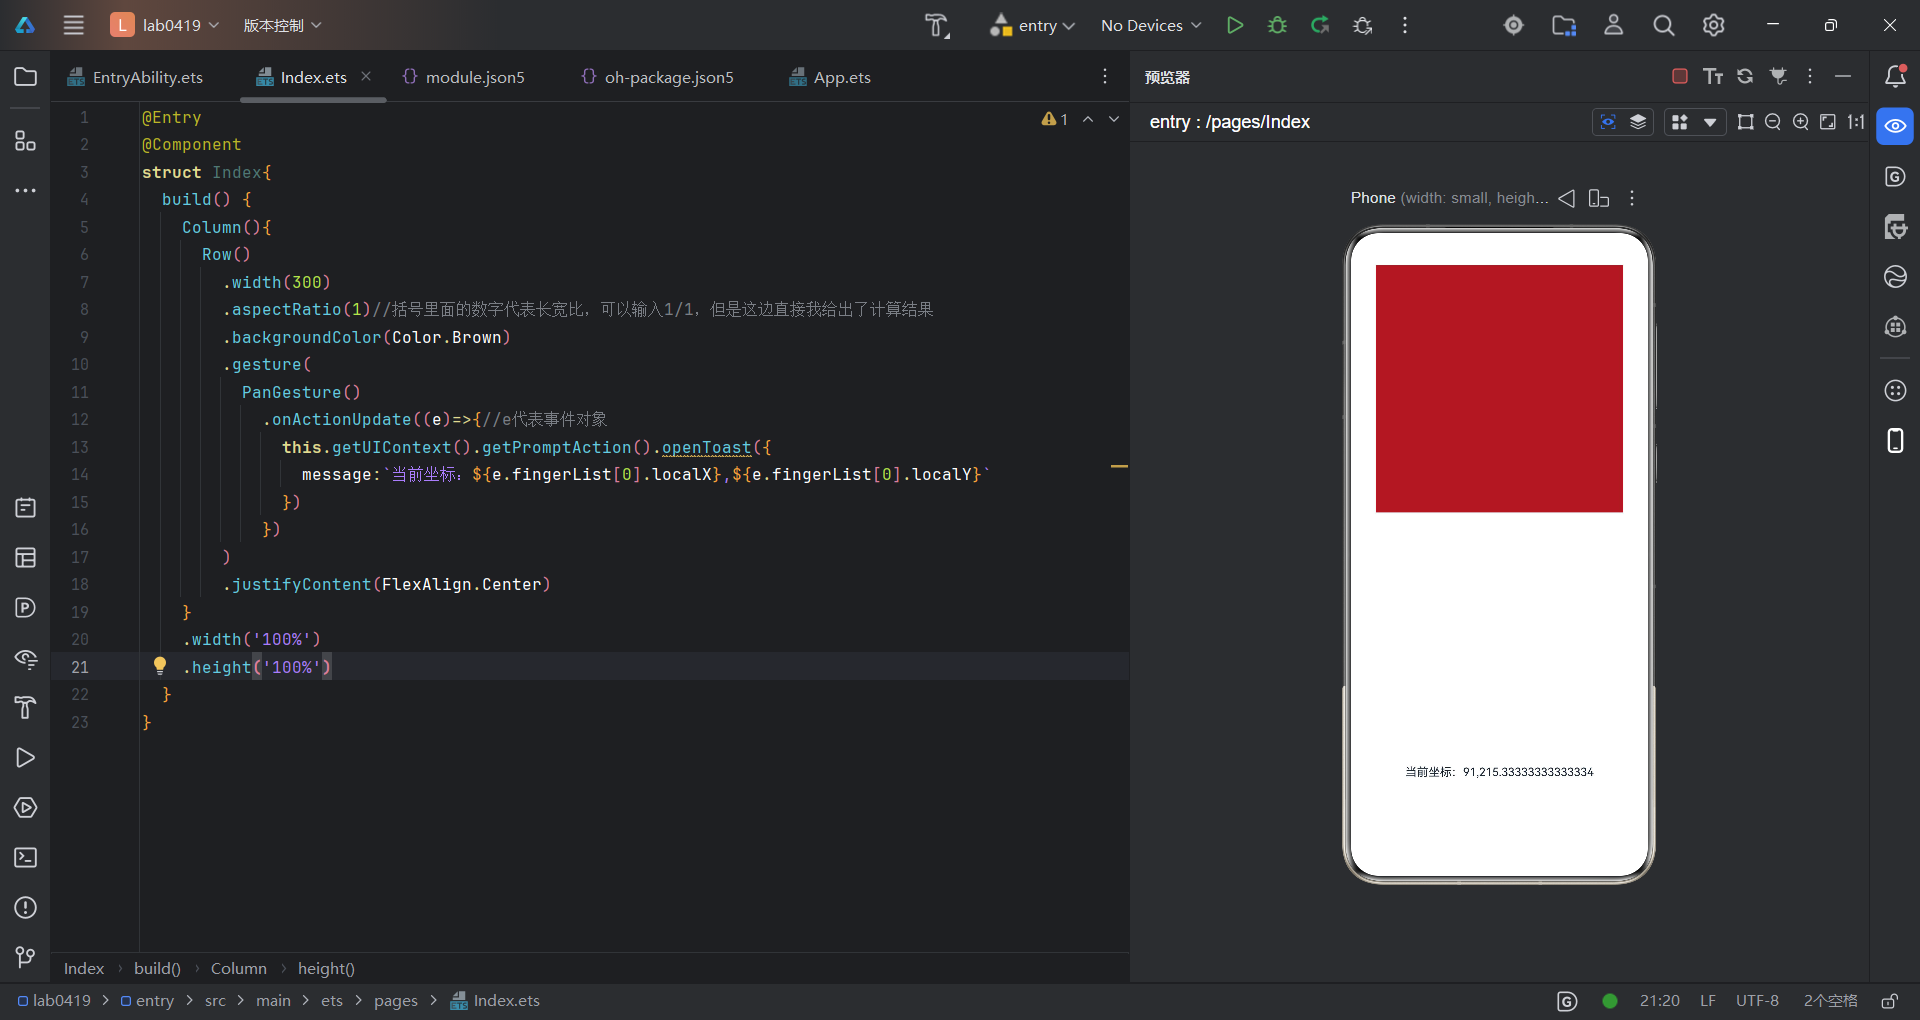
代码如下:
@Entry
@Component
struct Index{
  build() {
    Column(){
      Row()
        .width(300)
        .aspectRatio(1)//括号里面的数字代表长宽比,可以输入1/1,但是这边直接我给出了计算结果
        .backgroundColor(Color.Brown)
        .gesture(
          PanGesture()
            .onActionUpdate((e)=>{//e代表事件对象
              this.getUIContext().getPromptAction().openToast({
                message:`当前坐标:${e.fingerList[0].localX},${e.fingerList[0].localY}`
              })
            })
        )
        .justifyContent(FlexAlign.Center)
    }
    .width('100%')
    .height('100%')
  }
}
根据教学视频,手势识别组合,即两种及以上手势组合为符合手势,支持顺序识别、并发识别和互斥识别。
语法:
组件.gesture{
GestureGroup(识别模式,手势1,手势2...)
}
以下是一个示例,大家应该看着不会陌生,在发信息时,语音输入和发送语音就会有这个东西,初次运行的时候,可以动作缓慢一些,前面运行的时候发现没反应。。。一般来说更新一下可以解决
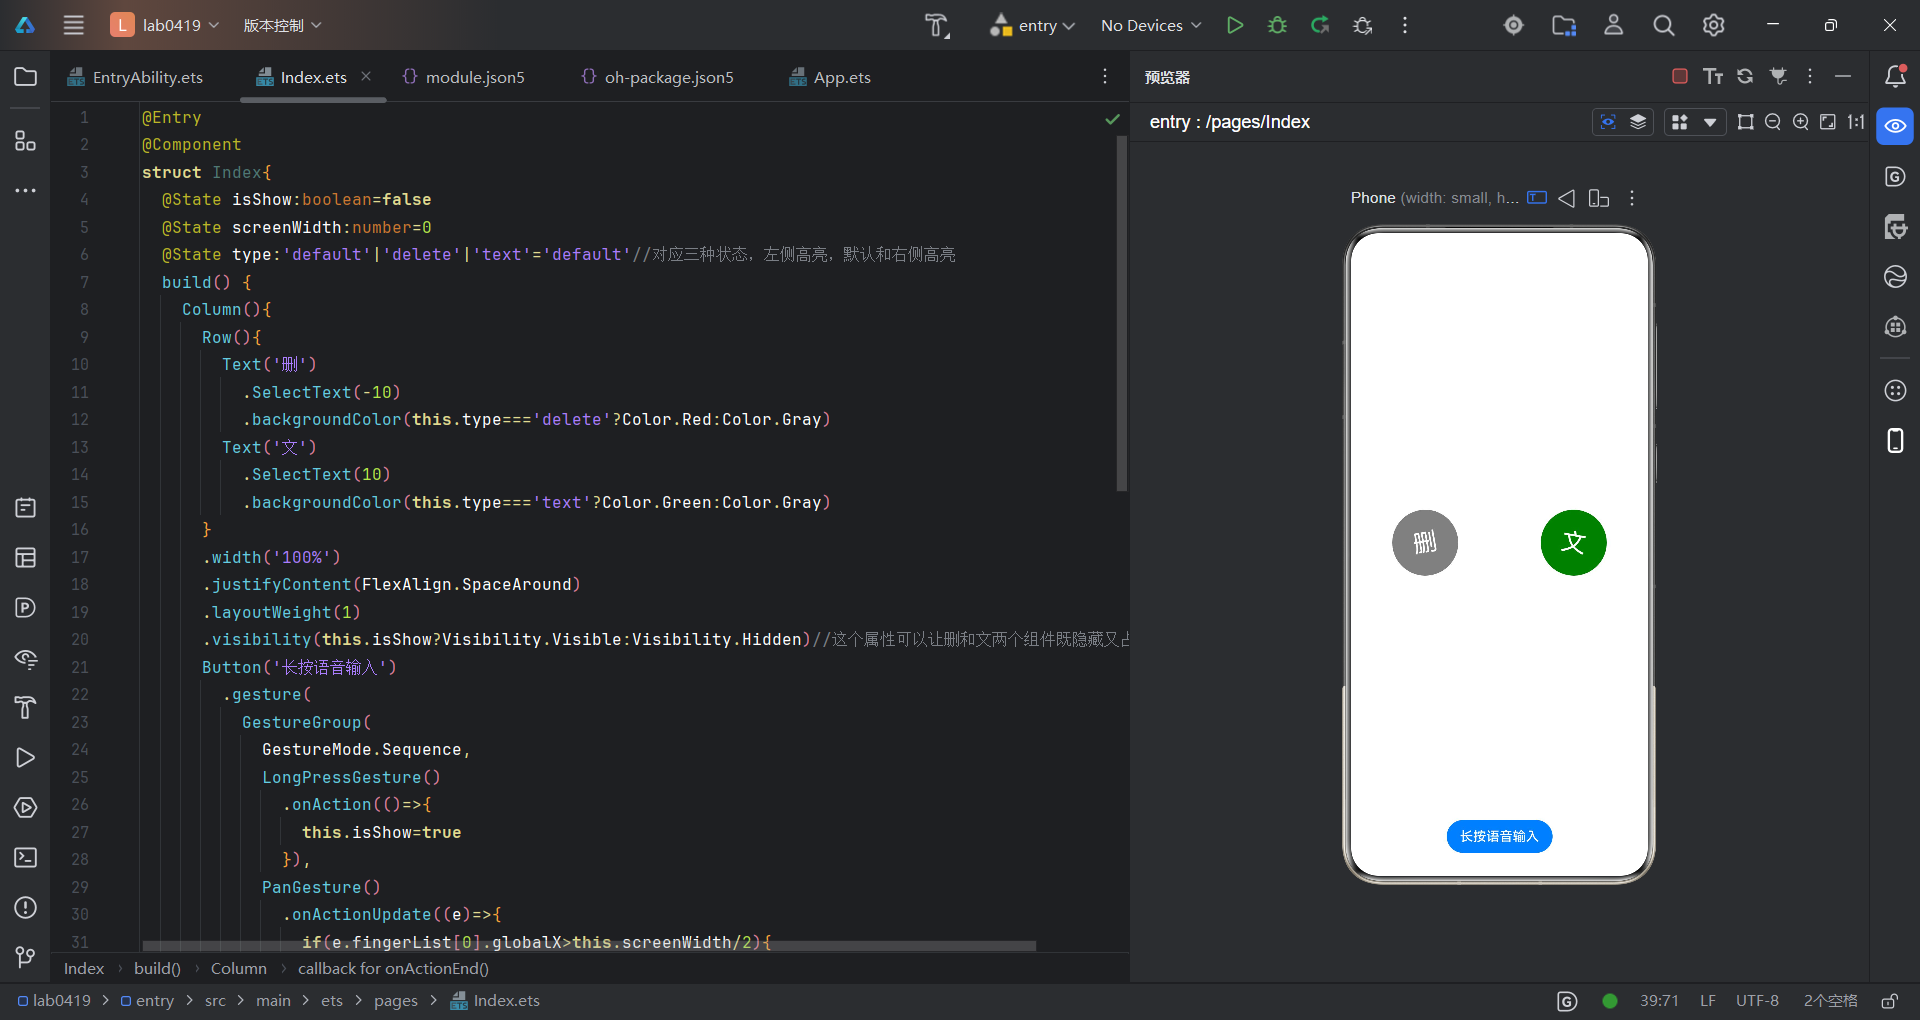
代码如下:
@Entry
@Component
struct Index{
  @State isShow:boolean=false
  @State screenWidth:number=0
  @State type:'default'|'delete'|'text'='default'//对应三种状态,左侧高亮,默认和右侧高亮
  build() {
    Column(){
      Row(){
        Text('删')
          .SelectText(-10)
          .backgroundColor(this.type==='delete'?Color.Red:Color.Gray)
        Text('文')
          .SelectText(10)
          .backgroundColor(this.type==='text'?Color.Green:Color.Gray)
      }
      .width('100%')
      .justifyContent(FlexAlign.SpaceAround)
      .layoutWeight(1)
      .visibility(this.isShow?Visibility.Visible:Visibility.Hidden)//这个属性可以让删和文两个组件既隐藏又占位
      Button('长按语音输入')
        .gesture(
          GestureGroup(
            GestureMode.Sequence,
            LongPressGesture()
              .onAction(()=>{
                this.isShow=true
              }),
            PanGesture()
              .onActionUpdate((e)=>{
                if(e.fingerList[0].globalX>this.screenWidth/2){
                  //右侧,当应该是右侧高亮是就要显示文,长按完如果没有滑动就会进入一个默认状态
                  this.type='text'
                }else{
                  //左侧
                  this.type='delete'
                }
              })
              .onActionEnd(()=>{//这个事件添加可以恢复至默认状态,即删和文都不显示,否则会停留在上一次操作
                this.type='default'
                this.isShow=false
              })

          )
        )
    }
    .width('100%')
    .height('100%')
    .onAreaChange((_old,_new)=>{
      this.screenWidth=Number(_new.width)//_nuw.width是length的类型,需要转成Number类型
    })
  }
}
@Extend(Text)
function SelectText(angle:number){
  .fontColor(Color.White)
  .fontSize(30)
  .textAlign(TextAlign.Center)
  .width(80)
  .height(80)
  .borderRadius(40)
  .rotate({
    angle:angle
  })
}
讨论HarmonyOS开发技术,专注于API与组件、DevEco Studio、测试、元服务和应用上架分发等。
更多推荐
 10
10 0
0- 0


 已为社区贡献10条内容

所有评论(0)