React Native鸿蒙跨平台使用 inputMode=“numeric“(RN 新版本)与 Platform.select 明确键盘类型
概述
本文分析的是一个基于React Native构建的饮食管理应用,集成了数量选择、营养计算、目标设定等核心功能。该应用采用了组件化的数量控制器、响应式营养计算和个性化的目标设定机制,展现了健康管理类应用的典型技术架构。在鸿蒙OS的跨端适配场景中,这种涉及复杂数据计算和个性化配置的应用具有重要的技术参考价值。
核心架构设计深度解析
可复用的数量选择器组件
QuantitySelector组件是本应用的核心技术组件,实现了完整的数字选择功能链:
const QuantitySelector = ({
  value,
  onChange,
  min = 0,
  max = 100,
  step = 1,
  label = "数量"
}) => {
  const increment = () => {
    if (value < max) {
      onChange(value + step);
    }
  };

  const decrement = () => {
    if (value > min) {
      onChange(value - step);
    }
  };

  return (
    <View style={styles.quantitySelector}>
      <Text style={styles.quantityLabel}>{label}</Text>
      <View style={styles.quantityControls}>
        <TouchableOpacity
          onPress={decrement}
          disabled={value <= min}
        >
          <Text>{ICONS.minus}</Text>
        </TouchableOpacity>
        <TextInput
          value={value.toString()}
          onChangeText={(text) => {
            const num = parseInt(text);
            if (!isNaN(num) && num >= min && num <= max) {
              onChange(num);
            }
          }}
          keyboardType="numeric"
        />
        <TouchableOpacity
          onPress={increment}
          disabled={value >= max}
        >
          <Text>{ICONS.plus}</Text>
        </TouchableOpacity>
      </View>
    </View>
  );
};
这种组件的设计体现了完整的功能链:通过按钮增减、通过输入框直接输入、通过条件判断限制边界、通过回调函数通知变化。参数化的设计(min/max/step/label)使得组件具有高度的可复用性。
在鸿蒙ArkUI体系中,数量选择器的实现需要完全重构:
@Component
struct QuantitySelector {
  @Prop value: number = 0;
  @Prop onChange: (value: number) => void = () => {};
  @Prop min: number = 0;
  @Prop max: number = 100;
  @Prop step: number = 1;
  @Prop label: string = "数量";

  increment() {
    const newValue = this.value + this.step;
    if (newValue <= this.max) {
      this.onChange(newValue);
    }
  }

  decrement() {
    const newValue = this.value - this.step;
    if (newValue >= this.min) {
      this.onChange(newValue);
    }
  }

  build() {
    Column() {
      Text(this.label)

      Row() {
        Button('', { type: ButtonType.Normal })
          .onClick(() => this.decrement())
          .enabled(this.value > this.min)

        TextInput({ text: this.value.toString(), type: InputType.Number })
          .onChange((value: string) => {
            const num = parseInt(value);
            if (!isNaN(num) && num >= this.min && num <= this.max) {
              this.onChange(num);
            }
          })

        Button('', { type: ButtonType.Normal })
          .onClick(() => this.increment())
          .enabled(this.value < this.max)
      }
    }
  }
}
响应式营养计算系统
应用实现了动态的营养计算机制:
const calculateTotalCalories = () => {
  return foods.reduce((total, food) => total + (food.calories * food.quantity), 0);
};

const totalCalories = calculateTotalCalories();
const remainingCalories = targetCalories - totalCalories;
这种计算模式采用了函数式编程思想,通过reduce方法累加所有食物的卡路里值。计算过程被封装为独立函数,确保了计算逻辑的纯净性和可测试性。
鸿蒙平台的响应式计算可以通过getter实现:
@State foods: FoodItem[] = [];
@State targetCalories: number = 2000;

get totalCalories(): number {
  return this.foods.reduce((total, food) =>
    total + (food.calories * food.quantity), 0);
}

get remainingCalories(): number {
  return this.targetCalories - this.totalCalories;
}
组件化食物条目
FoodItem组件展示了组合式组件设计:
const FoodItem = ({
  name,
  calories,
  quantity,
  onQuantityChange,
  icon
}) => {
  return (
    <View style={styles.foodItem}>
      <View style={styles.itemHeader}>
        <View style={styles.itemIcon}>
          <Text style={styles.itemIconText}>{icon}</Text>
        </View>
        <View style={styles.itemInfo}>
          <Text style={styles.itemName}>{name}</Text>
          <Text style={styles.itemCalories}>{calories} 卡路里/份</Text>
        </View>
      </View>
      <QuantitySelector
        value={quantity}
        onChange={onQuantityChange}
      />
      <Text style={styles.totalCalories}>
        小计: {quantity * calories} 卡路里
      </Text>
    </View>
  );
};
这种设计将展示信息、交互控件和计算结果集成在一个组件内,形成了完整的功能单元。图标、名称、单位热量、数量选择和小计计算各司其职,共同构成了清晰的用户界面。
鸿蒙的实现采用了类似的组合方式:
@Component
struct FoodItem {
  @Prop name: string;
  @Prop calories: number;
  @Prop quantity: number;
  @Prop icon: string;
  @Event onQuantityChange: (quantity: number) => void;

  build() {
    Column() {
      // 食物信息头
      Row() {
        Column() { Text(this.icon) }
        Column() {
          Text(this.name)
          Text(`${this.calories} 卡路里/份`)
        }
      }

      // 数量选择器
      QuantitySelector({
        value: this.quantity,
        onChange: this.onQuantityChange
      })

      // 小计计算
      Text(`小计: ${this.quantity * this.calories} 卡路里`)
    }
  }
}
状态管理与数据流
不可变状态更新
应用采用了React推荐的状态更新模式:
const updateFoodQuantity = (id: string, quantity: number) => {
  setFoods(prev =>
    prev.map(food =>
      food.id === id ? { ...food, quantity } : food
    )
  );
};
这种函数式更新确保了状态的可预测性,通过展开运算符创建新对象,避免了直接修改原始状态。
鸿蒙的状态更新采用直接赋值方式:
updateFoodQuantity(id: string, quantity: number) {
  this.foods = this.foods.map(food =>
    food.id === id ? { ...food, quantity } : food
  );
}
联动状态计算
多个状态间的联动计算体现了响应式编程思想:
const [foods, setFoods] = useState([...]);
const [targetCalories, setTargetCalories] = useState(2000);

// 自动重新计算
const totalCalories = calculateTotalCalories();
const remainingCalories = targetCalories - totalCalories;
这种设计使得界面能够自动响应状态变化,无需手动触发重新计算。
跨端适配技术方案
组件映射策略
| React Native组件 | 鸿蒙ArkUI组件 | 关键适配点 |
|---|---|---|
| TextInput | TextInput | 输入类型和事件处理 |
| TouchableOpacity | Button | 交互反馈机制 |
| View | Column/Row | 布局方式转换 |
| ScrollView | Scroll | 滚动行为一致 |
输入验证适配
数字输入的验证逻辑需要适配:
// React Native
onChangeText={(text) => {
  const num = parseInt(text);
  if (!isNaN(num) && num >= min && num <= max) {
    onChange(num);
  }
}}

// 鸿蒙
.onChange((value: string) => {
  const num = parseInt(value);
  if (!isNaN(num) && num >= this.min && num <= this.max) {
    this.onChange(num);
  }
})
样式系统转换
尺寸和布局的转换:
// React Native
quantityButton: {
  width: 40,
  height: 40,
  borderRadius: 20,
},

// 鸿蒙
Button('')
  .width(40)
  .height(40)
  .borderRadius(20)
性能优化与最佳实践
计算性能优化
对于频繁调用的计算函数,可以使用useMemo进行缓存:
const totalCalories = useMemo(() => {
  return foods.reduce((total, food) => total + (food.calories * food.quantity), 0);
}, [foods]);
事件处理优化
使用useCallback避免不必要的重渲染:
const updateFoodQuantity = useCallback((id: string, quantity: number) => {
  setFoods(prev => prev.map(food =>
    food.id === id ? { ...food, quantity } : food
  ));
}, []);
这个任务是代码讲解,不需要额外的专用工具或技能支持;下面直接开始技术解读。
React Native × 鸿蒙跨端技术解读:数量选择器、食物项与营养统计
这段页面以“节食数量选择器”为中心,搭建了一个轻量饮食记录视图:核心在自定义数量选择器 QuantitySelector,辅以 FoodItem 的小计与 NutritionCard 的总览展示;页面状态通过 foods、waterIntake 与 targetCalories 派生当日总卡路里与剩余值。整体用函数式组件与本地状态驱动;跨端角度,iOS/Android 走 RN 标准组件栈,落地到鸿蒙(OpenHarmony)时要关注输入法、数值校验、滚动性能与系统能力桥接的细节。
数量选择器:数值输入的边界与 IME 差异
- QuantitySelector 聚合三种交互:减号/加号按钮与中间的 TextInput 数字输入。按钮受 min/max 边界限制并在到达边界时禁用,中间输入使用 parseInt 做即时校验。
- 即时校验逻辑只接受 [min, max] 区间内的整数;但 parseInt 在输入过程中的中间态有典型陷阱:
- 空串、负号尚未完成、带空格等中间态会被视为 NaN;此时 onChangeText 不更新 state,用户体验可能“卡住”。
- 在 iOS/Android/鸿蒙的数字键盘映射存在差异(例如 iOS 的 numberPad 不包含负号、Android 的 numeric 多样、鸿蒙端 ArkUI 输入法的合成事件与候选词处理也不同)。生产建议:
- 在 onChangeText 内做“软容忍”,允许中间态输入,在 onEndEditing 或失焦时进行强校验与回滚。
- 对于只允许非负整数的场景,明确拒绝负号和前导零;或使用 inputMode=“numeric”(RN 新版本)与 Platform.select 明确键盘类型。
- 使用 clamp 函数统一数值:onChange(clamp(roundToStep(num), min, max)),其中 roundToStep 按 step 做取整。
- 边界与步进:increment/decrement 按 step 变动;为了避免“溢出与回退”的双更新,建议所有入口(按钮、输入框)都归一到一个 setQuantity(next) 函数,内部统一按 min/max/step 处理。
- 提示与反馈:按钮交互建议用 Pressable 并在三端注入一致的涟漪/触觉反馈(鸿蒙端通过 ArkUI 的交互能力),提升“原生感”。
食物项与小计:数据驱动的展示封装
- FoodItem 负责展示图标、名称、每份卡路里,与右侧的数量选择器,以及底部小计(quantity * calories)。这种“数据驱动 UI”的封装把业务计算聚合在一个视觉组件内,便于复用与测试。
- 数值格式化与单位:当前以“卡路里/份”与“小计: xxx 卡路里”直出数值,生产建议统一格式器(例如 Intl.NumberFormat 或轻量封装),避免不同 locale 下的千分位与符号差异。
- 图标用 emoji 简化依赖;跨端在不同系统字体下会出现对齐与颜色差异。建议迁移到统一的矢量/字体图标栈,并在鸿蒙端通过 ArkUI 渲染能力映射,保持像素与基线一致。
页面状态与派生统计:一致性与可维护性
- foods 是核心状态源,updateFoodQuantity 用不可变更新替换目标项;calculateTotalCalories 在 render 阶段 reduce 汇总。
- 为避免重复计算,建议对 totalCalories 使用 useMemo([foods]) 做派生,remainingCalories 同样派生,保证“单向数据流”的清晰与性能友好。
- 目标设置使用同一个 QuantitySelector(min:1200, max:3000, step:100),这体现了组件复用的设计;为了避免“大步进输入”时的体验割裂,建议在输入框内显示推荐范围与步进说明,或者在改变数值后做“贴步进”操作。
- 重置逻辑(handleReset)对 foods 全部置 0 并将 waterIntake 清零,行为一致;保存(handleSave)通过 Alert 展示汇总数据,生产场景可以落地到本地持久化(AsyncStorage/鸿蒙安全存储)与云端同步。
滚动组织与性能:何时用虚拟化
- 食物清单当前用 ScrollView + map 渲染;数据较少时简单直观;若清单增长(几十到上百项),建议切换 FlatList 获取虚拟化渲染与稳定滚动性能,避免长列表导致的内存占用与帧率下降。
- 在每个 FoodItem 上使用 React.memo,updateFoodQuantity 使用 useCallback 缓存,减少不必要重渲染;FlatList 的 keyExtractor 使用稳定 id,保障 diff 正确。
- 尺寸与旋转:页面使用 Dimensions 的初始宽度参与卡片布局;横竖屏与分屏场景建议使用 useWindowDimensions 并监听窗口变化,鸿蒙端需保证窗口事件正确传递到 RN 层。
跨端输入法与合成事件(IME)
- TextInput 的 onChangeText 在中文输入下涉及 composition(候选词合成);不同平台合成事件行为不一致,鸿蒙 ArkUI 的映射尤需准确。建议:
- 尽量在 onEndEditing 做强校验与修正,避免在合成中断时“即时校验导致闪烁”。
- 对“数字输入”场景,限定输入字符集(0-9),并在 onKeyPress 处理删除与编辑行为,减少解析错误。
- 对“水杯数/份数”这类小范围整数,考虑改用按钮或轮盘选择器,绕开 IME 复杂性。
完整代码:
// app.tsx
import React, { useState } from 'react';
import { SafeAreaView, View, Text, StyleSheet, TouchableOpacity, ScrollView, Dimensions, Alert, TextInput } from 'react-native';

// 图标库
const ICONS = {
  food: '🍎',
  water: '💧',
  calorie: '🔥',
  plus: '➕',
  minus: '➖',
  save: '💾',
  cancel: '❌',
  confirm: '✅',
};

const { width } = Dimensions.get('window');

// 自定义数量选择器组件
const QuantitySelector = ({
  value,
  onChange,
  min = 0,
  max = 100,
  step = 1,
  label = "数量"
}: {
  value: number;
  onChange: (value: number) => void;
  min?: number;
  max?: number;
  step?: number;
  label?: string;
}) => {
  const increment = () => {
    if (value < max) {
      onChange(value + step);
    }
  };

  const decrement = () => {
    if (value > min) {
      onChange(value - step);
    }
  };

  return (
    <View style={styles.quantitySelector}>
      <Text style={styles.quantityLabel}>{label}</Text>
      <View style={styles.quantityControls}>
        <TouchableOpacity
          style={[styles.quantityButton, value <= min && styles.disabledButton]}
          onPress={decrement}
          disabled={value <= min}
        >
          <Text style={styles.quantityButtonText}>{ICONS.minus}</Text>
        </TouchableOpacity>
        <TextInput
          style={styles.quantityInput}
          value={value.toString()}
          onChangeText={(text) => {
            const num = parseInt(text);
            if (!isNaN(num) && num >= min && num <= max) {
              onChange(num);
            }
          }}
          keyboardType="numeric"
        />
        <TouchableOpacity
          style={[styles.quantityButton, value >= max && styles.disabledButton]}
          onPress={increment}
          disabled={value >= max}
        >
          <Text style={styles.quantityButtonText}>{ICONS.plus}</Text>
        </TouchableOpacity>
      </View>
    </View>
  );
};

// 食物项组件
const FoodItem = ({
  name,
  calories,
  quantity,
  onQuantityChange,
  icon
}: {
  name: string;
  calories: number;
  quantity: number;
  onQuantityChange: (quantity: number) => void;
  icon: string;
}) => {
  return (
    <View style={styles.foodItem}>
      <View style={styles.itemHeader}>
        <View style={styles.itemIcon}>
          <Text style={styles.itemIconText}>{icon}</Text>
        </View>
        <View style={styles.itemInfo}>
          <Text style={styles.itemName}>{name}</Text>
          <Text style={styles.itemCalories}>{calories} 卡路里/份</Text>
        </View>
      </View>
      <QuantitySelector
        value={quantity}
        onChange={onQuantityChange}
        min={0}
        max={10}
        step={1}
        label="份数"
      />
      <Text style={styles.totalCalories}>
        小计: {quantity * calories} 卡路里
      </Text>
    </View>
  );
};

// 营养信息卡片组件
const NutritionCard = ({ title, value, unit, color }: { title: string; value: string | number; unit: string; color: string }) => {
  return (
    <View style={styles.nutritionCard}>
      <Text style={styles.nutritionValue}>{value}</Text>
      <Text style={styles.nutritionUnit}>{unit}</Text>
      <Text style={styles.nutritionTitle}>{title}</Text>
    </View>
  );
};

// 主页面组件
const DietQuantitySelectorApp: React.FC = () => {
  const [foods, setFoods] = useState([
    { id: '1', name: '苹果', calories: 52, quantity: 1, icon: ICONS.food },
    { id: '2', name: '鸡胸肉', calories: 165, quantity: 1, icon: ICONS.food },
    { id: '3', name: '米饭', calories: 130, quantity: 2, icon: ICONS.food },
    { id: '4', name: '西兰花', calories: 34, quantity: 1, icon: ICONS.food },
  ]);

  const [waterIntake, setWaterIntake] = useState(8); // 杯数
  const [targetCalories, setTargetCalories] = useState(2000);

  const updateFoodQuantity = (id: string, quantity: number) => {
    setFoods(prev =>
      prev.map(food =>
        food.id === id ? { ...food, quantity } : food
      )
    );
  };

  const calculateTotalCalories = () => {
    return foods.reduce((total, food) => total + (food.calories * food.quantity), 0);
  };

  const totalCalories = calculateTotalCalories();
  const remainingCalories = targetCalories - totalCalories;

  const handleSave = () => {
    Alert.alert(
      '保存成功',
      `今日摄入: ${totalCalories} 卡路里\n目标: ${targetCalories} 卡路里`,
      [{ text: '确定' }]
    );
  };

  const handleReset = () => {
    Alert.alert(
      '重置数据',
      '确定要重置所有数据吗?',
      [
        { text: '取消', style: 'cancel' },
        {
          text: '确定',
          onPress: () => {
            setFoods(prev => prev.map(food => ({ ...food, quantity: 0 })));
            setWaterIntake(0);
          }
        }
      ]
    );
  };

  return (
    <SafeAreaView style={styles.container}>
      {/* 头部 */}
      <View style={styles.header}>
        <Text style={styles.title}>节食数量选择器</Text>
        <View style={styles.headerActions}>
          <TouchableOpacity style={styles.headerButton} onPress={handleReset}>
            <Text style={styles.headerButtonText}>{ICONS.cancel} 重置</Text>
          </TouchableOpacity>
          <TouchableOpacity style={styles.saveButton} onPress={handleSave}>
            <Text style={styles.saveButtonText}>{ICONS.save} 保存</Text>
          </TouchableOpacity>
        </View>
      </View>

      {/* 营养统计卡片 */}
      <View style={styles.nutritionContainer}>
        <NutritionCard title="总卡路里" value={totalCalories} unit="卡" color="#3b82f6" />
        <NutritionCard title="剩余卡路里" value={remainingCalories} unit="卡" color="#10b981" />
        <NutritionCard title="目标卡路里" value={targetCalories} unit="卡" color="#f59e0b" />
      </View>

      {/* 水分摄入 */}
      <View style={styles.sectionCard}>
        <Text style={styles.sectionTitle}>水分摄入</Text>
        <QuantitySelector
          value={waterIntake}
          onChange={setWaterIntake}
          min={0}
          max={15}
          step={1}
          label="杯数"
        />
        <Text style={styles.waterInfo}>建议每日8杯水,当前: {waterIntake} 杯</Text>
      </View>

      {/* 食物列表 */}
      <ScrollView style={styles.content}>
        <Text style={styles.sectionTitle}>食物清单</Text>
        {foods.map(food => (
          <FoodItem
            key={food.id}
            name={food.name}
            calories={food.calories}
            quantity={food.quantity}
            onQuantityChange={(quantity) => updateFoodQuantity(food.id, quantity)}
            icon={food.icon}
          />
        ))}

        {/* 目标设置 */}
        <Text style={styles.sectionTitle}>目标设置</Text>
        <View style={styles.targetCard}>
          <Text style={styles.targetLabel}>每日卡路里目标</Text>
          <QuantitySelector
            value={targetCalories}
            onChange={setTargetCalories}
            min={1200}
            max={3000}
            step={100}
            label="卡路里"
          />
          <Text style={styles.targetInfo}>根据您的体重、身高和活动水平推荐</Text>
        </View>

        {/* 建议提示 */}
        <Text style={styles.sectionTitle}>饮食建议</Text>
        <View style={styles.adviceCard}>
          <Text style={styles.adviceText}>• 均衡摄入蛋白质、碳水化合物和脂肪</Text>
          <Text style={styles.adviceText}>• 多吃蔬菜水果,补充维生素</Text>
          <Text style={styles.adviceText}>• 控制糖分和油脂摄入</Text>
          <Text style={styles.adviceText}>• 保持适量运动配合饮食</Text>
        </View>
      </ScrollView>

      {/* 底部导航 */}
      <View style={styles.bottomNav}>
        <TouchableOpacity style={styles.navItem}>
          <Text style={styles.navIcon}>{ICONS.food}</Text>
          <Text style={styles.navText}>食物</Text>
        </TouchableOpacity>
        <TouchableOpacity style={styles.navItem}>
          <Text style={styles.navIcon}>{ICONS.water}</Text>
          <Text style={styles.navText}>饮水</Text>
        </TouchableOpacity>
        <TouchableOpacity style={[styles.navItem, styles.activeNavItem]}>
          <Text style={styles.navIcon}>{ICONS.calorie}</Text>
          <Text style={styles.navText}>数量</Text>
        </TouchableOpacity>
        <TouchableOpacity style={styles.navItem}>
          <Text style={styles.navIcon}>{ICONS.confirm}</Text>
          <Text style={styles.navText}>记录</Text>
        </TouchableOpacity>
      </View>
    </SafeAreaView>
  );
};

const styles = StyleSheet.create({
  container: {
    flex: 1,
    backgroundColor: '#f8fafc',
  },
  header: {
    flexDirection: 'row',
    alignItems: 'center',
    justifyContent: 'space-between',
    padding: 20,
    backgroundColor: '#ffffff',
    borderBottomWidth: 1,
    borderBottomColor: '#e2e8f0',
  },
  title: {
    fontSize: 20,
    fontWeight: 'bold',
    color: '#1e293b',
  },
  headerActions: {
    flexDirection: 'row',
  },
  headerButton: {
    backgroundColor: '#f1f5f9',
    paddingHorizontal: 12,
    paddingVertical: 6,
    borderRadius: 20,
    marginRight: 8,
  },
  headerButtonText: {
    color: '#64748b',
    fontSize: 12,
    fontWeight: '500',
  },
  saveButton: {
    backgroundColor: '#3b82f6',
    paddingHorizontal: 12,
    paddingVertical: 6,
    borderRadius: 20,
  },
  saveButtonText: {
    color: '#ffffff',
    fontSize: 12,
    fontWeight: '500',
  },
  nutritionContainer: {
    flexDirection: 'row',
    justifyContent: 'space-around',
    padding: 16,
    backgroundColor: '#ffffff',
    marginBottom: 16,
  },
  nutritionCard: {
    alignItems: 'center',
    padding: 12,
    backgroundColor: '#f8fafc',
    borderRadius: 8,
    width: (width - 48) / 3,
  },
  nutritionValue: {
    fontSize: 18,
    fontWeight: 'bold',
    color: '#1e293b',
  },
  nutritionUnit: {
    fontSize: 12,
    color: '#64748b',
  },
  nutritionTitle: {
    fontSize: 12,
    color: '#475569',
    marginTop: 4,
  },
  sectionCard: {
    backgroundColor: '#ffffff',
    borderRadius: 12,
    padding: 16,
    marginHorizontal: 16,
    marginBottom: 16,
  },
  sectionTitle: {
    fontSize: 18,
    fontWeight: 'bold',
    color: '#1e293b',
    marginVertical: 12,
    paddingHorizontal: 16,
  },
  content: {
    flex: 1,
    padding: 16,
  },
  foodItem: {
    backgroundColor: '#ffffff',
    borderRadius: 12,
    padding: 16,
    marginBottom: 12,
    elevation: 1,
    shadowColor: '#000',
    shadowOffset: { width: 0, height: 1 },
    shadowOpacity: 0.1,
    shadowRadius: 2,
  },
  itemHeader: {
    flexDirection: 'row',
    alignItems: 'center',
    marginBottom: 12,
  },
  itemIcon: {
    width: 40,
    height: 40,
    borderRadius: 20,
    backgroundColor: '#f1f5f9',
    alignItems: 'center',
    justifyContent: 'center',
    marginRight: 12,
  },
  itemIconText: {
    fontSize: 20,
  },
  itemInfo: {
    flex: 1,
  },
  itemName: {
    fontSize: 16,
    fontWeight: 'bold',
    color: '#1e293b',
  },
  itemCalories: {
    fontSize: 14,
    color: '#64748b',
    marginTop: 4,
  },
  totalCalories: {
    fontSize: 14,
    color: '#3b82f6',
    fontWeight: '500',
    marginTop: 8,
    textAlign: 'right',
  },
  quantitySelector: {
    marginTop: 8,
  },
  quantityLabel: {
    fontSize: 14,
    color: '#64748b',
    marginBottom: 8,
  },
  quantityControls: {
    flexDirection: 'row',
    alignItems: 'center',
  },
  quantityButton: {
    width: 40,
    height: 40,
    borderRadius: 20,
    backgroundColor: '#3b82f6',
    alignItems: 'center',
    justifyContent: 'center',
  },
  disabledButton: {
    backgroundColor: '#cbd5e1',
  },
  quantityButtonText: {
    fontSize: 18,
    color: '#ffffff',
  },
  quantityInput: {
    width: 60,
    height: 40,
    borderWidth: 1,
    borderColor: '#cbd5e1',
    borderRadius: 8,
    textAlign: 'center',
    marginHorizontal: 8,
    fontSize: 16,
    color: '#1e293b',
  },
  waterInfo: {
    fontSize: 14,
    color: '#64748b',
    marginTop: 8,
  },
  targetCard: {
    backgroundColor: '#ffffff',
    borderRadius: 12,
    padding: 16,
    marginBottom: 16,
  },
  targetLabel: {
    fontSize: 16,
    fontWeight: 'bold',
    color: '#1e293b',
    marginBottom: 12,
  },
  targetInfo: {
    fontSize: 14,
    color: '#64748b',
    marginTop: 8,
  },
  adviceCard: {
    backgroundColor: '#ffffff',
    borderRadius: 12,
    padding: 16,
  },
  adviceText: {
    fontSize: 14,
    color: '#64748b',
    lineHeight: 22,
    marginBottom: 8,
  },
  bottomNav: {
    flexDirection: 'row',
    justifyContent: 'space-around',
    backgroundColor: '#ffffff',
    borderTopWidth: 1,
    borderTopColor: '#e2e8f0',
    paddingVertical: 12,
  },
  navItem: {
    alignItems: 'center',
    flex: 1,
  },
  activeNavItem: {
    paddingBottom: 2,
    borderBottomWidth: 2,
    borderBottomColor: '#3b82f6',
  },
  navIcon: {
    fontSize: 20,
    color: '#94a3b8',
    marginBottom: 4,
  },
  activeNavIcon: {
    color: '#3b82f6',
  },
  navText: {
    fontSize: 12,
    color: '#94a3b8',
  },
  activeNavText: {
    color: '#3b82f6',
    fontWeight: '500',
  },
});

export default DietQuantitySelectorApp;
打包
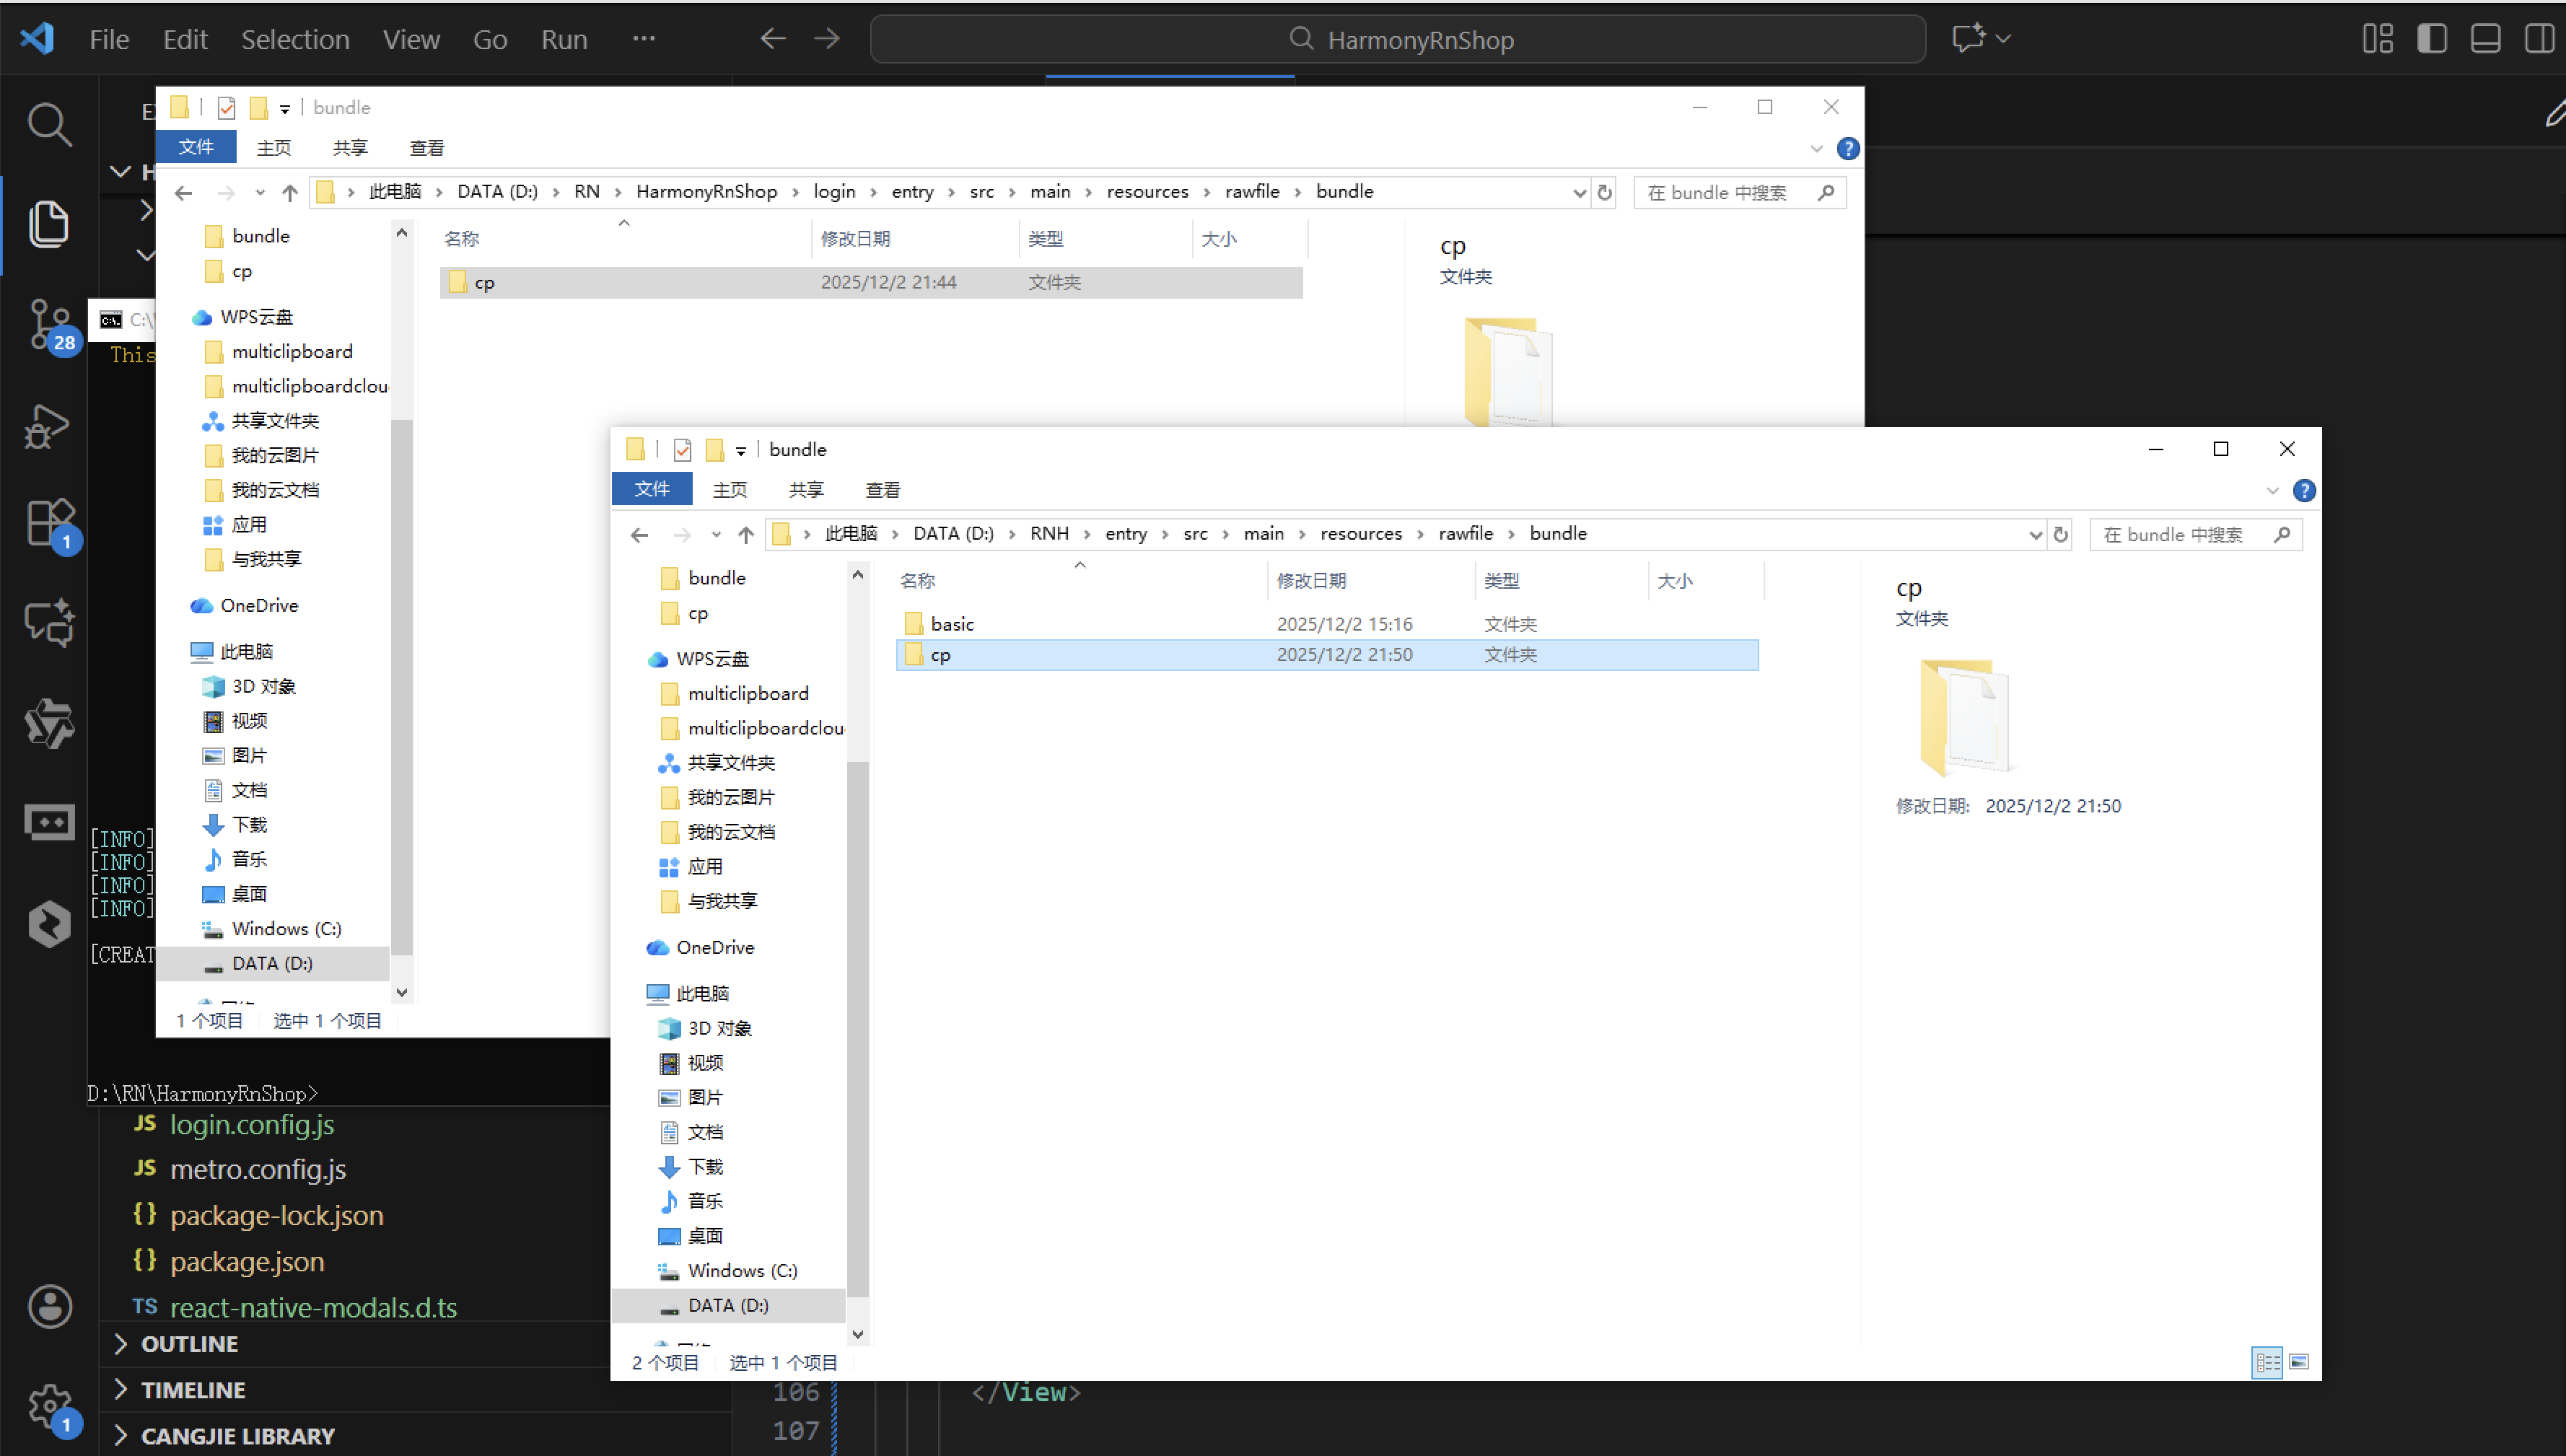
接下来通过打包命令npn run harmony将reactNative的代码打包成为bundle,这样可以进行在开源鸿蒙OpenHarmony中进行使用。

打包之后再将打包后的鸿蒙OpenHarmony文件拷贝到鸿蒙的DevEco-Studio工程目录去:
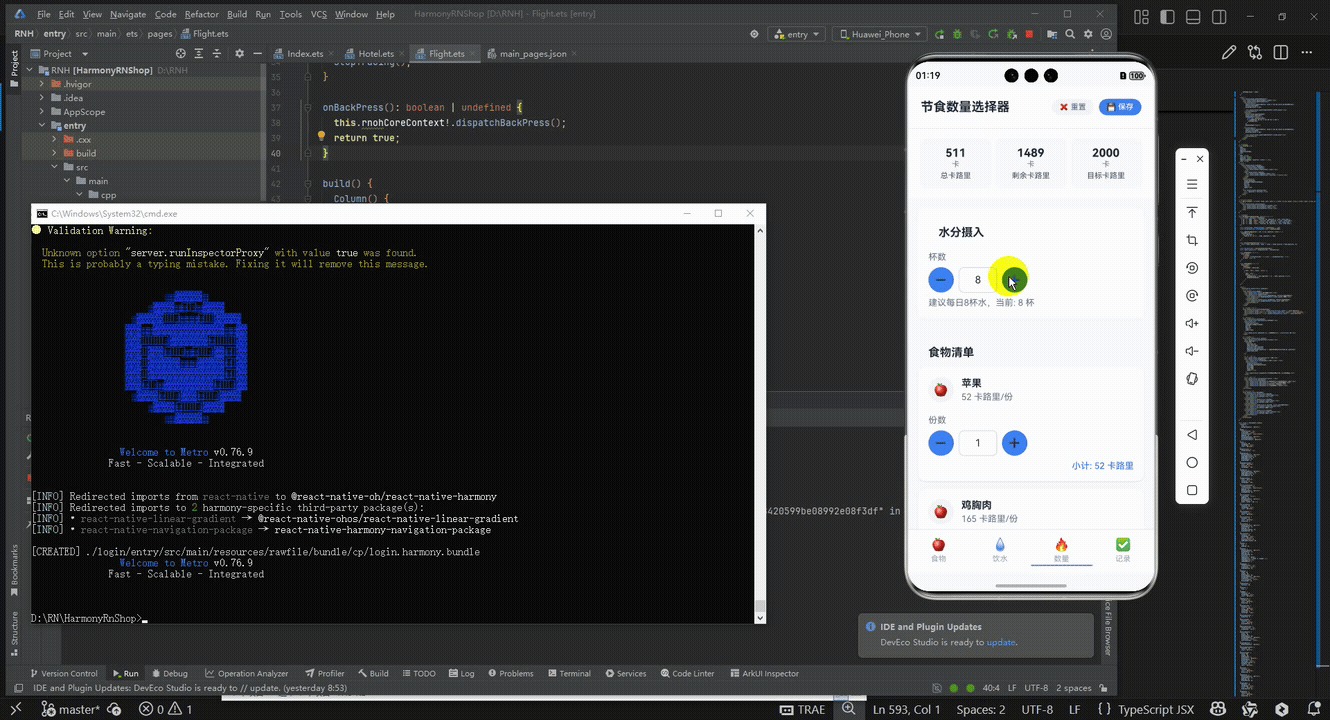
最后运行效果图如下显示:
欢迎大家加入开源鸿蒙跨平台开发者社区,一起共建开源鸿蒙跨平台生态。

讨论HarmonyOS开发技术,专注于API与组件、DevEco Studio、测试、元服务和应用上架分发等。
更多推荐


 12
12 0
0- 0


 已为社区贡献68条内容

所有评论(0)