基于Canvas实现画布
实现基于鸿蒙Canvas实现画布的案例,具备绘画、撤销重做、橡皮擦、清空、画笔属性设置、缩放等功能,涉及Canvas、手势事件、折叠屏适配等知识点。
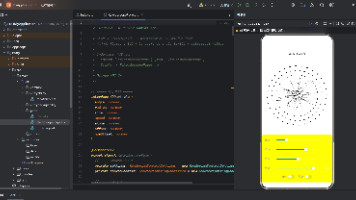
一、案例效果截图
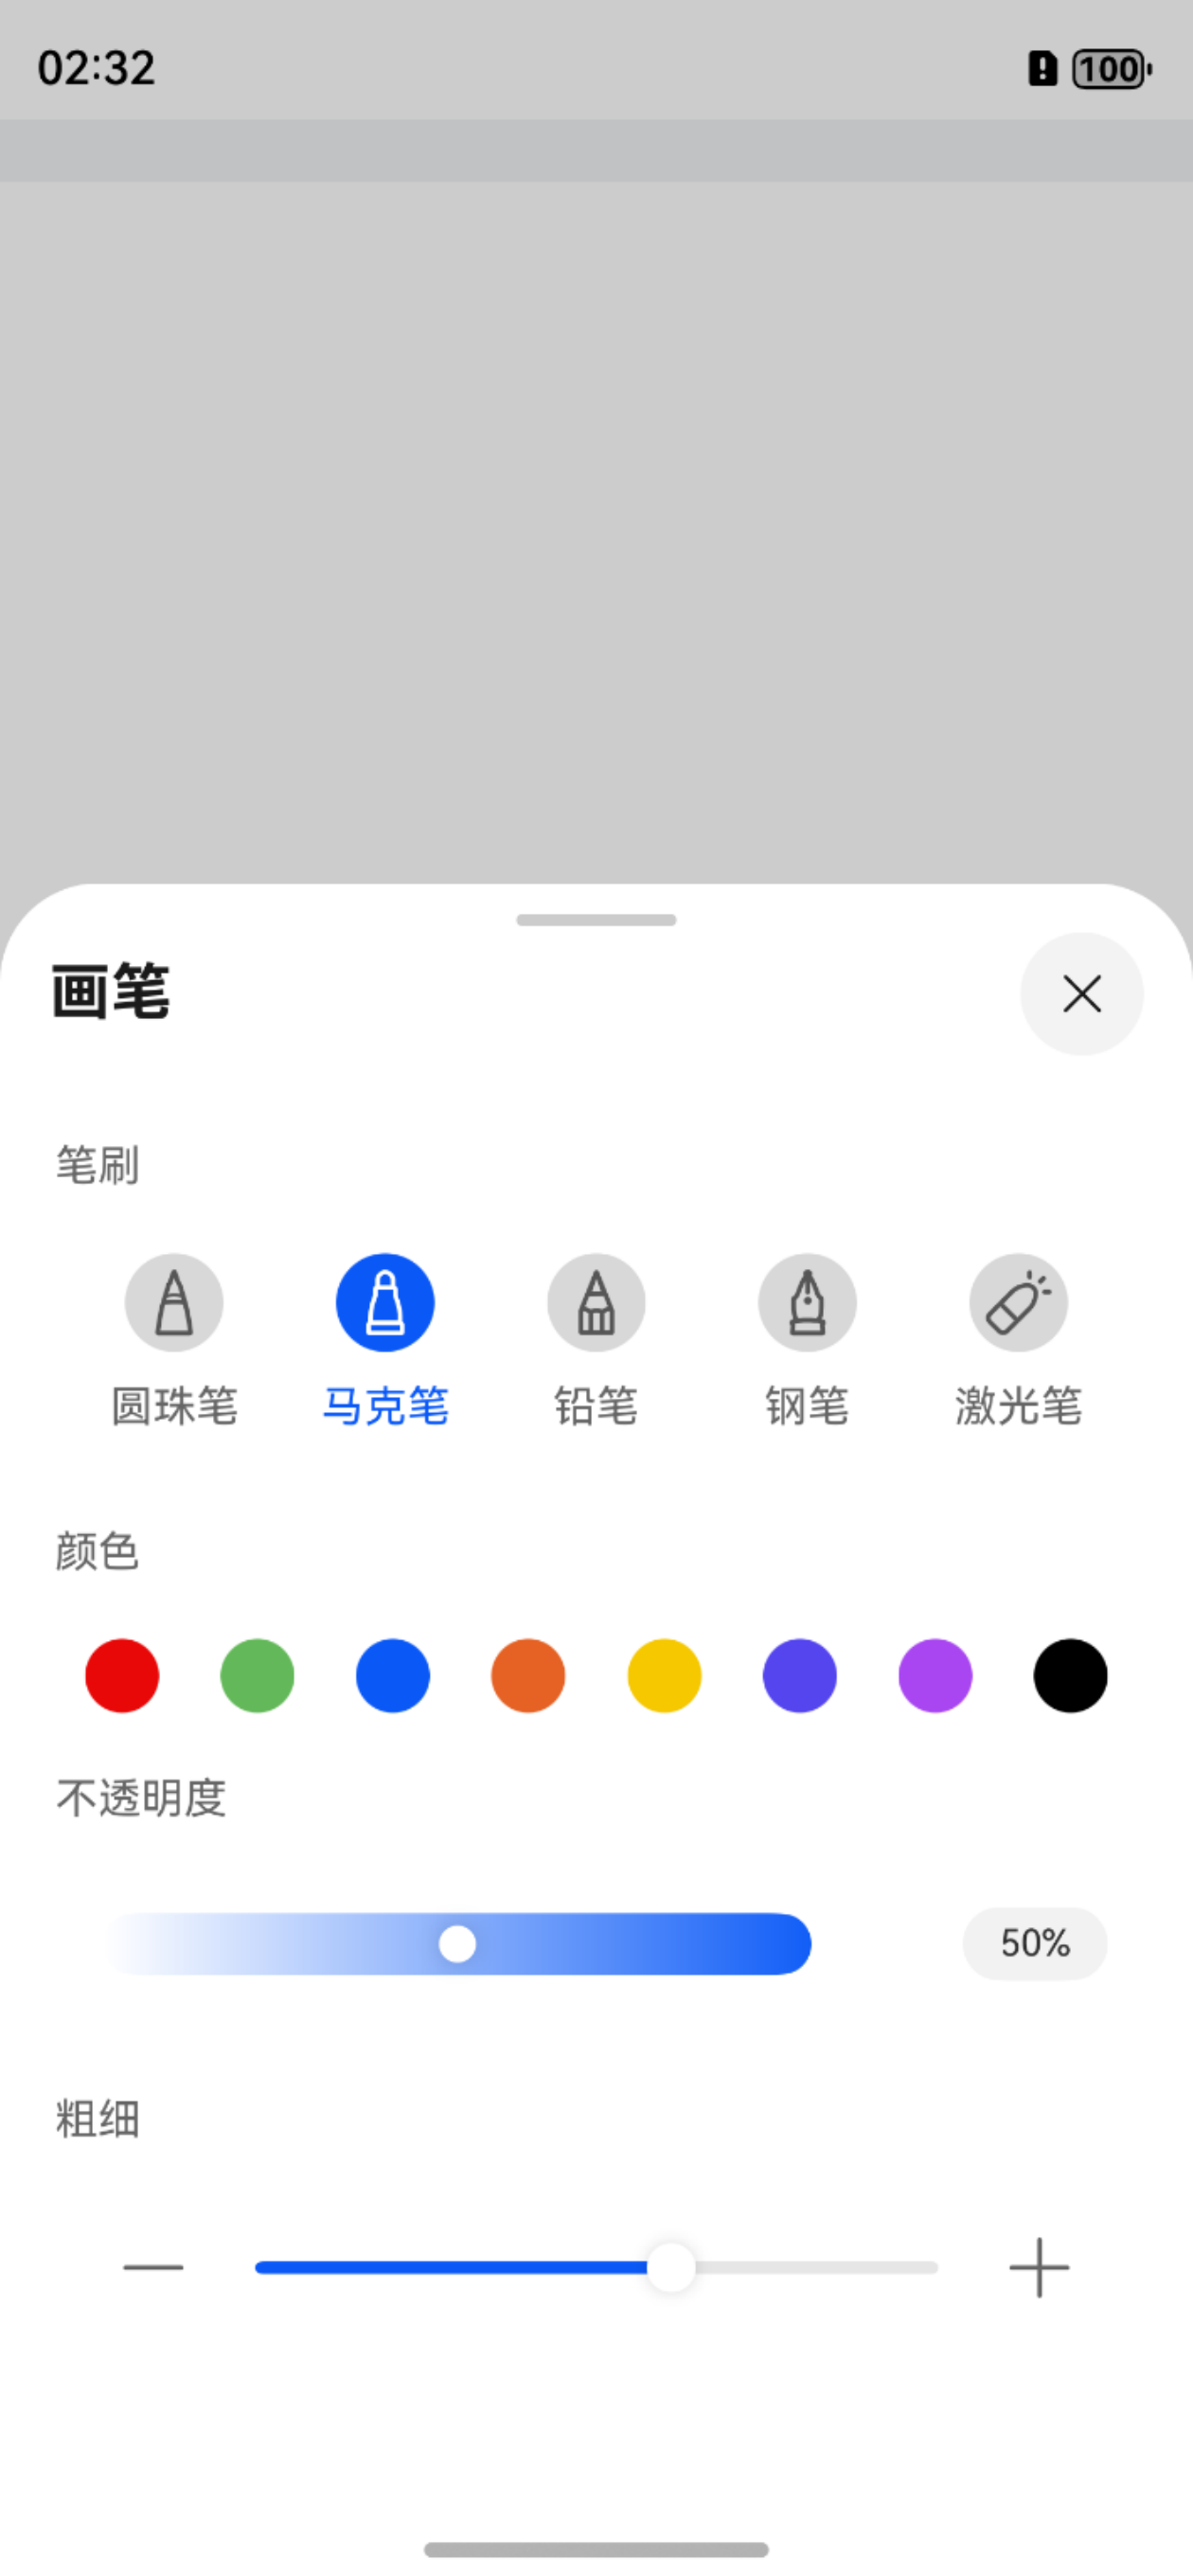
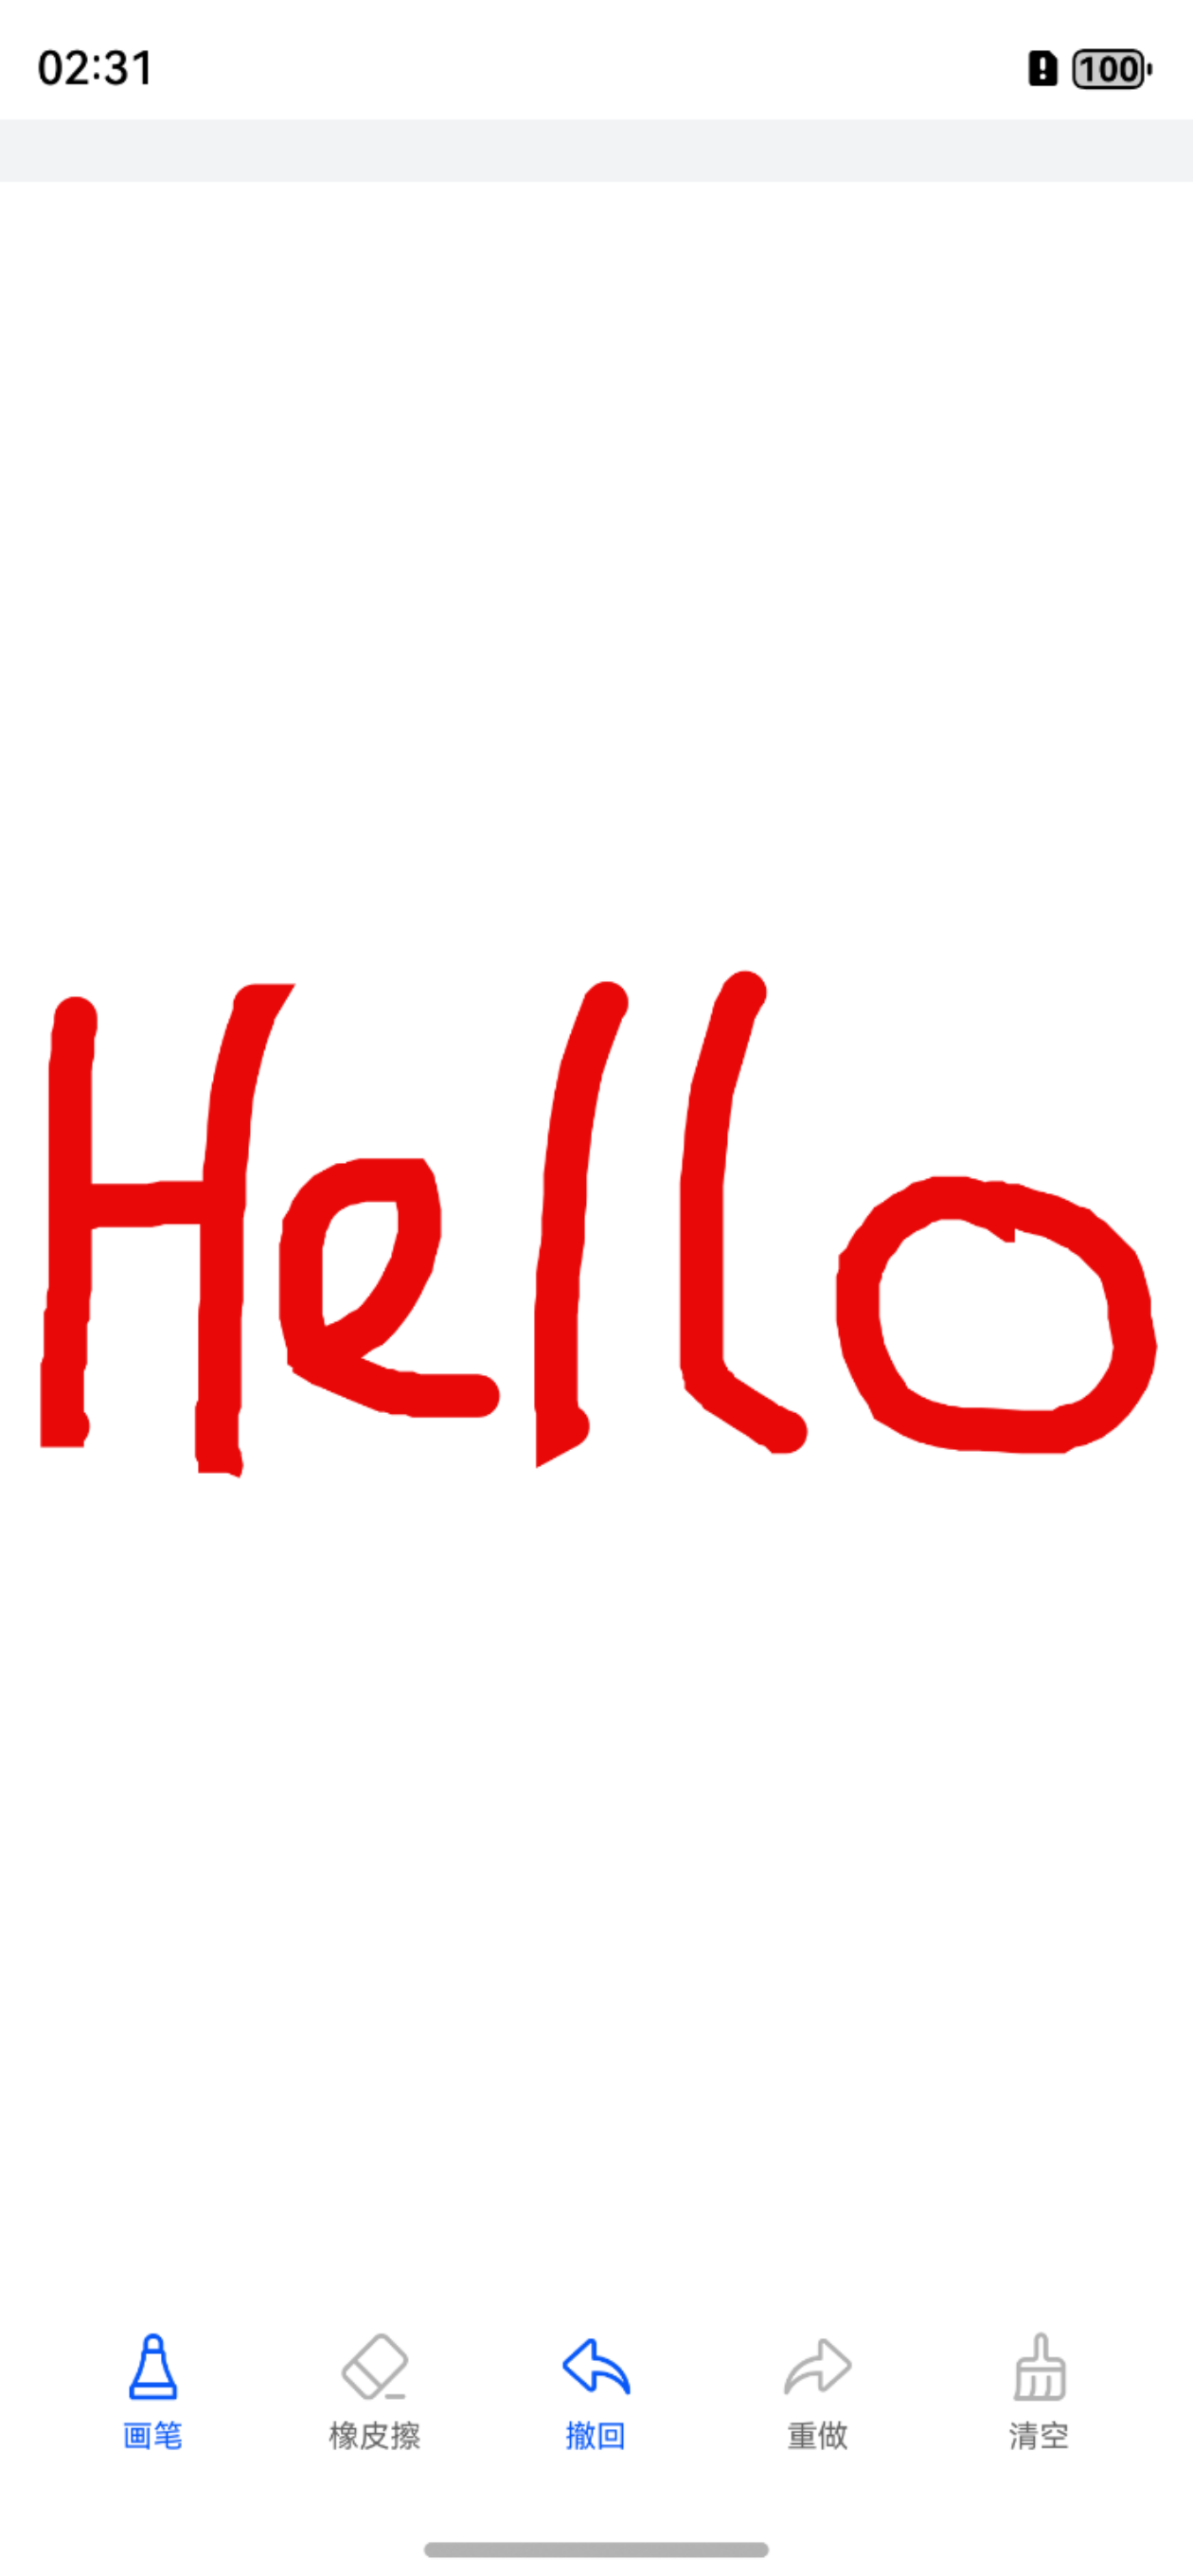
二、案例运用到的知识点
- 核心知识点
- Canvas:画布组件,用于自定义绘制图形。
- 手势事件:onTouch/gesture。
- 折叠屏适配:display。
- 其他知识点
- ArkTS 语言基础
- V2版状态管理:@ComponentV2/@Local/@Param/@Event/!!语法/@Provider/@Consumer/@Monitor
- 渲染控制:if/ForEach
- 自定义组件和组件生命周期
- 自定义构建函数@Builder
- 内置组件:Stack/Slider/Image/Column/Row/Text/Button
- 常量与资源分类的访问
- MVVM模式
三、代码结构
├──entry/src/main/ets/
│  ├──common
│  │  └──CommonConstants.ets         // 公共常量类
│  ├──entryability
│  │  └──EntryAbility.ets            // 程序入口类
│  ├──pages
│  │  └──Index.ets                   // 首页
│  ├──view
│  │  └──myPaintSheet.ets            // 半模态页面
│  └──viewmodel
│     ├──DrawInvoker.ets             // 绘制方法
│     ├──IBrush.ets                  // 笔刷接口
│     ├──IDraw.ets                   // 绘制类
│     └──Paint.ets                   // 绘制属性类
└──entry/src/main/resources          // 应用静态资源目录
四、公共文件与资源
本案例涉及到的常量类和工具类代码如下:
- 通用常量类
// main/ets/common/utils/CommonConstants.ets
export class CommonConstants {
  static readonly ZERO: number = 0
  static readonly ONE: number = 1
  static readonly NEGATIVE_ONE: number = -1
  static readonly THREE: number = 3
  static readonly TEN: number = 10
  static readonly TWENTY_ONE: number = 21
  static readonly CANVAS_WIDTH: number = 750
  static readonly ONE_HUNDRED: number = 100
  static readonly COLOR_STRING: string = ''
  static readonly SIGN: string = '%'
  static readonly BLACK: string = 'black'
  static readonly ONE_HUNDRED_PERCENT: string = '100%'
  static readonly COLOR_ARR: string[] = ['#E90808', '#63B959', '#0A59F7', '#E56224', '#F6C800', '#5445EF', '#A946F1',
    '#000000']
  static readonly WHITE: string = '#ffffff'
  static readonly DETENTS: [Length, Length] = [550, 600]
}
本案例涉及到的资源文件如下:
- string.json
// main/resources/base/element/string.json
{
  "string": [
    {
      "name": "module_desc",
      "value": "module description"
    },
    {
      "name": "EntryAbility_desc",
      "value": "description"
    },
    {
      "name": "EntryAbility_label",
      "value": "自定义Canvas画布"
    },
    {
      "name": "paint",
      "value": "画笔"
    },
    {
      "name": "brash",
      "value": "笔刷"
    },
    {
      "name": "ballpoint",
      "value": "圆珠笔"
    },
    {
      "name": "marker",
      "value": "马克笔"
    },
    {
      "name": "pencil",
      "value": "铅笔"
    },
    {
      "name": "fountain_pen",
      "value": "钢笔"
    },
    {
      "name": "laser_pointer",
      "value": "激光笔"
    },
    {
      "name": "color",
      "value": "颜色"
    },
    {
      "name": "opacity",
      "value": "不透明度"
    },
    {
      "name": "thicknesses",
      "value": "粗细"
    },
    {
      "name": "rubber",
      "value": "橡皮擦"
    },
    {
      "name": "redo",
      "value": "撤回"
    },
    {
      "name": "undo",
      "value": "重做"
    },
    {
      "name": "clear",
      "value": "清空"
    }
  ]
}- float.json
// main/resources/base/element/float.json
{
  "float": [
    {
      "name": "font_size",
      "value": "14fp"
    },
    {
      "name": "margin_bottom",
      "value": "20vp"
    },
    {
      "name": "back_width",
      "value": "32vp"
    },
    {
      "name": "image_width",
      "value": "24vp"
    },
    {
      "name": "border_radius",
      "value": "16vp"
    },
    {
      "name": "border_radius_m",
      "value": "12vp"
    },
    {
      "name": "margin_top",
      "value": "10vp"
    },
    {
      "name": "font_size_m",
      "value": "10fp"
    },
    {
      "name": "font_size_l",
      "value": "12fp"
    },
    {
      "name": "brash_width",
      "value": "58vp"
    },
    {
      "name": "brash_height",
      "value": "59vp"
    },
    {
      "name": "padding_left",
      "value": "18vp"
    },
    {
      "name": "title_bottom",
      "value": "30vp"
    },
    {
      "name": "paint_width",
      "value": "72vp"
    },
    {
      "name": "paint_height",
      "value": "52vp"
    },
    {
      "name": "slider_width",
      "value": "242vp"
    },
    {
      "name": "number",
      "value": "47vp"
    },
    {
      "name": "bottom",
      "value": "5vp"
    },
    {
      "name": "height",
      "value": "550vp"
    }
  ]
}- color.json
// main/resources/base/element/color.json
{
  "color": [
    {
      "name": "start_window_background",
      "value": "#FFFFFF"
    },
    {
      "name": "theme_color",
      "value": "#0A59F7"
    },
    {
      "name": "paint_color",
      "value": "#D8D8D8"
    },
    {
      "name": "linear_start",
      "value": "#000A59F7"
    },
    {
      "name": "linear_end",
      "value": "#F70A59F7"
    },
    {
      "name": "number_color",
      "value": "#0D000000"
    }
  ]
}
其他资源请到源码中获取。
五、画布主界面
// main/ets/pages/Index.ets
// 引入 ArkUI 显示模块
import { display } from '@kit.ArkUI'
// 引入命令模式实现类(用于管理绘图命令)
import DrawInvoker from '../viewmodel/DrawInvoker'
// 引入绘制路径接口
import DrawPath from '../viewmodel/IDraw'
// 引入画笔接口及实现
import { IBrush } from '../viewmodel/IBrush'
import NormalBrush from '../viewmodel/IBrush'
// 引入颜料属性类
import Paint from '../viewmodel/Paint'
// 引入通用常量
import { CommonConstants } from '../common/CommonConstants'
// 引入自定义底部设置面板组件
import { myPaintSheet } from '../view/myPaintSheet'

@Entry
@ComponentV2
struct DrawCanvas {
  // 定义组件的状态变量
  // 本地状态变量,用于管理组件内部状态
  @Local isDrawing: boolean = false // 是否正在绘制
  @Local unDoDraw: boolean = false // 是否可以撤销
  @Local redoDraw: boolean = false // 是否可以重做
  @Local isPaint: boolean = true // 是否为画笔模式(true 为画笔,false 为橡皮擦)
  @Local isShow: boolean = false // 是否显示设置面板
  @Local isMarker: boolean = false // 是否为标记模式(未使用)
  @Local scaleValueX: number = 1 // X 轴缩放比例
  @Local scaleValueY: number = 1 // Y 轴缩放比例
  @Local pinchValueX: number = 1 // 捏合手势的 X 轴基准值
  @Local pinchValueY: number = 1 // 捏合手势的 Y 轴基准值
  @Local strokeWidth: number = 3 // 画笔粗细
  @Local alpha: number = 1 // 透明度(0-1)
  @Local color: string = '#000000' // 画笔颜色
  @Local thicknessesValue: number = 3 // 显示用的粗细值
  @Local index: number = -1 // 手势操作索引
  @Local clean: boolean = false // 是否已清空画布
  @Local percent: string = '100' // 缩放百分比
  // 提供全局访问的颜料属性对象
  @Provider() mPaint: Paint = new Paint(0, '', 1)
  // 提供全局访问的画笔工具
  @Provider() mBrush: IBrush = new NormalBrush()

  // 画布渲染设置(开启抗锯齿)
  private setting: RenderingContextSettings = new RenderingContextSettings(true)
  // 2D 画布上下文对象
  private context: CanvasRenderingContext2D = new CanvasRenderingContext2D(this.setting)
  // 命令执行器(管理绘制命令)
  private drawInvoker: DrawInvoker = new DrawInvoker()
  // 当前绘制的路径对象
  private path2Db: Path2D = new Path2D()
  // 绘制路径数据对象(包含颜料属性和路径)
  private mPath: DrawPath = new DrawPath(this.mPaint, this.path2Db)
  // 触摸点坐标缓存数组(用于手势识别)
  private arr: number[] = []

  // 监听 isDrawing 变化的回调方法
  @Monitor('isDrawing')
  createDraw() {
    if (this.isDrawing) {
      // 用白色填充画布背景
      this.context.fillStyle = Color.White
      this.context.fillRect(CommonConstants.ZERO, CommonConstants.ZERO, this.context.width, this.context.height)
      // 执行所有绘制命令
      this.drawInvoker.execute(this.context)
      this.isDrawing = false
    }
  }

  aboutToAppear(): void {
    // 初始化默认画笔属性
    this.mPaint = new Paint(CommonConstants.ZERO, CommonConstants.COLOR_STRING, CommonConstants.ONE)
    this.mPaint.setStrokeWidth(CommonConstants.THREE) // 设置默认笔触宽度为 3
    this.mPaint.setColor(CommonConstants.BLACK) // 设置默认颜色为黑色
    this.mPaint.setGlobalAlpha(CommonConstants.ONE) // 设置默认完全不透明
    // 使用普通画笔
    this.mBrush = new NormalBrush()

    // 监听折叠屏状态变化事件
    display.on('foldStatusChange', (data: display.FoldStatus) => {
      if (data === 2) {
        this.scaleValueX = 0.5
        this.pinchValueX = 0.5
        this.scaleValueY = 1
        this.pinchValueY = 1
        this.context.clearRect(0, 0, this.context.width, this.context.height)
        this.drawInvoker.execute(this.context)
      } else if (data === 1) {
        this.scaleValueX = 1
        this.scaleValueY = 1
        this.pinchValueX = 1
        this.pinchValueY = 1
        this.context.clearRect(0, 0, this.context.width, this.context.height)
        this.drawInvoker.execute(this.context)
      }
    })
  }

  /**
   * 添加绘制路径到命令执行器
   * @param path 要添加的绘制路径对象
   */
  add(path: DrawPath): void {
    this.drawInvoker.add(path)
  }

  // 更新画笔属性(颜色/粗细/透明度)
  ToggleThicknessColor(): void {
    // 创建新 Paint 对象并更新属性
    this.mPaint = new Paint(CommonConstants.ZERO, CommonConstants.COLOR_STRING, CommonConstants.ONE)
    this.mPaint.setStrokeWidth(this.strokeWidth) // 设置笔触宽度
    this.mPaint.setColor(this.color) // 设置颜色
    this.mPaint.setGlobalAlpha(this.alpha) // 设置透明度
    // 使用普通画笔
    this.mBrush = new NormalBrush()
  }

  // 执行撤销操作
  drawOperateUndo(): void {
    this.drawInvoker.undo() // 执行撤销
    this.isDrawing = true // 标记需要重绘
    // 更新按钮状态
    if (!this.drawInvoker.canUndo()) {
      this.unDoDraw = false
    }
    this.redoDraw = true
  }

  // 执行重做操作
  drawOperateRedo(): void {
    this.drawInvoker.redo() // 执行重做
    this.isDrawing = true // 标记需要重绘
    // 更新按钮状态
    if (!this.drawInvoker.canRedo()) {
      this.redoDraw = false
    }
    this.unDoDraw = true
  }

  // 清空画布操作
  clear(): void {
    this.drawInvoker.clear() // 清除所有绘制命令
    this.isDrawing = true // 标记需要重绘
    // 重置按钮状态
    this.redoDraw = false
    this.unDoDraw = false
  }

  // 构建底部设置面板的 Builder 方法
  @Builder
  myPaintSheet() {
    Column() {
      // 使用自定义设置面板组件
      myPaintSheet({
        isMarker: this.isMarker!!, // 传递标记模式状态
        alpha: this.alpha!!, // 当前透明度
        percent: this.percent!!, // 缩放百分比
        color: this.color!!, // 当前颜色
        thicknessesValue: this.thicknessesValue!!, // 显示用粗细值
        strokeWidth: this.strokeWidth!!, // 实际笔触宽度
      })
    }
  }

  build() {
    Stack({ alignContent: Alignment.Bottom }) {
      Canvas(this.context)
        .width(CommonConstants.CANVAS_WIDTH)
        .height(CommonConstants.CANVAS_WIDTH)
        .backgroundColor($r('sys.color.white'))
        .onTouch((event: TouchEvent) => { // 触摸事件处理
          this.clean = false // 重置清空状态
          // 多指操作或正在缩放时返回
          if (this.index === 1 || event.touches.length > 1) {
            return
          }
          // 记录触摸点坐标
          this.arr.push(event.touches[0].x + event.touches[0].y)

          // 手指按下事件处理
          if (event.touches.length === 1 && event.touches[0].id === 0 && event.type === TouchType.Down) {
            // 创建新路径
            this.mPath = new DrawPath(this.mPaint, this.path2Db)
            this.mPath.paint = this.mPaint
            this.mPath.path = new Path2D()
            // 记录起始点
            this.mBrush.down(this.mPath.path, event.touches[0].x, event.touches[0].y)
          }

          // 手指移动事件处理
          if (event.touches.length === 1 && event.touches[0].id === 0 && event.type === TouchType.Move) {
            // 更新路径
            this.mBrush.move(this.mPath.path, event.touches[0].x, event.touches[0].y)
            // 清空并重绘
            this.context.clearRect(0, 0, this.context.width, this.context.height)
            this.drawInvoker.execute(this.context)
            // 绘制当前路径(超过 4 个点后显示)
            if (this.arr.length > 4) {
              this.mPath.draw(this.context)
            }
          }

          // 手指抬起事件处理
          if (event.touches.length === 1 && event.touches[0].id === 0 && event.type === TouchType.Up) {
            this.add(this.mPath) // 添加路径到命令列表
            this.arr = [] // 清空坐标缓存
            // 更新按钮状态
            this.redoDraw = false
            this.unDoDraw = true
            this.isDrawing = true
            // 清空并重绘
            this.context.clearRect(0, 0, this.context.width, this.context.height)
            this.drawInvoker.execute(this.context)
          }
        })
          // 应用缩放变换
        .scale({
          x: this.scaleValueX,
          y: this.scaleValueY,
          z: CommonConstants.ONE
        })
          // 捏合手势处理
        .gesture(
          PinchGesture()
            .onActionStart(() => {
              this.index = 1 // 标记手势开始
            })
            .onActionUpdate((event: GestureEvent) => {
              this.context.clearRect(0, 0, this.context.width, this.context.height)
              this.drawInvoker.execute(this.context)
              if (event) {
                // 更新缩放值
                this.scaleValueX = this.pinchValueX * event.scale
                this.scaleValueY = this.pinchValueY * event.scale
              }
            })
            .onActionEnd(() => {
              // 保存当前缩放值为基准值
              this.pinchValueX = this.scaleValueX
              this.pinchValueY = this.scaleValueY
              this.context.clearRect(0, 0, this.context.width, this.context.height)
              this.drawInvoker.execute(this.context)
            })
        )

      // 手势操作层(覆盖整个画布)
      Column()
        .width(CommonConstants.ONE_HUNDRED_PERCENT)
        .height(CommonConstants.ONE_HUNDRED_PERCENT)
        .backgroundColor(Color.Transparent)
        .zIndex(this.index) // 控制层级
        .gesture(
          PinchGesture()
            .onActionStart(() => {
              this.index = 1
            })
            .onActionUpdate((event: GestureEvent) => {
              this.context.clearRect(0, 0, this.context.width, this.context.height)
              this.drawInvoker.execute(this.context)
              if (event) {
                this.scaleValueX = this.pinchValueX * event.scale
                this.scaleValueY = this.pinchValueY * event.scale
              }
            })
            .onActionEnd(() => {
              this.context.clearRect(0, 0, this.context.width, this.context.height)
              this.drawInvoker.execute(this.context)
              this.pinchValueX = this.scaleValueX
              this.pinchValueY = this.scaleValueY
            })
        )

      // 底部工具栏
      Row() {
        // 画笔工具按钮
        Stack() {
          Column() {
            // 动态切换按钮图标
            Image(this.isPaint && this.index === CommonConstants.NEGATIVE_ONE ? $r('app.media.paintbrush_active') :
            $r('app.media.paintbrush'))
              .width($r('app.float.image_width'))
              .height($r('app.float.image_width'))
              .margin({ bottom: $r('app.float.bottom') })
            // 按钮文字
            Text($r('app.string.paint'))
              .fontSize($r('app.float.font_size_m'))
              .fontColor(this.isPaint && this.index === CommonConstants.NEGATIVE_ONE ? $r('app.color.theme_color') :
              $r('sys.color.mask_secondary'))
          }
          .width(CommonConstants.ONE_HUNDRED_PERCENT)
          .height(CommonConstants.ONE_HUNDRED_PERCENT)

          // 透明按钮覆盖
          Button({ type: ButtonType.Normal })
            .backgroundColor(Color.Transparent)
            .width(CommonConstants.ONE_HUNDRED_PERCENT)
            .height(CommonConstants.ONE_HUNDRED_PERCENT)
            .onClick(() => {
              this.ToggleThicknessColor() // 更新画笔属性
              this.isPaint = true // 切换为画笔模式
              this.isShow = !this.isShow // 切换设置面板显示
              this.index = -1 // 重置手势索引
              this.arr = [] // 清空坐标缓存
            })
        }
        // 绑定底部设置面板
        .bindSheet($$this.isShow, this.myPaintSheet(), {
          height: $r('app.float.height'),
          backgroundColor: Color.White,
          title: {
            title: $r('app.string.paint')
          },
          detents: CommonConstants.DETENTS
        })
        .width($r('app.float.paint_width'))
        .height($r('app.float.paint_height'))

        // 橡皮擦工具按钮(结构类似画笔按钮)
        Stack() {
          Column() {
            Image(this.isPaint || this.index === CommonConstants.ONE ? $r('app.media.rubbers') :
            $r('app.media.rubbers_active'))
              .width($r('app.float.image_width'))
              .height($r('app.float.image_width'))
              .margin({ bottom: $r('app.float.bottom') })
            Text($r('app.string.rubber'))
              .fontSize($r('app.float.font_size_m'))
              .fontColor(this.isPaint || this.index === CommonConstants.ONE ? $r('sys.color.mask_secondary') :
              $r('app.color.theme_color'))

          }
          .width(CommonConstants.ONE_HUNDRED_PERCENT)
          .height(CommonConstants.ONE_HUNDRED_PERCENT)

          Button({ type: ButtonType.Normal })
            .backgroundColor(Color.Transparent)
            .width(CommonConstants.ONE_HUNDRED_PERCENT)
            .height(CommonConstants.ONE_HUNDRED_PERCENT)
            .onClick(() => {
              this.mPaint = new Paint(CommonConstants.ZERO, CommonConstants.COLOR_STRING, CommonConstants.ONE)
              this.mPaint.setStrokeWidth(CommonConstants.TEN)
              this.mPaint.setColor(CommonConstants.WHITE)
              this.mPaint.setGlobalAlpha(CommonConstants.ONE)
              this.isPaint = false
            })
        }
        .width($r('app.float.paint_width'))
        .height($r('app.float.paint_height'))

        // 撤销按钮
        Stack() {
          Column() {
            Image(this.unDoDraw ? $r('app.media.recall_active') : $r('app.media.recall'))
              .width($r('app.float.image_width'))
              .height($r('app.float.image_width'))
              .margin({ bottom: $r('app.float.bottom') })
            Text($r('app.string.redo'))
              .fontSize($r('app.float.font_size_m'))
              .fontColor(this.unDoDraw ? $r('app.color.theme_color') : $r('sys.color.mask_secondary'))
          }
          .width(CommonConstants.ONE_HUNDRED_PERCENT)
          .height(CommonConstants.ONE_HUNDRED_PERCENT)

          Button({ type: ButtonType.Normal })
            .backgroundColor(Color.Transparent)
            .enabled(this.unDoDraw)
            .width(CommonConstants.ONE_HUNDRED_PERCENT)
            .height(CommonConstants.ONE_HUNDRED_PERCENT)
            .onClick(async () => {
              this.drawOperateUndo()
              this.context.clearRect(0, 0, this.context.width, this.context.height)
              this.drawInvoker.execute(this.context)
            })
        }
        .width($r('app.float.paint_width'))
        .height($r('app.float.paint_height'))

        // 重做按钮(结构类似撤销按钮)
        Stack() {
          Column() {
            Image(this.redoDraw ? $r('app.media.redo_active') : $r('app.media.redo'))
              .width($r('app.float.image_width'))
              .height($r('app.float.image_width'))
              .margin({ bottom: $r('app.float.bottom') })
            Text($r('app.string.undo'))
              .fontSize($r('app.float.font_size_m'))
              .fontColor(this.redoDraw ? $r('app.color.theme_color') : $r('sys.color.mask_secondary'))
          }
          .width(CommonConstants.ONE_HUNDRED_PERCENT)
          .height(CommonConstants.ONE_HUNDRED_PERCENT)

          Button({ type: ButtonType.Normal })
            .backgroundColor(Color.Transparent)
            .enabled(this.redoDraw)
            .width(CommonConstants.ONE_HUNDRED_PERCENT)
            .height(CommonConstants.ONE_HUNDRED_PERCENT)
            .onClick(async () => {
              this.drawOperateRedo()
              this.context.clearRect(0, 0, this.context.width, this.context.height)
              this.drawInvoker.execute(this.context)
            })
        }
        .width($r('app.float.paint_width'))
        .height($r('app.float.paint_height'))

        // 清空按钮
        Stack() {
          Column() {
            Image(this.clean ? $r('app.media.clear_active') : $r('app.media.clear'))
              .width($r('app.float.image_width'))
              .height($r('app.float.image_width'))
              .margin({ bottom: $r('app.float.bottom') })
            Text($r('app.string.clear'))
              .fontSize($r('app.float.font_size_m'))
              .fontColor(this.clean ? $r('app.color.theme_color') : $r('sys.color.mask_secondary'))
          }
          .width(CommonConstants.ONE_HUNDRED_PERCENT)
          .height(CommonConstants.ONE_HUNDRED_PERCENT)

          Button({ type: ButtonType.Normal })
            .backgroundColor(Color.Transparent)
            .width(CommonConstants.ONE_HUNDRED_PERCENT)
            .height(CommonConstants.ONE_HUNDRED_PERCENT)
            .onClick(async () => {
              this.clear()
              this.context.clearRect(0, 0, this.context.width, this.context.height)
              this.drawInvoker.execute(this.context)
              this.clean = true
            })
        }
        .width($r('app.float.paint_width'))
        .height($r('app.float.paint_height'))
      }
      .justifyContent(FlexAlign.SpaceBetween)
      .alignItems(VerticalAlign.Center)
      .zIndex(CommonConstants.TEN)
    }
    .backgroundColor($r('sys.color.comp_background_focus'))
    .width(CommonConstants.ONE_HUNDRED_PERCENT)
    .height(CommonConstants.ONE_HUNDRED_PERCENT)
  }
}
六、管理绘图命令类
// main/ets/viewmodel/DrawInvoker.ets
import { List } from '@kit.ArkTS'
import DrawPath from './IDraw'

export default class DrawInvoker {
  // Draw list.
  private drawPathList: List<DrawPath> = new List<DrawPath>()
  // Redo list.
  private redoList: Array<DrawPath> = new Array<DrawPath>()

  add(command: DrawPath): void {
    this.drawPathList.add(command)
    this.redoList = []
  }

  clear(): void {
    if (this.drawPathList.length > 0 || this.redoList.length > 0) {
      this.drawPathList.clear()
      this.redoList = []
    }
  }

  undo(): void {
    if (this.drawPathList.length > 0) {
      let undo: DrawPath = this.drawPathList.get(this.drawPathList.length - 1)
      this.drawPathList.removeByIndex(this.drawPathList.length - 1)
      this.redoList.push(undo)
    }
  }

  redo(): void {
    if (this.redoList.length > 0) {
      let redoCommand = this.redoList[this.redoList.length - 1]
      this.redoList.pop()
      this.drawPathList.add(redoCommand)
    }
  }

  execute(context: CanvasRenderingContext2D): void {
    if (this.drawPathList !== null) {
      this.drawPathList.forEach((element: DrawPath) => {
        element.draw(context)
      })
    }
  }

  canRedo(): boolean {
    return this.redoList.length > 0
  }

  canUndo(): boolean {
    return this.drawPathList.length > 0
  }
}
七、绘制路径接口
// main/ets/viewmodel/IDraw.ets
import Paint from './Paint'

export interface IDraw {
  draw(context: CanvasRenderingContext2D): void
}

export default class DrawPath implements IDraw {
  public paint: Paint
  public path: Path2D

  constructor(paint: Paint, path: Path2D) {
    this.paint = paint
    this.path = path
  }

  draw(context: CanvasRenderingContext2D): void {
    context.lineWidth = this.paint.lineWidth
    context.strokeStyle = this.paint.StrokeStyle
    context.globalAlpha = this.paint.globalAlpha
    context.lineCap = 'round'
    context.stroke(this.path)
  }
}
八、画笔接口
// main/ets/viewmodel/IBrush.ets
export interface IBrush {
  down(path: Path2D, x: number, y: number): void;
  move(path: Path2D, x: number, y: number): void;
  up(path: Path2D, x: number, y: number): void;
}

export default class NormalBrush implements IBrush {
  down(path: Path2D, x: number, y: number): void {
    path.moveTo(x, y);
  }
  move(path: Path2D, x: number, y: number): void {
    path.lineTo(x, y);
  }
  up(path: Path2D, x: number, y: number): void {}
}
九、绘制类
// main/ets/viewmodel/Paint.ets
export default class Paint {
  lineWidth: number
  StrokeStyle: string
  globalAlpha: number

  constructor(lineWidth: number, StrokeStyle: string, globalAlpha: number) {
    this.lineWidth = lineWidth
    this.StrokeStyle = StrokeStyle
    this.globalAlpha = globalAlpha
  }

  setColor(color: string) {
    this.StrokeStyle = color
  }

  setStrokeWidth(width: number) {
    this.lineWidth = width
  }

  setGlobalAlpha(alpha: number) {
    this.globalAlpha = alpha
  }
}
十、自定义底部设置面板组件
// main/ets/view/myPaintSheet.ets
// 引入通用常量
import { CommonConstants } from '../common/CommonConstants'
// 引入画笔接口及实现
import { IBrush } from '../viewmodel/IBrush'
import NormalBrush from '../viewmodel/IBrush'
// 引入颜料属性类
import Paint from '../viewmodel/Paint'

// 组件装饰器(V2 版本)
@ComponentV2
export struct myPaintSheet {
  // region [参数和事件定义]
  // 是否为马克笔模式(参数)
  @Param isMarker: boolean = false
  // 更新 isMarker 的事件回调
  @Event $isMarker: (val: boolean) => void = (val: boolean) => {}

  // 透明度(参数)
  @Param alpha: number = 1
  // 更新透明度的事件回调
  @Event $alpha: (val: number) => void = (val: number) => {}

  // 透明度百分比(参数)
  @Param percent: string = '100'
  // 更新百分比的事件回调
  @Event $percent: (val: string) => void = (val: string) => {}

  // 画笔颜色(参数)
  @Param color: string = '#000000'
  // 更新颜色的事件回调
  @Event $color: (val: string) => void = (val: string) => {}

  // 画笔粗细值(参数)
  @Param thicknessesValue: number = 3
  // 更新粗细值的事件回调
  @Event $thicknessesValue: (val: number) => void = (val: number) => {}

  // 画笔宽度(参数)
  @Param strokeWidth: number = 3
  // 更新画笔宽度的事件回调
  @Event $strokeWidth: (val: number) => void = (val: number) => {}

  // 消费全局的颜料属性对象
  @Consumer() mPaint: Paint = new Paint(0, '', 1)
  // 消费全局的画笔工具
  @Consumer() mBrush: IBrush = new NormalBrush()
  // endregion

  // 更新画笔属性的方法
  ToggleThicknessColor() {
    // 创建新的 Paint 对象并更新属性
    this.mPaint = new Paint(CommonConstants.ZERO, CommonConstants.COLOR_STRING, CommonConstants.ONE)
    this.mPaint.setStrokeWidth(this.strokeWidth) // 设置笔触宽度
    this.mPaint.setColor(this.color) // 设置颜色
    this.mPaint.setGlobalAlpha(this.alpha) // 设置透明度
    // 使用普通画笔
    this.mBrush = new NormalBrush()
  }

  // 主构建方法
  build() {
    Column() {
      // 画笔类型选择区域
      Column() {
        // 标题
        Text($r('app.string.brash'))
          .textAlign(TextAlign.Start)
          .fontSize($r('app.float.font_size'))
          .fontColor($r('sys.color.mask_secondary'))
          .margin({ bottom: $r('app.float.margin_bottom') })

        // 画笔类型选项
        Row() {
          // 圆珠笔选项
          Column() {
            Stack() {
              // 背景
              Text()
                .width($r('app.float.back_width'))
                .height($r('app.float.back_width'))
                .backgroundColor(this.isMarker ? $r('app.color.paint_color') : $r('app.color.theme_color'))
                .borderRadius($r('app.float.border_radius'))
              // 图标
              Image(this.isMarker ? $r('app.media.Ballpoint') : $r('app.media.Ballpoint_active'))
                .width($r('app.float.image_width'))
                .height($r('app.float.image_width'))
              // 透明按钮
              Button({ type: ButtonType.Normal })
                .width($r('app.float.back_width'))
                .height($r('app.float.back_width'))
                .borderRadius($r('app.float.border_radius'))
                .backgroundColor(Color.Transparent)
                .onClick(() => {
                  this.$isMarker(false) // 设置为非马克笔模式
                  this.$alpha(1) // 设置透明度为 100%
                  this.$percent('100') // 设置百分比为 100%
                  this.ToggleThicknessColor() // 更新画笔属性
                })
            }
            // 标签
            Text($r('app.string.ballpoint'))
              .fontSize($r('app.float.font_size'))
              .fontColor(this.isMarker ? $r('sys.color.mask_secondary') : $r('app.color.theme_color'))
              .margin({ top: $r('app.float.margin_top') })
          }
          .width($r('app.float.brash_width'))
          .height($r('app.float.brash_height'))

          // 马克笔选项(结构与圆珠笔类似)
          Column() { /* ... */ }

          // 铅笔选项(仅显示,无交互)
          Column() { /* ... */ }

          // 钢笔选项(仅显示,无交互)
          Column() { /* ... */ }

          // 激光笔选项(仅显示,无交互)
          Column() { /* ... */ }
        }
        .padding({
          left: $r('app.float.margin_top'),
          right: $r('app.float.margin_top')
        })
        .width(CommonConstants.ONE_HUNDRED_PERCENT)
        .justifyContent(FlexAlign.SpaceBetween)
      }
      .padding({
        left: $r('app.float.padding_left'),
        right: $r('app.float.padding_left'),
        top: $r('app.float.margin_bottom')
      })
      .alignItems(HorizontalAlign.Start)
      .width(CommonConstants.ONE_HUNDRED_PERCENT)
      .margin({ bottom: $r('app.float.title_bottom') })

      // 颜色选择区域
      Column() {
        // 标题
        Text($r('app.string.color'))
          .textAlign(TextAlign.Start)
          .fontSize($r('app.float.font_size'))
          .fontColor($r('sys.color.mask_secondary'))
          .margin({ bottom: $r('app.float.margin_bottom') })

        // 颜色选项
        Row() {
          // 遍历颜色数组,生成颜色选项
          ForEach(CommonConstants.COLOR_ARR, (item: string) => {
            Text()
              .width($r('app.float.image_width'))
              .height($r('app.float.image_width'))
              .borderRadius($r('app.float.border_radius_m'))
              .backgroundColor(item) // 设置背景颜色
              .onClick(() => {
                this.$color(item) // 更新颜色
                setTimeout(() => {
                  this.ToggleThicknessColor() // 更新画笔属性
                }, 100)
              })
          }, (item: string) => JSON.stringify(item)) // 使用颜色值作为唯一键
        }
        .padding({
          left: $r('app.float.margin_top'),
          right: $r('app.float.margin_top')
        })
        .justifyContent(FlexAlign.SpaceBetween)
        .width(CommonConstants.ONE_HUNDRED_PERCENT)
      }
      .padding({
        left: $r('app.float.padding_left'),
        right: $r('app.float.padding_left')
      })
      .alignItems(HorizontalAlign.Start)
      .width(CommonConstants.ONE_HUNDRED_PERCENT)
      .margin({ bottom: $r('app.float.margin_bottom') })

      // 透明度调整区域
      Column() {
        // 标题
        Text($r('app.string.opacity'))
          .textAlign(TextAlign.Start)
          .fontSize($r('app.float.font_size'))
          .fontColor($r('sys.color.mask_secondary'))
          .margin({ bottom: $r('app.float.margin_top') })

        // 滑块和百分比显示
        Row() {
          Stack() {
            // 透明度滑块
            Slider({
              style: SliderStyle.InSet,
              value: this.alpha * CommonConstants.ONE_HUNDRED
            })
              .height($r('app.float.brash_width'))
              .width($r('app.float.slider_width'))
              .selectedColor(Color.Transparent)
              .minResponsiveDistance(CommonConstants.ONE)
              .trackColor(new LinearGradient([
                { color: $r('app.color.linear_start'), offset: CommonConstants.ZERO },
                { color: $r('app.color.linear_end'), offset: CommonConstants.ONE }
              ]))
              .onChange((value: number) => {
                if (this.isMarker) { // 仅在马克笔模式下生效
                  this.$alpha(value / 100) // 更新透明度
                  this.$percent(value.toFixed(0)) // 更新百分比
                  this.ToggleThicknessColor() // 更新画笔属性
                }
              })

            // 非马克笔模式下禁用滑块
            if (!this.isMarker) {
              Row()
                .backgroundColor(Color.Transparent)
                .width($r('app.float.slider_width'))
                .height($r('app.float.brash_width'))
            }
          }

          // 百分比显示
          Text(this.percent + CommonConstants.SIGN)
            .width($r('app.float.number'))
            .height($r('app.float.image_width'))
            .fontSize($r('app.float.font_size_l'))
            .borderRadius($r('app.float.border_radius_m'))
            .textAlign(TextAlign.Center)
            .backgroundColor($r('app.color.number_color'))
        }
        .padding({
          left: $r('app.float.margin_top'),
          right: $r('app.float.margin_top')
        })
        .justifyContent(FlexAlign.SpaceBetween)
        .width(CommonConstants.ONE_HUNDRED_PERCENT)
      }
      .padding({
        left: $r('app.float.padding_left'),
        right: $r('app.float.padding_left')
      })
      .alignItems(HorizontalAlign.Start)
      .width(CommonConstants.ONE_HUNDRED_PERCENT)
      .margin({ bottom: $r('app.float.margin_bottom') })

      // 画笔粗细调整区域
      Column() {
        // 标题
        Text($r('app.string.thicknesses'))
          .textAlign(TextAlign.Start)
          .fontSize($r('app.float.font_size'))
          .fontColor($r('sys.color.mask_secondary'))
          .margin({ bottom: $r('app.float.margin_bottom') })

        // 粗细调整控件
        Row() {
          // 减号按钮
          Image($r('app.media.minuses'))
            .width($r('app.float.image_width'))
            .height($r('app.float.image_width'))
            .onClick(() => {
              this.$thicknessesValue(this.thicknessesValue - 1) // 减小粗细值
              this.$strokeWidth(this.thicknessesValue) // 更新画笔宽度
              this.ToggleThicknessColor() // 更新画笔属性
            })

          // 粗细滑块
          Slider({
            value: this.thicknessesValue,
            min: CommonConstants.THREE,
            max: CommonConstants.TWENTY_ONE
          })
            .width($r('app.float.slider_width'))
            .minResponsiveDistance(CommonConstants.ONE)
            .onChange((value: number, _mode: SliderChangeMode) => {
              this.$thicknessesValue(value) // 更新粗细值
              this.$strokeWidth(value) // 更新画笔宽度
              this.ToggleThicknessColor() // 更新画笔属性
            })

          // 加号按钮
          Image($r('app.media.add'))
            .width($r('app.float.image_width'))
            .height($r('app.float.image_width'))
            .onClick(() => {
              this.$thicknessesValue(this.thicknessesValue + 1) // 增加粗细值
              this.$strokeWidth(this.thicknessesValue) // 更新画笔宽度
              this.ToggleThicknessColor() // 更新画笔属性
            })
        }
        .padding({
          left: $r('app.float.margin_bottom'),
          right: $r('app.float.margin_bottom')
        })
        .justifyContent(FlexAlign.SpaceBetween)
        .width(CommonConstants.ONE_HUNDRED_PERCENT)
      }
      .padding({
        left: $r('app.float.padding_left'),
        right: $r('app.float.padding_left')
      })
      .alignItems(HorizontalAlign.Start)
      .width(CommonConstants.ONE_HUNDRED_PERCENT)
    }
    .width(CommonConstants.ONE_HUNDRED_PERCENT)
    .height(CommonConstants.ONE_HUNDRED_PERCENT)
  }
}更多鸿蒙案例学习,请观看《HarmonyOS应用开发实战指南》
【补充知识点】
使用画布绘制自定义图形 (Canvas)
Canvas提供画布组件,用于自定义绘制图形,绘制对象可以是基础形状、文本、图片等。
使用画布组件绘制自定义图形
可以由以下三种形式在画布绘制自定义图形。
直接绘制
使用CanvasRenderingContext2D对象在Canvas画布上绘制。
@Entry
@ComponentV2
struct CanvasExample1 {
  // 用来配置CanvasRenderingContext2D对象的参数,
  // 包括是否开启抗锯齿,true表明开启抗锯齿。
  private settings: RenderingContextSettings =
    new RenderingContextSettings(true)

  // 用来创建CanvasRenderingContext2D对象,
  // 通过在canvas中调用CanvasRenderingContext2D对象来绘制。
  private context: CanvasRenderingContext2D =
    new CanvasRenderingContext2D(this.settings)

  build() {
    Flex({
      direction: FlexDirection.Column,
      alignItems: ItemAlign.Center,
      justifyContent: FlexAlign.Center
    }) {
      //在canvas中调用CanvasRenderingContext2D对象。
      Canvas(this.context)
        .width('100%')
        .height('100%')
        .backgroundColor('#F5DC62')
        .onReady(() => {
          //可以在这里绘制内容。
          this.context.strokeRect(50, 50, 200, 150)
        })
    }
    .width('100%')
    .height('100%')
  }
}
代码运行效果如图11-14所示。
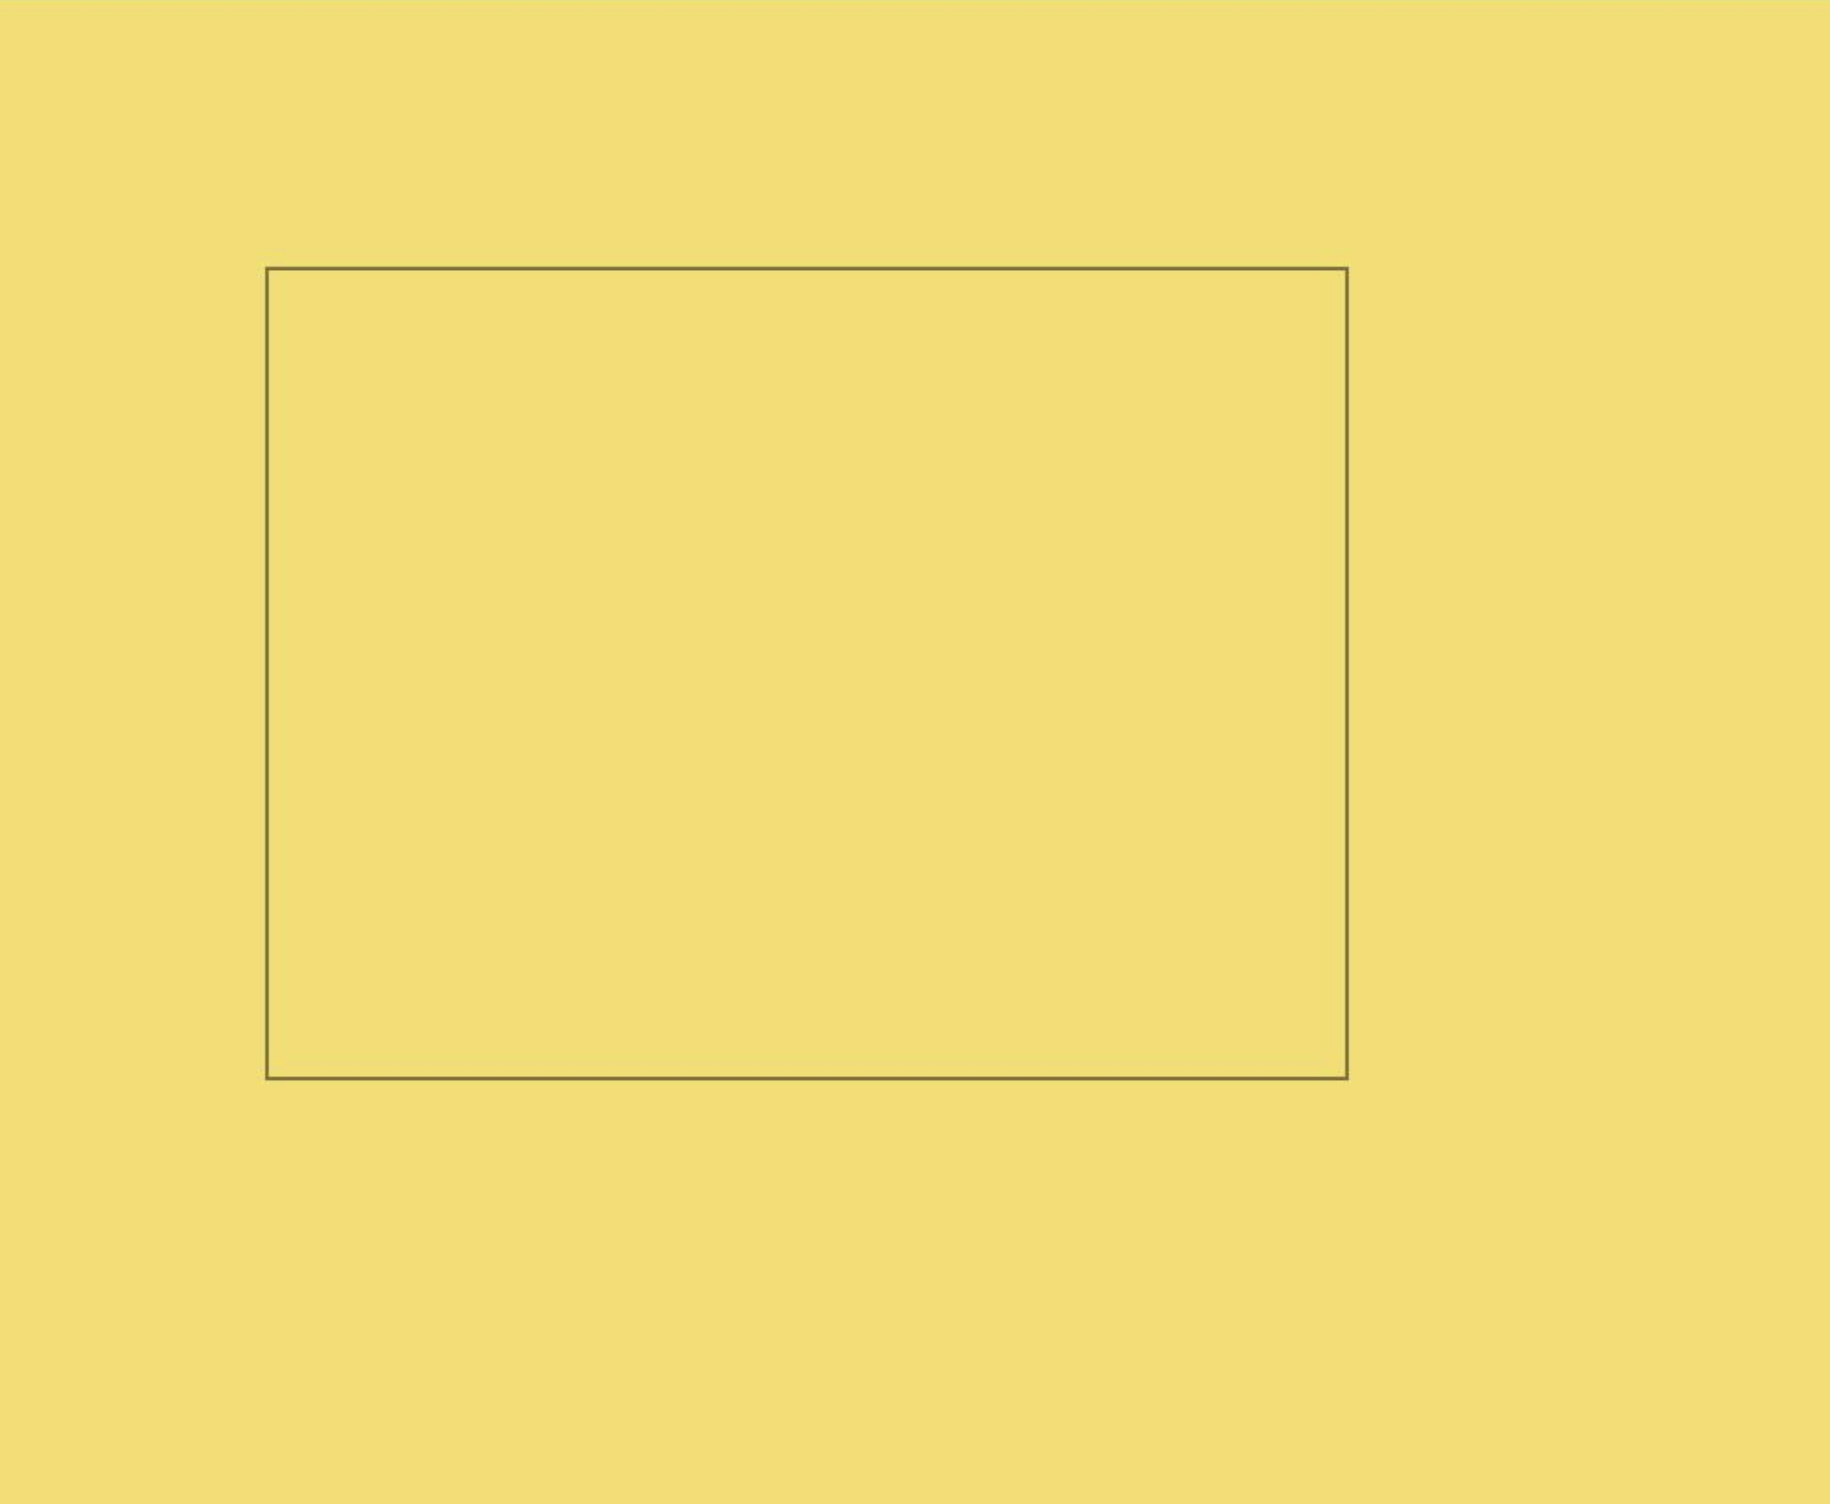
图11-14 效果图
离屏绘制
离屏绘制是指将需要绘制的内容先绘制在缓存区,再将其转换成图片,一次性绘制到Canvas上,加快了绘制速度。过程为:
- 通过transferToImageBitmap方法将离屏画布最近渲染的图像创建为一个ImageBitmap对象。
- 通过CanvasRenderingContext2D对象的transferFromImageBitmap方法显示给定的ImageBitmap对象。
@Entry
@ComponentV2
struct CanvasExample2 {
  // 用来配置CanvasRenderingContext2D对象
  // 和OffscreenCanvasRenderingContext2D对象的参数,
  // 包括是否开启抗锯齿。true表明开启抗锯齿
  private settings: RenderingContextSettings =
    new RenderingContextSettings(true)
  private context: CanvasRenderingContext2D =
    new CanvasRenderingContext2D(this.settings)

  // 用来创建OffscreenCanvas对象,width为离屏画布的宽度,height为离屏画布的高度。
  // 通过在canvas中调用OffscreenCanvasRenderingContext2D对象来绘制。
  private offCanvas: OffscreenCanvas = new OffscreenCanvas(600, 600)

  build() {
    Flex({
      direction: FlexDirection.Column,
      alignItems: ItemAlign.Center,
      justifyContent: FlexAlign.Center
    }) {
      Canvas(this.context)
        .width('100%')
        .height('100%')
        .backgroundColor('#F5DC62')
        .onReady(() => {
          let offContext = this.offCanvas.getContext("2d", this.settings)
          //可以在这里绘制内容
          offContext.strokeRect(50, 50, 200, 150)
          //将离屏绘值渲染的图像在普通画布上显示
          let image = this.offCanvas.transferToImageBitmap()
          this.context.transferFromImageBitmap(image)
        })
    }
    .width('100%')
    .height('100%')
  }
}
代码运行效果如图11-15所示。
图11-15 效果图
加载动画
可以应用第三方模块Lottie,在Canvas上加载Lottie动画。lottie是一个适用于OpenHarmony的动画库,它可以解析Adobe After Effects软件通过Bodymovin插件导出的json格式的动画,并在移动设备上进行本地渲染。
- 下载安装
在DevEco Studio的终端命令行里,运行如下命令:
$ ohpm install @ohos/lottie命令运行效果如图11-16所示。
图11-16 控制台效果
- 使用示例
本案例采用Lottie动画库的Canvas渲染模式,实现了一个卡通小动物开口说话的生动动画。
import lottie, { AnimationItem } from '@ohos/lottie'

@Entry
@ComponentV2
struct Index {
  // 构建上下文
  private renderingSettings: RenderingContextSettings =
    new RenderingContextSettings(true)
  private canvasRenderingContext: CanvasRenderingContext2D =
    new CanvasRenderingContext2D(this.renderingSettings)
  private animateItem: AnimationItem | null = null
  private animateName: string = "animation" // 动画名称

  // 页面销毁时释放动画资源
  aboutToDisappear(): void {
    console.info('aboutToDisappear')
    lottie.destroy()
  }

  build() {
    Row() {
      // 关联画布
      Canvas(this.canvasRenderingContext)
        .width(200)
        .height(200)
        .backgroundColor(Color.Gray)
        .onReady(() => {
          // 加载动画
          if (this.animateItem != null) {
            // 可在此生命回调周期中加载动画,可以保证动画尺寸正确
            this.animateItem.resize()
          } else {
            // 抗锯齿的设置
            this.canvasRenderingContext.imageSmoothingEnabled = true
            this.canvasRenderingContext.imageSmoothingQuality = 'medium'
            this.loadAnimation()
          }
        })
    }
  }

  loadAnimation() {
    this.animateItem = lottie.loadAnimation({
      container: this.canvasRenderingContext,
      renderer: 'canvas', // canvas 渲染模式
      loop: true,
      autoplay: false,
      name: this.animateName,
      contentMode: 'Contain',

      // 路径加载动画只支持entry/src/main/ets 文件夹下的相对路径
      path: "common/lottie/animation.json",
    })
    // 因为动画是异步加载,所以对animateItem的操作需要放在动画加载完成回调里操作
    this.animateItem.addEventListener(
      'DOMLoaded',
      (args: Object): void => {
        this.animateItem?.changeColor([225, 25, 100, 1])
        this.animateItem?.play()
      }
    )
  }

  destroy() {
    this.animateItem?.removeEventListener("DOMLoaded")
    lottie.destroy(this.animateName)
    this.animateItem = null
  }
}
代码运行效果如图11-17所示。

图11-17 效果图
初始化画布组件
onReady(event: () => void)是Canvas组件初始化完成时的事件回调,调用该事件后,可获取Canvas组件的确定宽高,进一步使用CanvasRenderingContext2D对象和OffscreenCanvasRenderingContext2D对象调用相关API进行图形绘制。
@Entry
@ComponentV2
struct Usage02 {
  private settings: RenderingContextSettings =
    new RenderingContextSettings(true)
  private context: CanvasRenderingContext2D =
    new CanvasRenderingContext2D(this.settings)

  build() {
    Canvas(this.context)
      .width('100%')
      .height('100%')
      .backgroundColor('#F5DC62')
      .onReady(() => {
        this.context.fillStyle = '#0097D4'
        this.context.fillRect(50, 50, 100, 100)
      })
  }
}
代码运行效果如图11-18所示。

图11-18 效果图
画布组件绘制方式
在Canvas组件生命周期接口onReady()调用之后,可以直接使用canvas组件进行绘制。或者可以脱离Canvas组件和onReady()生命周期,单独定义Path2d对象构造理想的路径,并在onReady()调用之后使用Canvas组件进行绘制。
直接绘制
通过CanvasRenderingContext2D对象和OffscreenCanvasRenderingContext2D对象直接调用相关API进行绘制。
@Entry
@ComponentV2
struct Usage0301 {
  private settings: RenderingContextSettings =
    new RenderingContextSettings(true)
  private context: CanvasRenderingContext2D =
    new CanvasRenderingContext2D(this.settings)

  build() {
    Canvas(this.context)
      .width('100%')
      .height('100%')
      .backgroundColor('#F5DC62')
      .onReady(() => {
        this.context.beginPath()
        this.context.moveTo(50, 50)
        this.context.lineTo(280, 160)
        this.context.stroke()
      })
  }
}
代码运行效果如图11-19所示。
图11-19 效果图
单独定义path2d对象绘制
先单独定义path2d对象构造理想的路径,再通过调用CanvasRenderingContext2D对象和OffscreenCanvasRenderingContext2D对象的stroke接口或者fill接口进行绘制。
@Entry
@ComponentV2
struct Usage0302 {
  private settings: RenderingContextSettings =
    new RenderingContextSettings(true)
  private context: CanvasRenderingContext2D =
    new CanvasRenderingContext2D(this.settings)

  build() {
    Canvas(this.context)
      .width('100%')
      .height('100%')
      .backgroundColor('#F5DC62')
      .onReady(() => {
        let region = new Path2D()
        region.arc(100, 75, 50, 0, 6.28)
        this.context.stroke(region)
      })
  }
}
代码运行效果如图11-20所示。
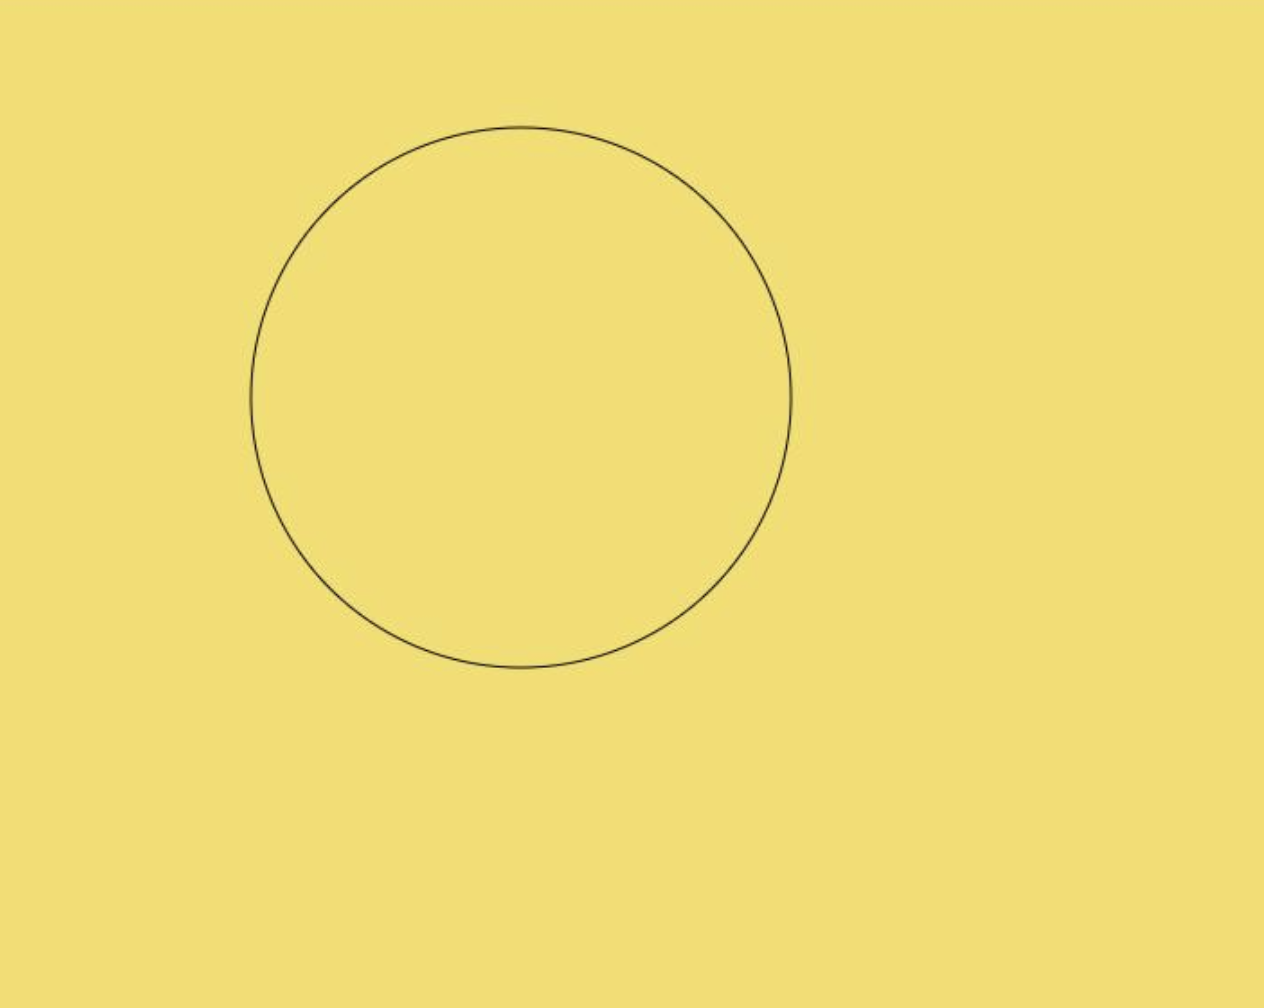
图11-20 效果图
画布组件常用方法
OffscreenCanvasRenderingContext2D对象和CanvasRenderingContext2D对象提供了大量的属性和方法,可以用来绘制文本、图形,处理像素等,是Canvas组件的核心。常用接口有fill(对封闭路径进行填充)、clip(设置当前路径为剪切路径)、stroke(进行边框绘制操作)等等,同时提供了fillStyle(指定绘制的填充色)、globalAlpha(设置透明度)与strokeStyle(设置描边的颜色)等属性修改绘制内容的样式。将通过以下几个方面简单介绍画布组件常见使用方法:
基础形状绘制
可以通过arc(绘制弧线路径)、 ellipse(绘制一个椭圆)、rect(创建矩形路径)等接口绘制基础形状。
@Entry
@ComponentV2
struct Usage0401 {
  private settings: RenderingContextSettings =
    new RenderingContextSettings(true)
  private context: CanvasRenderingContext2D =
    new CanvasRenderingContext2D(this.settings)

  build() {
    Canvas(this.context)
      .width('100%')
      .height('100%')
      .backgroundColor('#F5DC62')
      .onReady(() => {
        //绘制矩形
        this.context.beginPath()
        this.context.rect(100, 50, 100, 100)
        this.context.stroke()
        //绘制圆形
        this.context.beginPath()
        this.context.arc(150, 250, 50, 0, 6.28)
        this.context.stroke()
        //绘制椭圆
        this.context.beginPath()
        this.context.ellipse(
          150, 450, 50, 100, Math.PI * 0.25,
          Math.PI * 0, Math.PI * 2
        )
        this.context.stroke()
      })
  }
}
代码运行效果如图11-21所示。

图11-21 效果图
文本绘制
可以通过fillText(文本填充)、strokeText(文本描边)等接口进行文本绘制,示例中设置了font为50像素高加粗的"sans-serif"字体,然后调用fillText方法在(50, 100)处绘制文本"Hello World!",设置strokeStyle为红色,lineWidth为2,font为50像素高加粗的"sans-serif"字体,然后调用strokeText方法在(50, 150)处绘制文本"Hello World!"的轮廓。
@Entry
@ComponentV2
struct Usage0402 {
  private settings: RenderingContextSettings =
    new RenderingContextSettings(true)
  private context: CanvasRenderingContext2D =
    new CanvasRenderingContext2D(this.settings)

  build() {
    Canvas(this.context)
      .width('100%')
      .height('100%')
      .backgroundColor('#F5DC62')
      .onReady(() => {
        // 文本填充
        this.context.font = '50px bolder sans-serif'
        this.context.fillText("Hello World!", 50, 100)
        // 文本描边
        this.context.strokeStyle = "#ff0000"
        this.context.lineWidth = 2
        this.context.font = '50px bolder sans-serif'
        this.context.strokeText("Hello World!", 50, 150)
      })
  }
}
代码运行效果如图11-22所示。

图11-22 效果图
绘制图片和图像像素信息处理
可以通过drawImage(图像绘制)、putImageData(使用ImageData数据填充新的矩形区域)等接口绘制图片,通过createImageData(创建新的ImageData 对象)、getPixelMap(以当前canvas指定区域内的像素创建PixelMap对象)、getImageData(以当前canvas指定区域内的像素创建ImageData对象)等接口进行图像像素信息处理。
@Entry
@ComponentV2
struct GetImageData {
  private settings: RenderingContextSettings =
    new RenderingContextSettings(true)
  private context: CanvasRenderingContext2D =
    new CanvasRenderingContext2D(this.settings)
  private offCanvas: OffscreenCanvas = new OffscreenCanvas(600, 600)
  private img: ImageBitmap = new ImageBitmap('/common/images/camera.jpeg')

  build() {
    Flex({
      direction: FlexDirection.Column,
      alignItems: ItemAlign.Center,
      justifyContent: FlexAlign.Center
    }) {
      Canvas(this.context)
        .width('100%')
        .height('100%')
        .backgroundColor('#F5DC62')
        .onReady(() => {
          let offContext = this.offCanvas.getContext("2d", this.settings)
          // 使用drawImage接口将图片画在(0,0)为起点,宽高130的区域
          offContext.drawImage(this.img, 0, 0, 130, 130)
          // 使用getImageData接口,
          // 获得canvas组件区域中,(50,50)为起点,宽高130范围内的绘制内容
          let imageData = offContext.getImageData(50, 50, 130, 130)
          // 使用putImageData接口将得到的ImageData画在起点为(150, 150)的区域中
          offContext.putImageData(imageData, 150, 150)
          // 将离屏绘制的内容画到canvas组件上
          let image = this.offCanvas.transferToImageBitmap()
          this.context.transferFromImageBitmap(image)
        })
    }
    .width('100%')
    .height('100%')
  }
}
代码运行效果如图11-23所示。
图11-23 效果图
其他方法
Canvas中还提供其他类型的方法。渐变(CanvasGradient对象)相关的方法:createLinearGradient(创建一个线性渐变色)、createRadialGradient(创建一个径向渐变色)等。
@Entry
@ComponentV2
struct Usage0404 {
  private settings: RenderingContextSettings =
    new RenderingContextSettings(true)
  private context: CanvasRenderingContext2D =
    new CanvasRenderingContext2D(this.settings)

  build() {
    Canvas(this.context)
      .width('100%')
      .height('100%')
      .backgroundColor('#F5DC62')
      .onReady(() => {
        //创建一个径向渐变色的CanvasGradient对象
        let grad = this.context.createRadialGradient(200, 200, 50, 200, 200, 200)
        //为CanvasGradient对象设置渐变断点值,包括偏移和颜色
        grad.addColorStop(0.0, '#E87361')
        grad.addColorStop(0.5, '#FFFFF0')
        grad.addColorStop(1.0, '#BDDB69')
        //用CanvasGradient对象填充矩形
        this.context.fillStyle = grad
        this.context.fillRect(0, 0, 400, 400)
      })
  }
}
代码运行效果如图11-24所示。
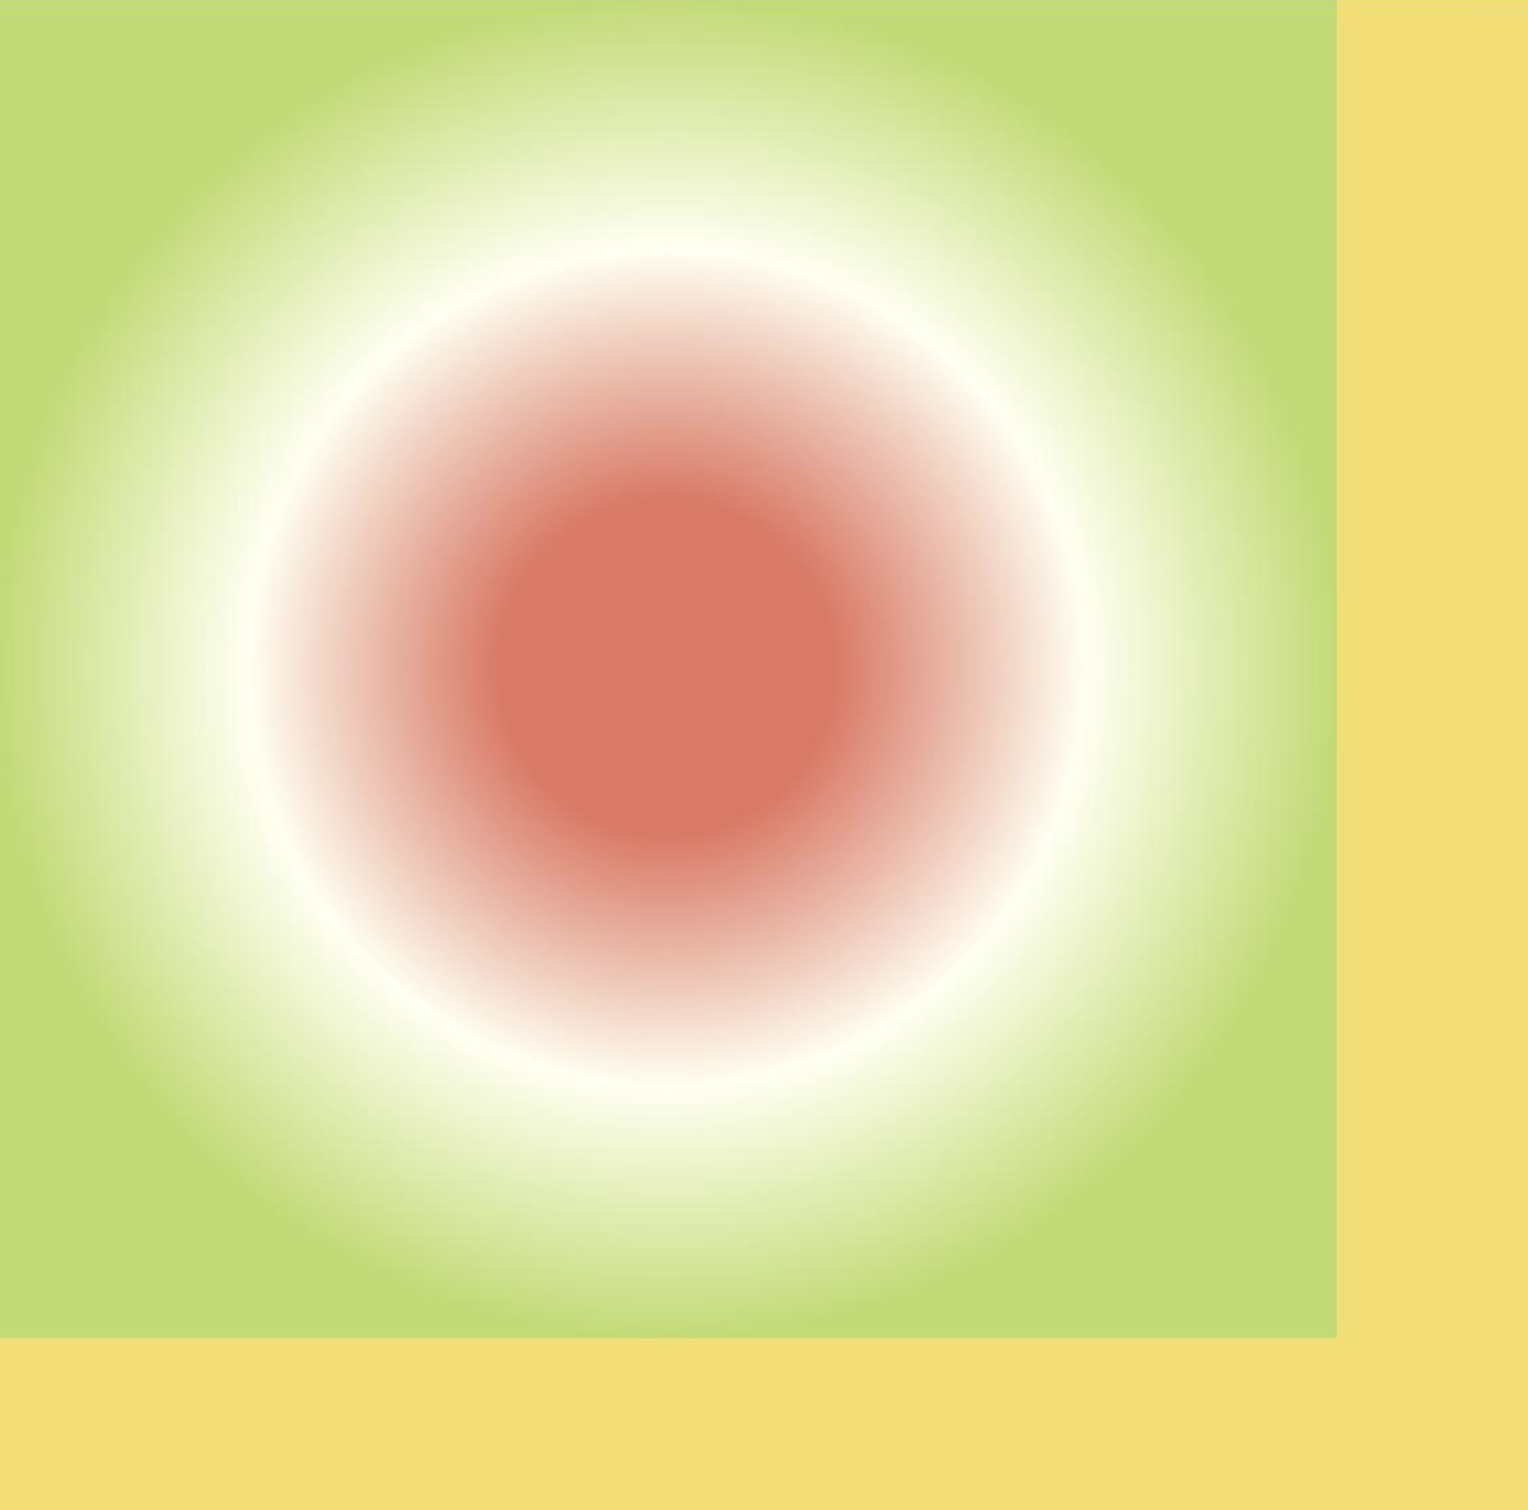
图11-24 效果图
场景示例
本节实现了规则基础形状绘制和不规则图形绘制两个例子。
规则基础形状绘制
@Entry
@ComponentV2
struct ClearRect {
  private settings: RenderingContextSettings =
    new RenderingContextSettings(true)
  private context: CanvasRenderingContext2D =
    new CanvasRenderingContext2D(this.settings)

  build() {
    Flex({
      direction: FlexDirection.Column,
      alignItems: ItemAlign.Center,
      justifyContent: FlexAlign.Center
    }) {
      Canvas(this.context)
        .width('100%')
        .height('100%')
        .backgroundColor('#F5DC62')
        .onReady(() => {
          // 设定填充样式,填充颜色设为蓝色
          this.context.fillStyle = '#0097D4'
          // 以(50, 50)为左上顶点,画一个宽高200的矩形
          this.context.fillRect(50, 50, 200, 200)
          // 以(70, 70)为左上顶点,清除宽150高100的区域
          this.context.clearRect(70, 70, 150, 100)
        })
    }
    .width('100%')
    .height('100%')
  }
}
代码运行效果如图11-25所示。
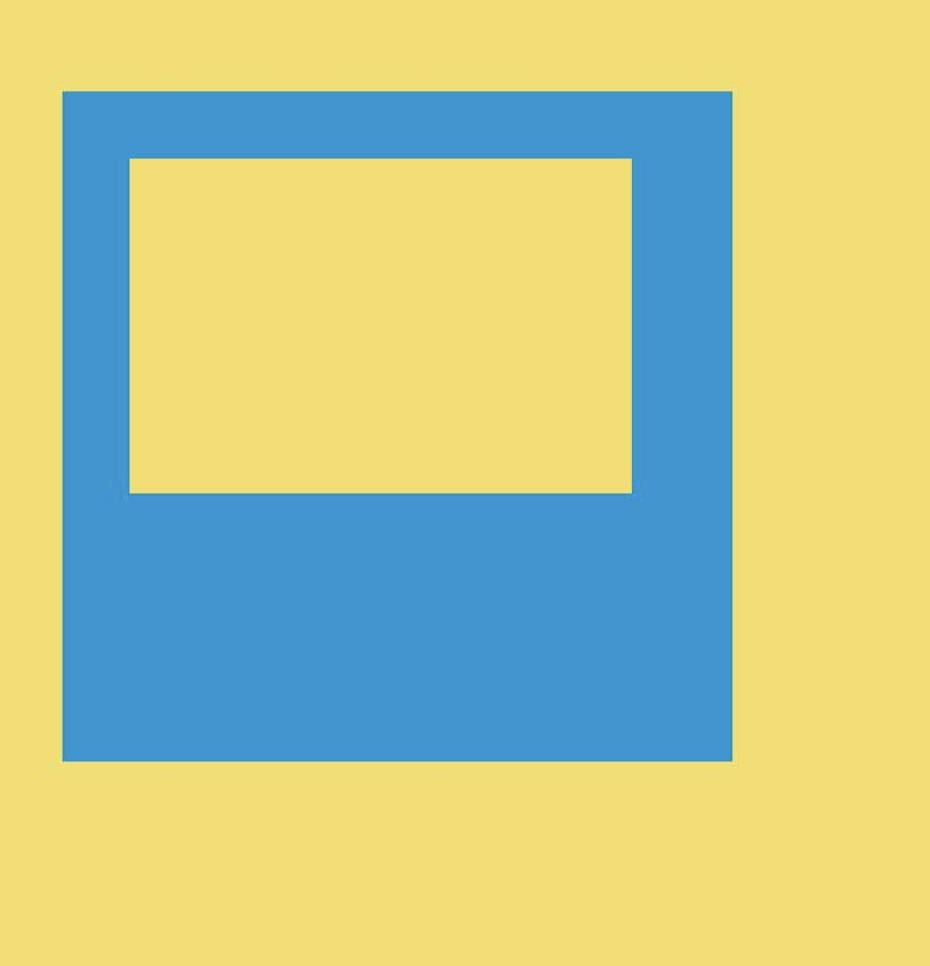
图11-25 效果图
不规则图形绘制
@Entry
@ComponentV2
struct Path2d {
  private settings: RenderingContextSettings =
    new RenderingContextSettings(true)
  private context: CanvasRenderingContext2D =
    new CanvasRenderingContext2D(this.settings)

  build() {
    Row() {
      Column() {
        Canvas(this.context)
          .width('100%')
          .height('100%')
          .backgroundColor('#F5DC62')
          .onReady(() => {
            // 使用Path2D的接口构造一个五边形
            let path = new Path2D()
            path.moveTo(150, 50)
            path.lineTo(50, 150)
            path.lineTo(100, 250)
            path.lineTo(200, 250)
            path.lineTo(250, 150)
            path.closePath()
            // 设定填充色为蓝色
            this.context.fillStyle = '#0097D4'
            // 使用填充的方式,将Path2D描述的五边形绘制在canvas组件内部
            this.context.fill(path)
          })
      }
      .width('100%')
    }
    .height('100%')
  }
}
代码运行效果如图11-26所示。
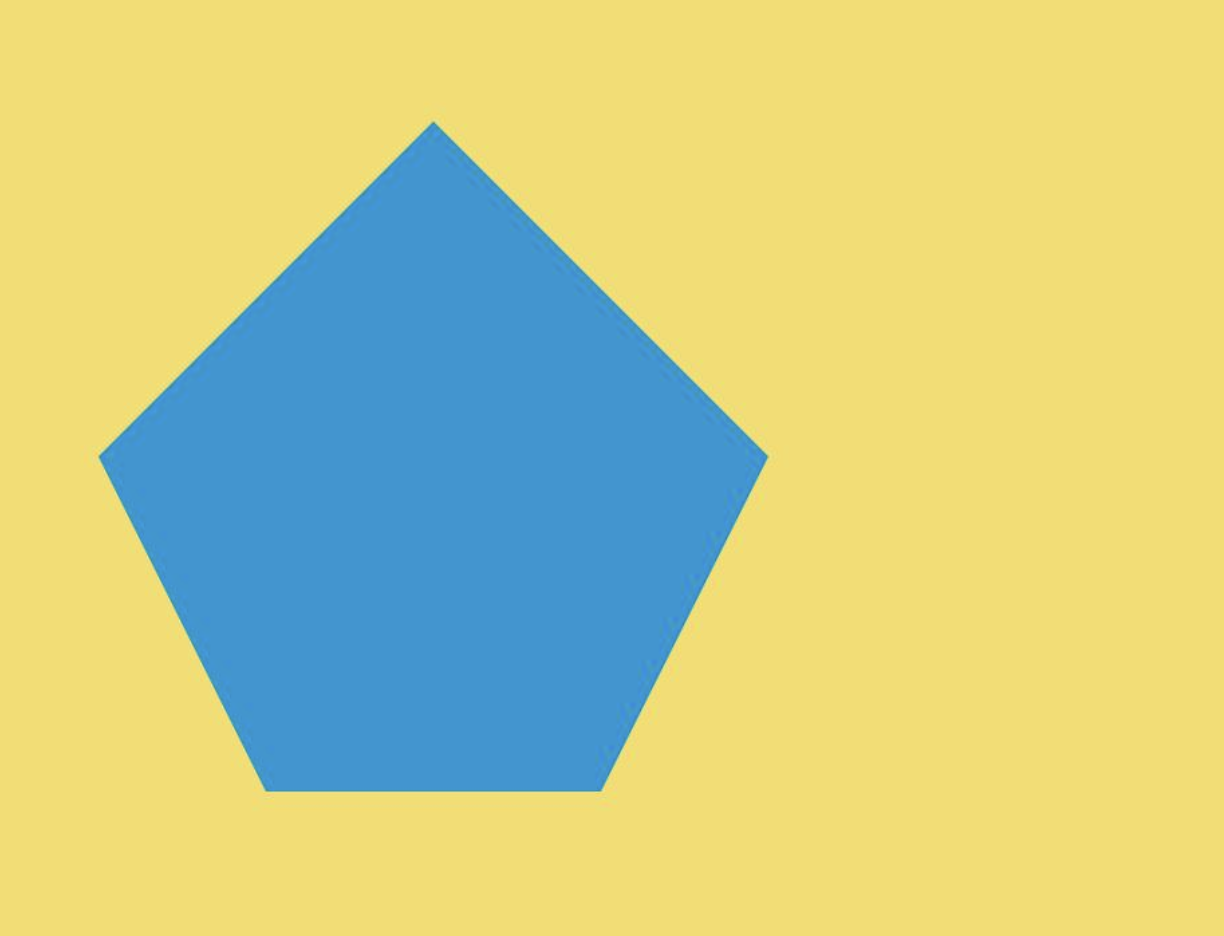
图11-26 效果图
需要参加鸿蒙认证的请点击 鸿蒙认证链接

讨论HarmonyOS开发技术,专注于API与组件、DevEco Studio、测试、元服务和应用上架分发等。
更多推荐
 8
8 0
0- 0


 已为社区贡献30条内容

所有评论(0)