HarmonyOS组件状态共享
State是当前组件的状态, 用State修饰的数据变化会驱动UI的更新(只有第一层)。
父传子的时候,子组件定义变量的时候,如果没有任何的修饰符,那么该值只会在第一次渲染时生效。
接下来,我们学习组件状态传递。
知道 State是当前组件的状态,它的数据变化可以驱动UI,但是子组件接收的数据没办法更新,我们需要更多的修饰符来帮助我们完成数据的响应式传递。
1. 状态共享-父子单向
@Prop 装饰的变量可以和父组件建立单向的同步关系。@Prop 装饰的变量是可变的,但是变化不会同步回其父组件。-@Prop是用在子组件中。
@Prop可以修饰string number boolean类型的数据。
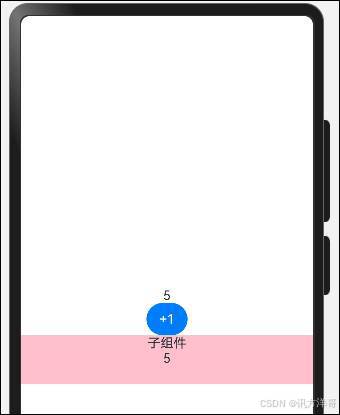
@Prop完成父 - 子的单向同步,代码如下:
@Entry

@Component

struct PropCase {

  @State pnum: number = 0

  build() {

    Row() {

      Column() {

        Text(this.pnum.toString())

        Button("+1")

          .onClick(() => {

            this.pnum++

          })

        Divider()

        Child({ num: this.pnum })

      }

      .width('100%')

    }

    .height('100%')

  }

}


@Component

struct Child {

  @Prop num: number

  build() {

    Column() {

      Text("子组件")

      Text(this.num.toString())

    }.height(60)

    .width('100%')

    .backgroundColor(Color.Pink)

  }

}
实现效果,如图所示:
如果子组件修改这个Prop呢?我们来试试,添加如下代码:
@Component

struct Child {

  @Prop num: number

  build() {

    Column() {

      Text("子组件")

      Text(this.num.toString())

      Button("修改子组件Prop")

        .onClick(() => {

          this.num++

        })

    }.height(60)

    .width('100%')

    .backgroundColor(Color.Pink)

  }

}
实现效果,如图所示。
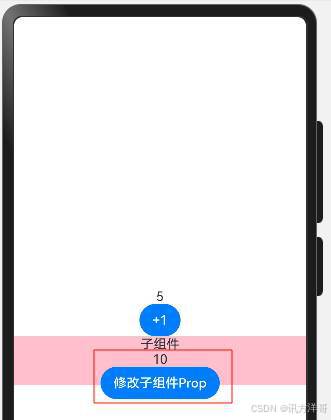
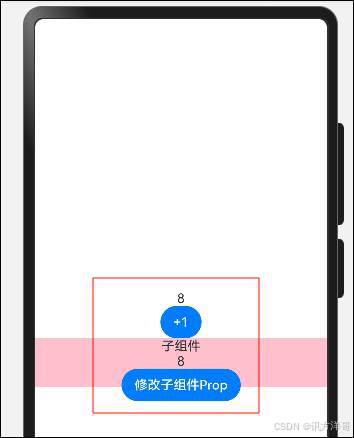
我们发现使用@Prop修饰的状态,只会在当前子组件生效,不会传导到父组件,所以它属于一种单向传递。
(1)支持类型 string、number、boolean、enum 类型。
(2)子组件可修改 Prop 数据值,但不同步到父组件,父组件更新后覆盖子组件 @Prop 数据。
(3)子组件可以初始化默认值。
- 状态共享-父子双向
@Prop修饰符- 父组件数据更新-让子组件更新- 子组件更新-父组件不为所动。
@Prop是单向的,而@Link修饰符则是双向的数据传递,只要使用@Link修饰了传递过来的数据,这个时候就是双向同步了。
注意点: 在父组件传入@Link属性时,需要使用$来修饰该变量,去掉this。
将刚刚的案例改造成双向的
修改子组件代码:
@Link num: number修改父组件,传递参数代码:
Child({ num: $pnum })完整代码如下:
@Entry

@Component

struct LinkCase {

  @State pnum: number = 0

  build() {

    Row() {

      Column() {

        Text(this.pnum.toString())

        Button("+1")

          .onClick(() => {

            this.pnum++

          })


        Divider()

        Child_Link({ num: $pnum })

      }

      .width('100%')

    }

    .height('100%')

  }

}


@Component

struct Child_Link {

  @Link num: number

  build() {

    Column() {

      Text("子组件")

      Text(this.num.toString())

      Button("修改子组件Prop")

        .onClick(() => {

          this.num++

        })

    }.height(60)

    .width('100%')

    .backgroundColor(Color.Pink)

  }

}
实现效果,如图所示。
子组件中被@Link装饰的变量与其父组件中对应的数据源建立双向数据绑定。
需要注意的是,@Link修饰的变量类型变得更为宽泛,支持string、number、boolean、enum Object Class以及这些类型对应的数组。
下面实现一个案例,做一个购物车对象的传参,实现效果,如图所示。
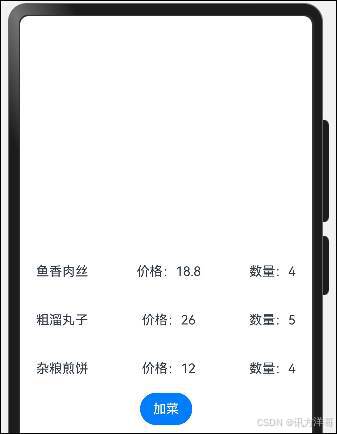
完整代码如下:
class FoodClass {

  order_id: number = 0

  food_name:  string = ""

  food_price: number = 0

  food_count: number = 0

}


@Entry

@Component

struct LinkDemoCase {

  @State cartList: FoodClass[] = [{

    order_id: 1,

    food_name: '鱼香肉丝',

    food_price: 18.8,

    food_count: 1

  },{

    order_id: 2,

    food_name: '粗溜丸子',

    food_price: 26,

    food_count: 2

  },{

    order_id: 3,

    food_name: '杂粮煎饼',

    food_price: 12,

    food_count: 1

  }]

  build() {

    Row() {

      Column() {

        ForEach(this.cartList, (item: FoodClass) => {

          Row() {

            Text(item.food_name)

            Text("价格:"+item.food_price.toString())

            Text("数量:"+item.food_count.toString())

          }

          .height(60)

          .width('100%')

          .justifyContent(FlexAlign.SpaceBetween)

          .padding({

            left: 20,

            right: 20

          })

        })

        BottomCart({

          foodList: $cartList

        })

      }

      .width('100%')

    }

    .height('100%')

  }

}


@Component

struct BottomCart {

  @Link foodList: FoodClass[]

  build() {

    Row() {

      Button("加菜")

        .onClick(() => {

          this.foodList = this.foodList.map(item => {

            item.food_count++

            return item

          })

        })

    }

  }

}
大家一定在想,为什么不把每个菜封装成一个组件,然后用Link传递过去岂不是更方便?我们试试。
测试代码如下:
class FoodClass2 {

  order_id: number = 0

  food_name:  string = ""

  food_price: number = 0

  food_count: number = 0

}


@Entry

@Component

struct LinkDemoCase_2 {

  @State cartList: FoodClass2[] = [{

    order_id: 1,

    food_name: '鱼香肉丝',

    food_price: 18.8,

    food_count: 1

  },{

    order_id: 2,

    food_name: '粗溜丸子',

    food_price: 26,

    food_count: 2

  },{

    order_id: 3,

    food_name: '杂粮煎饼',

    food_price: 12,

    food_count: 1

  }]

  build() {

    Row() {

      Column() {

        ForEach(this.cartList, (item: FoodClass2) => {

          FoodItem({foodInfo:$item})

        })

        BottomCart2({

          foodList: $cartList

        })

      }

      .width('100%')

    }

    .height('100%')

  }

}


@Component

struct FoodItem {

  @Link foodInfo: FoodClass2

  build() {

    Row() {

      Text(this.foodInfo.food_name)

      Text("价格:"+this.foodInfo.food_price.toString())

      Text("数量:"+this.foodInfo.food_count.toString())

    }

    .height(60)

    .width('100%')

    .justifyContent(FlexAlign.SpaceBetween)

    .padding({

      left: 20,

      right: 20

    })


  }

}


@Component

struct BottomCart2 {

  @Link foodList: FoodClass2[]

  build() {

    Row() {

      Button("加菜")

        .onClick(() => {

          this.foodList = this.foodList.map(item => {

            item.food_count++

            return item

          })

        })

    }

  }

}
出现异常,如图所示。
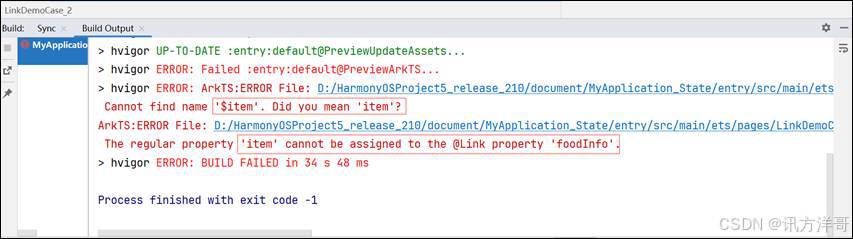
看到没有,ArtTS不支持这么做,也就是Link修饰的数据必须得是最外层的 State数据,想要实现我们刚刚的设想,我们还得另辟蹊径。-后续ObjectLink 和Observerd会解决这个问题。
- 状态共享-后代组件
如果我们的组件层级特别多,ArkTS支持跨组件传递状态数据来实现双向同步@Provide和 @Consume
这特别像Vue中的依赖注入
假设我们有三层组件,Index-Child-Grand, Index的数据不想经过Child而直接给到Grand可以使用该修饰器。
代码如下:
@Entry

@Component

struct ProvideCase {

  @Provide count: number = 0


  build() {

    Row() {

      Column({ space: 15 }) {

        Text(this.count.toString())

          .fontSize(50)

        Button("顶级组件+1")

          .onClick(() => {

            this.count++

          })

        Divider()

        ChildProvide()

      }

      .width('100%')

    }

    .height('100%')

  }

}


@Component

struct ChildProvide {

  build() {

    Column() {

      Text("子组件")

        .fontSize(40)

      Divider()

      Grand()

    }

  }

}


@Component

struct Grand {

  @Consume count: number

  build() {

    Column() {

      Text("孙组件")

        .fontSize(30)

      Text(this.count.toString())

    }

  }

}
实现效果,如图所示。

注意: 在不指定Provide名称的情况下,需要使用相同的名字来定义和接收数据。
通过相同的变量名绑定,示例代码如下:
@Entry

@Component

struct ProvideCase2 {

  @Provide

  money: number = 0


  build() {

    Column({ space: 20 }) {

      Text('父组件:' + this.money)

        .onClick(() => {

          this.money++

        })

      Parent()

    }

    .width('100%')

    .height('100%')

    .alignItems(HorizontalAlign.Center)

    .justifyContent(FlexAlign.Center)

  }

}


@Component

struct Parent {

  @Consume

  money: number


  build() {

    Column({ space: 20 }) {

      Text('父组件:' + this.money)

        .onClick(() => {

          this.money++

        })

      ChildProvider2()

    }

  }

}


@Component

struct ChildProvider2 {

  @Consume

  money: number


  build() {

    Text('子组件:' + this.money)

      .onClick(() => {

        this.money++

      })

  }

}
实现效果,如图所示:
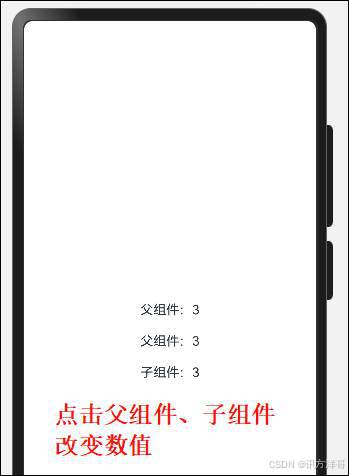
Object、class、string、number、boolean、enum 类型均支持。
通过相同的变量别名绑定 @Provide('key') 和 @Consume('key') key需要保持一致。完整代码如下:
@Entry

@Component

struct ProvideCase2 {

  @Provide

  money: number = 0


  build() {

    Column({ space: 20 }) {

      Text('父组件:' + this.money)

        .onClick(() => {

          this.money++

        })

      Parent()

    }

    .width('100%')

    .height('100%')

    .alignItems(HorizontalAlign.Center)

    .justifyContent(FlexAlign.Center)

  }

}


@Component

struct Parent {

  @Consume

  money: number


  build() {

    Column({ space: 20 }) {

      Text('父组件:' + this.money)

        .onClick(() => {

          this.money++

        })

      ChildProvider2()

    }

  }

}


@Component

struct ChildProvider2 {

  @Consume

  money: number


  build() {

    Column(){

      Text('子组件:' + this.money)

        .onClick(() => {

          this.money++

        })

      Grand2()

    }

  }

}


@Component

struct Grand2 {

  @Consume('money')

  co: number

  build() {

    Column(){

      Text('孙组件:')

        .fontSize(30)

      Text(this.co.toString())

      Button("孙组件+1")

        .onClick(() => {

          this.co++

        })

    }

  }

}
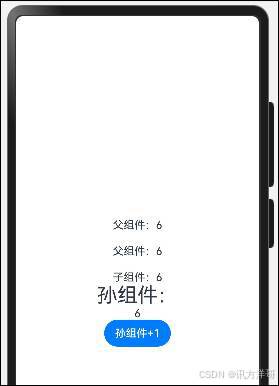
演示效果,如图所示。
- 状态共享-状态监听器
修饰符- entry-component-State-Prop-Link-Provide Consume。
如果开发者需要关注某个状态变量的值是否改变,可以使用 @Watch 为状态变量设置回调函数。
Watch("回调函数名")中的回调必须在组件中声明,该函数接收一个参数,参数为修改的属性名
注意:Watch修饰符要写在 State Prop Link Provide的修饰符下面,否则会有问题,在第一次初始化的时候,@Watch装饰的方法不会被调用。
代码如下:
@Provide('aa')

@Watch('updateCount')

count: number = 0

updateCount(keyName: string) {

    promptAction.showToast({

      message: this.count.toString()

    })

    console.log(keyName,this.count.toString())

}
完整代码如下:
import promptAction from '@ohos.promptAction'


@Entry

@Component

struct WatchCase {


  @Provide

  @Watch('updateCount')

  money: number = 0

  updateCount(keyName: string) {

    promptAction.showToast({

      message: this.money.toString()

    })

    console.log(keyName,this.money.toString())

  }


  build() {

    Column({ space: 20 }) {

      Text('父组件:' + this.money)

        .onClick(() => {

          this.money++

        })

      ParentWatch()

    }

    .width('100%')

    .height('100%')

    .alignItems(HorizontalAlign.Center)

    .justifyContent(FlexAlign.Center)

  }

}


@Component

struct ParentWatch {

  @Consume

  money: number


  build() {

    Column({ space: 20 }) {

      Text('父组件:' + this.money)

        .onClick(() => {

          this.money++

        })

      ChildWatch()

    }

  }

}


@Component

struct ChildWatch {

  @Consume

  money: number


  build() {

    Column(){

      Text('子组件:' + this.money)

        .onClick(() => {

          this.money++

        })

    }

  }

}
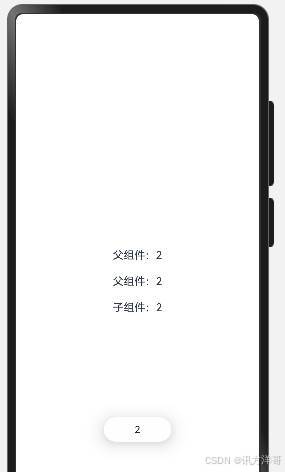
演示效果,如图所示。
@State、@Prop、@Link 等装饰器在 @Watch 装饰之前。
有了watch 我们就可以随心所欲的搞监听了,比如:
(1)父组件数据变化了,子组件随机而动
(2)子组件双向更新了父组件数据,父组件随机而动
5. @Observed与@ObjectLink
之前讲解Link的时候,我们遇到了一个问题,就是循环生成的item没办法用item传递给子组件的Link,也就是封装的组件没办法做双向更新同步,那么ArtTS支持 @Observed和@ObjectLink来实现这个需求。
使用步骤:
(1)类 class 数据需要定义通过构造函数,使用 @Observed 修饰这个类。
(2)初始化数据:需要通过初始化构造函数的方式添加。
(3)通过 @ObjectLink 关联对象,可以直接修改被关联对象来更新UI。
需求:改造下之前的购物车案例
定义构造函数和使用@Observed 修饰符,以及初始化数据,代码如下:
@Entry

@Component

struct ObservedCase {

  @State message: string = 'Hello World'

  @State

  list: FoodObjectClass[] = [new FoodObjectClass({

    order_id: 1,

    food_name: '鱼香肉丝',

    food_price: 18.8,

    food_count: 1

  }) ,new FoodObjectClass({

    order_id: 2,

    food_name: '粗溜丸子',

    food_price: 26,

    food_count: 2

  }) , new FoodObjectClass({

    order_id: 3,

    food_name: '杂粮煎饼',

    food_price: 12,

    food_count: 1

  }) ]

  build() {

    Row() {

      Column({ space: 20 }) {

        ForEach(this.list, (item: FoodObjectClass) => {

          FoodItemObserved({ item: item })

        })


        BottomCartObserved({ myList: $list  })

      }

      .width('100%')

    }

    .height('100%')

  }

}

@Extend(Text)

function TextStyleObserved () {

  .layoutWeight(1).textAlign(TextAlign.Center).fontSize(20)

}


@Extend(Text)

function AddCutStyleObserved () {

  .width(40)

  .height(40)

  .borderRadius(20)

  .backgroundColor(Color.Grey)

  .textAlign(TextAlign.Center)

  .fontSize(20)

}


@Component

struct FoodItemObserved {

  // Observed必须和ObjectLink才有UI更新的效果

  @ObjectLink

  item: FoodObjectClass

  build() {

    Row() {

      Text(this.item.food_name).TextStyleObserved()

      Text(this.item.food_price.toFixed(2)).TextStyleObserved()

      Row() {

        Text("-").AddCutStyleObserved()

          .onClick(() => {

            this.item.food_count--

          })

          .visibility(this.item.food_count > 0 ? Visibility.Visible : Visibility.Hidden)

        Text(this.item.food_count.toString()).TextStyleObserved()

          .visibility(this.item.food_count > 0 ? Visibility.Visible : Visibility.Hidden)


        Text("+").AddCutStyleObserved()

          .onClick(() => {

            this.item.food_count++

          })

      }.layoutWeight(1)

    }

    .width('100%')

    .height(40)

  }

}


// 底部组件

@Component

struct BottomCartObserved {

  @Link

  myList: FoodObjectClass[]

  build() {

    Button("更改菜品的数量")

      .onClick(() => {

        this.myList = this.myList.map(item => {

          item.food_count++

          return item

        })

      })

  }

}

// 定义了一个接口

interface IFoodInfo {

  order_id: number

  food_name: string

  food_price: number

  food_count: number

}


// 食品类

@Observed

class FoodObjectClass implements  IFoodInfo  {

  order_id: number = 0

  food_name:  string = ""

  food_price: number = 0

  food_count: number = 0

  constructor(obj: IFoodInfo) {

    this.order_id = obj.order_id

    this.food_name = obj.food_name

    this.food_price = obj.food_price

    this.food_count = obj.food_count

  }

}
演示效果,如图所示。

上述代码中,我们用了interface,interface声明类型不需要给初始值,class声明类型必须给初始值。
(1)我们使用Class继承实现了interface,并且通过传入的对象将我们Class中的属性进行赋值
(2)使用了Observed这个装饰器来修饰class,那么只要我们改动class的属性,它就会驱动UI的更新(只是第一层)
注意: 只有Observed修饰的class才可以被 ObjectLink使用,并且Entry修饰的组件不允许使用ObjectLink。

讨论HarmonyOS开发技术,专注于API与组件、DevEco Studio、测试、元服务和应用上架分发等。
更多推荐

 20
20 0
0- 0


 已为社区贡献57条内容

所有评论(0)