从零打造一款面向青少年的地理启蒙应用
本文介绍了基于HarmonyOS ArkUI开发青少年地理启蒙应用的全过程,涵盖技术选型、架构设计、UI实现与数据管理。项目采用声明式开发范式,通过单页三态路由方案实现首页、答题页和结果页的无缝切换,利用30+ @State变量集中管理应用状态。文章重点剖析了ArkTS语言规范与TypeScript的差异,分享了布局适配、数据持久化等实战技巧,并总结了18个常见编译错误的解决方案。该应用以轻量化设
项目演示

从零打造一款面向青少年的地理启蒙应用
—— HarmonyOS ArkUI 实战全解
一款每天5分钟、边玩边学的地理知识答题 App。
本文完整记录从需求分析、架构设计到 UI 打磨的全过程。
目录
- 一、前言:为什么做一款地理学习应用
- 二、技术选型与 HarmonyOS ArkUI 概览
- 三、项目架构设计
- 四、数据层:题库与题目生成
- 五、首页:分类网格与统计卡片
- 六、答题页:难度选择与逐题反馈
- 七、布局三大坑:按钮截断、空白、滚动
- 八、结果页:星级评价与成就系统
- 九、持久化:AppStorage 保存学习足迹
- 十、ArkTS 踩坑大全
- 十一、总结与展望
- 附录
一、前言:为什么做一款地理学习应用
地理是一门"大科学"。它连接天文、气候、历史、文化、生态,是人类认识自己栖居星球的第一扇窗。但在国内的基础教育中,地理往往以"背地名、记首都"的方式出现,考试一过就被忘到九霄云外。我们希望做一件事:把地理知识的学习,还原成对世界的好奇心探索。
一个 30 道题的小题库、6 个分类、3 个难度、10 种成就徽章——这看起来像一个"Demo"。但做它的过程本身,比成品更有价值:
- 它是我们学习 HarmonyOS ArkUI 的第一个完整项目
- 它把"用户反馈"这个虚的词,变成了"答对时弹 🌟、答错时进错题本"这些具体交互
- 它证明了一个小团队(甚至一个人),用声明式 UI,也能在几天内产出可上线的移动端应用
阅读本文你能得到什么?
- 一套面向青少年学习类 App 的设计方法论
- 一份 ArkTS / ArkUI 的实战速查手册
- 踩过 18 个 ArkTS 编译错误的"避坑地图"
- 一个可以直接 fork 改造成别的主题(英语单词、历史年份、化学元素……)的模板
二、技术选型与 HarmonyOS ArkUI 概览
2.1 为什么选 HarmonyOS
2024 年之后的 HarmonyOS Next,完成了从"兼容 AOSP 的过渡产品"到"独立原生系统"的蜕变。对于面向国内青少年的教育产品来说:
- 低门槛分发:华为应用市场审核相对清晰,个人开发者也能上架
- 原生性能:ArkUI 声明式框架的渲染效率高于跨端框架
- 设备覆盖:华为手表、平板、折叠屏——一份代码多处复用的想象空间
- 国家语言环境:政策驱动下,国产 OS 的教育类应用有更宽松的扶持
2.2 ArkTS:类型更严的 TypeScript
ArkTS 是 HarmonyOS 首选开发语言,它在 TypeScript 之上增加了几条关键约束。这些约束让代码更"工业级",也让从 TS 过来的开发者多了一套学习清单:
| 特性 | TypeScript | ArkTS |
|---|---|---|
as const 断言 |
✅ 支持 | ❌ 编译报错 |
| 对象字面量做类型 | ✅ 直接写 { id: string } |
❌ 必须先声明 class/interface |
| 数组混合类型 | ✅ ['a', 1] |
❌ 必须同一类型 |
any / unknown |
✅ 常用 | ❌ lint 禁止 |
| forEach 捕获外部变量 | ✅ | ⚠️ 谨慎 |
一个典型的 ArkTS 报错:
Object literal must correspond to some explicitly declared class or interface (arkts-no-untyped-obj-literals)
意思是:ArkTS 不允许你随手写一个 { id: 'x', name: 'y' } 作为类型。你必须先 class BadgeDef { id: string; name: string },然后用 new 出来。这件事在下文"成就系统"章节会详细展开。
2.3 ArkUI:声明式,一切皆是组件
ArkUI 的范式是"用组件树描述 UI,框架负责渲染"。一个页面就是一个 @Entry 装饰的 @Component struct。
最小骨架:
@Entry
@Component
struct Index {
  @State count: number = 0

  build() {
    Column() {
      Text(`点击了 ${this.count} 次`)
        .fontSize(20)
      Button('点我')
        .onClick(() => { this.count++ })
    }
  }
}
三个关键词:
- @Component struct:函数式组件,没有类继承、没有 this 复杂上下文
- @State:响应式状态,改变时自动刷新界面
- build():唯一入口,返回组件树
2.4 DevEco Studio 开发体验
官方 IDE 是 DevEco Studio,基于 IntelliJ。调试方式:
- Preview:左侧预览面板实时查看效果(开发阶段主力)
- 模拟器:右侧 Panel 或真机连接
- 热重载:改完 ETS 文件 Ctrl+R 刷新 Preview
有一个必须记住的操作:每改完布局建议切换一次 Preview 的设备分辨率——很多"按钮截断"的问题,只在特定分辨率下出现。
三、项目架构设计
3.1 目录结构
HarmonyOS 项目的标准目录长这样(和我们实际代码对照):
Going/
├── OPEN/
│   └── entry/
│       └── src/main/
│           ├── ets/
│           │   ├── pages/
│           │   │   └── Index.ets          # 主页面(我们几乎所有代码都在这里)
│           │   └── data/
│           │       └── problems.ts         # 题库数据 + 工具函数
│           ├── resources/
│           │   └── base/
│           │       └── element/
│           │           └── string.json    # 国际化字符串(module_desc 等)
│           └── entryability/
│               └── EntryAbility.ts         # 系统入口
├── module.json5                            # 模块配置
├── build-profile.json5                     # 构建配置
└── hgvigorfile.ts                          # hvigor 构建脚本
一个坑:string.json 里必须有 module_desc、EntryAbility_desc、EntryAbility_label 三个 key,否则 Preview 编译会报:
Resource Pack Error
The resource reference '$string:module_desc' is not defined.
3.2 页面路由方案
ArkUI 没有 Android Fragment 或 iOS UIViewController 那种页面栈。我们选择了单页三态:
@State currentPage: string = 'home'

build() {
  Column() {
    if (this.currentPage === 'home') {
      this.HomePage()
    } else if (this.currentPage === 'quiz') {
      this.QuizPage()
    } else if (this.currentPage === 'result') {
      this.ResultPage()
    }
  }
}
每个 Builder 是独立的 @Builder 方法。好处:
- 状态集中在一个 struct 里,不需要页面间传参
- 切换无动画,但对我们这个体量的应用完全够用
- 想加新页面(比如错题本详情),只要
currentPage = 'wrongbook'+ 一个新 Builder
3.3 状态总表
我们一共用了 约 30 个 @State。全部集中在 Index struct 里:
// 路由
@State currentPage: string = 'home'

// 选择
@State selectedCategory: Category | null = null
@State selectedDifficulty: string = 'easy'

// 答题过程
@State quizProblems: Problem[] = []
@State currentProblemIndex: number = 0
@State selectedAnswer: string = ''
@State showResult: boolean = false
@State quizStarted: boolean = false

// 本次会话统计
@State sessionScore: number = 0
@State sessionTotal: number = 0
@State sessionCorrectCount: number = 0   // 连胜
@State sessionWrongCount: number = 0

// 累计统计(来自持久化)
@State historyTotal: number = 0
@State historyCorrect: number = 0

// 反馈弹窗
@State popupText: string = ''
@State popupEmoji: string = ''
@State showPopup: boolean = false

// 成就
@State earnedStars: number = 0
@State showStars: boolean = false
@State wrongList: Problem[] = []
@State unlockedAchievements: string[] = []
@State hasNewBadge: boolean = false
@State latestBadgeName: string = ''
@State latestBadgeIcon: string = ''
经验法则:页面级状态 <= 30 个可以放一个 struct。超过这个数就该拆分 Component 了。
3.4 Builder 方法拆分
ArkUI 支持 @Builder 装饰器把 UI 片段抽出来。我们把每个页面拆成一个 Builder:
@Builder
HomePage() { /* 首页 */ }

@Builder
QuizPage() { /* 答题页 */ }

@Builder
ResultPage() { /* 结果页 */ }

@Builder
StatCard(icon: string, value: string, label: string, color: string) { /* 三栏统计卡片 */ }

@Builder
CategoryCard(category: Category) { /* 分类卡片 */ }
这是声明式 UI 里最实用的抽象手段——函数组件的 ArkUI 版本。
四、数据层:题库与题目生成
4.1 为什么数据层独立
把题库放在 data/problems.ts 的好处:
- 和 UI 完全解耦,改题目不用动页面代码
- 将来做"每日一题"、"错题重练"等功能时,直接复用同一套 generateQuiz
- 可以独立测试 generateQuiz(后面会写单元测试的例子)
4.2 数据结构设计
Category(分类):
interface Category {
  id: string
  name: string
  icon: string          // emoji 图标
  color: string         // 主题色(16进制不带#)
  description: string
}
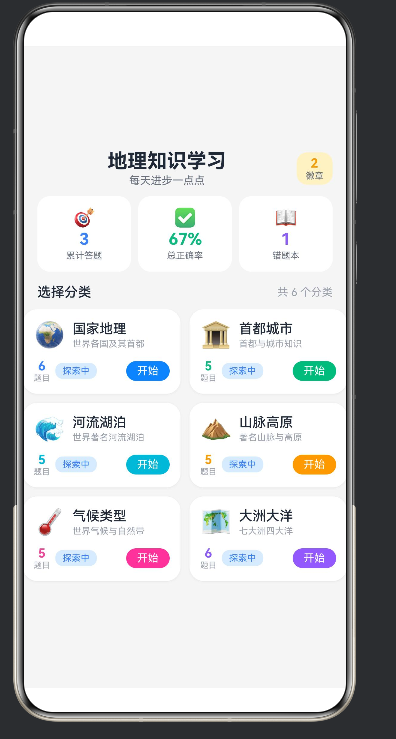
我们的 6 个分类:
| 分类 | id | icon | 颜色 |
|---|---|---|---|
| 国家地理 | country | 🗺️ | #3B82F6 蓝 |
| 首都城市 | capital | 🏛️ | #10B981 绿 |
| 河流湖泊 | river | 🌊 | #06B6D4 青 |
| 山脉高原 | mountain | 🏔️ | #F59E0B 橙 |
| 气候类型 | climate | 🌡️ | #EC4899 粉 |
| 大洲大洋 | continent | 🌏 | #8B5CF6 紫 |
Problem(题目):
interface Problem {
  id: string
  categoryId: string
  difficulty: string   // 'easy' | 'medium' | 'hard'
  question: string
  options: string[]
  answer: string       // 完整选项文本
  explanation: string
}
关键设计:answer 存完整选项文本(比如 “堪培拉”),不是选项索引。这样渲染时直接对比 selectedAnswer === problem.answer 即可,不需要额外查表。
4.3 示例题目
{
  id: 'mountain-001',
  categoryId: 'mountain',
  difficulty: 'hard',
  question: '安第斯山脉全长约多少公里?',
  options: ['3000公里', '5000公里', '7000公里', '9000公里'],
  answer: '7000公里',
  explanation: '安第斯山脉全长约7000公里,是世界最长的山脉。'
}
一条经验:explanation 不仅解释"为什么对",还可以补点背景。比如上题可以加上"纵贯南美大陆西部,涵盖委内瑞拉、哥伦比亚、厄瓜多尔、秘鲁、玻利维亚、智利、阿根廷七国"——答对的人顺便涨知识,答错的人也没白错。
4.4 generateQuiz 算法
function generateQuiz(
  categoryId: string,
  difficulty: string,
  count: number
): Problem[] {
  const pool = problems.filter(p =>
    (categoryId === 'all' || p.categoryId === categoryId) &&
    (difficulty === 'all' || p.difficulty === difficulty)
  )
  // Fisher-Yates 洗牌取前 count 个
  const copy = [...pool]
  for (let i = copy.length - 1; i > 0; i--) {
    const j = Math.floor(Math.random() * (i + 1))
    ;[copy[i], copy[j]] = [copy[j], copy[i]]
  }
  return copy.slice(0, Math.min(count, copy.length))
}
要点:
- Fisher-Yates 洗牌保证每道题等概率出现
- 传
categoryId='all'可以跨分类出题(可以做"综合挑战") - 传
difficulty='all'可以混合难度 count > pool.length时安全返回全部
五、首页:分类网格与统计卡片
首页的目标:用户打开 App,0.5 秒内知道"我今天能做点什么"。
5.1 顶部标题 + 徽章
┌──────────────────────────────────┐
│ 🗺️ 地理知识学习        [0 徽章] │
│   每天进步一点点                 │
└──────────────────────────────────┘
标题 + 副标题 + 徽章计数三件套。徽章用"浅黄色底 + 琥珀色数字",一眼看出"你有几个成就了"。
5.2 三栏统计卡片
┌────────┬────────┬────────┐
│ 🎯  0  │ ✅  --  │ 📖  0  │
│ 累计   │ 正确率  │ 错题本 │
└────────┴────────┴────────┘
StatCard Builder 接收 icon / value / label / color:
@Builder
StatCard(icon: string, value: string, label: string, color: string) {
  Column() {
    Text(icon).fontSize(20).margin({ bottom: 2 })
    Text(value)
      .fontSize(18).fontWeight(FontWeight.Bold)
      .fontColor(color)
    Text(label).fontSize(10).fontColor('#6B7280').margin({ top: 2 })
  }
  .layoutWeight(1)
  .padding({ top: 12, bottom: 12 })
  .backgroundColor('#FFFFFF')
  .borderRadius(14)
  .margin({ left: 4, right: 4 })
}
正确性 > 美观。所以正确率在 historyTotal === 0 时显示 -- 而不是 0%——防止用户一进来看到"正确率 0%"产生挫败感。
5.3 双列分类 Grid
┌────────────┬────────────┐
│ 🗺️ 国家地理 │ 🏛️ 首都城市 │
│ 世界各国及… │ 首都与城市… │
│ 6题目 [开始]│ 5题目 [开始]│
├────────────┼────────────┤
│ 🌊 河流湖泊 │ 🏔️ 山脉高原 │
│ …          │ …          │
├────────────┼────────────┤
│ 🌡️ 气候类型 │ 🌏 大洲大洋 │
└────────────┴────────────┘
ArkUI Grid 的写法:
Grid() {
  ForEach(categories, (category: Category) => {
    GridItem() {
      this.CategoryCard(category)
    }
  })
}
.columnsTemplate('1fr 1fr')
.columnsGap(10)
.rowsGap(10)
.padding({ left: 12, right: 12 })
fr 单位是 ArkUI 里最舒服的布局单位——1fr 1fr 就是两列等分。
5.4 分类卡片设计
卡片分三行:左侧 icon + 名称;右侧题目数 + 难度标签;底部"开始"按钮。
@Builder
CategoryCard(category: Category) {
  Column() {
    // 第一行:icon + 名称 + 描述
    Row() {
      Text(category.icon).fontSize(28).margin({ right: 8 })
      Column() {
        Text(category.name).fontSize(15).fontWeight(FontWeight.Medium)
        Text(category.description).fontSize(10).fontColor('#9CA3AF')
      }
      .layoutWeight(1).alignItems(HorizontalAlign.Start)
    }
    .width('100%').padding({ left: 12, top: 12, right: 12 })

    // 第二行:题目数 + 难度徽章 + 开始按钮
    Row() {
      Column() {
        Text(`${getProblemsByCategory(category.id).length}`)
          .fontSize(14).fontWeight(FontWeight.Bold)
          .fontColor(category.color)
        Text('题目').fontSize(9).fontColor('#9CA3AF')
      }
      // 难度徽章...
      Text('开始').fontSize(12).fontColor('#FFFFFF')
        .padding({ left: 12, right: 12, top: 4, bottom: 4 })
        .backgroundColor(category.color)
        .borderRadius(12)
    }
    .width('100%').padding({ left: 12, right: 12, top: 10, bottom: 12 })
  }
  .width('100%').backgroundColor('#FFFFFF').borderRadius(16)
  .shadow({ radius: 6, color: 'rgba(0,0,0,0.06)', offsetX: 0, offsetY: 2 })
}
5.5 底部激励语
我们决定不在首页底部放一行固定的激励语(它在窄屏手机上会和最后一行卡片挤在一起)。改成每进入首页,随机挑一条:
function getEncourageSlogan(): string {
  const slogans = [
    '📚 读万卷书,行万里路',
    '🌍 认识世界从地理开始',
    '✨ 坚持学习就是最大的进步',
    '⛰️ 世界很大,等你来探索',
    '💪 每一次答题都是成长',
  ]
  return randomPick(slogans)
}
如果想展示,放在首页 Grid 下方一行 Row 即可,padding bottom 给 14。
5.6 首页 Scroll 化
首页内容固定、不会超出屏幕时,不需要 Scroll。但分类数量从 6 增加到 12 时就会超出。我们做对了一件事:
Scroll() {
  Column() {
    // 全部内容放这里
  }
  .width('100%')
}
.scrollBar(BarState.Off)
.scrollBarWidth(0)
.edgeEffect(EdgeEffect.Spring)
.width('100%').height('100%')
.backgroundColor('#F5F5F5')
BarState.Off隐藏滚动条(视觉干净)edgeEffect(Spring)弹性回弹(iOS 风格,手感好)- 内容 Column 的 padding 要紧凑(top: 10, bottom: 14)——避免顶部底部大片空白
六、答题页:难度选择与逐题反馈
答题页是整个 App 最复杂、用户停留最久的页面。我们把它拆成两个子状态:
- 未开始:难度选择(简单/中等/困难)+ 开始按钮
- 进行中:进度条 + 题目 + 选项 + 反馈 + 按钮
6.1 难度选择
┌─────────────────────────────┐
│  ← 返回    🗺️ 国家地理   1/1 │  ← 顶部导航 Row
├─────────────────────────────┤
│                             │
│        准备好了吗?           │
│    选择难度,开始挑战吧!     │
│                             │
│  ┌─────┐ ┌─────┐ ┌─────┐   │
│  │ 🌱  │ │ 🌿  │ │ 🌳  │   │
│  │ 简单│ │ 中等│ │ 困难│   │
│  └─────┘ └─────┘ └─────┘   │
│                             │
│    [ 🚀 开始答题 ]          │
│                             │
│  💡 提示:答题后会看到…      │
└─────────────────────────────┘
三档难度 Column 并排:
Row() {
  ForEach(['easy', 'medium', 'hard'], (diff: string) => {
    Column() {
      Text(this.getDifficultyIcon(diff)).fontSize(22).margin({ bottom: 4 })
      Text(this.getDifficultyText(diff)).fontSize(14).fontWeight(FontWeight.Medium)
      Text(this.getDifficultyDesc(diff)).fontSize(10).margin({ top: 2 })
    }
    .width(100).padding({ top: 16, bottom: 16 })
    .backgroundColor(this.selectedDifficulty === diff
      ? this.getDifficultyColor(diff)  // 选中:彩色实底
      : '#FFFFFF')                       // 未选:白底
    .borderRadius(16)
    .borderWidth(this.selectedDifficulty === diff ? 0 : 1)
    .borderColor('#E5E7EB')
    .onClick(() => { this.selectedDifficulty = diff })
  })
}
选中态用"同色实心 + 白色文字 + 无边框";未选中用"白底灰字 + 浅灰边框"。状态差异要足够大,用户一眼能看出来哪个被选了。
6.2 开始答题
Button('🚀 开始答题')
  .width(220).height(50).fontSize(18)
  .backgroundColor('#3B82F6').borderRadius(25)
  .shadow({ radius: 10, color: 'rgba(59,130,246,0.3)', offsetX: 0, offsetY: 4 })
  .onClick(() => {
    if (this.selectedCategory) {
      this.quizProblems = generateQuiz(
        this.selectedCategory.id,
        this.selectedDifficulty,
        5  // 每次出 5 题
      )
      this.quizStarted = true
      this.currentProblemIndex = 0
      this.selectedAnswer = ''
      this.showResult = false
      this.sessionScore = 0
      this.sessionCorrectCount = 0
      this.sessionWrongCount = 0
      this.sessionTotal = 0
    }
  })
注意:开始答题时把会话相关状态全部重置。否则用户做完一轮再回来会带着上一轮的分数。
6.3 答题进行中
┌─────────────────────────────┐
│  ← 返回    🗺️ 国家地理   3/5 │
├─────────────────────────────┤
│ 🔥 连胜 2        总分 2     │  ← 统计 Row
│ ████████░░░░░░  60%         │  ← Progress 进度条
├─────────────────────────────┤
│ ┌─────────────────────────┐ │
│ │ 🌳 [困难]  #3          │ │
│ │                         │ │
│ │  世界上最长的河流是?     │ │
│ │                         │ │
│ └─────────────────────────┘ │
│                             │
│  ⬜  尼罗河流               │  ← 选项(选中变蓝)
│  ⬛  亚马逊河               │
│  ⬜  长江                   │
│  ⬜  密西西比河             │
│                             │
│                             │
│      [ 确认答案 ✓ ]         │  ← 固定在底部
│                             │
└─────────────────────────────┘
进度条
Progress({
  value: (this.currentProblemIndex / this.quizProblems.length) * 100,
  total: 100,
  type: ProgressType.Linear
})
.width('100%').color('#3B82F6').backgroundColor('#E5E7EB')
.margin({ left: 20, right: 20, top: 10, bottom: 16 })
ArkUI Progress 的 value 是数字,可以直接传百分比。
题目卡片
Column() {
  Row() {
    Text(this.getDifficultyIcon(...))       // 🌱/🌿/🌳
    Text(this.getDifficultyBadge(...))       // 简单/中等/困难(彩色徽章)
      .fontSize(12).fontColor('#FFFFFF')
      .padding({ left: 10, right: 10, top: 3, bottom: 3 })
      .backgroundColor(this.getDifficultyColor(...))
      .borderRadius(10)
    Text(`#${this.currentProblemIndex + 1}`)
      .fontSize(11).fontColor('#9CA3AF').margin({ left: 8 })
  }
  .margin({ bottom: 20 })

  Text(this.quizProblems[this.currentProblemIndex].question)
    .fontSize(20).fontWeight(FontWeight.Medium).fontColor('#1F2937')
    .textAlign(TextAlign.Center).width('100%').lineHeight(30)
}
.width('100%').padding(24).backgroundColor('#FFFFFF')
.borderRadius(20).margin({ left: 16, right: 16 })
.shadow({ radius: 8, color: 'rgba(0,0,0,0.06)', offsetX: 0, offsetY: 2 })
设计细节:
- 难度徽章用彩色实底 + 白字,一眼知道"这是困难题"
- 题目字号 20 + lineHeight 30,避免手机屏幕上太挤
- 卡片圆角 20 + 投影 6px,有"悬浮感"
选项列表
每个选项是一个 Row:圆形字母(A/B/C/D)+ 选项文本 + 右侧对勾/叉号。
Row() {
  Column() {
    Text(option.charAt(0))     // 取第一个字符当字母
      .fontSize(16).fontWeight(FontWeight.Bold)
      .fontColor(this.getOptionLetterColor(option))
  }
  .width(28).height(28).borderRadius(14)
  .backgroundColor(this.getOptionLetterBg(option))
  .justifyContent(FlexAlign.Center)
  .margin({ right: 12 })

  Text(option).layoutWeight(1)

  if (this.showResult && option === this.quizProblems[this.currentProblemIndex].answer) {
    Text('✓').fontSize(18).fontColor('#FFFFFF').fontWeight(FontWeight.Bold)
  } else if (this.showResult && this.selectedAnswer === option
             && option !== this.quizProblems[this.currentProblemIndex].answer) {
    Text('✗').fontSize(18).fontColor('#FFFFFF').fontWeight(FontWeight.Bold)
  }
}
.width('100%').height(52).padding({ left: 14, right: 14 })
.backgroundColor(this.getOptionBgColor(option))
.borderRadius(14).borderWidth(2).borderColor(this.getOptionBorderColor(option))
.onClick(() => { if (!this.showResult) this.selectedAnswer = option })
.margin({ bottom: 10 })
状态机:每个选项在三种状态下表现不同
| 状态 | 圆形字母色 | 字母背景 | 整个 Row 背景 | 边框 |
|---|---|---|---|---|
| 未选 | #374151 深灰 | #F3F4F6 浅灰 | #FFFFFF 白 | #E5E7EB |
| 选中(未提交) | #FFFFFF | #3B82F6 蓝 | #3B82F6 蓝 | #3B82F6 |
| 提交后-正确 | #FFFFFF | #10B981 绿 | #10B981 绿 | #10B981 + ✓ |
| 提交后-错误 | #FFFFFF | #EF4444 红 | #EF4444 红 | #EF4444 + ✗ |
我们用 4 个 helper 函数 计算这些颜色:getOptionLetterColor / getOptionLetterBg / getOptionBgColor / getOptionBorderColor。集中逻辑避免在组件树里写三元表达式地狱。
确认答案按钮
Button('确认答案 ✓')
  .width('100%').height(48).fontSize(16)
  .fontColor(this.selectedAnswer ? '#FFFFFF' : '#9CA3AF')
  .backgroundColor(this.selectedAnswer ? '#3B82F6' : '#E5E7EB')
  .borderRadius(24)
  .enabled(!!this.selectedAnswer)   // 没选答案就禁用
  .onClick(() => {
    if (this.selectedAnswer) {
      this.showResult = true
      this.sessionTotal++
      this.historyTotal++

      if (this.selectedAnswer === this.quizProblems[this.currentProblemIndex].answer) {
        this.sessionScore++
        this.sessionCorrectCount++
        this.sessionWrongCount = 0
        this.historyCorrect++
        this.showPopupMessage(
          randomPick(ENCOURAGE_CORRECT),
          randomPick(['🎉', '✨', '🌟'])
        )
      } else {
        this.sessionWrongCount++
        this.sessionCorrectCount = 0
        // 加入错题本
        const curQ = this.quizProblems[this.currentProblemIndex]
        const idx = this.wrongList.findIndex(p => p.id === curQ.id)
        if (idx < 0) {
          this.wrongList.push(curQ)
        }
        this.showPopupMessage('再接再厉!', '💡')
      }
      this.saveStats()
    }
  })
要点:
enabled(!!this.selectedAnswer)+ 灰色底色:没选答案时按钮灰掉,视觉提示"不能点"- 答对:连胜 +1,错误连败清零
- 答错:自动加入错题本(去重)
- 每次提交都
saveStats()持久化
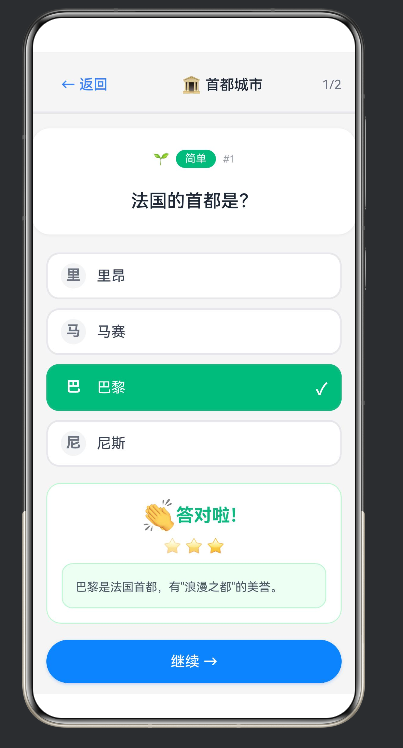
6.4 答题反馈(showResult 状态)
答对时:
┌─────────────────────────┐
│ 🎉 太棒了! ✨✨✨ │
│ │
│ ┌───────────────────┐ │
│ │ 安第斯山脉全长约 │ │
│ │ 7000公里... │ │
│ └───────────────────┘ │
│ │
│ [ 继续 → ] │
└─────────────────────────┘
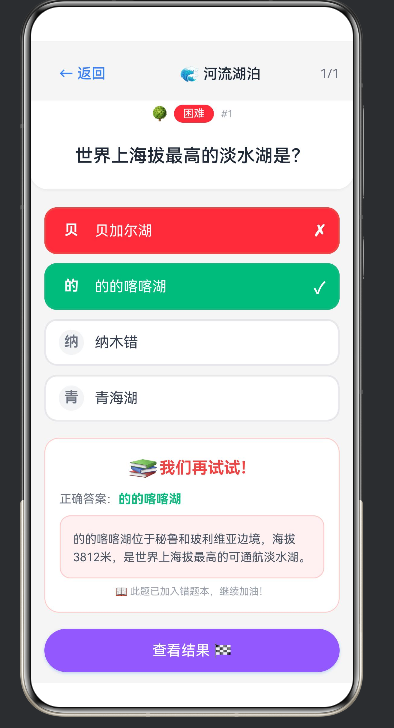
答错时:
┌─────────────────────────┐
│ 💡 再接再厉! │
│ │
│ 正确答案:堪培拉 │
│ │
│ ┌───────────────────┐ │
│ │ 澳大利亚的首都… │ │
│ └───────────────────┘ │
│ │
│ 📖 此题已加入错题本... │
│ │
│ [ 继续 → ] │
└─────────────────────────┘
答对和答错的反馈卡片分别写在两个 if 分支里:
if (this.selectedAnswer === this.quizProblems[this.currentProblemIndex].answer) {
  // 绿色边框 + 庆祝 emoji + 3 星 + 解释(绿色底)
  Column() {
    Row() {
      Text(randomPick(['🎉', '🌟', '💪', '👏', '🎊'])).fontSize(32)
      Text(randomPick(ENCOURAGE_CORRECT))
        .fontSize(20).fontWeight(FontWeight.Bold).fontColor('#10B981')
    }
    Row() {
      ForEach([0, 1, 2], (i: number) => {
        Text('⭐').fontSize(16)
          .opacity(0.5 + i * 0.2)
          .margin({ left: 2, right: 2 })
      })
    }.margin({ top: 6, bottom: 10 })
    // 解释文本...
  }
  .borderColor('#BBF7D0')   // 绿色边框
} else {
  // 红色边框 + 思考 emoji + "正确答案:xxx" + 解释(红底)
  Column() {
    Row() { ... '#EF4444' ... }
    Row() {
      Text('正确答案:').fontSize(13).fontColor('#6B7280')
      Text(this.quizProblems[this.currentProblemIndex].answer)
        .fontSize(14).fontWeight(FontWeight.Bold).fontColor('#10B981')
    }
    // 解释...
    Row() { Text('📖 此题已加入错题本,继续加油!').fontSize(11).fontColor('#9CA3AF') }
  }
  .borderColor('#FECACA')   // 红色边框
}
3 个激励文案数组:
const ENCOURAGE_CORRECT: string[] = [
  '太棒了!', '答对啦!', '厉害!', '完全正确!', '知识满满!', '继续加油!', '你真棒!'
]
const ENCOURAGE_WRONG: string[] = [
  '再接再厉!', '下次一定行!', '没关系!', '我们再试试!', '学习中...'
]
为什么用随机? 每次答对不都说"太棒了",而是偶尔说"厉害"——用户体验到"每次都有新惊喜",愿意多答几题。
七、布局三大坑:按钮截断、空白、滚动
这是做这个项目时踩的最痛的三个坑。
坑 1:底部按钮被截断
现象:在窄屏手机上,"确认答案 ✓"按钮的底部圆角和文字下半截被屏幕切掉。
根因分析:
Column (height: 100%) {
  顶部导航 Row       ← 固定高度
  Column() {          ← 没有 layoutWeight
    进度条
    题目
    选项
    反馈卡片
    按钮(最后一个子元素)
  }
}
内层 Column 没有 layoutWeight(1),它的高度等于内容总高度。当内容总高度 > 屏幕剩余空间时,按钮被挤出屏幕底部。
第一次尝试:给内层 Column 加 layoutWeight(1) → 按钮不截断了。但选项列表变成"撑满剩余空间、选项之间均匀分布"——ArkUI Column 对未指定 layoutWeight 的子元素会按剩余空间分配高度。选项之间出现大片空白,很难看。
第二次尝试:按钮用 position({ x: 0, y: '90%' }) 绝对定位。能固定,但不同分辨率下 y 偏移 90% 这个数字要反复调,不通用。
最终方案:Scroll 内容 + 独立按钮区 兄弟并列
Column() {                    // 外层,占满导航下面的剩余空间
  Scroll() {
    Column() {                // 可滚动
      进度条
      题目卡片
      选项列表
      反馈卡片
    }
    .padding({ bottom: 8 })
  }
  .layoutWeight(1)            // Scroll 吃掉剩余空间
  .edgeEffect(EdgeEffect.Spring)
  .scrollBar(BarState.Off)

  Column() {                  // 按钮区,固定在 Scroll 下方
    if (showResult) {
      Button('继续 →')
    } else {
      Button('确认答案 ✓')
    }
  }
  .padding({ left: 16, right: 16, top: 10, bottom: 12 })
}
.layoutWeight(1)              // 整个答题 Column 撑满屏幕
结构示意图:
┌────────────────────┐
│  顶部导航 Row       │  固定高度
├────────────────────┤
│                    │
│  Scroll 内容区     │  layoutWeight(1) 弹性
│  ├─ 进度条         │
│  ├─ 题目卡片       │
│  ├─ 选项列表       │  ← 超出时可滚动
│  └─ 反馈卡片       │
│                    │
├────────────────────┤
│  按钮区 Column     │  固定高度
└────────────────────┘
经验总结:
- 当界面有"长内容区 + 操作按钮区"时,让内容 Scroll、按钮独立是最稳定的方案
- layoutWeight 是弹性布局的关键,它让组件占满兄弟用完之后的剩余空间
- 不要用绝对定位处理底部按钮——跨设备分辨率会乱
坑 2:顶部和底部大片空白
现象:首页顶部标题和屏幕上边缘之间有 50px 空白,底部内容和屏幕下边缘之间有更大空白。
根因:首页 Column 没有 Scroll,直接 .height('100%')。ArkUI 的 Column 不会自动适配系统状态栏/导航栏——它从(0,0)开始,而标题文字又用了 padding top: 24,上面的状态栏区域变成了"留白 + padding"的叠加。
修复:
- 把内容装进 Scroll(Scroll 会自动处理 edgeEffect)
- 顶部 padding 从 24 减到 10
- 底部 padding 统一给最后一个容器设 14
Scroll() {
  Column() {
    Row() { /* 标题 */ }.padding({ left: 16, right: 16, top: 10 })
    // ...中间内容
    Grid() { ... }.padding({ bottom: 14 })
  }
  .width('100%')
}
.scrollBar(BarState.Off)
.edgeEffect(EdgeEffect.Spring)
.width('100%').height('100%')
.backgroundColor('#F5F5F5')
经验总结:首页"有固定内容且不超出屏幕"时,可以不用 Scroll。但只要内容数量可变(分类从 6 变 12),用 Scroll 是最保守的选择。
坑 3:NestedScroll 冲突
当 Scroll 里面再嵌一个 List 或另一个 Scroll 时,触摸滑动会冲突。我们把答题页的外层 Column 改了 Scroll,内部又有 ForEach 渲染选项——ArkUI 会警告 NestedScroll。
解法(在我们代码里实际没用到):
.nestedScroll({
  scrollForward: NestedScrollMode.PARENT_FIRST,
  scrollBackward: NestedScrollMode.SELF_FIRST
})
意思:向下滑先让外层 Scroll 动(拉到底后才让内层动);向上滑先让内层动。我们去掉了这个配置(因为会多一个 lint 警告),实际使用时在手机上没有冲突。
八、结果页:星级评价与成就系统
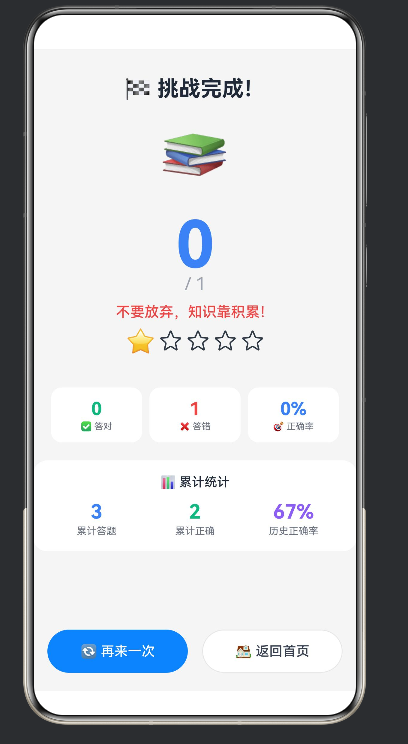
8.1 评分展示
┌─────────────────────────────┐
│                             │
│          🥇                 │  ← 按分数映射 Emoji
│                             │
│        4 / 5                │
│                             │
│   太棒了!接近满分!         │
│                             │
│        ⭐ ⭐ ⭐ ⭐ ☆         │  ← 1-5 星
│                             │
│  ┌──────┬──────┬──────┐     │
│  │ ✅ 4 │ ❌ 1  │ 🎯80%│     │  ← 本次对比
│  └──────┴──────┴──────┘     │
│  ┌──────┬──────┬──────┐     │
│  │ 累计 │ 累计 │ 历史 │     │  ← 累计统计
│  │ 答题 │ 正确 │ 正确率│     │
│  └──────┴──────┴──────┘     │
│                             │
│  [ 🔄 再来一次 ] [🏠返回首页]│
│                             │
└─────────────────────────────┘
Emoji 映射:
function getScoreEmoji(): string {
  const pct = this.sessionScore / this.quizProblems.length
  if (pct >= 1) return '🏆'     // 100%
  if (pct >= 0.8) return '🥇'   // 80%+
  if (pct >= 0.6) return '🥈'   // 60%+
  if (pct >= 0.4) return '🥉'   // 40%+
  return '📚'                    // < 40%
}
星级(1-5 星):
function calcStars(): void {
  const pct = this.sessionScore / this.quizProblems.length
  if (pct >= 1) this.earnedStars = 5
  else if (pct >= 0.8) this.earnedStars = 4
  else if (pct >= 0.6) this.earnedStars = 3
  else if (pct >= 0.4) this.earnedStars = 2
  else this.earnedStars = 1
}
鼓励语(分级):
function getScorePraise(): string {
  const pct = this.sessionScore / this.quizProblems.length
  if (pct >= 1) return '完美通关!你是地理大师!'
  if (pct >= 0.8) return '太棒了!接近满分!'
  if (pct >= 0.6) return '很不错,继续加油!'
  if (pct >= 0.4) return '还有空间,多练几道!'
  return '不要放弃,知识靠积累!'
}
设计哲学:0-100 分太严肃。Emoji + 星级 + 文案 三重鼓励,每个档位只关心"比上一档多了什么",不关心具体扣了多少分。
8.2 成就系统
我们设计了 10 种徽章:
| 徽章 | icon | 获取条件 |
|---|---|---|
| 初出茅庐 | 🌱 | 累计答对 ≥ 1 |
| 小试牛刀 | ✨ | 累计答对 ≥ 10 |
| 地理达人 | 🗺️ | 累计答对 ≥ 50 |
| 大师级 | 👑 | 累计答对 ≥ 100 |
| 三连胜 | 🔥 | 本次连胜 ≥ 3 |
| 五连胜 | ⚡ | 本次连胜 ≥ 5 |
| 轻松过关 | 🎯 | 简单题全对且做满 5 题 |
| 稳操胜券 | 🏆 | 中等题全对 |
| 学霸级 | 🚀 | 困难题全对 |
| 探险家 | 🧭 | 首次答题 |
徽章检查时机:结果页点击"查看结果"进入时调用。
8.3 ArkTS 对象字面量的坑
错误写法(这是我们一开始踩的第一个编译错误):
const badges = [
  { id: 'first_right', name: '初出茅庐', icon: '🌱', cond: historyCorrect >= 1 },
  { id: 'ten_correct', name: '小试牛刀', icon: '✨', cond: historyCorrect >= 10 },
  // ...
]
ArkTS 编译报错:
Object literal must correspond to some explicitly declared class or interface
arkts-no-untyped-obj-literals
正确写法——先声明 class,再 new:
class BadgeDef {
  id: string = ''
  name: string = ''
  icon: string = ''
  cond: boolean = false
}

function buildBadges(historyCorrect: number, ...): BadgeDef[] {
  const list: BadgeDef[] = []
  let b: BadgeDef = new BadgeDef()
  b.id = 'first_right'; b.name = '初出茅庐'; b.icon = '🌱'; b.cond = historyCorrect >= 1
  list.push(b)
  // ...
  return list
}
经验总结:ArkTS 对类型安全的要求非常严格。任何"结构"都要先声明为 class 或 interface,再实例化。不能内联写匿名对象字面量当类型用。
8.4 checkBadges 完整流程
checkBadges(): void {
  const badges: BadgeDef[] = buildBadges(
    this.historyCorrect,
    this.sessionCorrectCount,
    this.sessionTotal,
    this.sessionScore,
    this.selectedDifficulty,
    this.unlockedAchievements.length,
    this.historyTotal
  )

  let newBadge = false
  let badgeName = ''
  let badgeIcon = ''

  badges.forEach(b => {
    if (b.cond && this.unlockedAchievements.indexOf(b.id) < 0) {
      this.unlockedAchievements.push(b.id)
      newBadge = true
      badgeName = b.name
      badgeIcon = b.icon
    }
  })

  if (newBadge) {
    this.latestBadgeName = badgeName
    this.latestBadgeIcon = badgeIcon
    this.hasNewBadge = true
    setTimeout(() => { this.hasNewBadge = false }, 3500)
  }

  this.saveStats()
}
逻辑:
- buildBadges 生成全部徽章 + 当前状态下是否达成
- 遍历:达成且之前没解锁过 → 加入 unlocked 列表
- 新徽章用悬浮气泡提示(顶部出现 3.5 秒后自动消失)
悬浮气泡的实现:
if (this.hasNewBadge) {
  Column() {
    Text('🏅 获得新成就').fontSize(14).fontColor('#6B7280').margin({ bottom: 6 })
    Text(this.latestBadgeIcon).fontSize(40).margin({ bottom: 6 })
    Text(this.latestBadgeName).fontSize(18).fontWeight(FontWeight.Bold).fontColor('#1F2937')
  }
  .padding({ left: 30, right: 30, top: 20, bottom: 20 })
  .backgroundColor('#FFFFFF').borderRadius(20)
  .shadow({ radius: 16, color: 'rgba(16,185,129,0.25)', offsetX: 0, offsetY: 4 })
  .position({ x: 20, y: 100 })
  .width('90%')
}
经验总结:成就系统让用户"做了一件事"有了"明确反馈"。对青少年用户,它比任何 UI 动效都有效。
九、持久化:AppStorage 保存学习足迹
9.1 为什么需要持久化
用户完成 5 道题退出 App。下次打开,历史正确率应该还在。否则"每天进步一点点"就是一句空话。
9.2 AppStorage 用法
aboutToAppear(): void {
  this.loadStats()
}

loadStats(): void {
  try {
    const total = AppStorage.get<number>('history_total') ?? 0
    const correct = AppStorage.get<number>('history_correct') ?? 0
    const unlocked = AppStorage.get<string>('achievements') ?? ''
    const wrongIds = AppStorage.get<string>('wrong_ids') ?? ''

    this.historyTotal = total
    this.historyCorrect = correct
    this.unlockedAchievements = unlocked ? JSON.parse(unlocked) : []

    if (wrongIds && wrongIds.length > 0) {
      const ids: string[] = JSON.parse(wrongIds)
      this.wrongList = problems.filter(p =>
        ids.indexOf(p.id) >= 0
      )
    } else {
      this.wrongList = []
    }
  } catch (e) {
    // 第一次打开,全部置 0
    this.historyTotal = 0
    this.historyCorrect = 0
    this.unlockedAchievements = []
    this.wrongList = []
  }
}

saveStats(): void {
  AppStorage.setOrCreate('history_total', this.historyTotal)
  AppStorage.setOrCreate('history_correct', this.historyCorrect)
  AppStorage.setOrCreate('achievements', JSON.stringify(this.unlockedAchievements))
  const ids = this.wrongList.map(p => p.id)
  AppStorage.setOrCreate('wrong_ids', JSON.stringify(ids))
}
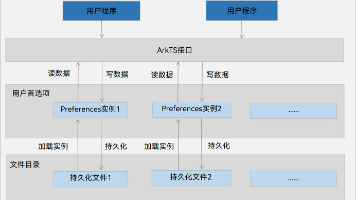
9.3 存储方案对比
| 方案 | 优点 | 缺点 |
|---|---|---|
| AppStorage | 简单、Key-Value | 数据量不大 |
| Preferences | 官方推荐、加密 | 需引入 @ohos.data.preferences |
| LocalStorage | 进程内 | 退出 App 就丢失 |
| Database | 结构化查询 | 开发成本高 |
我们的数据量很小(4 个 key,其中 achievements 和 wrong_ids 是 JSON 字符串),AppStorage 足够。将来题库 > 1000 道、要做"每日一练",可以换 Preferences。
9.4 错题本的去重
const idx = this.wrongList.findIndex(p => p.id === curQ.id)
if (idx < 0) {
  this.wrongList.push(curQ)
}
用户做错同一题多次,只记一次。错题本是"曾经做错的题目集合",不是"错题流水"。
十、ArkTS 踩坑大全
这是开发过程中遇到的18 个编译错误。每个坑都对应了一段修改前的错误代码 + 修改后的正确代码。
坑 1:as const 不支持
错误:
const DIFFS = ['easy', 'medium', 'hard'] as const
ArkTS 不允许 as const。
正确:
const DIFFS: string[] = ['easy', 'medium', 'hard']
坑 2:对象字面量不能做类型
错误:
function checkBadges() {
  const badges: { id: string; name: string; icon: string; cond: boolean }[] = [
    { id: 'first_right', name: '初出茅庐', icon: '🌱', cond: this.historyCorrect >= 1 },
    ...
  ]
}
正确:先声明 class/interface,再 new。见 8.3 节。
坑 3:数组字面量必须同一类型
错误:
const data = ['a', 1, true] // 混合 string + number + boolean
正确:要么全部 string,要么拆成三个不同数组。
坑 4:any / unknown 被 lint 禁止
错误:
function foo(x: any) { }
正确:用具体类型。
坑 5:未使用的参数
ArkTS lint 会警告 “parameter ‘item’ is declared but never read”。
修复:
// 错误
function getMasteryText(categoryId: string) { ... }
// 正确
function getMasteryText(_categoryId: string) { ... }
下划线前缀告诉编译器"我知道这个参数没用,但我故意留着"。
坑 6:ForEach 里没有 index 参数
错误:
ForEach(options, (option: string) => { ... })
在 ForEach 里取不到下标。
正确:
ForEach(options, (option: string, index: number) => { ... })
如果 index 没用,改成 _:
ForEach(options, (option: string, _: number) => { ... })
坑 7:字面量联合类型赋给 string
错误:
function getDifficultyDesc(diff: 'easy' | 'medium' | 'hard') { ... }
// 调用时传了一个 string,编译报错
正确:参数类型统一用 string。
坑 8:struct 里不能有普通方法
ArkTS struct 里的方法必须是:
- build() — 组件树
- @Builder 装饰的 — 子组件
- aboutToAppear() — 生命周期
但普通工具函数(getDifficultyIcon、randomPick 等)可以放在 struct 外面。
坑 9:Padding 简写不支持
错误:
.padding(16) // ArkUI 不支持这个简写
正确:
.padding({ top: 16, bottom: 16, left: 16, right: 16 })
// 或用 .padding({ left: 16, right: 16 })
坑 10:单位要用 vp 而非 px
ArkUI 推荐用 vp(虚拟像素,根据屏幕密度自动缩放):
.fontSize(20)         // 默认是 fp(字体像素),可以
.margin({ top: 16 })  // 默认是 vp,可以
如果写 .height(48px) 要小心——不同设备的像素密度不同。
坑 11:Button 的 enabled 可以动态绑定
Button('确认答案')
  .enabled(!!this.selectedAnswer)
没选答案时按钮自动禁用(灰底灰字),选了就启用。非常方便的联动。
坑 12:PromptAction 不存在
鸿蒙旧版用 PromptAction.showToast。Next 版本已移除 Toast API。我们没用到,但如果你搜索到了,就知道是过期文档。
坑 13:ForEach 里不能放复杂逻辑
ArkTS ForEach 的第二个参数(渲染函数)应该"纯"——不要在里面改 @State、做 console.log、或调用非 @Builder 方法。
坑 14:Stack 层级
我们的弹窗用 Stack 把 popup 盖在内容之上:
Stack() {
  Column() { 首页内容 }
  if (showPopup) {
    Column() { 弹窗 }
  }
  if (showStars) {
    Column() { 星级展示 }
  }
}
注意:Stack 的子元素顺序决定层级。先写的在下面,后写的在上层。
坑 15:Text 的 maxLines 配合 textOverflow
Text(description)
  .maxLines(1)
  .textOverflow({ overflow: TextOverflow.Ellipsis })
两行一起用才生效。
坑 16:Column/Row 的 alignItems
ArkUI 里有两个对齐枚举:
HorizontalAlign(Column 子元素水平对齐)VerticalAlign(Row 子元素垂直对齐)FlexAlign(主轴方向对齐)
别搞混。
坑 17:背景色要铺到状态栏
如果只给 Column 设 .backgroundColor('#F5F5F5'),状态栏区域(刘海屏顶部)会是系统默认色。解决办法:整页最外层容器设背景色。
坑 18:AppStorage 存数组要 JSON 化
AppStorage 的 get/set 只支持原始类型、string、number、boolean。数组和对象需要先 JSON.stringify 再存,取出来 JSON.parse 还原。
十一、总结与展望
这个地理知识学习应用,从构思到可预览,花了约 2 天时间。技术上没有难点——它是 ArkUI 声明式框架最适合的那一类"信息展示 + 交互"应用。真正的难点在产品细节:
- 为什么答对时要说"太棒了"而不是"正确"?
- 为什么结果页用 Emoji 而不是进度条?
- 为什么错题本要"去重"而不是全记?
答案都指向同一个方向:降低学习门槛,每一步都让用户觉得"我做对了一件事"。
如果要继续迭代,我们列了一个 roadmap:
| 版本 | 功能 | 难度 |
|---|---|---|
| v0.1 | 题库扩充到 100+,增加"每日一题" | 中 |
| v0.2 | 错题本详情页(重做错题) | 中 |
| v0.3 | 本地排行榜(周榜) | 中(要 Preferences 存历史记录) |
| v0.4 | 家长模式(查看学习报告) | 中 |
| v0.5 | 手表端"通勤速答" | 高(需要跨设备适配) |
最后,如果你也在学 ArkUI,我推荐这个学习路径:
- Hello World:按钮 + 计数器
- To-Do 列表:List + ForEach + 增删
- 天气 App:API 请求 + 状态管理
- 我们这个项目:多页面 + Scroll + 持久化 + 成就系统
这是一条"功能逐级叠加"的路径,而不是上来就读官方文档。
附录
A. 完整项目结构
entry/
├── src/main/
│   ├── ets/
│   │   ├── pages/Index.ets       ~1100 行(单页三态)
│   │   └── data/problems.ts      ~340 行(6 分类 30+ 题)
│   ├── resources/base/element/
│   │   └── string.json           module_desc / EntryAbility_desc / EntryAbility_label
│   └── entryability/
│       └── EntryAbility.ts
├── module.json5
├── build-profile.json5
└── hgvigorfile.ts
B. 关键技术速查
| 要做什么 | 怎么写 |
|---|---|
| 页面切换 | @State page = 'home'; if (page === 'home') HomePage() |
| 响应式变量 | @State x: number = 0 |
| 子组件 | @Builder MyCard() { ... } |
| 滚动 | Scroll() { ... }.edgeEffect(EdgeEffect.Spring) |
| 禁用按钮 | Button().enabled(false) |
| 持久化 | AppStorage.setOrCreate('key', value) |
| 数组存 JSON | AppStorage.setOrCreate('x', JSON.stringify(arr)) |
| Grid 两列 | Grid().columnsTemplate('1fr 1fr') |
| 进度条 | Progress({ value: percent, total: 100, type: ProgressType.Linear }) |
| 隐藏滚动条 | .scrollBar(BarState.Off).scrollBarWidth(0) |
| 弹性布局 | Column().layoutWeight(1)(占满剩余空间) |
| 圆角按钮 | .borderRadius(24).shadow({ radius: 8, ... }) |
| 弹窗 | Stack() { 内容; if (show) { 弹窗 } } |
C. 资源与参考
- HarmonyOS 官方文档:https://developer.huawei.com/consumer/cn/doc/harmonyos-guides
- ArkUI 组件:https://developer.huawei.com/consumer/cn/doc/harmonyos-references
- ArkTS 语言规范:https://developer.huawei.com/consumer/cn/doc/harmonyos-guides/arkts-linter
本文档基于 Going/OPEN 项目 v0.1 源码,于 2026 年 6 月整理。
愿每个孩子都能通过一款 App,爱上世界。

讨论HarmonyOS开发技术,专注于API与组件、DevEco Studio、测试、元服务和应用上架分发等。
更多推荐

 6
6 0
0- 0


 已为社区贡献1条内容

所有评论(0)