《星际练字板》一、Canvas使用指南
HarmonyOS Canvas 组件使用指南:从零到实战,打造沉浸式绘图体验
适用版本:HarmonyOS 6.1+(API 23+)
开发语言:ArkTS
关键词:Canvas、ArkUI、鸿蒙开发、绘图组件、onReady、onTouch
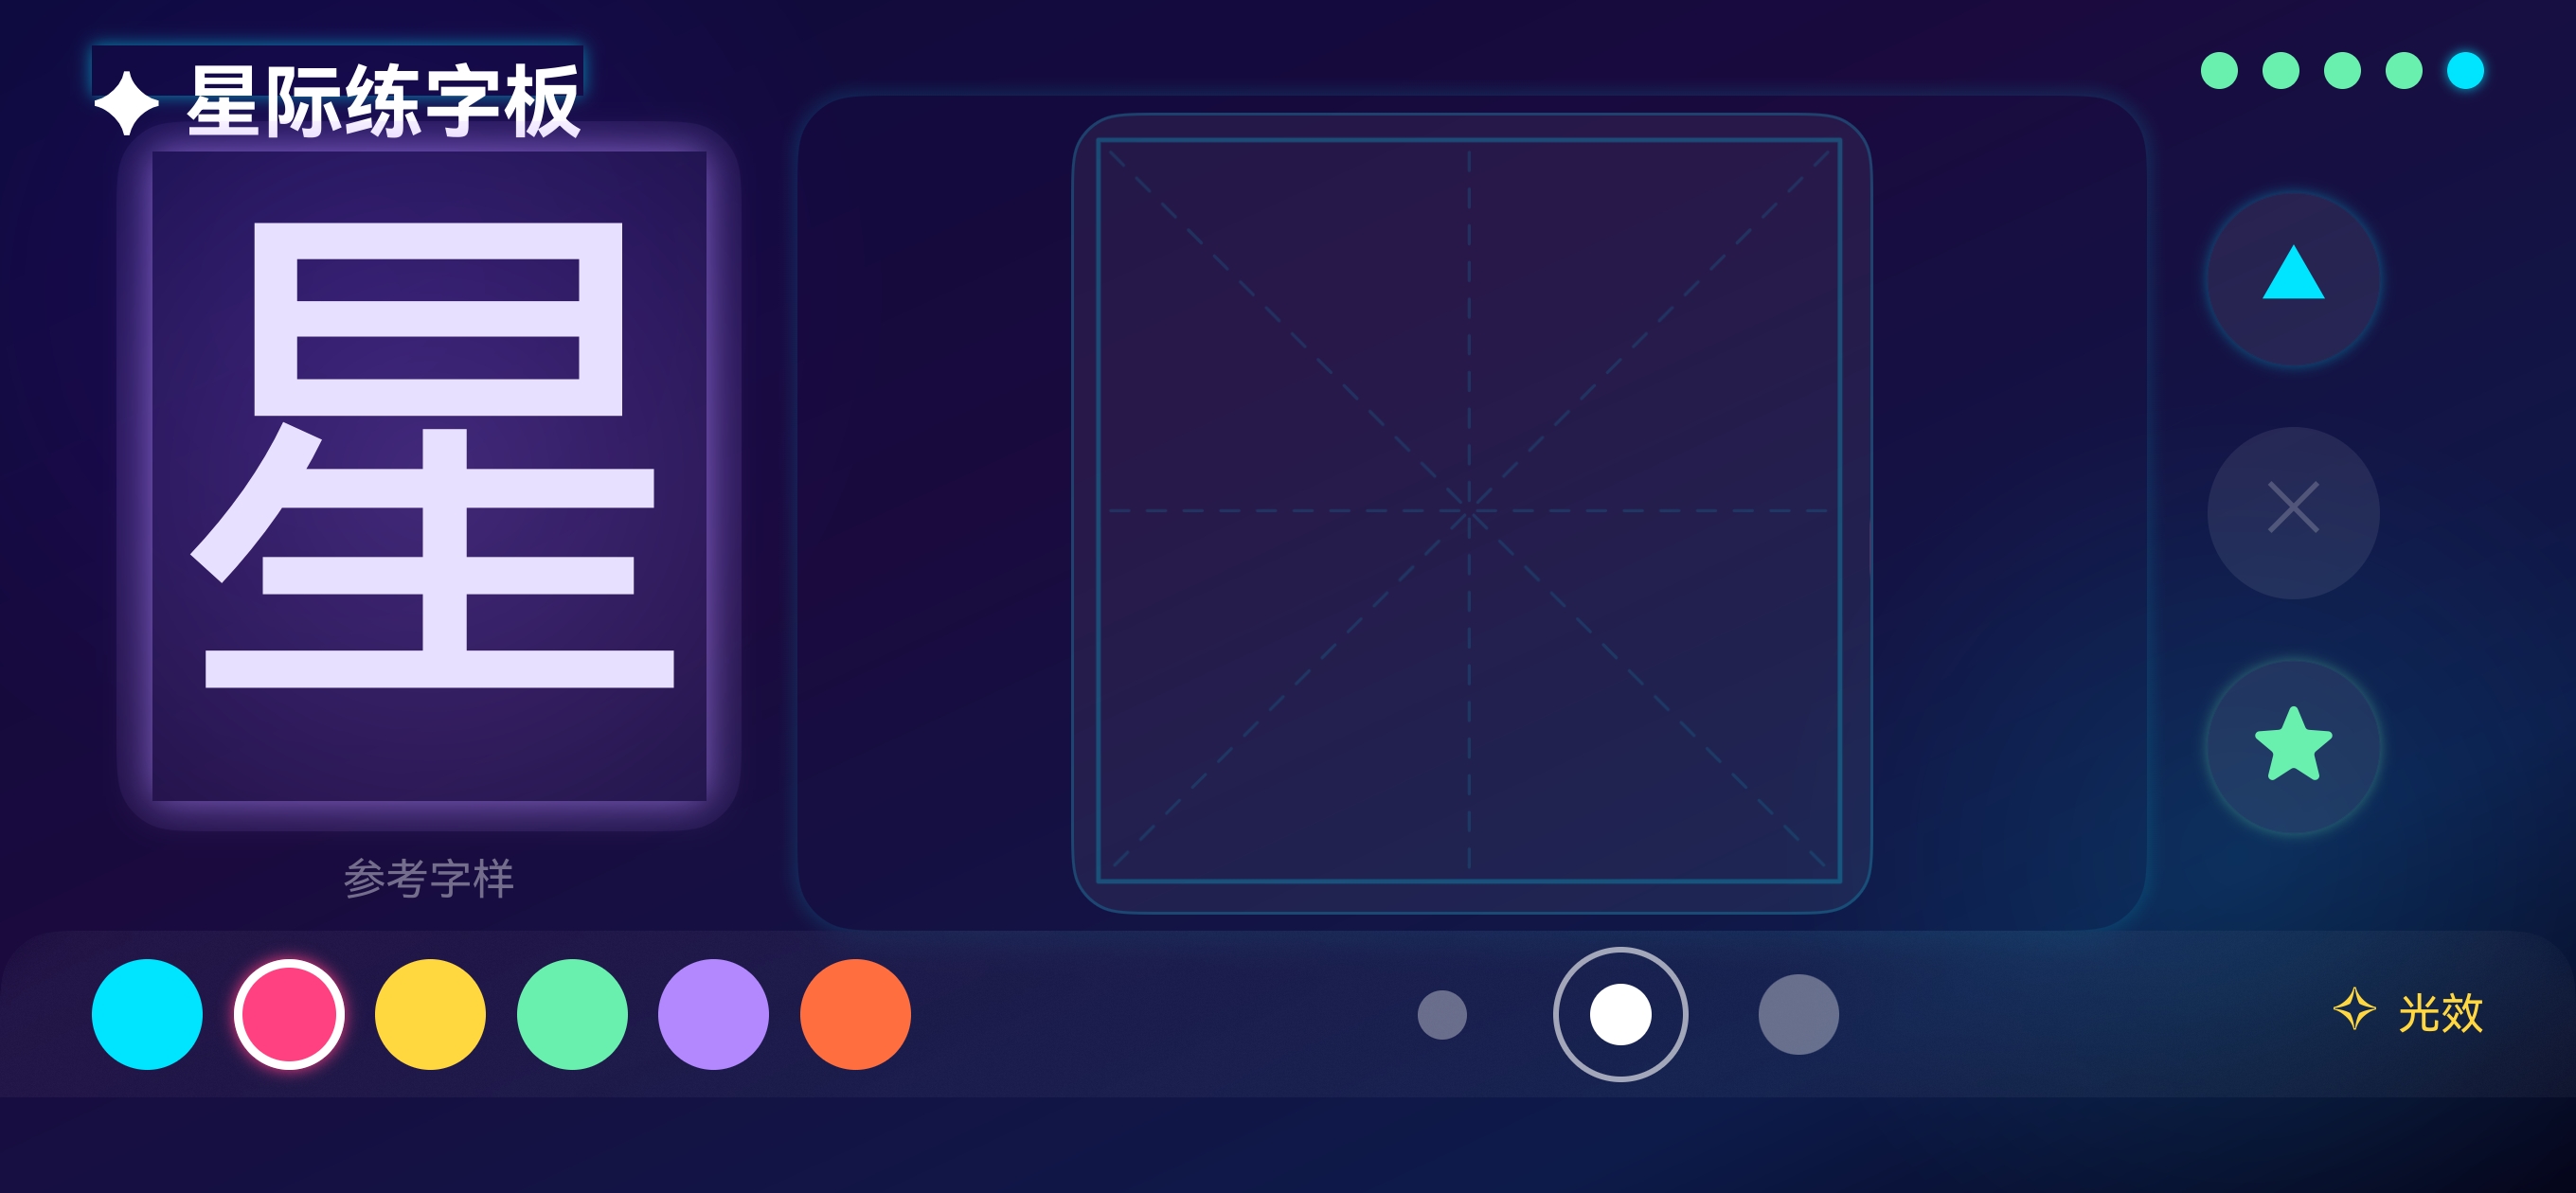
效果
一、前言
在 HarmonyOS 应用开发中,Canvas(画布) 是最核心的 2D 绘图组件。无论是儿童练字板、签名板、涂鸦应用,还是数据可视化图表,都离不开 Canvas 的身影。
本文将系统讲解 Canvas 组件的使用方法,并通过一个完整的实战示例,带你从零基础到熟练运用 Canvas 进行绘图开发。
二、Canvas 组件概述
2.1 什么是 Canvas?
Canvas 是 ArkUI 框架提供的自定义绘制组件,开发者可以通过 CanvasRenderingContext2D 上下文对象,在画布上绘制各种图形、文本和图像。
核心能力一览:
| 能力 | 说明 |
|---|---|
| 绘制图形 | 矩形、圆形、弧线、多边形、贝塞尔曲线等 |
| 绘制文本 | 支持自定义字体、大小、对齐方式 |
| 绘制图像 | 支持加载 PixelMap、ImageSource 等 |
| 路径操作 | 开始路径、关闭路径、裁剪、填充 |
| 变换操作 | 平移、旋转、缩放 |
| 事件监听 | 触摸事件、区域变化、就绪回调 |
2.2 Canvas 的创建方式
Canvas 组件通过传入 CanvasRenderingContext2D 实例来创建:
// 1. 创建 CanvasRenderingContext2D 实例
private context: CanvasRenderingContext2D = new CanvasRenderingContext2D()

build() {
  Column() {
    // 2. 将实例传入 Canvas 组件
    Canvas(this.context)
      .width(300)
      .height(300)
      .backgroundColor('#FFFFFF')
  }
}
要点:
CanvasRenderingContext2D实例是 Canvas 的"画笔",所有绘制操作都通过它来完成。
三、Canvas 核心属性与事件
3.1 常用属性
Canvas(this.context)
  .width(300)                    // 画布宽度
  .height(300)                   // 画布高度
  .aspectRatio(1)                // 宽高比(1 表示正方形)
  .backgroundColor('#FEFFF1')    // 背景色
  .borderRadius(20)              // 圆角
  .opacity(0.9)                  // 透明度
3.2 三大核心回调
onReady —— 画布就绪回调
onReady 是 Canvas 最重要的回调,在画布上下文准备就绪后触发。所有的初始绘制操作都应在此回调中执行:
Canvas(this.context)
  .onReady(() => {
    // 画布已就绪,可以开始绑定
    this.context.fillStyle = '#FF0000'
    this.context.fillRect(10, 10, 100, 100)
  })
注意:如果在
onReady之前调用绑定方法,将不会产生任何效果。
onTouch —— 触摸事件回调
Canvas 通过 onTouch 监听用户的触摸交互,支持按下、移动、抬起等事件:
Canvas(this.context)
  .onTouch((event: TouchEvent) => {
    const touch: TouchObject = event.touches[0]
    switch (event.type) {
      case TouchType.Down:   // 手指按下
        this.context.beginPath()
        this.context.moveTo(touch.x, touch.y)
        break
      case TouchType.Move:   // 手指移动
        this.context.lineTo(touch.x, touch.y)
        this.context.stroke()
        break
      case TouchType.Up:     // 手指抬起
        this.context.closePath()
        break
    }
  })
onAreaChange —— 区域变化回调
当画布尺寸发生变化时触发,适合用于动态获取画布实际尺寸:
Canvas(this.context)
  .onAreaChange((oldVal: Area, newVal: Area) => {
    this.canvasWidth = newVal.width as number
    this.canvasHeight = newVal.height as number
  })
四、Canvas 常用操作
4.1 清除画布
使用 clearRect 方法清除指定区域的内容:
// 清除整个画布
this.context.clearRect(0, 0, this.canvasWidth, this.canvasHeight)
4.2 导出图片
使用 toDataURL 方法将画布内容导出为 Base64 编码的图片:
const dataUrl: string = this.context.toDataURL()
// dataUrl 格式:data:image/png;base64,iVBORw0KGgo...
提示:导出后可以将 Base64 数据解码并保存到沙箱目录,实现图片持久化存储。
4.3 保存图片到沙箱
import { fileIo } from '@kit.CoreFileKit'
import { buffer } from '@kit.ArkTS'

savePicture(imgBase64: string, context: Context) {
  const imgPath = context.tempDir + '/' + Date.now() + '.jpeg'
  const file = fileIo.openSync(imgPath, fileIo.OpenMode.CREATE | fileIo.OpenMode.READ_WRITE)
  const base64Image = imgBase64.split(';base64,').pop()
  const imgBuffer = buffer.from(base64Image, 'base64')
  fileIo.writeSync(file.fd, imgBuffer.buffer)
  fileIo.closeSync(file)
}
五、完整实战示例:简易签名板
下面通过一个完整的签名板示例,演示 Canvas 的核心用法。
5.1 完整代码
import { fileIo } from '@kit.CoreFileKit'
import { buffer } from '@kit.ArkTS'

@Entry
@Component
struct SignatureBoard {
  // 画布上下文
  private canvasContext: CanvasRenderingContext2D = new CanvasRenderingContext2D()
  // 画布尺寸
  private canvasWidth: number = 0
  private canvasHeight: number = 0
  // 画笔设置
  @State penColor: string = '#3366FF'
  @State penWidth: number = 5
  @State hasContent: boolean = false

  build() {
    Column() {
      Text('✍️ 签名板')
        .fontSize(24)
        .fontWeight(FontWeight.Bold)
        .margin({ top: 20, bottom: 10 })

      // Canvas 画布
      Canvas(this.canvasContext)
        .width('90%')
        .aspectRatio(1.5)
        .backgroundColor('#FAFAFA')
        .borderRadius(16)
        .border({ width: 2, color: '#E0E0E0' })
        .onReady(() => {
          // 绘制签名引导线
          const w = this.canvasContext.width
          const h = this.canvasContext.height
          this.canvasContext.strokeStyle = '#E0E0E0'
          this.canvasContext.lineWidth = 1
          this.canvasContext.setLineDash([8, 4])
          this.canvasContext.beginPath()
          this.canvasContext.moveTo(w * 0.1, h * 0.7)
          this.canvasContext.lineTo(w * 0.9, h * 0.7)
          this.canvasContext.stroke()
          this.canvasContext.setLineDash([])
        })
        .onAreaChange((_: Area, newVal: Area) => {
          this.canvasWidth = newVal.width as number
          this.canvasHeight = newVal.height as number
        })
        .onTouch((event: TouchEvent) => {
          const touch: TouchObject = event.touches[0]
          switch (event.type) {
            case TouchType.Down:
              this.canvasContext.beginPath()
              this.canvasContext.moveTo(touch.x, touch.y)
              this.hasContent = true
              break
            case TouchType.Move:
              this.canvasContext.lineTo(touch.x, touch.y)
              this.canvasContext.lineWidth = this.penWidth
              this.canvasContext.strokeStyle = this.penColor
              this.canvasContext.lineCap = 'round'
              this.canvasContext.lineJoin = 'round'
              this.canvasContext.stroke()
              break
            case TouchType.Up:
              this.canvasContext.closePath()
              break
          }
        })

      // 工具栏
      Row({ space: 15 }) {
        // 清除按钮
        Button('清除')
          .type(ButtonType.Capsule)
          .fontSize(16)
          .backgroundColor('#FF5252')
          .fontColor('#FFFFFF')
          .onClick(() => {
            this.canvasContext.clearRect(0, 0, this.canvasWidth, this.canvasHeight)
            this.hasContent = false
          })

        // 保存按钮
        Button('保存')
          .type(ButtonType.Capsule)
          .fontSize(16)
          .backgroundColor('#4CAF50')
          .fontColor('#FFFFFF')
          .enabled(this.hasContent)
          .opacity(this.hasContent ? 1.0 : 0.5)
          .onClick(() => {
            const dataUrl = this.canvasContext.toDataURL()
            this.saveToSandbox(dataUrl)
          })
      }
      .margin({ top: 20 })
    }
    .width('100%')
    .height('100%')
    .backgroundColor('#F5F5F5')
    .justifyContent(FlexAlign.Center)
  }

  // 保存到沙箱
  saveToSandbox(base64Data: string) {
    const context = getContext(this) as Context
    const imgPath = context.tempDir + '/signature_' + Date.now() + '.png'
    const file = fileIo.openSync(imgPath, fileIo.OpenMode.CREATE | fileIo.OpenMode.READ_WRITE)
    const base64Image = base64Data.split(';base64,').pop()
    if (base64Image) {
      const imgBuffer = buffer.from(base64Image, 'base64')
      fileIo.writeSync(file.fd, imgBuffer.buffer)
      fileIo.closeSync(file)
    }
  }
}
5.2 运行效果说明
| 功能 | 说明 |
|---|---|
| 画布显示 | 带圆角和边框的白色画布,有虚线签名引导线 |
| 手写签名 | 手指按下开始绘制,移动时绘制笔迹,抬起结束路径 |
| 清除 | 一键清除画布内容 |
| 保存 | 将画布导出为图片并保存到沙箱目录 |
六、Canvas 开发注意事项
6.1 生命周期管理
- 必须在
onReady回调中进行绑定,过早调用无效 - 使用
onAreaChange获取真实尺寸,避免硬编码 - 页面销毁时,画布上下文会自动释放
6.2 性能优化建议
- 避免在
onTouch的Move事件中频繁创建新路径(beginPath),应在Down时创建 - 对于复杂图形,尽量批量绑定后再统一
stroke()或fill() - 使用
offscreenCanvas进行离屏绑定以提升性能(API 11+)
6.3 常见问题
| 问题 | 原因 | 解决方案 |
|---|---|---|
| 画布一片空白 | 未在 onReady 中绑定 |
将绑定代码移入 onReady 回调 |
| 线条断裂 | Move 中调用了 beginPath |
仅在 Down 时调用 beginPath |
| 图片导出为空 | 画布尺寸未正确获取 | 通过 onAreaChange 获取实际尺寸 |
justifyContent 报错 |
在 Stack 上使用了该方法 |
Stack 不支持 justifyContent,改用 alignContent(Alignment.Center) |
6.4 ArkTS 开发避坑提示
在 ArkTS 项目中使用 Canvas 时,还需注意以下编译规则:
- import 必须在文件顶部:所有
import语句必须位于文件最前面,不能在其他语句之后 - 装饰器版本匹配:
@Provide/@Consume仅支持@Component(V1),不支持@ComponentV2(V2) - NavDestination 不注册路由:作为 Navigation 子页面的
NavDestination不需要在main_pages.json中注册
七、总结
Canvas 组件是 HarmonyOS 中实现自定义绘图的核心能力。掌握以下关键点即可应对大部分绘图场景:
- 创建:实例化
CanvasRenderingContext2D并传入Canvas组件 - 初始化:在
onReady回调中执行初始绑定 - 交互:通过
onTouch实现手写、涂鸦等交互绘制 - 导出:使用
toDataURL将画布内容保存为图片 - 清除:使用
clearRect清除画布内容
在下一篇文章中,我们将深入探讨 CanvasRenderingContext2D 的全部 API,包括路径绘制、渐变填充、阴影效果、图像变换等高级用法。
参考链接

讨论HarmonyOS开发技术,专注于API与组件、DevEco Studio、测试、元服务和应用上架分发等。
更多推荐
 5
5 0
0- 0


 已为社区贡献46条内容

所有评论(0)