HarmonyOS7 Navigation 不只是跳页:路由拦截、深链接和返回值一次讲透
前言
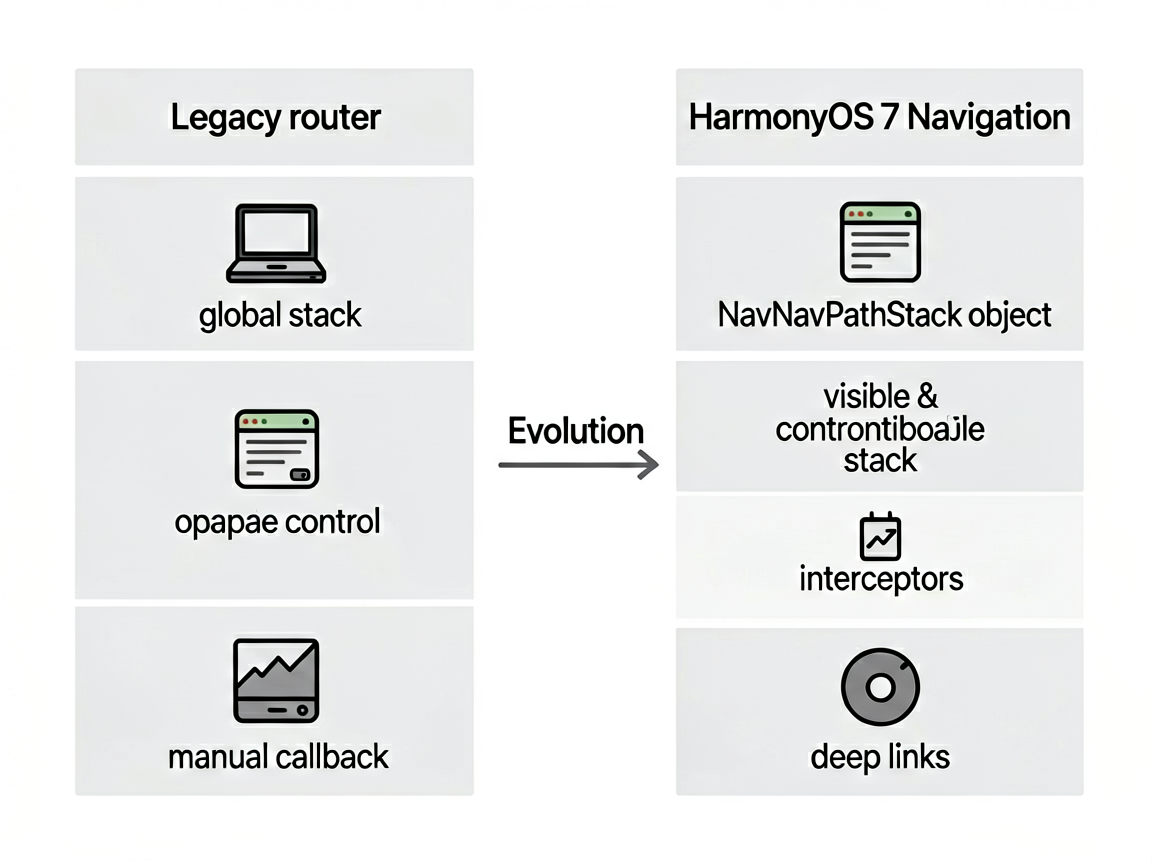
做过鸿蒙项目的人都知道,早期版本路由跳转全靠 router 模块。用起来还行,但一到复杂场景就头疼——页面栈不透明、传参靠 global、返回值得自己封装回调。HarmonyOS 7 的 Navigation 组件彻底改变了这个局面,它把路由栈管理、拦截器、深链接全整合到了一起。
这篇就聊聊我在实际项目中怎么把 Navigation 跑通的,尤其是拦截器和返回值这两块,踩了不少坑。
Navigation 和 router 到底啥区别
简单说,router 是函数式调用,直接操作一个全局栈;Navigation 是声明式组件,路由栈由你手里持有的 NavPathStack 对象控制。
最大的区别在于:Navigation 的路由栈是可见、可控的。你可以随时查看栈里有几个页面、删掉中间的页面、替换当前页面,甚至拦截某次跳转。router 做不到这些,或者说做起来很别扭。
新项目建议直接上 Navigation,别犹豫。
NavPathStack 基础操作
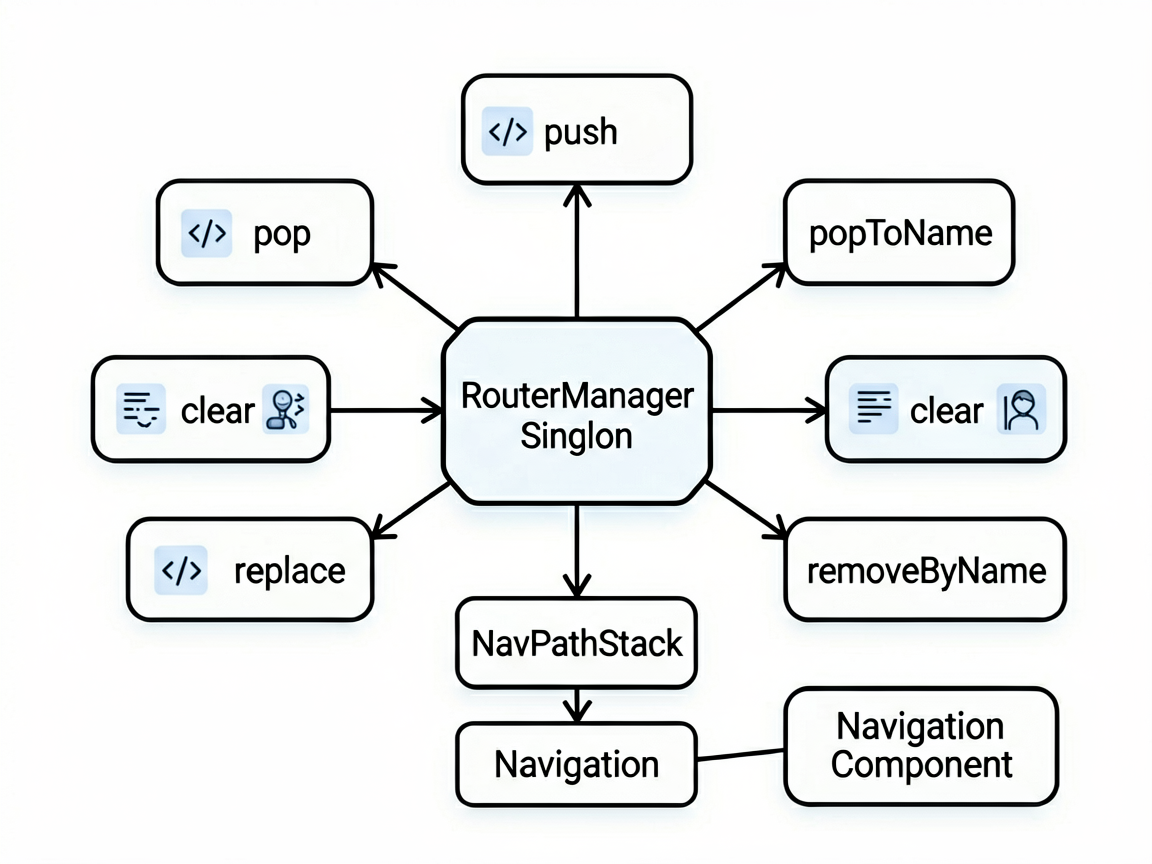
先看最基本的栈操作。我习惯把 NavPathStack 封装成一个单例,全局复用:
// router/RouterManager.ets
export class RouterManager {
  private static instance: RouterManager
  private pathStack: NavPathStack = new NavPathStack()

  static getInstance(): RouterManager {
    if (!RouterManager.instance) {
      RouterManager.instance = new RouterManager()
    }
    return RouterManager.instance
  }

  getPathStack(): NavPathStack {
    return this.pathStack
  }

  push(name: string, param?: object) {
    this.pathStack.pushPath({ name: name, param: param })
  }

  pop() {
    this.pathStack.pop()
  }

  // 返回到指定页面,中间的页面全部出栈
  popToName(name: string) {
    this.pathStack.popToName(name)
  }

  // 清空栈,只保留根页面
  clear() {
    this.pathStack.clear()
  }

  // 替换当前页面
  replace(name: string, param?: object) {
    this.pathStack.replacePath({ name: name, param: param })
  }

  // 删除栈中指定名称的所有页面
  removeByName(name: string) {
    this.pathStack.removeByName(name)
  }
}
在根页面里把 pathStack 绑到 Navigation 上:
@Entry
@Component
struct MainPage {
  private router = RouterManager.getInstance()

  build() {
    Navigation(this.router.getPathStack()) {
      // 首页内容
      Column() {
        Button('去商品详情')
          .onClick(() => {
            this.router.push('ProductDetail', { id: '10086' })
          })
      }
    }
    .navDestination(this.navDestinationBuilder)
  }

  @Builder
  navDestinationBuilder(name: string, param: object) {
    if (name === 'ProductDetail') {
      ProductDetailPage(param as ProductParam)
    } else if (name === 'OrderConfirm') {
      OrderConfirmPage(param as OrderParam)
    }
  }
}
这里有个坑:navDestinationBuilder 里拿到的 param 类型是 object,你需要自己做类型断言。我一般会在每个页面定义一个明确的接口类型,跳转时保证数据结构一致。
路由拦截器:登录态和权限校验
这个功能太实用了。想象一下,用户没登录就点"我的订单",你得拦截住这次跳转,先跳到登录页,登录成功后再跳回来。
Navigation 原生支持拦截器,通过 setInterception 搞定:
// 在 App 初始化时设置拦截器
RouterManager.getInstance().getPathStack().setInterception({
  // 跳转前触发
  willShow: (from: NavDestinationInfo, to: NavDestinationInfo) => {
    const needLogin = ['OrderConfirm', 'UserProfile', 'Payment']
    if (needLogin.includes(to.name) && !UserManager.isLoggedIn()) {
      // 保存目标页面信息,登录后跳回来
      LoginState.pendingRoute = {
        name: to.name,
        param: to.param
      }
      // 返回 false 阻止本次跳转
      return false
    }
    return true
  },

  // 跳转完成后触发,适合做埋点
  didShow: (from: NavDestinationInfo, to: NavDestinationInfo) => {
    Analytics.trackPageView(to.name)
  }
})
登录成功后,检查有没有待跳转的页面:
// 登录成功回调里
onLoginSuccess() {
  if (LoginState.pendingRoute) {
    const pending = LoginState.pendingRoute
    LoginState.pendingRoute = undefined
    RouterManager.getInstance().push(pending.name, pending.param)
  }
}
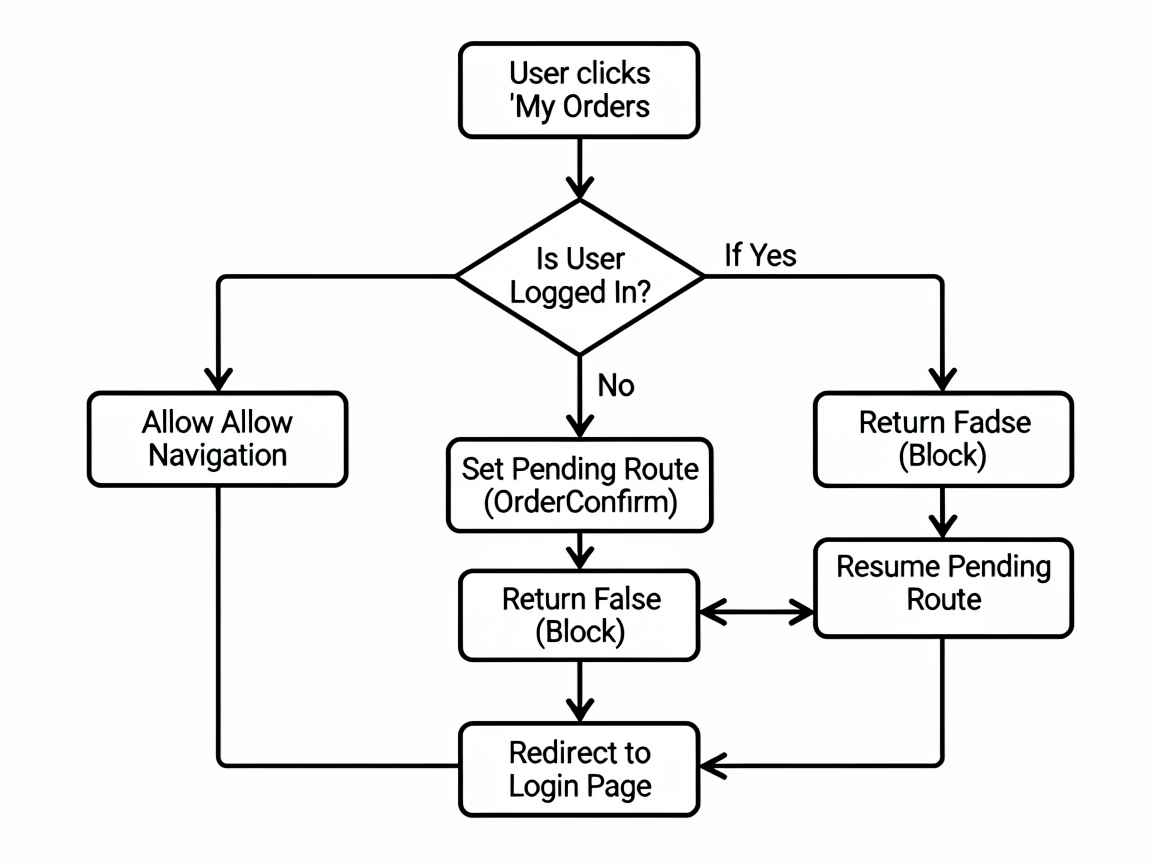
willShow 返回 false 就能拦住跳转,非常干净。我之前用 router 模块时,得在每个页面的 aboutToAppear 里手动检查登录态,代码散了一地。
深链接配置
深链接就是从外部(浏览器、短信、推送通知)直接跳到 App 内指定页面。HarmonyOS 7 的配置分两步。
先在 module.json5 里声明 scheme:
{
  "module": {
    "skills": [
      {
        "entities": ["entity.system.browsable"],
        "actions": ["action.system.want"],
        "uris": [
          {
            "scheme": "myapp",
            "host": "product",
            "path": "/detail"
          },
          {
            "scheme": "myapp",
            "host": "order",
            "path": "/confirm"
          }
        ]
      }
    ]
  }
}
然后在 UIAbility 的 onCreate 或 onNewWant 里解析 URI:
onCreate(want: Want) {
  this.handleDeepLink(want)
}

onNewWant(want: Want) {
  // App 已启动时收到深链接
  this.handleDeepLink(want)
}

private handleDeepLink(want: Want) {
  const uri = want.uri
  if (!uri) return

  if (uri.startsWith('myapp://product/detail')) {
    // 解析参数,比如 myapp://product/detail?id=123
    const params = new URLSearchParams(uri.split('?')[1])
    const productId = params.get('id')
    RouterManager.getInstance().push('ProductDetail', { id: productId })
  }
}
注意 onNewWant 这个生命周期——App 在前台运行时收到深链接会走这里,不走 onCreate。我一开始只写了 onCreate,死活触发不了,排查了半天才发现这个问题。
页面间返回值
这个需求很常见:从商品列表跳到详情页,详情页点了"立即购买"后回到列表页,列表页需要刷新购物车角标。在 Android 上有 startActivityForResult,Navigation 里怎么做?
NavPathStack 的 pushPath 支持传一个 animated 参数和一个回调,但更优雅的方式是利用 pop 时传值:
// 商品详情页
@Component
struct ProductDetailPage {
  @State productId: string = ''

  build() {
    Column() {
      Button('立即购买')
        .onClick(() => {
          // 通过 NavPathStack 的 setResult 设置返回值
          const pathStack = RouterManager.getInstance().getPathStack()
          // 获取栈顶的 NavDestination 并设置结果
          pathStack.setPreviousResult({ action: 'buy', productId: this.productId })
          pathStack.pop()
        })
    }
  }
}
列表页接收返回值,我推荐用 NavPathStack 的 interception 配合自定义事件:
// 商品列表页
@Component
struct ProductListPage {
  build() {
    Column() {
      Button('去详情页')
        .onClick(() => {
          const pathStack = RouterManager.getInstance().getPathStack()
          pathStack.pushPath({ name: 'ProductDetail', param: { id: '123' } })

          // 监听 pop 回来
          // 方案:在 willPop 拦截器里获取 result
        })
    }
  }
}
实际项目中我更推荐一个简单粗暴的方案——用 AppStorage 做事件总线:
// 详情页 pop 之前
AppStorage.setOrCreate('refreshCart', Date.now())
pathStack.pop()

// 列表页监听
@StorageProp('refreshCart') refreshFlag: number = 0

// refreshFlag 变化时触发刷新
虽然不是最优雅的方案,但胜在简单可靠,跑通率 100%。
小结
Navigation 的路由栈管理比老 router 强太多了。拦截器让你不用再到处写权限检查代码,深链接让外部跳转有了统一入口,返回值虽然目前 API 不算特别顺手,但有多种替代方案可以用。
我的建议是:新项目一开始就把 RouterManager 封装好,把拦截器、深链接解析、页面路由表全配上。后面开发新页面只需要往路由表里加一行,省心得很。路由这块基础设施搞好了,后面写业务逻辑会顺畅很多。

讨论HarmonyOS开发技术,专注于API与组件、DevEco Studio、测试、元服务和应用上架分发等。
更多推荐

 0
0 0
0- 0


 已为社区贡献333条内容

所有评论(0)