HarmonyOS律愈实战10:断点适配、系统栏和Want路由
HarmonyOS 多端适配实战:断点、沉浸式系统栏与 Want 路由
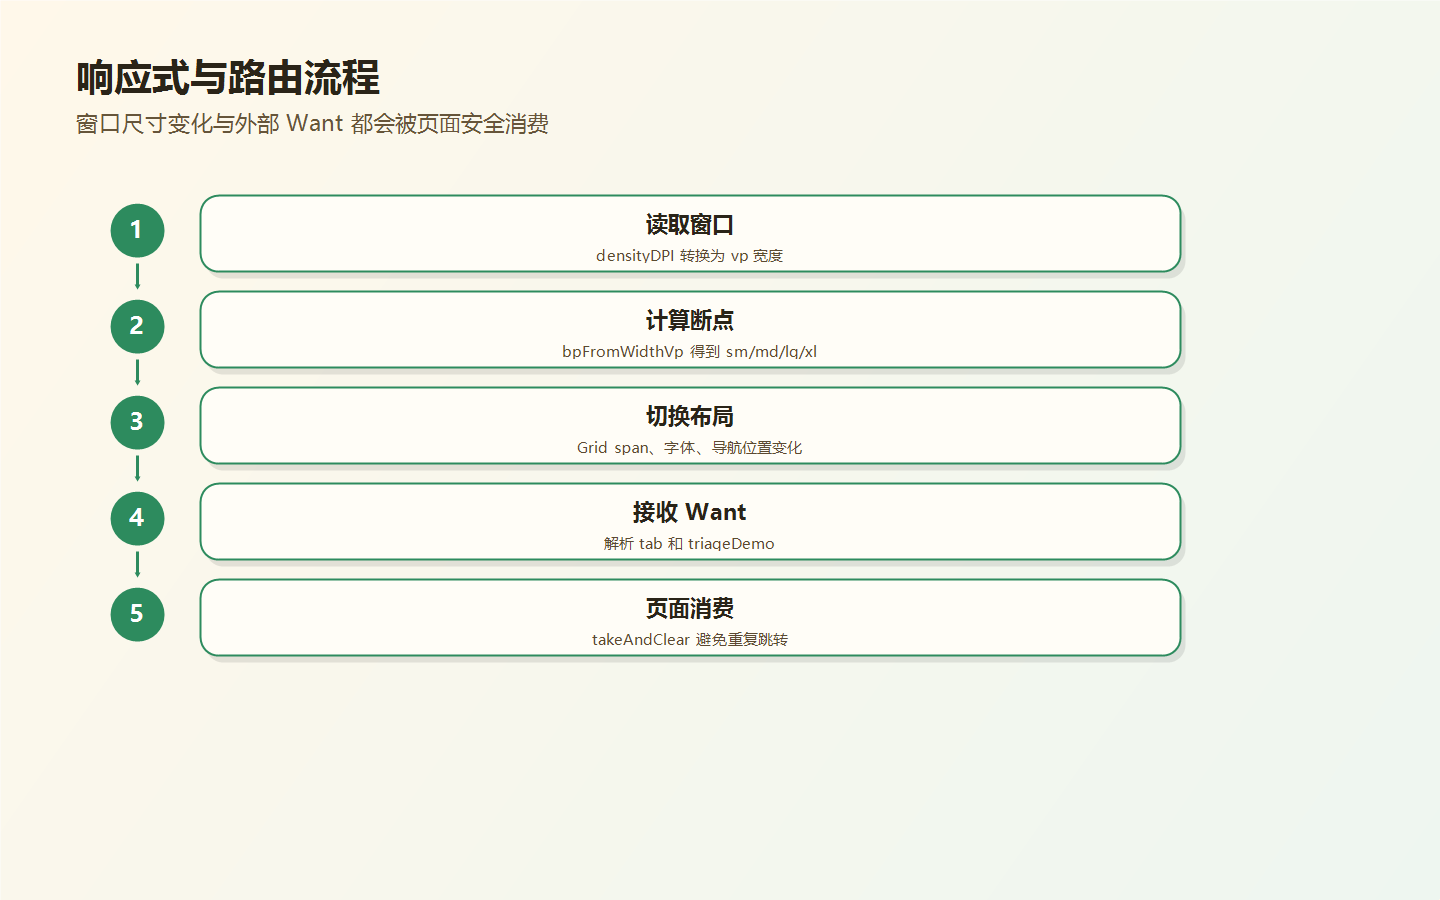

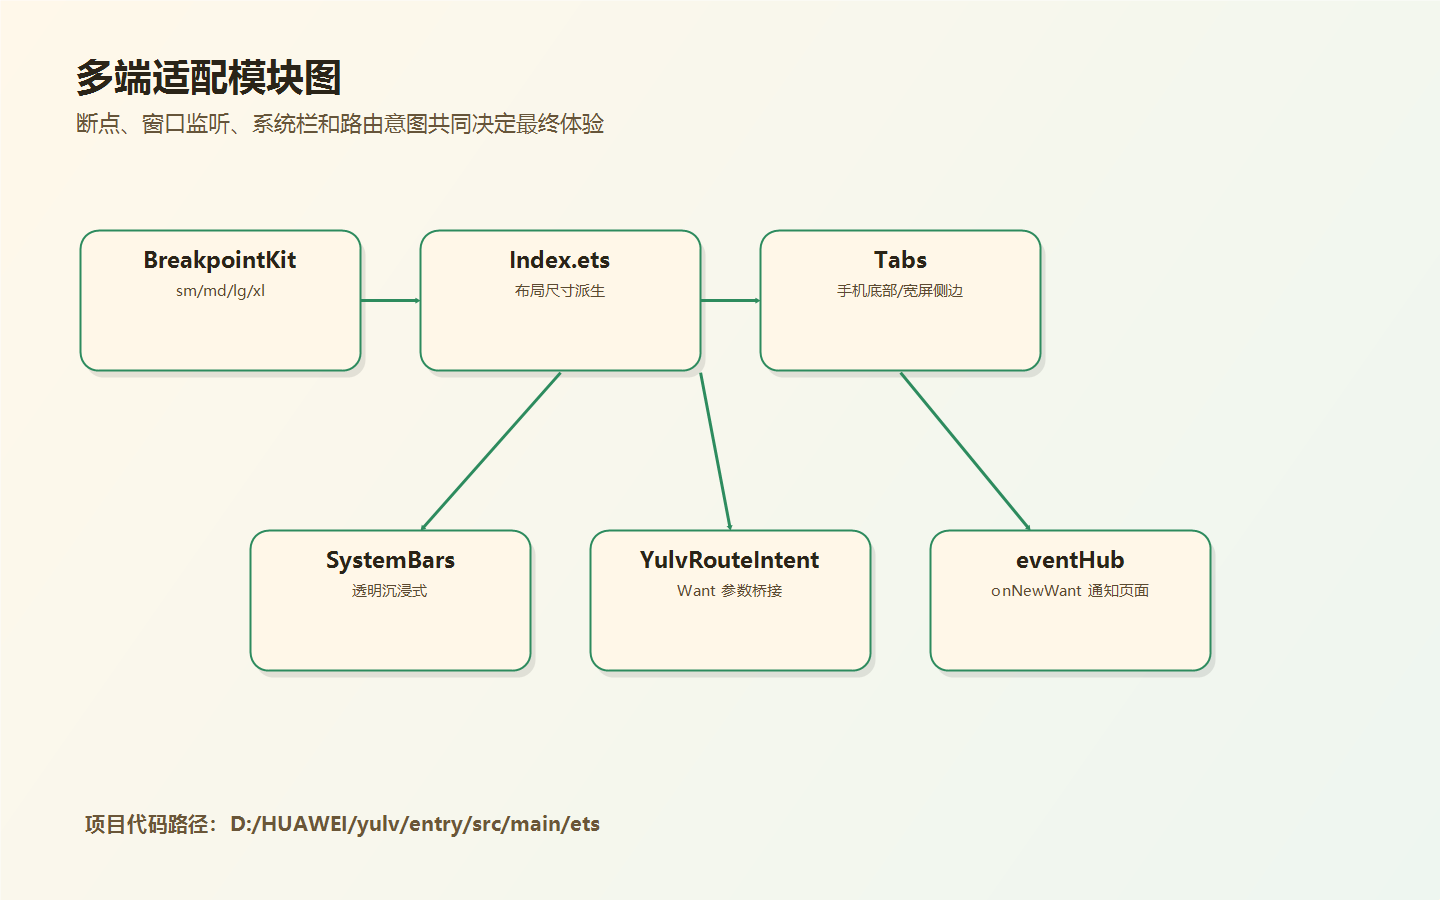
1. 为什么多端适配要提前做
“律愈”项目在 module.json5 中声明支持:
"deviceTypes": [
  "phone",
  "tablet",
  "2in1"
]
这意味着应用不能只按手机竖屏写 UI。平板和 2in1 设备屏幕更宽,如果仍然用单列布局,会显得空、散、低效。
项目里做了三个层面的打磨:
- 断点系统:根据屏幕宽度切换布局密度。
- 沉浸式系统栏:让页面背景延伸到状态栏和导航栏。
- Want 路由:支持从外部或卡片跳转到指定 Tab。
2. 断点工具类
BreakpointKit.ets 定义了四档断点:
export type BpSize = 'sm' | 'md' | 'lg' | 'xl';

const BP_SM = 520;
const BP_MD = 840;
const BP_LG = 1080;

export function bpFromWidthVp(widthVp: number): BpSize {
  if (widthVp >= BP_LG) return 'xl';
  if (widthVp >= BP_MD) return 'lg';
  if (widthVp >= BP_SM) return 'md';
  return 'sm';
}
这里用的是 vp 宽度,而不是直接用 px。这样适配不同屏幕密度时更稳定。
读取当前窗口断点:
export function bpFromWindowSync(): BpSize {
  try {
    const d = display.getDefaultDisplaySync();
    const dpi: number = d.densityDPI > 0 ? d.densityDPI : 480;
    const widthVp: number = (d.width * 160) / dpi;
    return bpFromWidthVp(widthVp);
  } catch (_e) {
    return 'sm';
  }
}
3. 页面中的响应式参数
Index.ets 不是在每个组件里硬写尺寸,而是封装了一组方法:
private marginH(): number {
  switch (this.bp) {
    case 'xl': return 48;
    case 'lg': return 36;
    case 'md': return 24;
    default: return 16;
  }
}

private titleFont(): number {
  switch (this.bp) {
    case 'xl': return 24;
    case 'lg': return 22;
    case 'md': return 20;
    default: return 18;
  }
}
这种写法比到处写三元表达式更可维护。以后要调间距,只改一个函数。
4. 宽屏切换布局
首页在宽屏下使用 Grid:
if (isWideBp(this.bp)) {
  GridRow({ columns: 12, gutter: { x: this.gutterX(), y: this.gutterY() } }) {
    GridCol({ span: this.homeHeroSpan() }) {
      IndexHeroCard({ currentBp: this.bp, heroSession: this.heroSession })
    }
    GridCol({ span: this.homeToneSpan() }) {
      IndexToneStrip({ currentTone: this.currentTone })
    }
  }
} else {
  Column() {
    IndexHeroCard({ currentBp: this.bp, heroSession: this.heroSession })
  }
  IndexToneStrip({ currentTone: this.currentTone })
}
这就是典型的手机单列、平板多列。
5. Tabs 位置切换
手机端使用底部胶囊导航,宽屏则使用侧边栏:
Tabs({
  barPosition: isWideBp(this.bp) ? BarPosition.Start : BarPosition.End,
  controller: this.tabController,
  index: this.selectedTabIndex
})
.vertical(isWideBp(this.bp))
.barWidth(isWideBp(this.bp) ? 80 : 0)
.barHeight(isWideBp(this.bp) ? '100%' : 0)
这类适配非常关键。平板上侧边导航比底部导航更符合阅读和操作习惯。
6. 监听窗口尺寸变化
页面注册窗口变化监听:
private registerWindowListener(): void {
  if (this.windowListenerRegistered) {
    return;
  }
  ohWindow.getLastWindow(this.uiContext).then((win: ohWindow.Window) => {
    this.winRef = win;
    win.on('windowSizeChange', (size: ohWindow.Size): void => {
      const d = display.getDefaultDisplaySync();
      const dpi: number = d.densityDPI > 0 ? d.densityDPI : 480;
      const widthVp: number = (size.width * 160) / dpi;
      this.currentBp = bpFromWidthVp(widthVp);
    });
    this.windowListenerRegistered = true;
  });
}
页面消失时注销监听:
private unregisterWindowListener(): void {
  if (!this.windowListenerRegistered || this.winRef === null) {
    return;
  }
  this.winRef.off('windowSizeChange');
  this.windowListenerRegistered = false;
  this.winRef = null;
}
这一步不能省,否则页面销毁后仍可能收到窗口事件。
7. 沉浸式系统栏
EntryAbility 中设置透明系统栏:
function applyYulvSystemBars(win: window.Window): void {
  win.setWindowLayoutFullScreen(true);
  const props: window.SystemBarProperties = {
    statusBarColor: '#00000000',
    navigationBarColor: '#00000000',
    isStatusBarLightIcon: true,
    isNavigationBarLightIcon: true,
    statusBarContentColor: '#2A2418',
    navigationBarContentColor: '#2A2418'
  };
  win.setWindowSystemBarProperties(props);
}
为了避免窗口刚创建时设置不生效,项目做了多次延迟应用:
function scheduleApplySystemBars(windowStage: window.WindowStage): void {
  const tryApply = (): void => {
    windowStage.getMainWindow().then((win: window.Window) => {
      applyYulvSystemBars(win);
    });
  };
  tryApply();
  setTimeout(tryApply, 0);
  setTimeout(tryApply, 80);
  setTimeout(tryApply, 300);
}
这是一个很实用的经验:窗口样式有时需要在内容加载后再次同步。
8. Want 路由桥接
项目支持从 Want 参数跳转到指定 Tab。路由数据用一个轻量桥接模块保存:
export interface YulvRoutePayload {
  tab: number;
  triageDemo: boolean;
}

let pending: YulvRoutePayload | null = null;
Ability 收到 Want:
onCreate(want: Want, launchParam: AbilityConstant.LaunchParam): void {
  setYulvRouteFromWant(want);
}

onNewWant(want: Want, launchParam: AbilityConstant.LaunchParam): void {
  setYulvRouteFromWant(want);
  this.context.eventHub.emit('yulvWantRoute');
}
页面消费一次:
private applyPendingRoute(): void {
  const r = takeAndClearYulvRoute();
  if (r === null) {
    return;
  }
  if (r.tab >= 0 && r.tab <= 4) {
    this.selectedTabIndex = r.tab;
    this.tabController.changeIndex(r.tab);
  }
}
takeAndClearYulvRoute() 的好处是避免重复跳转。
9. 总体流程图
10. 小结
多端适配不是最后“拉一下宽度”就能完成的事情。真正可维护的做法是:
- 先定义断点系统。
- 页面尺寸、间距、字体、Grid span 都从断点派生。
- 手机和宽屏使用不同导航结构。
- 系统栏、窗口监听和路由意图都要处理生命周期。
“律愈”这个项目虽然是一个疗愈类应用,但它的多端适配思路可以迁移到很多 HarmonyOS 项目中。
9. 断点不是只控制宽度
项目中断点影响的不只是容器宽度,还包括间距、字体、按钮大小、Grid span 和导航方向:
s private heroTitleFont(): number { switch (this.bp) { case 'xl': return 26; case 'lg': return 24; case 'md': return 22; default: return 20; } }
这种写法的好处是页面视觉比例更稳定。宽屏不是简单拉伸,而是重新组织信息密度。
10. 为什么手机底部导航、宽屏侧边导航
手机单手操作时,底部导航更容易触达;平板和 2in1 上,侧边导航能减少纵向空间占用。项目中用同一个 Tabs 控制器实现切换:
s Tabs({ barPosition: isWideBp(this.bp) ? BarPosition.Start : BarPosition.End, controller: this.tabController, index: this.selectedTabIndex }) .vertical(isWideBp(this.bp))
文章中可以把这段作为 HarmonyOS 多设备体验的重点,而不是只说“适配了平板”。
11. 系统栏为什么要重复设置
scheduleApplySystemBars() 做了多次延迟调用:
s tryApply(); setTimeout(tryApply, 0); setTimeout(tryApply, 80); setTimeout(tryApply, 300);
这属于实际项目经验:窗口创建、页面加载、系统栏应用并不总是严格同步。重复设置可以提升沉浸式样式的稳定性。
12. Want 路由为什么要 takeAndClear
路由桥接模块里保存一个 pending:
` s
let pending: YulvRoutePayload | null = null;
export function takeAndClearYulvRoute(): YulvRoutePayload | null {
const r = pending;
pending = null;
return r;
}
`
消费后清空可以避免页面重复跳转。特别是 boutToAppear()、onNewWant()、事件回调都可能触发路由处理,如果不清空,就会出现用户刚切到别的 Tab 又被拉回来的问题。
13. 多端验证清单
` ext
- 手机宽度下底部胶囊导航是否显示
- 平板宽度下 Tabs 是否切换到侧边
- GridRow 的 span 是否让首页不拥挤
- 状态栏文字颜色在浅背景上是否可读
- 横竖屏切换后 currentBp 是否更新
- 外部 Want 带 tab=2 时是否进入辨证页
- triageDemo=true 时是否自动生成演示辨证结果
`
urrentBp 是否更新
6. 外部 Want 带 tab=2 时是否进入辨证页
7. triageDemo=true 时是否自动生成演示辨证结果
`

讨论HarmonyOS开发技术,专注于API与组件、DevEco Studio、测试、元服务和应用上架分发等。
更多推荐


 4
4 0
0- 0


 已为社区贡献17条内容

所有评论(0)