鸿蒙动态路由实战:Navigation + NavPathStack 深度解析

前言
在鸿蒙应用开发中,页面导航是构建复杂应用的核心。传统的 router 模块虽然简单直接,但在处理复杂转场动画和跨页面状态共享时略显不足。
鸿蒙提供了更强大的 Navigation 组件配合 NavPathStack,实现了类似 Web 前端(如 React Router)的声明式路由管理。本案例将带你深入理解这套动态路由体系,掌握如何实现流畅的页面跳转、参数传递以及路由栈的精细控制。
本案例涵盖以下核心知识点:
- NavPathStack 路由栈管理:如何通过栈对象统一管理页面路径,实现声明式导航。
- 动态路由映射:使用
navDestination构建器根据路径名称动态加载页面组件。 - 路由栈操作:掌握
pushPath、pop、popToIndex等核心 API 的使用。 - 页面间通信:通过
param对象在页面跳转时传递参数。
完整代码结构预览
首先,让我们从整体上把握代码结构。它定义了一个 NavigationDemo 入口组件,核心在于通过 NavPathStack 控制 Navigation 组件的页面展示。
// 1. 模块导入
import { DetailPage } from '../views/DetailPage'
import { SettingsPage } from '../views/SettingsPage'
import { ProfilePage } from '../views/ProfilePage'
import { ROUTE_DETAIL, ROUTE_PROFILE, ROUTE_SETTINGS, RouteParams } from '../navigation/RouteConfig'

@Entry
@Component
struct NavigationDemo {
  // 2. 核心状态:路由栈
  @Provide('navPathStack') navPathStack: NavPathStack = new NavPathStack()
  @State stackDepth: number = 0
  @State routeLog: string = 'NavPathStack 已初始化'
  @State pathNames: string = 'Home'

  // 3. 路由映射构建器
  @Builder
  navDestinationBuilder(name: string, param: Object) {
    // 根据 name 动态返回对应的页面组件
    if (name === ROUTE_DETAIL) {
      DetailPage({ navPathStack: this.navPathStack })
    } else if (name === ROUTE_SETTINGS) {
      SettingsPage({ navPathStack: this.navPathStack })
    } else if (name === ROUTE_PROFILE) {
      ProfilePage({ navPathStack: this.navPathStack })
    } else {
      // 404 页面
      NavDestination() { /* ... */ }.title('404')
    }
  }

  build() {
    // 4. Navigation 组件包裹内容
    Navigation(this.navPathStack) {
      // 首页内容
      Scroll() { /* ... */ }
    }
    .navDestination(this.navDestinationBuilder) // 绑定路由构建器
    .mode(NavigationMode.Stack) // 设置为栈模式
    .title('动态路由 Home')
    .onNavBarStateChange((isVisible: boolean) => { /* ... */ })
  }

  // 5. UI 构建部分
  @Builder HeaderSection() { /* ... */ }
  @Builder StackSection() { /* ... */ } // 显示栈状态
  @Builder RouteButtonsSection() { /* ... */ } // 跳转按钮
  @Builder ApiSection() { /* ... */ } // 栈操作按钮
  @Builder GuideSection() { /* ... */ } // 实现要点

  // 6. 辅助方法
  private refreshStackInfo(action: string): void { /* 更新 UI 状态 */ }
}
第一部分:核心架构与路由映射
代码的核心在于 Navigation 组件与 NavPathStack 的配合使用,以及 navDestinationBuilder 的动态映射机制。
NavPathStack 路由栈
- 使用
@Provide装饰器将navPathStack注入到组件树中,使得子页面也能通过@Consumer获取到同一个栈实例,实现跨页面的路由控制。 - 它是路由的“大脑”,存储了当前的页面路径历史。
navDestinationBuilder 动态映射
@Builder
navDestinationBuilder(name: string, param: Object) {
  if (name === ROUTE_DETAIL) {
    // 返回具体的页面组件,并传入 navPathStack
    DetailPage({ navPathStack: this.navPathStack })
  } else if (name === ROUTE_SETTINGS) {
    SettingsPage({ navPathStack: this.navPathStack })
  }
  // ... 其他页面
  else {
    // 404 页面处理
    NavDestination() {
      Column() { Text(`未知路由: ${name}`) }
    }.title('404')
  }
}
- 作用:这是一个工厂函数。当
navPathStack发生变化(如pushPath)时,Navigation组件会调用此函数,传入目标路径的name。 - 动态加载:根据
name返回对应的@Component。这使得我们可以像写 Web 路由一样,通过字符串路径来管理页面,而不是在 UI 结构中写死。
Navigation 组件配置
Navigation(this.navPathStack) {
  // 默认首页内容
  Scroll() { ... }
}
.navDestination(this.navDestinationBuilder) // 绑定映射规则
.mode(NavigationMode.Stack) // 启用栈模式
- mode(NavigationMode.Stack):明确指定使用栈管理模式,这是实现
push/pop行为的关键。
第二部分:路由跳转与参数传递
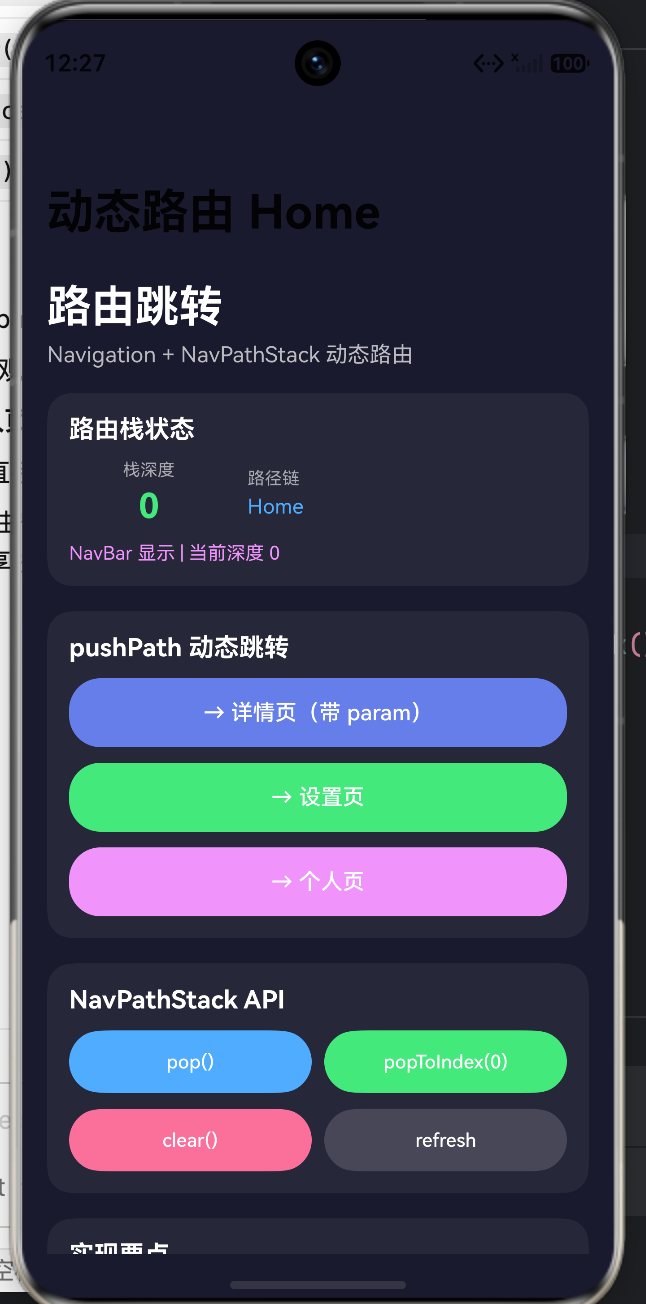
RouteButtonsSection 展示了如何触发页面跳转并传递参数。
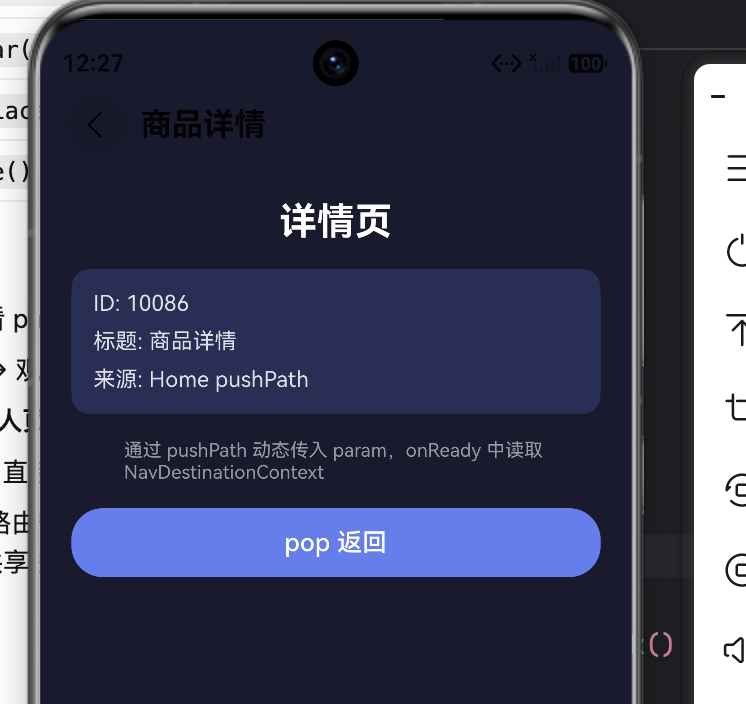
pushPath 动态跳转
Button('→ 详情页(带 param)')
  .onClick(() => {
    const param: RouteParams = {
      id: '10086',
      title: '商品详情',
      from: 'Home pushPath'
    }
    // 1. 压入新路径
    this.navPathStack.pushPath({ name: ROUTE_DETAIL, param: param })
    // 2. 更新 UI 日志
    this.refreshStackInfo(`pushPath → ${ROUTE_DETAIL}`)
  })
- 核心 API:
pushPath({ name, param })。 - 参数传递:
param对象可以携带任意数据(需可序列化),目标页面可以通过context.pathInfo.param获取这些数据。 - 类型安全:代码中使用了
RouteParams接口来约束参数类型,这是良好的开发习惯。
第三部分:路由栈的精细控制
ApiSection 和 StackSection 展示了对路由栈的查看和控制能力,这是 Navigation 组件相比传统 router 的一大优势。
栈状态可视化
// 实时显示栈深度和路径链
Text('栈深度: ' + this.stackDepth)
Text('路径链: ' + this.pathNames) // 例如:Home → Detail → Settings
- 通过
this.navPathStack.size()和this.navPathStack.getAllPathName()实时获取栈信息,帮助开发者调试。
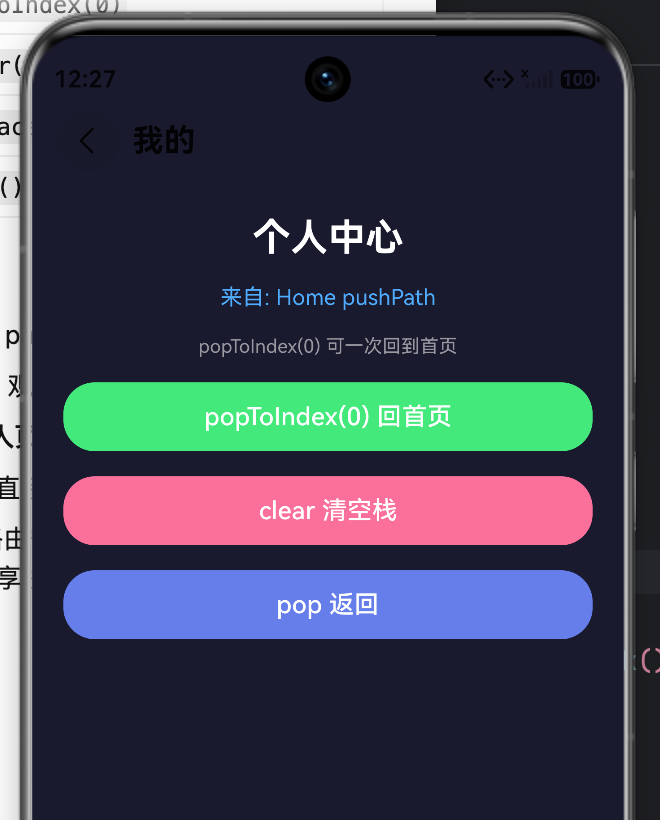
栈操作 API
| 按钮 | 对应代码 | 功能描述 |
|---|---|---|
| pop() | this.navPathStack.pop() |
弹出栈顶页面,返回上一页。 |
| popToIndex(0) | this.navPathStack.popToIndex(0) |
弹出直到索引为 0 的页面(即回到首页),常用于“退出登录”或“完成向导”场景。 |
| clear() | this.navPathStack.clear() |
清空所有路径(慎用,通常用于重置应用状态)。 |
完整代码
import { DetailPage } from '../views/DetailPage'
import { SettingsPage } from '../views/SettingsPage'
import { ProfilePage } from '../views/ProfilePage'
import {
ROUTE_DETAIL,
ROUTE_PROFILE,
ROUTE_SETTINGS,
RouteParams
} from '../navigation/RouteConfig'
struct NavigationDemo {
('navPathStack') navPathStack: NavPathStack = new NavPathStack()
stackDepth: number = 0
routeLog: string = 'NavPathStack 已初始化'
pathNames: string = 'Home'
navDestinationBuilder(name: string, param: Object) {
if (name === ROUTE_DETAIL) {
DetailPage({ navPathStack: this.navPathStack })
} else if (name === ROUTE_SETTINGS) {
SettingsPage({ navPathStack: this.navPathStack })
} else if (name === ROUTE_PROFILE) {
ProfilePage({ navPathStack: this.navPathStack })
} else {
NavDestination() {
Column() {
Text(`未知路由: ${name}`)
.fontColor('#FA709A')
}
.width('100%')
.height('100%')
.justifyContent(FlexAlign.Center)
.backgroundColor('#1A1A2E')
}
.title('404')
.backgroundColor('#1A1A2E')
}
}
build() {
Navigation(this.navPathStack) {
Scroll() {
Column({ space: 16 }) {
this.HeaderSection()
this.StackSection()
this.RouteButtonsSection()
this.ApiSection()
this.GuideSection()
}
.width('100%')
.padding({ top: 16, left: 16, right: 16, bottom: 24 })
}
.width('100%')
.height('100%')
.backgroundColor('#1A1A2E')
.scrollBar(BarState.Off)
}
.navDestination(this.navDestinationBuilder)
.mode(NavigationMode.Stack)
.title('动态路由 Home')
.backgroundColor('#1A1A2E')
.onNavBarStateChange((isVisible: boolean) => {
this.refreshStackInfo(`NavBar ${isVisible ? '显示' : '隐藏'}`)
})
}
HeaderSection() {
Column({ space: 6 }) {
Text('路由跳转')
.fontSize(28)
.fontWeight(FontWeight.Bold)
.fontColor('#FFFFFF')
Text('Navigation + NavPathStack 动态路由')
.fontSize(14)
.fontColor('#FFFFFF')
.opacity(0.7)
}
.width('100%')
.alignItems(HorizontalAlign.Start)
}
StackSection() {
Column({ space: 10 }) {
Text('路由栈状态')
.fontSize(16)
.fontWeight(FontWeight.Bold)
.fontColor('#FFFFFF')
.width('100%')
Row({ space: 12 }) {
Column({ space: 4 }) {
Text('栈深度')
.fontSize(11)
.fontColor('#FFFFFF')
.opacity(0.6)
Text(this.stackDepth.toString())
.fontSize(22)
.fontWeight(FontWeight.Bold)
.fontColor('#43E97B')
}
.layoutWeight(1)
Column({ space: 4 }) {
Text('路径链')
.fontSize(11)
.fontColor('#FFFFFF')
.opacity(0.6)
Text(this.pathNames)
.fontSize(13)
.fontColor('#4FACFE')
}
.layoutWeight(2)
.alignItems(HorizontalAlign.Start)
}
.width('100%')
Text(this.routeLog)
.fontSize(12)
.fontColor('#F093FB')
.width('100%')
}
.width('100%')
.padding(14)
.backgroundColor('rgba(255,255,255,0.06)')
.borderRadius(16)
.alignItems(HorizontalAlign.Start)
}
RouteButtonsSection() {
Column({ space: 10 }) {
Text('pushPath 动态跳转')
.fontSize(16)
.fontWeight(FontWeight.Bold)
.fontColor('#FFFFFF')
.width('100%')
Button('→ 详情页(带 param)')
.width('100%')
.height(44)
.fontSize(14)
.backgroundColor('#667EEA')
.onClick(() => {
const param: RouteParams = {
id: '10086',
title: '商品详情',
from: 'Home pushPath'
}
this.navPathStack.pushPath({ name: ROUTE_DETAIL, param: param })
this.refreshStackInfo(`pushPath → ${ROUTE_DETAIL}`)
})
Button('→ 设置页')
.width('100%')
.height(44)
.fontSize(14)
.backgroundColor('#43E97B')
.onClick(() => {
this.navPathStack.pushPath({
name: ROUTE_SETTINGS,
param: { from: 'Home pushPath' } as RouteParams
})
this.refreshStackInfo(`pushPath → ${ROUTE_SETTINGS}`)
})
Button('→ 个人页')
.width('100%')
.height(44)
.fontSize(14)
.backgroundColor('#F093FB')
.onClick(() => {
this.navPathStack.pushPath({
name: ROUTE_PROFILE,
param: { title: '我的', from: 'Home pushPath' } as RouteParams
})
this.refreshStackInfo(`pushPath → ${ROUTE_PROFILE}`)
})
}
.width('100%')
.padding(14)
.backgroundColor('rgba(255,255,255,0.06)')
.borderRadius(16)
.alignItems(HorizontalAlign.Start)
}
ApiSection() {
Column({ space: 10 }) {
Text('NavPathStack API')
.fontSize(16)
.fontWeight(FontWeight.Bold)
.fontColor('#FFFFFF')
.width('100%')
Row({ space: 8 }) {
Button('pop()')
.layoutWeight(1)
.height(40)
.fontSize(12)
.backgroundColor('#4FACFE')
.onClick(() => {
this.navPathStack.pop()
this.refreshStackInfo('pop 出栈')
})
Button('popToIndex(0)')
.layoutWeight(1)
.height(40)
.fontSize(12)
.backgroundColor('#43E97B')
.onClick(() => {
this.navPathStack.popToIndex(0)
this.refreshStackInfo('popToIndex(0)')
})
}
.width('100%')
Row({ space: 8 }) {
Button('clear()')
.layoutWeight(1)
.height(40)
.fontSize(12)
.backgroundColor('#FA709A')
.onClick(() => {
this.navPathStack.clear()
this.refreshStackInfo('clear 清空栈')
})
Button('refresh')
.layoutWeight(1)
.height(40)
.fontSize(12)
.backgroundColor('rgba(255,255,255,0.15)')
.onClick(() => this.refreshStackInfo('手动刷新栈信息'))
}
.width('100%')
}
.width('100%')
.padding(14)
.backgroundColor('rgba(255,255,255,0.06)')
.borderRadius(16)
.alignItems(HorizontalAlign.Start)
}
GuideSection() {
Column({ space: 8 }) {
Text('实现要点')
.fontSize(16)
.fontWeight(FontWeight.Bold)
.fontColor('#FFFFFF')
.width('100%')
this.GuideItem('1', 'NavPathStack 管理路由栈,pushPath 按 name 动态加载页面')
this.GuideItem('2', 'navDestination Builder 根据 name 映射到对应 @Component')
this.GuideItem('3', '子页 NavDestination.onReady 读取 context.pathInfo.param')
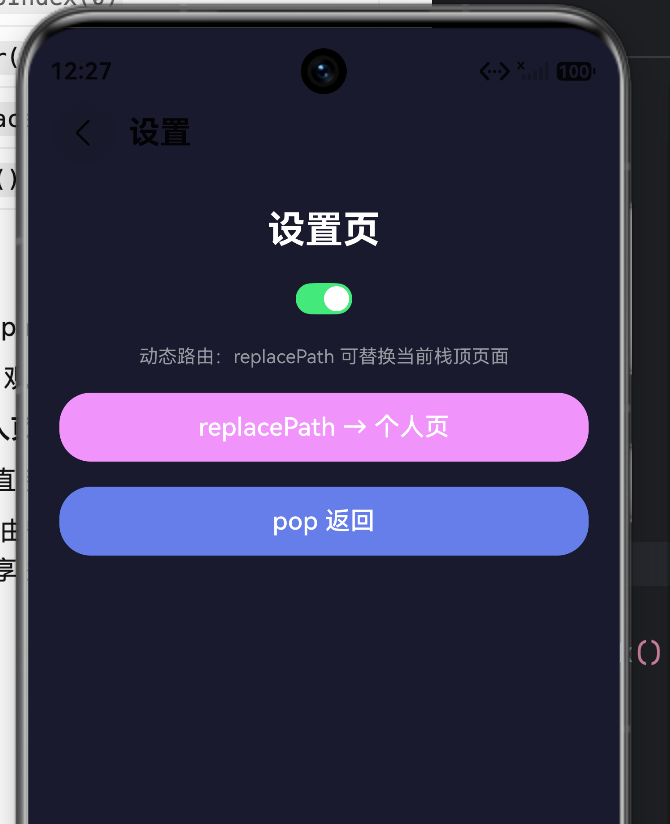
this.GuideItem('4', '@Provide/@Consumer 共享 navPathStack,子页可 pop / replacePath')
this.GuideItem('5', '对比 router.pushUrl:Navigation 栈内切换,转场更流畅、状态可保留')
}
.width('100%')
.padding(14)
.backgroundColor('rgba(255,255,255,0.06)')
.borderRadius(16)
.alignItems(HorizontalAlign.Start)
}
GuideItem(step: string, detail: string) {
Row({ space: 10 }) {
Text(step)
.fontSize(12)
.fontColor('#FFFFFF')
.width(22)
.height(22)
.textAlign(TextAlign.Center)
.backgroundColor('#667EEA')
.borderRadius(11)
Text(detail)
.fontSize(12)
.fontColor('#FFFFFF')
.opacity(0.65)
.layoutWeight(1)
}
.width('100%')
}
private refreshStackInfo(action: string): void {
this.stackDepth = this.navPathStack.size()
const names = this.navPathStack.getAllPathName()
this.pathNames = names.length > 0 ? names.join(' → ') : 'Home'
this.routeLog = `${action} | 当前深度 ${this.stackDepth}`
}
}
第四部分:实现要点与最佳实践
GuideSection 总结了使用该架构的 5 个关键点,非常值得背诵:
- NavPathStack 管理路由栈:不要直接操作页面组件,而是操作路径字符串。
- navDestination Builder 映射:集中管理路由表,解耦页面引用。
- 子页获取参数:在子页面的
onReady或aboutToAppear中,通过this.getUIContext().pathInfo.param读取传入的参数。 - 跨页面共享栈:使用
@Provide和@Consumer让子页面也能执行pop或replacePath操作。 - 对比 router.pushUrl:
Navigation组件的转场是组件级的,状态保留更好,且支持更复杂的共享元素转场。
总结与选型建议
什么时候使用 Navigation + NavPathStack?
- 复杂应用架构:需要清晰的层级结构(如 首页 -> 列表 -> 详情 -> 编辑)。
- 状态保留:希望页面返回时保留之前的滚动位置或输入状态(
Navigation默认会缓存页面实例)。 - 统一导航栏:需要统一的标题栏、菜单或转场动画。
什么时候使用 router.pushUrl?
- 简单页面跳转:如从登录页跳转到主页,不需要返回,或者页面之间完全独立。
- 全屏模态弹窗:使用
router的Dialog模式可能更直接。
一句话口诀:重交互、重层级、重状态,选 Navigation;轻跳转、一次性,选 router。
希望这篇解析能帮你彻底搞懂鸿蒙的动态路由架构,在项目中游刃有余地构建复杂的页面导航体系!

讨论HarmonyOS开发技术,专注于API与组件、DevEco Studio、测试、元服务和应用上架分发等。
更多推荐


 3
3 0
0- 0


 已为社区贡献95条内容

所有评论(0)