HarmonyOS 3D 拆解分析:AI 分析接入
前言
之前的拆解流程是:拍照 → 网格切分 → 爆炸展示。部件名称是程序根据网格位置自动生成的("部件 1"“部件 2”),没有真正的语义信息。
这次迭代做了两件事:
- 接入 AI 分析服务——拍照后自动识别物品名称和部件名称
- 加入粒子场动效——工作区背景不再是纯色,有了氛围感
新增服务:AiAnalysisService
import 变化
import { ParticleField } from '../components/ParticleField'
import { analyzeImage, AiAnalysisResult } from '../services/AiAnalysisService'
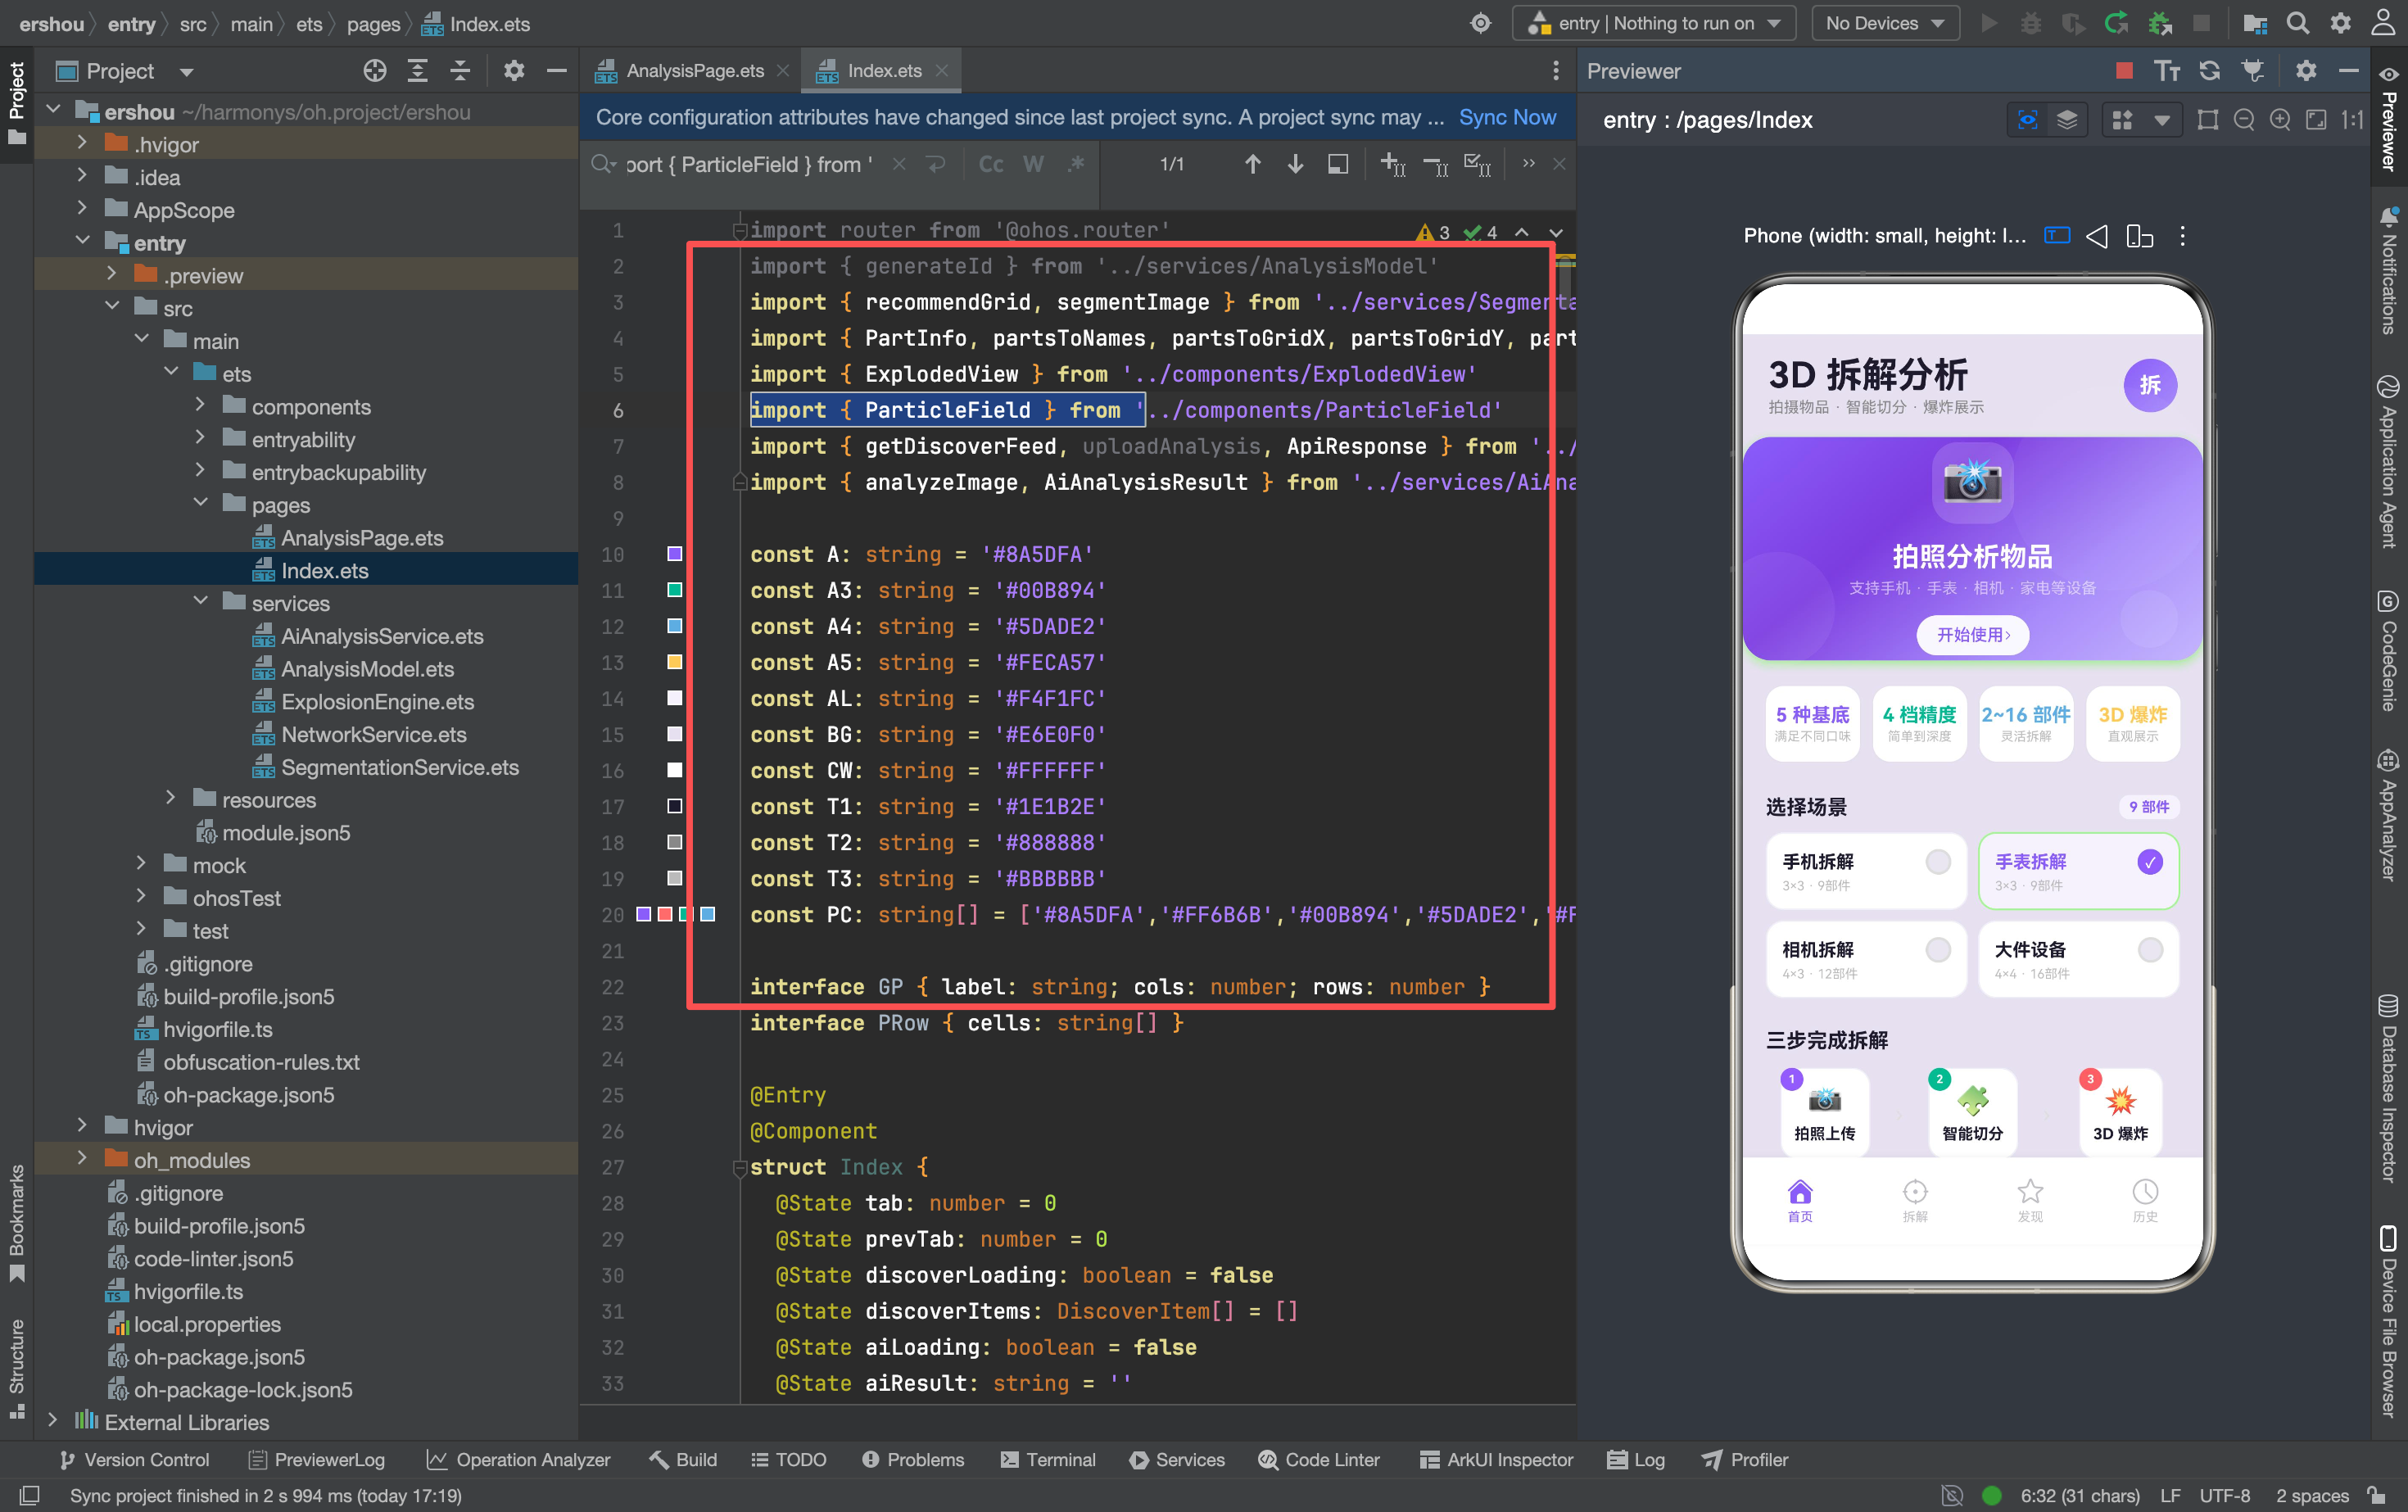
两个新组件:
ParticleField:粒子场背景组件analyzeImage+AiAnalysisResult:AI 图像分析服务
AI 分析的状态管理
@State aiLoading: boolean = false
@State aiResult: string = ''
两个状态变量:
aiLoading:AI 是否在分析中aiResult:分析结果的文字描述
AI 分析方法
private async runAiAnalysis(): Promise<void> {
  this.aiLoading = true; this.aiResult = ''
  const mockBase64: string = 'mock_image_data'
  const result: AiAnalysisResult = await analyzeImage(mockBase64)
  this.aiLoading = false

  if (result.success && result.parts.length > 0) {
    this.aiResult = result.objectName + ' · ' + result.parts.length + ' 部件'
    const maxParts: number = result.parts.length < this.pc.length ? result.parts.length : this.pc.length
    for (let i: number = 0; i < maxParts; i++) {
      this.pc[i].n = result.parts[i].name
    }
    // Force state refresh
    const updated: PCard[] = []
    for (let j: number = 0; j < this.pc.length; j++) { updated.push(this.pc[j]) }
    this.pc = updated
  } else {
    this.aiResult = 'AI 分析失败: ' + result.errorMessage
  }
}
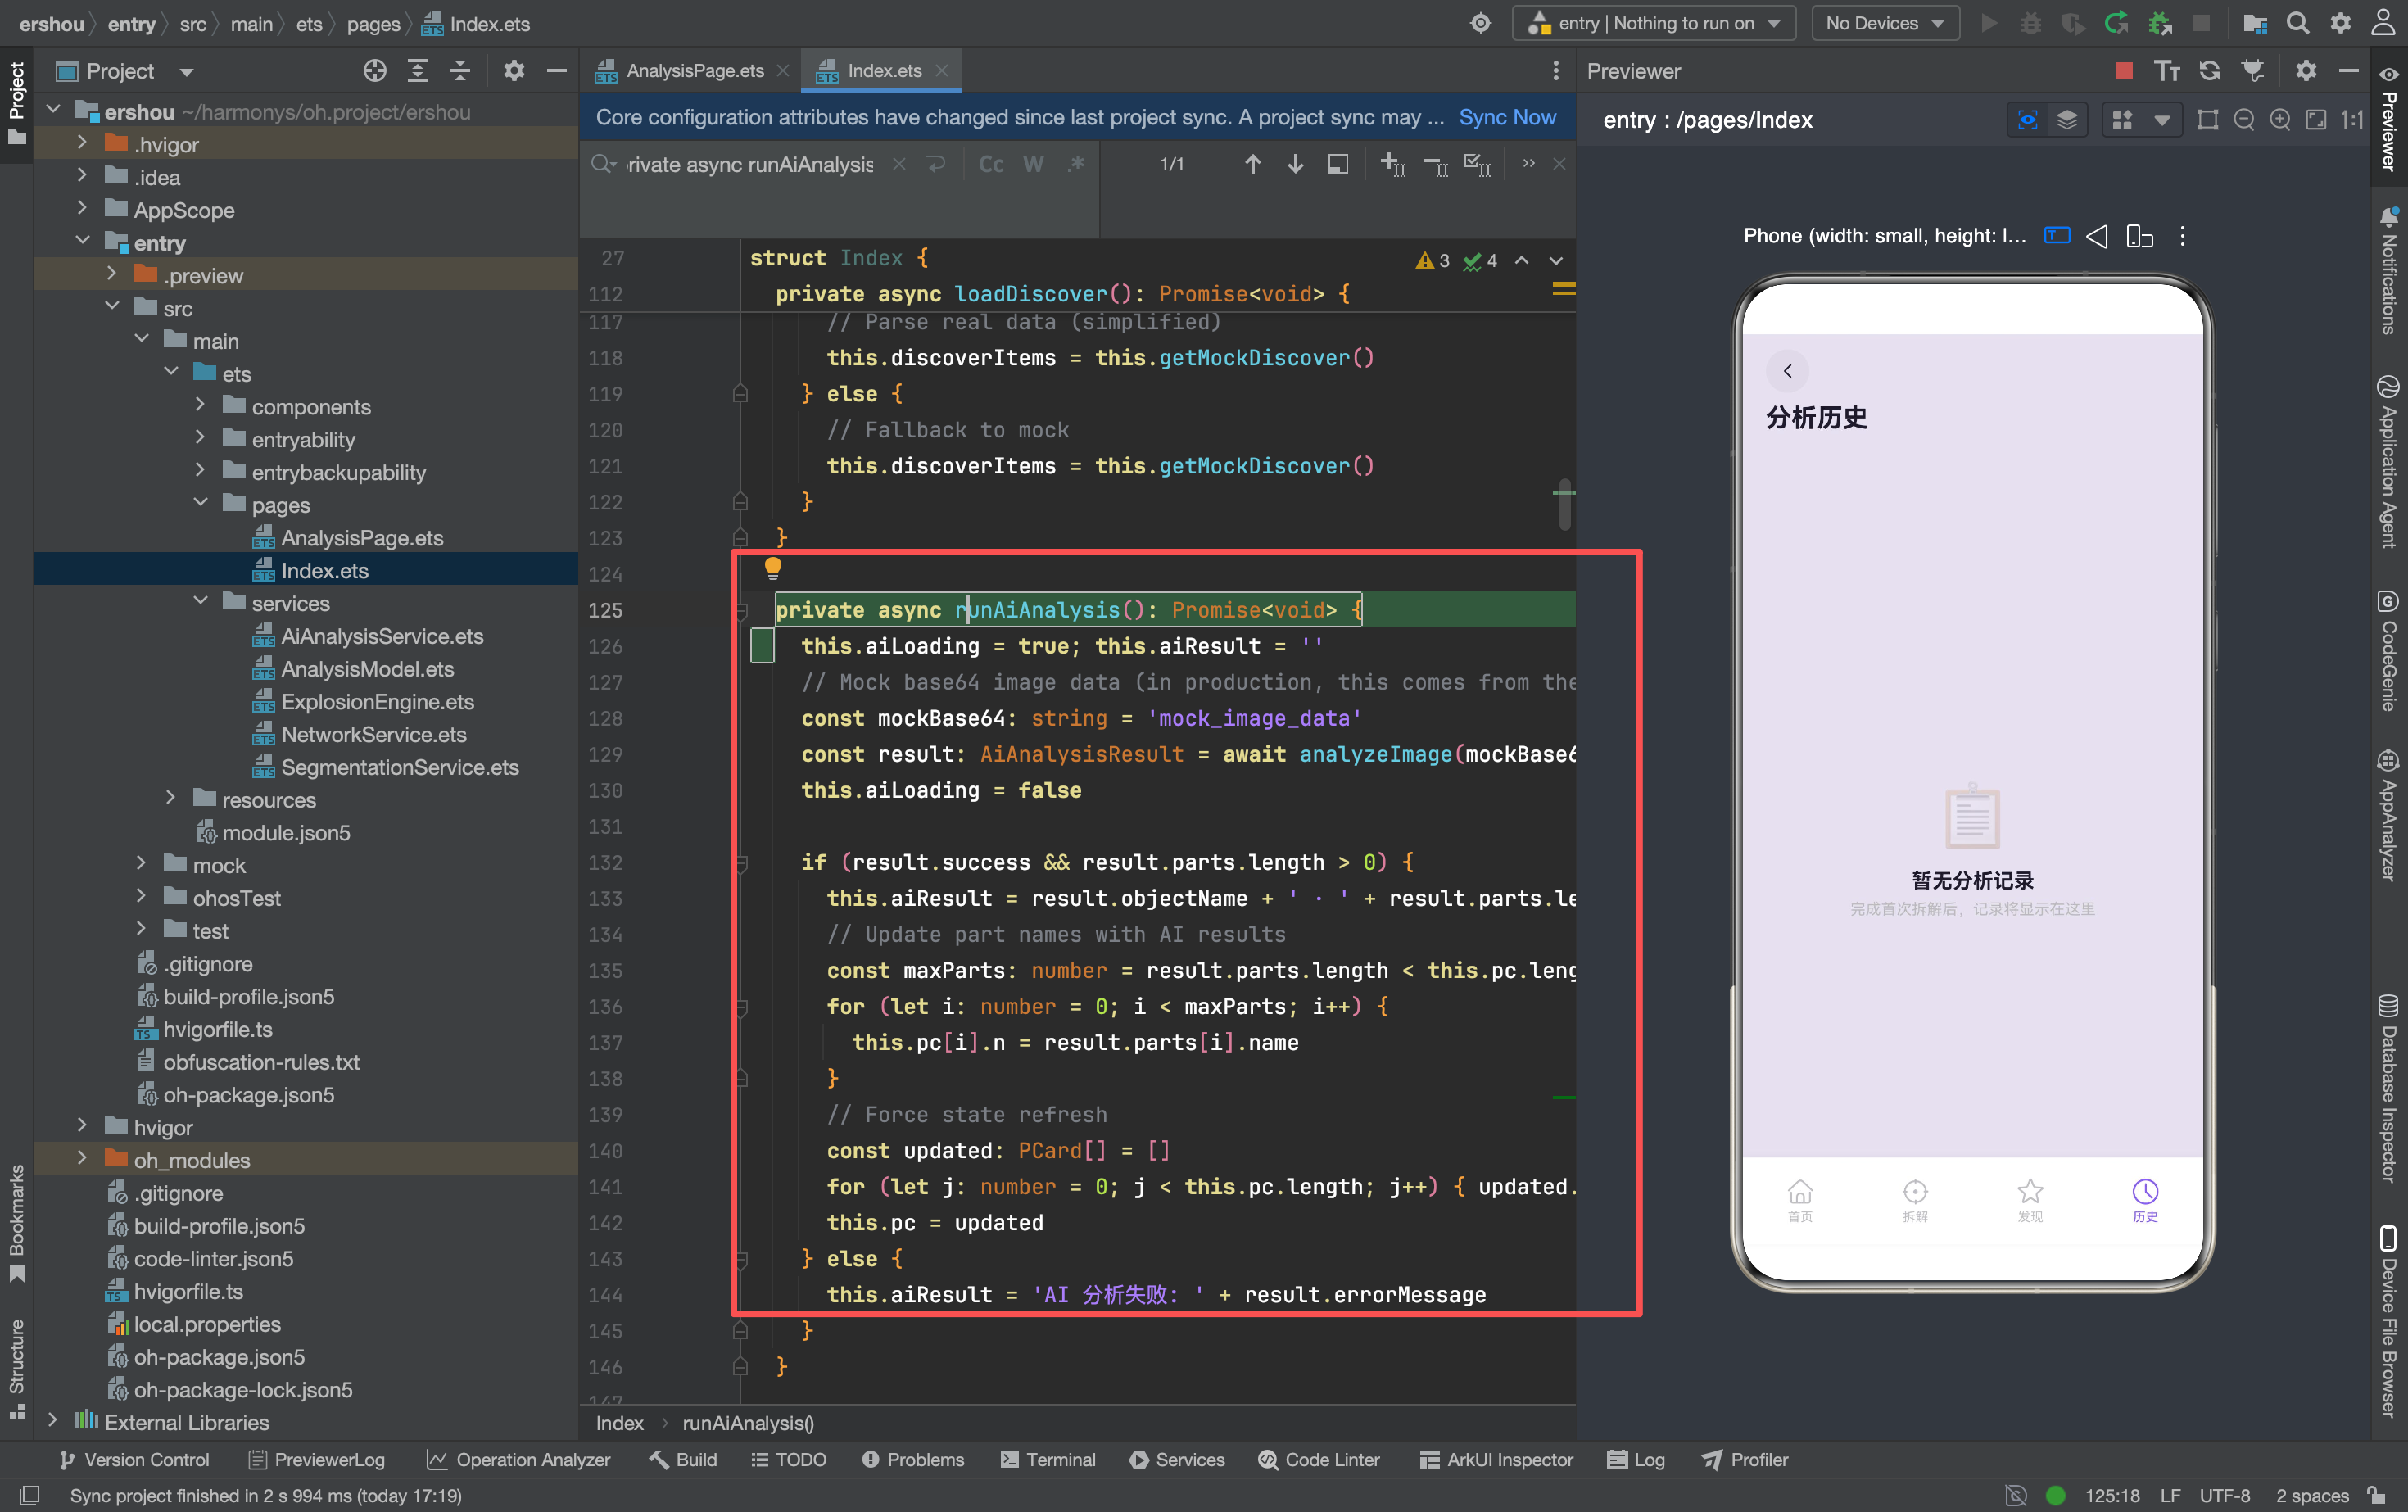
核心逻辑:
- 用 mock 的 base64 图片调用
analyzeImage - 返回
AiAnalysisResult,包含success、objectName、parts、errorMessage - 成功时:用 AI 返回的部件名称替换程序生成的名称
- 失败时:显示错误信息
为什么需要"force state refresh"?
const updated: PCard[] = []
for (let j: number = 0; j < this.pc.length; j++) { updated.push(this.pc[j]) }
this.pc = updated
直接修改 this.pc[i].n 不会触发 ArkUI 的状态更新——因为 @State 变量的引用没有变化。需要创建一个新数组赋值给 this.pc,才能让 UI 刷新。
这是 ArkTS 状态管理的一个常见陷阱:修改数组元素不会触发重新渲染,必须替换整个数组。
AiAnalysisResult 的数据结构
interface AiAnalysisResult {
  success: boolean
  objectName: string     // "iPhone 15"
  parts: PartName[]      // [{ name: "屏幕" }, { name: "电池" }, ...]
  errorMessage: string   // 失败时的错误信息
}

interface PartName {
  name: string
}
AI 返回的信息:
success:分析是否成功objectName:识别出的物品名称parts:部件名称列表errorMessage:失败原因
当前的 mock 实现:
analyzeImage 传入的是 'mock_image_data'——一个占位字符串。真正的实现需要:
- 将图片编码为 base64
- 调用 AI 视觉识别 API
- 解析返回结果
粒子场:ParticleField
// Workspace 背景
Stack({ alignContent: Alignment.Center }) {
  Column() {}
    .width('100%').height('100%').borderRadius(18)
    .linearGradient({ angle: 180,
      colors: [['#FCFBFE', 0], ['#F8F6FC', 0.5], ['#FCFBFE', 1]] })
    .border({ width: 1.5, color: '#E0DAF0' })
    .shadow({ radius: 16, color: 'rgba(108,60,224,0.06)', offsetY: 4 })

  // Native particle field
  ParticleField({ color: A })

  // ... ExplodedView or placeholder ...
}
ParticleField 放在背景层(渐变色卡片)和内容层(ExplodedView 或网格预览)之间。
为什么用粒子场?
- 氛围感:纯色背景太"死",粒子场给工作区一种"科技感"
- 深度暗示:粒子的运动暗示了 3D 空间的存在
- 视觉焦点:运动的粒子会吸引用户的注意力到工作区
粒子场的 color 参数传入主题色 A(#8A5DFA),粒子颜色和整体紫色主题一致。
工作区的视觉重设计
旧版:纯白背景
Column() {}
  .width('100%').height('100%').borderRadius(18)
  .backgroundColor('#FFFFFF')
  .border({ width: 1, color: '#D8D2E8' })
  .shadow({ radius: 12, color: 'rgba(0,0,0,0.06)', offsetY: 3 })
新版:渐变背景 + 粒子场
Column() {}
  .width('100%').height('100%').borderRadius(18)
  .linearGradient({ angle: 180,
    colors: [['#FCFBFE', 0], ['#F8F6FC', 0.5], ['#FCFBFE', 1]] })
  .border({ width: 1.5, color: '#E0DAF0' })
  .shadow({ radius: 16, color: 'rgba(108,60,224,0.06)', offsetY: 4 })

ParticleField({ color: A })
变化:
- 纯白 → 微妙渐变(#FCFBFE → #F8F6FC → #FCFBFE),上下略浅,中间略深
- 边框从 1px 灰色 → 1.5px 淡紫色,和主题色呼应
- 阴影从黑色 → 紫色,更柔和
- 新增粒子场
空状态的数字展示
// 旧版
Text('📸').fontSize(36).opacity(0.2).margin({ bottom: 12 })
Text(this.name).fontSize(16).fontWeight(FontWeight.Bold).fontColor(T1)
Text(this.count + ' 部件 · 点击 [▶ 爆炸] 查看').fontSize(12).fontColor(T3)

// 新版
Column() {
  Text(this.count.toString()).fontSize(44).fontWeight(FontWeight.Bold)
    .linearGradient({ angle: 135, colors: [[A, 0], ['#C4B5FD', 1]] })
  Text('部件就绪').fontSize(14).fontWeight(FontWeight.Medium).fontColor(T2).margin({ top: 4 })
  Text('点击 ▶ 爆炸 开始拆解').fontSize(11).fontColor(T3).margin({ top: 6 })
}
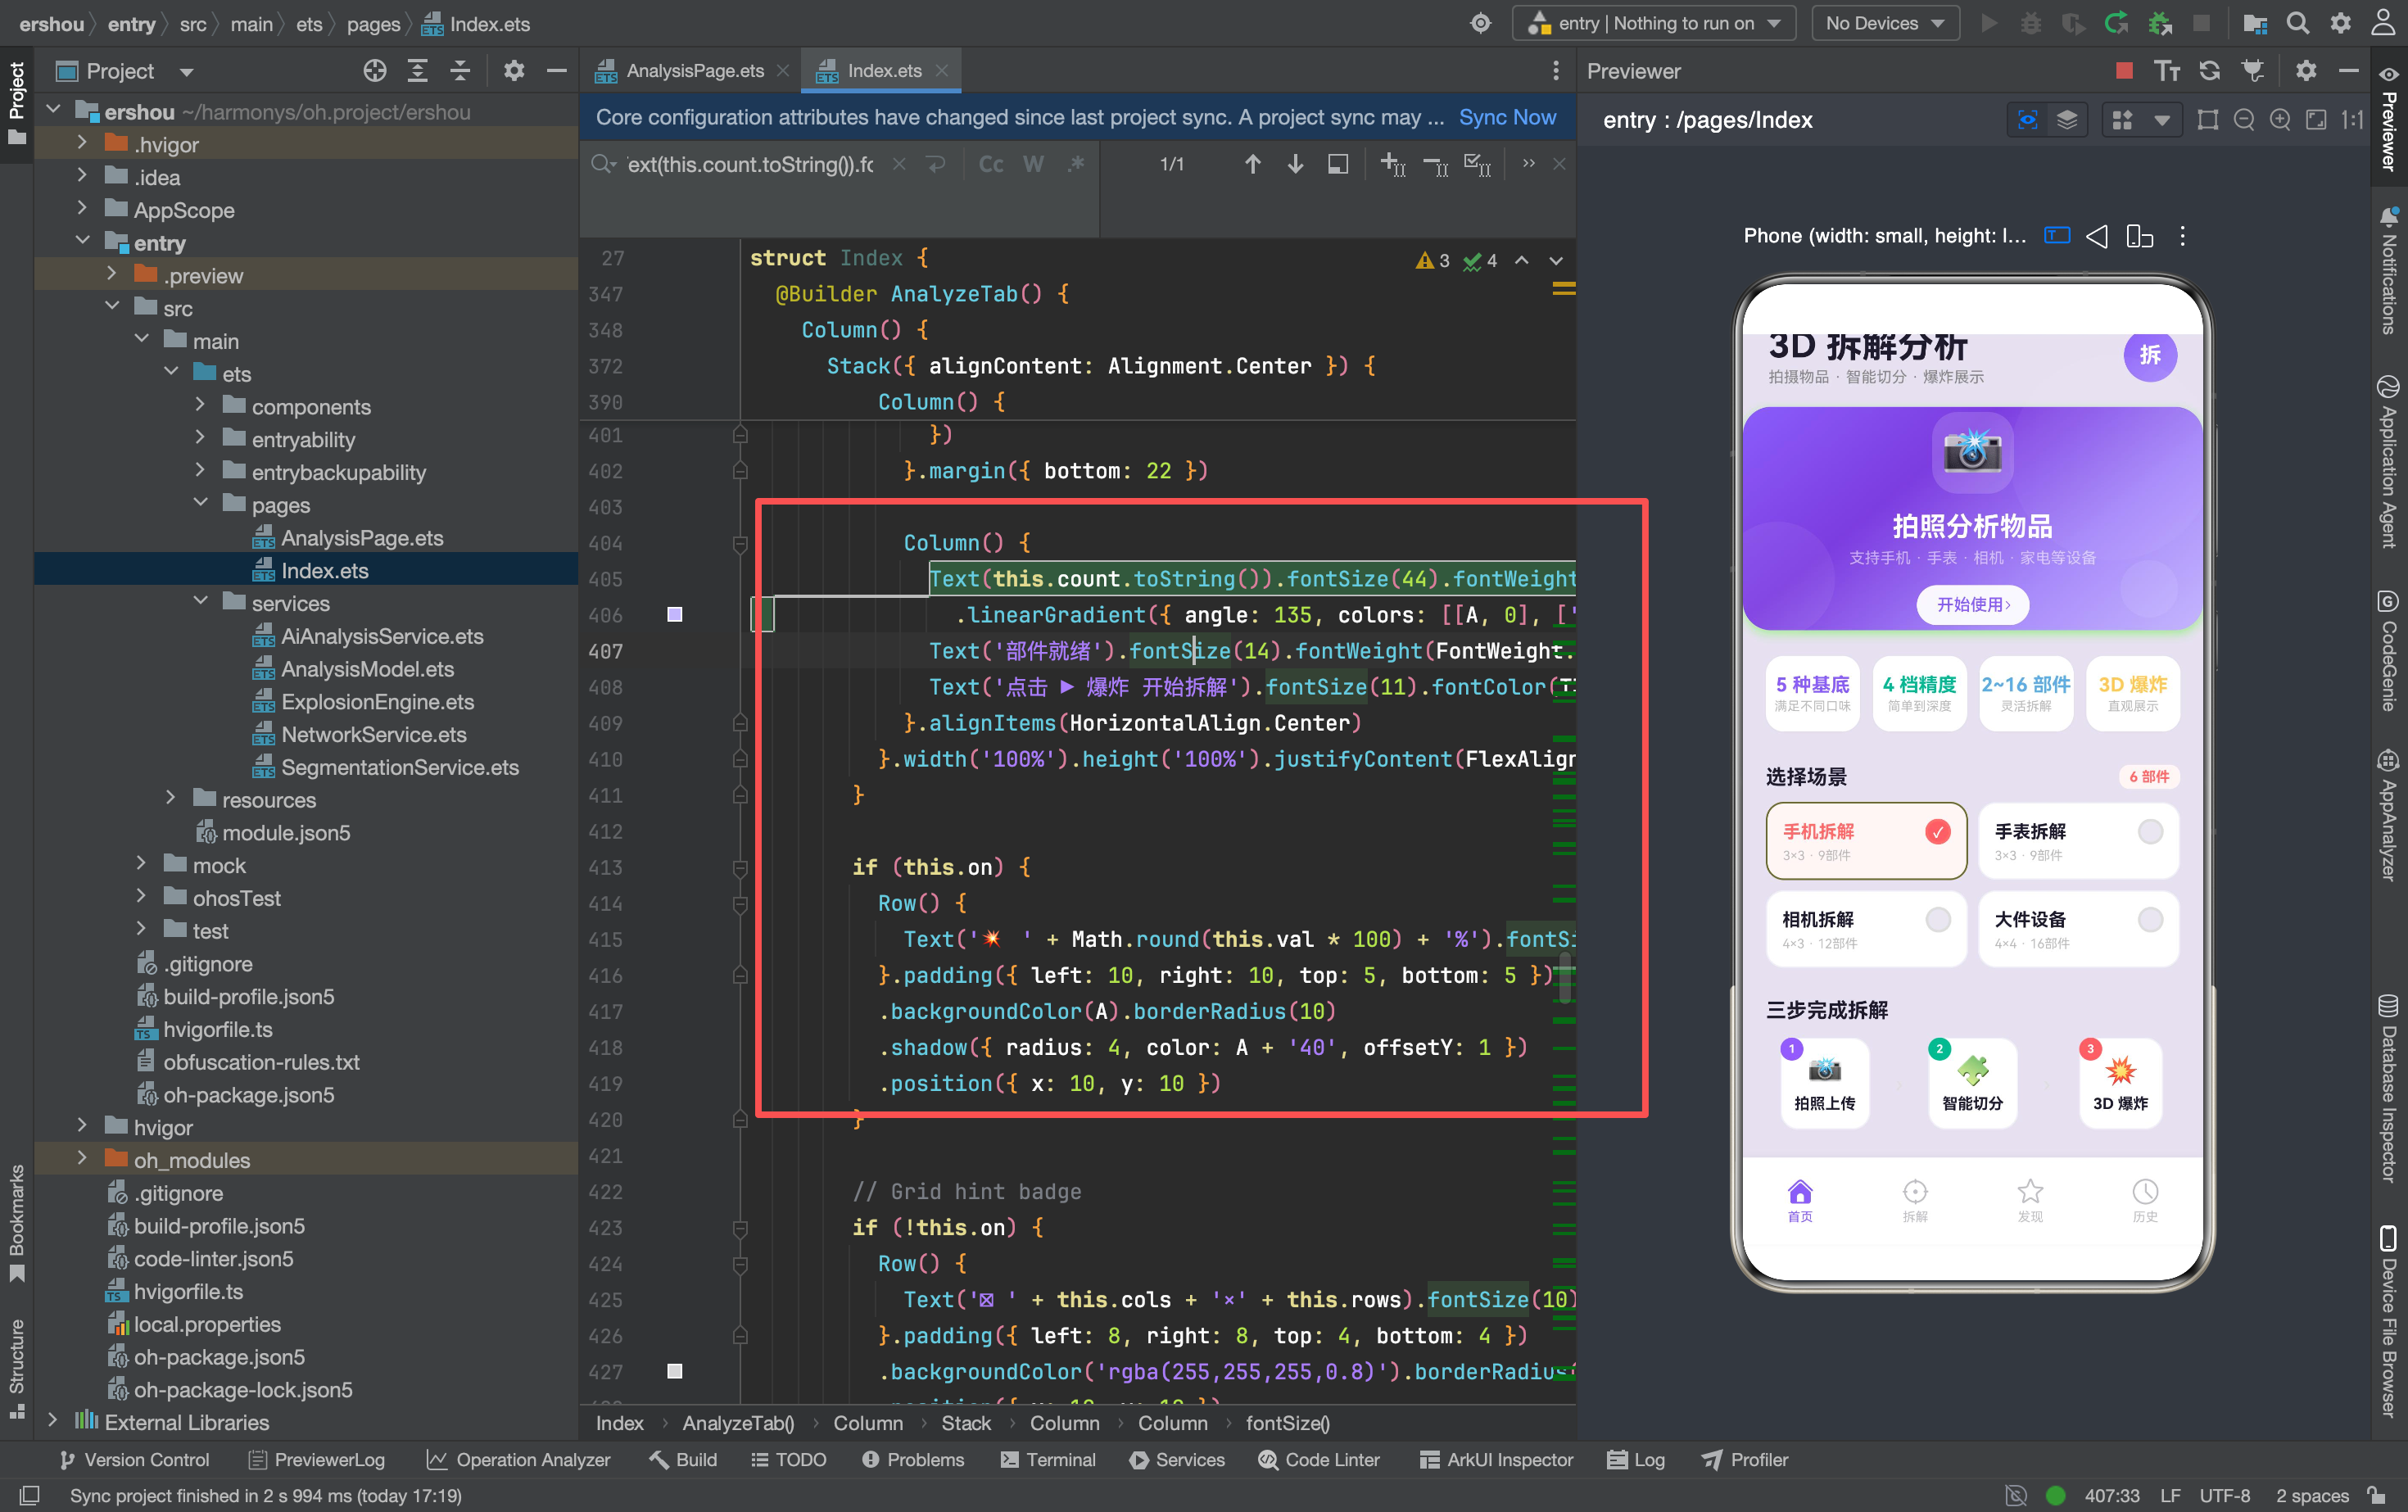
变化:
- 📸 emoji → 大号渐变数字(44px,紫色渐变)
- 文字更简洁:“部件就绪” + “点击 ▶ 爆炸 开始拆解”
为什么用数字替代 emoji?
数字(比如"9")比 emoji 更直接地传达了"有多少部件"的信息。用户看到"9"就知道"这个物品会被切成 9 块",比看到一个 📸 更有用。
Header 的 Tag 组件
旧版:Dot
@Builder Dot(color: string, text: string) {
  Row() {
    Row() {}.width(5).height(5).borderRadius(3).backgroundColor(color)
    Text(' ' + text).fontSize(10).fontColor(T2)
  }
}
新版:Tag
@Builder Tag(color: string, bg: string, text: string) {
  Row() {
    Row() {}.width(5).height(5).borderRadius(3).backgroundColor(color)
    Text(' ' + text).fontSize(10).fontWeight(FontWeight.Medium).fontColor(color)
  }.padding({ left: 7, right: 7, top: 3, bottom: 3 }).backgroundColor(bg).borderRadius(6)
}
变化:
- 新增
bg参数——背景色 - 文字颜色从 T2(灰色)→
color(主题色),和圆点颜色一致 - 加了 padding 和背景色——从"裸文字"变成了"胶囊标签"
调用方式:
// 旧版
this.Dot(A, this.count + ' 部件')
this.Dot(A3, this.cols + '×' + this.rows + ' 网格')

// 新版
this.Tag(A, '#F4F1FC', this.count + '部件')
this.Tag('#00B894', '#E8F8F5', this.cols + '×' + this.rows)
Tag 更醒目——有了背景色和主题色文字,用户一眼就能看到"9 部件"“3×3”。
QuickBtn:快捷力度按钮
@Builder QuickBtn(label: string, action: () => void, active: boolean, color: string) {
  Text(label).fontSize(11).fontWeight(FontWeight.Medium)
    .fontColor(active ? '#FFFFFF' : T2)
    .padding({ left: 14, right: 14, top: 5, bottom: 5 })
    .borderRadius(12).backgroundColor(active ? color : '#F5F5F7')
    .onClick(action)
}
三个预设力度:0%、50%、100%。
Row({ space: 6 }) {
  this.QuickBtn('0%', () => { this.setV(0) }, this.val === 0, A)
  this.QuickBtn('50%', () => { this.setV(0.5) }, this.val === 0.5, '#FECA57')
  this.QuickBtn('100%', () => { this.setV(1) }, this.val === 1, '#FF6B6B')
  Row() {}.width(1).height(18).backgroundColor('#E8E4F0')
    .margin({ left: 4, right: 4 })
  ForEach(this.gps, ...)
}
为什么加 QuickBtn?
Slider 适合精细调节,但有时候用户只是想"看一下完全展开的效果"。QuickBtn 提供了一键设置:点"100%"直接爆炸到最大,点"0%"直接收起。
QuickBtn 和网格选择器放在同一行,用一个竖线分隔:
[0%] [50%] [100%] | [2×2] [3×2] [3×3] [4×3] [4×4]
左边是力度,右边是网格——一行搞定所有控制。
底部操作栏
Row() {
  // AI 分析按钮
  Row() {
    Text('🤖').fontSize(13).margin({ right: 2 })
    Text(this.aiLoading ? '分析中...' : 'AI 分析').fontSize(11)
      .fontWeight(FontWeight.Medium)
      .fontColor(this.aiLoading ? T3 : A)
  }.padding({ left: 12, right: 12, top: 6, bottom: 6 })
    .backgroundColor(this.aiLoading ? '#F5F5F7' : AL).borderRadius(12)
    .onClick(() => { if (!this.aiLoading) { this.runAiAnalysis() } })

  // 部件清单按钮
  Row() {
    Text('☰').fontSize(12).fontColor(this.list ? A : T3)
    Text(' 部件').fontSize(11).fontWeight(this.list ? FontWeight.Medium : FontWeight.Regular)
      .fontColor(this.list ? A : T3)
  }.padding({ left: 12, right: 12, top: 6, bottom: 6 })
    .backgroundColor(this.list ? AL : '#F5F5F7').borderRadius(12)
    .margin({ left: 6 })
    .onClick(() => { this.list = !this.list })

  Blank()

  // 重置按钮
  Row() {
    Text('🔄 重置').fontSize(11).fontColor(T2)
  }.padding({ left: 12, right: 12, top: 6, bottom: 6 })
    .backgroundColor('#F5F5F7').borderRadius(12)
    .onClick(() => { this.setV(0); this.cg(3, 3) })
}
三个按钮:
- AI 分析:调用 AI 识别部件名称
- 部件清单:展开/收起部件列表
- 重置:力度归零 + 网格恢复 3×3
为什么重置按钮单独放?
重置是一个"破坏性"操作——会丢失当前的力度和网格设置。放在右边、用灰色文字,降低误触风险。
AI 结果指示器
if (this.aiResult.length > 0) {
  Row() {
    Row() {}.width(6).height(6).borderRadius(3)
      .backgroundColor(this.aiLoading ? '#FECA57' : '#00B894')
    Text(' ' + this.aiResult).fontSize(11).fontColor(T2)
  }.width('100%').padding({ left: 18, right: 18, top: 2, bottom: 2 })
}
AI 分析完成后,在操作栏下方显示结果:
- 黄色圆点 + “分析中…”(加载中)
- 绿色圆点 + “iPhone 15 · 12 部件”(成功)
- 绿色圆点 + “AI 分析失败: …”(失败)
踩坑记录
1. ArkTS 的状态刷新陷阱
// 直接修改数组元素——不会触发 UI 更新
this.pc[i].n = result.parts[i].name

// 必须创建新数组——才能触发 UI 更新
const updated: PCard[] = []
for (let j: number = 0; j < this.pc.length; j++) { updated.push(this.pc[j]) }
this.pc = updated
ArkTS 的 @State 是引用类型。修改数组内部属性不会改变引用,所以不会触发重新渲染。必须创建新数组替换整个引用。
2. QuickBtn 的 active 判断
this.QuickBtn('50%', () => { this.setV(0.5) }, this.val === 0.5, '#FECA57')
this.val === 0.5 是精确比较。但 val 是从 Slider 的 v / 100 计算的,可能存在浮点精度问题。比如用户拖到 50%,val 可能是 0.4999999999 而不是 0.5。
建议用范围判断:
active: Math.abs(this.val - 0.5) < 0.01
3. ParticleField 的性能
粒子场是持续动画——即使用户不在拆解页,粒子也在跑。如果粒子数量多或动画复杂,可能影响电池续航。
建议:
- 只在拆解页(tab=1)时启用粒子动画
- 其他 Tab 时暂停动画
4. AI 分析的 mock 数据
const mockBase64: string = 'mock_image_data'
const result: AiAnalysisResult = await analyzeImage(mockBase64)
当前传入的是假数据。真正的实现需要:
- 从
this.uri读取图片 - 编码为 base64
- 调用 AI API
- 处理超时和错误
在真正接入 AI 之前,建议在 AiAnalysisService 里做好 mock 返回,方便前端调试。
写在最后
AI 分析的接入让拆解从"程序自动命名"升级到"智能识别命名"。用户拍一张 iPhone 的照片,AI 能告诉它"这是 iPhone 15,屏幕、电池、摄像头、主板……"——这比"部件 1、部件 2"有用得多。
粒子场的加入让工作区有了"呼吸感"。虽然只是视觉效果,但它让整个 App 从"工具"变成了"产品"——用户能感受到开发者在细节上花了心思。
当前的 AI 分析还是 mock 状态。后续接入真实的 AI 服务后,这个功能会成为 App 的核心卖点:拍照 → AI 识别 → 爆炸展示 → 分享给朋友。

讨论HarmonyOS开发技术,专注于API与组件、DevEco Studio、测试、元服务和应用上架分发等。
更多推荐
 10
10 0
0- 0


 已为社区贡献38条内容

所有评论(0)